O documento descreve a história e aplicações das matrizes, começando pela sua origem na antiga China e evoluindo até o uso moderno. Aborda conceitos como tipos de matrizes, elementos, operações e propriedades.
Um dos primeirosregistros sobre as
matrizes surgiu na antiga China, sob a
forma de tabelas.
Essas tabelas aparecem na obra Chui-
Chang Suan-Shu (Nove capítulos sobre
a arte matemática, escrita por volta de
250 a.C.
ENSINO MÉDIO
3.
Com o auxíliodessas
tabelas, os chineses
resolviam sistemas
de equações
lineares, utilizando as
matrizes como são
atualmente
conhecidas.
618
753
294
ENSINO MÉDIO
4.
Avançando quase 2mil anos, o matemáti-
co inglês Arthur Carley foi um dos primei-
ros a introduzir matrizes na
matemática, criando em 1857, a álgebra
das matrizes.
No século XX, o matemático alemão David
Hilbert apresentou um estudo aprofundado
sobre as matrizes.
ENSINO MÉDIO
5.
Quanto às aplicações,as matrizes são
utilizadas na computação, na
mecânica, em circuitos elétricos e na
eletrônica. Um exemplo do uso na
eletrônica é o medidor de vibrações. As
informações detectadas por esse
instrumento são processadas utilizando a
linguagem das matrizes.
ENSINO MÉDIO
6.
vários cálculos com
númerosdispostos
no formato de
matrizes.
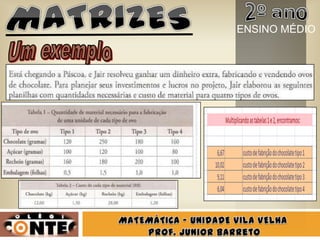
Uma outra grande utilização das matrizes
é através do editor de planilhas Microsoft
Excel, onde se é possível fazer
ENSINO MÉDIO
A tabela aseguir apresenta um
panorama da quantidade de poluentes
que saem dos escapamentos dos
veículos:
Tabelas assim
como estas
são denominadas
MATRIZES
ENSINO MÉDIO
9.
A tabela aseguir apresenta um
panorama da quantidade de poluentes
que saem dos escapamentos dos
veículos:
Tabelas assim
como estas
são denominadas
MATRIZES
ENSINO MÉDIO
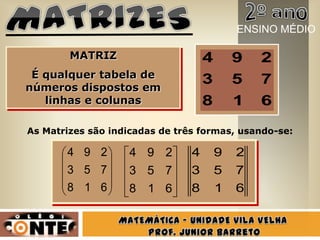
10.
MATRIZ
É qualquer tabelade
números dispostos em
linhas e colunas 618
753
294
618
753
294
618
753
294
618
753
294
As Matrizes são indicadas de três formas, usando-se:
ENSINO MÉDIO
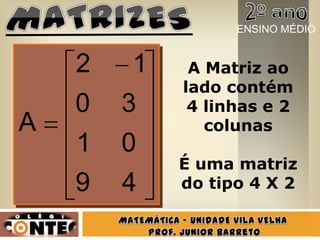
11.
Seja m onúmero de linhas e n o número de
colunas de uma matriz.
Uma matriz com m linhas e n
colunas é denominada
Matriz do tipo m X n
lê-se “m por n”
ENSINO MÉDIO
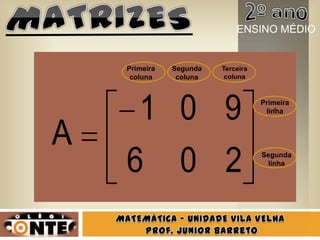
Para identificar aslinhas e as colunas de
uma matriz, procedemos da seguinte
forma:
• Numeramos as linhas de cima para baixo
• Numeramos as colunas da esquerda para
a direita
ENSINO MÉDIO
Os elementos deuma matriz são
representados por letras
minúsculas, acompanhadas de dois
índices, i e j, que indicam a linha e a
coluna, respectivamente, onde se
encontra o elemento da matriz.
ENSINO MÉDIO
É a matrizformada
por igual número
de linhas e colunas
665
174
163
ENSINO MÉDIO
23.
Toda matriz quadradado
tipo n X n é chamada
Matriz Quadrada de ordem n
No exemplo
dado, a
matriz é de
ordem 3
ENSINO MÉDIO
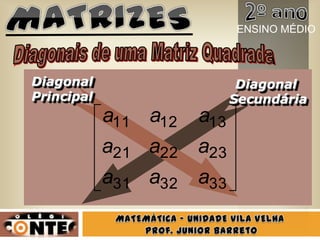
24.
Toda Matriz quadradade ordem n
possui duas diagonais:
Diagonal Principal, formada pelos
elementos que têm i = j
Diagonal Secundária, formada pelos
elementos que têm i + j = n + 1
ENSINO MÉDIO
300
070
004É a matrizem
que todos os elementos
não pertencentes à
diagonal principal são
iguais a zero
ENSINO MÉDIO
27.
É a matrizem que todos
os elementos
pertencentes à diagonal
principal são
iguais a 1 e os demais
elementos, iguais a zero.
100
010
001
ENSINO MÉDIO
28.
É a matrizem
que todos os
elementos são
iguais a zero 000
000
000
ENSINO MÉDIO
29.
Cada elemento
é ooposto do elemento
na matriz original.
Identificamos a
matriz oposta de A por -A
3910
071
574
A3910
071
574
A
ENSINO MÉDIO
30.
Uma matriz éSIMÉTRICA se, e somente
se, A = At
476
709
692
A
476
709
692
At
ENSINO MÉDIO
31.
Uma matriz éANTI-SIMÉTRICA se, e
somente se, At = - A
02
20
A
02
20
At
ENSINO MÉDIO
32.
www.colegiocontec.com.br
A Grande Marcado Ensino
Unidades:
Vila Velha
Carapina
Laranjeiras
2127-1111
Disse-lhe Jesus: Eu sou o caminho, e
a verdade e a vida; ninguém vem ao
Pai, senão por mim.
João 14:6
Notas do Editor
#2 Animated recolored picture fades in over black and white copy(Advanced)To reproduce the picture effects on this slide, do the following:On the Home tab, in the Slides group, click Layout and then click Blank. On the Insert tab, in the Images group, click Picture. In the Insert Picture dialog box, select a picture, and then click Insert. Under PictureTools, on the Format tab, in the Size group, click the Size and Position dialog box launcher. In the Format Picture dialog box, resize or crop the image so that the height is set to 3.58” and the widthis set to 8”. To crop the picture, click Crop in the left pane, and in the right pane, under Crop position, enter values into the Height, Width, Left, and Top boxes. To resize the picture, click Size in the left pane, and in the right pane, under Size and rotate, enter values into the Height and Width boxes.Under Picture Tools, on the Format tab, in the Adjust group, click Color, and then under Recolor click Dark Blue, Text color 2 Dark (second row, first option from the left). Under Picture Tools, on the Format tab, in the Picture Styles group, click Picture Effects, point to Shadow, and then under Inner click Inside Diagonal Top Left (first row, first option from the left).Drag the picture so that it is positioned above the middle of the slide. On the Home tab, in the Clipboard group, click the arrow next to Copy, and then click Duplicate.Press and hold CTRL and select both pictures on the slide. On the Home tab, in the Drawing group, click Arrange, point to Align, and then do the following:Click Align to Slide.Click Align Center. Click Align Selected Objects. Click Align Middle. Select only the duplicate (top) picture. Under PictureTools, on the Format tab, in the Size group, click the Size and Position dialog box launcher. In the Format Picture dialog box, resize or crop the image so that the widthis set to 2.33”. To crop the picture, click Crop in the left pane, and in the right pane, under Crop position, enter values into the Height, Width, Left, and Top boxes. To resize the picture, click Size in the left pane, and in the right pane, under Size and rotate, enter values into the Height and Width boxes.Under Picture Tools, on the Format tab, in the Adjust group, click Color, and then under Recolor, click No Recolor. On the Home tab, in the Drawing group, click Shapes, and then under Rectangles click Rectangle (first option from the left). On the slide, drag to draw a rectangle. Select the rectangle. Under Drawing Tools, on the Format tab, in the Size group, do the following:In the Shape Height box, enter 7.5”.In the Shape Width box, enter 2.33”.Select the rectangle. Under Drawing Tools, on the Format tab, in the Shape Styles group, click Shape Outline, and then click No Outline.Under DrawingTools, on the Format tab, in the ShapeStyles group, click ShapeFill, point to Gradient, and then click MoreGradients. In the Format Shape dialog box click Fill in the left pane, select Gradient fill in the Fill pane, and then do the following:In the Type list, select Linear. In the Angle box, enter 90.Under Gradient stops, click Add gradient stops or Remove gradient stops until two stops appear in the slider. Also under Gradient stops, customize the gradient stops as follows:Select the first stop in the slider, and then do the following: In the Position box, enter 0%.Click the button next to Color, and then under Theme Colors click White, Background 1 (first row, first option from the left).In the Transparency box, enter 55%. Select the secondstop in the slider, and then do the following: In the Position box, enter 100%.Click the button next to Color, and then under Theme Colors click White, Background 1 (first row, first option from the left).In the Transparency box, enter 100%. On the slide, drag the rectangle to cover the duplicate picture. Select the rectangle. On the Home tab, in the Drawing group, click Arrange, and then do the following:Point to Align, and then click Align to Slide.Point to Align, and then click Align Middle. Click Send Backward. On the Home tab, in the Drawing group, click Shapes, and then under Rectangles click Rectangle (first option from the left). On the slide, drag to draw another rectangle. Select the rectangle. Under Drawing Tools, on the Format tab, in the Size group, do the following:In the Shape Height box, enter 4”.In the Shape Width box, enter 2.67”.Under Drawing Tools, on the Format tab, in the Shape Styles group, click Shape Fill, point to Gradient, and then click No fill. Under Drawing Tools, on the Format tab, in the Shape Styles group, click the Format Shape dialog box launcher. In the Format Shape dialog box, click Line Color in the left pane, select Solid line in the Line Color pane, and then do the following:Click the button next to Color, and then under Theme Colors click White, Background 1 (first row, first option from the left). In the Transparency box, enter 70%.Also in the Format Shape dialog box, click Line Style in the left pane, and then do the following in the Line Style pane:In the Width box, enter 0.75 pt. Click the button next to Dash type, and then click Square Dot (third option from the top).Drag the dotted rectangle on top of the small, full-color picture. Press and hold SHIFT and select the dotted rectangle, the small picture, and the large picture on the slide. On the Home tab, in the Drawing group, click Arrange, point to Align, and then do the following:Click Align Selected Objects. Click Align Middle. On the Insert tab, in the Text group, click Text Box, and then on the slide, drag to draw the text box.Enter text in the text box, select the text, and then on the Home tab, in the Font group, select Gill Sans MT Condensedfrom the Font list, select 24 from the Font Size list, click the button next to Font Color, and then under Theme Colors click White, Background 1 (first row, first option from the left).On the Home tab, in the Paragraph group, click Center to center the text within the text box.On the slide, drag the text box below the dotted rectangle.To reproduce the background effects on this slide, do the following:Right-click the slide background area, and then click Format Background. In the Format Background dialog box, click Fill in the left pane, and then select Solid fill in the Fill pane. Also in the Fill pane, click the button next to Color, and then under Theme Colors click Black, Text 1, Lighter 15% (fifth row, second option from the left).To reproduce the animation effects on this slide, do the following:On the View tab, in the Zoom group, click Zoom, and then in the Zoom dialog box, in the Percent box, enter 70%. (Note: Make sure that Fit is not selected in the Zoom dialog box.)On the slide, select the dotted rectangle. On the Animations tab, in the Advanced Animations group, click Add Animation, and then, under Motion Paths, clickCustom Path.Press and hold SHIFT to conform the path to a straight, horizontal line, and then do the following on the slide:Click the center of the dotted rectangle to create the first motion-path point.Click approximately ½” beyond the right edge of the rectangle to create the second motion-path point. Double-click approximately 2” beyond the left edge of the slide to create the third and final motion-path point. On the slide, right-click the freeform motion path, and then click Reverse Path Direction. On the Animations tab, in the Timing group, in the Start list, select WithPrevious.On the slide, select the gradient-filled rectangle. On the Animations tab, in the Advanced Animations group, click Add Effect, and then click More Entrance Effects. In the Add Entrance Effect dialog box, under Subtle, click Fade, and then click OK. On the Animations tab, in the Timing group, in the Start list, select WithPrevious.On the Animations tab, in the Timing group, in the Duration box, enter 0.5. On the slide, select the gradient-filled rectangle. On the Animations tab, in the Advanced Animations group, click Add Effect, and then click More Motion Paths. In the Add Motion Path dialog box, under Lines and Curves, click Down, and then click OK. On the Animations tab, in the Timing group, in the Start list, select WithPrevious.On the Animations tab, in the Timing group, in the Duration box, enter 2. On the slide, right-click the down motion path and click ReversePathDirection.On the slide, select the smaller, full-color picture. On the Animations tab, in the Advanced Animations group, click Add Effect, and then click More Entrance Effects. In the Add Entrance Effect dialog box, under Subtle, click Fade, and then click OK. On the Animations tab, in the Timing group, in the Start list, select WithPrevious.On the Animations tab, in the Timing group, in the Duration box, enter 2. On the Animations tab, in the Timing group, in the Delaybox, enter 1.5. On the slide, select the text box. On the Animations tab, in the Advanced Animations group, click Add Effect, and then click More Entrance Effects. In the Add Entrance Effect dialog box, under Subtle, click Fade, and then click OK. On the Animations tab, in the Timing group, in the Start list, select WithPrevious.On the Animations tab, in the Timing group, in the Duration box, enter 1.


![Matriz[1]](https://cdn.slidesharecdn.com/ss_thumbnails/matriz1-091124113217-phpapp01-thumbnail.jpg?width=640&height=640&fit=bounds)


![MatemáTica Matrizes [TaíS Andrade]](https://cdn.slidesharecdn.com/ss_thumbnails/matemtica-matrizestasandrade-100127025923-phpapp01-thumbnail.jpg?width=640&height=640&fit=bounds)
![MatemáTica Matrizes [TaíS Andrade]](https://cdn.slidesharecdn.com/ss_thumbnails/matemtica-matrizestasandrade-100127025840-phpapp01-thumbnail.jpg?width=640&height=640&fit=bounds)


