

Recomendados
Mais conteúdo relacionado
Mais procurados
Mais procurados (20)
Destaque
Destaque (16)
Semelhante a Frank Lloyd Wright
Semelhante a Frank Lloyd Wright (19)
Último
Último (20)
Frank Lloyd Wright
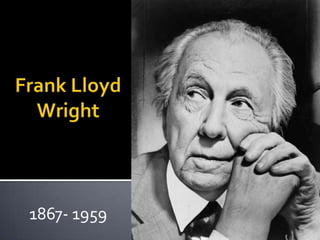
- 1. 1867- 1959
- 2. Nasceu em 8 de junho de 1867 em Richland Center, Wisconsin- EUA. 1886- foi para a Universidade de Wisconsin Estagiou na área de Engenharia Civil 1887-Trabalha no escritório de arquitetura de Joseph L. Silsbee
- 3. 1888- Trabalha na empresa Adler e Sullivan, um dos pioneiros na construção de arranha-céus. 1889-Casou-se com Catherine Lee Tobin, filha de um rico homem de negócios. 1901 -Seu escritório já havia concluído mais de 50 projetos. 09 de abril de 1959 Morre em Phoenix após cirurgia.
- 4. Frank Lloyd é considerado um dos mais importantes arquitetos do século XX tendo destaque por sua arquitetura orgânica. Em1908, Wright estabeleceu as seis características da arquitetura orgânica: 1- Simplicidade, eliminação do que não é essencial. 2- Ter tantos estilos na arquitetura como estilos de pessoas. 3- A arquitetura deve estar subordinada à natureza, que tem proporcionado o material para os temas arquitetônicos dos quais há surgido as formas que conhecemos. 4- As cores devem harmonizar com as formas naturais. 5- Os materiais devem ser mostrados como são. 6- Uma casa deve ser caracterizada, expressando sua função.
- 5. Para ele, a arquitetura deveria funcionar como um agente comunicador capaz de emocionar. Desenvolveu mais de 1000 projetos, entre eles apenas 500 foram executados como casas, escritórios, igrejas, museus, escolas, entre outros. plantas compostas por unidades agrupadas de uma maneira simétrica, modulada e com zonas bem definidas. expressão honesta dos materiais. interesse pela tecnologia.
- 6. • Natureza como tema central. • Materiais locais. • Ligação entre o interior e o exterior da edificação. • Valorização do ambiente interno. • Exemplo: casa da cascata.
- 7. As casas de pradaria desenvolveram-se em sintonia com os ideais do movimento Arts and Crafts, Interior e exterior com senso de unidade: reduz as partes necessárias ao mínimo. construção sobre uma base elevada, fundação visível. Redução da quantidade de materiais, utilizar os ornamentos dentro da natureza dos materiais, este uso expressa claramente a concepção do edifício. implantação horizontal em grande área plana. partido em cruz ou duplo “T” longas janelas em sequência. As paredes divisórias eram reduzidas a um mínimo indispensável
- 8. • A beleza é ressaltada por formas e elementos construtivos: telhados leves, prolongados(e m balanço), e terraços. • Exemplo: Willian Martin house, Oak Park
- 9. Robie house.
- 10. um conjunto de 55 casas de classe média criada pelo arquiteto a partir de 1936. economia na construção Planta livre – flexível Emprego de materiais naturais Busca do espaço continuo. Atração ao orgânico. Housenbaum house, 1940
- 12. Museu Solomon R. Guggenheim Localização: Nova York Data: 1943 e 1956 Características: •Formas geométricas puras e orgânicas •O edifício foi concebido como uma hélix e possui uma rampa em espiral contínua que no exterior do edifício passa o efeito de casca de caracol.
- 14. Hotel Imperial Sua estrutura foi feita com concreto, pedras e tijolos e sua cobertura era feita com placas de cobre (menos pesadas), para suportar os terremotos que ocorriam na região.
- 15. Hotel Imperial Localização: Japão. Data: Entre 1916 e 1922 Características: •Presença de espaços em forma de cubo, o que expressa o aconchego dos espaços compactos japoneses. • A textura e a cor do edíficio afetam no peso visual e a escala de um plano, absorve e reflete luz e som no local.
- 17. Casa da Cascata Localização: Bear Run, Pensilvânia Data: 1939 A Casa da cascata é um das mais belas obras da arquitetura orgânica, que tem como proposta a integração entre a obra e o entorno. A construção aproveita o declive do terreno e se assenta sobre as pedras. A casa está situada no meio da floresta.
- 18. Casa da Cascata A remoção de vegetação foi mínima e o curso da cascata não foi alterado. A integração com o entorno é vista nos detalhes. É uma casa de campo com função dedicada ao lazer.
- 22. Rosenbaum House Localização: Florence, Alabama Data: 1940 A casa foi baseada no estilo usoniano. Construído sobre planta em L. Feita de materiais naturais, principalmente de madeira de ciprestes, tijolo, vidro, e apresenta cobertura de aço.
- 23. A maioria dos cômodos têm portas para o exterior. O centro da casa é a área de trabalho, construída em torno de uma grande lareira de pedra, junto a um estúdio de quase dez metros quadrados.
- 26. Arquitetura Religiosas As igrejas de Frank Lloyd Wright, se destaca também em duas obras religiosas que são importantes edifícios de sua arquitetura.
- 27. Templo Unity Arquiteto: Frank Lloyd Wright Localização: Oak Park, IIlinois Data: 1906 Edifício: Igreja e Casa Paroquial Sistemas construtivos: Concreto, clima temperado, contexto suburbano e estilo moderno.
- 30. Sinagoga Beth Sholom Local: Elkins Park - US Data: 1959 O grande destaque em seu design, é a cobertura translúcida feita com placas de fibras de vidro e plástico, que permitem a entrada de luz natural durante o período claro e que transformam a construção em uma escultura de luz durante a noite.
- 33. Própria casa de Frank Lloyd Wright em Arizon, Taliesin
- 35. Walter H. Gale House, projetada por Frank Lloyd Wright
- 37. • Seus móveis apresentavam fluidez formal e eram específicos para o local onde seriam instalados, não sendo projetados para fabricação em série. Cadeira para o Hotel Poltrona Origami, 1949 Escrivaninha Meyer May Imperial, Tóquio, 1922
- 38. http://www.eye4design.com.br/pedia/beth-sholom-synagogue http://www.architecture.about.com http://www.arcoweb.com.br http://www.recoparq.blogspot.com.br http://www.vitruvius.com.br/revistas/read/arquitextos/13.150/4465 http://www.infopedia.pt/$museu-guggenheim-de-nova-iorque http://arquiteturaearte.wordpress.com http://www.archdaily.com.br http://www.delmars.com/flwtrip/rosenb1_.htm http://www.encyclopediaofalabama.org http://www.franklloydwrightsites.com http://www.posterenvy.com http://www.arquitetonico.ufsc.br
- 39. Annanda Jéssika Dailde Morais Isabella Marra Isadora Ferreira Jéssica Thaís
Notas do Editor
- Custom animation effects: buttons grow and turn on path(Advanced)To reproduce the curved shape on this slide, do the following:On the Home tab, in the Slides group, click Layout, and then click Blank.On the Home tab, in the Drawing group, click Shapes, and then under Lines click Freeform (11th option from the left).On the slide, do the following to draw the freeform line:Click the first point on the upper left corner of the slide. Click the second point on the bottom edge of the slide, slightly to the left of the middle. Click the third point on the lower left corner of the slide. Double-click the fourth and final point on the first point, on the upper left corner of the slide.Right-click the freeform shape, and then click Edit Points. Right-click the diagonal line, and then click Curved Segment. (Note: Your segment may not look as curved as in the example above.)Select the freeform shape. On the Home tab, in the Drawing group, click the arrow next to Shape Fill, and then under Theme Colors click White, Background 1 (first row, first option from the left).On the Home tab, in the Drawing group, click the arrow next to Shape Outline, and then click No Outline.To reproduce the background effects on this slide, do the following:Right-click the slide background area, and then click Format Background. In the Format Background dialog box, click Fill in the left pane, select Gradient fill in the Fill pane, and then do the following:In the Type list, select Linear.Click the button next to Direction, and then click Linear Diagonal(second row, third option from the left).Under Gradient stops, click Add or Remove until two stops appear in the drop-down list.Also under Gradient stops, customize the gradient stops that you added as follows:Select Stop 1 from the list, and then do the following:In the Stop position box, enter 0%.Click the button next to Color, and then under Theme Colors click White, Background 1 (first row, first option from the left).Select Stop 2 from the list, and then do the following: In the Stop position box, enter 100%.Click the button next to Color, click More Colors, and then in the Colors dialog box, on the Custom tab, enter values for Red: 230, Green: 230, Blue: 230.To reproduce the picture and text effects on this slide, do the following:On the Insert tab, in the Illustrations group, click Picture. In the Insert Picture dialog box, select a picture, and then click Insert.On the slide, select the picture. Under Picture Tools, on the Format tab, in the Picture Styles group, click Picture Shape, and then under Basic Shapes click Oval (first option from the left).With the picture still selected, under Picture Tools, on the Format tab, in the bottom right corner of the Size group, click the Size and Position dialog box launcher. In the Size and Position dialog box, on the Size tab, resize or crop the picture as needed so that under Size and rotate, the Height box is set to 1.2” and the Width box is set to 1.2”. Resize the picture under Size and rotate by entering values into the Height and Width boxes. Crop the picture under Crop from by entering values into the Left, Right, Top, and Bottom boxes. Under Picture Tools, on the Format tab, in the Picture Styles group, click the arrow next to Picture Effects, point to Bevel, and then under Bevel click Circle (first row, first option from the left).Under Picture Tools, on the Format tab, in the Picture Styles group, click Picture Effects, point to Bevel, and then click 3-D Options. In the Format Picture dialog box, click 3-D Format in the left pane, and then do the following in the 3-D Format pane, under Surface:Click the button next to Material, and then under Standard click Metal (fourth option from the left). Click the button next to Lighting, and then under Neutral click Contrasting (second row, second option from the left). In the Angle box, enter 25°.Also in the Format Picture dialog box, click Shadow in the left pane. In the Shadow pane, click the button next to Presets, under Outer click Offset Diagonal Bottom Left (first row, third option from the left), and then do the following:In the Transparency box, enter 77%.In the Size box, enter 100%.In the Blur box, enter 10 pt.In the Angle box, enter 141°.In the Distance box, enter 10 pt.On the slide, drag the picture onto the curve, near the top. On the Insert tab, in the Text group, click Text Box. On the slide, drag to draw the text box.Enter text in the text box and select it. On the Home tab, in the Font group, do the following:In the Font list, select Corbel.In the Font Size box, enter 22.Click the arrow next to Font Color,and then under Theme Colors click White, Background 1, Darker 50% (sixth row, first option from the left).On the Home tab, in the Paragraph group, click Align Text Left to align the text left in the text box.On the slide, drag the text box to the right of the picture. To reproduce the animation effects on this slide, do the following:It will help to zoom out in order to view the area off the slide. On the View tab, in the Zoom group, click Zoom. In the Zoom dialog box, select 33%.On the Animations tab, in the Animations group, click Custom Animation.On the slide, select the picture. In the CustomAnimation task pane, do the following:Click AddEffect, point to Entrance, and then clickMoreEffects. In the AddEntrance Effect dialog box, under Moderate, click Grow & Turn.Select the animation effect (grow & turn effect for the picture). Under Modify: Grow & Turn, do the following:In theStart list, selectWith Previous.In the Speed list, select Fast. On the slide, select the picture. In the CustomAnimation task pane, click AddEffect, point to Motion Paths, point to Draw Custom Path, and then click Curve.On the slide, do the following to create the custom motion path:Click the first point in the center of the picture. Click the second point in the middle of the curve. Double-click the third point off the bottom edge of the slide. In the CustomAnimation task pane, select the second animation effect (motion path for the picture), and then under Modify: Custom Path, do the following:In theStart list, selectWith Previous.In the Speedlist, select Fast.On the slide, right-click the motion path and then click Reverse Path Direction.On the slide, select the text box. In the CustomAnimation task pane, do the following:Click AddEffect, point to Entrance, and then clickMoreEffects. In the AddEntrance Effect dialog box, under Subtle, click Fade.Select the third animation effect (fade effect for the text box). Under Modify: Fade, do the following:In theStart list, selectAfter Previous.In the Speed list, select Fast. To reproduce the other animated pictures and text boxes on this slide, do the following:On the Home tab, in the Editing group, click Select, and then click Selection Pane. On the slide, press and hold CTRL and then select the picture and the text box. On the Home tab, in the Clipboard group, click the arrow under Paste, and then click Duplicate.In the Selection and Visibility pane, select the duplicate picture and text box. On the slide, drag them onto the curve below the first group. In the Custom Animation task pane, select the fifth animation effect (motion path for the second picture). On the slide, point to the starting point (green arrow) until the cursor becomes a two-headed arrow. Drag the starting point below the bottom edge of the slide, to the same position as the starting point for the first motion path. (Note: The endpoint of the second motion path should still be in the middle of the second picture.)On the slide, right-clickthe second picture and then click ChangePicture. In the Insert Picture dialog box, select a picture, and then click Insert. With the picture still selected, under Picture Tools, on the Format tab, in the bottom right corner of the Size group, click the Size and Position dialog box launcher. In the Size and Position dialog box, on the Size tab, resize or crop the picture as needed so that under Size and rotate, the Height box is set to 1.2” and the Width box is set to 1.2”. Resize the picture under Size and rotate by entering values into the Height and Width boxes. Crop the picture under Crop from by entering values into the Left, Right, Top, and Bottom boxes. Click in the text box and edit the text.Repeat steps 1-7 two more times to reproduce the third and fourth pictures and text boxes with animation effects.
- To reproduce the curved shape on this slide, do the following:On the Home tab, in the Slides group, click Layout, and then click Blank.On the Home tab, in the Drawing group, click Shapes, and then under Lines click Freeform (11th option from the left).On the slide, do the following to draw the freeform line:Click the first point on the upper left corner of the slide. Click the second point on the bottom edge of the slide, slightly to the left of the middle. Click the third point on the lower left corner of the slide. Double-click the fourth and final point on the first point, on the upper left corner of the slide.Right-click the freeform shape, and then click Edit Points. Right-click the diagonal line, and then click Curved Segment. (Note: Your segment may not look as curved as in the example above.)Select the freeform shape. On the Home tab, in the Drawing group, click the arrow next to Shape Fill, and then under Theme Colors click White, Background 1 (first row, first option from the left).On the Home tab, in the Drawing group, click the arrow next to Shape Outline, and then click No Outline.To reproduce the background effects on this slide, do the following:Right-click the slide background area, and then click Format Background. In the Format Background dialog box, click Fill in the left pane, select Gradient fill in the Fill pane, and then do the following:In the Type list, select Linear.Click the button next to Direction, and then click Linear Diagonal(second row, third option from the left).Under Gradient stops, click Add or Remove until two stops appear in the drop-down list.Also under Gradient stops, customize the gradient stops that you added as follows:Select Stop 1 from the list, and then do the following:In the Stop position box, enter 0%.Click the button next to Color, and then under Theme Colors click White, Background 1 (first row, first option from the left).Select Stop 2 from the list, and then do the following: In the Stop position box, enter 100%.Click the button next to Color, click More Colors, and then in the Colors dialog box, on the Custom tab, enter values for Red: 230, Green: 230, Blue: 230.To reproduce the picture and text effects on this slide, do the following:On the Insert tab, in the Illustrations group, click Picture. In the Insert Picture dialog box, select a picture, and then click Insert.On the slide, select the picture. Under Picture Tools, on the Format tab, in the Picture Styles group, click Picture Shape, and then under Basic Shapes click Oval (first option from the left).With the picture still selected, under Picture Tools, on the Format tab, in the bottom right corner of the Size group, click the Size and Position dialog box launcher. In the Size and Position dialog box, on the Size tab, resize or crop the picture as needed so that under Size and rotate, the Height box is set to 1.2” and the Width box is set to 1.2”. Resize the picture under Size and rotate by entering values into the Height and Width boxes. Crop the picture under Crop from by entering values into the Left, Right, Top, and Bottom boxes. Under Picture Tools, on the Format tab, in the Picture Styles group, click the arrow next to Picture Effects, point to Bevel, and then under Bevel click Circle (first row, first option from the left).Under Picture Tools, on the Format tab, in the Picture Styles group, click Picture Effects, point to Bevel, and then click 3-D Options. In the Format Picture dialog box, click 3-D Format in the left pane, and then do the following in the 3-D Format pane, under Surface:Click the button next to Material, and then under Standard click Metal (fourth option from the left). Click the button next to Lighting, and then under Neutral click Contrasting (second row, second option from the left). In the Angle box, enter 25°.Also in the Format Picture dialog box, click Shadow in the left pane. In the Shadow pane, click the button next to Presets, under Outer click Offset Diagonal Bottom Left (first row, third option from the left), and then do the following:In the Transparency box, enter 77%.In the Size box, enter 100%.In the Blur box, enter 10 pt.In the Angle box, enter 141°.In the Distance box, enter 10 pt.On the slide, drag the picture onto the curve, near the top. On the Insert tab, in the Text group, click Text Box. On the slide, drag to draw the text box.Enter text in the text box and select it. On the Home tab, in the Font group, do the following:In the Font list, select Corbel.In the Font Size box, enter 22.Click the arrow next to Font Color,and then under Theme Colors click White, Background 1, Darker 50% (sixth row, first option from the left).On the Home tab, in the Paragraph group, click Align Text Left to align the text left in the text box.On the slide, drag the text box to the right of the picture. To reproduce the animation effects on this slide, do the following:It will help to zoom out in order to view the area off the slide. On the View tab, in the Zoom group, click Zoom. In the Zoom dialog box, select 33%.On the Animations tab, in the Animations group, click Custom Animation.On the slide, select the picture. In the CustomAnimation task pane, do the following:Click AddEffect, point to Entrance, and then clickMoreEffects. In the AddEntrance Effect dialog box, under Moderate, click Grow & Turn.Select the animation effect (grow & turn effect for the picture). Under Modify: Grow & Turn, do the following:In theStart list, selectWith Previous.In the Speed list, select Fast. On the slide, select the picture. In the CustomAnimation task pane, click AddEffect, point to Motion Paths, point to Draw Custom Path, and then click Curve.On the slide, do the following to create the custom motion path:Click the first point in the center of the picture. Click the second point in the middle of the curve. Double-click the third point off the bottom edge of the slide. In the CustomAnimation task pane, select the second animation effect (motion path for the picture), and then under Modify: Custom Path, do the following:In theStart list, selectWith Previous.In the Speedlist, select Fast.On the slide, right-click the motion path and then click Reverse Path Direction.On the slide, select the text box. In the CustomAnimation task pane, do the following:Click AddEffect, point to Entrance, and then clickMoreEffects. In the AddEntrance Effect dialog box, under Subtle, click Fade.Select the third animation effect (fade effect for the text box). Under Modify: Fade, do the following:In theStart list, selectAfter Previous.In the Speed list, select Fast. To reproduce the other animated pictures and text boxes on this slide, do the following:On the Home tab, in the Editing group, click Select, and then click Selection Pane. On the slide, press and hold CTRL and then select the picture and the text box. On the Home tab, in the Clipboard group, click the arrow under Paste, and then click Duplicate.In the Selection and Visibility pane, select the duplicate picture and text box. On the slide, drag them onto the curve below the first group. In the Custom Animation task pane, select the fifth animation effect (motion path for the second picture). On the slide, point to the starting point (green arrow) until the cursor becomes a two-headed arrow. Drag the starting point below the bottom edge of the slide, to the same position as the starting point for the first motion path. (Note: The endpoint of the second motion path should still be in the middle of the second picture.)On the slide, right-clickthe second picture and then click ChangePicture. In the Insert Picture dialog box, select a picture, and then click Insert. With the picture still selected, under Picture Tools, on the Format tab, in the bottom right corner of the Size group, click the Size and Position dialog box launcher. In the Size and Position dialog box, on the Size tab, resize or crop the picture as needed so that under Size and rotate, the Height box is set to 1.2” and the Width box is set to 1.2”. Resize the picture under Size and rotate by entering values into the Height and Width boxes. Crop the picture under Crop from by entering values into the Left, Right, Top, and Bottom boxes. Click in the text box and edit the text.Repeat steps 1-7 two more times to reproduce the third and fourth pictures and text boxes with animation effects.
- Custom animation effects: descending text levels(Basic)To reproduce the rectangleon this slide, do the following:On the Home tab, in theSlides group, click Layout, and then click Blank.On the Home tab, in the Drawing group, click Shapes, and then under Rectangle click Rounded Rectangle (second option from the left). On the slide, drag to draw a rectangle.Select the rectangle. Under Drawing Tools, on the Format tab, in the Size group, do the following:In the Shape Height box, enter 3.08”. In the Shape Width box, enter 4.33”.Under Drawing Tools, on the Format tab, in the Shapes Styles group, click the arrow next to Shape Outline, and then click No Outline.Under DrawingTools, on the Format tab, in the bottom right corner in the Shapes Styles group, click the Format Shape dialog box launcher. In the Format Shape dialog box, click Fill in the left pane, select Gradient fill in the Fill pane, and then do the following:In the Type list, select Linear.Click the button next to Direction, and then click Linear Down (first row, second option from the left).Under Gradient stops, click Add or Remove until two stops appear in the drop-down list.Also under Gradient stops, customize the gradient stops that you added as follows:Select Stop 1 from the list, and then do the following:In the Stop position box, enter 0%.Click the button next to Color, and then under Theme Colors click White, Background 1 (first row, first option from the left).In the Transparency box, enter 25%.Select Stop 2 from the list, and then do the following: In the Stop position box, enter 20%.Click the button next to Color, and then under Theme Colors click White, Background 1 (first row, first option from the left).In the Transparency box, enter 69%.Also in the Format Shape dialog box, click Shadow in the left pane. In the Shadow pane, click the button next to Presets, under Outer click Offset Diagonal Bottom Left (first row, third option from the left), and then do the following:In the Transparency box, enter 72%.In the Size box, enter 100%.In the Blur box, enter 11.81 pt.In the Angle box, enter 141°.In the Distance box, enter 19.7 pt. Also in the Format Shape dialog box,click 3-D Format in the left pane, and then do the following in the 3-D Format pane:Under Bevel, click the button next to Top, and then under Bevel click Circle (first row, first option from the left). Next to Top, in the Width box, enter 7 pt, in the Height box, enter 7 pt.Under Surface, click the button next to Material, and then under Standard clickMetal (fourth option from the left). Click the button next to Lighting, and then under Neutral click Contrasting (second row, second option from the left). In the Angle box, enter 75°.On the slide, drag the rectangle into the bottom right corner. To reproduce the rectangle animation effects on this slide, do the following:On the Animations tab, in the Animations group, click Custom Animation.On the slide, select the rectangle. In the CustomAnimation task pane, do the following:Click AddEffect, point to Entrance,and then click More Effects. In the Add Entrance Effect dialog box, under Moderate,click Ascend. Select the animation effect (ascend effect for the rectangle). Under Modify: Ascend,do the following:In theStart list, selectWith Previous. In theSpeed list, selectMedium. To reproduce the text effects on this slide, do the following:On the Insert tab, in the Text group, click Text Box, and then on the slide, drag to draw the text box. Enter three lines of text with paragraph breaks in the text box. Select the text, and then on the Home tab, in the Font group, do the following:In the Font list, select Candara.In the Font Size list, select 28. Click the arrow next to Font Color,and then under Theme Colors click Aqua, Accent 5; Darker 50% (sixth row, ninth option from the left). On the Home tab, in the Paragraph group, click Align TextLeft to position the text left in the text box.On the slide, drag the text box onto the rectangle. To reproduce the text animation effects on this slide, do the following:On the Animations tab, in the Animations group, click Custom Animation.On the slide, select the text box. In the CustomAnimation task pane, do the following:Click AddEffect, point to Entrance,and then click More Effects. In the Add Entrance Effect dialog box, under Moderate,click Descend. Select the second animation effect (descend effect for the text box). Click the arrow to the right of the selected effect, and then click Effect Options. In the Descend dialog box, do the following:On the Timing tab, do the following:In theStart box, selectWith Previous. In theSpeed box, select1 seconds (Fast). On the Text Animation tab, in the Group text list, select By 1st Level Paragraphs.Also in the Custom Animation task pane, click the double arrow under the second animation effect to expand the list of effects, and then do the following:Select the new second animation effect in the list (descend effect for the first line of text). Click the arrow to the right of the selected effect, and then click Timing. In the Descend dialog box, on the Timing tab, in the Delay box, enter 1.Select the third animation effect (descend effect for the second line of text). Click the arrow to the right of the selected effect, and then click Timing. In the Descend dialog box, on the Timing tab, do the following:In the Start list select WithPrevious.In the Delay box, enter 1.5.Select the fourth animation effect (descend effect for the second line of text). Click the arrow to the right of the selected effect, and then click Timing. In the Descend dialog box, on the Timing tab, do the following:In the Start list select WithPrevious.In the Delay box, enter 2.To reproduce the background effects on this slide, do the following: On the Design tab, in the bottom right corner of the Background group, click the Format Background dialog box launcher.In the Format Background dialog box, click Fill in the left pane, select Picture or texture fill in the Fill pane, and then under Insert from click File.In the Insert Picture dialog box, select a picture, and then click Insert.
- Custom animation effects: descending text levels(Basic)To reproduce the rectangleon this slide, do the following:On the Home tab, in theSlides group, click Layout, and then click Blank.On the Home tab, in the Drawing group, click Shapes, and then under Rectangle click Rounded Rectangle (second option from the left). On the slide, drag to draw a rectangle.Select the rectangle. Under Drawing Tools, on the Format tab, in the Size group, do the following:In the Shape Height box, enter 3.08”. In the Shape Width box, enter 4.33”.Under Drawing Tools, on the Format tab, in the Shapes Styles group, click the arrow next to Shape Outline, and then click No Outline.Under DrawingTools, on the Format tab, in the bottom right corner in the Shapes Styles group, click the Format Shape dialog box launcher. In the Format Shape dialog box, click Fill in the left pane, select Gradient fill in the Fill pane, and then do the following:In the Type list, select Linear.Click the button next to Direction, and then click Linear Down (first row, second option from the left).Under Gradient stops, click Add or Remove until two stops appear in the drop-down list.Also under Gradient stops, customize the gradient stops that you added as follows:Select Stop 1 from the list, and then do the following:In the Stop position box, enter 0%.Click the button next to Color, and then under Theme Colors click White, Background 1 (first row, first option from the left).In the Transparency box, enter 25%.Select Stop 2 from the list, and then do the following: In the Stop position box, enter 20%.Click the button next to Color, and then under Theme Colors click White, Background 1 (first row, first option from the left).In the Transparency box, enter 69%.Also in the Format Shape dialog box, click Shadow in the left pane. In the Shadow pane, click the button next to Presets, under Outer click Offset Diagonal Bottom Left (first row, third option from the left), and then do the following:In the Transparency box, enter 72%.In the Size box, enter 100%.In the Blur box, enter 11.81 pt.In the Angle box, enter 141°.In the Distance box, enter 19.7 pt. Also in the Format Shape dialog box,click 3-D Format in the left pane, and then do the following in the 3-D Format pane:Under Bevel, click the button next to Top, and then under Bevel click Circle (first row, first option from the left). Next to Top, in the Width box, enter 7 pt, in the Height box, enter 7 pt.Under Surface, click the button next to Material, and then under Standard clickMetal (fourth option from the left). Click the button next to Lighting, and then under Neutral click Contrasting (second row, second option from the left). In the Angle box, enter 75°.On the slide, drag the rectangle into the bottom right corner. To reproduce the rectangle animation effects on this slide, do the following:On the Animations tab, in the Animations group, click Custom Animation.On the slide, select the rectangle. In the CustomAnimation task pane, do the following:Click AddEffect, point to Entrance,and then click More Effects. In the Add Entrance Effect dialog box, under Moderate,click Ascend. Select the animation effect (ascend effect for the rectangle). Under Modify: Ascend,do the following:In theStart list, selectWith Previous. In theSpeed list, selectMedium. To reproduce the text effects on this slide, do the following:On the Insert tab, in the Text group, click Text Box, and then on the slide, drag to draw the text box. Enter three lines of text with paragraph breaks in the text box. Select the text, and then on the Home tab, in the Font group, do the following:In the Font list, select Candara.In the Font Size list, select 28. Click the arrow next to Font Color,and then under Theme Colors click Aqua, Accent 5; Darker 50% (sixth row, ninth option from the left). On the Home tab, in the Paragraph group, click Align TextLeft to position the text left in the text box.On the slide, drag the text box onto the rectangle. To reproduce the text animation effects on this slide, do the following:On the Animations tab, in the Animations group, click Custom Animation.On the slide, select the text box. In the CustomAnimation task pane, do the following:Click AddEffect, point to Entrance,and then click More Effects. In the Add Entrance Effect dialog box, under Moderate,click Descend. Select the second animation effect (descend effect for the text box). Click the arrow to the right of the selected effect, and then click Effect Options. In the Descend dialog box, do the following:On the Timing tab, do the following:In theStart box, selectWith Previous. In theSpeed box, select1 seconds (Fast). On the Text Animation tab, in the Group text list, select By 1st Level Paragraphs.Also in the Custom Animation task pane, click the double arrow under the second animation effect to expand the list of effects, and then do the following:Select the new second animation effect in the list (descend effect for the first line of text). Click the arrow to the right of the selected effect, and then click Timing. In the Descend dialog box, on the Timing tab, in the Delay box, enter 1.Select the third animation effect (descend effect for the second line of text). Click the arrow to the right of the selected effect, and then click Timing. In the Descend dialog box, on the Timing tab, do the following:In the Start list select WithPrevious.In the Delay box, enter 1.5.Select the fourth animation effect (descend effect for the second line of text). Click the arrow to the right of the selected effect, and then click Timing. In the Descend dialog box, on the Timing tab, do the following:In the Start list select WithPrevious.In the Delay box, enter 2.To reproduce the background effects on this slide, do the following: On the Design tab, in the bottom right corner of the Background group, click the Format Background dialog box launcher.In the Format Background dialog box, click Fill in the left pane, select Picture or texture fill in the Fill pane, and then under Insert from click File.In the Insert Picture dialog box, select a picture, and then click Insert.
- Custom animation effects: descending text levels(Basic)To reproduce the rectangleon this slide, do the following:On the Home tab, in theSlides group, click Layout, and then click Blank.On the Home tab, in the Drawing group, click Shapes, and then under Rectangle click Rounded Rectangle (second option from the left). On the slide, drag to draw a rectangle.Select the rectangle. Under Drawing Tools, on the Format tab, in the Size group, do the following:In the Shape Height box, enter 3.08”. In the Shape Width box, enter 4.33”.Under Drawing Tools, on the Format tab, in the Shapes Styles group, click the arrow next to Shape Outline, and then click No Outline.Under DrawingTools, on the Format tab, in the bottom right corner in the Shapes Styles group, click the Format Shape dialog box launcher. In the Format Shape dialog box, click Fill in the left pane, select Gradient fill in the Fill pane, and then do the following:In the Type list, select Linear.Click the button next to Direction, and then click Linear Down (first row, second option from the left).Under Gradient stops, click Add or Remove until two stops appear in the drop-down list.Also under Gradient stops, customize the gradient stops that you added as follows:Select Stop 1 from the list, and then do the following:In the Stop position box, enter 0%.Click the button next to Color, and then under Theme Colors click White, Background 1 (first row, first option from the left).In the Transparency box, enter 25%.Select Stop 2 from the list, and then do the following: In the Stop position box, enter 20%.Click the button next to Color, and then under Theme Colors click White, Background 1 (first row, first option from the left).In the Transparency box, enter 69%.Also in the Format Shape dialog box, click Shadow in the left pane. In the Shadow pane, click the button next to Presets, under Outer click Offset Diagonal Bottom Left (first row, third option from the left), and then do the following:In the Transparency box, enter 72%.In the Size box, enter 100%.In the Blur box, enter 11.81 pt.In the Angle box, enter 141°.In the Distance box, enter 19.7 pt. Also in the Format Shape dialog box,click 3-D Format in the left pane, and then do the following in the 3-D Format pane:Under Bevel, click the button next to Top, and then under Bevel click Circle (first row, first option from the left). Next to Top, in the Width box, enter 7 pt, in the Height box, enter 7 pt.Under Surface, click the button next to Material, and then under Standard clickMetal (fourth option from the left). Click the button next to Lighting, and then under Neutral click Contrasting (second row, second option from the left). In the Angle box, enter 75°.On the slide, drag the rectangle into the bottom right corner. To reproduce the rectangle animation effects on this slide, do the following:On the Animations tab, in the Animations group, click Custom Animation.On the slide, select the rectangle. In the CustomAnimation task pane, do the following:Click AddEffect, point to Entrance,and then click More Effects. In the Add Entrance Effect dialog box, under Moderate,click Ascend. Select the animation effect (ascend effect for the rectangle). Under Modify: Ascend,do the following:In theStart list, selectWith Previous. In theSpeed list, selectMedium. To reproduce the text effects on this slide, do the following:On the Insert tab, in the Text group, click Text Box, and then on the slide, drag to draw the text box. Enter three lines of text with paragraph breaks in the text box. Select the text, and then on the Home tab, in the Font group, do the following:In the Font list, select Candara.In the Font Size list, select 28. Click the arrow next to Font Color,and then under Theme Colors click Aqua, Accent 5; Darker 50% (sixth row, ninth option from the left). On the Home tab, in the Paragraph group, click Align TextLeft to position the text left in the text box.On the slide, drag the text box onto the rectangle. To reproduce the text animation effects on this slide, do the following:On the Animations tab, in the Animations group, click Custom Animation.On the slide, select the text box. In the CustomAnimation task pane, do the following:Click AddEffect, point to Entrance,and then click More Effects. In the Add Entrance Effect dialog box, under Moderate,click Descend. Select the second animation effect (descend effect for the text box). Click the arrow to the right of the selected effect, and then click Effect Options. In the Descend dialog box, do the following:On the Timing tab, do the following:In theStart box, selectWith Previous. In theSpeed box, select1 seconds (Fast). On the Text Animation tab, in the Group text list, select By 1st Level Paragraphs.Also in the Custom Animation task pane, click the double arrow under the second animation effect to expand the list of effects, and then do the following:Select the new second animation effect in the list (descend effect for the first line of text). Click the arrow to the right of the selected effect, and then click Timing. In the Descend dialog box, on the Timing tab, in the Delay box, enter 1.Select the third animation effect (descend effect for the second line of text). Click the arrow to the right of the selected effect, and then click Timing. In the Descend dialog box, on the Timing tab, do the following:In the Start list select WithPrevious.In the Delay box, enter 1.5.Select the fourth animation effect (descend effect for the second line of text). Click the arrow to the right of the selected effect, and then click Timing. In the Descend dialog box, on the Timing tab, do the following:In the Start list select WithPrevious.In the Delay box, enter 2.To reproduce the background effects on this slide, do the following: On the Design tab, in the bottom right corner of the Background group, click the Format Background dialog box launcher.In the Format Background dialog box, click Fill in the left pane, select Picture or texture fill in the Fill pane, and then under Insert from click File.In the Insert Picture dialog box, select a picture, and then click Insert.
- Custom animation effects: descending text levels(Basic)To reproduce the rectangleon this slide, do the following:On the Home tab, in theSlides group, click Layout, and then click Blank.On the Home tab, in the Drawing group, click Shapes, and then under Rectangle click Rounded Rectangle (second option from the left). On the slide, drag to draw a rectangle.Select the rectangle. Under Drawing Tools, on the Format tab, in the Size group, do the following:In the Shape Height box, enter 3.08”. In the Shape Width box, enter 4.33”.Under Drawing Tools, on the Format tab, in the Shapes Styles group, click the arrow next to Shape Outline, and then click No Outline.Under DrawingTools, on the Format tab, in the bottom right corner in the Shapes Styles group, click the Format Shape dialog box launcher. In the Format Shape dialog box, click Fill in the left pane, select Gradient fill in the Fill pane, and then do the following:In the Type list, select Linear.Click the button next to Direction, and then click Linear Down (first row, second option from the left).Under Gradient stops, click Add or Remove until two stops appear in the drop-down list.Also under Gradient stops, customize the gradient stops that you added as follows:Select Stop 1 from the list, and then do the following:In the Stop position box, enter 0%.Click the button next to Color, and then under Theme Colors click White, Background 1 (first row, first option from the left).In the Transparency box, enter 25%.Select Stop 2 from the list, and then do the following: In the Stop position box, enter 20%.Click the button next to Color, and then under Theme Colors click White, Background 1 (first row, first option from the left).In the Transparency box, enter 69%.Also in the Format Shape dialog box, click Shadow in the left pane. In the Shadow pane, click the button next to Presets, under Outer click Offset Diagonal Bottom Left (first row, third option from the left), and then do the following:In the Transparency box, enter 72%.In the Size box, enter 100%.In the Blur box, enter 11.81 pt.In the Angle box, enter 141°.In the Distance box, enter 19.7 pt. Also in the Format Shape dialog box,click 3-D Format in the left pane, and then do the following in the 3-D Format pane:Under Bevel, click the button next to Top, and then under Bevel click Circle (first row, first option from the left). Next to Top, in the Width box, enter 7 pt, in the Height box, enter 7 pt.Under Surface, click the button next to Material, and then under Standard clickMetal (fourth option from the left). Click the button next to Lighting, and then under Neutral click Contrasting (second row, second option from the left). In the Angle box, enter 75°.On the slide, drag the rectangle into the bottom right corner. To reproduce the rectangle animation effects on this slide, do the following:On the Animations tab, in the Animations group, click Custom Animation.On the slide, select the rectangle. In the CustomAnimation task pane, do the following:Click AddEffect, point to Entrance,and then click More Effects. In the Add Entrance Effect dialog box, under Moderate,click Ascend. Select the animation effect (ascend effect for the rectangle). Under Modify: Ascend,do the following:In theStart list, selectWith Previous. In theSpeed list, selectMedium. To reproduce the text effects on this slide, do the following:On the Insert tab, in the Text group, click Text Box, and then on the slide, drag to draw the text box. Enter three lines of text with paragraph breaks in the text box. Select the text, and then on the Home tab, in the Font group, do the following:In the Font list, select Candara.In the Font Size list, select 28. Click the arrow next to Font Color,and then under Theme Colors click Aqua, Accent 5; Darker 50% (sixth row, ninth option from the left). On the Home tab, in the Paragraph group, click Align TextLeft to position the text left in the text box.On the slide, drag the text box onto the rectangle. To reproduce the text animation effects on this slide, do the following:On the Animations tab, in the Animations group, click Custom Animation.On the slide, select the text box. In the CustomAnimation task pane, do the following:Click AddEffect, point to Entrance,and then click More Effects. In the Add Entrance Effect dialog box, under Moderate,click Descend. Select the second animation effect (descend effect for the text box). Click the arrow to the right of the selected effect, and then click Effect Options. In the Descend dialog box, do the following:On the Timing tab, do the following:In theStart box, selectWith Previous. In theSpeed box, select1 seconds (Fast). On the Text Animation tab, in the Group text list, select By 1st Level Paragraphs.Also in the Custom Animation task pane, click the double arrow under the second animation effect to expand the list of effects, and then do the following:Select the new second animation effect in the list (descend effect for the first line of text). Click the arrow to the right of the selected effect, and then click Timing. In the Descend dialog box, on the Timing tab, in the Delay box, enter 1.Select the third animation effect (descend effect for the second line of text). Click the arrow to the right of the selected effect, and then click Timing. In the Descend dialog box, on the Timing tab, do the following:In the Start list select WithPrevious.In the Delay box, enter 1.5.Select the fourth animation effect (descend effect for the second line of text). Click the arrow to the right of the selected effect, and then click Timing. In the Descend dialog box, on the Timing tab, do the following:In the Start list select WithPrevious.In the Delay box, enter 2.To reproduce the background effects on this slide, do the following: On the Design tab, in the bottom right corner of the Background group, click the Format Background dialog box launcher.In the Format Background dialog box, click Fill in the left pane, select Picture or texture fill in the Fill pane, and then under Insert from click File.In the Insert Picture dialog box, select a picture, and then click Insert.
- Custom animation effects: descending text levels(Basic)To reproduce the rectangleon this slide, do the following:On the Home tab, in theSlides group, click Layout, and then click Blank.On the Home tab, in the Drawing group, click Shapes, and then under Rectangle click Rounded Rectangle (second option from the left). On the slide, drag to draw a rectangle.Select the rectangle. Under Drawing Tools, on the Format tab, in the Size group, do the following:In the Shape Height box, enter 3.08”. In the Shape Width box, enter 4.33”.Under Drawing Tools, on the Format tab, in the Shapes Styles group, click the arrow next to Shape Outline, and then click No Outline.Under DrawingTools, on the Format tab, in the bottom right corner in the Shapes Styles group, click the Format Shape dialog box launcher. In the Format Shape dialog box, click Fill in the left pane, select Gradient fill in the Fill pane, and then do the following:In the Type list, select Linear.Click the button next to Direction, and then click Linear Down (first row, second option from the left).Under Gradient stops, click Add or Remove until two stops appear in the drop-down list.Also under Gradient stops, customize the gradient stops that you added as follows:Select Stop 1 from the list, and then do the following:In the Stop position box, enter 0%.Click the button next to Color, and then under Theme Colors click White, Background 1 (first row, first option from the left).In the Transparency box, enter 25%.Select Stop 2 from the list, and then do the following: In the Stop position box, enter 20%.Click the button next to Color, and then under Theme Colors click White, Background 1 (first row, first option from the left).In the Transparency box, enter 69%.Also in the Format Shape dialog box, click Shadow in the left pane. In the Shadow pane, click the button next to Presets, under Outer click Offset Diagonal Bottom Left (first row, third option from the left), and then do the following:In the Transparency box, enter 72%.In the Size box, enter 100%.In the Blur box, enter 11.81 pt.In the Angle box, enter 141°.In the Distance box, enter 19.7 pt. Also in the Format Shape dialog box,click 3-D Format in the left pane, and then do the following in the 3-D Format pane:Under Bevel, click the button next to Top, and then under Bevel click Circle (first row, first option from the left). Next to Top, in the Width box, enter 7 pt, in the Height box, enter 7 pt.Under Surface, click the button next to Material, and then under Standard clickMetal (fourth option from the left). Click the button next to Lighting, and then under Neutral click Contrasting (second row, second option from the left). In the Angle box, enter 75°.On the slide, drag the rectangle into the bottom right corner. To reproduce the rectangle animation effects on this slide, do the following:On the Animations tab, in the Animations group, click Custom Animation.On the slide, select the rectangle. In the CustomAnimation task pane, do the following:Click AddEffect, point to Entrance,and then click More Effects. In the Add Entrance Effect dialog box, under Moderate,click Ascend. Select the animation effect (ascend effect for the rectangle). Under Modify: Ascend,do the following:In theStart list, selectWith Previous. In theSpeed list, selectMedium. To reproduce the text effects on this slide, do the following:On the Insert tab, in the Text group, click Text Box, and then on the slide, drag to draw the text box. Enter three lines of text with paragraph breaks in the text box. Select the text, and then on the Home tab, in the Font group, do the following:In the Font list, select Candara.In the Font Size list, select 28. Click the arrow next to Font Color,and then under Theme Colors click Aqua, Accent 5; Darker 50% (sixth row, ninth option from the left). On the Home tab, in the Paragraph group, click Align TextLeft to position the text left in the text box.On the slide, drag the text box onto the rectangle. To reproduce the text animation effects on this slide, do the following:On the Animations tab, in the Animations group, click Custom Animation.On the slide, select the text box. In the CustomAnimation task pane, do the following:Click AddEffect, point to Entrance,and then click More Effects. In the Add Entrance Effect dialog box, under Moderate,click Descend. Select the second animation effect (descend effect for the text box). Click the arrow to the right of the selected effect, and then click Effect Options. In the Descend dialog box, do the following:On the Timing tab, do the following:In theStart box, selectWith Previous. In theSpeed box, select1 seconds (Fast). On the Text Animation tab, in the Group text list, select By 1st Level Paragraphs.Also in the Custom Animation task pane, click the double arrow under the second animation effect to expand the list of effects, and then do the following:Select the new second animation effect in the list (descend effect for the first line of text). Click the arrow to the right of the selected effect, and then click Timing. In the Descend dialog box, on the Timing tab, in the Delay box, enter 1.Select the third animation effect (descend effect for the second line of text). Click the arrow to the right of the selected effect, and then click Timing. In the Descend dialog box, on the Timing tab, do the following:In the Start list select WithPrevious.In the Delay box, enter 1.5.Select the fourth animation effect (descend effect for the second line of text). Click the arrow to the right of the selected effect, and then click Timing. In the Descend dialog box, on the Timing tab, do the following:In the Start list select WithPrevious.In the Delay box, enter 2.To reproduce the background effects on this slide, do the following: On the Design tab, in the bottom right corner of the Background group, click the Format Background dialog box launcher.In the Format Background dialog box, click Fill in the left pane, select Picture or texture fill in the Fill pane, and then under Insert from click File.In the Insert Picture dialog box, select a picture, and then click Insert.
- Custom animation effects: descending text levels(Basic)To reproduce the rectangleon this slide, do the following:On the Home tab, in theSlides group, click Layout, and then click Blank.On the Home tab, in the Drawing group, click Shapes, and then under Rectangle click Rounded Rectangle (second option from the left). On the slide, drag to draw a rectangle.Select the rectangle. Under Drawing Tools, on the Format tab, in the Size group, do the following:In the Shape Height box, enter 3.08”. In the Shape Width box, enter 4.33”.Under Drawing Tools, on the Format tab, in the Shapes Styles group, click the arrow next to Shape Outline, and then click No Outline.Under DrawingTools, on the Format tab, in the bottom right corner in the Shapes Styles group, click the Format Shape dialog box launcher. In the Format Shape dialog box, click Fill in the left pane, select Gradient fill in the Fill pane, and then do the following:In the Type list, select Linear.Click the button next to Direction, and then click Linear Down (first row, second option from the left).Under Gradient stops, click Add or Remove until two stops appear in the drop-down list.Also under Gradient stops, customize the gradient stops that you added as follows:Select Stop 1 from the list, and then do the following:In the Stop position box, enter 0%.Click the button next to Color, and then under Theme Colors click White, Background 1 (first row, first option from the left).In the Transparency box, enter 25%.Select Stop 2 from the list, and then do the following: In the Stop position box, enter 20%.Click the button next to Color, and then under Theme Colors click White, Background 1 (first row, first option from the left).In the Transparency box, enter 69%.Also in the Format Shape dialog box, click Shadow in the left pane. In the Shadow pane, click the button next to Presets, under Outer click Offset Diagonal Bottom Left (first row, third option from the left), and then do the following:In the Transparency box, enter 72%.In the Size box, enter 100%.In the Blur box, enter 11.81 pt.In the Angle box, enter 141°.In the Distance box, enter 19.7 pt. Also in the Format Shape dialog box,click 3-D Format in the left pane, and then do the following in the 3-D Format pane:Under Bevel, click the button next to Top, and then under Bevel click Circle (first row, first option from the left). Next to Top, in the Width box, enter 7 pt, in the Height box, enter 7 pt.Under Surface, click the button next to Material, and then under Standard clickMetal (fourth option from the left). Click the button next to Lighting, and then under Neutral click Contrasting (second row, second option from the left). In the Angle box, enter 75°.On the slide, drag the rectangle into the bottom right corner. To reproduce the rectangle animation effects on this slide, do the following:On the Animations tab, in the Animations group, click Custom Animation.On the slide, select the rectangle. In the CustomAnimation task pane, do the following:Click AddEffect, point to Entrance,and then click More Effects. In the Add Entrance Effect dialog box, under Moderate,click Ascend. Select the animation effect (ascend effect for the rectangle). Under Modify: Ascend,do the following:In theStart list, selectWith Previous. In theSpeed list, selectMedium. To reproduce the text effects on this slide, do the following:On the Insert tab, in the Text group, click Text Box, and then on the slide, drag to draw the text box. Enter three lines of text with paragraph breaks in the text box. Select the text, and then on the Home tab, in the Font group, do the following:In the Font list, select Candara.In the Font Size list, select 28. Click the arrow next to Font Color,and then under Theme Colors click Aqua, Accent 5; Darker 50% (sixth row, ninth option from the left). On the Home tab, in the Paragraph group, click Align TextLeft to position the text left in the text box.On the slide, drag the text box onto the rectangle. To reproduce the text animation effects on this slide, do the following:On the Animations tab, in the Animations group, click Custom Animation.On the slide, select the text box. In the CustomAnimation task pane, do the following:Click AddEffect, point to Entrance,and then click More Effects. In the Add Entrance Effect dialog box, under Moderate,click Descend. Select the second animation effect (descend effect for the text box). Click the arrow to the right of the selected effect, and then click Effect Options. In the Descend dialog box, do the following:On the Timing tab, do the following:In theStart box, selectWith Previous. In theSpeed box, select1 seconds (Fast). On the Text Animation tab, in the Group text list, select By 1st Level Paragraphs.Also in the Custom Animation task pane, click the double arrow under the second animation effect to expand the list of effects, and then do the following:Select the new second animation effect in the list (descend effect for the first line of text). Click the arrow to the right of the selected effect, and then click Timing. In the Descend dialog box, on the Timing tab, in the Delay box, enter 1.Select the third animation effect (descend effect for the second line of text). Click the arrow to the right of the selected effect, and then click Timing. In the Descend dialog box, on the Timing tab, do the following:In the Start list select WithPrevious.In the Delay box, enter 1.5.Select the fourth animation effect (descend effect for the second line of text). Click the arrow to the right of the selected effect, and then click Timing. In the Descend dialog box, on the Timing tab, do the following:In the Start list select WithPrevious.In the Delay box, enter 2.To reproduce the background effects on this slide, do the following: On the Design tab, in the bottom right corner of the Background group, click the Format Background dialog box launcher.In the Format Background dialog box, click Fill in the left pane, select Picture or texture fill in the Fill pane, and then under Insert from click File.In the Insert Picture dialog box, select a picture, and then click Insert.
- Custom animation effects: descending text levels(Basic)To reproduce the rectangleon this slide, do the following:On the Home tab, in theSlides group, click Layout, and then click Blank.On the Home tab, in the Drawing group, click Shapes, and then under Rectangle click Rounded Rectangle (second option from the left). On the slide, drag to draw a rectangle.Select the rectangle. Under Drawing Tools, on the Format tab, in the Size group, do the following:In the Shape Height box, enter 3.08”. In the Shape Width box, enter 4.33”.Under Drawing Tools, on the Format tab, in the Shapes Styles group, click the arrow next to Shape Outline, and then click No Outline.Under DrawingTools, on the Format tab, in the bottom right corner in the Shapes Styles group, click the Format Shape dialog box launcher. In the Format Shape dialog box, click Fill in the left pane, select Gradient fill in the Fill pane, and then do the following:In the Type list, select Linear.Click the button next to Direction, and then click Linear Down (first row, second option from the left).Under Gradient stops, click Add or Remove until two stops appear in the drop-down list.Also under Gradient stops, customize the gradient stops that you added as follows:Select Stop 1 from the list, and then do the following:In the Stop position box, enter 0%.Click the button next to Color, and then under Theme Colors click White, Background 1 (first row, first option from the left).In the Transparency box, enter 25%.Select Stop 2 from the list, and then do the following: In the Stop position box, enter 20%.Click the button next to Color, and then under Theme Colors click White, Background 1 (first row, first option from the left).In the Transparency box, enter 69%.Also in the Format Shape dialog box, click Shadow in the left pane. In the Shadow pane, click the button next to Presets, under Outer click Offset Diagonal Bottom Left (first row, third option from the left), and then do the following:In the Transparency box, enter 72%.In the Size box, enter 100%.In the Blur box, enter 11.81 pt.In the Angle box, enter 141°.In the Distance box, enter 19.7 pt. Also in the Format Shape dialog box,click 3-D Format in the left pane, and then do the following in the 3-D Format pane:Under Bevel, click the button next to Top, and then under Bevel click Circle (first row, first option from the left). Next to Top, in the Width box, enter 7 pt, in the Height box, enter 7 pt.Under Surface, click the button next to Material, and then under Standard clickMetal (fourth option from the left). Click the button next to Lighting, and then under Neutral click Contrasting (second row, second option from the left). In the Angle box, enter 75°.On the slide, drag the rectangle into the bottom right corner. To reproduce the rectangle animation effects on this slide, do the following:On the Animations tab, in the Animations group, click Custom Animation.On the slide, select the rectangle. In the CustomAnimation task pane, do the following:Click AddEffect, point to Entrance,and then click More Effects. In the Add Entrance Effect dialog box, under Moderate,click Ascend. Select the animation effect (ascend effect for the rectangle). Under Modify: Ascend,do the following:In theStart list, selectWith Previous. In theSpeed list, selectMedium. To reproduce the text effects on this slide, do the following:On the Insert tab, in the Text group, click Text Box, and then on the slide, drag to draw the text box. Enter three lines of text with paragraph breaks in the text box. Select the text, and then on the Home tab, in the Font group, do the following:In the Font list, select Candara.In the Font Size list, select 28. Click the arrow next to Font Color,and then under Theme Colors click Aqua, Accent 5; Darker 50% (sixth row, ninth option from the left). On the Home tab, in the Paragraph group, click Align TextLeft to position the text left in the text box.On the slide, drag the text box onto the rectangle. To reproduce the text animation effects on this slide, do the following:On the Animations tab, in the Animations group, click Custom Animation.On the slide, select the text box. In the CustomAnimation task pane, do the following:Click AddEffect, point to Entrance,and then click More Effects. In the Add Entrance Effect dialog box, under Moderate,click Descend. Select the second animation effect (descend effect for the text box). Click the arrow to the right of the selected effect, and then click Effect Options. In the Descend dialog box, do the following:On the Timing tab, do the following:In theStart box, selectWith Previous. In theSpeed box, select1 seconds (Fast). On the Text Animation tab, in the Group text list, select By 1st Level Paragraphs.Also in the Custom Animation task pane, click the double arrow under the second animation effect to expand the list of effects, and then do the following:Select the new second animation effect in the list (descend effect for the first line of text). Click the arrow to the right of the selected effect, and then click Timing. In the Descend dialog box, on the Timing tab, in the Delay box, enter 1.Select the third animation effect (descend effect for the second line of text). Click the arrow to the right of the selected effect, and then click Timing. In the Descend dialog box, on the Timing tab, do the following:In the Start list select WithPrevious.In the Delay box, enter 1.5.Select the fourth animation effect (descend effect for the second line of text). Click the arrow to the right of the selected effect, and then click Timing. In the Descend dialog box, on the Timing tab, do the following:In the Start list select WithPrevious.In the Delay box, enter 2.To reproduce the background effects on this slide, do the following: On the Design tab, in the bottom right corner of the Background group, click the Format Background dialog box launcher.In the Format Background dialog box, click Fill in the left pane, select Picture or texture fill in the Fill pane, and then under Insert from click File.In the Insert Picture dialog box, select a picture, and then click Insert.
- Custom animation effects: descending text levels(Basic)To reproduce the rectangleon this slide, do the following:On the Home tab, in theSlides group, click Layout, and then click Blank.On the Home tab, in the Drawing group, click Shapes, and then under Rectangle click Rounded Rectangle (second option from the left). On the slide, drag to draw a rectangle.Select the rectangle. Under Drawing Tools, on the Format tab, in the Size group, do the following:In the Shape Height box, enter 3.08”. In the Shape Width box, enter 4.33”.Under Drawing Tools, on the Format tab, in the Shapes Styles group, click the arrow next to Shape Outline, and then click No Outline.Under DrawingTools, on the Format tab, in the bottom right corner in the Shapes Styles group, click the Format Shape dialog box launcher. In the Format Shape dialog box, click Fill in the left pane, select Gradient fill in the Fill pane, and then do the following:In the Type list, select Linear.Click the button next to Direction, and then click Linear Down (first row, second option from the left).Under Gradient stops, click Add or Remove until two stops appear in the drop-down list.Also under Gradient stops, customize the gradient stops that you added as follows:Select Stop 1 from the list, and then do the following:In the Stop position box, enter 0%.Click the button next to Color, and then under Theme Colors click White, Background 1 (first row, first option from the left).In the Transparency box, enter 25%.Select Stop 2 from the list, and then do the following: In the Stop position box, enter 20%.Click the button next to Color, and then under Theme Colors click White, Background 1 (first row, first option from the left).In the Transparency box, enter 69%.Also in the Format Shape dialog box, click Shadow in the left pane. In the Shadow pane, click the button next to Presets, under Outer click Offset Diagonal Bottom Left (first row, third option from the left), and then do the following:In the Transparency box, enter 72%.In the Size box, enter 100%.In the Blur box, enter 11.81 pt.In the Angle box, enter 141°.In the Distance box, enter 19.7 pt. Also in the Format Shape dialog box,click 3-D Format in the left pane, and then do the following in the 3-D Format pane:Under Bevel, click the button next to Top, and then under Bevel click Circle (first row, first option from the left). Next to Top, in the Width box, enter 7 pt, in the Height box, enter 7 pt.Under Surface, click the button next to Material, and then under Standard clickMetal (fourth option from the left). Click the button next to Lighting, and then under Neutral click Contrasting (second row, second option from the left). In the Angle box, enter 75°.On the slide, drag the rectangle into the bottom right corner. To reproduce the rectangle animation effects on this slide, do the following:On the Animations tab, in the Animations group, click Custom Animation.On the slide, select the rectangle. In the CustomAnimation task pane, do the following:Click AddEffect, point to Entrance,and then click More Effects. In the Add Entrance Effect dialog box, under Moderate,click Ascend. Select the animation effect (ascend effect for the rectangle). Under Modify: Ascend,do the following:In theStart list, selectWith Previous. In theSpeed list, selectMedium. To reproduce the text effects on this slide, do the following:On the Insert tab, in the Text group, click Text Box, and then on the slide, drag to draw the text box. Enter three lines of text with paragraph breaks in the text box. Select the text, and then on the Home tab, in the Font group, do the following:In the Font list, select Candara.In the Font Size list, select 28. Click the arrow next to Font Color,and then under Theme Colors click Aqua, Accent 5; Darker 50% (sixth row, ninth option from the left). On the Home tab, in the Paragraph group, click Align TextLeft to position the text left in the text box.On the slide, drag the text box onto the rectangle. To reproduce the text animation effects on this slide, do the following:On the Animations tab, in the Animations group, click Custom Animation.On the slide, select the text box. In the CustomAnimation task pane, do the following:Click AddEffect, point to Entrance,and then click More Effects. In the Add Entrance Effect dialog box, under Moderate,click Descend. Select the second animation effect (descend effect for the text box). Click the arrow to the right of the selected effect, and then click Effect Options. In the Descend dialog box, do the following:On the Timing tab, do the following:In theStart box, selectWith Previous. In theSpeed box, select1 seconds (Fast). On the Text Animation tab, in the Group text list, select By 1st Level Paragraphs.Also in the Custom Animation task pane, click the double arrow under the second animation effect to expand the list of effects, and then do the following:Select the new second animation effect in the list (descend effect for the first line of text). Click the arrow to the right of the selected effect, and then click Timing. In the Descend dialog box, on the Timing tab, in the Delay box, enter 1.Select the third animation effect (descend effect for the second line of text). Click the arrow to the right of the selected effect, and then click Timing. In the Descend dialog box, on the Timing tab, do the following:In the Start list select WithPrevious.In the Delay box, enter 1.5.Select the fourth animation effect (descend effect for the second line of text). Click the arrow to the right of the selected effect, and then click Timing. In the Descend dialog box, on the Timing tab, do the following:In the Start list select WithPrevious.In the Delay box, enter 2.To reproduce the background effects on this slide, do the following: On the Design tab, in the bottom right corner of the Background group, click the Format Background dialog box launcher.In the Format Background dialog box, click Fill in the left pane, select Picture or texture fill in the Fill pane, and then under Insert from click File.In the Insert Picture dialog box, select a picture, and then click Insert.
- Custom animation effects: descending text levels(Basic)To reproduce the rectangleon this slide, do the following:On the Home tab, in theSlides group, click Layout, and then click Blank.On the Home tab, in the Drawing group, click Shapes, and then under Rectangle click Rounded Rectangle (second option from the left). On the slide, drag to draw a rectangle.Select the rectangle. Under Drawing Tools, on the Format tab, in the Size group, do the following:In the Shape Height box, enter 3.08”. In the Shape Width box, enter 4.33”.Under Drawing Tools, on the Format tab, in the Shapes Styles group, click the arrow next to Shape Outline, and then click No Outline.Under DrawingTools, on the Format tab, in the bottom right corner in the Shapes Styles group, click the Format Shape dialog box launcher. In the Format Shape dialog box, click Fill in the left pane, select Gradient fill in the Fill pane, and then do the following:In the Type list, select Linear.Click the button next to Direction, and then click Linear Down (first row, second option from the left).Under Gradient stops, click Add or Remove until two stops appear in the drop-down list.Also under Gradient stops, customize the gradient stops that you added as follows:Select Stop 1 from the list, and then do the following:In the Stop position box, enter 0%.Click the button next to Color, and then under Theme Colors click White, Background 1 (first row, first option from the left).In the Transparency box, enter 25%.Select Stop 2 from the list, and then do the following: In the Stop position box, enter 20%.Click the button next to Color, and then under Theme Colors click White, Background 1 (first row, first option from the left).In the Transparency box, enter 69%.Also in the Format Shape dialog box, click Shadow in the left pane. In the Shadow pane, click the button next to Presets, under Outer click Offset Diagonal Bottom Left (first row, third option from the left), and then do the following:In the Transparency box, enter 72%.In the Size box, enter 100%.In the Blur box, enter 11.81 pt.In the Angle box, enter 141°.In the Distance box, enter 19.7 pt. Also in the Format Shape dialog box,click 3-D Format in the left pane, and then do the following in the 3-D Format pane:Under Bevel, click the button next to Top, and then under Bevel click Circle (first row, first option from the left). Next to Top, in the Width box, enter 7 pt, in the Height box, enter 7 pt.Under Surface, click the button next to Material, and then under Standard clickMetal (fourth option from the left). Click the button next to Lighting, and then under Neutral click Contrasting (second row, second option from the left). In the Angle box, enter 75°.On the slide, drag the rectangle into the bottom right corner. To reproduce the rectangle animation effects on this slide, do the following:On the Animations tab, in the Animations group, click Custom Animation.On the slide, select the rectangle. In the CustomAnimation task pane, do the following:Click AddEffect, point to Entrance,and then click More Effects. In the Add Entrance Effect dialog box, under Moderate,click Ascend. Select the animation effect (ascend effect for the rectangle). Under Modify: Ascend,do the following:In theStart list, selectWith Previous. In theSpeed list, selectMedium. To reproduce the text effects on this slide, do the following:On the Insert tab, in the Text group, click Text Box, and then on the slide, drag to draw the text box. Enter three lines of text with paragraph breaks in the text box. Select the text, and then on the Home tab, in the Font group, do the following:In the Font list, select Candara.In the Font Size list, select 28. Click the arrow next to Font Color,and then under Theme Colors click Aqua, Accent 5; Darker 50% (sixth row, ninth option from the left). On the Home tab, in the Paragraph group, click Align TextLeft to position the text left in the text box.On the slide, drag the text box onto the rectangle. To reproduce the text animation effects on this slide, do the following:On the Animations tab, in the Animations group, click Custom Animation.On the slide, select the text box. In the CustomAnimation task pane, do the following:Click AddEffect, point to Entrance,and then click More Effects. In the Add Entrance Effect dialog box, under Moderate,click Descend. Select the second animation effect (descend effect for the text box). Click the arrow to the right of the selected effect, and then click Effect Options. In the Descend dialog box, do the following:On the Timing tab, do the following:In theStart box, selectWith Previous. In theSpeed box, select1 seconds (Fast). On the Text Animation tab, in the Group text list, select By 1st Level Paragraphs.Also in the Custom Animation task pane, click the double arrow under the second animation effect to expand the list of effects, and then do the following:Select the new second animation effect in the list (descend effect for the first line of text). Click the arrow to the right of the selected effect, and then click Timing. In the Descend dialog box, on the Timing tab, in the Delay box, enter 1.Select the third animation effect (descend effect for the second line of text). Click the arrow to the right of the selected effect, and then click Timing. In the Descend dialog box, on the Timing tab, do the following:In the Start list select WithPrevious.In the Delay box, enter 1.5.Select the fourth animation effect (descend effect for the second line of text). Click the arrow to the right of the selected effect, and then click Timing. In the Descend dialog box, on the Timing tab, do the following:In the Start list select WithPrevious.In the Delay box, enter 2.To reproduce the background effects on this slide, do the following: On the Design tab, in the bottom right corner of the Background group, click the Format Background dialog box launcher.In the Format Background dialog box, click Fill in the left pane, select Picture or texture fill in the Fill pane, and then under Insert from click File.In the Insert Picture dialog box, select a picture, and then click Insert.
- Custom animation effects: descending text levels(Basic)To reproduce the rectangleon this slide, do the following:On the Home tab, in theSlides group, click Layout, and then click Blank.On the Home tab, in the Drawing group, click Shapes, and then under Rectangle click Rounded Rectangle (second option from the left). On the slide, drag to draw a rectangle.Select the rectangle. Under Drawing Tools, on the Format tab, in the Size group, do the following:In the Shape Height box, enter 3.08”. In the Shape Width box, enter 4.33”.Under Drawing Tools, on the Format tab, in the Shapes Styles group, click the arrow next to Shape Outline, and then click No Outline.Under DrawingTools, on the Format tab, in the bottom right corner in the Shapes Styles group, click the Format Shape dialog box launcher. In the Format Shape dialog box, click Fill in the left pane, select Gradient fill in the Fill pane, and then do the following:In the Type list, select Linear.Click the button next to Direction, and then click Linear Down (first row, second option from the left).Under Gradient stops, click Add or Remove until two stops appear in the drop-down list.Also under Gradient stops, customize the gradient stops that you added as follows:Select Stop 1 from the list, and then do the following:In the Stop position box, enter 0%.Click the button next to Color, and then under Theme Colors click White, Background 1 (first row, first option from the left).In the Transparency box, enter 25%.Select Stop 2 from the list, and then do the following: In the Stop position box, enter 20%.Click the button next to Color, and then under Theme Colors click White, Background 1 (first row, first option from the left).In the Transparency box, enter 69%.Also in the Format Shape dialog box, click Shadow in the left pane. In the Shadow pane, click the button next to Presets, under Outer click Offset Diagonal Bottom Left (first row, third option from the left), and then do the following:In the Transparency box, enter 72%.In the Size box, enter 100%.In the Blur box, enter 11.81 pt.In the Angle box, enter 141°.In the Distance box, enter 19.7 pt. Also in the Format Shape dialog box,click 3-D Format in the left pane, and then do the following in the 3-D Format pane:Under Bevel, click the button next to Top, and then under Bevel click Circle (first row, first option from the left). Next to Top, in the Width box, enter 7 pt, in the Height box, enter 7 pt.Under Surface, click the button next to Material, and then under Standard clickMetal (fourth option from the left). Click the button next to Lighting, and then under Neutral click Contrasting (second row, second option from the left). In the Angle box, enter 75°.On the slide, drag the rectangle into the bottom right corner. To reproduce the rectangle animation effects on this slide, do the following:On the Animations tab, in the Animations group, click Custom Animation.On the slide, select the rectangle. In the CustomAnimation task pane, do the following:Click AddEffect, point to Entrance,and then click More Effects. In the Add Entrance Effect dialog box, under Moderate,click Ascend. Select the animation effect (ascend effect for the rectangle). Under Modify: Ascend,do the following:In theStart list, selectWith Previous. In theSpeed list, selectMedium. To reproduce the text effects on this slide, do the following:On the Insert tab, in the Text group, click Text Box, and then on the slide, drag to draw the text box. Enter three lines of text with paragraph breaks in the text box. Select the text, and then on the Home tab, in the Font group, do the following:In the Font list, select Candara.In the Font Size list, select 28. Click the arrow next to Font Color,and then under Theme Colors click Aqua, Accent 5; Darker 50% (sixth row, ninth option from the left). On the Home tab, in the Paragraph group, click Align TextLeft to position the text left in the text box.On the slide, drag the text box onto the rectangle. To reproduce the text animation effects on this slide, do the following:On the Animations tab, in the Animations group, click Custom Animation.On the slide, select the text box. In the CustomAnimation task pane, do the following:Click AddEffect, point to Entrance,and then click More Effects. In the Add Entrance Effect dialog box, under Moderate,click Descend. Select the second animation effect (descend effect for the text box). Click the arrow to the right of the selected effect, and then click Effect Options. In the Descend dialog box, do the following:On the Timing tab, do the following:In theStart box, selectWith Previous. In theSpeed box, select1 seconds (Fast). On the Text Animation tab, in the Group text list, select By 1st Level Paragraphs.Also in the Custom Animation task pane, click the double arrow under the second animation effect to expand the list of effects, and then do the following:Select the new second animation effect in the list (descend effect for the first line of text). Click the arrow to the right of the selected effect, and then click Timing. In the Descend dialog box, on the Timing tab, in the Delay box, enter 1.Select the third animation effect (descend effect for the second line of text). Click the arrow to the right of the selected effect, and then click Timing. In the Descend dialog box, on the Timing tab, do the following:In the Start list select WithPrevious.In the Delay box, enter 1.5.Select the fourth animation effect (descend effect for the second line of text). Click the arrow to the right of the selected effect, and then click Timing. In the Descend dialog box, on the Timing tab, do the following:In the Start list select WithPrevious.In the Delay box, enter 2.To reproduce the background effects on this slide, do the following: On the Design tab, in the bottom right corner of the Background group, click the Format Background dialog box launcher.In the Format Background dialog box, click Fill in the left pane, select Picture or texture fill in the Fill pane, and then under Insert from click File.In the Insert Picture dialog box, select a picture, and then click Insert.
- Custom animation effects: descending text levels(Basic)To reproduce the rectangleon this slide, do the following:On the Home tab, in theSlides group, click Layout, and then click Blank.On the Home tab, in the Drawing group, click Shapes, and then under Rectangle click Rounded Rectangle (second option from the left). On the slide, drag to draw a rectangle.Select the rectangle. Under Drawing Tools, on the Format tab, in the Size group, do the following:In the Shape Height box, enter 3.08”. In the Shape Width box, enter 4.33”.Under Drawing Tools, on the Format tab, in the Shapes Styles group, click the arrow next to Shape Outline, and then click No Outline.Under DrawingTools, on the Format tab, in the bottom right corner in the Shapes Styles group, click the Format Shape dialog box launcher. In the Format Shape dialog box, click Fill in the left pane, select Gradient fill in the Fill pane, and then do the following:In the Type list, select Linear.Click the button next to Direction, and then click Linear Down (first row, second option from the left).Under Gradient stops, click Add or Remove until two stops appear in the drop-down list.Also under Gradient stops, customize the gradient stops that you added as follows:Select Stop 1 from the list, and then do the following:In the Stop position box, enter 0%.Click the button next to Color, and then under Theme Colors click White, Background 1 (first row, first option from the left).In the Transparency box, enter 25%.Select Stop 2 from the list, and then do the following: In the Stop position box, enter 20%.Click the button next to Color, and then under Theme Colors click White, Background 1 (first row, first option from the left).In the Transparency box, enter 69%.Also in the Format Shape dialog box, click Shadow in the left pane. In the Shadow pane, click the button next to Presets, under Outer click Offset Diagonal Bottom Left (first row, third option from the left), and then do the following:In the Transparency box, enter 72%.In the Size box, enter 100%.In the Blur box, enter 11.81 pt.In the Angle box, enter 141°.In the Distance box, enter 19.7 pt. Also in the Format Shape dialog box,click 3-D Format in the left pane, and then do the following in the 3-D Format pane:Under Bevel, click the button next to Top, and then under Bevel click Circle (first row, first option from the left). Next to Top, in the Width box, enter 7 pt, in the Height box, enter 7 pt.Under Surface, click the button next to Material, and then under Standard clickMetal (fourth option from the left). Click the button next to Lighting, and then under Neutral click Contrasting (second row, second option from the left). In the Angle box, enter 75°.On the slide, drag the rectangle into the bottom right corner. To reproduce the rectangle animation effects on this slide, do the following:On the Animations tab, in the Animations group, click Custom Animation.On the slide, select the rectangle. In the CustomAnimation task pane, do the following:Click AddEffect, point to Entrance,and then click More Effects. In the Add Entrance Effect dialog box, under Moderate,click Ascend. Select the animation effect (ascend effect for the rectangle). Under Modify: Ascend,do the following:In theStart list, selectWith Previous. In theSpeed list, selectMedium. To reproduce the text effects on this slide, do the following:On the Insert tab, in the Text group, click Text Box, and then on the slide, drag to draw the text box. Enter three lines of text with paragraph breaks in the text box. Select the text, and then on the Home tab, in the Font group, do the following:In the Font list, select Candara.In the Font Size list, select 28. Click the arrow next to Font Color,and then under Theme Colors click Aqua, Accent 5; Darker 50% (sixth row, ninth option from the left). On the Home tab, in the Paragraph group, click Align TextLeft to position the text left in the text box.On the slide, drag the text box onto the rectangle. To reproduce the text animation effects on this slide, do the following:On the Animations tab, in the Animations group, click Custom Animation.On the slide, select the text box. In the CustomAnimation task pane, do the following:Click AddEffect, point to Entrance,and then click More Effects. In the Add Entrance Effect dialog box, under Moderate,click Descend. Select the second animation effect (descend effect for the text box). Click the arrow to the right of the selected effect, and then click Effect Options. In the Descend dialog box, do the following:On the Timing tab, do the following:In theStart box, selectWith Previous. In theSpeed box, select1 seconds (Fast). On the Text Animation tab, in the Group text list, select By 1st Level Paragraphs.Also in the Custom Animation task pane, click the double arrow under the second animation effect to expand the list of effects, and then do the following:Select the new second animation effect in the list (descend effect for the first line of text). Click the arrow to the right of the selected effect, and then click Timing. In the Descend dialog box, on the Timing tab, in the Delay box, enter 1.Select the third animation effect (descend effect for the second line of text). Click the arrow to the right of the selected effect, and then click Timing. In the Descend dialog box, on the Timing tab, do the following:In the Start list select WithPrevious.In the Delay box, enter 1.5.Select the fourth animation effect (descend effect for the second line of text). Click the arrow to the right of the selected effect, and then click Timing. In the Descend dialog box, on the Timing tab, do the following:In the Start list select WithPrevious.In the Delay box, enter 2.To reproduce the background effects on this slide, do the following: On the Design tab, in the bottom right corner of the Background group, click the Format Background dialog box launcher.In the Format Background dialog box, click Fill in the left pane, select Picture or texture fill in the Fill pane, and then under Insert from click File.In the Insert Picture dialog box, select a picture, and then click Insert.