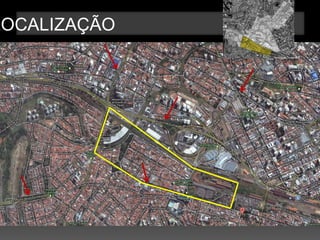
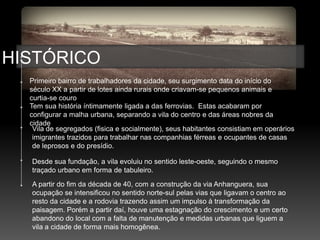
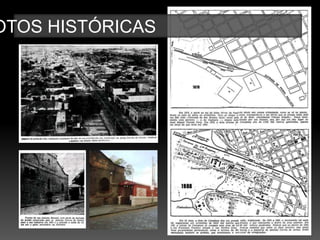
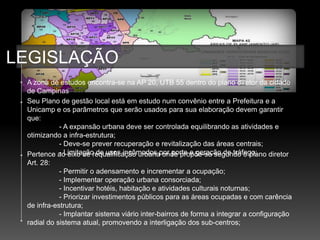
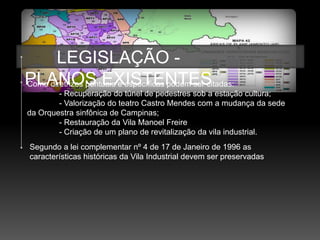
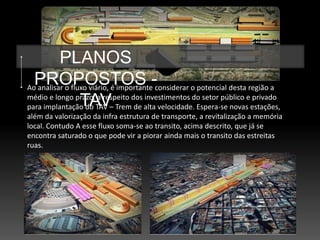
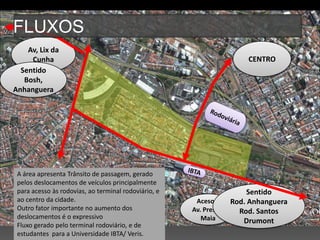
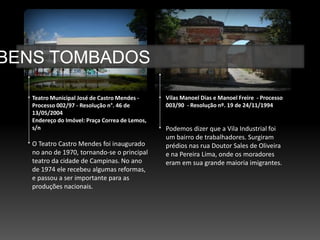
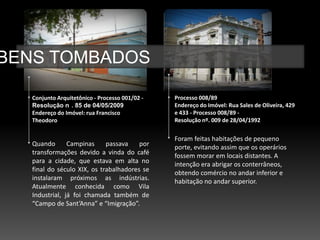
A Vila Industrial surgiu no início do século XX como um bairro de trabalhadores ligado às ferrovias em Campinas. Atualmente possui prédios históricos tombados e ruas estreitas, sofrendo com problemas como segregação, degradação do patrimônio e infraestrutura insuficiente. No entanto, há potencial para revitalização cultural e melhor acesso a rodovias aproveitando sua localização.
O documento descreve um estudo de caso de intervenção urbana na região de Água Branca em São Paulo. A área possui 504 hectares e problemas como baixa densidade populacional, zonagem restritiva, inundações e barreiras causadas por ferrovias. A intervenção objetiva promover o desenvolvimento equilibrado da região, ocupando vazios urbanos e melhorando infraestrutura. Após 5 anos, poucos resultados foram alcançados além de um empreendimento comercial e melhorias viárias limitadas.
Apresentação da Operação Urbana Água BrancaChico Macena
O documento resume o plano urbanístico da Operação Urbana Água Branca, incluindo melhorias à mobilidade, reurbanização da orla ferroviária, habitação social, drenagem e áreas verdes, e recuperação da paisagem. O plano foi apresentado a vários órgãos para coleta de contribuições e está em fase de elaboração de projetos e desapropriações necessárias para execução.
O documento descreve um estudo realizado sobre uma área de 30 hectares no bairro do Bessa em João Pessoa. O estudo analisou aspectos ambientais, sociais e locais da área e propôs a implantação de um parque urbano com equipamentos de lazer, culturais e sociais para melhorar a qualidade de vida dos moradores e usuários da área.
Análise da Ocupação e Estrutura Urbana - Avenidas Novas_ApresentaçãoLuis Neto
Planeamento Regional e Urbano. Mestrado de Planeamento e Operação de Transportes. Instituto Superior Técnico, Universidade de Lisboa. Nota do Trabalho 16 / 20. Nota final 14 / 20.
Urban and Regional Planning. MSc Transport Planning and Operation, Instituto Superior Tecnico, Lisbon University. Project course grade 16 / 20. Final grade 14 / 20.
O documento descreve um estudo de caso sobre as calçadas da Rua do Comércio I no bairro Parque 10 de Novembro em Manaus. O objetivo é comparar a realidade das calçadas com as normas do Plano Diretor da cidade e propor um projeto de adequação considerando as percepções dos usuários. A metodologia inclui pesquisa bibliográfica, entrevistas e desenvolvimento de um projeto de recondução das calçadas.
O documento propõe um parque linear ao longo de uma ferrovia desativada em Congonhas (MG), com um sistema de bondes movido a ar comprimido e estações integradas ao parque. As "folies" são vagões adaptados com diferentes usos que rodam entre as estações. Pontes, escadas e ruas são sugeridas para conectar as partes da cidade divididas pela ferrovia e promover a integração urbana.
Análise Urbana [Giovani Gustavo Rafael]Giovani Comin
Trabalho desenvolvido na cadeira de Atelier de Arquitetura VIII, ministrada pelo professor Artur na Faculdade de Arquitetura da UNISINOS.
Apresentação do trabalho com a Análise Urbana de seção de área localizado em Porto Alegre, no Bairro Jardim Botânico.
Trabalho desenvolvido pelos alunos: Giovani Comin, Gustavo Heurich e Rafael Coutinho.
O documento descreve a área de estudo localizada no centro da cidade de Anápolis, Goiás. A área possui ruas principais em boa conservação, porém ruas locais precisam de reparos, e é cortada por diversas vias de transporte público. O tecido urbano da área é formado por quadras de tamanhos irregulares sem espaços verdes.
Estudo Sobre Vila Olimpia Como Polo Gerador De TráFegoChico Macena
O documento discute os impactos de novos empreendimentos imobiliários na região da Vila Olímpia em São Paulo e propõe medidas para mitigar esses impactos, como obras viárias, melhorias no transporte público e transferência de usuários do transporte individual para o coletivo.
CAIS MAUÁ- PORTO ALEGRE X PORTO MARAVILHA -RIO DE JANEIROPLANORS
1.-PORTO MARAVILHA:CONSORCIO OAS/ODEBRECHT/CARIOCA -APRESENTAÇÃO DO EMPREENDIMENTO, QUE IRÁ REVITALIZAR 5.000.000 m2, ENQUANTO O DE PORTO ALEGRE FICA CONFINADO PELA LINHA DO CAIS E UM MURO DE PROTEÇÃO CONTRA CHEIAS, SEM ABRANGÊNCIA EXTERNA E AUMENTO DA CAPACIDADE DE TRAFEGO DA REGIÃO, COMPREENDENDO BASICAMENTE A RESTAURAÇÃO DE ARMAZÉNS EXISTENTES E CONSTRUÇÃO DE DOIS PRÉDIOS COMERCIAIS
2.-CAIS MAUÁ : CONSÓRCIO INTEGRADO PELO GRUPO BERTIM: (90% INICIAL),, O QUAL ESTÁ EM SÉRIA DIFICULDADES FINANCEIRAS E CONSTANTEMENTE CITADO NA LAVA JATO, ATUALMENTE REDUZIU PARA 10%, PELA ENTRADA FUNDOS DE INVESTIMENTOS, ALÉM DE ALTERAÇÕES SIGNFICATIVAS NA LICENÇA PRÉVIA,EM RELAÇÃO A MOBILIDADE URBANA, MANTENDO O OBJETO INICIAL INTERNO.(EM RECUPERAÇÃO JUDICIAL- 08/2017)
O documento apresenta três projetos para a cidade de Porto Velho: 1) A construção de um shopping popular no local do camelódromo para melhorar as condições dos comerciantes. 2) A repaginação da Avenida Sete de Setembro para priorizar pedestres e transporte público. 3) A criação de um circuito cultural no centro histórico com placas informativas e um posto de turismo.
1 apresentação - amélia rosa jatiuca maceió al - cesmac e semplaMarcela Jambo
O documento apresenta uma proposta de intervenção urbana no bairro Jatiúca em Maceió, AL, com o objetivo de melhorar a mobilidade em um trecho da Avenida Antônio Gomes de Barros. A proposta inclui a criação de ciclovias, áreas de lazer, ginástica e convivência ao longo da via.
O documento descreve o projeto Porto Maravilha no Rio de Janeiro, que visa requalificar a região portuária da cidade. O projeto pretende revitalizar a área, que estava relegada a segundo plano, por meio de intervenções urbanas, culturais e sociais para melhorar a qualidade de vida dos moradores e impulsionar o desenvolvimento econômico da região.
O documento descreve a história e características da Praça XV e da Praça Otávio Rocha no Centro Histórico de Porto Alegre. Inicialmente, a Praça XV abrigava comércio ambulante e era usada como depósito de lixo antes de se tornar o primeiro Mercado Público da cidade. Atualmente, ambas as praças são importantes pontos de encontro no Centro e contam com diversos usos como comércio, serviços e lazer. O documento também apresenta dados sobre o projeto "Viva o Centro"
Sintese e Proposta Preliminar [Giovani Gustavo Rafael]Giovani Comin
Este documento apresenta um diagnóstico de deficiências urbanísticas em uma área da cidade e propõe intervenções preliminares. As deficiências incluem problemas na malha viária, densificação desordenada e divisão da área por grandes equipamentos. A proposta visa promover a fluidez do trânsito, a sociabilização do espaço público e a mistura de usos, consolidando a perimetral e criando uma área verde integrada.
O documento descreve uma rua residencial que se tornou uma via de passagem movimentada devido à ligação a uma estrada principal. Apresenta insuficiências como estreitos passeios, falta de estacionamento e espaços verdes. Contudo, também aponta oportunidades como melhorar a mobilidade pedonal, aproveitar a proximidade à zona industrial e criar mais espaços de lazer para os residentes.
1. O documento descreve diretrizes urbanísticas para o redesenho do Projeto Novo Recife e entorno, incluindo um percurso metodológico, sistematização de contribuições recebidas, e diretrizes de zoneamento, requisitos e cartogramas.
2. As diretrizes incluem princípios como a preservação do patrimônio, continuidade da malha viária, escalonamento de gabaritos, e implantação de espaços públicos e usos diversificados.
3. Requisitos especificam perf
Análise Entorno e Programa de Necessidadesfauprojetoe
O documento fornece informações sobre a Região Metropolitana de São Paulo e o município de São Paulo, destacando dados sobre transporte e deslocamento. Em seguida, apresenta detalhes sobre a Zona Oeste da cidade, incluindo dados demográficos. Por fim, fornece detalhes sobre a área de intervenção na Vila Madalena, com mapas e informações sobre o projeto de extensão do metrô para a região.
O documento descreve o empreendimento imobiliário Porto Atlântico, localizado na região portuária do Rio de Janeiro. O projeto inclui a construção de torres corporativas, salas comerciais, lojas e hotéis. Além disso, o texto destaca os benefícios da localização do empreendimento, como acessos fáceis a diversas regiões da cidade e investimentos em infraestrutura na região portuária.
O documento propõe a instituição do Plano Municipal de Transporte e Mobilidade da cidade do Recife. O plano define a estrutura viária da cidade, dividida em eixos principais, secundários e locais, e estabelece ações prioritárias para a implantação de infraestrutura de transporte nesses eixos, como corredores exclusivos e faixas compartilhadas. Além disso, o plano delimita Zonas Especiais de Desenvolvimento Econômico e Corredores Fluviais no município.
Este documento institui o Plano Específico para a Zona Especial de Preservação do Patrimônio Histórico e Cultural - ZEPH 19, que engloba o Hospital de Santo Amaro e a Vila Naval. O plano define parâmetros urbanísticos como gabaritos, afastamentos e coeficientes de ocupação para a preservação da área.
O documento descreve o projeto Porto Atlântico, um complexo empresarial e imobiliário em desenvolvimento na região portuária do Rio de Janeiro. O Porto Atlântico contará com torres corporativas, salas comerciais, lojas e hotéis projetados por renomados escritórios para transformar a região no principal polo de negócios da cidade.
O documento descreve o projeto imobiliário Porto Atlântico, localizado na região portuária do Rio de Janeiro. O projeto inclui a construção de torres corporativas, salas comerciais, lojas e hotéis. Além disso, o documento destaca os benefícios da localização do empreendimento, como acessos fáceis e infraestrutura em desenvolvimento na região.
O documento descreve o projeto imobiliário Porto Atlântico, localizado na região portuária do Rio de Janeiro. O projeto inclui a construção de torres corporativas, salas comerciais, lojas e hotéis. Além disso, o documento destaca os benefícios da localização do empreendimento, como acessos fáceis a diversas regiões da cidade e investimentos em infraestrutura na região.
O documento descreve o projeto imobiliário Porto Atlântico, localizado na região portuária do Rio de Janeiro. O projeto inclui a construção de torres corporativas, salas comerciais, lojas e hotéis. Além disso, o documento destaca os benefícios da localização do empreendimento, como acessos fáceis e infraestrutura em desenvolvimento na região.
Renai Oportunidadede Investimento Pe IMarketizador
Projeto de urbanização do Porto do Recife, requalificação dos armazéns, construção de hotéis e marina. E sua transformação para ampliar capacidade receptiva de cruzeiros marítimos.
A Vila Jardim Acrópole está situada a 9,5 km do centro da cidade.
Intervenção em três frentes:
1- reassentamento de 192 famílias em situação de risco;
2- obras de infraestrutura e a recuperação ambiental de áreas degradadas;
3- regularização fundiária com a aprovação do loteamento e titulação de 846 famílias.
O documento descreve uma dissertação de mestrado que analisa três projetos urbanos na Europa: Céramique em Maastricht, Holanda; St. Jean em Genebra, Suíça; e Bicocca em Milão, Itália. Os projetos enfrentaram problemas de degradação urbana resultantes da obsolescência industrial e infraestrutura de transporte. O trabalho examina os processos de projeto e gestão que tornaram possível a implantação dos projetos e sua realidade atual, verificando se melhoraram a qualidade de vida dos habitantes.
Plano de Reabilitação do Bairro do RecifePâmela Castro
Trabalho realizado à disciplina de Teoria e História da Arquitetura e Urbanismo pelos discentes do 1º semestre de Arquitetura e Urbano da Universidade Paulista (UNIP) campus - Campinas Swift
O documento descreve projetos de revitalização da área central de Americana entre 1996 e 2004, incluindo alargamento de calçadas, abertura de ruas, remodelação de praças, pesquisas sobre o comércio, regulamentação de horários comerciais, melhorias na coleta de lixo, proibição de tráfego de caminhões, remodelação da Praça Matriz Velha e inauguração da Linha Verde. A Comissão de Revitalização da Área Central trabalhou em parceria com a prefeitura na execução destes projetos.
O documento descreve o plano de expansão do Sistema Viário Itaqui-Bacanga na cidade de São Luís, MA, incluindo três trechos com a construção de pontes e vias para melhorar o transporte público. O projeto faz parte do planejamento urbano da cidade para promover a mobilidade e desenvolvimento sustentável.
Este documento descreve o projeto da Estação Nova Lapa em São Paulo, que unificará as duas estações separadas da Lapa atualmente. O projeto criará uma grande praça linear acima da estação com espaços verdes e uma marquise, além de dez edifícios multifuncionais. A estação abrigará quatro plataformas e terá acessos integrados com ônibus, revitalizando a região.
O documento descreve um projeto urbano para o bairro Cosme Velho no Rio de Janeiro, com o objetivo de melhorar a qualidade de vida dos moradores. O projeto inclui: (1) a reorganização do tráfego na região e a criação de uma área de lazer e informação turística sob um viaduto; (2) a integração de duas praças e a valorização do Rio Carioca; (3) a construção de um novo terminal de ônibus com estacionamento e uma grande praça no telhado.
O documento propõe a revitalização do perímetro urbano da BR-116 em Teófilo Otoni através de intervenções como paisagismo, sinalização e duplicação de pistas. Serão realizadas melhorias nos acessos às escolas, bairros e trevos ao longo da rodovia, com o plantio de flores e construção de monumentos para homenagear a cultura local. O objetivo é tornar a passagem da BR-116 pela cidade mais segura e agradável.
A Prefeitura de Olinda está realizando obras em toda a extensão da Orla, que compreende os bairros de Bairro Novo, Casa Caiada e Rio Doce.
Estão sendo investidos R$ 23 milhões, sendo R$ 20 milhões provenientes do Ministério do Turismo e R$ 3 milhões do Governo do Estado. Além de recuperar a faixa de terra à beira-mar, tentando conter o avanço das águas, as intervenções prevêem o resgate da área, tornando o espaço mais atrativo para moradores e turistas.
Mais informações:
www.olinda.pe.gov.br/voce-faz-olinda/revitalizacao-da-orla
A indicação propõe a criação de calçadões nas Ruas Professor Sud Menucci e São Luis, transformando-as em ruas de mão única e ampliando as calçadas para melhorar o lazer e o comércio local. Isso beneficiaria pedestres e comerciantes e aumentaria a segurança ao reduzir a velocidade de veículos.
Memorial Descritivo AU 118 - ComplexidadesTifani Kuga
O documento descreve a situação atual de uma quadra no bairro da Barra Funda em São Paulo, Brasil. Ele fornece informações sobre o contexto histórico do bairro, dados demográficos, uso do solo, infraestrutura, potencialidades e fragilidades da quadra. O objetivo do projeto é propor uma reurbanização da quadra que inclua habitação social, estudantil e comércio de forma integrada ao contexto urbano da região.
Projeto desenvolvido pelo Observatório da Cidade, escritório modelo do curso de arquitetura e urbanismo da UNESA campus Praça XI, coordenado pelo professor Rodrigo Azevedo, dentro do convênio estabelecido com a CET_Rio para o desenvolvimento de estudos de urbanismo e mobilidade na cidade do Rio de Janeiro.
Resignificação das Infraestruturas Existentes_Rua Voluntários da Pátria
A cidade do Rio de Janeiro possui uma paisagem urbana ainda ancorada na infraestrutura rodoviária produzida nas décadas de 1960 e 1970 – grandes avenidas expressas cortando a cidade, viadutos, pontes – época em que a cidade não possuia a rede de mobilidade urbana que hoje a serve: metrô, BRT, diversas linhas de ônibus, táxi, transporte por aplicativo e ciclovias. Isto posto, podemos afirmar que, seguindo os exemplos das diversas iniciativas de qualificação urbana pelo mundo a partir da resignificação de suas infraestruturas, a cidade do Rio de Janeiro possui um grande potencial em se reinventar urbanisticamente. É necessário um novo entendimento sobre as infraestruturas da cidade, compreender quais as novas funções que estes elementos e espaços podem adquirir para contribuir de forma mais positiva e efetiva com a cidade.
Tomemos como exemplo a infraestrutura de vias expressas e viadutos construídos na década de 1960 na cidade do Rio de Janeiro: meio século depois de inauguradas, as áreas da cidade afetadas por estes elementos seguem degradadas, abandonadas, desvalorizadas e perigosas, gerando uma deseconomia para o Município. A Avenida Trinta e Um de Março, no Catumbi (junto ao Sambódramo), o viaduto Engenheiro Noronha em Laranjeiras, a Avenida Maracanã na Tijuca, o Elevado Engenheiro Freyssinet no Rio Comprido ou as ruas Venceslau Brás e Voluntário da Pátria em Botafogo, são alguns exemplos. A maior parte destas infraestruturas não possuem mais a relevância do passado para a mobilidade na cidade, visto o avanço inegável na rede de modais de transporte. E ainda pesa o fato de que parte desta infraestrutura, por conta de sua idade, está demandando grandes investimentos para sua manutenção estrutural.
Afinal, que caminho devemos seguir: recuperar estas infraestruturas ou resignificá-las de acordo com as novas demandas da sociedade?
Os exemplos à seguir ilustram uma série de intervenções urbanas em capitais pelo mundo onde a função original de cada infraestrutura foi resignificada, atualizada de acordo com as novas demandas da sociedade no que tange sustentabilidade, desenvolvimento econômico, geração de emprego e renda, aumento da arrecadação tributária, qualificação do ambiente urbano, criação de novas áreas de lazer e eventos.
O documento descreve planos para revitalizar a área da Cidade Baixa em Salvador através da construção de um complexo poliesportivo e melhorias urbanas. O plano propõe a relocação de edifícios existentes para abrir espaço para o complexo, melhorias de infraestrutura para pedestres e a adição de espaços verdes e edifícios de uso misto para trazer mais vida para a área.
O documento descreve um estudo socioespacial realizado sobre o Viaduto Santa Tereza em Belo Horizonte. O viaduto, construído em 1929, é um importante ponto cultural e de circulação na cidade, mas encontra-se em processo de reforma que fechou o acesso público. O estudo analisou o contexto histórico, usos, fluxos, concentrações de pessoas e impactos da obra no viaduto e seu entorno.
Este documento descreve uma saída de campo realizada no centro-sul do bairro centro de Canoas, Rio Grande do Sul. O resumo apresenta as principais estações visitadas e as características observadas, como a diversidade de funções ao longo do trajeto, com ênfase em transporte, comércio e serviços públicos. Objetos construídos ao longo do tempo mudaram suas funções para se adaptar às transformações urbanas.
O documento descreve a revitalização da rua São Francisco em Curitiba pelo prefeito Luciano Ducci. Em três frases:
1) A rua São Francisco passou por obras de renovação urbana preservando sua memória histórica e valorizando o comércio local.
2) As calçadas foram alargadas e receberam iluminação e placas de concreto vermelhas, além da pintura das fachadas dos prédios.
3) O projeto manteve parte do piso histórico de pedras e melhorou a acessibilidade
Artigo: Proposta de Urbanismo para o Bairro Canjica em Cuiabá -MTDiane Oliveira
Trabalho da disciplina de Projeto de Urbanismo e Paisagismo II, 2° Bimestre sobre as Propostas Urbanísticas do Bairro Canjica, Cuiabá/MT, apresentado à Universidade de Cuiabá
O documento descreve a história do desenvolvimento urbano e ferroviário do bairro Bonfim em Campinas entre 1872 e 2012. As principais informações são: (1) Inauguração da primeira ferrovia ligando Campinas a outras cidades no século XIX; (2) Expansão da malha ferroviária e da economia de Campinas no século XX atraindo imigrantes; (3) Implementação e desativação do VLT em Campinas na década de 1990.
PMSP - Plano de Ação - Zona Sul 1 (média)LennonBersa1
O documento descreve dois perímetros de ação na Macrorregião Sul 1. O ID 30 abrange as avenidas Ricardo Jafet e Abraão de Morais, que ligam as subprefeituras de Vila Mariana e Ipiranga, e apresenta problemas de alagamento, falta de arborização e mobilidade. O ID 74 engloba a região ao longo da linha 10 da CPTM, entre o Viaduto São Carlos e São Caetano do Sul, com foco em melhorar transporte, habitação, saneamento e atividades econômicas.
SLIDE - ANTEPROJETO DE INTERVENÇÃO E MOBILIDADE URBANA NA CIDADE DO NATALManoel Fagundes
1. O documento propõe um anteprojeto de intervenção e mobilidade urbana na cidade de Natal, com foco em reestruturar vias, criar um sistema BRT, faixas exclusivas para ônibus, ciclovias e parque linear.
2. A justificativa é o trânsito intenso, ônibus degradados, problemas estruturais e de mobilidade, falta de transporte alternativo e áreas de lazer com contato com a natureza.
3. O projeto apresenta intervenções em 12 vias e áreas da cidade,
O documento descreve obras e melhorias realizadas na Escola Municipal Maria Aparecida Soares Amêndola no bairro Nossa Senhora do Sion em Itanhaém, São Paulo. A escola ganhou duas quadras poliesportivas, sendo uma coberta, vestiários e arquibancada para 700 pessoas, com adaptações para pessoas com necessidades especiais. O investimento faz parte de um pacote de quase R$7 milhões que contemplou também outras obras educacionais na cidade.
AMAR - Apresentação do Master Plan para o Jardim Oceânico - Estudos / Projeto...Amar Jardim Oceânico
O documento propõe um plano mestre para requalificar o bairro Jardim Oceânico no Rio de Janeiro. O plano inclui a construção de uma rede de transporte limpo integrada à nova estação de metrô, uma ciclovia circular, melhorias na orla marítima para lazer, e projetos para tornar a Rua Olegário Maciel mais atraente e conectar melhor os bairros da Barra da Tijuca.
[1] O documento descreve um projeto de intervenção para criar o Parque Monjolinho em São Carlos, SP a partir da recuperação de uma área de fundo de vale de 6 hectares atualmente subutilizada. [2] O projeto propõe integrar lazer, cultura, esportes, comércio e serviços por meio de um parque linear com trilhas, mirantes, quadras e espaços de convivência. [3] O documento apresenta imagens da área e detalha os sistemas propostos de drenagem e acessos
Projetos Jardim Oceânico - Estudos Iniciais Igor Nunes
O documento propõe um plano mestre para requalificar a área do Jardim Oceânico após a construção da Linha 4 do Metrô. O plano inclui um anel viário com transporte limpo, ciclovias, melhorias na orla da Praia do Pepê, revitalização da Rua Olegário Maciel e novas ligações entre bairros.
Os três documentos solicitam melhorias para a cidade: 1) instalação de auto-falantes nos terminais de ônibus para informar os passageiros, 2) inspeção urgente na passarela do Jardim Samambaia que está em mau estado, 3) troca da iluminação da Avenida Washington Luiz para melhorar a visibilidade à noite.
O documento descreve um estudo realizado sobre uma área de 30 hectares no bairro do Bessa em João Pessoa. O estudo analisou aspectos ambientais, sociais e locais da área e propôs a implantação de um parque urbano com equipamentos de lazer, culturais e sociais para melhorar a qualidade de vida dos moradores e usuários da área.
Projeto urbanístico proposto para dois bairros da cidade de Teresina, Piauí. As diretrizes inseridas são as adaptações das vias para atender às necessidades de circulação das normas, utilizando como base a NBR 9050.
3. HISTÓRICO
Primeiro bairro de trabalhadores da cidade, seu surgimento data do início do
século XX a partir de lotes ainda rurais onde criavam-se pequenos animais e
curtia-se couro
Tem sua história íntimamente ligada a das ferrovias. Estas acabaram por
configurar a malha urbana, separando a vila do centro e das áreas nobres da
cidade
Vila de segregados (fisica e socialmente), seus habitantes consistiam em operários
imigrantes trazidos para trabalhar nas companhias férreas e ocupantes de casas
de leprosos e do presídio.
Desde sua fundação, a vila evoluiu no sentido leste-oeste, seguindo o mesmo
traçado urbano em forma de tabuleiro.
A partir do fim da década de 40, com a construção da via Anhanguera, sua
ocupação se intensificou no sentido norte-sul pelas vias que ligavam o centro ao
resto da cidade e a rodovia trazendo assim um impulso à transformação da
paisagem. Porém a partir daí, houve uma estagnação do crescimento e um certo
abandono do local com a falta de manutenção e medidas urbanas que liguem a
vila a cidade de forma mais homogênea.
5. LEGISLAÇÃO
A zona de estudos encontra-se na AP 20, UTB 55 dentro do plano diretor da cidade
de Campinas
Seu Plano de gestão local está em estudo num convênio entre a Prefeitura e a
Unicamp e os parâmetros que serão usados para sua elaboração devem garantir
que:
- A expansão urbana deve ser controlada equilibrando as atividades e
otimizando a infra-estrutura;
- Deve-se prever recuperação e revitalização das áreas centrais;
Pertence ao eixo de requalificação urbanapor porte e geração de tráfego;
- Limitação de usos incômodos onde propõe-se segundo o plano diretor
Art. 28:
- Permitir o adensamento e incrementar a ocupação;
- Implementar operação urbana consorciada;
- Incentivar hotéis, habitação e atividades culturais noturnas;
- Priorizar investimentos públicos para as áreas ocupadas e com carência
de infra-estrutura;
- Implantar sistema viário inter-bairros de forma a integrar a configuração
radial do sistema atual, promovendo a interligação dos sub-centros;
6. LEGISLAÇÃO -
PLANOS EXISTENTES
Como diretrizes pontuais e específicas podem ser citadas:
- Recuperação do túnel de pedestres sob a estação cultura;
- Valorização do teatro Castro Mendes com a mudança da sede
da Orquestra sinfônica de Campinas;
- Restauração da Vila Manoel Freire
- Criação de um plano de revitalização da vila industrial.
Segundo a lei complementar nº 4 de 17 de Janeiro de 1996 as
características históricas da Vila Industrial devem ser preservadas
7. PLANOS
PROPOSTOS -
Ao analisar o fluxo viário, é importante considerar o potencial desta região a
TAV
médio e longo prazo, a respeito dos investimentos do setor público e privado
para implantação do TAV – Trem de alta velocidade. Espera-se novas estações,
além da valorização da infra estrutura de transporte, a revitalização a memória
local. Contudo A esse fluxo soma-se ao transito, acima descrito, que já se
encontra saturado o que pode vir a piorar ainda mais o transito das estreitas
ruas.
8. FLUXOS
Av, Lix da
Cunha CENTRO
Sentido
Bosh,
Anhanguera
A área apresenta Trânsito de passagem, gerado
pelos deslocamentos de veículos principalmente
para acesso às rodovias, ao terminal rodoviário, e Sentido
ao centro da cidade. Aceso a Rod. Anhanguera
Outro fator importante no aumento dos Av. Prestes Rod. Santos
deslocamentos é o expressivo Maia Drumont
Fluxo gerado pelo terminal rodoviário, e de
estudantes para a Universidade IBTA/ Veris.
9. FLUXOS
Área de estudo
A linha férrea
configura uma Sentido das
barreira vias
Linha de ônibus
Linha férrea
Área verde
Ponto Nodal
10. LUXOS - MOBILIDADE
Vias
Asfaltadas
Asfalto sobre
paralelepípedo
Trafego de
pedestres
Trafego de
Veículos
11. BENS TOMBADOS
Teatro Municipal José de Castro Mendes - Vilas Manoel Dias e Manoel Freire - Processo
Processo 002/97 - Resolução n°. 46 de 003/90 - Resolução nº. 19 de 24/11/1994
13/05/2004
Endereço do Imóvel: Praça Correa de Lemos,
s/n Podemos dizer que a Vila Industrial foi
um bairro de trabalhadores. Surgiram
O Teatro Castro Mendes foi inaugurado prédios nas rua Doutor Sales de Oliveira
no ano de 1970, tornando-se o principal e na Pereira Lima, onde os moradores
teatro da cidade de Campinas. No ano eram em sua grande maioria imigrantes.
de 1974 ele recebeu algumas reformas,
e passou a ser importante para as
produções nacionais.
12. BENS TOMBADOS
Conjunto Arquitetônico - Processo 001/02 - Processo 008/89
Resolução n . 85 de 04/05/2009 Endereço do Imóvel: Rua Sales de Oliveira, 429
Endereço do Imóvel: rua Francisco e 433 - Processo 008/89 -
Theodoro Resolução nº. 009 de 28/04/1992
Foram feitas habitações de pequeno
Quando Campinas passava por porte, evitando assim que os operários
transformações devido a vinda do café fossem morar em locais distantes. A
para a cidade, que estava em alta no intenção era abrigar os conterrâneos,
final do século XIX, os trabalhadores se obtendo comércio no andar inferior e
instalaram próximos as indústrias. habitação no andar superior.
Atualmente conhecida como Vila
Industrial, já foi chamada também de
“Campo de Sant’Anna” e “Imigração”.
13. QUIPAMENTOS PÚBLICOS Fonte: Site da ENDEC
COLÉGIO PADRE
JULIO CHEVALIER ENDEC
METROCAMP
RENOVATUS COLÉGIO EEI
BRANCA DE NEVE
Fonte: Site da
16. GABARITO
Construções com mais de 6 m
Construções com até 6 m
17. ENCIALIDADES – ANÁLISE CRÍTICA
Problemáticas:
- Segregação que evita o acesso de pedestres ao bairro;
- Dificuldade interna de locomoção;
- Infra-estrutura viária insuficiente para o tráfego;
- Degradação do patrimônio histórico cultural e conjunto
arquitetônico;
- Falta de manutenção da infra-estrutura urbana;
Potencialidades: áreas verdes.
- Poucas
- Identificamos na área potencial de programa voltado a atividades
culturais publicas e privadas como: Centro cultural, teatro, museus, cursos e
oficinas...
- Explorar o acesso as rodovias, ao centro de campinas, e como
ponto de conexão ao subúrbio da cidade;
- Investimentos em adensamento do vazio urbano no antigo pátio
da FEPASA.
Notas do Editor
Custom animation effects: recolored picture with full-color section and motion path(Advanced)To reproduce the picture effects on this slide, do the following:On the Home tab, in the Slides group, click Layout and then click Blank. On the Insert tab, in the Illustrations group, click Picture. In the Insert Picture dialog box, select a picture, and then click Insert. Select the picture. Under Picture Tools, on the Format tab, in the bottom right corner of the Size group, click the Size and Position dialog box launcher. In the Size and Position dialog box, on the Size tab, resize or crop the picture as needed so that under Size and rotate, the Height box is set to 3.58” and the Width box is set to 8”. Resize the picture under Size and rotate by entering values into the Height and Width boxes. Crop the picture under Crop from by entering values into the Left, Right, Top, and Bottom boxes. Under Picture Tools, on the Format tab, in the Adjust group, click Recolor, and then under Dark Variations click Text color 2 Dark (first option from the left). Under Picture Tools, on the Format tab, in the Picture Styles group, click Picture Effects, point to Shadow, and then under Inner click Inside Diagonal Top Left (first row, first option from the left).Drag the picture so that it is positioned above the middle of the slide. On the Home tab, in the Clipboard group, click the arrow next to Paste, and then click Duplicate.Press and hold CTRL and select both pictures on the slide. On the Home tab, in the Drawing group, click Arrange, point to Align, and then do the following:Click Align to Slide.Click Align Center. Click Align Selected Objects. Click Align Middle. Click the slide background area to cancel the selection of both pictures. Select the duplicate (top) picture. Under Picture Tools, on the Format tab, in the bottom right corner of the Size group, click the Size and Position dialog box launcher. In the Size and Position dialog box, on the Size tab, under Crop from,enter valuesinto the Left andRight boxes so that under Size and rotate, and the Width box is set to 2.33”. (Note: For best results, crop the duplicate picture to tightly focus on a single element in the original picture.)Under Picture Tools, on the Format tab, in the Adjust group, click Recolor, and then under No Recolor click No Recolor. On the Home tab, in the Drawing group, click Shapes, and then under Rectangles click Rectangle (first option from the left). On the slide, drag to draw a rectangle. Select the rectangle. Under Drawing Tools, on the Format tab, in the Size group, do the following:In the Shape Height box, enter 7.5”.In the Shape Width box, enter 2.33”.Under Drawing Tools, on the Format tab, in the Shape Styles group, click the arrow next to Shape Fill, point to Gradient, and then click More Gradients. In the Format Shape dialog box, click Fill in the left pane, select Gradient fill in the Fill pane, and then do the following:In the Type list, select Linear.Click the button next to Direction, and then click Linear Down (first row, second option from the left).Under Gradient stops, click Add or Remove until two stops appear in the drop-down list.Also under Gradient stops, customize the gradient stops that you added as follows:Select Stop 1 from the list, and then do the following:In the Stop position box, enter 0%.Click the button next to Color, then under Theme Colors click White, Background 1 (first row, first option from the left).In the Transparency box, enter 55%.Select Stop 2 from the list, and then do the following: In the Stop position box, enter 100%.Click the button next to Color, and then under Theme Colors click White, Background 1 (first row, first option from the left).In the Transparency box, enter 100%.On the slide, drag the rectangle to cover the duplicate picture. Select the rectangle. On the Home tab, in the Drawing group, click Arrange, and then do the following:Point to Align, and then click Align to Slide.Point to Align, and then click Align Middle. Click Send Backward. On the Home tab, in the Drawing group, click Shapes, and then under Rectangles click Rectangle (first option from the left). On the slide, drag to draw another rectangle. Select the rectangle. Under Drawing Tools, on the Format tab, in the Size group, do the following:In the Shape Height box, enter 4”.In the Shape Width box, enter 2.67”.Under Drawing Tools, on the Format tab, in the Shape Styles group, click the arrow next to Shape Fill, point to Gradient, and then click More Gradients. In the Format Shape dialog box, click Fill in the left pane. In the Fill pane, select No fill. Also in the Format Shape dialog box, click Line Color in the left pane, select Solid line in the Line Color pane, and then do the following:Click the button next to Color, and then under Theme Colors click White, Background 1 (first row, first option from the left). In the Transparency box, enter 70%.Also in the Format Shape dialog box, click Line Style in the left pane, and then do the following in the Line Style pane:In the Width box, enter 0.75 pt. Click the button next to Dash type, and then click Square Dot (third option from the top).Drag the dotted rectangle on top of the small, full-color picture. Press and hold SHIFT and select the dotted rectangle, the small picture, and the large picture on the slide. On the Home tab, in the Drawing group, click Arrange, point to Align, and then do the following:Click Align Selected Objects. Click Align Middle. On the Insert tab, in the Text group, click Text Box, and then on the slide, drag to draw the text box.Enter text in the text box, select the text, and then on the Home tab, in the Font group, select Gill Sans MT Condensedfrom the Font list, select 24 from the Font Size list, click the button next to Font Color, and then under Theme Colors click White, Background 1 (first row, first option from the left).On the Home tab, in the Paragraph group, click Center to center the text within the text box.On the slide, drag the text box below the dotted rectangle.To reproduce the background effects on this slide, do the following:Right-click the slide background area, and then click Format Background. In the Format Background dialog box, click Fill in the left pane, and then select Solid fill in the Fill pane. Also in the Fill pane, click the button next to Color, and then under Theme Colors click Black, Text 1, Lighter 15% (fifth row, second option from the left).To reproduce the animation effects on this slide, do the following:To view the area beyond the slide, on the View tab, click Zoom, and then in the Zoom dialog box, in the Percent box, enter 70%. (Note: Make sure that Fit is not selected in the Zoom dialog box.)On the Animations tab, in the Animations group, click Custom Animation. On the slide, select the dotted rectangle. In the Custom Animation task pane, click Add Effect, point to Motion Paths, point to Draw Custom Path, and then click Freeform. Press and hold SHIFT to conform the path to a straight, horizontal line, and then do the following on the slide:Click the center of the dotted rectangle to create the first motion-path point.Click approximately ½” beyond the right edge of the rectangle to create the second motion-path point. Double-click approximately 2” beyond the left edge of the slide to create the third and final motion-path point. On the slide, right-click the freeform motion path, and then click Reverse Path Direction. On the slide, select the freeform motion path. In the Custom Animation task pane, under Modify: Custom Path, in the Start list, select With Previous. On the slide, select the gradient-filled rectangle. In the Custom Animation task pane, do the following:Click Add Effect, point to Entrance, and then click More Effects. In the Add Entrance Effect dialog box, under Subtle, click Fade, and then click OK. Under Modify: Fade, in the Start list, select With Previous.Under Modify: Fade, in the Speed list, select Very Fast.Click Add Effect, point to Motion Paths, and then click Down.Under Modify: Down, in the Start list, select With Previous. Under Modify: Down, in the Speed list, select Medium. On the slide, right-click the down motion path and click ReversePathDirection.On the slide, select the smaller, full-color picture. In the Custom Animation task pane, do the following:Click Add Effect, point to Entrance, and then click More Effects. In the Add Entrance Effect dialog box, under Subtle, click Fade, and then click OK. Under Modify: Fade, in the Start list, select With Previous.Under Modify: Fade, in the Speed list, select Very Fast.Right-click the picture fade effect in the pane, and then click Timing. In the Fade dialog box, on the Timing tab, in the Delay box, enter 1.5.On the slide, select the text box. In the Custom Animation task pane, do the following:Click Add Effect, point to Entrance, and then click More Effects. In the Add Entrance Effect dialog box, under Moderate, click Descend, and then click OK. Under Modify: Descend, in the Start list, select With Previous. Under Modify:Descend, in the Speed list, select Fast.
Timeline graphic with pictures(Intermediate)To reproduce the picture effects on this slide, do the following:On the Home tab, in theSlides group, click Layout, and then click Blank.On the Insert tab, in the Illustrations group, click Picture. In the Insert Picture dialog box, select a picture and then click Insert. Select the picture. Under Picture Tools, on the Format tab, in the bottom right corner of the Size group, click the Size and Position dialog box launcher.In the Size and Position dialog box, on the Size tab, resize or crop the picture as needed so that under Size and rotate, the Height box is set to 2.65” and the Width box is set to 9”. Resize the picture under Size and rotate by entering values into the Height and Width boxes. Crop the picture under Crop from by entering values into the Left, Right, Top, and Bottom boxes. Under Picture Tools, in the Format tab, in the Picture Styles group, click Picture Shape, and then under Rectangles click Round Same Side Corner Rectangle (eighth option from the left).Drag the top yellow diamond adjustment handle slightly to the right to decrease the amount of rounding on the corners. Under Picture Tools, in the Format tab, in the Picture Styles group, click Picture Effects, point to Shadow, and then under Inner click Inside Center (second row, second option from the left).To reproduce the timeline effects on this slide, do the following:On the Home tab, in the Drawing group, click Shapes, and then under Rectangles click Rectangle (first option from the left). On the slide, drag to draw a rectangle.Select the rectangle. Under Drawing Tools, on the Format tab, in the Size group, do the following:In the Shape Height box, enter 0.73”.In the Shape Width box, enter 9”.On the Home tab, in the bottom right corner of the Drawing group, click the Format Shape dialog box launcher. In the Format Shape dialog box, click Fill in the left pane, select Solid fill in the Fill pane, and then do the following:Click the button next to Color, and then under Theme Colors click Black, Text 1, Lighter 35%(third row, second option from the left).In the Transparency box, enter 20%.Also in the Format Shape dialog box, click Line Color in the left pane, and then in the right pane, select No line. Also in the Format Shape dialog box, click Shadow in the left pane. In the right pane, click the button next to Presets, and then under Inner click Inside Center (second row, second option from the left). Drag the rectangle onto the bottom of the picture. Press and hold SHIFT and select the rectangle and the picture. On the Home tab, in the Drawing group, click Arrange, point to Align, and then do the following: Click Align Selected Objects. Click Align Center.Click Align Top.Click Align to Slide.Click Align Center. To reproduce the month labels for the timeline, do the following:On the Insert tab, in the Text group, click Text Box, and then on the slide, drag to draw the text box.Enter text in the text box (in this example the text is “JAN”), select the text, and then on the Home tab, in the Font group, select Gil Sans MT Condensed from the Font list, select 18 from the Font Size list, click the arrow next to Font Color, and then under Theme Colors click White, Background 1, Darker 35% (fifth row, first option from the left).On the Home tab, in the Paragraph group, click Center to center the text in the text box. Select the text box. On the Home tab, in the Clipboard group, click the arrow under Paste, and then click Duplicate. Repeat the process until there is a total of six text boxes. On the slide, drag the text boxes onto the rectangle to form a timeline. On the Home tab, in the Editing group, click Select, and then click Selection Pane. In the Selection and Visibility pane, press and hold CTRL and select all six text boxes and the rectangle.On the Home tab, in the Drawing group, click Arrange, point to Align, and then do the following:Click Align Selected Objects.Click Align Middle. In the Selection and Visibility pane, press and hold CTRL and cancel the selection of the rectangle, keeping the text boxes selected. On the Home tab, in the Drawing group, click Arrange, point to Align, and then do the following:Click Align to Slide.Click Distribute Horizontally. To change the text in the duplicate text boxes, click in each text box and edit the text.To change the color of the second text box from the left, select the text box, and then on the Home tab, in the Font group, click the arrow next to Font Color, and then under Theme Colors click White, Background 1 (first row, first option from the left). To reproduce the vertical line with text effects on this slide, do the following:On the Home tab, in the Drawing group, click Shapes, and then under Lines click Line (first option from the left).Press and hold SHIFT, and then drag on the slide to draw a straight, vertical line. Select the line. Under Drawing Tools, on the Format tab, in the Size group, in the Shape Width box, enter 1.2”.On the Home tab, in the bottom right corner of the Drawing group, click the Format Shape dialog box launcher. In the Format Shape dialog box, click Line Color in the left pane, and then do the following in the right pane:Select Solid line.Click the button next to Color, and then under Theme Colors click White, Background 1, Darker 25% (fourth row, first option from the left).Also in the Format Shape dialog box, click Line Style in the left pane, and then do the following in the right pane:In the Width box, enter 0.75 pt.Under Arrow Settings, click the button next to Begin type, and then click Oval Arrow (second row, third option from the left).Click the button next to Begin size, and then click Arrow L Size 1 (first row, first option from the left).Click the button next to End type, and then enter Oval Arrow (second row, third option from the left).Click the button next to End size, and then enter Arrow R Size 1 (first row, first option from the left).On the Home tab, in the Clipboard group, click the arrow under Paste, and then click Duplicate. Select the duplicate line. Under Drawing Tools, on the Format tab, in the Size group, in the Shape Width box, enter 2.6”.Press and hold SHIFT and select both lines. On the Home tab, in the Drawing group, click Arrange, and then do the following:Point to Align, and then click Align Selected Objects.Point to Align, and then click Align Center.Drag both lines together on the slide to position them under one of the timeline month labels. Press and hold SHIFT and select both lines and the text box they are under. On the Home tab, in the Drawing group, click Arrange, and then do the following:Click Align Selected Objects.Click Align Center.On the Insert tab, in the Text group, click Text Box, and then on the slide, drag to draw the text box.Enter text in the text box, select the text, and then on the Home tab, in the Font group, select Gill Sans MT from the Font list, select 20 from the Font Size list, and then click the arrow next to Font Color and click White, Background 1 (first row, first option from the left).On the Home tab, in the Paragraph group, click Align Text Left to align the text left in the text box. On the slide, drag the text box to position it to the right of the vertical line. To reproduce the background on this slide, do the following:Right-click the slide background area, and then clickFormat Background.In the Format Background dialog box, click Fill in the left pane, select Gradient fill in the Fill pane, and then do the following:In the Type list, select Linear.Click the button next to Direction, and then clickLinear Down (first row, second option from the left).Under Gradient stops, click Add or Remove until two stops appear in the drop-down list.Also under Gradient stops, customize the gradient stops that you added as follows:Select Stop 1 from the list, and then do the following:In the Stop position box, enter50%.Click the button next to Color, and then under Theme Colorsclick Black, Text 1(first row, second option from the left).Select Stop 2 from the list, and then do the following:In the Stop position box, enter99%.Click the button next to Color, and then under Theme Colorsclick Black, Text 1, Lighter 35% (third row, second option from the left).