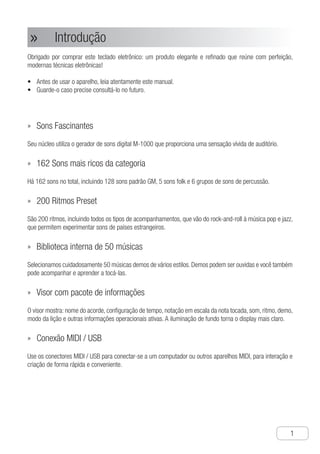
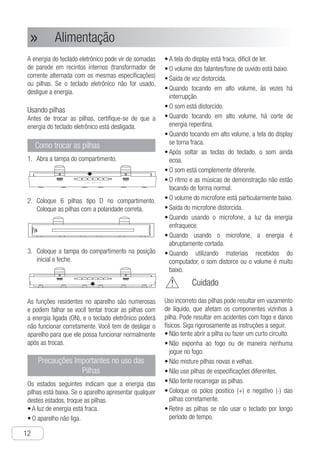
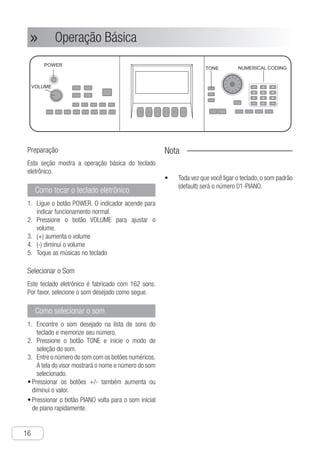
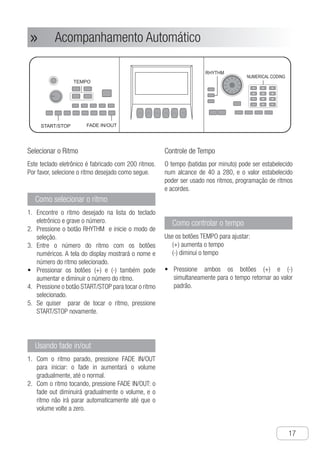
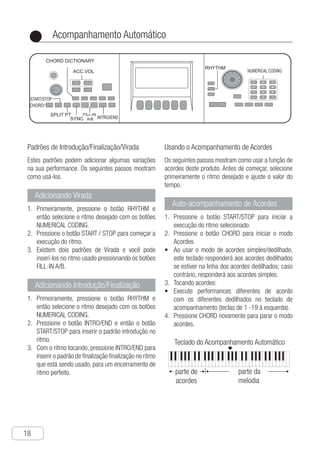
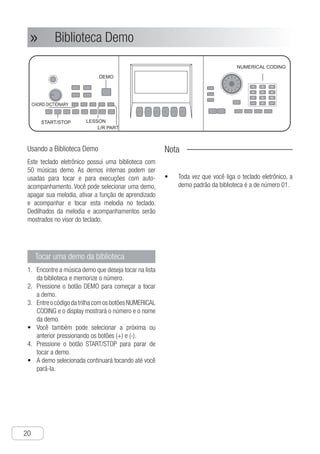
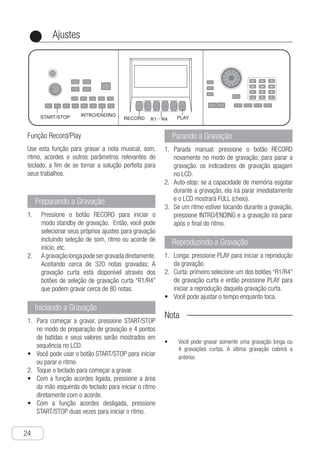
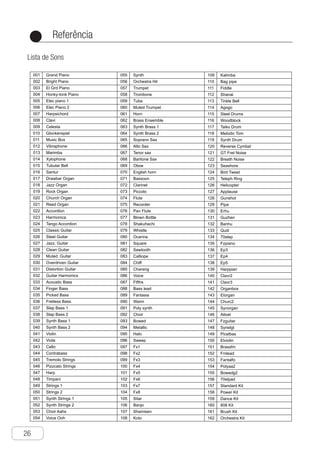
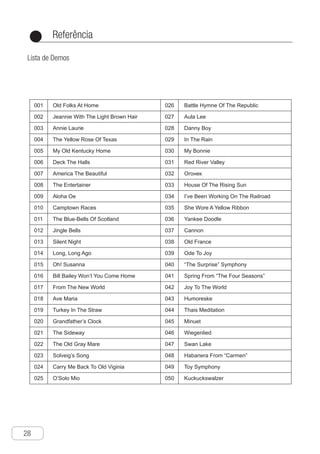
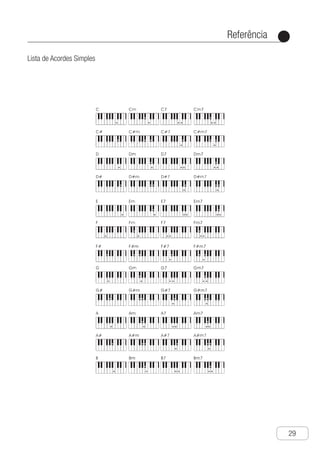
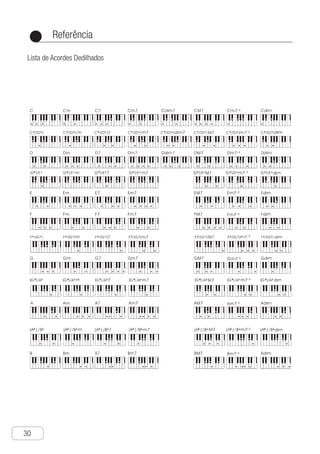
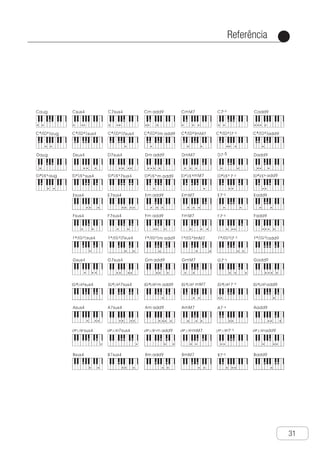
Manual da Interface Thunderbolt FOCUSRITE Clarett 8Pre
User manual for electronic keyboard
1. Please read this instruc
anual carefully befor
onic Key
USER MANUAL
LP-6210C
Please read this instruction
manual carefully before use
Electronic Keyboard
USER MANUAL
Teclado Eletrônico
Manual do Usuário
Por favor, leia cuidadosamente este
manual de instruções antes de usar
2.
3. Introdução
●
1
Introdução»»
Obrigado por comprar este teclado eletrônico: um produto elegante e refinado que reúne com perfeição,
modernas técnicas eletrônicas!
A• ntes de usar o aparelho, leia atentamente este manual.
G• uarde-o caso precise consultá-lo no futuro.
Sons Fascinantes»»
Seu núcleo utiliza o gerador de sons digital M-1000 que proporciona uma sensação vívida de auditório.
162 Sons mais ricos da categoria»»
Há 162 sons no total, incluindo 128 sons padrão GM, 5 sons folk e 6 grupos de sons de percussão.
200 Ritmos Preset»»
São 200 ritmos, incluindo todos os tipos de acompanhamentos, que vão do rock-and-roll à música pop e jazz,
que permitem experimentar sons de países estrangeiros.
Biblioteca interna de 50 músicas»»
Selecionamos cuidadosamente 50 músicas demos de vários estilos. Demos podem ser ouvidas e você também
pode acompanhar e aprender a tocá-las.
Visor com pacote de informações»»
O visor mostra: nome do acorde, configuração de tempo, notação em escala da nota tocada, som, ritmo, demo,
modo da lição e outras informações operacionais ativas. A iluminação de fundo torna o display mais claro.
Conexão MIDI / USB»»
Use os conectores MIDI / USB para conectar-se a um computador ou outros aparelhos MIDI, para interação e
criação de forma rápida e conveniente.
4. Introdução
2
●
Lista de Funções
Display de LCD•
Teclado de 61 teclas com velocity•
162 Sons•
200 Ritmos•
50 Músicas demo•
61 Percussões•
Teclado numérico / Seletor rotativo para seleção•
Controle de volume master / Controle de volume do acompanhamento•
Controle de Tempo•
Função de gravação multipistas•
Acorde automático / Divisão de acordes / Dicionário de acordes•
Virada / Introdução / Finalização•
Acompanhamento sincronizado / Fade In / Fade Out•
Divisão de teclado•
Função 3 exercícios / Prática para mãos esquerda-direita•
Função de memória•
Controle Touch•
Sustain / Conector para pedal de sustain•
Função Pitch Bend•
Interfaces MIDI e USB•
Entrada de microfone / Conector para fone de ouvido / Saída estéreo de falantes•
Funciona com 6 pilhas D ou fonte de alimentação inclusa•
5. Instruções de Segurança
●
3
Instruções de Segurança»»
Sinais
Para o bom uso deste instrumento musical e evitar qualquer dano físico e prejuízos ao usuário e outras
pessoas, o manual e o instrumento musical possuem alguns sinais de segurança. Os sinais e suas implicações
são as seguintes:
Perigo - Aviso - Notas
O sinal indica que se o usuário ignorá-lo operar o instrumento indevidamente, poderá resultar em morte ou
lesão física.
Exemplos destes sinais
Este triângulo ∆ indica as precauções para o usuário.
(o sinal à esquerda significa “Esteja alerta com a energia elétrica”).
O sinal de um círculo com traço oblíquo Ø indica proibição/proibição específica.
(o sinal à esquerda significa “Desmontagem Proibida”).
O ponto preto •indica algo para observar. O desenho interno indica a observação específica.
(o sinal à esquerda significa que o cabo de alimentação deve ser puxado da somada).
6. Instruções de Segurança
4
●
Perigo
Pilha Alcalina
Caso o eletrólito vazado da pilha alcalina atinja
os olhos, por favor, siga as instruções abaixo
imediatamente.
1. Não esfregue os olhos! Lave com água limpa
abundante.
2. Consulte um médico imediatamente. Se não
for limpo, o eletrólito nos olhos pode resultar
em cegueira.
Atenção
Fumaça, cheiro estranho e superaquecimento
Quando o teclado emitir fumaça, cheiro
estranho ou superaquecer, continuar a usar
o teclado pode causar incêndios ou choque
elétrico.
Fonte de alimentação
O• uso de fonte de alimentação incorreta
pode causar incêndio ou choque elétrico.
Siga rigorosamente as instruções a seguir.
U• se somente fontes de alimentação
compatíveis com as tensões de alimentação
da rede e do teclado.
N• ão sobrecarregue somadas e extensões,
para evitar sobrecarga.
O• uso do cabo de alimentação da fonte de
alimentação incorreto pode resultar em
dano ou ruptura, que pode levar a acidentes,
incêndios e choques elétricos.
N• ão coloque o cabo de energia próximo a um
forno ou outras fontes de calor.
Q• uando retirar a somada da parede, tirar
pelo corpo da somada, não puxar pelo cabo.
A• fonte de alimentação deve ser inserida na
somada completamente.
R• etire o adaptador da somada durante
tempestades, antes de viajar ou quando não
for usar por longos períodos.
R• etire o adaptador da somada pelo menos
uma vez por ano.
N• ão coloque quaisquer objetos pesados
em cima do cabo de alimentação e não o
exponha ao calor.
N• ão tente modificar ou dobrar o cabo de
alimentação.
S• e o cabo de alimentação ou o plug
estiverem danificados, mude por outro de
mesma especificação.
T• ocar no transformador com a mão molhada
poderá resultar em choque elétrico.
P• or favor, evitar a pulverização de água sobre
o transformador de corrente. A água pode
resultar em incêndio, acidentes e choques
elétricos.
N• ão coloque vaso ou qualquer coisa cheia
de água em cima do transformador. A
fonte molhada pode resultar em incêndio,
acidentes elétricos e choques.
Pilha
Uso inadequado das pilhas pode resultar em
vazamentos, que irão corroer os componentes
em torno da pilha ou explodir. Pode resultar em
incêndio, acidentes e lesão corporal. Por favor,
siga rigorosamente as instruções a seguir.
N• ão tente desmontar ou fazer curto-circuito.
N• ão exponha ao fogo e mantenha afastado
de produtos inflamáveis.
N• ão misture pilhas antigas e novas.
N• ão misture pilhas alcalinas, normais ou
recarregáveis.
N• ão tente recarregar pilhas não
recarregáveis.
C• oloque os pólos das pilhas positivos (+) e
negativos (-) − corretamente.
Não atire o aparelho no fogo: pode haver
estouros, acidentes e lesão corporal. Água,
outros líquidos ou folha de metal podem causar
incêndios, acidentes ou choque elétrico.
Quedas ou impactos
Se o produto for danificado por queda ou
impactos intensos quando ligado pode resultar
em incêndio, acidentes e choque elétrico.
Saco Plástico
Não coloque saco plástico da embalagem
sobre a cabeça ou na boca. Pode haver asfixia
ou sufocamento. Famílias com crianças devem
prestar atenção extra.
7. Instruções de Segurança
●
5
Remoção do produto
Antes da retirada do produto, retire a fonte da
somada da parede. Desligue todos os cabos
elétricos e fios conectados. Caso contrário,
pode haver danos, incêndios e acidentes ou
choque elétrico.
Limpeza
Antes de limpar o produto, tire a fonte da
somada da parede. Caso contrário, podem
haver danos no cabo, incêndio, acidentes ou
choque elétrico.
Interface
A interface deste produto deve ser ligada
somente no equipamento designado. Caso
contrário, podem haver incêndios, acidentes e
choque elétrico.
Posição
Evite colocar o produto em locais instáveis e
em superfícies irregulares. Isto pode causar
queda do produto e prejuízo.
Evite colocar o produto em lugares de alta
temperatura; locais empoeirados; cozinha ou
outros locais com óleo e fumo; perto de ar-
condicionado, cobertor elétrico, luz solar direta;
ou qualquer outro local que possa causar
aquecimento no teclado.
Visor
Não pressione intensamente o painel LCD – ele
pode quebrar-se e causar ferimentos. Se for
encontrado quebrado, não toque no líquido -
pode causar inflamação. Se o líquido do LCD
for para a boca,olhos ou pele,lavar a boca com
água limpa abundante pelo menos 15 minutos
e procurar um médico imediatamente.
Volume
Não reproduzir música no volume máximo por
muito tempo. Preste atenção especial quando
usar fone de ouvido. Volume alto pode causar
danos à sua audição.
Nota
Se algum desses acidentes ocorer, siga
imediatamente as instruções a seguir
1. Desligue o aparelho.
2. Se a energia for fornecida pela fonte de
alimentação, puxe o plug da somada da parede
imediatamente.
3. Contate seu fornecedor.
8. Índice
6
●
Introdução---------------------------------------------------------------------------------------- 1
Instruções de Segurança------------------------------------------------------------------------- 3
Índice--------------------------------------------------------------------------------------------- 6
Descrições das Partes---------------------------------------------------------------------------- 8
Instalação da Porta Lira--------------------------------------------------------------------------10
Indicadores do Display---------------------------------------------------------------------------11
Alimentação-------------------------------------------------------------------------------------12
Conexões----------------------------------------------------------------------------------------14
Conector do Fone de Ouvido-----------------------------------------------------------------------------14
Terminal de Saída de Áudio-------------------------------------------------------------------------------14
Microfone-------------------------------------------------------------------------------------------------14
Conector para pedal de Sustain--------------------------------------------------------------------------15
Interface MIDI---------------------------------------------------------------------------------------------15
Operação Básica---------------------------------------------------------------------------------16
Preparação-----------------------------------------------------------------------------------------------16
Selecionar o Som-----------------------------------------------------------------------------------------16
Acompanhamento Automático-------------------------------------------------------------------17
Selecionar o Ritmo----------------------------------------------------------------------------------------17
Controle de Tempo----------------------------------------------------------------------------------------17
Padrões de Introdução/Finalização/Virada----------------------------------------------------------------18
Usando o Acompanhamento de Acordes-----------------------------------------------------------------18
Controle de Volume de Acompanhamento----------------------------------------------------------------19
Início Sincronizado----------------------------------------------------------------------------------------19
Índice»»
9. Índice
●
7
Biblioteca Demo---------------------------------------------------------------------------------20
Usando a Biblioteca Demo--------------------------------------------------------------------------------20
Modo Aprendizado----------------------------------------------------------------------------------------21
Ajustes-------------------------------------------------------------------------------------------22
Usando o controle de Pitch-------------------------------------------------------------------------------22
Usando a Função de Sensibilidade do Toque-------------------------------------------------------------22
Controle do Efeito Sustain--------------------------------------------------------------------------------22
Função Percussão do Teclado----------------------------------------------------------------------------22
Função de Divisão do Teclado----------------------------------------------------------------------------23
Modo Memória-------------------------------------------------------------------------------------------23
Configuração de Um-toque-------------------------------------------------------------------------------23
Função Record/Play--------------------------------------------------------------------------------------24
Referência---------------------------------------------------------------------------------------25
Especificações--------------------------------------------------------------------------------------------25
Lista de Sons---------------------------------------------------------------------------------------------26
Lista de Ritmos-------------------------------------------------------------------------------------------27
Lista de Demos-------------------------------------------------------------------------------------------28
Lista de Acordes Simples---------------------------------------------------------------------------------29
Lista de Acordes Dedilhados-----------------------------------------------------------------------------30
Manutenção do Produto-------------------------------------------------------------------------32
10. Descrições das Partes
8
● Descrições das Partes»»
P arts D escription
Ch-09
1 2 3
4 5 6
7 8 9
- 0 +
S
11. Descrições das Partes
●
9
Nomes das Partes
p1. ower
c2. ontrole de volume principal
c3. ontrole de volume do acompanhamento
t4. empo
d5. emo
d6. icionários de acordes
s7. ustain
d8. ivisão do teclado
S9. érie de exercícios
A10. corde
s11. tart/stop
d12. ivisão de acordes
S13. ynchro
V14. irada
i15. ntrodução/finalização
f16. ade in/fade out
R17. ec
G18. rupo de Gravação
R19. ec/Play
M20. emória
A21. juste de um toque
P22. osição de memória
T23. ouch
B24. otões numéricos
S25. eletor rotativo
s26. om
r27. itmo
p28. ercussão de teclado
P29. rática das mãos esquerda/direita
L30. CD
f31. alantes
C32. ontrole de Pitch Bend
t33. eclado
C34. onector USB
I35. nterface MIDI
C36. onector para pedal de sustain
C37. onector para microfone
C38. onector para fone de ouvido
C39. onectores das saídas de áudio
e40. ntrada da fonte de alimentação
C41. ompartimento das pilhas
t42. ampa das pilhas
s
p
,
Ch-10
01- Power
02- Volume Control
03- Accompaniment Volume Control
04- Tempo Control
05- Demo Play
06- Chord Dictionary
07- Sustain
08- Keyboard Split
09- Lesson Course
10- Chord
11- Start/stop
12- Chord Split
13- Synchro
14- Insert Intermezzo
15- Prelude/postlude
16- Fade In / Out
17- Rec
18- Record Group
19- Rec Play
20- Memory
21- One Touch Setting
22- Memory Position
23- Touch
24-numeral Coding Buttons
25- Dial
26- Tone
27- Rhythm
28- Keyboard Percussion
29- Left/right Hand Selection
30- LCD
31- Speaker
32- Pitch Bend Wheel
33- Keyboard
34- Usb Jack
35- Midi Connection
36- Sustain Pedal Jack
37- Microphone Jack
38- Headphone Jack
39- Audio Output Jack
40- Power Input Jack
41- Battery Compartment
42- Battery Cover
Part Description
Parts Description
12. Descrições das Partes
10
● Instalação da Porta Lira»»
Ch-11
Installation Of Music Stand
Insira na direção
das setas
Pronto
13. Descrições das Partes
●
11
Indicadores do Display»»
I1. ndicador de função ativa (atual)
I2. ndicador do modo de acordes
A3. juste do valor de som / ritmo / demo que está em andamento
I4. ndicadores do tempo
I5. nformação da posição da nota
I6. ndicador de viradas
I7. ndicador do modo de gravação
I8. ndicador do Teclado
I9. ndicador de exercícios
I10. ndicador de sensibilidade de toque
I11. ndicador da memória
Nota
As imagens das telas deste manual do usuário são usadas apenas como ilustração. Os•
caracteres e os valores mostrados na tela do seu teclado podem diferir das ilustrações deste
manual.
rd
e
h
Display Screen Instruction
Ch-12
1 Function in use indicator
2 Chord lndicator
3 Tone,Rhythm,Demo Setting indicator.
4 Tempo indicator
5 Note position information
6 Fill-in information
7 Recording mode indicator
8 Keyboard graphic
9 Lesson mode indicator
0 Touch sensitive indicator
Memory mode indicator
NOTICE !
● The screen samples in the illustrations of this user manual are only used for demonstration,
the actual characters and values showed on the screen may differ from samples of this
user manual.
91011
A
14. Alimentação
12
● Alimentação»»
A energia do teclado eletrônico pode vir de somadas
de parede em recintos internos (transformador de
corrente alternada com os mesmas especificações)
ou pilhas. Se o teclado eletrônico não for usado,
desligue a energia.
Usando pilhas
Antes de trocar as pilhas, certifique-se de que a
energia do teclado eletrônico está desligada.
Como trocar as pilhas
A1. bra a tampa do compartimento.
Ch-13
Power
The power of the electronic organ can be
supplied by the wall sockets for standard
indoor (alternating current transformer with
the same specification parameter) or batteries.
If the electronic organ is not used, please turn
off the power.
1 Take off the cover of the batteries.
2 Put six D type batteries in the battery tray.
● Fit the batteries in the right direction.
3 Insert the battery tray into the initial place
and cover the battery cover.
The built-in functions are tremendous and
they often fail to response. Or if you fix or
change the batteries while the power is ON,
the electronic organ may not work properly.
In this case, you have to turn off the power
of the electronic organ for regular work.
How to fit the batteries
● The display screen is dim, hard to read the
words.
● The volume of the loud speaker/earphone
is low.
● Voice output distorts.
● When playing in high volume, it is interrupted
sometimes.
● When playing in high volume, the power
cut down abruptly.
● When playing in high volume, the display
screen is dim.
● After loosening the piano keyboard, the
tone has still echo.
● The tone is completely different.
● The rhythm and demonstration songs are
play abnormally.
● The volume of microphone is particularly low.
● Microphone output distorts.
● When using microphone, the power light
is faint.
● When using microphone, the power is cut
down abruptly.
● When performing the materials received
from the computer, the poweris cut down
abruptly, the sound distorts or the volume
is too low.
Important Precautions for
Using the Batteries
OPEN OPEN
OPEN OPEN
Improper use of the battery may result in liquid
leakage, which will rust the components around
the battery or blast. It may result in fire accidents
and physical injury. Please follow the instructions
below strictly.
● Do not attempt to tear open the battery or
make it short circuit.
● Do not exposure it to fire source or cast it
away in the fire.
● Do not mix use the fresh and worn batteries
●Do not mix use the batteries in different
specifications.
● Do not charge the batteries.
Before fitting of changing the batteries, make
sure to turn off the power of the electronic
organ.
Using Battery
□The following states mean the battery is
low. If any of the states it shows, please
change the batteries as soon as possible.
● The power light is dim.
● Unable to turn on the power of the electronic
organ.
● Put the anode (+) and cathode (-) ends of
the batteries correctly.
● Release the battery if unused for a long time.
Warning
C2. oloque 6 pilhas tipo D no compartimento.
Coloque as pilhas com a polaridade correta.
Ch-13
Power
The power of the electronic organ can be
supplied by the wall sockets for standard
indoor (alternating current transformer with
the same specification parameter) or batteries.
If the electronic organ is not used, please turn
off the power.
1 Take off the cover of the batteries.
2 Put six D type batteries in the battery tray.
● Fit the batteries in the right direction.
3 Insert the battery tray into the initial place
and cover the battery cover.
The built-in functions are tremendous and
they often fail to response. Or if you fix or
change the batteries while the power is ON,
the electronic organ may not work properly.
In this case, you have to turn off the power
of the electronic organ for regular work.
How to fit the batteries
● The display screen is dim, hard to read the
words.
● The volume of the loud speaker/earphone
is low.
● Voice output distorts.
● When playing in high volume, it is interrupted
sometimes.
● When playing in high volume, the power
cut down abruptly.
● When playing in high volume, the display
screen is dim.
● After loosening the piano keyboard, the
tone has still echo.
● The tone is completely different.
● The rhythm and demonstration songs are
play abnormally.
● The volume of microphone is particularly low.
● Microphone output distorts.
● When using microphone, the power light
is faint.
● When using microphone, the power is cut
down abruptly.
● When performing the materials received
from the computer, the poweris cut down
abruptly, the sound distorts or the volume
is too low.
Important Precautions for
Using the Batteries
OPEN OPEN
OPEN OPEN
Improper use of the battery may result in liquid
leakage, which will rust the components around
the battery or blast. It may result in fire accidents
and physical injury. Please follow the instructions
below strictly.
● Do not attempt to tear open the battery or
make it short circuit.
● Do not exposure it to fire source or cast it
away in the fire.
● Do not mix use the fresh and worn batteries
●Do not mix use the batteries in different
specifications.
● Do not charge the batteries.
Before fitting of changing the batteries, make
sure to turn off the power of the electronic
organ.
Using Battery
□The following states mean the battery is
low. If any of the states it shows, please
change the batteries as soon as possible.
● The power light is dim.
● Unable to turn on the power of the electronic
organ.
● Put the anode (+) and cathode (-) ends of
the batteries correctly.
● Release the battery if unused for a long time.
Warning
C3. oloque a tampa do compartimento na posição
inicial e feche.
Power
The power of the electronic organ can be
supplied by the wall sockets for standard
indoor (alternating current transformer with
the same specification parameter) or batteries.
If the electronic organ is not used, please turn
off the power.
1 Take off the cover of the batteries.
2 Put six D type batteries in the battery tray.
● Fit the batteries in the right direction.
3 Insert the battery tray into the initial place
and cover the battery cover.
The built-in functions are tremendous and
they often fail to response. Or if you fix or
change the batteries while the power is ON,
the electronic organ may not work properly.
In this case, you have to turn off the power
of the electronic organ for regular work.
How to fit the batteries
● The display screen is dim, hard to read the
words.
● The volume of the loud speaker/earphone
is low.
● Voice output distorts.
● When playing in high volume, it is interrupted
sometimes.
● When playing in high volume, the power
cut down abruptly.
● When playing in high volume, the display
screen is dim.
● After loosening the piano keyboard, the
tone has still echo.
● The tone is completely different.
● The rhythm and demonstration songs are
play abnormally.
● The volume of microphone is particularly low.
● Microphone output distorts.
● When using microphone, the power light
is faint.
● When using microphone, the power is cut
down abruptly.
● When performing the materials received
from the computer, the poweris cut down
abruptly, the sound distorts or the volume
is too low.
Important Precautions for
Using the Batteries
OPEN OPEN
OPEN OPEN
Improper use of the battery may result in liquid
leakage, which will rust the components around
the battery or blast. It may result in fire accidents
and physical injury. Please follow the instructions
below strictly.
● Do not attempt to tear open the battery or
make it short circuit.
● Do not exposure it to fire source or cast it
away in the fire.
● Do not mix use the fresh and worn batteries
●Do not mix use the batteries in different
specifications.
● Do not charge the batteries.
Before fitting of changing the batteries, make
sure to turn off the power of the electronic
organ.
Using Battery
□The following states mean the battery is
low. If any of the states it shows, please
change the batteries as soon as possible.
● The power light is dim.
● Unable to turn on the power of the electronic
organ.
● Put the anode (+) and cathode (-) ends of
the batteries correctly.
● Release the battery if unused for a long time.
Warning
As funções residentes no aparelho são numerosas
e podem falhar se você tentar trocar as pilhas com
a energia ligada (ON), e o teclado eletrônico poderá
não funcionar corretamente. Você tem de desligar o
aparelho para que ele possa funcionar normalmente
após as trocas.
Precauções Importantes no uso das
Pilhas
Os estados seguintes indicam que a energia das
pilhas está baixa. Se o aparelho apresentar qualquer
destes estados, troque as pilhas.
a• luz de energia está fraca.
o• aparelho não liga.
a• tela do display está fraca, difícil de ler.
o• volume dos falantes/fone de ouvido está baixo.
s• aída de voz distorcida.
q• uando tocando em alto volume, às vezes há
interrupção.
o• som está distorcido.
q• uando tocando em alto volume, há corte de
energia repentina.
q• uando tocando em alto volume, a tela do display
se torna fraca.
a• pós soltar as teclas do teclado, o som ainda
ecoa.
o• som está complemente diferente.
o• ritmo e as músicas de demonstração não estão
tocando de forma normal.
o• volume do microfone está particularmente baixo.
s• aída do microfone distorcida.
q• uando usando o microfone, a luz da energia
enfraquece.
q• uando usando o microfone, a energia é
abruptamente cortada.
q• uando utilizando materiais recebidos do
computador, o som distorce ou o volume é muito
baixo.
Cuidado
Uso incorreto das pilhas pode resultar em vazamento
de líquido, que afetam os componentes vizinhos à
pilha. Pode resultar em acidentes com fogo e danos
físicos. Siga rigorosamente as instruções a seguir.
n• ão tente abrir a pilha ou fazer um curto circuito.
n• ão exponha ao fogo ou de maneira nenhuma
jogue no fogo.
n• ão misture pilhas novas e velhas.
n• ão use pilhas de especificações diferentes.
n• ão tente recarregar as pilhas.
c• oloque os pólos positico (+) e negativo (-) das
pilhas corretamente.
r• etire as pilhas se não usar o teclado por longo
período de tempo.
15. Alimentação
●
13
Fonte de Alimentação
Por favor, utilize somente fontes de alimentação
indicadas para este teclado eletrônico (detalhadas
no anexo)
Use AC Transformer
Please use only AC transformer appointed
by this electronic keyboard ( detailed in
attachment ).
Warning
● Adjust the alternating current power supply
within the range of output voltage and rating
voltage in the alternating current transformer.
● Do not use any power sockets and extension
cord sets to overload.
● Do not put any heavy objects on top of the
power cord or exposure to heat.
● Do not attempt to alter or over bend the
power cord.
● If the power cord or plug is damaged, please
change it with the same specifications.
● Do not torch the alternating current trans-
former with a wet hand, or it may result in
electric shocks.
● Please use the alternating current transfo-
rmer and avoid spraying water on it. Any
water may result in fire accidents and
electric shocks.
● Do not put a vase or vessel that fills with
water on top of the alternating current
transformer. Any water may result in fire
accidents and electric shocks.
● Do not put a vase or vessel that fills with
water on top of the alternating current
transformer. Any water may result in fire
accidents and electric shocks.
Note
Improper use of the alternating current
transformer may result in fire accident or
electric shock. Please follow the instructions
below strictly.
● Do not put the power cord near an oven or
other heat sources.
● When pulling off the power socket, one must
not drag the power cord. The user must
hold the body of the alternating current
transformer.
● The power socket must insert the alternating
current transformer fully.
● When thunder storm days or leaving for a
long time, the alternating current transformer
should be pulled off the p-ower socket from
the wall.
● Pull the power socket from the alternating
current transformer, clean the dust around
the plug at least once every year.
Please pay attention to the warningand the
note when using the alternating current
transformer.
Important!
● Make sure to turn off the power of the ele-
ctronic organ when connecting or cut off
the alternating current transformer.
● The alternating current transformer will get
hot when using for a long time. It is a normal
phenomenon but not a failure.
● The built-in functions are tremendous and
they often fail to response. Please turn off
the power and turn on again and it will work
properly.
Improper use of the alternating current tran-
sformer may result in fire accident or electric
shock. Please follow the instru-ctions below
strictly.
Tomada AC
Power
Preste atenção às instruções de segurança e avisos
ao utilizar a fonte de alimentação.
Cuidado
O uso incorreto da fonte de alimentação pode causar
incêndios ou choques elétricos. Siga rigorosamente
as instruções a seguir.
S• elecione corretamente a tensão de alimentação
da fonte com a tensão local quando necessário.
E• vite usar adaptadores e extensões com muitos
aparelhos para evitar sobrecargas.
N• ão coloque objetos pesados sobre os cabos nem
exponha-os ao calor.
N• ão tente alterar nem esticar o cabo de
alimentação.
S• e o cabo de alimentação ou plug estiverem
danificados, troque-os por novos com as mesmas
especificações.
N• ão toque na fonte de alimentação com as mãos
molhadas para evitar choques.
P• or favor evite espirrar liquidos ou água na fonte de
alimentação para evitar incêndios e choques.
N• ão coloque vasos ou recipientes contendo liquidos
sobre a fonte de alimentação para evitar incêndios
e choques.
Nota
O uso de fontes de alimentação incorretas pode
causar incêncios ou choques elétricos. Siga
rigorosamente as instruções a seguir.
N• ão deixe o cabo de alimentação perto de fogões
ou outras fontes de calor.
A• o retirar os cabos, não puxe pelo cabo. Deve-
se segurar no corpo da fonte para retirá-la da
somada.
A• fonte deve ser encaixada na somada
completamente.
E• m dias de chuva forte ou quando não usado
por longo período, a fonte deve ser removida da
somada.
R• emova a fonte de alimentação e limpe o pó pelo
menos uma vez por ano.
Importante
C• ertifique-se que o teclado está desligado ao
conectar ou remover a fonte da somada.
A• fonte de alimentação pode aquecer quando
usada por longo período. Isso é normal, caso o
aquecimento seja excessivo, pode indicar mau
funcionamento.
O• teclado possui muitas funções, caso elas falhem,
desligue e ligue novamente.
16. Conexões
14
● Conexões»»
Conector do Fone de Ouvido
Antes de conectar o fone de ouvido, certifique-se de
abaixar o volume do teclado.Após a conexão correta,
você pode ajustar o volume a seu gosto.
Ch-15
Note
After connecting an amplifier, please adjust the
volume to a lower level and use the controller
of the amplifier to conrol the output volume.
Microphone Connection
Insert microphone into MIC jack and you can
sing songs with the built-in music of the music
gallery and play while you sing.
Audio Output Terminal
Before connecting with the audio amplifier,
make sure to lower the volume of the electric
piano. After connecting suc-cessfully, you can
adjust the volume to your taste.
Conectores de Saída de Áudio estéreo
Important!
● If it not used, the power should be turned
off and the microphone should be
disconnected.
Audio connecting wire(Purchase separately)
is available at the market.
Conector para Microfone
The following cases may lead to squeaking
sound ( Psophometric noise).
● Cover the head of the microphone by hand.
● Put the microphone near the loud speaker.
When it utters squeaking sounds, please
do not cover the microphone head and take
it far away from any loud speakers.
Squeaking Sound
(Psophometric Noise)
Headphone Connection
Before connecting with the earphone, make
sure to lower the volume of the electric piano.
After connecting successfully, you can adjust
the volume to your taste.
Conector Estéreo
Padrão
When connecting the earphone, it will cut
off the built-in loudspeaker output of the
electronic organ. Therefore, it won’t interrupt
others when you play the music in midnight.
Connection
1
2
1
2
Ao conectar o fone de ouvido, as saídas dos falante
internos serão cortadas. Portanto não incomodará
outros quando estiver tocando música no meio da
noite.
Terminal de Saída de Áudio
Antes de conectar um amplificador de áudio,
certifique-se de que o volume do mesmo esteja
baixo. Após a conexão correta, você pode ajustar o
volume a seu gosto.
Ch-15
Note
After connecting an amplifier, please adjust the
volume to a lower level and use the controller
of the amplifier to conrol the output volume.
Microphone Connection
Insert microphone into MIC jack and you can
sing songs with the built-in music of the music
gallery and play while you sing.
Audio Output Terminal
Before connecting with the audio amplifier,
make sure to lower the volume of the electric
piano. After connecting suc-cessfully, you can
adjust the volume to your taste.
Conectores de Saída de Áudio estéreo
Important!
● If it not used, the power should be turned
off and the microphone should be
disconnected.
Audio connecting wire(Purchase separately)
is available at the market.
Conector para Microfone
The following cases may lead to squeaking
sound ( Psophometric noise).
● Cover the head of the microphone by hand.
● Put the microphone near the loud speaker.
When it utters squeaking sounds, please
do not cover the microphone head and take
it far away from any loud speakers.
Squeaking Sound
(Psophometric Noise)
Headphone Connection
Before connecting with the earphone, make
sure to lower the volume of the electric piano.
After connecting successfully, you can adjust
the volume to your taste.
Conector Estéreo
Padrão
When connecting the earphone, it will cut
off the built-in loudspeaker output of the
electronic organ. Therefore, it won’t interrupt
others when you play the music in midnight.
Connection
1
2
1
2
O cabo de conexão de áudio (opcional) está
disponível no mercado. Possui dois conectores tipo
RCA em cada ponta para conectar os canais direito e
esquerdo ao amplificador.
Nota
Ao conectar um amplificador externo, abaixe o
volume do teclado e use o controle do amplificador
para ajustar o volume de saída.
Microfone
Coloque o microfone no conector MIC para poder
cantar acompanhando as músicas internas ou cantar
enquanto toca o teclado.
Ch-15
Note
After connecting an amplifier, please adjust the
volume to a lower level and use the controller
of the amplifier to conrol the output volume.
Microphone Connection
Insert microphone into MIC jack and you can
sing songs with the built-in music of the music
gallery and play while you sing.
Audio Output Terminal
Before connecting with the audio amplifier,
make sure to lower the volume of the electric
piano. After connecting suc-cessfully, you can
adjust the volume to your taste.
Conectores de Saída de Áudio estéreo
Important!
● If it not used, the power should be turned
off and the microphone should be
disconnected.
Audio connecting wire(Purchase separately)
is available at the market.
Conector para Microfone
The following cases may lead to squeaking
sound ( Psophometric noise).
● Cover the head of the microphone by hand.
● Put the microphone near the loud speaker.
When it utters squeaking sounds, please
do not cover the microphone head and take
it far away from any loud speakers.
Squeaking Sound
(Psophometric Noise)
Headphone Connection
Before connecting with the earphone, make
sure to lower the volume of the electric piano.
After connecting successfully, you can adjust
the volume to your taste.
Conector Estéreo
Padrão
When connecting the earphone, it will cut
off the built-in loudspeaker output of the
electronic organ. Therefore, it won’t interrupt
others when you play the music in midnight.
Connection
1
●
●
●
●
2
1
2
●
Importante
S• e não estiver usando, a energia deverá ser
desligada e o microfone desconectado do teclado.
Realimentação
Os seguintes casos podem induzir à microfonia:
C• obrir a cabeça do microfone com a mão.
C• olocar o microfone perto do falante.
Se isto acontecer, não cubra a cabeça do microfone
com as mãos e afaste-o dos falantes.
17. Conexões
●
15
Conector para pedal de Sustain
Conecte um pedal sustain (opcional) no conector
Sustain.
Esta função sustain irá prolongar o som quando o
pedal estiver pisado enquanto toca o teclado.
a• funçãosustainfuncionasomentecominstrumento
musical de sons longos
w
Ch-16
MIDI Out Interface
MIDI is acronym of Musical Instrument Digital
Interface.MIDI is the standard communication
system of electric piano and musical
instruments that label MIDI.
To use the MIDI OUT interface of the electric
piano, you can connect the musical instrum-
ent with MIDI and the computer to operate the
function of playing, memorizing and compo-
sing.
● Connect the computer with the MIDI
cable(Purchase separately), and start the
power
● Install a musical editing software
(Purchase separately), such as cakewalk,
for the computer, and start the software.
This electronic keyboard will be added into
the hardware list of the musical software,
and shall be set as default, therefore you
can connect the electronic keyboard and
the computer.
Conectores MIDI
Connection
Sustain Terminal
Conector para pedal sustain
Connect a sustain pedal (Purchase separately)
to sustain terminal.
This sustain function will prolong the sound
while stepping on the pedal when you play
the keyboard.
● Sustain function takes effect only on
musical instrument with longer tone.
● Connect the computer with the USB cable
(Purchase separately) , and start the power
● Install a musical editing software
(Purchase separately) , such as cakewalk,
for the computer, and start the software.
This electronic keyboard will be added into
the hardware list of the musical software,
and shall be set as default, therefore you
can connect t he electronic keyboard and
the computer.
Conector USBInterface MIDI
MIDIsignificaInterfaceDigitaldeInstrumentoMusical.
O MIDI é um sistema de comunicação padronizado de
teclados e instrumentos musicais compatíveis MIDI.
Para usar a interface MIDI do teclado, você pode
conectá-lo via MIDI com o computador, para controlar
a função reprodução, gravação e composição.
w
t
Ch-16
MIDI Out Interface
MIDI is acronym of Musical Instrument Digital
Interface.MIDI is the standard communication
system of electric piano and musical
instruments that label MIDI.
To use the MIDI OUT interface of the electric
piano, you can connect the musical instrum-
ent with MIDI and the computer to operate the
function of playing, memorizing and compo-
sing.
● Connect the computer with the MIDI
cable(Purchase separately), and start the
power
● Install a musical editing software
(Purchase separately), such as cakewalk,
for the computer, and start the software.
This electronic keyboard will be added into
the hardware list of the musical software,
and shall be set as default, therefore you
can connect the electronic keyboard and
the computer.
Conectores MIDI
Connection
Sustain Terminal
Conector para pedal sustain
Connect a sustain pedal (Purchase separately)
to sustain terminal.
This sustain function will prolong the sound
while stepping on the pedal when you play
the keyboard.
● Sustain function takes effect only on
musical instrument with longer tone.
● Connect the computer with the USB cable
(Purchase separately) , and start the power
● Install a musical editing software
(Purchase separately) , such as cakewalk,
for the computer, and start the software.
This electronic keyboard will be added into
the hardware list of the musical software,
and shall be set as default, therefore you
can connect t he electronic keyboard and
the computer.
Conector USB
C• onecte o computador com um cabo MIDI (vendidos
separadamente), e ligue o computador.
I• nstale um software de edição musical (vendido
separadamente) como o cakewalk no computador
e abra o software.
E• ste teclado será adicionado na lista de hardware
do software,e deverá ser configurado como padrão,
então o teclado estará conectado ao computador.
Ch-16
MIDI Out Interface
MIDI is acronym of Musical Instrument Digital
Interface.MIDI is the standard communication
system of electric piano and musical
instruments that label MIDI.
To use the MIDI OUT interface of the electric
piano, you can connect the musical instrum-
ent with MIDI and the computer to operate the
function of playing, memorizing and compo-
sing.
● Connect the computer with the MIDI
cable(Purchase separately), and start the
power
● Install a musical editing software
(Purchase separately), such as cakewalk,
for the computer, and start the software.
This electronic keyboard will be added into
the hardware list of the musical software,
and shall be set as default, therefore you
can connect the electronic keyboard and
the computer.
Conectores MIDI
Connection
Sustain Terminal
Conector para pedal sustain
Connect a sustain pedal (Purchase separately)
to sustain terminal.
This sustain function will prolong the sound
while stepping on the pedal when you play
the keyboard.
● Sustain function takes effect only on
musical instrument with longer tone.
● Connect the computer with the USB cable
(Purchase separately) , and start the power
● Install a musical editing software
(Purchase separately) , such as cakewalk,
for the computer, and start the software.
This electronic keyboard will be added into
the hardware list of the musical software,
and shall be set as default, therefore you
can connect t he electronic keyboard and
the computer.
Conector USB
c• onecte o computador com um cabo USB (vendidos
separadamente), e ligue-o.
I• nstale um software de edição musical (vendido
separadamente) como o cakewalk no computador
e abra o software.
E• ste teclado será adicionado na lista de hardware
do software,e deverá ser configurado como padrão,
então o teclado estará conectado ao computador.
18. Conexões
16
● Operação Básica»»
Preparação
Esta seção mostra a operação básica do teclado
eletrônico.
Como tocar o teclado eletrônico
L1. igue o botão POWER. O indicador acende para
indicar funcionamento normal.
P2. ressione o botão VOLUME para ajustar o
volume.
(3. +) aumenta o volume
(4. -) diminui o volume
T5. oque as músicas no teclado
Selecionar o Som
Este teclado eletrônico é fabricado com 162 sons.
Por favor, selecione o som desejado como segue.
Como selecionar o som
E1. ncontre o som desejado na lista de sons do
teclado e memorize seu número.
P2. ressione o botão TONE e inicie o modo de
seleção do som.
E3. ntre o número do som com os botões numéricos.
A tela do visor mostrará o nome e número do som
selecionado.
P• ressionar os botões +/- também aumenta ou
diminui o valor.
P• ressionar o botão PIANO volta para o som inicial
de piano rapidamente.
Nota
Toda vez que você ligar o teclado, o som padrão•
(default) será o número 01-PIANO.
Ch-17
1 Turn the "POWER" on, and then indicator
lights, which means that normal
performance starts.
2 Press "VOLUME" button to set proper
volume.
+ : turn volume up
- : turn volume down
3 Play songs on the keyboard
How to play electronic
keyboard
1 Find out required tone in the tone list of
the electronic keyboard and record its
tone number.
2 Press "TONE" button and start tone
selection mode .
How to select tone
This section introduce you electronic
keyboard's basic operation.
Select Tone
Preparation
This electronic keyboard is built in with 162
tones, please select required tone as follow.
1
2
3
4
5
S
T
r
a
VOLUME
POWER
3 Input tonal number with "numerical coding
buttons" directly, and display screen
shows the selected tone number and
name.
● Pressing " + - " buttons can also increase
and decrease tone number.
● Pressing "PIANO" button can return to
default piano tone mode quickly.
TONE
1
Basic Operation
Notice !
● Every time you turn on power of electronic
keyboard, the default tone is the one
numbered 01 "PIANO"
NUMERICAL CODING
19. Acompanhamento Automático
●
17
Acompanhamento Automático»»
Selecionar o Ritmo
Este teclado eletrônico é fabricado com 200 ritmos.
Por favor, selecione o ritmo desejado como segue.
Como selecionar o ritmo
E1. ncontre o ritmo desejado na lista do teclado
eletrônico e grave o número.
P2. ressione o botão RHYTHM e inicie o modo de
seleção.
E3. ntre o número do ritmo com os botões
numéricos. A tela do display mostrará o nome e
número do ritmo selecionado.
P• ressionar os botões (+) e (-) também pode
aumentar e diminuir o número do ritmo.
P4. ressione o botão START/STOP para tocar o ritmo
selecionado.
S5. e quiser parar de tocar o ritmo, pressione
START/STOP novamente.
Usando fade in/out
C1. om o ritmo parado, pressione FADE IN/OUT
para iniciar: o fade in aumentará o volume
gradualmente, até o normal.
C2. om o ritmo tocando, pressione FADE IN/OUT: o
fade out diminuirá gradualmente o volume, e o
ritmo não irá parar automaticamente até que o
volume volte a zero.
Controle de Tempo
O tempo (batidas por minuto) pode ser estabelecido
num alcance de 40 a 280, e o valor estabelecido
poder ser usado nos ritmos, programação de ritmos
e acordes.
Como controlar o tempo
Use os botões TEMPO para ajustar:
(+) aumenta o tempo
(-) diminui o tempo
P• ressione ambos os botões (+) e (-)
simultaneamente para o tempo retornar ao valor
padrão.
Ch-18
1 Find out required rhythm in the rhythm list
of the electronic keyboard and record its
rhythm number.
2 Press "RHYTHM" button to start rhythm
selection mode .
3 Input rhythm number with "numerical
coding buttons" directly, and display
screen shows the selected rhythm
number and name.
● Pressing " + - " buttons can also increase
or decrease rhythm number.
4 Press rhythm "START/STOP" button to
start to play the selected rhythm.
5 If you want to stop rhythm playing, please
press "START/STOP" again.
How to select rhythm
Select Rhythm
This electronic keyboard is built in with 200
rhythms, and please select required rhythm
as follow.
g
e
Please use "TEMPO" buttons to set tempo.
+ : turn tempo up
- : turn tempo down
● Press both buttons of " TEMPO + - "
simultaneously and the tempo is returned
to default value.
How to control tempo
Tempo Control
Tempo (beats per minute) can be set at a
range of 40 to 280, and the tempo value
you set can be used in rhythm, rhythm
programming play and chord play.
RHYTHM
TEMPO
1 When stopping playing rhythm, press
"FADE IN/OUT" button to start rhythm,
and then rhythm volume fade in gradually
to normal volume .
Use fade in / out
2 When playing the rhythm, press "FADE IN
/OUT" button, then rhythm volume fade
out gradually, and rhythm isn't stopped
automatically until the volume turns to be
zero.
START/STOP FADE IN/OUT
Auto Accompaniment
c
NUMERICAL CODING
20. Acompanhamento Automático
18
●
Padrões de Introdução/Finalização/Virada
Estes padrões podem adicionar algumas variações
na sua performance. Os seguintes passos mostram
como usá-los.
Adicionando Virada
P1. rimeiramente, pressione o botão RHYTHM e
então selecione o ritmo desejado com os botões
NUMERICAL CODING.
P2. ressione o botão START / STOP para começar a
execução do ritmo.
E3. xistem dois padrões de Virada e você pode
inseri-los no ritmo usado pressionando os botões
FILL-IN A/B.
Adicionando Introdução/Finalização
P1. rimeiramente, pressione o botão RHYTHM e
então selecione o ritmo desejado com os botões
NUMERICAL CODING.
P2. ressione o botão INTRO/END e então o botão
START/STOP para inserir o padrão introdução no
ritmo.
C3. om o ritmo tocando, pressione INTRO/END para
inserir o padrão de finalização finalização no ritmo
que está sendo usado, para um encerramento de
ritmo perfeito.
Usando o Acompanhamento de Acordes
Os seguintes passos mostram como usar a função de
acordes deste produto. Antes de começar, selecione
primeiramente o ritmo desejado e ajuste o valor do
tempo.
Auto-acompanhamento de Acordes
P1. ressione o botão START/STOP para iniciar a
execução do ritmo selecionado.
P2. ressione o botão CHORD para iniciar o modo
Acordes.
A• o usar o modo de acordes simples/dedilhado,
este teclado responderá aos acordes dedilhados
se estiver na linha dos acordes dedilhados; caso
contrário, responderá aos acordes simples.
T3. ocando acordes:
e• xecute performances diferentes de acordo
com os diferentes dedilhados no teclado de
acompanhamento (teclas de 1 -19 à esquerda).
P4. ressione CHORD novamente para parar o modo
acordes.
Ch-19
CHORD
1 Press "RHYTHM" button at first and then
select required rhythm with "NUMERAL
CODING" buttons .
2 Press "START / STOP" button to begin
rhythm performance.
3 There are two intermezzo patterns, and
you can insert intermezzo pattern into
the rhythm being used by pressing
"FILL-IN A/B" buttons.
Insert intermezzo
1 Press "RHYTHM" button at first and then
select required rhythm with "NUMERAL
CODING" buttons .
2 Press "INTRO/END" button, and then
press "START/STOP" button to insert
prelude pattern into the rhythm.
3 When the rhythm is in progress, press
"INTRO/END" buttons to insert ending
postlude pattern for the rhythm being
used so as to end the rhythm perfectly.
Insert prelude / postlude
Prelude / Postlude /
Intermezzo Pattern
Prelude / postlude / intermezzo patterns can
add some appealing changes into your
performance.The following operation steps
show how to use for you.
INTRO/END
START/STOP
CHORD DICTIONARY
SYNC
FILL-IN
A/B
SPLIT PT
Auto Accompaniment
1 Press "START/STOP" button to start
performance of the selected rhythm at
present.
2 Press "CHORD" button to start chord
mode.
● When using single/fingered chord mode,
this keyboard will respond to fingered
chord if it is in line with fingered chord
way; otherwise it will respond to single-
finger chord.
3 Play chord
● do different performance according to
different fingering on accompaniment
keyboard(1-19 keys from the left)
4 Press "CHORD" button again to stop
chord mode.
Auto chord accompaniment
Use Chord Accompaniment
The following operation steps introduce how
to use this product's chord function.Before
starting, shall select the rhythm you want at
first, and set tempo value.
Teclado do Acompanhamento Automático
parte de
acordes
parte da
melodia
ACC.VOL
RHYTHM
NUMERICAL CODING
M
M
I
s
i
T
p
e
f
s
S
C
T
w
t
Ch-19
CHORD
1 Press "RHYTHM" button at first and then
select required rhythm with "NUMERAL
CODING" buttons .
2 Press "START / STOP" button to begin
rhythm performance.
3 There are two intermezzo patterns, and
you can insert intermezzo pattern into
the rhythm being used by pressing
"FILL-IN A/B" buttons.
Insert intermezzo
1 Press "RHYTHM" button at first and then
select required rhythm with "NUMERAL
CODING" buttons .
2 Press "INTRO/END" button, and then
press "START/STOP" button to insert
prelude pattern into the rhythm.
3 When the rhythm is in progress, press
"INTRO/END" buttons to insert ending
postlude pattern for the rhythm being
used so as to end the rhythm perfectly.
Insert prelude / postlude
Prelude / Postlude /
Intermezzo Pattern
Prelude / postlude / intermezzo patterns can
add some appealing changes into your
performance.The following operation steps
show how to use for you.
INTRO/END
START/STOP
CHORD DICTIONARY
SYNC
FILL-IN
A/B
SPLIT PT
Auto Accompaniment
1 Press "START/STOP" button to start
performance of the selected rhythm at
present.
2 Press "CHORD" button to start chord
mode.
● When using single/fingered chord mode,
this keyboard will respond to fingered
chord if it is in line with fingered chord
way; otherwise it will respond to single-
finger chord.
3 Play chord
● do different performance according to
different fingering on accompaniment
keyboard(1-19 keys from the left)
4 Press "CHORD" button again to stop
chord mode.
Auto chord accompaniment
Use Chord Accompaniment
The following operation steps introduce how
to use this product's chord function.Before
starting, shall select the rhythm you want at
first, and set tempo value.
Teclado do Acompanhamento Automático
parte de
acordes
parte da
melodia
ACC.VOL
RHYTHM
NUMERICAL CODING
M
M
In
sy
in
T
p
e
fu
s
S
C
t
T
w
th
●
21. Acompanhamento Automático
●
19
Divisão do Teclado
P1. ressione o botão SPLIT PT e o visor LCD
mostrará SPLIT PT. Então, você pode selecionar
a tecla do ponto de divisão pressionando os
botões numéricos (+) e (-) ou teclar no teclado
diretamente.
P2. ressione SPLIT PT novamente para sair da
função e a tecla selecionada se torna a nova tecla
do ponto de divisão.
E• sta função pode dividir o teclado em duas áreas
esquerda e direita independentes e a tecla do
ponto de divisão pertence à área de acordes.
Usando o Dicionário de Acordes
P1. ressione o botão CHORD DICTIONARY para
iniciar este modo. O LCD mostra DICT. Então,
o teclado da mão direita pode ser usado para
definir o som fundamental do acorde e o tipo
de acorde. Depois que o usuário escolhe a voz
fundamental do acorde respectiva e o tipo de
acorde, haverá o mapeamento correspondente
entre teclas e notas mostrado na escala e teclado
do LCD. Então, o usuário pode tocar este acorde
na área da mão esquerda.
q• uando você toca o teclado da mão direita para
definir som fundamental do acorde e o tipo de
acorde, o teclado não emite som.
q• uando acorde é tocado corretamente, aparece
uma palma para mostrar que a área da esquerda
está correta.
s• e o acorde não for tocado corretamente,
obteremos o som das respectivas teclas.
o• acorde que estiver fora do ponto de divisão não
será mostrado,
P2. ressione CHORD DICTIONARY novamente para
parar o modo acordes.
Controle de Volume de Acompanhamento
Use os botõesACC.VOL para estabelecer o volume de
acompanhamento correlativo do ritmo e do acorde.
(+) aumenta o volume
(-) diminui o volume
Início Sincronizado
Você pode ajustar este produto para começar a tocar
um ritmo enquanto toca um acompanhamento no
teclado, ao mesmo tempo.
Os passos a seguir mostram como usar a função
de início sincronizado. Antes de começar, selecione
primeiramente o ritmo, ajuste o valor do tempo e
selecione o acompanhamento de acorde.
Usando a função de início sincronizado
N1. o modo de acordes, pressione o botão SYNC e o
início sincronizado entra em modo de espera.
T2. oque o acorde e o acompanhamento começa a
tocar automaticamente.
P3. ressione START/STOP para parar o modo
synchro.
22. Biblioteca Demo
20
● Biblioteca Demo»»
Usando a Biblioteca Demo
Este teclado eletrônico possui uma biblioteca com
50 músicas demo. As demos internas podem ser
usadas para tocar e para execuções com auto-
acompanhamento. Você pode selecionar uma demo,
apagar sua melodia, ativar a função de aprendizado
e acompanhar e tocar esta melodia no teclado.
Dedilhados da melodia e acompanhamentos serão
mostrados no visor do teclado.
Tocar uma demo da biblioteca
E1. ncontre a música demo que deseja tocar na lista
da biblioteca e memorize o número.
P2. ressione o botão DEMO para começar a tocar
a demo.
E3. ntreocódigodatrilhacomosbotõesNUMERICAL
CODING e o display mostrará o número e o nome
da demo.
V• ocê também pode selecionar a próxima ou
anterior pressionando os botões (+) e (-).
P4. ressione o botão START/STOP para parar de
tocar a demo.
A• demo selecionada continuará tocando até você
pará-la.
Nota
Toda vez que você liga o teclado eletrônico, a•
demo padrão da biblioteca é a de número 01.
Ch-21
This electronic keyboard is built in demo
library with 50 demos.Built-in demos can be
used to play and auto accompaniment
performance.You can select a demo,
deleting its melody, and adopt learning
function and follow and play this melody on
the keyboard.Fingerings of Melody and
accompaniment shall be shown on
electronic keyboard's display screen.
Use Demo Library
1 Find out the demo you want to play in the
list of the library and record its number.
2 Press “DEMO“ button to start playing the
demo.
3 Input track code directly with “NUMERAL
CODING" buttons and the display screen
shows demo's number and name.
● You can also select previous or next
demo by turning the dial .
4 Press “START/STOP” button to stop
playing the demo.
● The selected demo will not stop playing
until you stop it.
Play demo of the library
DEMO
L/R PART
START/STOP
CHORD DICTIONARY
Demo Library
Notice !
● Every time you turn on electronic
keyboard power, the default demo
song is 01.
LESSON
NUMERICAL CODING
U
P
b
a
●
●
●
●
●
●
●
●
●
P
n
t
I
s
s
s
23. Biblioteca Demo
●
21
Modo Aprendizado
O Modo Aprendizado mostra como aprender a tocar
as músicas demo através de três exercícios.
Usando esta Função
P1. ressione DEMO e então pressione o botão
START/STOP rapidamente para iniciar o modo
standby.
P2. ressione LESSON sucessivamente para
selecionar o exercicio A, B, C ou sair. O visor
mostrará o exercício correspondente, de acordo
com a seleção. Pressione o botão START/STOP
para iniciar ou parar o exercício.
V3. ocê pode selecionar exercícios para as mãos
esquerda, direita ou ambas através dos botões
L/R PART e CHORD DICTIONARY. Quando
pressionar L/R PART para selecionar exercício
de mão esquerda, o sinal da mão esquerda
acende. Quando pressionar CHORD DICTIONARY
para selecionar exercício da mão direita, o sinal
de mão direita acende. Quando pressionar L/R
PART e CHORD DICTIONARY simultaneamente,
significando exercício de mão direita e mão
esquerda, os sinais das mãos direita e esquerda
serão mostrados no LCD. Se nenhuma mão for
selecionada, o sistema iniciará automaticamente
o exercício da mão direita, por conveniência.
q• uando escolher exercício da mão direita, o
tema da mão direita apaga; quando selecionar
o da mão esquerda, a melodia ou mudança de
acorde do acompanhamento da mão esquerda
apaga. Selecionando exercício da mão esquerda
e direita, as melodias de ambas as mãos serão
apagadas.
d• epois que parar o exercício, a demo atual será
tocada novamente e o modo de exercício anterior
será mantido.
Sequência de exercícios
E1. xercício A - para prática de andamento da demo
sem necessidade de tocar as notas corretamente.
A demo toca a peça de acompanhamento e
mostra a notação na escala e no teclado do LCD.
Quando o usuário toca o tema, o teclado produz o
som da tecla respectiva.
E2. xercício B - estudo considerando a notação
temática da demo. Toque o som correspondente
corretamente e a demo continuará a tocar. Caso
contrário a demo ficará em standby.
E3. xercício C - estudo sintético considerando o
tempo e tema da demo. A demo toca a parte do
acompanhamento e mostra a notação na escala
e no teclado do LCD.
24. Ajustes
22
● Ajustes»»
Usando o controle de Pitch
Usando o controle de Pitch pode-se aumentar ou
diminuir a afinação. Ao movê-lo, que o ajuste da
afinação é gradual, e ele geralmente consegue
apresentar cada pequena variação entre o pitch
original e o final. A faixa de variação é de +/- 2
semitons. Ao soltar o controle de pitch, a afinação
volta ao normal.
Ch-23
SUSTAIN
Press "DRUM" button to switch the keyboard
into drum keyboard, and press "DRUM"
again and stop the function.
Use Keyboard Percussion
Function
SPLIT
DRUM
Setting
Using pitch wheel can obtain glissando with
turning up and down. When moving it, you
will find that its pitch adjustment is gradual-
changing pattern, and it can almost show
every tiny tune between the original pitch
and final pitch. The changing range is + - 2
semitones. When you release the pitch
wheel, the pitch will return to normal.
Using Pitch Wheel
Mova o controle para
variar a afinação
● You can use pitch wheel to imitate the
glissando effect of guitar, violin, sax, etc.
making your play more vividly.
The keyboard is touch sensitive, and
when "TOUCH" function is turned on,
the note volume will differ according to the
force that the keyboard are pressed,
Use Keyboard Touch
Sensitive Function
Press "SUSTAIN" button, and then play the
keyboard with the sound accompanied with
obvious sustaining effect, and when you
press "SUSTAIN" again, the sustain effect
function is stopped.
● sustain function takes effect only on
musical instrument with longer tone.
Control Sustain Effect
1 Press "TOUCH" button, and start touch
sensitive function.
2 Press "TOUCH" again to stop sensitive
function
● when the keyboard starts, it starts touch
sensitive function automatically.
STORE
O.T.S
TOUCH
V• ocê pode usar o controle de pitch para simular
o efeito bend de instrumentos de corda e sopro
etc, tornando sua interpretação mais viva e
expressiva.
Usando a Função de Sensibilidade do Toque
O teclado deste produto é sensível ao toque e,quando
a função TOUCH é ligada, o volume do som da nota
responderá de acordo com a força com que a tecla
foi pressionada.
P1. ressione o botão TOUCH e inicie a função de
sensibilidade do toque.
P2. ressione TOUCH novamente para parar a
função
Q• uando o teclado é ligado, a função de
sensibilidade do é ativada automaticamente.
Controle do Efeito Sustain
Pressione o botão SUSTAIN e então toque o teclado
que acrescentará ao som um efeito de sustentação.
Ao pressionar SUSTAIN novamente, a função do
efeito sustain será desativada.
A• função sustain tem efeito somente em sons
instrumentos musicais de longa duração.
Função Percussão do Teclado
Pressione o botão DRUM para alternar o som do
teclado para sons de bateria. Pressione DRUM
novamente para parar a função.
Ch-23
SUSTAIN
Press "DRUM" button to switch the keyboard
into drum keyboard, and press "DRUM"
again and stop the function.
Use Keyboard Percussion
Function
SPLIT
DRUM
Setting
Using pitch wheel can obtain glissando with
turning up and down. When moving it, you
will find that its pitch adjustment is gradual-
changing pattern, and it can almost show
every tiny tune between the original pitch
and final pitch. The changing range is + - 2
semitones. When you release the pitch
wheel, the pitch will return to normal.
Using Pitch Wheel
Mova o controle para
variar a afinação
● You can use pitch wheel to imitate the
glissando effect of guitar, violin, sax, etc.
making your play more vividly.
The keyboard is touch sensitive, and
when "TOUCH" function is turned on,
the note volume will differ according to the
force that the keyboard are pressed,
Use Keyboard Touch
Sensitive Function
Press "SUSTAIN" button, and then play the
keyboard with the sound accompanied with
obvious sustaining effect, and when you
press "SUSTAIN" again, the sustain effect
function is stopped.
● sustain function takes effect only on
musical instrument with longer tone.
Control Sustain Effect
1 Press "TOUCH" button, and start touch
sensitive function.
2 Press "TOUCH" again to stop sensitive
function
● when the keyboard starts, it starts touch
sensitive function automatically.
STORE
O.T.S
TOUCH
1
2
3
4
5
6
7
8
9
0
N
A
25. Ajustes
●
23
Função de Divisão do Teclado
Você pode endereçar dois sons diferentes para
ambas partes do teclado com a função de divisão.
E você pode tocar um som com a mão esquerda
enquanto a mão direita toca outro som, para produzir
efeito conjunto.
Como dividir o teclado
1. Inicie antes o modo Tone e selecione um
instrumento como som principal.
2. Pressione o botão SPLIT para iniciar o modo de
divisão do teclado.
3. Selecione um instrumento como som da divisão
com os botões NUMERICAL CODING.
4. Pressione o botão SPLIT novamente para cancelar
a divisão do teclado e retornar ao modo de teclado
normal.
Ch-24
You could assign two different tones to both
ends of the keyboard with split function, and
you can play a tone with left hand, while
your right hand plays another tone so as to
produce ensemble effect.
Use Keyboard Split Function
1 Start tone mode at first, and select an
instrument as principal tone.
2 Press "SPLIT" button to start split tone
selection mode.
3 Select an instrument as split tone with
"NUMERAL CODING" buttons.
4 Press "SPLIT" button again to cancel
keyboard split and return to normal
keyboard mode.
How to split keyboard
Setting
Split do teclado
Mão
esquerda
Mão
direita
The mode memory function can record your
tone, rhythm, tempo and relevant
parameter's settings .
Mode Memory
You can choose the tone that fits current
style with the function of one touch setting,
and every rhythm has 4 preset tones.
One-touch Setting
1 Press "STORE" button, and then press
any button of "M1-M4" so as to store
current settings in corresponding position.
2 If you want to call the saved parameter
setting when playing, you could press any
button of "M1-M4" and the saved setting
will be called and become to take the place
of current setting.
● After turning power off, the memory will
be cleared automatically.
Store/call memory
parameter
1 Press "O.T.S" button to start one touch
setting mode, and then press "M1-M4"
so as to call out 4 tones preset for current
rhythm.With this mode, chord function is
turned on automatically.
2 Press "O.T.S" button again to exit the
mode .
Using One-touch setting
Modo Memória
A função memória pode gravar seu som, ritmo,
andamento e outros ajustes de parâmetros.
Parâmetro Salvar/Carregar a Memória
P1. ressione o botão STORE e qualquer dos botões
M1-M4 para armazenar os ajustes atuais na
posição correspondente.
S2. e você quiser carregar parâmetros salvos
enquanto toca, basta pressionar qualquer
dos botões M1-M4 e os ajustes salvos serão
carregados e tomarão o lugar dos ajustes atuais.
D• epois de desligar o aparelho, a memória será
limpa automaticamente.
Configuração de Um-toque
Você pode escolher o som que combine com o estilo
atual com a função de ajuste de um-toque. Cada
ritmo possui 4 sons preset.
Usando o ajuste de Um-toque
P1. ressione o botão O.T.S para iniciar o modo
de um toque e então pressione M1-M4 para
carregar um dos 4 sons preset para o ritmo
atual. Neste modo, a função de acordes é ligada
automaticamente.
P2. ressione O.T.S novamente para sair deste
modo.
26. Ajustes
24
●
Função Record/Play
Use esta função para gravar a nota musical, som,
ritmo, acordes e outros parâmetros relevantes do
teclado, a fim de se tornar a solução perfeita para
seus trabalhos.
Preparando a Gravação
Pressione o botão RECORD para iniciar o1.
modo standby de gravação. Então, você pode
selecionar seus próprios ajustes para gravação
incluindo seleção de som, ritmo ou acorde de
início, etc.
A gravação longa pode ser gravada diretamente.2.
Aceitando cerca de 320 notas gravadas; A
gravação curta está disponível através dos
botões de seleção de gravação curta “R1/R4”
que podem gravar cerca de 80 notas.
Iniciando a Gravação
P1. ara começar a gravar, pressione START/STOP
no modo de preparação de gravação e 4 pontos
de batidas e seus valores serão mostrados em
sequência no LCD.
V• ocê pode usar o botão START/STOP para iniciar
ou parar o ritmo.
T2. oque o teclado para começar a gravar.
c• om a função acordes ligada, pressione a área
da mão esquerda do teclado para iniciar o ritmo
diretamente com o acorde.
c• om a função acordes desligada, pressione
START/STOP duas vezes para iniciar o ritmo.
Parando a Gravação
P1. arada manual: pressione o botão RECORD
novamente no modo de gravação, para parar a
gravação. os indicadores de gravação apagam
no LCD.
A2. uto-stop: se a capacidade de memória esgotar
durante a gravação, ela irá parar imediatamente
e o LCD mostrará FULL (cheio).
S3. e um ritmo estiver tocando durante a gravação,
pressione INTRO/ENDING e a gravação irá parar
após o final do ritmo.
Reproduzindo a Gravação
L1. onga: pressione PLAY para iniciar a reprodução
da gravação.
C2. urta: primeiro selecione um dos botões “R1/R4”
de gravação curta e então pressione PLAY para
iniciar a reprodução daquela gravação curta.
V• ocê pode ajustar o tempo enquanto toca.
Nota
Você pode gravar somente uma gravação longa ou•
4 gravações curtas. A última gravação cobrirá a
anterior.
Ch-25
RECORD R1-R4 PLAY
INTRO/ENDINGSTART/STOP
You can use recording function to record
musical note, tone, rhythm, chord and other
relevant parameters of the keyboard to offer
perfect solution for your work.
Use Record / Play Function
1 Press "RECORD" button to start recording
stand-by mode, and you can select your
own setting for recording including
tone, rhythm or starting chord etc.
2 Long recording can be recorded directly,
and there are about 320 notes to be
recorded; short recording is available by
selecting corresponding short recording
buttons "R1-R4", and there are about 80
notes to be recorded.
Recording preparation
1 Manual stop:press "RECORD" button
again under recording mode to stop
recording, recording sign disappears on
the LCD.
2 Auto stop:if memory capacity is full
during recording, recording will be
stopped automatically after LCD displays
FULL.
3 If rhythm is played during recording,
press "INTRO/ENDING" button, and stop
recording automatically after the ending
stops.
Stop recording
1 Long recording:press "PLAY" button to
start recording playback.
2 Short recording: choose corresponding
short recording button "R1-R4" at first,
and then press "PLAY" button to start
corresponding short recording playback.
● When playing, you can adjust tempo.
Recording playback
1 Press "START/STOP" button to start
recording under recording preparation
mode, and 4 beat points of LCD will be
displayed in turn circularly and the value
will be displayed too.
● You can use "START/STOP" button at will
to start or stop rhythm.
2 Play the keyboard to start recording mode.
● When turning on chord function, press left
-hand area of the keyboard to start rhythm
with chord directly.
● When chord function is off, press "START
/STOP" button twice to start rhythm.
Start recording
Notice !
● You can only record a long record or 4
short records, both of which are
incompatible, and latest record will
cover previous record.
Setting
P
27. Referência
●
25
Referência»»
Especificações
Tamanho: 940 x 370 x 130 mm Ritmos: 200
Peso: 6,32 kg Músicas: 50
Teclas: 61 Exatidão de pitch: ≤ 3 cents
Faixa de notas: C2 – C7 Potência de saída: ≥ 8W x 2
Sons: 162
Polifonia: 32 notas
Parâmetros da fonte: DC 12V 800mA
29. Referência
●
27
Lista de Ritmos
1
3
7
9
1
2
3
5
7
8
Ch-28
001
002
003
004
005
006
007
008
009
010
011
012
013
014
015
016
017
018
019
020
021
022
023
024
025
026
027
028
029
030
031
032
033
034
035
036
037
038
039
040
041
042
043
044
045
046
047
048
049
050
8 Beat 1-1
8 Beat 2-1
8 Beat 3-1
8 Beat 4-1
60’s 8 Beat-1
8 Beat Ballad-1
8 Beat Rock-1
16 Beat 1-1
16 Beat 2-1
16 Beat Pop-1
16 Beat Shuffle-1
Ballad-1
Slow Ballad-1
16 Beat Ballad-1
Unplugged-1
Rock-1
Pop Rock-1
Fast Rock-1
Slow Rock 1-1
Slow Rock 2-1
Rock & Roll-1
Heavy Metal-1
Blues Boogie-1
Blues-1
Shuffle-1
Blues Shuffle-1
Rock Shuffle-1
Charlston-1
Disco 1-1
Disco 2-1
Disco Funk-1
Dance-1
House 1-1
House 2-1
Rap-1
Euro Beat-1
Hip Hop-1
Techno-1
Funky Pop-1
Jazz Funk-1
Cool Funky-1
Soul 1-1
Soul 2-1
Soul Shuffle-1
Soul Blues-1
R & B-1
6/8 Gospel-1
Pop Groove-1
Swing-1
Cool Jazz-1
051
052
053
054
055
056
057
058
059
060
061
062
063
064
065
066
067
068
069
070
071
072
073
074
075
076
077
078
079
080
081
082
083
084
085
086
087
088
089
090
091
092
093
094
095
096
097
098
099
100
Pop Swing-1
Swing Fox-1
Big Band-1
Big Band Meduim-1
Jazz Waltz-1
Ragtime-1
Dixeland-1
Quick Step-1
Country 1-1
Country 2-1
Pop Country-1
Country Rock-1
Country Folk-1
3/4 Country-1
Country Waltz-1
Country Shuffle-1
Country Boogie-1
Country Blues-1
Country Quick Step-1
Bluegrass-1
Bossa Nova 1-1
Bossa Nova 2-1
Rhumba-1
Pop Rhumba-1
Cha Cha-1
Pop Cha Cha-1
Tango-1
Jazz Samba-1
Reggae-1
Pop Reggae-1
March 1-1
March 2-1
German March-1
6/8 March-1
Polka-1
Pop Polka-1
Waltz-1
Slow Waltz-1
Vienna Waltz-1
Musette-1
8 Beat-1
Ballad-1
Boogie-1
Jazz-1
Swing-1
Jazz Waltz-1
Twist-1
March-1
6/8 March-1
Waltz-1
101
102
103
104
105
106
107
108
109
110
111
112
113
114
115
116
117
118
119
120
121
122
123
124
125
126
127
128
129
130
131
132
133
134
135
136
137
138
139
140
141
142
143
144
145
146
147
148
149
150
8 Beat 1-2
8 Beat 2-2
8 Beat 3-2
8 Beat 4-2
60’s 8 Beat-2
8 Beat Ballad-2
8 Beat Rock-2
16 Beat 1-2
16 Beat 2-2
16 Beat Pop-2
16 Beat Shuffle-2
Ballad-2
Slow Ballad-2
16 Beat Ballad-2
Unplugged-2
Rock-2
Pop Rock-2
Fast Rock-2
Slow Rock 1-2
Slow Rock 2-2
Rock & Roll-2
Heavy Metal-2
Blues Boogie-2
Blues-2
Shuffle-2
Blues Shuffle-2
Rock Shuffle-2
Charlston-2
Disco 1-2
Disco 2-2
Disco Funk-2
Dance-2
House 1-2
House 2-2
Rap-2
Euro Beat-2
Hip Hop-2
Techno-2
Funky Pop-2
Jazz Funk-2
Cool Funky-2
Soul 1-2
Soul 2-2
Soul Shuffle-2
Soul Blues-2
R & B-2
6/8 Gospel-2
Pop Groove-2
Swing-2
Cool Jazz-2
151
152
153
154
155
156
157
158
159
160
161
162
163
164
165
166
167
168
169
170
171
172
173
174
175
176
177
178
179
180
181
182
183
184
185
186
187
188
189
190
191
192
193
194
195
196
197
198
199
200
Pop Swing-2
Swing Fox-2
Big Band-2
Big Band Meduim-2
Jazz Waltz-2
Ragtime-2
Dixeland-2
Quick Step-2
Country 1-2
Country 2-2
Pop Country-2
Country Rock-2
Country Folk-2
3/4 Country-2
Country Waltz-2
Country Shuffle-2
Country Boogie-2
Country Blues-2
Country Quick Step-2
Bluegrass-2
Bossa Nova 1-2
Bossa Nova 2-2
Rhumba-2
Pop Rhumba-2
Cha Cha-2
Pop Cha Cha-2
Tango-2
Jazz Samba-2
Reggae-2
Pop Reggae-2
March 1-2
March 2-2
German March-2
6/8 March-2
Polka-2
Pop Polka-2
Waltz-2
Slow Waltz-2
Vienna Waltz-2
Musette-2
8 Beat-2
Ballad-2
Boogie-2
Jazz-2
Swing-2
Jazz Waltz-2
Twist-2
March-2
6/8 March-2
Waltz-2
Reference
Rhythm List
30. Referência
28
●
Lista de Demos
Ch-29
001
002
003
004
005
006
007
008
009
010
011
012
013
014
015
016
017
018
019
020
021
022
023
024
025
026
027
028
029
030
031
032
033
034
035
036
037
038
039
040
041
042
043
044
045
046
047
048
049
050
Old Folks At Home
Jeannie With The Light Brown Hair
Annie Laurie
The Yellow Rose Of Texas
My Old Kentucky Home
Deck The Halls
America The Beautiful
The Entertainer
Aloha Oe
Camptown Races
The Blue-Bells Of Scotland
Jingle Bells
Silent Night
Long, Long Ago
Oh! Susanna
Bill Bailey Won’t You Come Home
From The New World
Ave Maria
Turkey In The Straw
Grandfather’s Clock
The Sideway
The Old Gray Mare
Solveig’s Song
Carry Me Back To Old Viginia
O’Solo Mio
Battle Hymne Of The Republic
Aula Lee
Danny Boy
In The Rain
My Bonnie
Red River Valley
Огонек
House Of The Rising Sun
I’ve Been Working On The Railroad
She Wore A Yellow Ribbon
Yankee Doodle
Cannon
Old France
Ode To Joy
“The Surprise” Symphony
Spring From “The Four Seasons”
Joy To The World
Humoreske
Thais Meditation
Minuet
Wiegenlied
Swan Lake
Habanera From “Carmen”
Toy Symphony
Kuckuckswalzer
Reference
Demo List
R
B
t
t
d
c
r
c
C
B
t
t
O
o
a
B
I
c
s
r
a
in
●
(
●
a
I
T
o
p
c
L
A
o
f
●
●
s
●
e
i
o
t
32. Referência
30
●
Lista de Acordes Dedilhados
Ch-31
Fingered Chord List
Reference
A
I
l
d
i
1
e
2
I
i
S
o
W
s
o
e
a
a
t
1
2
a
o
3
A
●
c
a
f
●
s
v
a
●
s
o
34. 32
● Manutenção do Produto»»
A boa e cuidadosa manutenção deste produto desempenha importante papel em sua vida útil e na
ausência de falhas.
Evite aquecimento, umidade ou luz do sol direta
Nunca exponha o instrumento musical na luz direta do sol por muito tempo, nem tampouco coloque
perto de aparelhos de ar condicionado ou fornos.
Não use perto de rádio ou TV
Este instrumento musical pode causar interferências de áudio e vídeo em TV ou no rádio. Neste
caso, leve o instrumento musical para longe da TV ou rádio.
Para limpar, não use produtos como thinner ou similares
Você pode limpar este produto com um pano macio e solução de detergente fraca e neutra. O pano
deve ser mergulhado nesta solução e bem torcido para que seja utilizado levemente úmido.
Evite chacoalhar e bater
O produto deve ser manuseado com cuidado ao ser movido.
Evite uso sob temperaturas muito altas ou muito baixas
Sob altas ou baixas temperaturas, a tela LCD se torna clara e difícil de ser vizualizada. Quando voltar
à temperatura normal, será corrigida automaticamente.