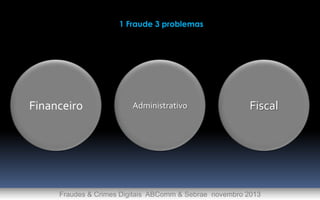
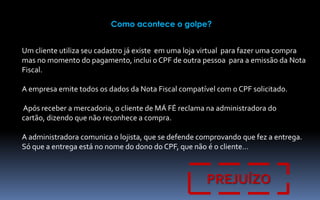
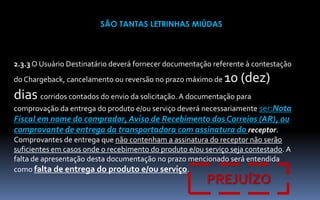
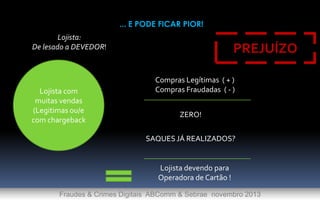
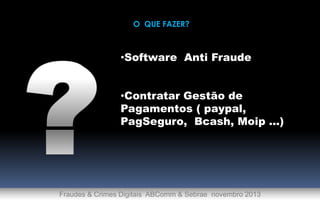
3. DE ONDE VEM AS FRAUDES EM CARTÃO
CLONAGEM
MÁ FÉ
Fraudes & Crimes Digitais ABComm & Sebrae novembro 2013
4. O PESADELO DOS LOJISTAS DIGITAIS TEM NOME
CHARGEBACK
Fraudes & Crimes Digitais ABComm & Sebrae novembro 2013
5. Qual o tamanho do prejuízo?
$ 114
Bilhões
Quando custaram os crimes
digitais nos últimos 12
meses
Fraudes & Crimes Digitais ABComm & Sebrae novembro 2013
7. Como ocorre?
PREJUÍZO
Comprador faz a
compra dia
05
novembro
Comunica cartão
que não
reconhece a
compra em
10
novembro
Cartão informa a
Loja Virtual do
Charge Back dia
02 de
dezembro
Mercadoria já entregue
Impostos já pagos!
Fraudes & Crimes Digitais ABComm & Sebrae novembro 2013
8. Como acontece o golpe?
Um cliente utiliza seu cadastro já existe em uma loja virtual para fazer uma compra
mas no momento do pagamento, inclui o CPF de outra pessoa para a emissão da Nota
Fiscal.
A empresa emite todos os dados da Nota Fiscal compatível com o CPF solicitado.
Após receber a mercadoria, o cliente de MÁ FÉ reclama na administradora do
cartão, dizendo que não reconhece a compra.
A administradora comunica o lojista, que se defende comprovando que fez a entrega.
Só que a entrega está no nome do dono do CPF, que não é o cliente…
PREJUÍZO
9. Operadoras Cartão
Operadoras de
cartão não
garantem
pagamento
transação no caso
de ChargeBack
Fraude com cartões
de crédito
roubados/clonados
Má fé, por não
reconhecer as
compras legitimas
Fraudes & Crimes Digitais ABComm & Sebrae novembro 2013
10. SÃO TANTAS LETRINHAS MIÚDAS
2.3.3 O Usuário Destinatário deverá fornecer documentação referente à contestação
do Chargeback, cancelamento ou reversão no prazo máximo de
10 (dez)
dias corridos contados do envio da solicitação. A documentação para
comprovação da entrega do produto e/ou serviço deverá necessariamente ser:Nota
Fiscal em nome do comprador, Aviso de Recebimento dos Correios (AR), ou
comprovante de entrega da transportadora com assinatura do receptor.
Comprovantes de entrega que não contenham a assinatura do receptor não serão
suficientes em casos onde o recebimento do produto e/ou serviço seja contestado. A
falta de apresentação desta documentação no prazo mencionado será entendida
como falta de entrega do produto e/ou serviço.
PREJUÍZO
11. ... E PODE FICAR PIOR!
Lojista:
De lesado a DEVEDOR!
Lojista com
muitas vendas
(Legitimas ou/e
com chargeback
PREJUÍZO
Compras Legítimas ( + )
Compras Fraudadas ( - )
ZERO!
SAQUES JÁ REALIZADOS?
Lojista devendo para
Operadora de Cartão !
Fraudes & Crimes Digitais ABComm & Sebrae novembro 2013
12. O QUE FAZER?
•Software Anti Fraude
•Contratar Gestão de
Pagamentos ( paypal,
PagSeguro, Bcash, Moip ...)
Fraudes & Crimes Digitais ABComm & Sebrae novembro 2013
Custom animation effects: picture changes during motion path(Advanced)To reproduce the first picture effect on this slide, do the following:On the Home tab, in the Slides group, click Layout and then click Blank. On the Insert tab, in the Illustrations group, click Picture. In the Insert Picture dialog box, select a picture, and then click Insert. Under Picture Tools, on the Format tab, in the bottom right corner of the Size group, click the Size and Position dialog box launcher. In the Size and Position dialog box, on the Size tab, resize or crop the picture as needed so that under Size and rotate, the Height box is set to 2” and the Width box is set to 2”. Resize the picture under Size and rotate by entering values into the Height and Width boxes. Crop the picture under Crop from by entering values into the Left, Right, Top, and Bottom boxes. Under Picture Tools, on the Format tab, in the bottom right corner of the Picture Styles group, click the Format Shape dialog box launcher. In the Format Shape dialog box, click Line Color in the left pane. In the Line Color pane, select Solid line, click the button next to Color, and then under Theme Colors click White, Background 1 (first row, first option from the left).Also in the Format Shape dialog box, click Line Style in the left pane, and then in the Line Style pane, in the Width box, enter 1.5 pt. Also in the Format Shape dialog box, click Shadow in the left pane. In the Shadow pane, click the button next to Presets, and then under Outer click Offset Center (second row, second option from the left). On the Animations tab, in the Animations group, click Custom Animation. On the slide, select the picture. In the Custom Animation task pane, click Add Effect, point to Entrance, and then click More Effects. In the Add Entrance Effect dialog box, under Subtle, click Fade, and then click OK. Also in the Custom Animation task pane, select the first animation effect (fade effect for the picture), and then under Modify: Fade do the following:In the Start list, select With Previous. In the Speed list, select Fast. Also in the Custom Animation task pane, click Add Effect, point to Motion Paths, and then click Right. Also in the Custom Animation task pane, select the second animation effect (motion path for the picture), and then under Modify: Right, in the Start list, select With Previous. Also in the Custom Animation task pane, click the arrow to the right of the second animation effect, and then click Timing. In the Right dialog box, on the Timing tab, in the Speed box, enter 10seconds.On the slide, select the motion path. Press and hold SHIFT to constrain the path to a straight, horizontal line, and then drag the right adjustment handle to the right, stopping approximately 1.5” left of the right edge of the slide. (Note: On the View tab, in the Show/Hide group, select Ruler to measure approximately where the endpoint is on the slide.)To reproduce the other pictures on this slide, do the following:Select the picture. On the Home tab, in the Clipboard group, click the arrow under Paste, and then click Duplicate. Repeat this process for a total of four duplicate pictures. Select a duplicate picture. Under Picture Tools, on the Format tab, in the Adjust group, click Change Picture. In the Insert Picture dialog box, select a new picture, and then click Insert. Under Picture Tools, on the Format tab, in the bottom right corner of the Size group, click the Size and Position dialog box launcher. In the Size and Position dialog box, on the Size tab, resize or crop the picture as needed so that under Size and rotate, the Height box is set to 2” and the Width box is set to 2”. Resize the picture under Size and rotate by entering values into the Height and Width boxes. Crop the picture under Crop from by entering values into the Left, Right, Top, and Bottom boxes. Repeat steps 2-4 for the other duplicate pictures. To reproduce the other animation effects on this slide, do the following:In the Custom Animation task pane, select the third animation effect (fade effect for the second picture). Click the arrow to the right of the selected effect, and then click Timing. In the Fade dialog box, on the Timing tab, in the Delay box, enter 2.5. Also in the Custom Animation task pane, select the fifth animation effect (fade effect for the third picture). Click the arrow to the right of the selected effect, and then click Timing. In the Fade dialog box, on the Timing tab, in the Delay box, enter 5. Also in the Custom Animation task pane, select the seventh animation effect (fade effect for the fourth picture). Click the arrow to the right of the selected effect, and then click Timing. In the Fade dialog box, on the Timing tab, in the Delay box, enter 7.5. On the slide, press and hold SHIFT and select all four pictures. On the Home tab, in the Drawing group, click Arrange, point to Align, and then do the following:Click Align Selected Objects.Click Align Center. Click Align Middle. Drag the pictures into the top left corner of the slide. To reproduce the background effects on this slide, do the following:On the Home tab, in the Drawing group, click Shapes, and then under Rectangles click Rectangle (first option from the left). On the slide, drag to draw a rectangle. Select the rectangle. Under Drawing Tools, on the Format tab, in the Size group, do the following:In the Shape Height box, enter 3.42”.In the Shape Width box, enter 10”.Under DrawingTools, on the Format tab, in the bottom right corner of the Shape Styles group, click the Format Shape dialog box launcher. In the Format Shape dialog box, click Line Color in the left pane, and then select No line in the Line Color pane. Also in the Format Shape dialog box, click Fill in the left pane, select Gradient fill in the Fill pane, and then do the following:In the Type list, select Linear.Click the button next to Direction, and then click Linear Down (first row, second option from the left).Under Gradient stops, click Add or Remove until two stops appear in the drop-down list.Also under Gradient stops, customize the gradient stops that you added as follows:Select Stop 1 from the list, and then do the following:In the Stop position box, enter 1%. Click the button next to Color, click More Colors, and then in the Colors dialog box, on the Custom tab, enter values for Red: 94, Green: 156, Blue: 198.In the Transparency box, enter 60%.Select Stop 2 from the list, and then do the following: In the Stop position box, enter 100%.Click the button next to Color, click More Colors, and then in the Colors dialog box, on the Custom tab, enter values for Red: 94, Green: 156, Blue: 198.In the Transparency box, enter 90%.On the slide, drag the rectangle vertically to position it just above the middle of the slide. On the Home tab, in the Drawing group, click Arrange, and then do the following:Point to Align, and then click Align to Slide.Point to Align, and then click Align Center.Click Send to Back. Right-click the slide background area, and then click Format Background. In the Format Background dialog box, click Fill in the left pane, select Gradient fill in the Fill pane, and then do the following:In the Type list, select Linear.Click the button next to Direction, and then click Linear Down (first row, second option from the left)In the Angle box, enter 90⁰.Under Gradient stops, click Add or Remove until two stops appear in the drop-down list.Also under Gradient stops, customize the gradient stops that you added as follows:Select Stop 1 from the list, and then do the following:In the Stop position box, enter 70%.Click the button next to Color, and then click White, Background 1, Darker 5% (second row, first option from the left).Select Stop 2 from the list, and then do the following: In the Stop position box, enter 100%.Click the button next to Color, and then click White, Background 1, Darker 25% (fourth row, first option from the left).
O Chargeback é o cancelamento de uma venda feita com cartão de débito ou crédito, que pode acontecer por dois motivos: um deles é o não reconhecimento da compra por parte do titular do cartão (algum tipo de fraude), e o outro pode se dar pelo fato de a transação não obedecer às regulamentações previstas nos contratos, termos, aditivos e manuais editados pelas administradoras. To reproduce the first picture effect on this slide, do the following:On the Home tab, in the Slides group, click Layout and then click Blank. On the Insert tab, in the Illustrations group, click Picture. In the Insert Picture dialog box, select a picture, and then click Insert. Under Picture Tools, on the Format tab, in the bottom right corner of the Size group, click the Size and Position dialog box launcher. In the Size and Position dialog box, on the Size tab, resize or crop the picture as needed so that under Size and rotate, the Height box is set to 2” and the Width box is set to 2”. Resize the picture under Size and rotate by entering values into the Height and Width boxes. Crop the picture under Crop from by entering values into the Left, Right, Top, and Bottom boxes. Under Picture Tools, on the Format tab, in the bottom right corner of the Picture Styles group, click the Format Shape dialog box launcher. In the Format Shape dialog box, click Line Color in the left pane. In the Line Color pane, select Solid line, click the button next to Color, and then under Theme Colors click White, Background 1 (first row, first option from the left).Also in the Format Shape dialog box, click Line Style in the left pane, and then in the Line Style pane, in the Width box, enter 1.5 pt. Also in the Format Shape dialog box, click Shadow in the left pane. In the Shadow pane, click the button next to Presets, and then under Outer click Offset Center (second row, second option from the left). On the Animations tab, in the Animations group, click Custom Animation. On the slide, select the picture. In the Custom Animation task pane, click Add Effect, point to Entrance, and then click More Effects. In the Add Entrance Effect dialog box, under Subtle, click Fade, and then click OK. Also in the Custom Animation task pane, select the first animation effect (fade effect for the picture), and then under Modify: Fade do the following:In the Start list, select With Previous. In the Speed list, select Fast. Also in the Custom Animation task pane, click Add Effect, point to Motion Paths, and then click Right. Also in the Custom Animation task pane, select the second animation effect (motion path for the picture), and then under Modify: Right, in the Start list, select With Previous. Also in the Custom Animation task pane, click the arrow to the right of the second animation effect, and then click Timing. In the Right dialog box, on the Timing tab, in the Speed box, enter 10seconds.On the slide, select the motion path. Press and hold SHIFT to constrain the path to a straight, horizontal line, and then drag the right adjustment handle to the right, stopping approximately 1.5” left of the right edge of the slide. (Note: On the View tab, in the Show/Hide group, select Ruler to measure approximately where the endpoint is on the slide.)To reproduce the other pictures on this slide, do the following:Select the picture. On the Home tab, in the Clipboard group, click the arrow under Paste, and then click Duplicate. Repeat this process for a total of four duplicate pictures. Select a duplicate picture. Under Picture Tools, on the Format tab, in the Adjust group, click Change Picture. In the Insert Picture dialog box, select a new picture, and then click Insert. Under Picture Tools, on the Format tab, in the bottom right corner of the Size group, click the Size and Position dialog box launcher. In the Size and Position dialog box, on the Size tab, resize or crop the picture as needed so that under Size and rotate, the Height box is set to 2” and the Width box is set to 2”. Resize the picture under Size and rotate by entering values into the Height and Width boxes. Crop the picture under Crop from by entering values into the Left, Right, Top, and Bottom boxes. Repeat steps 2-4 for the other duplicate pictures. To reproduce the other animation effects on this slide, do the following:In the Custom Animation task pane, select the third animation effect (fade effect for the second picture). Click the arrow to the right of the selected effect, and then click Timing. In the Fade dialog box, on the Timing tab, in the Delay box, enter 2.5. Also in the Custom Animation task pane, select the fifth animation effect (fade effect for the third picture). Click the arrow to the right of the selected effect, and then click Timing. In the Fade dialog box, on the Timing tab, in the Delay box, enter 5. Also in the Custom Animation task pane, select the seventh animation effect (fade effect for the fourth picture). Click the arrow to the right of the selected effect, and then click Timing. In the Fade dialog box, on the Timing tab, in the Delay box, enter 7.5. On the slide, press and hold SHIFT and select all four pictures. On the Home tab, in the Drawing group, click Arrange, point to Align, and then do the following:Click Align Selected Objects.Click Align Center. Click Align Middle. Drag the pictures into the top left corner of the slide. To reproduce the background effects on this slide, do the following:On the Home tab, in the Drawing group, click Shapes, and then under Rectangles click Rectangle (first option from the left). On the slide, drag to draw a rectangle. Select the rectangle. Under Drawing Tools, on the Format tab, in the Size group, do the following:In the Shape Height box, enter 3.42”.In the Shape Width box, enter 10”.Under DrawingTools, on the Format tab, in the bottom right corner of the Shape Styles group, click the Format Shape dialog box launcher. In the Format Shape dialog box, click Line Color in the left pane, and then select No line in the Line Color pane. Also in the Format Shape dialog box, click Fill in the left pane, select Gradient fill in the Fill pane, and then do the following:In the Type list, select Linear.Click the button next to Direction, and then click Linear Down (first row, second option from the left).Under Gradient stops, click Add or Remove until two stops appear in the drop-down list.Also under Gradient stops, customize the gradient stops that you added as follows:Select Stop 1 from the list, and then do the following:In the Stop position box, enter 1%. Click the button next to Color, click More Colors, and then in the Colors dialog box, on the Custom tab, enter values for Red: 94, Green: 156, Blue: 198.In the Transparency box, enter 60%.Select Stop 2 from the list, and then do the following: In the Stop position box, enter 100%.Click the button next to Color, click More Colors, and then in the Colors dialog box, on the Custom tab, enter values for Red: 94, Green: 156, Blue: 198.In the Transparency box, enter 90%.On the slide, drag the rectangle vertically to position it just above the middle of the slide. On the Home tab, in the Drawing group, click Arrange, and then do the following:Point to Align, and then click Align to Slide.Point to Align, and then click Align Center.Click Send to Back. Right-click the slide background area, and then click Format Background. In the Format Background dialog box, click Fill in the left pane, select Gradient fill in the Fill pane, and then do the following:In the Type list, select Linear.Click the button next to Direction, and then click Linear Down (first row, second option from the left)In the Angle box, enter 90⁰.Under Gradient stops, click Add or Remove until two stops appear in the drop-down list.Also under Gradient stops, customize the gradient stops that you added as follows:Select Stop 1 from the list, and then do the following:In the Stop position box, enter 70%.Click the button next to Color, and then click White, Background 1, Darker 5% (second row, first option from the left).Select Stop 2 from the list, and then do the following: In the Stop position box, enter 100%.Click the button next to Color, and then click White, Background 1, Darker 25% (fourth row, first option from the left).
Custom animation effects: picture changes during motion path(Advanced)To reproduce the first picture effect on this slide, do the following:On the Home tab, in the Slides group, click Layout and then click Blank. On the Insert tab, in the Illustrations group, click Picture. In the Insert Picture dialog box, select a picture, and then click Insert. Under Picture Tools, on the Format tab, in the bottom right corner of the Size group, click the Size and Position dialog box launcher. In the Size and Position dialog box, on the Size tab, resize or crop the picture as needed so that under Size and rotate, the Height box is set to 2” and the Width box is set to 2”. Resize the picture under Size and rotate by entering values into the Height and Width boxes. Crop the picture under Crop from by entering values into the Left, Right, Top, and Bottom boxes. Under Picture Tools, on the Format tab, in the bottom right corner of the Picture Styles group, click the Format Shape dialog box launcher. In the Format Shape dialog box, click Line Color in the left pane. In the Line Color pane, select Solid line, click the button next to Color, and then under Theme Colors click White, Background 1 (first row, first option from the left).Also in the Format Shape dialog box, click Line Style in the left pane, and then in the Line Style pane, in the Width box, enter 1.5 pt. Also in the Format Shape dialog box, click Shadow in the left pane. In the Shadow pane, click the button next to Presets, and then under Outer click Offset Center (second row, second option from the left). On the Animations tab, in the Animations group, click Custom Animation. On the slide, select the picture. In the Custom Animation task pane, click Add Effect, point to Entrance, and then click More Effects. In the Add Entrance Effect dialog box, under Subtle, click Fade, and then click OK. Also in the Custom Animation task pane, select the first animation effect (fade effect for the picture), and then under Modify: Fade do the following:In the Start list, select With Previous. In the Speed list, select Fast. Also in the Custom Animation task pane, click Add Effect, point to Motion Paths, and then click Right. Also in the Custom Animation task pane, select the second animation effect (motion path for the picture), and then under Modify: Right, in the Start list, select With Previous. Also in the Custom Animation task pane, click the arrow to the right of the second animation effect, and then click Timing. In the Right dialog box, on the Timing tab, in the Speed box, enter 10seconds.On the slide, select the motion path. Press and hold SHIFT to constrain the path to a straight, horizontal line, and then drag the right adjustment handle to the right, stopping approximately 1.5” left of the right edge of the slide. (Note: On the View tab, in the Show/Hide group, select Ruler to measure approximately where the endpoint is on the slide.)To reproduce the other pictures on this slide, do the following:Select the picture. On the Home tab, in the Clipboard group, click the arrow under Paste, and then click Duplicate. Repeat this process for a total of four duplicate pictures. Select a duplicate picture. Under Picture Tools, on the Format tab, in the Adjust group, click Change Picture. In the Insert Picture dialog box, select a new picture, and then click Insert. Under Picture Tools, on the Format tab, in the bottom right corner of the Size group, click the Size and Position dialog box launcher. In the Size and Position dialog box, on the Size tab, resize or crop the picture as needed so that under Size and rotate, the Height box is set to 2” and the Width box is set to 2”. Resize the picture under Size and rotate by entering values into the Height and Width boxes. Crop the picture under Crop from by entering values into the Left, Right, Top, and Bottom boxes. Repeat steps 2-4 for the other duplicate pictures. To reproduce the other animation effects on this slide, do the following:In the Custom Animation task pane, select the third animation effect (fade effect for the second picture). Click the arrow to the right of the selected effect, and then click Timing. In the Fade dialog box, on the Timing tab, in the Delay box, enter 2.5. Also in the Custom Animation task pane, select the fifth animation effect (fade effect for the third picture). Click the arrow to the right of the selected effect, and then click Timing. In the Fade dialog box, on the Timing tab, in the Delay box, enter 5. Also in the Custom Animation task pane, select the seventh animation effect (fade effect for the fourth picture). Click the arrow to the right of the selected effect, and then click Timing. In the Fade dialog box, on the Timing tab, in the Delay box, enter 7.5. On the slide, press and hold SHIFT and select all four pictures. On the Home tab, in the Drawing group, click Arrange, point to Align, and then do the following:Click Align Selected Objects.Click Align Center. Click Align Middle. Drag the pictures into the top left corner of the slide. To reproduce the background effects on this slide, do the following:On the Home tab, in the Drawing group, click Shapes, and then under Rectangles click Rectangle (first option from the left). On the slide, drag to draw a rectangle. Select the rectangle. Under Drawing Tools, on the Format tab, in the Size group, do the following:In the Shape Height box, enter 3.42”.In the Shape Width box, enter 10”.Under DrawingTools, on the Format tab, in the bottom right corner of the Shape Styles group, click the Format Shape dialog box launcher. In the Format Shape dialog box, click Line Color in the left pane, and then select No line in the Line Color pane. Also in the Format Shape dialog box, click Fill in the left pane, select Gradient fill in the Fill pane, and then do the following:In the Type list, select Linear.Click the button next to Direction, and then click Linear Down (first row, second option from the left).Under Gradient stops, click Add or Remove until two stops appear in the drop-down list.Also under Gradient stops, customize the gradient stops that you added as follows:Select Stop 1 from the list, and then do the following:In the Stop position box, enter 1%. Click the button next to Color, click More Colors, and then in the Colors dialog box, on the Custom tab, enter values for Red: 94, Green: 156, Blue: 198.In the Transparency box, enter 60%.Select Stop 2 from the list, and then do the following: In the Stop position box, enter 100%.Click the button next to Color, click More Colors, and then in the Colors dialog box, on the Custom tab, enter values for Red: 94, Green: 156, Blue: 198.In the Transparency box, enter 90%.On the slide, drag the rectangle vertically to position it just above the middle of the slide. On the Home tab, in the Drawing group, click Arrange, and then do the following:Point to Align, and then click Align to Slide.Point to Align, and then click Align Center.Click Send to Back. Right-click the slide background area, and then click Format Background. In the Format Background dialog box, click Fill in the left pane, select Gradient fill in the Fill pane, and then do the following:In the Type list, select Linear.Click the button next to Direction, and then click Linear Down (first row, second option from the left)In the Angle box, enter 90⁰.Under Gradient stops, click Add or Remove until two stops appear in the drop-down list.Also under Gradient stops, customize the gradient stops that you added as follows:Select Stop 1 from the list, and then do the following:In the Stop position box, enter 70%.Click the button next to Color, and then click White, Background 1, Darker 5% (second row, first option from the left).Select Stop 2 from the list, and then do the following: In the Stop position box, enter 100%.Click the button next to Color, and then click White, Background 1, Darker 25% (fourth row, first option from the left).
Timeline graphic with pictures(Intermediate)To reproduce the picture effects on this slide, do the following:On the Home tab, in the Slides group, click Layout, and then click Blank.On the Insert tab, in the Illustrations group, click Picture. In the Insert Picture dialog box, select a picture and then click Insert. Select the picture. Under Picture Tools, on the Format tab, in the bottom right corner of the Size group, click the Size and Position dialog box launcher.In the Size and Position dialog box, on the Size tab, resize or crop the picture as needed so that under Size and rotate, the Height box is set to 2.65” and the Width box is set to 9”. Resize the picture under Size and rotate by entering values into the Height and Width boxes. Crop the picture under Crop from by entering values into the Left, Right, Top, and Bottom boxes. Under Picture Tools, in the Format tab, in the Picture Styles group, click Picture Shape, and then under Rectangles click Round Same Side Corner Rectangle (eighth option from the left).Drag the top yellow diamond adjustment handle slightly to the right to decrease the amount of rounding on the corners. Under Picture Tools, in the Format tab, in the Picture Styles group, click Picture Effects, point to Shadow, and then under Inner click Inside Center (second row, second option from the left).To reproduce the timeline effects on this slide, do the following:On the Home tab, in the Drawing group, click Shapes, and then under Rectangles click Rectangle (first option from the left). On the slide, drag to draw a rectangle.Select the rectangle. Under Drawing Tools, on the Format tab, in the Size group, do the following:In the Shape Height box, enter 0.73”.In the Shape Width box, enter 9”.On the Home tab, in the bottom right corner of the Drawing group, click the Format Shape dialog box launcher. In the Format Shape dialog box, click Fill in the left pane, select Solid fill in the Fill pane, and then do the following:Click the button next to Color, and then under Theme Colors click Black, Text 1, Lighter 35% (third row, second option from the left).In the Transparency box, enter 20%.Also in the Format Shape dialog box, click Line Color in the left pane, and then in the right pane, select No line. Also in the Format Shape dialog box, click Shadow in the left pane. In the right pane, click the button next to Presets, and then under Inner click Inside Center (second row, second option from the left). Drag the rectangle onto the bottom of the picture. Press and hold SHIFT and select the rectangle and the picture. On the Home tab, in the Drawing group, click Arrange, point to Align, and then do the following: Click Align Selected Objects. Click Align Center.Click Align Top.Click Align to Slide.Click Align Center. To reproduce the month labels for the timeline, do the following:On the Insert tab, in the Text group, click Text Box, and then on the slide, drag to draw the text box.Enter text in the text box (in this example the text is “JAN”), select the text, and then on the Home tab, in the Font group, select Gil Sans MT Condensed from the Font list, select 18 from the Font Size list, click the arrow next to Font Color, and then under Theme Colors click White, Background 1, Darker 35% (fifth row, first option from the left).On the Home tab, in the Paragraph group, click Center to center the text in the text box. Select the text box. On the Home tab, in the Clipboard group, click the arrow under Paste, and then click Duplicate. Repeat the process until there is a total of six text boxes. On the slide, drag the text boxes onto the rectangle to form a timeline. On the Home tab, in the Editing group, click Select, and then click Selection Pane. In the Selection and Visibility pane, press and hold CTRL and select all six text boxes and the rectangle.On the Home tab, in the Drawing group, click Arrange, point to Align, and then do the following:Click Align Selected Objects.Click Align Middle. In the Selection and Visibility pane, press and hold CTRL and cancel the selection of the rectangle, keeping the text boxes selected. On the Home tab, in the Drawing group, click Arrange, point to Align, and then do the following:Click Align to Slide.Click Distribute Horizontally. To change the text in the duplicate text boxes, click in each text box and edit the text.To change the color of the second text box from the left, select the text box, and then on the Home tab, in the Font group, click the arrow next to Font Color, and then under Theme Colors click White, Background 1 (first row, first option from the left). To reproduce the vertical line with text effects on this slide, do the following:On the Home tab, in the Drawing group, click Shapes, and then under Lines click Line (first option from the left).Press and hold SHIFT, and then drag on the slide to draw a straight, vertical line. Select the line. Under Drawing Tools, on the Format tab, in the Size group, in the Shape Width box, enter 1.2”.On the Home tab, in the bottom right corner of the Drawing group, click the Format Shape dialog box launcher. In the Format Shape dialog box, click Line Color in the left pane, and then do the following in the right pane:Select Solid line.Click the button next to Color, and then under Theme Colors click White, Background 1, Darker 25% (fourth row, first option from the left).Also in the Format Shape dialog box, click Line Style in the left pane, and then do the following in the right pane:In the Width box, enter 0.75 pt.Under Arrow Settings, click the button next to Begin type, and then click Oval Arrow (second row, third option from the left).Click the button next to Begin size, and then click Arrow L Size 1 (first row, first option from the left).Click the button next to End type, and then enter Oval Arrow (second row, third option from the left).Click the button next to End size, and then enter Arrow R Size 1 (first row, first option from the left).On the Home tab, in the Clipboard group, click the arrow under Paste, and then click Duplicate. Select the duplicate line. Under Drawing Tools, on the Format tab, in the Size group, in the Shape Width box, enter 2.6”.Press and hold SHIFT and select both lines. On the Home tab, in the Drawing group, click Arrange, and then do the following:Point to Align, and then click Align Selected Objects.Point to Align, and then click Align Center.Drag both lines together on the slide to position them under one of the timeline month labels. Press and hold SHIFT and select both lines and the text box they are under. On the Home tab, in the Drawing group, click Arrange, and then do the following:Click Align Selected Objects.Click Align Center.On the Insert tab, in the Text group, click Text Box, and then on the slide, drag to draw the text box.Enter text in the text box, select the text, and then on the Home tab, in the Font group, select Gill Sans MT from the Font list, select 20 from the Font Size list, and then click the arrow next to Font Color and click White, Background 1 (first row, first option from the left).On the Home tab, in the Paragraph group, click Align Text Left to align the text left in the text box. On the slide, drag the text box to position it to the right of the vertical line. To reproduce the background on this slide, do the following:Right-click the slide background area, and then click Format Background. In the Format Background dialog box, click Fill in the left pane, select Gradient fill in the Fill pane, and then do the following:In the Type list, select Linear.Click the button next to Direction, and then click Linear Down (first row, second option from the left).Under Gradient stops, click Add or Remove until two stops appear in the drop-down list.Also under Gradient stops, customize the gradient stops that you added as follows:Select Stop 1 from the list, and then do the following:In the Stop position box, enter 50%.Click the button next to Color, and then under Theme Colors click Black, Text 1 (first row, second option from the left).Select Stop 2 from the list, and then do the following:In the Stop position box, enter 99%.Click the button next to Color, and then under Theme Colors click Black, Text 1, Lighter 35% (third row, second option from the left).