Permaculture Design Process in Action
•
24 gostaram•6,376 visualizações

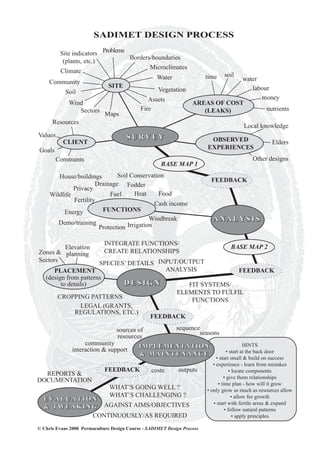
The document outlines the SADIMET design process, which involves 6 main steps: 1) conducting a site survey, 2) analyzing the site to identify functions and areas of production needed, 3) designing systems to fulfill the identified functions, 4) implementing and maintaining the design, 5) evaluating the design, and 6) tweaking the design as needed. The design process focuses on holistically meeting the client's goals while addressing the needs of the land through integrated systems that utilize beneficial relationships to minimize effort and waste. Feedback is incorporated from the client and tutors at various stages of the process.

Recomendados
Recomendados
Mais conteúdo relacionado
Mais procurados
Mais procurados (20)
Destaque
Destaque (20)
Semelhante a Permaculture Design Process in Action
Semelhante a Permaculture Design Process in Action (20)
Último
Último (20)
Permaculture Design Process in Action
- 1. SADIMET DESIGN PROCESS Site indicators Problems Borders/boundaries (plants, etc.) Microclimates Climate Water time soil water Community SITE labour Soil Vegetation Assets money Wind AREAS OF COST Sectors Fire (LEAKS) nutrients Maps Resources Local knowledge Values SURVEY CLIENT OBSERVED Elders Goals EXPERIENCES Constraints Other designs BASE MAP 1 House/buildings Soil Conservation FEEDBACK Drainage Fodder Privacy Wildlife Fuel Heat Food Fertility Cash income Energy FUNCTIONS Demo/training Windbreak ANALYSIS Protection Irrigation INTEGRATE FUNCTIONS/ Elevation BASE MAP 2 Zones & planning CREATE RELATIONSHIPS Sectors SPECIES’ DETAILS INPUT/OUTPUT PLACEMENT ANALYSIS FEEDBACK (design from patterns to details) DESIGN FIT SYSTEMS/ ELEMENTS TO FULFIL CROPPING PATTERNS FUNCTIONS LEGAL (GRANTS, REGULATIONS, ETC.) FEEDBACK sources of sequence seasons resources community IMPLEMENTATION HINTS interaction & support • start at the back door & MAINTENANCE • start small & build on success • experience - learn from mistakes FEEDBACK costs outputs • locate components REPORTS & • give them relationships DOCUMENTATION • time plan - how will it grow WHAT’S GOING WELL ? • only grow as much as resources allow WHAT’S CHALLENGING ? • allow for growth EVALUATION • start with fertile areas & expand & T W E A K I N G AGAINST AIMS/OBJECTIVES • follow natural patterns CONTINUOUSLY/AS REQUIRED • apply principles © Chris Evans 2008 Permaculture Design Course - SADIMET Design Process
- 2. Designed Visions Permaculture Design Course Handout Source: © Chris Evans 2003
- 3. Designed Visions Permaculture Design Course Handout Source: © Chris Evans 2003
- 4. Designed Visions Permaculture Design Course Handout Themes in Design Yield The sum total of surplus energy produced by, stored, conserved, reused or converted by the design. Energy is in surplus once the system itself has available all its needs for growth, reproduction & maintenance (and thus the extra is available for export, use or trade). Resource Energy storage to assist yield. Categories of resources; 1. Those which increase with modest use e.g. coppice, information; 2. Those unaffected by use e.g. sunlight, water through mill, view; 3. Those which disappear or degrade if not used, e.g veggies (overcome by 'weeds', etc), bees; 4. Those that are reduced by use. e.g. oil, clay deposits; 5. Those that pollute or destroy other resources if used. e.g. nuclear power, concrete. 1-3 are commonly produced in natural systems & rural living situations & are the only sustainabie basis of society. 4 & 5 are as a result of urban & industrial development. (maximise number of useful energy storages). Entropy Dissipated energy - no longer in a form usable by the system - bound or dissipated energy; energy unavailable for work, or not useful to the system (1+1=1.5 ....minimise entropy). Synergy Organisms are energy transformers. They survive by using this energy and their survival is a function of their ability to use it. Energy produced by elements in harmonious cooperation with each other is GREATER THAN THE SUM OF- ITS PARTS (1+1=3 ....maximise synergetic connections). Guild Assemblies of plants & animals of different species, occurring together over their range. Guilds act to assist our health, aid our management (work) and to buffer against adverse environmental effects. Microclimate The summation of environmental conditions at a particular site, as affected by local factors rather than climatic ones.
- 5. Designed Visions - Permaculture Design Course Handout Design Activity – Hints on the Process The main purpose of the design activity is to provide an opportunity for supported practice & to show that you have achieved and are able to implement an understanding of the permaculture principles and their application using the design process. Step One: Survey Site analysis: • Create a base map with existing boundaries, structures, land/vegetation types (pasture, trees, etc.), water bodies, access routes, etc. You can also make a site profile/transect to show slope/shape of land. • List information on climate, soil, plant species (esp. those indicating types of site), water/moisture, wind, microclimates, etc. Pay attention to those things that may act as limiting factors and/or resources, and potential hazards e.g. flooding, fires. Include historical information about the site. • List areas/types of erosion (leaks) i.e. where resources are being lost from the site e.g. soil, nutrients, water, money, skills, etc. Client Analysis: • Use client questionnaire handout as a basis for your client interview. • List goals of client - their vision for the land, what they want to achieve. • What is their timeframe for achieving these goals? • List the resources they have, e.g. time, skills, money, etc. • List their constraints/limiting factors, other relevant information. Step Two: Analysis - Identify Functions/Areas of Production needed • What functions are required to meet the needs of the client & land, prevent the resource leaks etc? e.g. livestock, irrigation, income generation, soil conservation, shelter, security, etc. Some of the "areas" can be sub-divided e.g. income generation into bees, vegetables, fruit, livestock, crafts, etc. Step Three: Design • What systems are needed to fulfill the functions required? • List these & examine linkages/beneficial relationships that exist between the systems. Examine the needs/outputs/characteristics of the different systems (systems' analysis). • Experiment with placement of systems (using a map) & examine if their productivity can be improved (or erosion reduced) by siting them in different places. • Select and place elements to fulfil the functions identified as needed in the different systems. Give an idea of species' composition of relevant systems e.g. windbreaks, orchard, kitchen garden, etc. • Integrate functions to satisfy needs with outputs i.e. allow the systems/elements to do the work to decrease effort (work) & waste (pollution).
- 6. Designed Visions - Permaculture Design Course Handout Feedback to client Feedback the outcome so far & if the client has any changes/suggestions etc. Is the design helping to achieve their goals while meeting the needs of the land? Are new problems being created? Step Four: Implementation & Maintenance • Detail the sequence of implementation - which systems/elements go in first (priority ranking). Give an idea of time needed to implement the different priorities. • Give an idea of costs of implementation over time. • Give an idea of outputs coming from the designed system, over time if possible. • Detail how the design is maintained and/or added to over time (including the priorities, sequence and costs of doing this). • Detail how the design involves and/or benefits the community/region as a whole. • Make a detailed map with systems & placement. Step Five: Evaluate • Feedback the design so far & if the client has any changes/suggestions etc. Is the design helping to achieve their goals while meeting the needs of the client & land? Are new problems being created? Is the design realistic/achievable? Are there any unnecessary costs? Step Six: Tweaking • Modify as required. Presentation You will have 60 minutes for presentation of which approximately: • 5 mins on introduction, summarising step one. • 40 mins to present the design, including all the items in step four. Include information on process - how you came to reach the decisions/selections you made, what other options had you considered? • 5 minutes question/answers, clarification etc. • 10 minutes feedback from client/tutors (don’t allow feedback on this feedback!). • Make sure all the group is involved in the presentation. • You don't have to give details of every plant/animal in the design, but give representative samples e.g. structure of the windbreak, orchard, vegetable beds etc.
- 7. Designed Visions Permaculture Design Course Handout Permaculture Designers Checklist Name[s] of Client[s]; Address; Size of Property; Number of People on site and Relationship: Ages; Special Needs; Occupations / Skills; Lifestyle: Eating Habits; Level of Food Self-sufficiency Required; Clients Wants and Needs: Financial Situation: On-site Resources; Security of Tenure; Potential catastrophes; (e.g. fire, flood and frost); Plans and Drawings; Known Problems; Privacy; Priorities: Water Catchment: (Quality and Size); Water (General): Sewage & Waste: Soil (General); Erosion: Aspect: Sacred Sites: Archaeological Sites: Addresses of like-minded local people; Source: Terra Firma – permaculture design & teaching – Patsy Garrard & George Sobol – terrafirma@gn.apc.org - Based on an original by Lea Harrison
- 8. Designed Visions Permaculture Design Course Handout Environmental Analysis Historical land use: Talk to locals, look at old maps, photos. Recent site history: Logging, cropping, spraying, crops, uses. County structure plans: Topography: Contour maps and Field survey. Identify key areas. Mark volleys and ridges. Determine slope gradient. Sector analysis: Aspect (direction of slopes). Sun Sectors (winter & summer sunrise to sunset). Wind (wind rose for the area – prevailing wind direction, damaging winter winds). Soils & geology: Geological maps. Types of soil and Analysis. Soil tests: Field Test Kits. Drainage and Absorption. Soil Depths, a and b levels. Stability of site. Vegetation: Flora - mix, identification, health. Forests - type, age, condition, value, density, exotic species, ground cover, poisonous plants. Fauna: Grazing animals, waterfowl, native birds, ntroduced animals, creatures of pain and fear. Climate: Altitude. Frost. Hail - timing, frequency and directions. Storms - timing, frequency and directions. Average Rainfall. Minimum and maximum temperatures. Hydrology: Drainage patterns. Springs. Rivers and Streams. Farm roads: New roads required: Costs? Source: Terra Firma – permaculture design & teaching – Patsy Garrard & George Sobol – terrafirma@gn.apc.org - Based on an original by Lea Harrison
- 9. Designed Visions Permaculture Design Course Handout Particular features: Rock outcrops. Landslides. Waterfalls. Caves. Swimming holes. Suitable windmill / hydraulic ram sites. Views. Local utilities: Electricity. Gas. Mains water. Telephone. Mains Sewerage. Shops. Schools. Public transport. Hospitals. Fire brigade. Dump. Council constraints: Planning permission. Water extraction. Easements. Macro landuse: What is happening upstream and over the fence? Local resources: Sawmill. Factories. Free plant and seed sources. Biomass. Quarry. Livestock breeders. Local skills/producers. Noise: Rail, air, road, industry. Visual pollution: Smells: Sewage works Tannery Source: Terra Firma – permaculture design & teaching – Patsy Garrard & George Sobol – terrafirma@gn.apc.org - Based on an original by Lea Harrison