
Recomendados
Mais conteúdo relacionado
Mais procurados
Mais procurados (20)
Semelhante a Forno doméstico HA-830 manual de instruções
Semelhante a Forno doméstico HA-830 manual de instruções (17)
Forno doméstico HA-830 manual de instruções
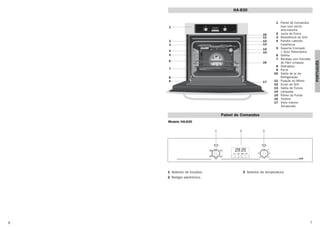
- 1. 7 PORTUGUÉS 6 HA-830 1 Painel de Comandos Inox com verniz anti-mancha 2 Junta do Forno 3 Resistência do Grill 4 Painéis Laterais Cataliticos 5 Suporte Cromado + Guia Telescópica 6 Grelha 7 Bandeja com Esmalte de Fácil Limpeza 8 Dobradiça 9 Porta 10 Saída de ar da Refrigeração 11 Fixação ao Móvel 12 Ecran do Grill 13 Saída de Fumos 14 Lâmpada 15 Painel do Fundo 16 Turbina 17 Vidro Interior Temperado Modelo HA-830 Painel de Comandos 1 Selector de funções. 2 Relógio electrónico. 3 Selector de temperatura. HA830 50 90 130 170 210 250 1 2 3 4 6 7 8 9 5 11 10 12 13 14 15 16 17 HA830 50 90 130 170 210 250 21 3 3172092-ABB00 15/4/05 09:19 Página 6
- 2. 9 PORTUGUÉS 8 seguida, o forno desligar-se-á de forma auto- mática. Duração e Fim do Cozinhado: Permite progra- mar a duração e a hora de finalização do cozin- hado. Com esta função, o forno colocar-se-á em funcionamento de forma automática à hora necessária para cozinhar durante o tempo seleccionado (Duração), finalizando de forma automática à hora anteriormente indica- da. (Fim do Cozinhado). Programação do Avisador 1 Prima a tecla até o símbolo ilumi- nar-se. A seguir prima a tecla . 2 Seleccione o tempo após o qual deseja que o relógio avise, premindo as teclas ou . 3 Posteriormente, soarão 2 beeps seguidos, será mostrada a hora actual e o símbolo permanecerá iluminado, indicando que o avisador já está programado. 4 Decorrido o tempo programado, soará um sinal acústico e o símbolo começará a piscar. 5 Prima qualquer tecla para parar o sinal acús- tico, o símbolo desligar-se-á. Em qualquer momento, pode visualizar o tempo restante, premindo as teclas ou até o símbolo piscar, e premindo de seguida a tecla . Neste momento, pode alterar o tempo seleccionado premindo as teclas ou . A seguir ouvirá 2 beeps seguidos como confirmação da alteração. Se desejar ver de forma permanente o tempo restante até à finalização, prima a tecla de forma prolongada. O símbolo piscará. Para voltar à hora actual, basta premir de novo a tecla de forma prolongada. Programação da Duração do Cozinhado 1 Prima as teclas ou até o símbolo iluminar-se. De seguida prima a tecla . 2 Seleccione a duração, premindo as teclas ou . 3 Posteriormente soarão 2 beeps seguidos, será mostrada a hora actual e o símbolo permanecerá iluminado, indicando que o forno desligar-se-à de forma automática. 4 Seleccione uma função e uma temperatura de cozinhado. 5 Decorrida a duração do cozinhado, o forno desligar-se-á, soará um sinal acústico e o símbolo piscará. 6 Prima qualquer tecla para parar o sinal acús- tico, ligando-se o forno de novo. 7 Coloque os comandos na posição para desligar o forno. A qualquer momento, pode visualizar o tempo restante de cozinhado, premindo as teclas ou até o símbolo piscar, e premindo de seguida a tecla . Neste momento, pode modificar o tempo seleccionado premindo as teclas ou . A seguir ouvirá 2 beeps seguidos, como confirmação da alteração. Se desejar ver de forma permanente o tempo restante até à finalização, prima a tecla de forma prolongada. O símbolo piscará. Para voltar à hora actual, basta premir de novo a tecla de forma prolongada. Programação da Hora de Finalização do Cozinhado 1 Prima as teclas ou até o símbolo iluminar-se. De seguida prima a tecla . 2 Seleccione a hora de finalização do cozinha- do, premindo as teclas ou . 3 Posteriormente soarão 2 beeps seguidos, será mostrada a hora actual e o símbolo permanecerá iluminado, indicando que o forno desligar-se-à de forma automática. 4 Seleccione uma função e uma temperatura de cozinhado. 5 Alcançada a hora seleccionada, o forno des- ligar-se-á, soará um sinal acústico e o sím- bolo piscará. 6 Prima qualquer tecla para parar o sinal acús- tico, ligando-se o forno de novo. 7 Coloque os comandos na posição para desligar o forno. A qualquer momento pode visualizar a hora de finalização do cozinhado, premindo as teclas Desconexão do forno Grill e Resistência Inferior Especial para assados. Pode ser usado para qualquer porção, independente do seu tamanho. Convencional com Turbina Adequado para assados e pastelaria. O venti- lador reparte de forma uniforme o calor no interior do forno. Grill Gratina e assa superficialmente. Permite alou- rar a camada exterior sem afectar o interior do alimento. Indicado para pedaços planos como filetes, costelas, peixe, tostas. Atenção Durante o uso da função Grill deve-se manter a porta fechada. Resistência Inferior Calor somente na parte inferior. Apropriado para aquecer pratos ou levantar massas de confeitaria e semelhantes. Descongelação Esta função é apropriada para a descongela- ção leve de alimentos. En especial alimentos sem aquecer, por exemplo, cremes, natas, pastas, tartes, biscoitos, frutas... Nota A lâmpada permanece acesa em qualquer fun- ção de cozinhado. Funções do Forno Acerto do Relógio Electrónico Ao ligar o forno, observará que, no relógio, aparece a piscar a indicação 00:00. Premindo as teclas ou acertará o relógio; a seguir ouvirá 2 beeps seguidos como confir- mação da hora seleccionada. Se desejar alterar a hora, prima as teclas ou até a hora actual começar a piscar. A seguir prima a tecla . Premindo as teclas ou poderá modificar a hora. Finalmente, ouvirá 2 beeps seguidos como confirmação da alteração realizada. Funcionamento Manual Depois de acertar o relógio, o forno está pron- to para cozinhar. Seleccione uma função de cozinhado e uma temperatura. Durante o cozinhado, o símbolo ilumina- se indicando que o forno está a transmitir calor ao alimento, e desliga-se quando é atin- gida a temperatura seleccionada. Para desligar o forno, coloque os comandos na posição . Funções do Relógio Electrónico Avisador: Gera um sinal acústico ao fim de algum tempo, para tal, não é necessário que o forno esteja a cozinhar. Duração do Cozinhado: Permite cozinhar durante um tempo seleccionado; de seguida, o forno desligar-se-á de forma automática. Hora de Finalização do Cozinhado: Permite cozinhar até a uma hora estabelecida, de Uso do Forno 3172092-ABB00 15/4/05 09:19 Página 8
- 3. 1110 HA-830 1 Stainless Steel Control Panel with anti finger-mark 2 Oven Seal 3 Grill Element 4 Catalytic Side Wall 5 Chrome Support + Telescopic Guide 6 Grid 7 Tray with Easy-cleaning Enamel 8 Hinge 9 Door 10 Air Outlet 11 Fixing to Unit 12 Grill Screen 13 Smoke Outlet 14 Light 15 Back Wall Panel 16 Fan 17 Tempered Inner Glass 1 Function selector. 2 Electronic clock. 3 Temperature selector. Model HA-830 Control Panel HA830 50 90 130 170 210 250 1 2 3 4 6 7 8 9 5 11 10 12 13 14 15 16 17 HA830 50 90 130 170 210 250 21 3 ou até o símbolo piscar, e pre- mindo de seguida a tecla . Neste momen- to, pode modificar a hora de finalização selec- cionada premindo as teclas ou . A seguir ouvirá 2 beeps seguidos, como confir- mação da alteração. Pode usar esta função mesmo que já esteja a utilizar o forno. Para tal, siga as instruções indicadas, excepto a número 4. Programação da Duração e Fim do Cozinhado 1 Prima as teclas ou até o símbolo iluminar-se. De seguida prima a tecla . 2 Seleccione a duração, premindo as teclas ou . 3 Posteriormente soarão 2 beeps seguidos, será mostrada a hora actual e o símbolo permanecerá iluminado. 4 Prima as teclas ou até o símbolo se iluminar. A seguir prima a tecla . 5 Seleccione a hora de finalização do cozin- hado, premindo as teclas ou . 6 Posteriormente soarão 2 beeps seguidos, será mostrada a hora actual e o símbolo permanecerá iluminado. 7 Seleccione uma função e uma temperatura de cozinhado. 8 O forno permanecerá desligado, ficando ilu- minados os símbolos e . O seu forno está programado. 9 Quando alcançar a hora de início do cozin- hado, o forno entrará em funcionamento e realizar-se-á o cozinhado durante o tempo seleccionado. 10 Alcançada a hora final que tinha sido pro- gramada, o forno desligar-se-á, soará um sinal acústico e os símbolos e piscarão. 11 Prima qualquer tecla para parar o sinal acústico, ligando-se o seu forno de novo. 12 Coloque os comandos na posição para desligar o forno. Se, durante o cozinhado, desejar modificar a hora de finalização, prima as teclas ou até se iluminar o símbolo , e prima a tecla . A partir deste momento, pode modificar a hora seleccionada premindo as teclas ou . A seguir ouvirá 2 beeps seguidos, como confirmação da modificação. Atenção No caso de um corte de fornecimento eléctri- co, será eliminada toda a programação do relógio electrónico e aparecerá a indicação 00:00 a piscar no relógio. Deverá acertá-lo e programá-lo de novo. Informação Técnica O forno atinge uma temperatura na porta inferior a 60 K (conforme EN60335-1/2-6). ENGLISH 3172092-ABB00 15/4/05 09:19 Página 10
- 4. 13 ENGLISH 12 End Cooking Time: To cook until a set time; the oven turns itself off automatically when the time finishes. Cooking time and End Cooking Time: To cook for a selected length of time and end at a set time. When this function is set, the oven comes on automatically at the time required in order to cook for the set length of time (Cooking time) and end automatically at the indicated time (End Cooking Time) Programming the Alarm 1 Press until symbol lights up. Press . 2 Set the period of time after which you wish the alarm to sound by pressing or . 3 The clock beeps twice, the current time is displayed and symbol lights up perma- nently to indicate that the alarm has been set. 4 When the set period of time comes to an end, the alarm sounds and symbol starts to flash. 5 Press any button to stop the alarm; symbol goes out. You can consult the remaining time at any moment by pressing or until symbol flashes and then pressing . You can also modify the set time at this point by press- ing or . The clock beeps twice to confirm the change. If you wish the remaining time to be displayed until the end of the set period of time, press and keep it pressed in. Symbol flashes. Keep pressed in again to return to the real time. Setting the Cooking Time 1 Press or until symbol lights up. Press . 2 Select the period of time you wish to cook for by pressing or . 3 The clock beeps twice, the current time is displayed and symbol lights up perma- nently to indicate that the oven will turn itself off automatically. 4 Select a cooking function and temperature. 5 When the cooking time comes to an end, the oven turns itself off, the alarm sounds and symbol flashes. 6 Press any button to stop the alarm and turn the oven back on again. 7 Set the controls to to turn the oven off. You can consult the remaining cooking time at any moment by pressing or until symbol flashes and then pressing . You can also modify the set time at this point by press- ing or . The clock beeps twice to confirm the change. If you wish the remaining time to be displayed until the end of the set period of time, press OK and keep it pressed in. Symbol flash- es. Keep pressed in again to return to the real time. Setting the End Cooking Time 1 Press or until symbol lights up. Press . 2 Select the time you wish the cooking process to finish at by pressing or . 3 The clock beeps twice, the current time is displayed and symbol lights up perma- nently to indicate that the oven will turn itself off automatically. 4 Select a cooking function and temperature. 5 When the set time is reached, the oven turns itself off, the alarm sounds and sym- bol flashes. 6 Press any button to stop the alarm and turn the oven back on again. 7 Set the controls to to turn the oven off. You can consult the end cooking time at any moment by pressing or until symbol flashes and then pressing . You can also modify the end cooking time at this point by pressing or . The clock beeps twice to confirm the change. Setting the time on the Electronic Clock When the oven is connected to the power supply, the indication 00:00 flash on the display. Press or to set the time on the clock. The clock beeps twice to confirm the selected time. If you wish to modify the time, press or until the current time flash on the screen. Press . Then press or to modify the time. The clock beeps twice to confirm the modification. Manual Operation The oven is ready to be used when the clock has been set. Select a cooking function and a temperature. When you begin cooking, symbol lights up to indicate that the oven is heating the con- tents; the symbol goes out when the selected temperature is reached. Set the controls to to turn the oven off. Functions of the Electronic Clock Alarm: Creates an alarm signal when the peri- od of time finishes; the oven does not need to be in use in order to use this function. Cooking Time: To cook for a selected length of time; the oven turns itself off automatically when the time finishes. Use of the Oven Oven Functions Switch off oven Grill and Lower element Special for roasts. It can be used for any piece, whatever its size. Conventional with fan Appropriate for roasts and cakes. The fan spreads the heat uniformly inside the oven. Grill For preparing dishes with superficial roasting. It allows the outer layer to be browned without affecting the inside of the food. Ideal for flat food, such as steaks, ribs, fish, toast. Caution While using the Grill the door must be kept closed. Lower element Heats only from beneath. Suitable for heating dishes and raising pastry and similar. Defrosting This cooking mode is suitable for gently defrosting of food. In special food to be consumed unwarmed, e.g.: cream, custard, pastry, tarts, cakes, fruit,... Note The pilot light remains on in any cooking function. 3172092-ABB00 15/4/05 09:19 Página 12
- 5. 1514 This function can be used even when you are already using the oven. To do this, follow the instructions indicated above except point number 4. Setting the Cooking Time and the End Cooking Time 1 Press or until symbol lights up. Press . 2 Select the period of time you wish to cook for by pressing or . 3 The clock beeps twice, the current time is displayed and symbol lights up per- manently. 4 Press or until symbol lights up. Press . 5 Select the time you wish the cooking process to finish at by pressing or . 6 The clock beeps twice, the current time is displayed and symbol lights up per- manently. 7 Select a cooking function and temperature. 8 The oven remains off with symbols and lit up. Your oven is set. 9 When the time to start cooking is reached, the oven starts up and cooks for the set period of time. 10 When the set end cooking time is reached, the oven turns itself off, the alarm sounds and symbols and flash. 11 Press any button to stop the alarm and turn the oven back on again. 12 Set the controls to to turn the oven off. You can modify the end cooking time while cook- ing is in progress by pressing or until symbol lights up and then pressing . You can now modify the end cooking time by pressing or . The clock beeps twice to confirm the change. Important In the event of a power cut, all the electronic clock settings are deleted and the indication 00:00 flashes on the display. It is necessary to set the time and programme the clock again. Technical Information This oven has got a door temperature of below 60 K (as per EN60335-1/2-6). 3172092-ABB00 15/4/05 09:19 Página 14