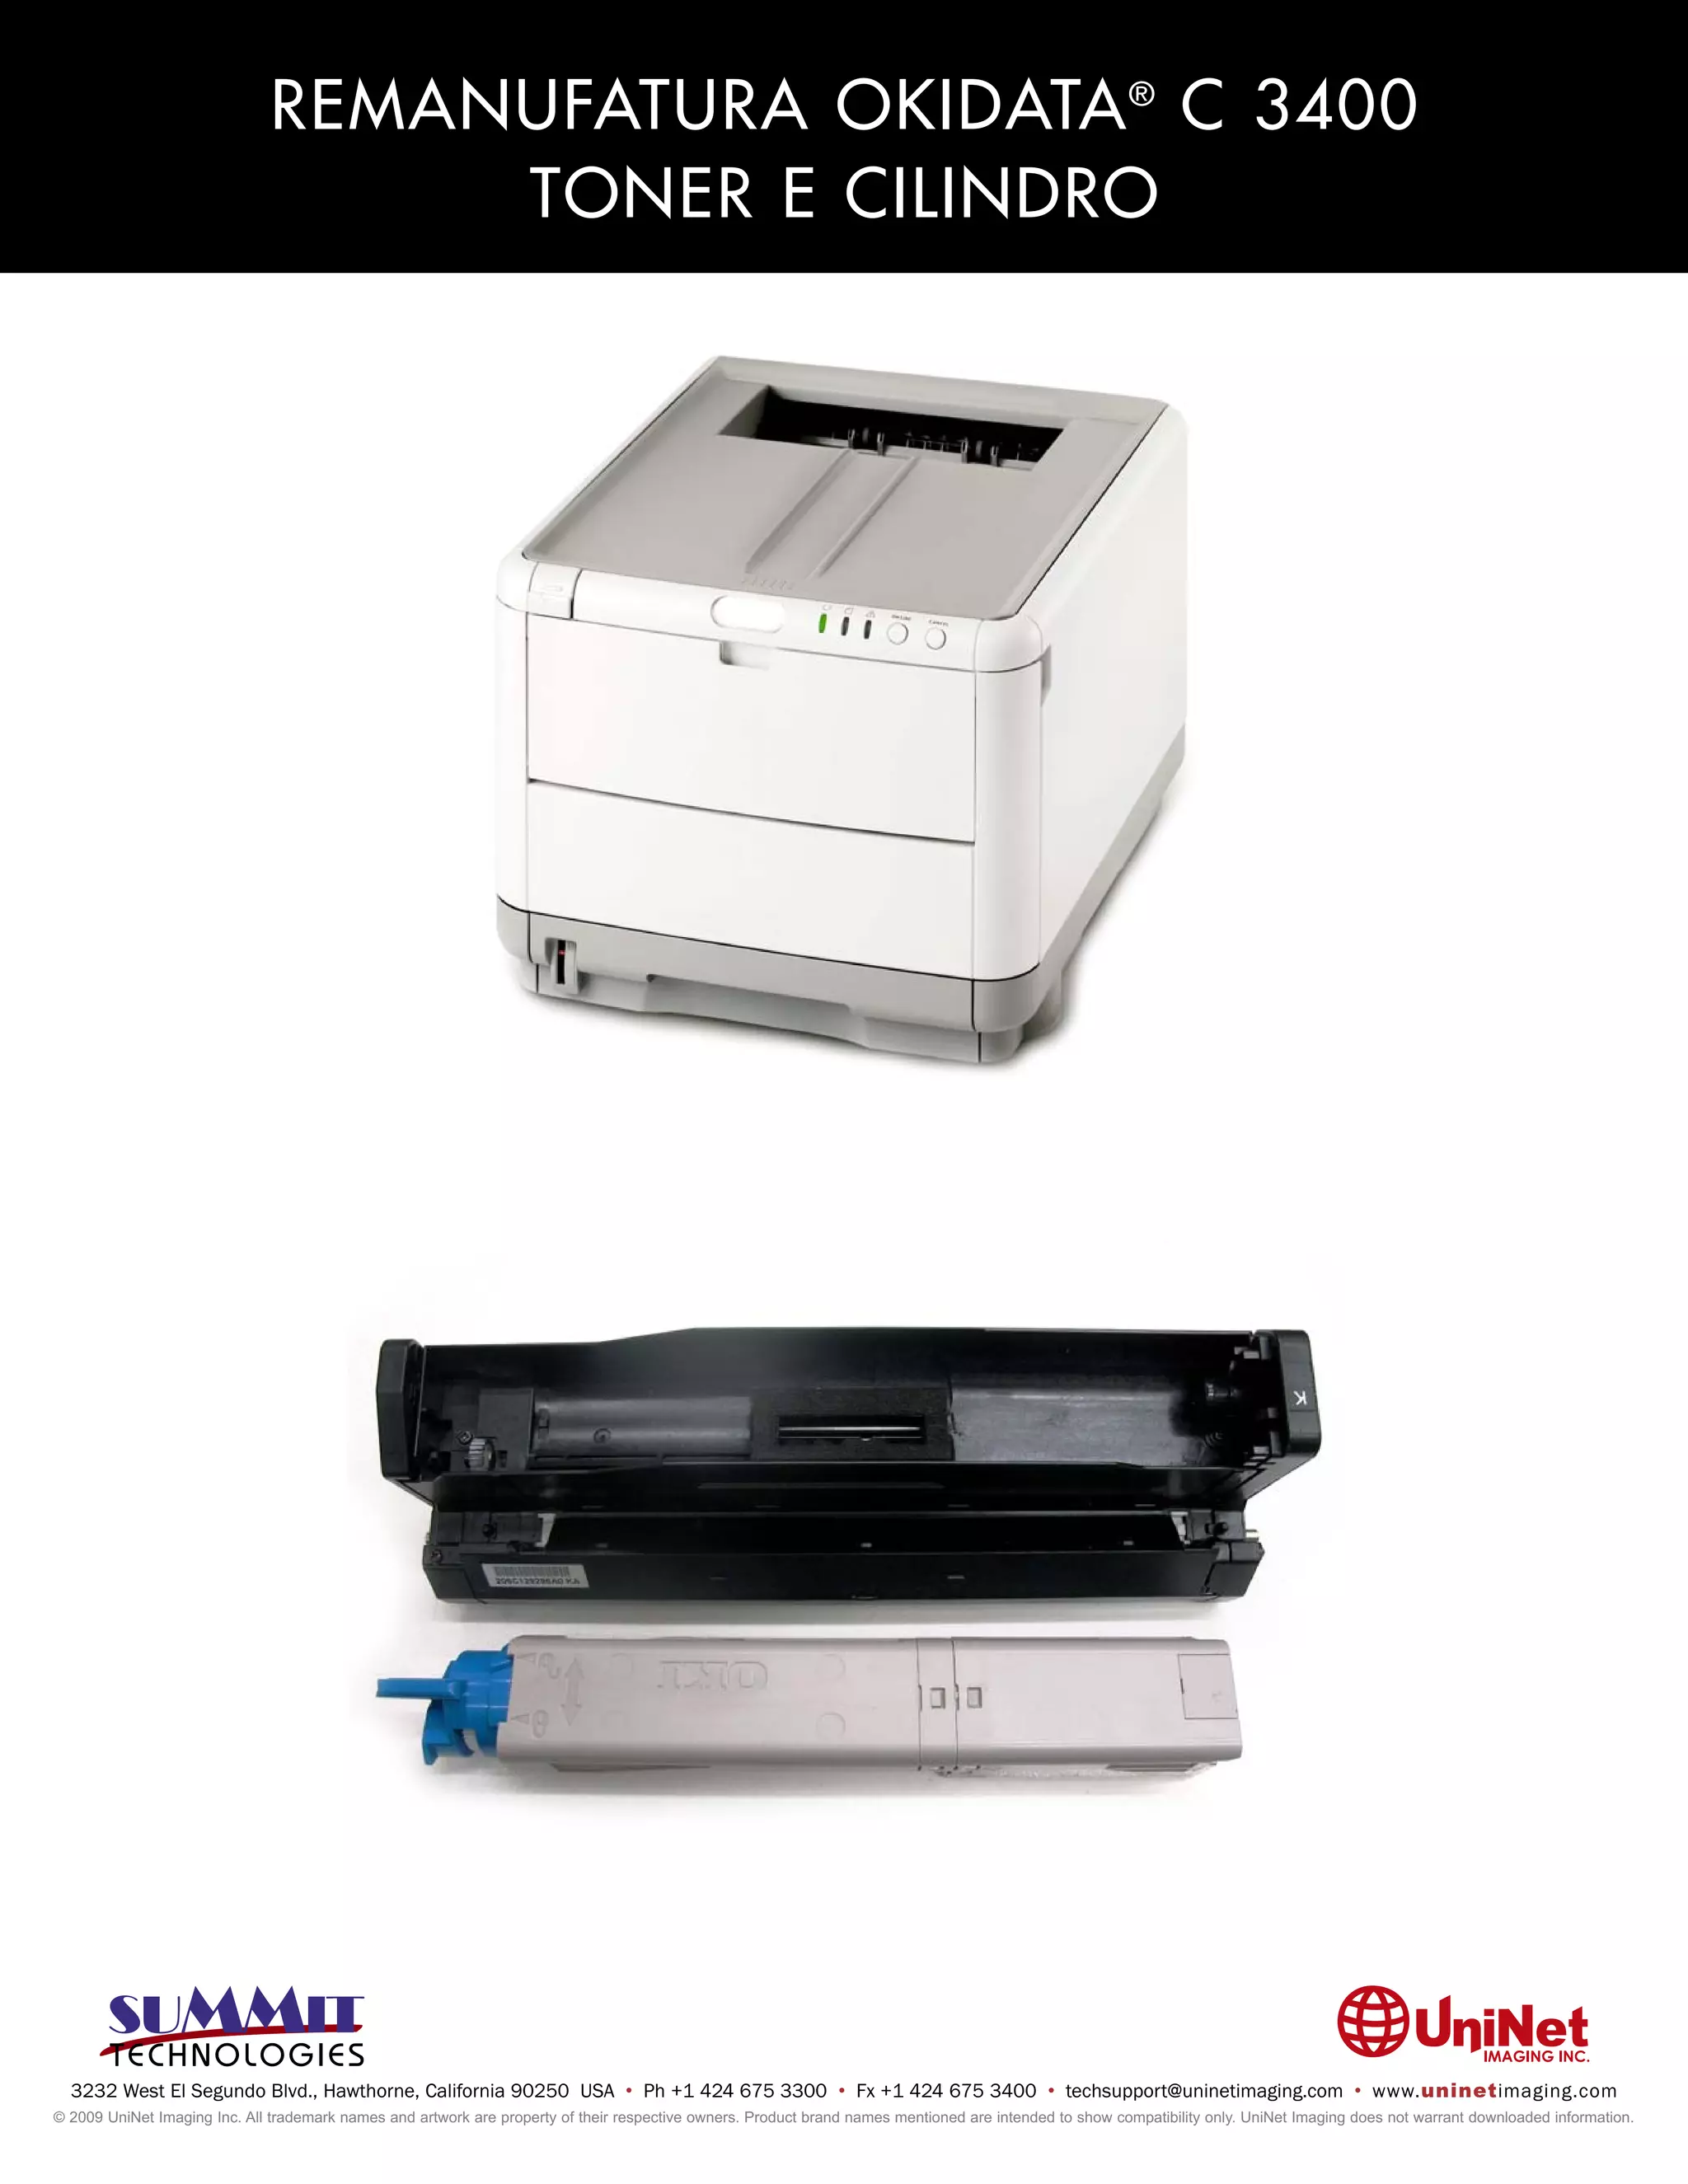
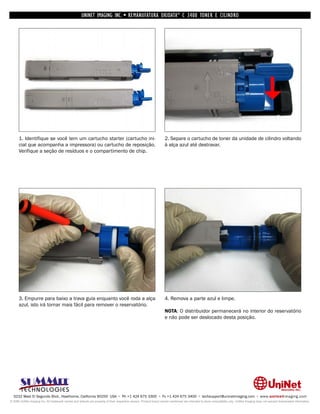
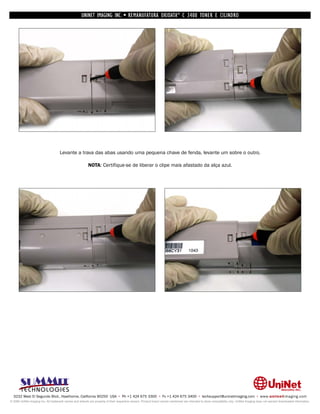
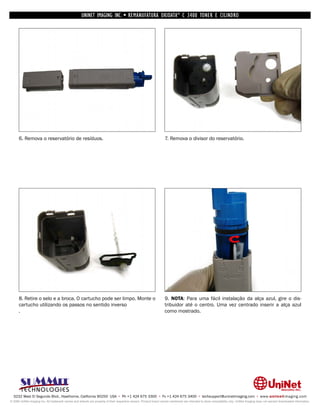
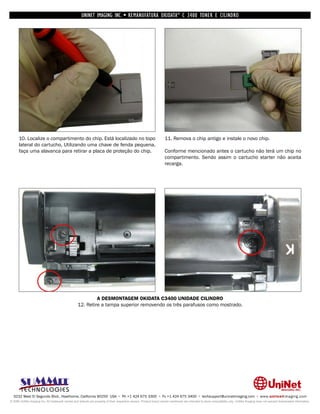
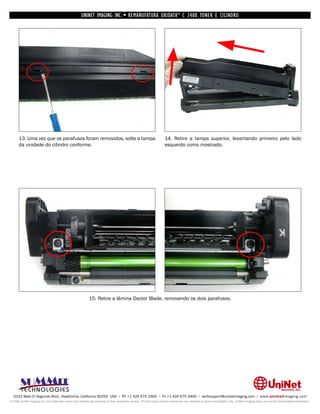
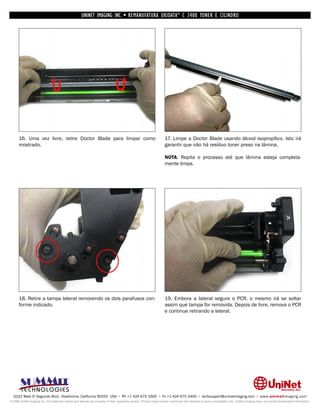
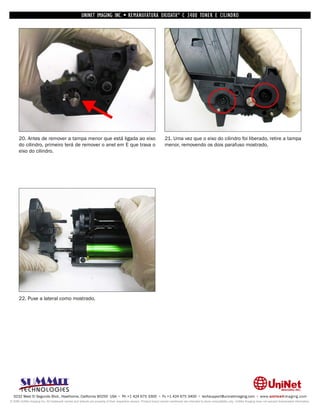
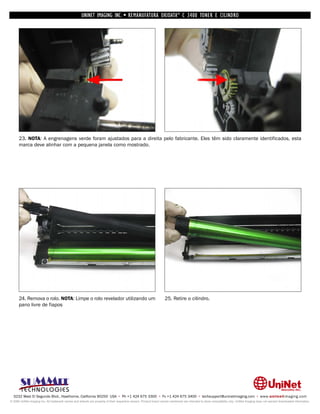
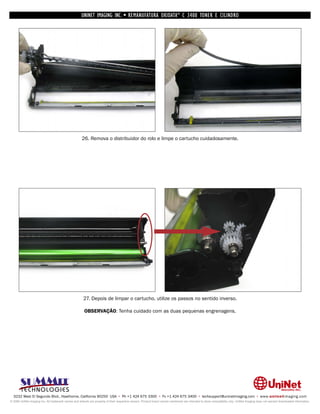
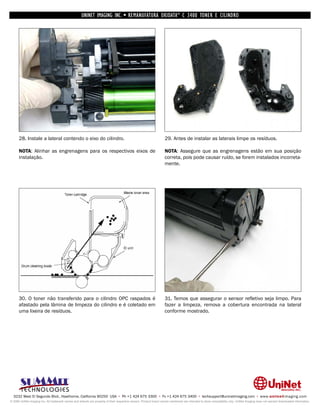
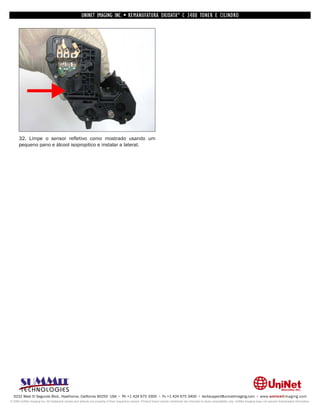
REMANUFATURA OKIDATA ® C 3400
                                   TONER E CILINDRO


  3232 West El Segundo Blvd., Hawthorne, California 90250 USA • Ph +1 424 675 3300 • Fx +1 424 675 3400 • techsupport@uninetimaging.com • www.uninetimaging.com
© 2009 UniNet Imaging Inc. All trademark names and artwork are property of their respective owners. Product brand names mentioned are intended to show compatibility only. UniNet Imaging does not warrant downloaded information.
UNINET IMAGING INC. • REMANUFATURA OKIDATA ® C 3400 TONER E CILINDRO


      1. Identifique se você tem um cartucho starter (cartucho ini-                                                 2. Separe o cartucho de toner da unidade de cilindro voltando
      cial que acompanha a impressora) ou cartucho de reposição.                                                    à alça azul até destravar.
      Verifique a seção de resíduos e o compartimento de chip.


      3. Empurre para baixo a trava guia enquanto você roda a alça                                                  4. Remova a parte azul e limpe.
      azul, isto irá tornar mais fácil para remover o reservatório.
                                                                                                                    NOTA: O distribuidor permanecerá no interior do reservatório
                                                                                                                    e não pode ser deslocado desta posição.


  3232 West El Segundo Blvd., Hawthorne, California 90250 USA • Ph +1 424 675 3300 • Fx +1 424 675 3400 • techsupport@uninetimaging.com • www.uninetimaging.com
© 2009 UniNet Imaging Inc. All trademark names and artwork are property of their respective owners. Product brand names mentioned are intended to show compatibility only. UniNet Imaging does not warrant downloaded information.
UNINET IMAGING INC. • REMANUFATURA OKIDATA ® C 3400 TONER E CILINDRO


                                     Levante a trava das abas usando uma pequena chave de fenda, levante um sobre o outro.

                                                          NOTA: Certifique-se de liberar o clipe mais afastado da alça azul.


  3232 West El Segundo Blvd., Hawthorne, California 90250 USA • Ph +1 424 675 3300 • Fx +1 424 675 3400 • techsupport@uninetimaging.com • www.uninetimaging.com
© 2009 UniNet Imaging Inc. All trademark names and artwork are property of their respective owners. Product brand names mentioned are intended to show compatibility only. UniNet Imaging does not warrant downloaded information.
UNINET IMAGING INC. • REMANUFATURA OKIDATA ® C 3400 TONER E CILINDRO


      6. Remova o reservatório de resíduos.                                                                         7. Remova o divisor do reservatório.


      8. Retire o selo e a broca. O cartucho pode ser limpo. Monte o                                                9. NOTA: Para uma fácil instalação da alça azul, gire o dis-
      cartucho utilizando os passos no sentido inverso                                                              tribuidor até o centro. Uma vez centrado inserir a alça azul
      .                                                                                                             como mostrado.


  3232 West El Segundo Blvd., Hawthorne, California 90250 USA • Ph +1 424 675 3300 • Fx +1 424 675 3400 • techsupport@uninetimaging.com • www.uninetimaging.com
© 2009 UniNet Imaging Inc. All trademark names and artwork are property of their respective owners. Product brand names mentioned are intended to show compatibility only. UniNet Imaging does not warrant downloaded information.
UNINET IMAGING INC. • REMANUFATURA OKIDATA ® C 3400 TONER E CILINDRO


      10. Localize o compartimento do chip. Está localizado no topo                                                 11. Remova o chip antigo e instale o novo chip.
      lateral do cartucho, Utilizando uma chave de fenda pequena,
      faça uma alavanca para retirar a placa de proteção do chip.                                                   Conforme mencionado antes o cartucho não terá um chip no
                                                                                                                    compartimento. Sendo assim o cartucho starter não aceita
                                                                                                                    recarga.


                                                           A DESMONTAGEM OKIDATA C3400 UNIDADE CILINDRO
                                                  12. Retire a tampa superior removendo os três parafusos como mostrado.


  3232 West El Segundo Blvd., Hawthorne, California 90250 USA • Ph +1 424 675 3300 • Fx +1 424 675 3400 • techsupport@uninetimaging.com • www.uninetimaging.com
© 2009 UniNet Imaging Inc. All trademark names and artwork are property of their respective owners. Product brand names mentioned are intended to show compatibility only. UniNet Imaging does not warrant downloaded information.
UNINET IMAGING INC. • REMANUFATURA OKIDATA ® C 3400 TONER E CILINDRO


      13. Uma vez que os parafusos foram removidos, solte a tampa                                                   14. Retire a tampa superior, levantando primeiro pelo lado
      da unidade do cilindro conforme.                                                                              esquerdo como mostrado.


                                                           15. Retire a lâmina Doctor Blade, removendo os dois parafusos.


  3232 West El Segundo Blvd., Hawthorne, California 90250 USA • Ph +1 424 675 3300 • Fx +1 424 675 3400 • techsupport@uninetimaging.com • www.uninetimaging.com
© 2009 UniNet Imaging Inc. All trademark names and artwork are property of their respective owners. Product brand names mentioned are intended to show compatibility only. UniNet Imaging does not warrant downloaded information.
UNINET IMAGING INC. • REMANUFATURA OKIDATA ® C 3400 TONER E CILINDRO


      16. Uma vez livre, retire Doctor Blade para limpar como                                                       17. Limpe a Doctor Blade usando álcool isopropílico. Isto irá
      mostrado.                                                                                                     garantir que não há resíduo toner preso na lâmina.

                                                                                                                    NOTA: Repita o processo até que lâmina esteja completa-
                                                                                                                    mente limpa.


      18. Retire a tampa lateral removendo os dois parafusos con-                                                   19. Embora a lateral segure o PCR, o mesmo irá se soltar
      forme indicado.                                                                                               assim que tampa for removida. Depois de livre, remova o PCR
                                                                                                                    e continue retirando a lateral.


  3232 West El Segundo Blvd., Hawthorne, California 90250 USA • Ph +1 424 675 3300 • Fx +1 424 675 3400 • techsupport@uninetimaging.com • www.uninetimaging.com
© 2009 UniNet Imaging Inc. All trademark names and artwork are property of their respective owners. Product brand names mentioned are intended to show compatibility only. UniNet Imaging does not warrant downloaded information.
UNINET IMAGING INC. • REMANUFATURA OKIDATA ® C 3400 TONER E CILINDRO


      20. Antes de remover a tampa menor que está ligada ao eixo                                                    21. Uma vez que o eixo do cilindro foi liberado, retire a tampa
      do cilindro, primeiro terá de remover o anel em E que trava o                                                 menor, removendo os dois parafuso mostrado.
      eixo do cilindro.


      22. Puxe a lateral como mostrado.


  3232 West El Segundo Blvd., Hawthorne, California 90250 USA • Ph +1 424 675 3300 • Fx +1 424 675 3400 • techsupport@uninetimaging.com • www.uninetimaging.com
© 2009 UniNet Imaging Inc. All trademark names and artwork are property of their respective owners. Product brand names mentioned are intended to show compatibility only. UniNet Imaging does not warrant downloaded information.
UNINET IMAGING INC. • REMANUFATURA OKIDATA ® C 3400 TONER E CILINDRO


      23. NOTA: A engrenagens verde foram ajustados para a direita pelo fabricante. Eles têm sido claramente identificados, esta
      marca deve alinhar com a pequena janela como mostrado.


      24. Remova o rolo. NOTA: Limpe o rolo revelador utilizando um                                                 25. Retire o cilindro.
      pano livre de fiapos


  3232 West El Segundo Blvd., Hawthorne, California 90250 USA • Ph +1 424 675 3300 • Fx +1 424 675 3400 • techsupport@uninetimaging.com • www.uninetimaging.com
© 2009 UniNet Imaging Inc. All trademark names and artwork are property of their respective owners. Product brand names mentioned are intended to show compatibility only. UniNet Imaging does not warrant downloaded information.
UNINET IMAGING INC. • REMANUFATURA OKIDATA ® C 3400 TONER E CILINDRO


                                                      26. Remova o distribuidor do rolo e limpe o cartucho cuidadosamente.


                                                       27. Depois de limpar o cartucho, utilize os passos no sentido inverso.

                                                       OBSERVAÇÃO: Tenha cuidado com as duas pequenas engrenagens.


  3232 West El Segundo Blvd., Hawthorne, California 90250 USA • Ph +1 424 675 3300 • Fx +1 424 675 3400 • techsupport@uninetimaging.com • www.uninetimaging.com
© 2009 UniNet Imaging Inc. All trademark names and artwork are property of their respective owners. Product brand names mentioned are intended to show compatibility only. UniNet Imaging does not warrant downloaded information.
UNINET IMAGING INC. • REMANUFATURA OKIDATA ® C 3400 TONER E CILINDRO


      28. Instale a lateral contendo o eixo do cilindro.                                                            29. Antes de instalar as laterais limpe os resíduos.

      NOTA: Alinhar as engrenagens para os respectivos eixos de                                                     NOTA: Assegure que as engrenagens estão em sua posição
      instalação.                                                                                                   correta, pois pode causar ruído, se forem instalados incorreta-
                                                                                                                    mente.


      30. O toner não transferido para o cilindro OPC raspados é                                                    31. Temos que assegurar o sensor refletivo seja limpo. Para
      afastado pela lâmina de limpeza do cilindro e é coletado em                                                   fazer a limpeza, remova a cobertura encontrada na lateral
      uma lixeira de resíduos.                                                                                      conforme mostrado.


  3232 West El Segundo Blvd., Hawthorne, California 90250 USA • Ph +1 424 675 3300 • Fx +1 424 675 3400 • techsupport@uninetimaging.com • www.uninetimaging.com
© 2009 UniNet Imaging Inc. All trademark names and artwork are property of their respective owners. Product brand names mentioned are intended to show compatibility only. UniNet Imaging does not warrant downloaded information.
UNINET IMAGING INC. • REMANUFATURA OKIDATA ® C 3400 TONER E CILINDRO


      32. Limpe o sensor refletivo como mostrado usando um
      pequeno pano e álcool isopropilico e instalar a lateral.


  3232 West El Segundo Blvd., Hawthorne, California 90250 USA • Ph +1 424 675 3300 • Fx +1 424 675 3400 • techsupport@uninetimaging.com • www.uninetimaging.com
© 2009 UniNet Imaging Inc. All trademark names and artwork are property of their respective owners. Product brand names mentioned are intended to show compatibility only. UniNet Imaging does not warrant downloaded information.

Manual de Recarga Okidata C3400

  • 1.
    REMANUFATURA OKIDATA ®C 3400 TONER E CILINDRO 3232 West El Segundo Blvd., Hawthorne, California 90250 USA • Ph +1 424 675 3300 • Fx +1 424 675 3400 • techsupport@uninetimaging.com • www.uninetimaging.com © 2009 UniNet Imaging Inc. All trademark names and artwork are property of their respective owners. Product brand names mentioned are intended to show compatibility only. UniNet Imaging does not warrant downloaded information.
  • 2.
    UNINET IMAGING INC.• REMANUFATURA OKIDATA ® C 3400 TONER E CILINDRO 1. Identifique se você tem um cartucho starter (cartucho ini- 2. Separe o cartucho de toner da unidade de cilindro voltando cial que acompanha a impressora) ou cartucho de reposição. à alça azul até destravar. Verifique a seção de resíduos e o compartimento de chip. 3. Empurre para baixo a trava guia enquanto você roda a alça 4. Remova a parte azul e limpe. azul, isto irá tornar mais fácil para remover o reservatório. NOTA: O distribuidor permanecerá no interior do reservatório e não pode ser deslocado desta posição. 3232 West El Segundo Blvd., Hawthorne, California 90250 USA • Ph +1 424 675 3300 • Fx +1 424 675 3400 • techsupport@uninetimaging.com • www.uninetimaging.com © 2009 UniNet Imaging Inc. All trademark names and artwork are property of their respective owners. Product brand names mentioned are intended to show compatibility only. UniNet Imaging does not warrant downloaded information.
  • 3.
    UNINET IMAGING INC.• REMANUFATURA OKIDATA ® C 3400 TONER E CILINDRO Levante a trava das abas usando uma pequena chave de fenda, levante um sobre o outro. NOTA: Certifique-se de liberar o clipe mais afastado da alça azul. 3232 West El Segundo Blvd., Hawthorne, California 90250 USA • Ph +1 424 675 3300 • Fx +1 424 675 3400 • techsupport@uninetimaging.com • www.uninetimaging.com © 2009 UniNet Imaging Inc. All trademark names and artwork are property of their respective owners. Product brand names mentioned are intended to show compatibility only. UniNet Imaging does not warrant downloaded information.
  • 4.
    UNINET IMAGING INC.• REMANUFATURA OKIDATA ® C 3400 TONER E CILINDRO 6. Remova o reservatório de resíduos. 7. Remova o divisor do reservatório. 8. Retire o selo e a broca. O cartucho pode ser limpo. Monte o 9. NOTA: Para uma fácil instalação da alça azul, gire o dis- cartucho utilizando os passos no sentido inverso tribuidor até o centro. Uma vez centrado inserir a alça azul . como mostrado. 3232 West El Segundo Blvd., Hawthorne, California 90250 USA • Ph +1 424 675 3300 • Fx +1 424 675 3400 • techsupport@uninetimaging.com • www.uninetimaging.com © 2009 UniNet Imaging Inc. All trademark names and artwork are property of their respective owners. Product brand names mentioned are intended to show compatibility only. UniNet Imaging does not warrant downloaded information.
  • 5.
    UNINET IMAGING INC.• REMANUFATURA OKIDATA ® C 3400 TONER E CILINDRO 10. Localize o compartimento do chip. Está localizado no topo 11. Remova o chip antigo e instale o novo chip. lateral do cartucho, Utilizando uma chave de fenda pequena, faça uma alavanca para retirar a placa de proteção do chip. Conforme mencionado antes o cartucho não terá um chip no compartimento. Sendo assim o cartucho starter não aceita recarga. A DESMONTAGEM OKIDATA C3400 UNIDADE CILINDRO 12. Retire a tampa superior removendo os três parafusos como mostrado. 3232 West El Segundo Blvd., Hawthorne, California 90250 USA • Ph +1 424 675 3300 • Fx +1 424 675 3400 • techsupport@uninetimaging.com • www.uninetimaging.com © 2009 UniNet Imaging Inc. All trademark names and artwork are property of their respective owners. Product brand names mentioned are intended to show compatibility only. UniNet Imaging does not warrant downloaded information.
  • 6.
    UNINET IMAGING INC.• REMANUFATURA OKIDATA ® C 3400 TONER E CILINDRO 13. Uma vez que os parafusos foram removidos, solte a tampa 14. Retire a tampa superior, levantando primeiro pelo lado da unidade do cilindro conforme. esquerdo como mostrado. 15. Retire a lâmina Doctor Blade, removendo os dois parafusos. 3232 West El Segundo Blvd., Hawthorne, California 90250 USA • Ph +1 424 675 3300 • Fx +1 424 675 3400 • techsupport@uninetimaging.com • www.uninetimaging.com © 2009 UniNet Imaging Inc. All trademark names and artwork are property of their respective owners. Product brand names mentioned are intended to show compatibility only. UniNet Imaging does not warrant downloaded information.
  • 7.
    UNINET IMAGING INC.• REMANUFATURA OKIDATA ® C 3400 TONER E CILINDRO 16. Uma vez livre, retire Doctor Blade para limpar como 17. Limpe a Doctor Blade usando álcool isopropílico. Isto irá mostrado. garantir que não há resíduo toner preso na lâmina. NOTA: Repita o processo até que lâmina esteja completa- mente limpa. 18. Retire a tampa lateral removendo os dois parafusos con- 19. Embora a lateral segure o PCR, o mesmo irá se soltar forme indicado. assim que tampa for removida. Depois de livre, remova o PCR e continue retirando a lateral. 3232 West El Segundo Blvd., Hawthorne, California 90250 USA • Ph +1 424 675 3300 • Fx +1 424 675 3400 • techsupport@uninetimaging.com • www.uninetimaging.com © 2009 UniNet Imaging Inc. All trademark names and artwork are property of their respective owners. Product brand names mentioned are intended to show compatibility only. UniNet Imaging does not warrant downloaded information.
  • 8.
    UNINET IMAGING INC.• REMANUFATURA OKIDATA ® C 3400 TONER E CILINDRO 20. Antes de remover a tampa menor que está ligada ao eixo 21. Uma vez que o eixo do cilindro foi liberado, retire a tampa do cilindro, primeiro terá de remover o anel em E que trava o menor, removendo os dois parafuso mostrado. eixo do cilindro. 22. Puxe a lateral como mostrado. 3232 West El Segundo Blvd., Hawthorne, California 90250 USA • Ph +1 424 675 3300 • Fx +1 424 675 3400 • techsupport@uninetimaging.com • www.uninetimaging.com © 2009 UniNet Imaging Inc. All trademark names and artwork are property of their respective owners. Product brand names mentioned are intended to show compatibility only. UniNet Imaging does not warrant downloaded information.
  • 9.
    UNINET IMAGING INC.• REMANUFATURA OKIDATA ® C 3400 TONER E CILINDRO 23. NOTA: A engrenagens verde foram ajustados para a direita pelo fabricante. Eles têm sido claramente identificados, esta marca deve alinhar com a pequena janela como mostrado. 24. Remova o rolo. NOTA: Limpe o rolo revelador utilizando um 25. Retire o cilindro. pano livre de fiapos 3232 West El Segundo Blvd., Hawthorne, California 90250 USA • Ph +1 424 675 3300 • Fx +1 424 675 3400 • techsupport@uninetimaging.com • www.uninetimaging.com © 2009 UniNet Imaging Inc. All trademark names and artwork are property of their respective owners. Product brand names mentioned are intended to show compatibility only. UniNet Imaging does not warrant downloaded information.
  • 10.
    UNINET IMAGING INC.• REMANUFATURA OKIDATA ® C 3400 TONER E CILINDRO 26. Remova o distribuidor do rolo e limpe o cartucho cuidadosamente. 27. Depois de limpar o cartucho, utilize os passos no sentido inverso. OBSERVAÇÃO: Tenha cuidado com as duas pequenas engrenagens. 3232 West El Segundo Blvd., Hawthorne, California 90250 USA • Ph +1 424 675 3300 • Fx +1 424 675 3400 • techsupport@uninetimaging.com • www.uninetimaging.com © 2009 UniNet Imaging Inc. All trademark names and artwork are property of their respective owners. Product brand names mentioned are intended to show compatibility only. UniNet Imaging does not warrant downloaded information.
  • 11.
    UNINET IMAGING INC.• REMANUFATURA OKIDATA ® C 3400 TONER E CILINDRO 28. Instale a lateral contendo o eixo do cilindro. 29. Antes de instalar as laterais limpe os resíduos. NOTA: Alinhar as engrenagens para os respectivos eixos de NOTA: Assegure que as engrenagens estão em sua posição instalação. correta, pois pode causar ruído, se forem instalados incorreta- mente. 30. O toner não transferido para o cilindro OPC raspados é 31. Temos que assegurar o sensor refletivo seja limpo. Para afastado pela lâmina de limpeza do cilindro e é coletado em fazer a limpeza, remova a cobertura encontrada na lateral uma lixeira de resíduos. conforme mostrado. 3232 West El Segundo Blvd., Hawthorne, California 90250 USA • Ph +1 424 675 3300 • Fx +1 424 675 3400 • techsupport@uninetimaging.com • www.uninetimaging.com © 2009 UniNet Imaging Inc. All trademark names and artwork are property of their respective owners. Product brand names mentioned are intended to show compatibility only. UniNet Imaging does not warrant downloaded information.
  • 12.
    UNINET IMAGING INC.• REMANUFATURA OKIDATA ® C 3400 TONER E CILINDRO 32. Limpe o sensor refletivo como mostrado usando um pequeno pano e álcool isopropilico e instalar a lateral. 3232 West El Segundo Blvd., Hawthorne, California 90250 USA • Ph +1 424 675 3300 • Fx +1 424 675 3400 • techsupport@uninetimaging.com • www.uninetimaging.com © 2009 UniNet Imaging Inc. All trademark names and artwork are property of their respective owners. Product brand names mentioned are intended to show compatibility only. UniNet Imaging does not warrant downloaded information.