1. Making a Violin
Day 1 The plates
This is one page in a series about making a violin by hand in the
traditional way. Please see the introduction for more about the
series and links to other pages. The glossary contains an
explanation of the terms used.
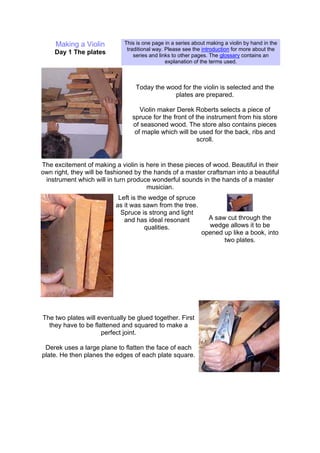
Today the wood for the violin is selected and the
plates are prepared.
Violin maker Derek Roberts selects a piece of
spruce for the front of the instrument from his store
of seasoned wood. The store also contains pieces
of maple which will be used for the back, ribs and
scroll.
The excitement of making a violin is here in these pieces of wood. Beautiful in their
own right, they will be fashioned by the hands of a master craftsman into a beautiful
instrument which will in turn produce wonderful sounds in the hands of a master
musician.
Left is the wedge of spruce
as it was sawn from the tree.
Spruce is strong and light
and has ideal resonant
qualities.
A saw cut through the
wedge allows it to be
opened up like a book, into
two plates.
The two plates will eventually be glued together. First
they have to be flattened and squared to make a
perfect joint.
Derek uses a large plane to flatten the face of each
plate. He then planes the edges of each plate square.
2. Derek checks the edges with a square, and the faces with a straight edge. More
work must be done with the plane until a perfect result is obtained. Then the two
plates can be glued together.
Derek examines the joint
before applying glue.
The two plates must fit
together perfectly. The
final joint will be almost
invisible. Hot animal glue
is applied to the joint.
Derek rubs the two
surfaces of the joint
together to get rid of
excess glue.
Finally the plates are cramped together. The glue will take several
hours to dry. Later, the outline of the front will be marked and roughly
sawn out.
This wedge of maple will be prepared and
jointed in the same way, for the back of the
violin. Maple selected for violin making is often
strikingly figured, as in this piece.
The flame, as the figuring is called, appears to flicker as it catches the light from
different angles. This gives a very attractive effect to the finished instrument.
3. Making a Violin
Day 2 The blocks
This is one page in a series about making a violin by hand in the
traditional way. Please see the introduction for more about the
series and links to other pages. The glossary contains an
explanation of the terms used.
Today the blocks are glued to the mould and
shaped.
The blocks are cut from willow, a strong, light
wood which is easily carved. There are six
blocks, two end blocks and four corner blocks.
Above, violin maker Derek Roberts is planing one of the corner blocks. You can
see the five other blocks roughly positioned round the mould.
The corner blocks will form the corners
between the C ribs and the top and bottom
bouts. The top block will have the neck joint cut
in it, and the bottom block will have a tapered
hole reamed for the end pin.
Each block is worked with a small hand plane
and checked with a square. It must be accurate
to achieve a good fit with the mould.
The blocks are glued to the mould.
Animal glue is heated and applied with
a brush to the block surface. The joint is
easy to break later on when the ribs are
complete and the blocks need to be
detached from the mould.
The mould itself forms the basis for
building up the rib structure of the
instrument. There are two types of
mould, the inside or Italian mould, used
here, and the outside or French mould.
Each violin maker makes his or her own
moulds based on patterns for different
models of instrument.
The holes through the mould will be used at a later stage for attaching cramps to
the instrument.
4. Once the six blocks are glued to the
mould, work starts on shaping each block.
Right, a corner block is shaped with a
large gouge.
5. Making a Violin
Day 3 The ribs
This is one page in a series about making a violin by hand in the
traditional way. Please see the introduction for more about the
series and links to other pages. The glossary contains an
explanation of the terms used.
Today violin maker Derek Roberts prepares
the ribs and bends them to shape.
The rib structure will be built up on the
mould which has been prepared with blocks
in the previous stage. Shown here is the
template which will be used to guide the
shaping of the ribs, being placed on top of
the mould.
Each violin maker has his or her own sets of templates for different models of
instrument. The template shown here is for a Stradivarius model from the early 18th
century. Derek made this template of thin plywood from drawings of the
Stradivarius instrument.
Each rib is made from a thin slice of flamed
maple.
The rib is very flexible and light when finished.
Strength is provided by the six blocks, and by
the linings which will be made later and fixed to
the ribs and blocks.
The rib is planed to a fine thickness and
measured with a dial gauge to an accurate
tolerance, typically 0.1 mm.
6. The rib is placed on a shooting
board and planed to the right
depth for this stage.
Later on, when the ribs have been glued to the blocks, the depth will be reworked.
Now each rib is bent to shape on a bending iron.
The bending iron is a piece of
brass with an electric heating
element inside. Derek made the
bending iron himself, the brass
having been cast to order in a
small foundry.
The ribs are roughly bent to shape and
are put in place against the blocks on
the mould.
The shape of the instrument begins to
emerge.
7. Making a Violin
Day 4 Completing the rib
structure
This is one page in a series about making a violin by hand in the
traditional way. Please see the introduction for more about the
series and links to other pages. The glossary contains an
explanation of the terms used.
Today violin maker Derek Roberts
completes the rib structure. He will
shape the blocks and glue all the ribs
into place.
The ribs have been bent in the previous stage. The C ribs are now glued to the
corner blocks and cramped up.
With the C ribs in place, Derek uses a
scriber to mark the curved shape of the
corner on a block. The template which
sits on top of the mould is used to guide
the line.
The block is carved to the marked line with a gouge
and finished with a file. The curve is made in the block
to receive the shape of the rib as it curves outwards to
the corner.
8. Derek marks the rib corners with a square. The ends
of the C rib must be cut off where they overhang the
block, and a perfectly square joint made where the
bottom rib joins the C rib at the corner.
Left, you can see that the near
corner blocks have been cut to
the curved shape. The far blocks
have still to be shaped.
Derek applies hot glue with a brush to a
block, to fix the top rib into place.
The lower rib has already been glued to
the blocks and cramped up.
Both top and bottom rib are cramped up
now. The procedure must be repeated
on the other side.
The flame in the maple ribs shows its
silvery qualities.
9. Derek flattens the ribs with a plane so that they will fit
closely with the violin back.
You can see the finished shape of the blocks and how
they provide strength and shape for the ribs.
The linings will add yet more strength when they are in
place.
10. Making a Violin
Day 5 The linings
This is one page in a series about making a violin by hand in the
traditional way. Please see the introduction for more about the
series and links to other pages. The glossary contains an
explanation of the terms used.
Today the linings are shaped and glued to the rib
structure which was completed in the previous stage.
The linings are made from willow, the same wood as
the blocks.
Above, violin maker Derek Roberts bends one
of the linings on the hot bending iron to the
required curved shape.
Left, a shaped lining is marked to the correct
length. This one is for a bottom bout.
The linings are
sawn to the
marked lengths.
Right, the linings for the top and bottom bouts
are ready for glueing.
11. A lining is glued to the inside of a C rib. One of
the bottom bout linings has already been glued
to a bottom rib and it is held in place with
wooden clothes pegs while the glue sets.
This detail shows how the C lining is morticed into the corner
block. If the lining were simply glued in place to the C rib, it
would tend to come unfixed as the instrument aged. The
mortice helps to prevent this from happening.
All the linings for the back of the instrument have now
been glued in place.
A set of linings must also be made for the top, but these
can only be fitted later when the mould is removed.
The addition of the linings has made the fragile rib
structure much stronger. The linings also provide a better
glueing surface than the ribs alone, for fixing the front and
back plates.
12. Making a Violin
Day 6 The back
This is one page in a series about making a violin by hand in the
traditional way. Please see the introduction for more about the
series and links to other pages. The glossary contains an
explanation of the terms used.
Today the back plates are marked and
sawn out and the rough arching of the
back is done. The plates of maple wood
have already been flattened and jointed.
Violin maker Derek Roberts marks the
outline of the rib structure (completed in
the previous stage) onto the plates. First
the line of the ribs is followed. Then
Derek uses a washer to mark a second
line outside the ribs. This is the outline
of the plates, as they must overhang the
ribs. The inner line will be used to
position the ribs exactly on the plates.
Derek uses a bow
saw to saw round
the outer line.
Right, the roughly
sawn back
emerges from the
plates.
A marking gauge is used to mark the edge thickness of the
back.
13. Derek uses a knife to trim the roughly
sawn edge down to the marked lines.
The rough arching of the back is done with a large
gouge. A skilled maker works quickly, removing large
amounts of wood with each sweep of the tool.
The back is held in a holding jig while Derek works on
it. The same jig will be used to hold the front when that
is rough arched.
This is an exciting and dynamic stage of the
making. The glorious curves of a violin back
take shape very rapidly under the gouge.
The marks of the gouge remain to be
smoothed off in a later stage.
Now that the rough arching is complete, the final outline
and the corners are worked with a file.
14. Making a Violin
Day 7 The front
This is one page in a series about making a violin by hand in the
traditional way. Please see the introduction for more about the
series and links to other pages. The glossary contains an
explanation of the terms used.
Today violin maker Derek Roberts
saws out the front plates, completes
the rough arching and begins the final
arching. The front plates are marked,
sawn out and trimmed in the same way
as the back plates were done in the
previous stage.
As for the back, the edge is trimmed down to the marked line
with a knife and with a chisel (right), and then filed to achieve
the final outline and shape of the corners.
Below, a large gouge is used to begin the rough arching. The
spruce used for the front is softer than the maple used for the
back and so is easier to cut.
15. The rough arching is complete. The arching is
developed further with smaller gouges and a
tiny violin maker's thumbplane.
The thumbplane is made from brass and is held between
the thumb and forefingers. The curved cutting edge of the
blade and curved base of the plane enable very precise
shaping of the arch.
As work progresses with the thumbplane on the
arching, templates are used to guide the shaping of
the instrument.
The long arch template is used in
the middle of the front to
establish the contours. There is
another long arch template of
slightly different shape for the
back.
Here is one of the set of five templates for the
cross arch, used at different positions across
the front. The back has its own set of five cross
arch templates.
Derek made these templates out of thin
plywood, from drawings of the Stradivarius
model for this instrument.
16. With the outline finalized and the arching roughly worked to the templates, this
stage is complete. Later on the purfling will be inlaid and the contours of the
arching will be finished with a scraper. Then the insides of the front and back will
be hollowed out.
17. Making a Violin
Day 8 Preparing the neck
block
This is one page in a series about making a violin by hand in the
traditional way. Please see the introduction for more about the
series and links to other pages. The glossary contains an
explanation of the terms used.
Today violin maker Derek Roberts starts work on the
neck and scroll of the violin. These are made from one
solid block of flamed maple wood.
First the block must be planed square and to the
correct dimensions. Here Derek checks the edge with
a square.
A template is used for the neck and scroll
outline, which is marked onto the wood with a
scriber.
Derek uses a coping saw
to roughly saw the
outline. Then various
tools are used to work
down to the outline and
shape the initial profile of
the scroll.
Above, Derek uses a gouge on the back of the
pegbox, and left, he uses a file on the head of
the scroll.
18. Now the final shape of the back of the pegbox is
marked out. The marked lines will be used in the next
stage to guide the removal of waste wood.
The four pegholes are drilled. Later on the
pegholes will be enlarged and a taper cut with
a reamer.
19. Making a Violin
Day 9 Carving the scroll
This is one page in a series about making a violin by hand in the
traditional way. Please see the introduction for more about the
series and links to other pages. The glossary contains an
explanation of the terms used.
Today violin maker Derek Roberts carves the scroll
from the neck block which was prepared in the
previous stage.
The back of the scroll and pegbox have been carefully
marked out.
Derek uses the marked lines as guides for saw
cuts across the sides of the pegbox and at the
back and sides of the scroll head. These cuts
must be made carefully, to avoid cutting away
too much wood and leaving saw marks on the
finished scroll.
The sawcuts (left) enable
the waste wood outside
the marked lines to be
removed more easily.
First Derek saws out
some wood on each side
of the head of the scroll.
20. Then more of the wood is removed from the
pegbox sides using a chisel.
After more work with a gouge the roughly
carved shape of the scroll emerges. The
outside of the pegbox has been shaped and
only requires finishing. The first turn of the
scroll head has been started.
Now the work on the second turn of the
scroll starts. A further set of saw cuts is
made in the volute. The excess wood
is sawed out and the carving
progresses towards the eye of the
scroll. Right, the shape of the eye has
been cut with a small gouge.
21. More work is done to carve the eye and the volutes of the
scroll. This picture and the one below show the two main
techniques of cutting with a gouge.
Here the gouge is held upright by the handle, in order to
make vertical cuts. These are used to shape the profile of the
turns in the scroll.
Right, the gouge is held by the blade
near the cutting tip, to make angled
cuts. The faces of the side of the scroll
must all slope inwards towards the
centre. This is called undercutting.
The basic shape of the scroll has now been carved. There is
more work to do: the peg box must be hollowed out, all the edges
have to be chamfered, and two flutes must be cut on the back.
Then a fine finish is achieved with a scraper.
22. Making a Violin
Day 10 Finishing the
scroll
This is one page in a series about making a violin by hand in the
traditional way. Please see the introduction for more about the
series and links to other pages. The glossary contains an
explanation of the terms used.
Today violin maker Derek Roberts finishes the scroll
which was carved in the previous stage.
First the pegbox is hollowed out with a chisel.
Then a skew chisel is used to cut the flat inside
surface of the pegbox cheek. Above you can see the
two tools, a left skew chisel and a right skew chisel,
one for each cheek of the pegbox.
Derek uses a file and a
knife to put a chamfer on
the edges. This is the
final stage in shaping the
profile of the scroll.
Two flutes are carved around the outside
of the scroll head and down the back of
the pegbox. Left, Derek cuts one of the
flutes with a small gouge.
23. Finally all the surfaces are given a smooth
finish with steel scrapers. Violin makers prefer
to achieve a fine finish with scrapers, rather
than sandpaper.
Scrapers do less damage to the surface fibres of the wood than sandpaper. This
helps the figure of the wood to show to its best advantage after varnishing.
All that remains to be done is to ream the peg holes.
This will be done at a later stage.
24. Making a Violin
Day 11 Finishing the
outline
This is one page in a series about making a violin by hand in the
traditional way. Please see the introduction for more about the
series and links to other pages. The glossary contains an
explanation of the terms used.
Today violin maker Derek Roberts
finishes the outline of the violin.
First the front and back plates must be
aligned with the rib structure.
In the violin back, Derek drills holes for two small wooden
pins. These locating pins are used to position the front
and back accurately on the rib structure of the instrument.
The front, back
and rib structure
are placed
together.
The front and back plates overhang the rib structure by a
small margin. With the plates pinned in place, the overhang is
checked.
25. The plates can be taken apart to
make adjustments to the
overhang, and then easily
repositioned on the rib structure
using the pins.
Derek has taken the back plate off the rib
structure to file the edge.
At this point he is making the final adjustments
to the outline of the instrument, making the
overhang even throughout and ensuring that all
the curves flow perfectly.
Right, Derek shapes the corners.
An accurate outline is critical for inlaying the
purfling.
26. Making a Violin
Day 12 Purfling
This is one page in a series about making a violin by hand in the
traditional way. Please see the introduction for more about the
series and links to other pages. The glossary contains an
explanation of the terms used.
Today violin maker Derek Roberts inlays the purfling
in the plates, whose outline was finished in the
previous stage. Purfling is a delicate sandwich of
different coloured woods which is inlaid in a channel
cut around the margins of the instrument.
Pictured right are the purfling marker, purfling pick and
two strips of purfling.
Left, Derek uses the
blades of the purfling
marker to score two
parallel lines a short way
in from the edge of the
plate. Then, right, he
deepens each line with a
knife.
The wood between each knife cut is
removed with the purfling pick. This is a
very small narrow-bladed chisel. Using
this method, a purfling channel is cut
around each plate, ready to receive the
inlay.
27. This picture shows the difference between the pair of
parallel lines marking out the purfling channel in the
plate on the left, and the purfling channel in the plate
on the right which has been fully cut out.
Cutting the channel in the corners is particularly
delicate work. At this point two strips of purfling will
meet in a mitred joint.
A strip of purfling is heated and bent to shape
on the bending iron. This is the same iron that
was used to bend the ribs.
The curved purfling is fitted into the channel.
Small adjustments are made to the depth and
width of the channel with a knife and a purfling
pick, to ensure a comfortable fit.
The most difficult stage in inlaying the
purfling is forming the mitre where two
strips of purfling join at the corners of
the instrument.
28. The mitre terminates in a very delicate point which is
called the "bee-sting".
The neatness of the purfling, and especially the bee-
sting, are important elements in the aesthetic design
of a violin.
A very sharp chisel is required to shape the ends of
the purfling strips to form the bee-sting. This is a test
of the violin maker's skill.
To fix the purfling in the channel, Derek
applies hot animal glue with a brush and
presses the purfling down into the
channel.
29. Finally Derek gently taps the purfling
with a light hammer, to ensure a
positive fit and to squeeze out surplus
glue.
The purfling has now been inlaid in both
the front and back plates, which begin
to take on their final appearance.
However, you can see that further work
is needed to remove the tool marks
which are still visible.
30. Making a Violin
Day 13 Final arching
This is one page in a series about making a violin by hand in the
traditional way. Please see the introduction for more about the
series and links to other pages. The glossary contains an
explanation of the terms used.
Today violin maker Derek
Roberts completes the final
arching on the top and bottom
plates, having finished the
purfling in the previous stage.
The external contours of the instrument have already been roughly carved on Day
6 and Day 7. In this final stage the contours are shaped precisely and the wood is
very finely finished. The tools used, shown above, are a thumbplane and a
selection of steel scrapers. Also shown are templates and a pencil gauge.
Before Derek starts on the final
arching, he carves a narrow flute
over the line of the purfling, around
the edge of the instrument. The
finished arching will rise up from this
flute.
Derek uses the pencil gauge to mark
out a contour line in pencil on the back
plate.
This and other contours marked with the
pencil gauge will guide the final shaping
of the arch.
31. Templates are also used to guide the
final shaping. These templates are
made of thin plywood, shaped from
measurements taken from the original
Stradivarius instrument.
A small brass thumbplane is ideally
suited for work on the complex contours
of the instrument.
The first step is to remove the gouge
marks left from the rough arching of Day
6.
Only tiny shavings of wood are
removed, compared with the large
amounts removed during rough arching.
32. The next step is to finish the contours of the
plate, using the pencil lines and the templates
as guides.
Although the thumbplane can shape the
contours very accurately, it still leaves small
tool marks visible on the plates. A much finer
finish to the surface of the wood is desired.
Derek uses a flexible steel scraper to remove the tool
marks together with any other irregularities in the
surface of the arch.
The scraper has a small fine cutting edge which
produces a silky smooth finish, allowing the grain of
the wood to show at its best. Violin makers prefer to
use scrapers rather than abrasive paper for this final
finishing.
Scrapers of different shapes are used to suit the
contours being worked on. Here Derek uses a small
oval scraper to blend in the flute over the purfling with
the main part of the arching.
33.
34. Making a Violin
Day 14 Hollowing
This is one page in a series about making a violin by hand in the
traditional way. Please see the introduction for more about the
series and links to other pages. The glossary contains an
explanation of the terms used.
Today violin maker Derek Roberts hollows out the back
plate of the violin.
The final arching was done on the outside of the plate in
the previous stage. Now a similar process of removing
excess wood is carried out on the inside of the plate.
First Derek checks the back to make sure that the final
arching has been accurately completed.
Excess wood on the inside of the back will be
carved out with gouges. Derek marks a pencil
line around the edge. Wood inside this line will be
hollowed out, leaving a flat area around the edge
for glueing onto the rib structure when the
instrument is assembled.
The back is put in a holding jig
and a large gouge is used to
remove wood quickly.
35. Initially the work is done by eye.
As the hollowing progresses, the
thickness of the plate must be
checked.
Now you can see the hollowing taking
place while the area around the edge
remains flat. The gouge marks visible
on the plate will be removed later.
Derek uses the pencil gauge as
a quick way of judging where
wood still needs to be removed
during the initial stages of
gouging.
36. The dial gauge is used to check
the thickness of the plate more
precisely. There is a complicated
pattern of thicknesses varying
from around 4.5mm at the centre
to 2.6mm at the edges of the top
and bottom bouts.
37. Making a Violin
Day 15 Thicknessing
This is one page in a series about making a violin by hand in the
traditional way. Please see the introduction for more about the
series and links to other pages. The glossary contains an
explanation of the terms used.
Today violin maker Derek Roberts
hollows out the front plate and
completes the thicknessing of both
plates of the violin.
The back plate was hollowed out in the
previous stage. Now similar work is
carried out on the front. Derek uses a
large gouge to begin carving the inside.
The next few photos show how
quickly the work progresses. The
spruce of the front is softer than
the maple of the back, so the
rough hollowing is completed in
the space of a few minutes.
38. Now the gouging is complete,
Derek starts finer work with the
thumbplane. At first the aim is to
remove the tool marks.
Next, specific thicknesses must be
achieved across the plate. Derek uses
the dial gauge to check these
measurements.
39. Work with the thumbplane is
much more accurate than work
with the gouge. Small tool marks
are left which will later be
removed.
You can see the flat surface
around the edge and at the top,
bottom and corner block
positions, ready for glueing to the
rib structure.
The work is finished with a steel
scraper. This produces a fine
surface and removes the small
plane marks. It also allows the
thickness to be adjusted to an
even finer tolerance, a tenth of a
millimetre.
40. Making a Violin
Day 16 Marking the F
holes
This is one page in a series about making a violin by hand in the
traditional way. Please see the introduction for more about the
series and links to other pages. The glossary contains an
explanation of the terms used.
Today violin maker Derek Roberts starts work on the F holes or
sound holes. They will be marked out on the front plate of the
violin which was thicknessed in the previous stage.
A template of thin plywood is used to give the shape of the F
hole. This template belongs to the particular Stradivarius model
which Derek is making.
The template is placed on the front plate and
drawn round with a pencil.
Accurate positioning of the F holes is important as this will determine the position of
the bridge and the length of the vibrating strings.
Next Derek uses a gouge to flute
the edge of the F holes. The
purpose of the fluting is purely
aesthetic.
41. The fluting is finished with a steel
scraper.
Below, the centres of the top and
bottom holes of each F hole are
marked with a scriber, and then
drilled out with a hand drill.
42. Making a Violin
Day 17 Cutting the F
holes
This is one page in a series about making a violin by hand in the
traditional way. Please see the introduction for more about the
series and links to other pages. The glossary contains an
explanation of the terms used.
Today violin maker Derek Roberts cuts
the F holes which were marked out in
the previous stage on the front plate of
the violin.
These are specially designed tools, made by Derek himself, to cut the top and
bottom holes. They are different sizes because the top hole is smaller than the
bottom.
Derek inserts the guide pin through one of the
pilot holes drilled in the previous stage. He
twists the tool and the cutters remove a small
plug of wood of the correct size.
The hole is started by cutting on the outside,
and finished by cutting on the inside. This
lessens the risk of splintering the wood.
43. The top and bottom holes of the F holes are
now finished.
The next step is to saw out the F hole. This is a
very delicate stage and care must be taken to
work with the grain of the wood. There is a
danger of splintering where the sawcut meets
the previously cut hole.
The saw stays well within the marked line. The
aim is to saw out waste wood, not to achieve
the final shape. This will be done more
carefully with a knife.
44. Above, Derek uses a razor-sharp knife
to pare the wood away to achieve the
right design. The top and bottom holes
should be joined by a series of complex
flowing curves.
Left, Derek checks that the F holes are
wide enough to admit a soundpost.
Derek completes the F hole by cutting the
nicks. The function of these is not only
aesthetic: they also provide a guide for
positioning the bridge when the instrument is
set up.
45.
46. Making a Violin
Day 18 Glue the back
This is one page in a series about making a violin by hand in the
traditional way. Please see the introduction for more about the
series and links to other pages. The glossary contains an
explanation of the terms used.
Today violin maker Derek Roberts glues the back to
the rib structure.
First Derek cuts a small bevel all around the inside
edge of the back plate. This will make final shaping of
the edge easier. The back linings of the rib structure
should also be shaped before glueing. They are
bevelled with a knife and then rounded with abrasives.
Before cramping the back and ribs
together, Derek applies a thin sizing
coat of glue to both the edge of the
plate and to the linings and blocks.
The end grain of the blocks is very
absorbent and Derek gives them an
extra coat of glue. The glue is then
allowed to dry thoroughly before the
next stage.
47. A small locating pin at each end of the
plate and corresponding holes in the top
and bottom blocks allow the plate to be
positioned exactly on the rib structure.
Special cramps are used to secure the plate to the rib
structure. These are fixed all round the edges of the
instrument.
The glue must be allowed to dry thoroughly before this
stage is done.
Derek heats up a small palette knife in a pan of boiling
water and removes a few cramps. Then he uses the
hot knife to melt the previously applied glue, so that
the glue on the back and on the linings fuses together.
The cramps are then replaced and the next section of
edge is opened and glued.
48. Now all the edge has been glued, the
glue is left to dry with all the cramps
back in place.
This method allows much more control
and prevents a build-up of too much
glue.
49. Making a Violin
Day 19 The bass bar
This is one page in a series about making a violin by hand in the
traditional way. Please see the introduction for more about the
series and links to other pages. The glossary contains an
explanation of the terms used.
Today violin maker
Derek Roberts makes
the bass bar and fits it
to the inside of the
front plate.
The bass bar is a reinforcing strut which is fixed inside the front of the violin and lies
under the line of the G string. It strengthens the front plate and helps transmit low
frequency vibrations from the string to the body of the instrument.
The bass bar is made from
quarter sawn spruce. It has
been roughly prepared to the
correct dimensions. Now it has
to be accurately fitted to the
internal curvature of the front
plate. Left, Derek is marking the
curve on the bass bar.
Small pieces of wood have been
glued temporarily to the inside of
the plate, to ensure that the bass
bar is always correctly positioned
while it's being fitted. They will
be removed after the bass bar
has been glued in.
50. Derek uses a technique called
chalk fitting. Here he applies
chalk to the inside of the plate
along the line where the bass bar
will be fitted.
Then he places the bass bar in
its correct position, rubbing it
against the plate. The bass bar
will pick up chalk from all the
points where it is making contact
with the plate.
Only part of the bass bar is
making contact. Wood must be
removed from the bar where the
chalk has marked it, so that it will
eventually make contact down its
whole length.
Derek uses a chisel to remove the chalked
wood, and a scraper to make fine adjustments.
Then he repeats the process of fitting to the
plate and checking for chalk marks.
51. Eventually the whole of the bass bar picks up
chalk, showing that it is making a good fit.
Derek cleans off the chalk from the front plate
before glueing.
Finally the bass bar is glued in place
and cramped up.
52. Making a Violin
Day 20 Closing the box
This is one page in a series about making a violin by hand in the
traditional way. Please see the introduction for more about the
series and links to other pages. The glossary contains an
explanation of the terms used.
Today violin maker Derek Roberts closes the
box. He will remove the mould from the back
and rib structure, then glue on the front.
First Derek gently taps each block to break the
glue joint and free it from the mould.
Then he checks each block with a knife to
make sure that the joint is completely open.
This stage is accomplished more easily if the
glue was applied sparingly when the blocks
were glued to the mould on Day 2.
Carefully he pulls the mould free from
the back and ribs. This is a dangerous
moment: it is possible to crack the ribs
or the blocks if one is hasty or careless.
Here is the rib structure and back with
the mould succesfully removed.
Next the top linings are fitted and the
blocks are shaped.
The top linings will reinforce the edge and give a good
glueing surface for the front.
They are made and fitted to the ribs in the same way
as the linings for the back on Day 5.
53. Left, we can see the top linings have
been glued in place and the corner
blocks have been shaped. Derek
shapes the top block with a gouge.
Now the back and ribs are prepared for
the front to be glued onto them. Derek
uses a sanding board to achieve a
completely flat glueing surface of the
ribs, lining and blocks.
On the inside of the front plates,
Derek completes shaping the
bass bar with a thumbplane.
Finally the front is glued on to the
back and ribs using the same
method as for the back on Day
18.
54. This is an important stage of the making. The box is now closed and all the
structural work on the body of the instrument is finished.
55. Making a Violin
Day 21
The fingerboard
This is one page in a series about making a violin by hand in the
traditional way. Please see the introduction for more about the
series and links to other pages. The glossary contains an
explanation of the terms used.
Today violin maker Derek Roberts shapes the
fingerboard and glues it onto the neck block.
The fingerboard is made from ebony. Usually it
is bought machined to a rough finish, for the
maker to shape to exact measurements. First,
Derek checks the measurements with
callipers.
The top surface of the fingerboard has to be shaped
very carefully because it has a big effect on the
playability of the violin.
Left, Derek checks the curve with a template.
Below, the top surface is sanded with a shaped
sanding block.
Derek finishes the hollow
of the under-surface with
a steel scraper.
56. The next stage is to glue the fingerboard onto
the neck block, which was finished on Day 10.
First, Derek uses a block plane to flatten the
heel of the neck block. This is the part which
will be glued into the body of the instrument.
Unless it is perfectly flat, it will be difficult to set
the neck in accurately.
Finally the fingerboard is glued
onto the top of the neck block
and cramped into place.
The neck is still only roughly shaped. It will be finished after the neck has been
glued into the body.
This end-on view shows the curved
shape of the cramping block, matching
the curve of the fingerboard.
57. Making a Violin
Day 22 The neck joint
This is one page in a series about making a violin by hand in the
traditional way. Please see the introduction for more about the
series and links to other pages. The glossary contains an
explanation of the terms used.
Today violin maker Derek Roberts makes the neck joint
and fits the neck to the body. The neck and fingerboard
were assembled in the previous stage.
The joint is in two parts, at the heel of the neck and at
the top block of the body of the instrument. The
measurements of the joint must be marked out before
the joint can be made. Right, Derek marks out the heel
of the neck.
The measurements are transferred to the body of the
instrument. This should ensure a perfect fit: it is critical
that the neck is set very accurately into the body.
Derek makes a series of saw cuts in the side of
the neck where the wood is overlapping the
fingerboard.
These saw cuts make it easier to
remove the waste wood with a chisel.
The neck is finished flush with the sides
of the fingerboard.
58. Derek planes a taper on the heel of the
neck, using the lines previously marked
out. Once he has planed down to the
lines he will make no more adjustments
to this part of the joint.
Next Derek turns his attention to the
other part of the joint, in the body of the
instrument.
Here he cuts into the spruce front to
start the back edge of the joint. This
must be perfectly square with the centre
joint of the plates, to ensure that the
neck is set into the body perfectly
straight.
Derek uses a fine tooth saw to cut the
sides of the joint through the spruce
front and the maple ribs.
He cuts carefully through the spruce and into
the top block.
59. He removes the maple ribs, exposing the top block.
This part of the joint can then be cut in the top block. It
is a complex operation because there are four faces of
the joint which have to fit together perfectly.
Just the right amount of wood must be taken
away, so that the neck runs straight down the
body and it is set deep enough and at the right
elevation. Each cut can change each of these
settings.
To achieve a perfect joint, Derek uses
the method of chalk fitting, also used in
fitting the bass bar.
60. Derek tests the fit of the neck in the
body, making small modifications as
indicated by the chalk. This process is
repeated several times over.
Right, the picture shows that the neck
is not set deeply enough yet. More
wood must be taken from the sides of
the joint in the top block.
An elevation stick is used to test
whether the neck is set in at the correct
angle yet.
Finally the fit is judged to be correct and the joint is
glued and cramped.
61. Making a Violin
Day 23 Finishing the
neck
This is one page in a series about making a violin by hand in the
traditional way. Please see the introduction for more about the
series and links to other pages. The glossary contains an
explanation of the terms used.
Today violin maker Derek Roberts finishes shaping the
neck and the back button.
The neck is still only roughly shaped. It was fitted into the
body of the violin in the previous stage.
The back button is that part of the back which is glued
onto the heel of the neck.
Derek starts by marking out a semi-circle with dividers,
to form the shape of the button.
He saws out the waste wood from the
button with a coping saw, continuing the
cut into the neck block.
Derek starts roughly shaping the
neck with a knife.
62. He uses a chisel to cut out the semi-circular shape of the button and continue the
shape into the neck.
The shaping continues, first with
a knife and then with files.
Below right a flat hand-cut rasp
is used, and left a half round file.
63. Derek uses callipers and a template to check the
shape of the neck.
Finally Derek finishes the neck off with a
scraper and with abrasive paper.
64. This has to be done very carefully
because the neck is the part of the
instrument which the player handles. It
must not have any irregularities which
the player might detect.
65. Making a Violin
Day 24 Finishing
This is one page in a series about making a violin by hand in the
traditional way. Please see the introduction for more about the
series and links to other pages. The glossary contains an
explanation of the terms used.
Today violin maker Derek
Roberts finishes shaping
the edge and does the
final scraping.
First Derek cuts a chamfer
around the front and back edges.
A file is used to soften the edges of the
chamfer.
The file does not give a very fine
finish, so the shaping and
smoothing of the edges is
completed with abrasive papers
of different grades.
66. Above, a cork is used to support
the abrasive paper as Derek
shapes the corner. Left, a thin
strip of wood is used as he
shapes the bottom bout.
Here Derek uses a small
teardrop shaped scraper around
the margin of the instrument,
where the arch rises up to meet
the edge.
This picture shows how the edgework and
the fluting over the purfling blend together.
67. The whole instrument is then scraped very lightly - front, back, ribs and scroll. This
produces a better finish on the larger surfaces of the instrument than can be
achieved with abrasive paper.
The violin is ready for
varnishing.