SlideShare uma empresa Scribd logo
1 de 204
Baixar para ler offline
Making cooking as much fun as eating
Please read this instruction manual. This will ensure that you
make full use of all the technical benefits your microwave
appliance has to offer.
It will provide you with important safety information. You will
be familiarised with the individual components of your new
appliance. And we will show you how to make settings step
by step. Ć simple!
The tables list numerous wellĆknown dishes and typical
settings. All these dishes are tested in our cooking studio.
In the unlikely event of a malfunction, look here for
information on how to rectify minor faults yourself.
A detailed table of contents will help you to find what you're
looking for quickly.
Enjoy your meal!
Instruction manual 2 - 50. . . . . . . . . . . . . . . . . . . . . .
Instrucciones para el uso 51 - 100. . . . . . . . . . . . . . . .
Instruções de serviço 101 - 150. . . . . . . . . . . . . . . . . .
¥pa­åæa ÿo濵o­a¸åø 151 - 204. . . . . . . . . . . . . . .
Table of contents
2
Safety information 4. . . . . . . . . . . . . . . . . . . . . . . . . .
Before installation 4. . . . . . . . . . . . . . . . . . . . . . . . . . . .
Information for your safety 4. . . . . . . . . . . . . . . . . . . . .
Information on the microwave 6. . . . . . . . . . . . . . . . . .
Causes of damage 9. . . . . . . . . . . . . . . . . . . . . . . . . . .
Your new appliance 10. . . . . . . . . . . . . . . . . . . . . . . . .
Control panel 10. . . . . . . . . . . . . . . . . . . . . . . . . . . . . . . .
Buttons and display 11. . . . . . . . . . . . . . . . . . . . . . . . . .
Accessories 12. . . . . . . . . . . . . . . . . . . . . . . . . . . . . . . . .
Cooking compartment 12. . . . . . . . . . . . . . . . . . . . . . . .
Switching the appliance on and off 13. . . . . . . . . . .
Before using the appliance for the first time 14. . .
Setting the time 14. . . . . . . . . . . . . . . . . . . . . . . . . . . . . .
Heating up the cooking compartment 15. . . . . . . . . . .
Cleaning accessories 15. . . . . . . . . . . . . . . . . . . . . . . . .
The microwave 16. . . . . . . . . . . . . . . . . . . . . . . . . . . . .
Notes regarding ovenware 16. . . . . . . . . . . . . . . . . . . . .
Microwave power settings 17. . . . . . . . . . . . . . . . . . . . .
Setting the microwave 17. . . . . . . . . . . . . . . . . . . . . . . .
1,2,3 followĆon mode 19. . . . . . . . . . . . . . . . . . . . . . . .
Setting followĆon mode 19. . . . . . . . . . . . . . . . . . . . . . .
Grilling 21. . . . . . . . . . . . . . . . . . . . . . . . . . . . . . . . . . . . .
Setting the grill 21. . . . . . . . . . . . . . . . . . . . . . . . . . . . . . .
MicroCombi operation 23. . . . . . . . . . . . . . . . . . . . . .
Setting MicroCombi 23. . . . . . . . . . . . . . . . . . . . . . . . . .
Table of contents
3
Automatic programmes 24. . . . . . . . . . . . . . . . . . . . .
Setting the programme 24. . . . . . . . . . . . . . . . . . . . . . .
Notes on automatic programming 26. . . . . . . . . . . . . .
Memory 30. . . . . . . . . . . . . . . . . . . . . . . . . . . . . . . . . . .
Storing settings in the memory 30. . . . . . . . . . . . . . . . .
Starting the memory function 31. . . . . . . . . . . . . . . . . .
Changing the basic settings 32. . . . . . . . . . . . . . . . .
Basic settings 32. . . . . . . . . . . . . . . . . . . . . . . . . . . . . . .
Care and cleaning 33. . . . . . . . . . . . . . . . . . . . . . . . . .
Cleaning agents 33. . . . . . . . . . . . . . . . . . . . . . . . . . . . .
Troubleshooting 35. . . . . . . . . . . . . . . . . . . . . . . . . . . .
AfterĆsales service 37. . . . . . . . . . . . . . . . . . . . . . . . . .
Technical data 38. . . . . . . . . . . . . . . . . . . . . . . . . . . . . . .
EnvironmentallyĆfriendly disposal 39. . . . . . . . . . . .
Dishes tested for you in our cooking studio 39. . .
Defrosting, heating up and cooking
with the microwave 40. . . . . . . . . . . . . . . . . . . . . . . . . . .
Tips for microwave operation 46. . . . . . . . . . . . . . . . . .
Grilling table 46. . . . . . . . . . . . . . . . . . . . . . . . . . . . . . . . .
Combined grill and microwave 48. . . . . . . . . . . . . . . . .
Test dishes in accordance with EN 60705 50. . . . .
4
d Safety information
Read this instruction manual carefully. Only then will
you really be able to operate your appliance safely and
correctly.
Please keep the instruction and installation manuals
in a safe place. Please include these manuals if you
pass on the appliance to a new owner.
Check the appliance for damage after unpacking it.
Do not connect the appliance if it has been damaged
during transportation.
Only allow a licensed professional to connect the
appliance. Warranty claims for damage caused by
incorrect connection will not be accepted.
Please observe the special installation instructions.
This appliance is intended for domestic use only. This
appliance must only be used for preparing food and
drink.
Adults and children must not operate the appliance
without supervision,
H if they are physically or mentally incapable of doing
so or
H if they lack the knowledge and experience to
operate it correctly and safety.
Never let children play with the appliance.
Before installation
Transport damage
Electrical connection
Installation and connection
Information for your
safety
5
There is a risk of burns.
Never touch the hot surfaces of heating and cooking
appliances. Never touch the internal surfaces of the
cooking compartment or the heating elements. Open
the cooking compartment door carefully. Hot steam
may escape. Small children must be kept at a safe
distance from the appliance at all times.
There is a risk of fire.
Never store combustible items in the cooking
compartment.
Never open the cooking compartment door if smoke
can be seen in the appliance. Switch off the
appliance. Pull out the mains plug or switch off the
fuse in the fuse box.
There is a risk of a shortĆcircuit.
Never trap cables of electrical appliances in the
cooking compartment door when it is hot. The cable
insulation could melt.
There is a risk of burns.
Never prepare food containing large quantities of
drinks with a high alcohol content. Alcoholic vapours
can catch fire in the cooking compartment. Use only
small quantities of drinks with a high alcohol content
and open the cooking compartment door carefully.
There is a risk of burns.
Always use an oven cloth or oven gloves to remove
hot accessories from the appliance.
There is a risk of serious damage to health.
Never use the appliance if the cooking compartment
door or the door seal is damaged. Otherwise
microwave energy may escape. Only use the
appliance again once it has been repaired.
There is a risk of serious damage to health.
The surface of the appliance could rust through over
time if it is not cleaned properly. Microwave energy
may escape. Clean the appliance on a regular basis.
Hot cooking compartment
Hot accessories
Damaged cooking
compartment door or door
seal
Heavily corroded surfaces
6
There is a risk of electric shock.
Never remove the casing. The appliance is a
highĆvoltage appliance.
There is a risk of serious damage to health.
Never remove the casing. It prevents microwave
energy from escaping.
There is a risk of shortĆcircuiting.
Never expose the appliance to intense heat or
humidity.
There is a risk of electric shock.
Incorrect repairs are dangerous. Repairs may only be
carried out, and damaged power cables replaced, by
one of our experienced afterĆsales engineers.
You must not open the casing. The appliance is a
highĆvoltage appliance. The casing prevents
microwave energy from escaping.
If the appliance is faulty, switch off the circuit breaker
in the fuse box or disconnect the appliance at the
mains. Call the afterĆsales service.
There is a risk of fire.
Only use the microwave to prepare food which is fit for
consumption. Using the microwave for other
purposes may be dangerous and may result in
damage,
e.g. heated slippers and grain or cereal pillows could
catch fire, even several hours later.
There is a risk of injury.
Porcelain or ceramic ovenware can have small
perforations in the handles or lids. These perforations
conceal a cavity below. Moisture that has penetrated
this cavity could cause the ovenware to crack.
Only use ovenware that is suitable for use in a
microwave.
Casing open
Hot or humid environment
Incorrect repairs
Information on the
microwave
Preparing food
Ovenware
7
There is a risk of burns.
Hot food can heat up ovenware. Always use an oven
cloth or oven gloves to remove ovenware and
accessories from the cooking compartment.
There is a risk of fire.
Do not select a microwave power or time setting that
is higher than necessary. The food could catch fire
and cause damage to the appliance. Follow the
information provided in this instruction manual.
There is a risk of fire.
Never heat food in heatĆretaining packages.
Do not leave food heating unattended in containers
made of plastic, paper or other combustible materials.
There is a risk of burns.
Airtight packaging may burst when food is heated.
Follow the information provided on the packaging.
Always use an oven cloth or oven gloves to remove
meals.
There is a risk of scalding
There is a possibility of delayed boiling when a liquid is
heated. This means that the liquid reaches boiling
temperature without the usual steam bubbles rising to
the surface. If the container is only shaken a little, the
hot liquid can suddenly boil over and spatter.
When heating liquids, always place a spoon in the
container. This will prevent delayed boiling.
Microwave power and time
Packaging
Drinks
8
There is a risk of explosion.
Never heat drinks or other food in containers that have
been tightly sealed.
Never overheat alcoholic drinks.
There is a risk of burns.
Never heat baby food in closed containers. Always
remove the lid or teat.
Stir or shake well after the food has been heated. This
ensures even heat distribution.
Check the temperature of the food before it is given to
the child.
There is a risk of burns.
Never cook eggs in their shells. Never reheat
hardĆboiled eggs as they can explode even after
microwave operation has ended. The same applies to
shellfish and crustaceans.
Always prick the yoke when baking or poaching eggs.
Always prick the skin of foodstuffs with solid peels or
skins such as apples, tomatoes, potatoes and
sausages before cooking to prevent the peel or skin
from bursting.
There is a risk of fire.
Never use the microwave to dry food.
There is a risk of fire.
Never defrost or heat food with a low water content,
e.g. bread, at too high a power or for too long.
There is a risk of fire.
Never use the microwave to heat cooking oil on its
own.
Baby food
Foods with a shell or skin
Drying food
Food with a low water
content
Cooking oil
9
Never pour water into the hot cooking compartment.
This will cause steam. The temperature change can
cause damage to the ceramic floor panel.
Only leave the cooking compartment to cool with the
door closed. Do not trap anything in the appliance
door. Even if the door is only slightly ajar, the fronts of
adjacent units may be damaged over time.
If the seal is very dirty, the appliance door will no
longer close properly during operation. The fronts of
adjacent units could be damaged. Always keep the
seal clean.
Do not switch on the microwave unless there is food
in the cooking compartment. The appliance may be
overloaded if it is switched on without any food inside.
An exception to this rule is for brief testing of
ovenware (see notes on ovenware).
Causes of damage
Water in the hot cooking
compartment
Cooling with the appliance
door open
Heavily soiled seal
Operating the microwave
without food
10
Your new appliance
Use this section to familiarise yourself with your new
appliance. The control panel and the individual
controls are explained here. You will find information
about the cooking compartment and the accessories.
Here is an overview of the control panel.
Depending on the appliance model, there may be
differences in the particular details.
Display Rotary selector
Buttons
Microwave power
settings
Button for a series of operations
On/Off button
The rotary selector is retractable. Press on the rotary
selector to lock it in or out.
Sensors are located under the individual buttons.
They must not be pressed too firmly. Only touch the
corresponding symbol.
Exception: the button for the series of operations and
the buttons for the microwave power settings are
normal push buttons.
Control panel
Rotary selector
Buttons
11
Using the buttons, you can set various additional
functions. In the display, you can check the values
that you have set.
Symbol Button function
% Switches the appliance on and off
90 Selects 90 wattmicrowave power
180 Selects 180 wattmicrowave power
360 Selects 360 wattmicrowave power
600 Selects 600 wattmicrowave power
900 Selects 900 wattmicrowave power
2 Selects followĆon mode
( Selects the grill
0 Opens and closes the timeĆsetting options menu
g / h Selects memory
` Selects a programme
f Selects weight
^ Opens the appliance door
n Press briefly = starts/pauses operation
Press and hold = cancels operation
Notes
The timeĆsetting options that are in the foreground of
the display are indicated by the brackets [ ] around the
relevant symbol.
Exception: With the clock, the symbol 0 is lit up only
if you are making changes.
When you switch on the oven, the lamp in the cooking
compartment comes on.
Buttons and display
12
Your appliance is equipped with the following
accessories:
Wire rack
as a surface for ovenware or for grilling and browning.
Glass pan
This can act as a splash guard if you are grilling food directly on
the wire rack. Therefore, place the wire rack in the glass pan.
The glass pan can also be used as a dish when using the
microwave.
The appliance is equipped with a cooling fan. The fan
may run on even if the oven has been switched off.
Notes
The cooking compartment remains cold during
microwave operation. The cooling fan will still switch
on. The fan may run on even when microwave
operation has ended.
Condensation may appear on the door panel, interior
walls and floor. This is normal and does not affect
microwave operation. Wipe away the condensation
after cooking.
Accessories
Cooking
compartment
Cooling fan
13
Switching the appliance on and off
The % button allows you to switch the microwave
oven on and off.
Press the % button.
Select the operating mode you require.
H 90, 180, 360, 600 or 900 W button for the
microwave power setting
H 2 button = followĆon mode
H ( button = grill
H ` and f buttons = automatic programming
H g or h button = memory programme
You can find out how to make the settings in the
individual sections.
Press the % button.
The appliance switches off and the clock appears in
the display.
Switching on
Switching off
14
Before using the appliance for the first
time
Here you will find everything you need to do before
using the microwave to prepare food for the first time.
First read the Safety information section.
When the microwave has been connected to the
power supply, the [0] symbol and four zeros lights up
in the display.
Set the time.
1. Set the current time using the rotary selector.
2. Press the 0 button.
The time is set.
You can hide the time. You can then only see it
when the oven is in operation. Read about this in the
Changing basic settings section.
Note
In order to reduce the energy consumption of your
appliance in standby, you can hide the clock. Read
about this in the Changing basic settings section.
Setting the time
Hiding the clock
15
Heat up the empty cooking compartment with the
door closed to remove the new smell.
Make sure that there are no remains of packaging in
the cooking compartment.
Heat the cooking compartment for 10 minutes with
the grill ( at level 3.
1. Press the % button.
2. Press the ( button.
Grill, level 3 and 10:00 minutes appear in the
display.
3. Press the n button.
Operation begins. The n symbol lights up.
After 10 minutes, switch off the appliance with
button %.
Before using the accessories for the first time,
clean them thoroughly using a soft cloth and hot
soapy water.
Heating up the
cooking
compartment
Cleaning
accessories
16
The microwave
Microwaves are converted to heat in foodstuffs. You
can set the microwave on its own or in combination
with the grill. You will find information about cookware
and how to set the microwave.
Note
In the Tested for your in our cooking studio section,
you will find examples for defrosting, heating and
cooking with the microwave oven.
Suitable dishes are heatĆresistant ovenware
made of glass, glass ceramic, porcelain, ceramic or
heatĆresistant plastic. These materials allow
microwaves to pass through.
You can also use serving dishes. This saves you
having to transfer food from one dish to another.
You should only use ovenware with decorative gold or
silver trim if the manufacturer guarantees that they are
suitable for use in microwaves.
Metal ovenware is unsuitable.
Metal does not allow microwaves to pass through.
Food in covered metal containers will remain cold.
Caution Metal Ć e.g. a spoon in a glass Ć must be kept
at least 2 cm from the oven walls and the inside of the
door. Sparks could destroy the glass on the inside of
the door.
Do not switch on the microwave unless there is food
inside.
The following ovenware test is the only exception to
this rule.
Notes regarding
ovenware
Suitable ovenware
Unsuitable ovenware
Ovenware test
17
Perform the following test if you are unsure whether
your ovenware is suitable for use in the microwave:
Heat the empty ovenware at maximum power for
between 30 and 60 seconds. Check the temperature
of the ovenware during this period. The ovenware
should still be cold or warm to the touch. The
ovenware is unsuitable if it becomes hot or sparks are
generated.
Use the button to set the desired microwave power.
90 watts for defrosting delicate foods
180 watts for defrosting and continued cooking
360 watts for cooking meat and heating delicate foods
600 watts for heating and cooking food
900 watts for heating liquids
When you press a button, the selected power
lights up.
Note
The microwave power can be set to 900 watts
for a maximum of 30 minutes. A cooking time of
90 minutes is possible with all other power settings.
Example: Microwave power 360 W, cooking time
17 minutes.
1. Press the % button.
Your appliance is ready for use.
2. Press the button for the microwave power setting
you require.
The power is lit up in the display and a suggested
cooking time is displayed.
3. Set the cooking time using the rotary selector.
4. Press the n button.
Operation begins. The cooking time can be seen
counting down.
Microwave power
settings
Setting the
microwave
18
A signal sounds. Microwave operation is finished.
You can cancel the signal before it sounds using
the 0 button. Use the % button to switch off the
appliance.
Cooking is paused. Press the n button briefly once
you have closed the appliance door. The programme
will then continue.
This is possible at any time. Change the cooking time
using the rotary selector.
Press the button for the new microwave power
setting. Use the rotary selector to set the cooking time
and restart the microwave.
Press the n button and switch off the appliance with
the % button.
Notes
When you switch on the appliance with the % button,
the highest microwave power always appears in the
display as a suggestion.
If you open the appliance door during cooking, the fan
may continue to run.
The cooking time has
elapsed
Opening the appliance
door during cooking
Changing the cooking time
Changing the microwave
power setting
Cancelling cooking
19
1,2,3 followĆon mode
You can use the followĆon mode to set up to three
different microwave power settings and times one
after the other and then start.
You can also connect the grill to the microwave power
settings.
Always use heatĆresistant cookware which is suitable
for microwaves.
1. Press the % button.
Your appliance is ready for use.
2. Press the 2 button.
The ª for the first followĆon mode appears in
the display.
3. Set the first microwave power and cooking time.
4. Press the 2 button.
The « for the second followĆon mode appears.
5. Set the second microwave power and cooking
time.
6. Press the 2 button.
The ¬ for the third followĆon mode appears.
7. Set the third microwave power and cooking time.
8. Press the n button.
Operation begins. The total cooking time and
ª symbol for the first followĆon mode appear in
the display.
A signal sounds. FollowĆon mode is finished.
You can cancel the acoustic signal before it sounds
using the 0 button.
Changes can only be made before operation begins.
Press the 2 button repeatedly until the number for
the followĆon mode appears. Change the setting.
Ovenware
Setting followĆon
mode
The cooking time has
elapsed
Changing the setting
20
Cooking is paused. Press the nbutton again once
you have closed the appliance door. The programme
will then continue.
Press the n button briefly. Operation is paused.
Press the n button again to continue cooking.
Press and hold the n button for approximately
4 seconds and switch off the appliance with the
% button.
Note
You can also combine the grill with the followĆon
mode. First, set the followĆon mode.
Opening the appliance
door during cooking
Pausing cooking
Cancelling cooking
21
Grilling
The following grill settings are available:
Grill Level 3 § high Press the ( button
once
Grill Level 2 ¦ medium Press the ( button
twice
Grill Level 1 ¥ low Press the ( button
three times
Example in the diagram: Grill setting 2, 15 minutes
1. Press the % button.
Your appliance is ready for use.
2. Press the ( grill button twice.
Grill, level 2 and 10:00 minutes appear in the
display.
To set a different grill setting, press the ( grill button
again.
Setting the grill
22
3. Set the cooking time using the rotary selector.
4. Press the n button.
In the display, the timer can be seen counting
down and the q symbol is in brackets.
A signal sounds.
00:00 is shown in the display Press the n button
and switch off the appliance with the % button. You
can cancel the acoustic signal before it sounds using
the 0 button.
You can change the grill setting at any time.
Then press the n button again.
Open the appliance door. The microwave is
interrupted. Press the n button again once you have
closed the appliance door. Cooking resumes.
Press and hold the n button for a few seconds and
switch off the appliance with the % button.
Note
If you open the appliance door during cooking, the fan
may continue to run.
The cooking time has
elapsed
Changing the setting
Pausing cooking
Cancelling the setting
23
MicroCombi operation
This involves simultaneous operation of the grill and
the microwave. Using the microwave makes your
dishes ready more quickly, but they are still nicely
browned.
You can switch on all microwave power settings.
Exception: 900 and 600 watt.
Example: microwave 360 W, 17 minutes and grill
level 1.
1. Press the % button.
Your appliance is ready for use.
2. Press the button for the microwave power setting
you require.
A suggested cooking time appears.
3. Set the cooking time using the rotary selector.
4. Press the ( button three times.
The ¥ and [q] symbols are lit in the display.
5. Press the n button.
Operation begins. The cooking time can be seen
counting down.
A signal sounds. Combination mode is finished.
You can cancel the acoustic signal before it sounds
using the 0 button.
You may change the grill setting or cooking time at
any time. Then, press the n button and cooking
continues.
Press the n button and switch off the appliance with
the % button.
Cooking is paused. When you have closed the door,
press the n button and cooking continues.
Setting MicroCombi
The cooking time has
elapsed
Changing the settings
Cancelling cooking
Opening the appliance
door during cooking
24
Press the n button briefly. The appliance is paused.
Press n again and cooking resumes.
Notes
You can also set the grill setting first and then set the
microwave power and cooking time.
If you open the appliance door during cooking, the fan
may continue to run.
Automatic programmes
The automatic programmes enable you to prepare
food very easily. You select the programme and enter
the weight of your food. The automatic programme
makes the optimum setting. You can select from
10 programmes.
Once you have selected a programme, set the oven
as follows.
Example in the diagram: programme 2 with 1 kg
weight.
1. Press the % button.
Your appliance is ready for use.
2. Press the ` button.
The first programme number appears in the
display.
Pausing cooking
Setting the
programme
25
3. Select the programme number with the rotary
selector.
4. Press the f button.
The weight suggestion 0.50 kg appears in the
display.
5. Turn the rotary selector to set the weight.
26
6. Press the n button.
The programme starts. The [r] cooking time
counts down in the display.
A signal sounds. The programme has finished, the
appliance no longer heats.
Use the % button to switch off the appliance or make
new settings. You can stop the acoustic signal early
by pressing the 0 button.
Press the % button. The appliance is switched off.
Once the oven has started, the programme number
and weight cannot be changed.
With automatic programmes, you cannot change the
cooking time.
Take the food out of its packaging and weigh it. If it is
not possible to enter the exact weight, you should
round it up or down.
For the programs, always use microwaveĆproof
ovenware such as glass, ceramic, or the glass pan.
Observe the accessories tips in the program table.
Place the food in the cold appliance.
A table of suitable food with weight ranges and
accessories required can be found after the tips.
It is not possible to set a weight outside the weight
range.
With many dishes, a signal sounds after a certain
time. Turn or stir the food.
If possible, freeze and store food flat and in portions at
Ć18 ºC.
Put the frozen food on a flat dish, e.g. a glass or
porcelain plate.
After defrosting, allow the food to defrost for a further
10 to 30 minutes until it reaches room temperature.
Programme has finished
Cancelling the programme
Changing the programme
Changing the cooking time
Notes on automatic
programming
Defrosting
27
Liquid will be produced when defrosting meat, poultry
or fish. Drain off this liquid when turning and under no
circumstances should it be used for other purposes or
be allowed to come into contact with other foods.
Place beef, lamb and pork on the dish fattyĆside down
first.
Bread should only be defrosted in the required
amounts, as it quickly becomes stale.
After turning, remove any minced meat that has
already defrosted.
whole poultry should be placed in the dish breastĆside
down and poultry pieces skinĆside down.
Boiled potatoes: cut into pieces of a uniform size. Add
2 tablespoons of water per 100 g potatoes, and add
salt to taste.
Jacket potatoes: use potatoes of equal size. Wash the
potatoes and prick them all over. Place the wet
potatoes in a dish. Do not add water.
Rice foams a lot during cooking. Therefore, use a
highĆsided dish with a lid. Enter the uncooked weight
(without liquid).
Add two to two and a half times the amount of liquid
to the rice.
Do not use boilĆinĆtheĆbag rice.
Vegetables, fresh: cut into pieces of equal size. Add
two tablespoons of water for every 100 g vegetables.
Vegetables, deepĆfrozen: this program is only suitable
for blanched, not preĆcooked vegetables. The
program is not suitable for frozen vegetables in cream
sauce. Add 1 to 2 tablespoons of water per 100 g. Do
not add water to spinach or red cabbage.
Use potatoes of equal size.
Wash the potatoes and prick them all over.
Place the potatoes on the wire rack while they are still
damp.
Potatoes
Rice
Vegetables
Baked potatoes
28
Place the chicken halves on the wire rack with the
skin side facing up.
Place the wire rack in the glass pan so that it catches
the dripping fat or meat juices.
Some dishes need some cooling down time in the
cooking compartment after the program has ended.
Meal Standing time
Vegetables approx. 5 minutes
Potatoes approx. 5 minutes.
Strain the remaining water.
Rice 5Ć10 minutes
Observe the signals for stirring and turning.
Chicken halves
Standing time
29
Food Programme
number
Weight range Cookware/
accessories
Defrosting
Meat and poultry
Ć Joints
Ć Flat pieces of meat
Ć Mince
Ć Chicken, poulard, duck
P1 0.2 Ć 2.0 kg Shallow cookware
without lid.
Fish
Whole fish, fish fillet, fish cutlet
P2 0.1 Ć 1.0 kg Shallow cookware
without lid.
Bread and cake*
Bread, whole, round or long, bread in
slices, sponge cake, yeast cake, fruit flan
P3 0.2 Ć 1.5 kg Shallow cookware
without lid.
Cooking
Potatoes
Boiled potatoes, unpeeled boiled potatoes
P4 0.2 Ć 1.0 kg Dish with lid.
Rice P5 0.05 Ć 0.3 kg HighĆsided dish
with lid.
Fresh vegetables
Cauliflower, broccoli, carrot, kohlrabi,
leek, pepper, courgette
P6 0.15 Ć 1.0 kg Dish with lid.
Frozen vegetables
Cauliflower, broccoli, carrot, kohlrabi, red
cabbage, spinach
P7 0.15 Ć 1.0 kg Dish with lid.
Baked potatoes
Weight per potato approx. 200 g Ć 250 g
P8 0.2 Ć 1.5 kg Wire rack.
Bake, frozen e.g. lasagne P9 0.3 Ć 1.0 kg
Chicken, halved P10 0.5 Ć 1.8 kg Glass pan and
wire rack.
* Cream cakes, buttercream cakes, cakes with frosting, icing or gelatine are unsuitable.
30
Memory
The memory allows you to store the setting for your
favourite dish and call it up at any time. You have two
memories available g" and h".
The memory is useful if you prepare one dish
particularly frequently.
1. Press the % button.
Your appliance is ready for use.
2. Press the button for the microwave power setting
you require.
The power and a suggested cooking time appear
in the display.
3. Set the cooking time using the rotary selector.
4. Press and hold the g or h button for
approximately 4 seconds until a signal sounds.
The setting is stored and can be started at any time.
Make new settings and store them. The old settings
are overwritten.
Storing settings in
the memory
Storing another setting
31
The stored settings for your dish can be started at
any time.
1. Press the % button.
Your appliance is ready for use.
2. Press the g or h button.
The stored settings are displayed.
3. Press the n button.
The memory starts. The cooking time r counts
down in the display.
Notes
Once the appliance has been started, you can no
longer change the memory location.
The programmes which have been set also remain
stored if there is a power cut.
A signal sounds. The memory has finished.
Use the % button to switch off the appliance or make
new settings. You can cancel the acoustic signal
before it sounds using the 0 button.
Press the n button or open the appliance door.
Cooking is paused. Press the n button once you
have closed the appliance door. The programme will
then continue.
Starting the
memory function
The cooking time has
elapsed
Pausing
32
Changing the basic settings
Your appliance has various basic settings that you
can change at any time.
The table lists all of the basic settings and the options
for making changes.
Basic setting Options Explanation
™‚ Clock display
‚ = on
Clock display
ƒ = off
Display of the clock
™ƒ Signal duration
ƒ = medium = 2 minutes
‚ = short = 10 seconds
„ = long = 5 minutes
Signal after the cooking time has
elapsed
™„ Button tone:
‚ = on
Button tone:
ƒ = off
Confirmation tone when a button
is pressed
™… Waiting time
ƒ = medium = 5 seconds
‚ = short = 2 seconds
„ = long = 10 seconds
Waiting time between individual
steps, after making a setting
Prerequisite: Your appliance is switched off.
1. Press and hold the 0 button for several seconds.
The first basic setting appears in the display.
2. Change the basic setting with the rotary selector.
3. Confirm with the 0 button.
The next basic setting appears in the display.
You can go through all of the basic settings with
the 0 button and make changes with the rotary
selector.
4. Finally, press and hold the 0 button for a few
seconds.
All settings are applied.
You may change the settings at any time.
Basic settings
33
Care and cleaning
If carefully cleaned and taken care of, your microwave
oven will remain fully functional and in a good
condition for a long time to come. This section
explains how to properly care for and clean your
appliance.
Danger of shortĆcircuiting.
Never use highĆpressure cleaners or steam jets.
Risk of burning.
Do not clean the appliance immediately after
switching it off. Allow the appliance to cool down.
Notes
Slight differences in the colours on the front of the
appliance are caused by the use of different materials,
such as glass, plastic and metal.
Shadows on the door panel which look like streaks
are light reflections from the oven light.
Unpleasant smells, e.g. after preparing fish, can be
removed quite easily. Add a few drops of lemon juice
to a cup of water. Place a spoon in the container to
prevent delayed boiling. Heat the water for 1 to
2 minutes at the maximum microwave power setting.
Surfaces are different and damage caused by using
the wrong cleaning agent can be avoided by
observing the information in the table below.
Do not use:
H any caustic or abrasive cleaning agents.
H metal or glass scrapers to clean the glass in the
appliance door.
H metal or glass scrapers to clean the door seal.
H coarse scouring pads or cleaning sponges.
Rinse out new sponge cloths thoroughly before use.
d
d
Cleaning agents
34
Area Cleaning agents
Appliance front Hot soapy water:
Clean using a dish cloth and then dry with a soft cloth.
Do not use metal or glass scrapers for cleaning.
Stainless steel Hot soapy water:
Clean using a dish cloth and then dry with a soft cloth. Remove
any flecks of limescale, grease, starch and egg white
immediately. Corrosion can form under such marks.
Special stainless steel cleaning agents can be obtained from the
afterĆsales service or from specialist retailers.
Cooking compartment
Cooking compartment made of
stainless steel
Hot soapy water or a vinegar solution:
Clean using a dish cloth and then dry with a soft cloth.
For heavy soiling:
Only use oven cleaner in a cold cooking compartment.
Do not use oven spray or other aggressive oven cleaners or
abrasive materials. Scouring pads, rough sponges and pan
cleaners are also unsuitable. These agents scratch the surface.
Allow the interior surfaces to dry thoroughly.
Door panels Glass cleaner:
Clean with a dish cloth.
Do not use metal or glass scrapers for cleaning.
Door seal
Do not remove.
Hot soapy water:
Clean with a dish cloth; do not scrub.
Do not use metal or glass scrapers for cleaning.
Accessories Hot soapy water:
Soak and then clean with a dish cloth or a brush.
35
Troubleshooting
Malfunctions often have simple explanations. Please
read the following notes before calling the after-sales
service.
If one of your dishes does not turn out as you had
hoped, please refer to the Tested for you in our
cooking studio section. You will find many cooking
tips and tricks there.
Problem Possible cause Remedial action/notes
The appliance does not work. The plug is not plugged into
the mains.
Plug it in.
Power cut. Check whether the kitchen light
switches on.
Blown fuse. Look in the fuse box to make
sure that the fuse for the
appliance is OK.
Operating error. Switch off the circuit breaker in
the fuse box. After approx.
10 seconds switch it on again.
The appliance is not in operation.
A cooking time appears in the
display.
The n button was not
pressed after the setting had
been made.
Press the n button or switch
the appliance off.
The microwave does not switch on. The door is not properly closed. Check whether leftover food or
a foreign object is trapped in
the door.
The n button was not
pressed.
Press the n button.
It takes longer than before for the
food to heat up.
The microwave power setting is
too low.
Select a higher microwave
power setting.p
You have placed a larger
amount of food than normal in
the appliance.
Double the amount = almost
double the cooking time.
36
Problem Remedial action/notesPossible cause
A signal sounds. The two dots in
the display are flashing.
The appliance is in
demonstration mode.
1. Press the 2 button.
2. Press and hold the `
button for 3 seconds.
The demonstration mode is
deactivated.
The appliance switches off shortly
after starting. Error message "H95"
appears in the display.
The door is not properly closed. Open the door again and close
it properly, if this does not help,
contact the afterĆsales service.
Error message "E723" appears in
the display.
The door is not properly closed. Open and close the appliance
with the ^ button.
Error message "Er1" appears in the
display.
The temperature sensor is
faulty.
Call the afterĆsales service.
Error message "Er11" appears in
the display. "Button is jammed"
The buttons are dirty or the
mechanics have jammed.
Press all the buttons several
times. Clean the buttons with a
dry cloth. Open and close the
appliance door. If this does not
help, consult the afterĆsales
service.
Error message "Er4" appears in the
display.
There is extreme overheating
(possibly a fire inside).
Microwave power setting too
high.
Do not open the door.
Disconnect from the mains or
switch off the fuse in the fuse
box and allow to cool down.
Error message "Er18" appears in
the display.
Technical fault. Call the afterĆsales service.
Risk of electric shock.
Incorrect repairs are dangerous. Repairs may only be
carried out by one of our trained afterĆsales engineers.
d
37
AfterĆsales service
Our afterĆsales service is there for you if your
appliance should need to be repaired. You will find the
address and telephone number of your nearest
afterĆsales service point in the phone book. The listed
afterĆsales service centres will also be pleased to give
you the details of an afterĆsales service point near you.
Please quote the E number (product number) and the
FD number (production number) of your appliance
when contacting the afterĆsales service.
The rating plate bearing these numbers can be found
on the right hand side after opening the appliance
door.
You can make a note of the number of your appliance
and the telephone number of the afterĆsales service in
the space below to save time should it be required.
E no. FD no.
AfterĆsales service %
Please note that a visit from an afterĆsales service
engineer is not free of charge, even during the
warranty period.
E number and FD number
38
Power supply 220Ć240 V, 50 Hz
Maximum total
connected load
1,990 W
Microwave power
setting
900 W (IEC 60705)
Microwave frequency 2,450 MHz
Grill 1,300 W
Fuse min. 10 A
Dimensions (HxWxD)
Ć appliance 38.2 x 59.4 x 31.9 cm
Ć cooking compartment 22.0 x 35.0 x 27.0 cm
VDE approved Yes
CE mark Yes
This appliance complies with standard EN 55011 or
CISPR 11.
It is a group 2, class B product.
Group 2 means that microwaves are produced for the
purpose of heating food.
Class B indicates that the appliance is suitable for
domestic use.
Technical data
39
EnvironmentallyĆfriendly disposal
Dispose of packaging in an environmentallyĆfriendly
manner.
This appliance is labelled in accordance with
European Directive 2002/96/EU on Waste Electrical
and Electronic Equipment Ć WEEE.
The directive gives a framework for the collection
and recycling of old appliances, which is valid across
the EU.
Dishes tested for you in our cooking
studio
Here you will find a selection of dishes and the ideal
settings for them. We will show you which type of
heating and which temperature or microwave power
setting are ideal for your dish. You can find
information about suitable accessories and there are
tips about cookware and preparation.
Notes
The values in the table always apply to dishes placed
in a cold and empty cooking compartment. Only
preheat the appliance if this is specified in the tables.
Before use, remove any accessories from the cooking
compartment that you will not be using.
The times specified in the tables are only guidelines.
They depend on the quality and consistency of the
food.
Use the accessories supplied. Additional accessories
may be obtained from specialist retailers or from the
afterĆsales service.
Always use an oven cloth or oven gloves when taking
accessories or cookware out of the cooking
compartment.
ó
40
The following tables provide you with numerous options
and settings for the microwave.
The times specified in the tables are only guidelines.
They may vary according to the ovenware used, the
quality, temperature and consistency of the food.
Time ranges are often specified in the tables. Set the
shortest time first and then extend the time if
necessary.
It may be that you have different quantities from those
specified in the tables.
A rule of thumb can be applied:
Double amount - just under double cooking time,
half amount - half the cooking time.
Stir or turn the food several times during the heating
time. Check the temperature.
Place the frozen food in an open container on the
cooking compartment floor.
Turn or stir the food once or twice during the
defrosting time. Large pieces of food should be turned
several times.
Liquid will be produced when defrosting meat, poultry
or fish. Drain off this liquid when turning and under no
circumstances should it be used for other purposes or
be allowed to come into contact with other foods.
Leave defrosted items to stand at room temperature
for a further 10 to 30 minutes so that the temperature
can stabilise. The giblets can be removed from poultry
at this point.
Defrosting, heating
up and cooking
with the microwave
Defrosting
41
Amount Microwavesetting in watts
Timeinminutes
Notes
Whole joints of meat
e.g. beef, pork or veal
(with or without bones)
800 g
1,000 g
1,500 g
180 W, 15 min. + 90 W, 15 Ć 25 min.
180 W, 20 min. + 90 W, 20 Ć 30 min.
180 W, 25 min. + 90 W, 25 Ć 35 min.
Turn several times.
Diced or sliced beef,
pork and veal
200 g
500 g
800 g
180 W, 5 Ć 8 min. + 90 W, 5 Ć 10 min.
180 W, 8 Ć 11 min. + 90 W, 10 Ć 15 min.
180 W, 12 Ć 15 min. + 90 W, 15 Ć 20 min.
Separate the parts when
turning.
Mixed minced meat 200 g
500 g
800 g
180 W, 2 min. + 90 W, 5 Ć 10 min.
180 W, 6 min. + 90 W, 8 Ć 13 min.
180 W, 10 min. + 90 W, 15 Ć 20 min.
Freeze flat if possible. Turn
several times during defrosting
and remove meat which has
already been defrosted.
Poultry or poultry
portions
600 g
1,200 g
180 W, 8 min. + 90 W, 10 Ć 15 min.
180 W, 15 min. + 90 W, 20 Ć 25 min.
Turn several times.
Fish
fillet, fish steak, slices
400 g 180 W, 5 min. + 90 W, 10 Ć 15 min. Separate defrosted items.
Whole fish 300 g
600 g
180 W, 3 min. + 90 W, 10 Ć 15 min.
180 W, 8 min. + 90 W, 15 Ć 25 min.
Turn half way through.
Vegetables e.g. peas 300 g 180 W, 10 Ć 15 min.
Fruit
e.g.raspberries
300 g
500 g
180 W, 6 Ć 9 min.
180 W, 8 min. + 90 W, 5 Ć 10 min.
Stir carefully during defrosting
and separate the defrosted
parts.
Butter 125 g
250 g
180 W, 1 min. + 90 W, 1 Ć 2 min.
180 W, 1 min. + 90 W, 2 Ć 4 min.
Remove all the packaging.
Whole loaf 500 g
1,000 g
180 W, 8 min. + 90 W, 5 Ć 10 min.
180 W, 12 min. + 90 W, 10 Ć 20 min.
Turn half way through.
Dry cakes
e.g. creaming method
cakes
500 g
750 g
90 W, 10 Ć 15 min.
180 W, 5 min. + 90 W, 10 Ć 15 min.
Separate the pieces of cake
when turning them. Only for
cakes without icing, cream or
crème pâtissière.
Juicy cakes
e.g. fruit cake and quark
cake
500 g
750 g
180 W, 5 min. + 90 W, 15 Ć 20 min.
180 W, 7 min. + 90 W, 15 Ć 20 min.
Only for cakes without icing or
gelatine.
42
Always place the ovenware on the cooking
compartment floor.
Always cover the food. If you do not have a suitable
cover for your container, use a plate or special
microwave foil.
Take ready meals out of the packaging. They will heat
up more quickly and evenly in microwaveable
ovenware.
The different components of the meal may not require
the same amount of time to heat up.
Food which lies flat will cook more quickly than food
which is piled high. You should therefore distribute the
food so that it is as flat as possible in the container.
Stir or turn the food two or three times during the
defrosting, heating or cooking time.
After heating, allow the food to rest for a further
2 Ć 5 minutes until it reaches an even temperature.
This will help the food retain its own distinct taste, so it
will require less seasoning.
Amount Microwave setting in
watts
Time in minutes
Notes
Menu, plated meal,
readyĆmade meals in
2 to 3 parts
300Ć400g 600 W, 8 Ć 13 min.
Soups 400 g 600 W, 8 Ć 12 min.
Stews 500 g 600 W, 10 Ć 15 min.
Meat in sauce e.g. goulash 500 g 600 W, 10 Ć 15 min. Separate the pieces of meat
when stirring.
Fish, e.g. fillets 400 g 600 W, 10 Ć 15 min. You may add water, lemon juice
or wine.
Bakes
e.g. lasagne and cannelloni
450 g 600 W, 10 Ć 15 min.
Side dishes
rice and pasta
250 g
500 g
600 W, 3 Ć 7 min.
600 W, 8 Ć 12 min.
Add a little liquid.
Defrosting, heating up or
cooking frozen food
43
NotesMicrowave setting in
watts
Time in minutes
Amount
Vegetables e.g. peas, broccoli
and carrots
300 g
600 g
600 W, 7 Ć 11 min.
600 W, 14 Ć 17 min.
Add water to cover the base of
the dish.
Creamed spinach 450 g 600 W, 10 Ć 15 min. Cook without adding any water.
Always place the ovenware on the cooking
compartment floor.
Always cover the food. If you do not have a suitable
cover for your container, use a plate or special
microwave foil.
Take readyĆtoĆeat meals out of the packaging. They
will heat up more quickly and evenly in microwaveable
ovenware. The different components of the meal may
not require the same amount of time to heat up .
When heating liquids, always place a spoon in the
container to prevent delayed boiling. When delayed
boiling occurs, this means that the liquid reaches
boiling temperature without the usual steam bubbles
rising to the surface. Even if the container only vibrates
a little, the hot liquid can suddenly boil over or spatter.
This can cause injuries and burns.
Stir or turn the food several times during the heating
time. Check the temperature.
After heating, allow the food to rest for a further 2 to
5 minutes until it reaches an even temperature.
Heating food
d
44
Amount Microwave settings in
watts
Time in minutes
Notes
Menu, plated meal,
readyĆmade meals in two
to three parts
600 W, 5 Ć 8 min.
Drinks 125 ml
200 ml
500 ml
900 W, ½ Ć 1 min.
900 W, 1 Ć 2 min.
900 W, 3 Ć 4 min.
Place a spoon in the container.
Do not overheat alcoholic
drinks. Check during heating.
Baby food e.g. baby's
bottles
50 ml
100 ml
200 ml
360 W, ½ min.
360 W, ½ Ć 1 min.
360 W, 1 Ć 2 min.
Without the lid or teat. Always
shake well after heating. You
must check the temperature.
Soup 1 bowl
2 bowls
175 g
350 g
600 W, 1 Ć 2 min.
600 W, 2 Ć 3 min.
Meat in sauce 500 g 600 W, 7 Ć 10 min. Separate slices of meat.
Stew 400 g
800 g
600 W, 5 Ć 7 min.
600 W, 7 Ć 8 min.
Vegetables1 portion
2 portions
150 g
300 g
600 W, 2 Ć 3 min.
600 W, 3 Ć 5 min.
45
Food which lies flat will cook more quickly than food
which is piled high. You should therefore distribute the
food so that it is as flat as possible in the container.
Cook the food in covered ovenware. Food should be
stirred or turned during cooking.
This will help the food retain its own distinct taste, so it
will require less seasoning.
After cooking, allow the food to rest for a further 2 to
5 minutes until it reaches an even temperature.
Quantity Microwave power setting in W
and duration in minutes
Notes
Whole chicken, fresh
without giblets
1,200 g 600 W, 25 Ć 30 mins Turn halfway through the
cooking time.
Fish fillet, fresh 400 g 600 W, 7 Ć 12 mins
Vegetables, fresh 250 g
500 g
600 watts, 5 Ć 10 mins
600 watts, 10 Ć 15 mins
Cut vegetables into pieces
of equal size. Add 1 Ć 2 tbsp
water per 100 g of
vegetables.
Side dishes, e.g.
Potatoes
Rice
250 g
500 g
750 g
125 g
250 g
600 W, 8 Ć 10 mins
600 W, 10 Ć 15 mins
600 W, 15 Ć 22 mins
600 W, 4 Ć 6 + 180 W 14 Ć 16
mins
600 W, 6 Ć 8 + 180 W 14 Ć 16
mins
Cut potatoes into equal
sized pieces. Add 1 Ć 2 tbsp
water per 100 g, stir.
Add double the amount of
liquid.
Desserts, e.g.
Custard (instant)
Fruit, compote
500 ml
500 g
600 W, 5 Ć 7 mins
600 W, 9 Ć 12 mins
Uncovered dish
Stir the custard thoroughly
2 to 3 times during cooking
using an egg whisk.
Cooking food
46
No settings are given for
specified amounts of food.
Increase or decrease the cooking times according to the
following rule of thumb:
Double the amount = almost double the time
Half the amount = half the time
The food becomes too dry. Set a shorter cooking time next time or select a lower
microwave setting. Cover the food and add more liquid.
After the time has elapsed, the
food is not defrosted, is not hot
or is not cooked.
Set a longer time. Larger amounts and deeper dishes take
longer to cook.
At the end of the cooking time,
the food is overcooked on the
outside but undercooked in the
middle.
Stir the food during the cooking time and next time select a
lower setting and a longer duration.
After defrosting, the poultry or
meat is cooked on the outside
but still frozen in the middle.
Next time select a lower microwave setting. In addition, turn
large amounts of meat or poultry frequently when defrosting.
Always grill on the wire rack with the cooking
compartment door closed and do not preheat.
All the values given are guidelines and can vary
depending on the properties of your food.
Rinse meat in cold water and dab it dry with kitchen
towel.
Do not add salt to the meat until it has been grilled.
Place the wire rack on the glass pan so that it catches
the meat juices.
Use tongs to turn the pieces of food you are grilling. If
you pierce the meat with a fork, the juices will run out
and it will become dry.
Tips for microwave
operation
Grilling table
47
Dark meat, e.g. beef, browns more quickly than
lighterĆcoloured meat such as veal or pork. Do not let
this worry you. When grilling lightĆcoloured meat or
fish fillets, these often only brown slightly on the
surface, although they are cooked and juicy on the
inside.
Quantity Weight Grill
setting
Time in minutes Notes
Neck steaks 3 Ć 4
pieces
approx. 120 g
each
high 1st side: approx. 15 minutes
2nd side: approx. 10 Ć 15 minutes
1 Ć 2 cm thick
Grilled sausages 4 Ć 6
pieces
approx. 150 g
each
high 1st side: approx. 5 Ć 10 minutes
2nd side: approx. 7 Ć 12 minutes
Fish steak 2 Ć 3
pieces
approx. 150 g
each
high 1st side: approx. 10 minutes
2nd side: approx. 8 Ć 12 minutes
Grease the
wire rack with
oil before
grilling.
Fish, whole
e.g. trout
2 Ć 3
pieces
approx. 150 g
each
medium 1st side: approx. 10 minutes
2nd side: approx. 10 Ć 15 minutes
Grease the
wire rack with
oil before
grilling.
PreĆtoasting
bread
2 Ć 6
slices
high 1st side: approx. 3 Ć 4 minutes
2nd side: approx. 3 Ć 4 minutes
Toast with topping 2 Ć 6
slices
medium
or high
Depending on topping: approx.
5 Ć 9 minutes
Set the first time using the rotary knob. Turn the food and then set the time for the second side.
48
Use a highĆsided dish for roasting. This keeps the
cooking compartment cleaner.
Use large flat ovenware for bakes and gratins. Food
takes longer to cook in narrow, deep containers and
browns more on top.
Check that your ovenware fits in the cooking
compartment. It should not be too big.
Always set the maximum cooking time. Check the
food after the shorter time specified.
Leave the meat to rest for another 5 Ć 10 minutes
before cutting it. This allows the meat juices to be
distributed evenly so that they do not run out when
the meat is cut.
Bakes and gratins should be left to cook in the
appliance for a further 5 minutes after the appliance
has been switched off.
Use the wire rack to place the ovenware on.
Combined grill and
microwave
49
Quantity
Weight
Microwavepower
setting in watts
Grillsetting Cookingtimein
minutes
Notes
Roast pork,
e.g. neck of pork
Approx.
750 g
360 W low 35 Ć 40 mins Turn after approx.
15 minutes.
Meat loaf
max. 7 cm deep
Approx.
750 g
360 W medium Approx. 25 mins*
Chicken, halved Approx.
1200 g
360 W high 40 mins
Chicken portions,
e.g. chicken quarters
Approx.
800 g
360 W medium 20 Ć 25 mins Place with the skin side
up. Do not turn.
Duck breast Approx.
800 g
180 W high 25 Ć 30 mins Place with the skin side
up. Do not turn.
Pasta bake
(using preĆcooked
ingredients)
Approx.
1000 g
360 W low 25 Ć 30 mins Sprinkle with cheese.
Potato gratin
(made from raw
potatoes)
max. 3 cm deep
Approx.
1000 g
360 W medium Approx. 35 mins*
Fish, scalloped Approx.
500 g
360 W high 15 mins Defrost frozen fish
before cooking.
Quark soufflé
max. 5 cm deep
Approx.
1000 g
360 W low 20 Ć 25 mins
50
Test dishes in accordance with
EN 60705
The quality and correct operation of microwave
appliances are tested by testing institutes using the
following dishes.
Dish Microwave power setting in W,
cooking time in minutes
Notes
Custard, 1,000 g 600 W, 11 Ć 12 mins + 180 W,
8 Ć 10 mins
Pyrex dish
Sponge, 475 g 600 W, 7 Ć 9 mins Pyrex dish, dia. 22 cm
Meat loaf, 900 g 600 W, 25 Ć 30 mins Square Pyrex dish*, 28 cm long
* Use the wire rack to place the cookware on.
Dish Microwave power setting in W,
cooking time in minutes
Notes
Meat, 500 g Programme 1, 500 g
or 180 W, 8 mins + 90 W 7 Ć 10 mins
Pyrex dish, dia. 24 cm
Dish Microwave power setting in W,
grill setting,
cooking time in minutes
Notes
Potato gratin, 1,100g 360 W, + grill setting II, 25 Ć 30 mins Round Pyrex dish, dia. 22 cm
Cake Ć Not recommended
Chicken, halved
approx. 1,100 g
360 W, + grill setting III, 40 Ć 45 mins Wire rack, glass pan
Solo microwave cooking
Solo microwave defrosting
Microwave and grill
cooking
Para disfrutar de la cocina tanto como
de la comida, recomendamos leer las presentes instrucciones
de uso. Sólo así podrá sacar el máximo partido a la tecnología
de su aparato microondas.
Además, se incluyen notas importantes en materia de
seguridad. Conocerá en detalle todas las partes de su nuevo
aparato. Aprenderá a realizar los ajustes paso a paso. Todo
de forma muy sencilla.
En las tablas podrá consultar los valores de ajuste
necesarios para preparar los platos más habituales. Todos
estos platos han sido probados en nuestro estudio de
cocina.
En caso de que surja alguna incidencia, aquí figuran las
informaciones necesarias para solucionar las pequeñas
averías.
El indice detallado facilita la búsqueda de la información
deseada.
Buen provecho.
Contenido
52
Consejos y advertencias de seguridad 54. . . . . . . .
Antes del montaje 54. . . . . . . . . . . . . . . . . . . . . . . . . . . .
Consejos y advertencias sobre seguridad 54. . . . . . . .
Consejos y advertencias sobre el microondas 57. . . .
Causas de los daños 59. . . . . . . . . . . . . . . . . . . . . . . . .
Su nuevo aparato 60. . . . . . . . . . . . . . . . . . . . . . . . . . .
Panel de mando 60. . . . . . . . . . . . . . . . . . . . . . . . . . . . .
Teclas e indicadores 61. . . . . . . . . . . . . . . . . . . . . . . . . .
Accesorios 62. . . . . . . . . . . . . . . . . . . . . . . . . . . . . . . . . .
Compartimento de cocción 62. . . . . . . . . . . . . . . . . . . .
Encender y apagar el aparato 63. . . . . . . . . . . . . . . .
Antes del primer uso 64. . . . . . . . . . . . . . . . . . . . . . . .
Ajustar la hora 64. . . . . . . . . . . . . . . . . . . . . . . . . . . . . . .
Calentar el compartimento de cocción 65. . . . . . . . . .
Limpieza de los accesorios 65. . . . . . . . . . . . . . . . . . . .
El microondas 66. . . . . . . . . . . . . . . . . . . . . . . . . . . . . .
Consejos y advertencias de los recipientes 66. . . . . . .
Niveles de potencia del microondas 67. . . . . . . . . . . . .
Programar el microondas 67. . . . . . . . . . . . . . . . . . . . .
Funcionamiento secuencial 1,2,3 69. . . . . . . . . . . . .
Programar el funcionamiento secuencial 69. . . . . . . . .
Asar al grill 71. . . . . . . . . . . . . . . . . . . . . . . . . . . . . . . . .
Programar el grill 71. . . . . . . . . . . . . . . . . . . . . . . . . . . . .
Funcionamiento MicroCombi 73. . . . . . . . . . . . . . . .
Programar el MicroCombi 73. . . . . . . . . . . . . . . . . . . . .
Contenido
53
Programa automático 74. . . . . . . . . . . . . . . . . . . . . . .
Seleccionar el programa 74. . . . . . . . . . . . . . . . . . . . . .
Consejos y advertencias sobre el
programa automático 76. . . . . . . . . . . . . . . . . . . . . . . . .
Memoria 80. . . . . . . . . . . . . . . . . . . . . . . . . . . . . . . . . . .
Guardar configuraciones en la memoria 80. . . . . . . . .
Activar memoria 81. . . . . . . . . . . . . . . . . . . . . . . . . . . . .
Modificar los ajustes básicos 82. . . . . . . . . . . . . . . .
Ajustes básicos 82. . . . . . . . . . . . . . . . . . . . . . . . . . . . . .
Cuidados y limpieza 83. . . . . . . . . . . . . . . . . . . . . . . .
Productos de limpieza 83. . . . . . . . . . . . . . . . . . . . . . . .
¿Qué hacer en caso de avería? 85. . . . . . . . . . . . . . .
Servicio de Asistencia Técnica 87. . . . . . . . . . . . . . .
Datos técnicos 88. . . . . . . . . . . . . . . . . . . . . . . . . . . . . .
Eliminación de residuos respetuosa
con el medio ambiente 89. . . . . . . . . . . . . . . . . . . . . .
Platos probados en nuestro estudio de cocina 89
Descongelar, calentar y cocer con el microondas 90.
Consejos prácticos para usar el microondas 96. . . . . .
Asado al grill 97. . . . . . . . . . . . . . . . . . . . . . . . . . . . . . . .
Grill con microondas combinado 98. . . . . . . . . . . . . . .
Comidas normalizadas según EN 60705 100. . . . . .
54
d Consejos y advertencias de
seguridad
Le recomendamos leer con atención las siguientes
instrucciones de uso. Solo así se puede manejar el
aparato de forma correcta y segura.
Conservar las instrucciones de uso y montaje. En
caso de traspasar el aparato debe incluirse el manual
correspondiente.
Al desembalar el aparato, debe comprobarse su
estado. El aparato no debe conectarse en caso de
haber sufrido daños durante el transporte.
La conexión del aparato debe realizarse
exclusivamente por un técnico especialista
autorizado. La garantía no cubre los daños que se
produzcan como consecuencia de una conexión
incorrecta del aparato.
Tener en cuenta las instrucciones especiales de
montaje.
Este aparato ha sido diseñado exclusivamente para
su uso doméstico. Utilizar el aparato únicamente para
la preparación de alimentos y bebidas.
Los niños y adultos no deben manejar el aparato sin
vigilancia
H en caso de que sufran alguna disminución de sus
capacidades físicas o mentales, o
H en caso de que no tengan los conocimientos o la
experiencia suficiente para manejar el aparato de
forma correcta y segura.
No dejar que los niños jueguen con el aparato.
Antes del montaje
Daños derivados
del transporte
Conexión eléctrica
Instalación y conexión
Consejos y
advertenciassobre
seguridad
55
¡Peligro de quemaduras!
No tocar las superficies calientes de los aparatos
calefactores y de cocción. No tocar las superficies
interiores calientes del compartimento de cocción ni
los elementos calefactores. Abrir la puerta del
compartimento de cocción con cuidado. Puede salir
vapor caliente. Mantener alejados especialmente a los
niños pequeños.
¡Peligro de incendio!
No introducir objetos inflamables en el compartimento
de cocción.
No abrir la puerta en caso de que salga humo del
aparato. Apagar el aparato. Extraer el enchufe o
desconectar el fusible de la caja de fusibles.
¡Peligro de cortocircuito!
No fijar cables de conexión de aparatos eléctricos a la
puerta caliente del compartimento de cocción. El
aislante del cable puede derretirse.
¡Peligro de quemaduras!
No preparar comidas utilizando grandes cantidades
de bebidas alcohólicas de alta graduación. Los
vapores del alcohol pueden incendiarse en el
compartimento de cocción. Utilizar bebidas
alcohólicas de alta graduación solo en pequeñas
dosis y abrir la puerta del compartimento de cocción
con cuidado.
¡Peligro de quemaduras!
No extraer los accesorios calientes del aparato sin
utilizar agarradores.
¡Peligro de riesgos importantes para la salud!
No utilizar el aparato si la puerta o la junta de la puerta
del compartimento de cocción está dañada. Puede
producirse un escape de energía de microondas. El
aparato puede volverse a utilizar una vez se haya
reparado.
Compartimento de cocción
caliente
Accesorios calientes
Puerta o junta de la puerta
del compartimento de
cocción deteriorada
56
¡Peligro de riesgos importantes para la salud!
Si la superficie del aparato no se limpia correctamente
puede oxidarse con el paso del tiempo. Puede
producirse un escape de energía de microondas.
Limpiar el aparato con regularidad.
¡Peligro de descarga eléctrica!
No retirar la carcasa del aparato. El aparato funciona
con alta tensión.
¡Peligro de riesgos importantes para la salud!
No retirar la carcasa del aparato. Evita escapes de
energía de microondas.
¡Peligro de cortocircuito!
No exponer el aparato a fuentes intensas de calor y
humedad.
¡Peligro de descarga eléctrica!
Las reparaciones inadecuadas son peligrosas.
Únicamente los técnicos de nuestro Servicio de
Asistencia Técnica debidamente instruidos están
autorizados para realizar reparaciones y cambiar el
cable de suministro de electricidad.
No abrir nunca la carcasa del aparato. El aparato
funciona con alta tensión. La carcasa evita escapes
de energía de microondas.
En caso de que el aparato esté defectuoso,
desconectar el fusible de la caja de fusibles o
desenchufar el aparato. Ponerse en contacto con el
Servicio de Asistencia Técnica.
Superficies oxidadas
Carcasa abierta
Entorno caliente o húmedo
Reparaciones inadecuadas
57
¡Peligro de incendio!
Utilizar el microondas exclusivamente para la
preparación de alimentos apropiados para el
consumo. Otras aplicaciones pueden resultar
peligrosas y ocasionar daños.
Por ejemplo, en caso de calentar almohadillas
rellenas de semillas o granos, estas pueden
incendiarse incluso al cabo de unas horas.
¡Peligro de lesiones!
Los recipientes de porcelana o cerámica pueden
presentar finos orificios en asas y tapas. Estos orificios
ocultan huecos. La posible humedad que haya
penetrado en estos huecos puede hacer estallar el
recipiente.
No utilizar recipientes que no sean aptos para el
microondas.
¡Peligro de quemaduras!
Los alimentos calientes pueden calentar el recipiente.
Extraer siempre los recipientes o accesorios del
compartimento de cocción con un agarrador.
¡Peligro de incendio!
No programar el microondas a una potencia o
duración demasiado elevadas. Los alimentos pueden
incendiarse y dañar el aparato. Seguir las
indicaciones de estas instrucciones de uso.
¡Peligro de incendio!
No calentar alimentos en envases de conservación
del calor.
No calentar sin vigilancia alimentos en recipientes de
plástico, papel u otros materiales inflamables.
¡Peligro de quemaduras!
Los envoltorios sellados de algunos alimentos pueden
estallar. Seguir las indicaciones del envoltorio o
envase. Extraer siempre los platos con un agarrador.
Consejos y
advertenciassobre
el microondas
Preparación de alimentos
Recipientes
Potencia y tiempo del
microondas
Envases y envoltorios
58
¡Peligro de quemaduras!
Al calentar líquidos puede producirse un retardo de
ebullición, Esto quiere decir que se puede alcanzar la
temperatura de ebullición sin que aparezcan las
burbujas de vapor habituales. Un ligero movimiento
del recipiente es suficiente para hacer que el líquido
caliente empiece de repente a hervir y salpicar
intensamente.
Al calentar líquidos introducir siempre una cuchara en
el recipiente. De este modo se evitan los retardos de
ebullición.
¡Peligro de explosión!
No calentar nunca líquidos u otros alimentos en
recipientes tapados.
No calentar bebidas alcohólicas a temperaturas
demasiado elevadas.
¡Peligro de quemaduras!
No calentar alimentos para bebés en recipientes
tapados. Retirar siempre la tapa o la tetina.
Remover o agitar bien tras el calentamiento. De este
modo, el calor se reparte uniformemente.
Controlar la temperatura antes de alimentar al bebé.
¡Peligro de quemaduras!
No cocer huevos con cáscara. No calentar huevos
duros. Pueden reventar incluso una vez finalizado el
funcionamiento del microondas. Esto también es
aplicable a los crustáceos.
Con huevos fritos o huevos pasados por agua debe
pincharse previamente la yema.
Bebidas
Alimentos para bebés
Alimentos con cáscara o
piel
59
En caso de alimentos con piel dura, como p. ej.
manzanas, tomates, patatas o salchichas, la piel
puede reventar. Antes de calentar, pinchar la cáscara
o la piel.
¡Peligro de incendio!
No secar alimentos con el microondas.
¡Peligro de incendio!
Los alimentos con poco contenido en agua, como p.
ej. el pan, no se deben descongelar o calentar a
demasiada potencia o durante demasiado tiempo.
¡Peligro de incendio!
No calentar aceite de mesa con el microondas.
No derramar agua en el compartimento de cocción
caliente. Se formará vapor de agua. El cambio de
temperatura puede ocasionar daños en la placa base
de cerámica.
Dejar enfriar el compartimento de cocción
únicamente con la puerta cerrada. No fijar nada a la
puerta del aparato. Incluso aunque solo quede una
rendija de la puerta abierta, los muebles contiguos
podrían dañarse con el tiempo.
Si la junta presenta mucha suciedad, la puerta del
aparato no se cerrará correctamente. Los frontales
de los muebles contiguos pueden deteriorarse.
Mantener siempre limpia la junta.
Encender el horno solo si previamente se han
introducido alimentos en el compartimento de
cocción. El aparato podría sobrecargarse sin
alimentos. En todo caso se permite una prueba
breve de la vajilla (véanse las indicaciones relativas
a los recipientes).
Secar alimentos
Alimentos con poco
contenido en agua
Aceite de mesa
Causas de los
daños
Agua en el compartimento
de cocción caliente
Enfriar con la puerta
abierta
Junta muy sucia
Funcionamiento del
microondas sin alimentos
60
Su nuevo aparato
Aquí conocerá a su nuevo aparato. En este capítulo
se explica el panel de mando y sus elementos
individuales. Asimismo, se proporciona información
sobre el compartimento de cocción y los accesorios.
Le presentamos una vista general del panel de
mando.
Los elementos pueden variar según el modelo de
aparato.
Indicador Selector giratorio
Teclas
Potencias del
microondas
Tecla de
funcionamiento
secuencial
Tecla on/off
El selector giratorio es retráctil. Para enclavar o
desenclavar el selector giratorio, presionarlo.
Debajo de cada tecla hay sensores. No pulsar
la superficie con fuerza. Pulsar sólo el símbolo
correspondiente.
Excepción: La tecla Func secuencial y las teclas para
los niveles de potencia del microondas son teclas
normales de pulsado.
Panel de mando
Selector giratorio
Teclas
61
Las teclas sirven para configurar distintas funciones
adicionales. En el indicador se muestran los valores
configurados.
Símbolo Función de la tecla
% Encender y apagar el aparato
90 Seleccionar la potencia del microondas de 90 W
180 Seleccionar la potencia del microondas de 180 W
360 Seleccionar la potencia del microondas de 360 W
600 Seleccionar la potencia del microondas de 600 W
900 Seleccionar la potencia del microondas de 900 W
2 Seleccionar el funcionamiento secuencial
( Seleccionar el grill
0 Abrir y cerrar el menú de funciones de tiempo
g / h Seleccionar la memoria
` Seleccionar un programa
f Seleccionar el peso
^ Abrir la puerta del aparato
n Pulsación breve = iniciar/interrumpir el funcionamiento
Pulsación larga = cancelar el funcionamiento
Consejos y advertencias
En el indicador, los corchetes [ ] indican el símbolo
correspondiente a la función de tiempo en primer
plano.
Excepción: el símbolo 0 de la hora sólo se ilumina
cuando se modifica.
Al pulsar la tecla start se ilumina la lámpara del
compartimento de cocción.
Teclas e
indicadores
62
Su aparato está equipado con los siguientes
accesorios:
Parrilla
como superficie para colocar la vajilla o para asar al grill y
gratinar.
Bandeja de vidrio
Sirve de protección contra salpicaduras cuando se asan los
alimentos al grill directamente sobre la parrilla. Para ello,
colocar la parrilla en la bandeja de vidrio.
La bandeja de vidrio puede utilizarse también como vajilla para
el funcionamiento del microondas.
El aparato está equipado con un ventilador. El
ventilador puede seguir funcionando aunque ya se
haya desconectado el aparato.
Consejos y advertencias
Durante el funcionamiento del microondas, el
compartimento de cocción permanece frío. El
ventilador se activa igualmente. Puede seguir
funcionando incluso si el microondas ya no está en
funcionamiento.
Puede aparecer agua condensada en la ventana de la
puerta, en las paredes interiores y en la base. Se trata
de algo normal y el funcionamiento del microondas no
se ve perjudicado. Limpie el agua condensada tras la
cocción.
Accesorios
Compartimentode
cocción
Ventilador
63
Encender y apagar el aparato
El microondas se enciende y se apaga con la tecla %.
Pulsar la tecla %.
Seleccionar el modo de funcionamiento deseado.
H Tecla 90, 180, 360, 600 o 900 W para la potencia
del microondas
H Tecla 2 = funcionamiento secuencial
H Tecla ( = grill
H Teclas ` y f = programa automático
H Teclas g o h = programa de la memoria
Consultar los capítulos individuales para más
información sobre el modo de programar.
Pulsar la tecla %.
El aparato se apaga; la hora se muestra en el
indicador.
Encender
Apagar
64
Antes del primer uso
A continuación se indican los pasos que deben
seguirse antes de utilizar el microondas por primera
vez.
Leer antes el capítulo Consejos y advertencias de
seguridad.
Tras la conexión, en el indicador se ilumina el
símbolo [0] y se muestran cuatro ceros.
Ajustar la hora.
1. Ajustar la hora actual con el mando giratorio.
2. Pulsar la tecla 0.
Se ha configurado la hora.
Es posible ocultar la hora. De este modo, sólo se
mostrará cuando el horno esté en funcionamiento.
Consultar al respecto el capítulo Modificar los ajustes
básicos.
Nota
Para reducir el consumo cuando el aparato está en el
modo "stand by" se puede ocultar la indicación de la
hora. Para obtener más información, consultar el
capítulo Modificar los ajustes básicos.
Ajustar la hora
Ocultar la hora
65
A fin de eliminar el olor a aparato nuevo, calentar el
compartimento de cocción vacío y con la puerta
cerrada.
Comprobar que no haya restos del embalaje en el
compartimento de cocción.
Calentar el compartimento de cocción durante
10 minutos con el grill ( nivel 3.
1. Pulsar la tecla %.
2. Pulsar la tecla (.
En el indicador se muestran Grill, nivel 3 y
10:00 minutos.
3. Pulsar la tecla n.
Se inicia el funcionamiento. El símbolo n se
ilumina.
Transcurridos 10 minutos apagar el aparato con la
tecla %.
Antes de utilizar los accesorios por primera vez,
limpiarlos a fondo con agua caliente, un poco de
jabón y un paño de limpieza suave.
Calentar el
compartimentode
cocción
Limpieza de los
accesorios
66
El microondas
Las microondas se transforman en calor dentro de los
alimentos. Se puede utilizar únicamente el
microondas o combinado con el grill. Le presentamos
toda información necesaria sobre recipientes y sobre
cómo programar el microondas.
Nota
En el capítulo Platos probados en nuestro estudio de
cocina encontrará ejemplos sobre cómo descongelar,
calentar y cocinar con microondas.
Son adecuados los recipientes resistentes al calor de
vidrio, vitrocerámica, porcelana, cerámica o plástico
resistente al cambio de temperatura. Estos materiales
dejan pasar las microondas.
También puede utilizar recipientes para servir. Así no
tiene que trasvasar los alimentos.
Utilizar recipientes con decoración dorada o plateada
sólo si el fabricante garantiza que son aptos para
microondas.
Los recipientes de metal no son aptos.
El metal no deja pasar las microondas. La comida en
recipientes de metal cerrados no se calienta
¡Atención! Los metales Ć p. ej., la cuchara en un
vaso Ć deben estar separados al menos 2 cm de las
paredes del horno y de la parte interior de la puerta
del horno. La formación de chispas podría destruir el
vidrio interior de la puerta del aparato.
No encienda nunca el microondas sin alimentos en su
interior, con excepción de la prueba de la vajilla
siguiente.
Consejos y
advertencias de los
recipientes
Recipientes apropiados
Recipientes no adecuados
Prueba de la vajilla
67
Si no está seguro de si su recipiente es adecuado
para el microondas, efectúe el siguiente test:
Introducir el recipiente vacío en el aparato durante ½
hasta 1 minuto a la potencia máxima. Comprobar
continuamente la temperatura. El recipiente debería
estar frío o templado. Si se calienta o se generan
chispas, no es adecuado para el microondas.
Con las teclas ajustar la potencia del microondas
deseada.
90 W para descongelar alimentos delicados
180 W para descongelar y continuar la cocción
360 W para cocer carne y para calentar alimentos
delicados
600 W para calentar y cocer alimentos
900 W para calentar líquidos
Al pulsar una tecla se ilumina la potencia
seleccionada.
Nota
La potencia del microondas 900 W sólo se podrá
ajustar para un máximo de 30 minutos. En el resto
de potencias se podrán ajustar programas con una
duración del ciclo de cocción de hasta 90 minutos.
Ejemplo: potencia del microondas 360 W, duración
del ciclo de cocción 17 minutos.
1. Pulsar la tecla %.
El aparato está listo para su funcionamiento.
2. Pulsar el botón del nivel de potencia del
microondas deseada.
En el indicador se ilumina la potencia y se muestra
una duración recomendada.
3. Programar la duración del ciclo de cocción con el
mando giratorio.
Niveles de potencia
del microondas
Programar el
microondas
68
4. Pulsar la tecla n.
Se inicia el funcionamiento. Se muestra el
transcurso del tiempo programado.
Suena una señal. El funcionamiento del microondas
ha finalizado. La señal se puede apagar con la tecla
0. Apagar el aparato con la tecla %.
El funcionamiento se interrumpe. Tras cerrar la
puerta, pulsar brevemente la tecla n. El programa
continua.
Se puede realizar en cualquier momento. Modificar la
duración del ciclo de cocción con el mando giratorio.
Pulsar la tecla para el nuevo nivel de potencia del
microondas. Programar la duración del ciclo de
cocción con el mando giratorio y volver a iniciar.
Pulsar la tecla n y apagar el aparato con la tecla %.
Consejos y advertencias
Cuando el aparato se enciende con la tecla %, en el
indicador se recomienda siempre la potencia máxima
del microondas.
El ventilador sigue funcionando aunque se abra la
puerta del aparato.
La duración del ciclo de
cocción ha transcurrido
Abrir la puerta del aparato
durante el funcionamiento
Modificar la duración del
ciclo de cocción
Modificar la potencia del
microondas
Cancelar el funcionamiento
69
Funcionamiento secuencial 1,2,3
En el funcionamiento secuencial se pueden ajustar
hasta tres potencias diferentes y tiempos
consecutivos en el microondas y, a continuación,
iniciar el funcionamiento.
El grill también se puede activar a las potencias del
microondas.
Utilizar siempre un recipiente resistente al calor y apto
para el microondas.
1. Pulsar la tecla %.
El aparato está listo para su funcionamiento.
2. Pulsar la tecla 2.
En el indicador se muestra el símbolo ª del primer
funcionamiento secuencial.
3. Programar el primer nivel de potencia del
microondas y la duración del ciclo de cocción.
4. Pulsar la tecla 2.
Se muestra el símbolo « del segundo
funcionamiento secuencial.
5. Programar el segundo nivel de potencia del
microondas y la duración del ciclo de cocción.
6. Pulsar la tecla 2.
Se muestra el símbolo ¬ del tercer
funcionamiento secuencial.
7. Programar el tercer nivel de potencia del
microondas y la duración del ciclo de cocción.
8. Pulsar la tecla n.
Se inicia el funcionamiento. En el indicador se
muestran la duración total y el símbolo ª del primer
funcionamiento secuencial.
Recipientes
Programar el
funcionamiento
secuencial
70
Suena una señal. El funcionamiento secuencial ha
finalizado. El tono de aviso se puede apagar con la
tecla 0.
Las modificaciones sólo son posibles antes de iniciar
el funcionamiento.
Pulsar repetidamente la tecla 2 hasta que se muestre
el número del funcionamiento secuencial. Modificar el
ajuste.
El funcionamiento se interrumpe. Tras cerrar la
puerta, volver a pulsar la tecla n. El programa
continua.
Pulsar brevemente la tecla n. El funcionamiento se
interrumpe. Volver a pulsar la tecla n, el
funcionamiento se reanuda.
Mantener pulsada la tecla n durante 4 segundos y
apagar el aparato con la tecla %.
Nota
El grill también se puede combinar con el
funcionamiento secuencial. Programar primero el
funcionamiento secuencial.
La duración del ciclo de
cocción ha transcurrido
Modificar los ajustes
Abrir la puerta del aparato
durante el funcionamiento
Interrumpir el
funcionamiento
Cancelar el funcionamiento
71
Asar al grill
El aparato dispone de los siguientes niveles de grill:
Grill Nivel 3 § fuerte Pulsar 1 vez la tecla (
Grill Nivel 2 ¦ medio Pulsar 2 veces la tecla (
Grill Nivel 1 ¥ bajo Pulsar 3 veces la tecla (
Ejemplo de la imagen: Grill nivel 2, 15 minutos
1. Pulsar la tecla %.
El aparato está listo para su funcionamiento.
2. Pulsar dos veces la tecla Grill (.
En el indicador se muestran Grill, nivel 2 y
10:00 minutos.
Para programar otro nivel de grill, pulsar de nuevo la
tecla Grill (.
Programar el grill
72
3. Programar la duración del ciclo de cocción con el
mando giratorio.
4. Pulsar la tecla n.
Se muestra el transcurso del tiempo y el
símbolo q se indica entre corchetes.
Suena una señal.
En el indicador se muestra 00:00. Pulsar la tecla n y
apagar el aparato con la tecla %. El tono de aviso se
puede apagar con la tecla 0.
El nivel de grill se puede cambiar en cualquier
momento. A continuación, volver a pulsar la tecla n.
Abrir la puerta del aparato. El microondas interrumpe
el programa. Tras cerrar la puerta, volver a pulsar la
tecla n. El funcionamiento se reanuda.
Mantener pulsada la tecla n durante unos segundos
y apagar el aparato con la tecla %.
Nota
El ventilador sigue funcionando aunque se abra la
puerta del aparato.
La duración del ciclo de
cocción ha transcurrido
Modificar los ajustes
Interrumpir el
funcionamiento
Borrar el ajuste
73
Funcionamiento MicroCombi
El grill funciona simultáneamente con el microondas.
El microondas se encarga de tener el plato listo con
mayor rapidez y, además, con un bonito dorado.
Se pueden activar todos los niveles de potencia
del microondas.
Excepción: 900 y 600 W.
Ejemplo: microondas 360 W, 17 minutos y grill nivel 1.
1. Pulsar la tecla %.
El aparato está listo para su funcionamiento.
2. Pulsar el botón del nivel de potencia del
microondas deseada.
Se muestra una duración recomendada.
3. Programar la duración del ciclo de cocción con el
mando giratorio.
4. Pulsar 3 veces la tecla (.
En el indicador se iluminan los símbolos ¥ y [q].
5. Pulsar la tecla n.
Se inicia el funcionamiento. Se muestra el
transcurso del tiempo programado.
Suena una señal. El funcionamiento combinado ha
finalizado. El tono de aviso se puede apagar con la
tecla 0.
El nivel de grill o la duración del ciclo de cocción se
pueden modificar en cualquier momento. A
continuación, pulsar la tecla n, el funcionamiento se
reanuda.
Pulsar la tecla n y apagar el aparato con la tecla %.
El funcionamiento se interrumpe. Tras cerrar la
puerta, volver a pulsar la tecla n. El funcionamiento
se reanuda.
Programar el
MicroCombi
La duración del ciclo de
cocción ha transcurrido
Cambio de ajustes
Cancelar el funcionamiento
Abrir la puerta del aparato
durante el funcionamiento
74
Pulsar brevemente la tecla n. El aparato pasa al
estado de pausa. Volver a pulsar n, el
funcionamiento se reanuda.
Consejos y advertencias
También se puede ajustar primero el grill y después la
potencia del microondas y la duración del ciclo de
cocción.
El ventilador sigue funcionando aunque se abra la
puerta del aparato.
Programa automático
Con el programa automático pueden prepararse
platos de forma sencilla. Seleccionar el programa e
introducir el peso de los alimentos. El programa
automático configura el programa óptimo. Pueden
seleccionarse hasta 10 programas.
Una vez seleccionado un programa, proceder del
modo siguiente.
Ejemplo de la imagen: programa 2 con 1 kilo de peso.
1. Pulsar la tecla %.
El aparato está listo para su funcionamiento.
2. Pulsar la tecla `.
En el indicador se muestra el primer programa.
Interrumpir el
funcionamiento
Seleccionar el
programa
75
3. Seleccionar el número de programa con el mando
giratorio.
4. Pulsar la tecla f.
En el indicador se muestra el peso recomendado
de 0,50 kilogramos.
5. Seleccionar el peso con el mando giratorio.
76
6. Pulsar la tecla n.
Se inicia el programa. En el indicador se muestra
el transcurso del tiempo programado [r].
Suena una señal. El programa ha finalizado y el
aparato deja de calentar.
Apagar el aparato con la tecla % o volver a
programarlo. El tono de aviso se puede apagar con la
tecla 0.
Pulsar la tecla %. El aparato se apaga.
El número de programa y el peso no pueden
modificarse tras la puesta en marcha.
La duración del programa automático no se puede
modificar.
Sacar el alimento de su envase y pesarlo. Si no se
puede introducir el peso exacto, redondear hacia
arriba o hacia abajo.
Para estos programas utilizar siempre recipientes
adecuados para el microondas, p. ej., recipientes de
vidrio o cerámica o la bandeja universal. Consultar
también los consejos y advertencias sobre los
accesorios en la tabla de programación.
Introducir los alimentos en el aparato frío.
A continuación de estos consejos y advertencias
encontrará una tabla con alimentos adecuados, el
intervalo de peso correspondiente y los accesorios
necesarios.
No es posible programar pesos no incluidos dentro
del intervalo de peso.
Con muchos tipos de comida se oye una señal al
cabo de un tiempo. Dar la vuelta o remover el
alimento.
Congelar los alimentos almacenados a ser posible en
posición horizontal, repartidos en porciones y a
Ć18 ºC.
El programa ha finalizado
Interrumpir el programa
Modificar el programa
Modificar la duración del
ciclo de cocción
Consejos y
advertenciassobre
el programa
automático
Descongelación
77
Colocar el alimento congelado en un recipiente plano,
p. ej., un plato de cristal o de porcelana.
Una vez descongelado, dejar reposar el alimento
entre 10 y 30 minutos más para que la temperatura
del mismo se estabilice.
La descongelación de carne, aves o pescado
produce siempre un líquido. Eliminar este líquido al
dar la vuelta a la pieza y no utilizarlo de nuevo, ni
ponerlo en contacto con otros alimentos.
Colocar primero la carne de vacuno, cordero o cerdo
por la parte con más grasa hacia abajo sobre el
recipiente.
Descongelar sólo la cantidad necesaria de pan, pues
se volvería duro.
Cuando se trate de carne picada, retirar la capa
descongelada al darle la vuelta.
Si el ave es entera, se coloca primero por el lado de la
pechuga dentro del recipiente, si son trozos de ave,
por el lado de la piel.
Patata cocida con sal: cortarlas en trozos igual de
grandes. Añadir 2 cucharadas de agua y un poco de
sal por cada 100 g de patatas.
Patata hervida sin pelar: utilizar patatas del mismo
tamaño. Lavarlas y pinchar la cáscara varios veces.
Colocar las patatas aún húmedas en un recipiente sin
agua.
El arroz genera abundante espuma durante la
cocción. Utilizar por tanto un recipiente alto con tapa.
Introducir el peso bruto (sin líquido).
Añadir al arroz el doble o el doble y medio de cantidad
de líquido.
No utilizar arroz en bolsa para cocer.
Verduras, frescas: cortarlas en trozos regulares.
Añadir 2 cucharadas de agua por cada 100 g.
Patatas
Arroz
Verduras
78
Verduras, congeladas: sólo son adecuadas las
verduras escaldadas, no precocinadas. La verdura
ultracongelada con salsa de nata no es adecuada.
Añadir de 1 a 2 cucharadas de agua por cada 100 g.
Para espinacas y col roja, no añadir agua.
utilizar patatas del mismo tamaño.
Lavarlas y pinchar la cáscara varios veces.
Colocar las patatas húmedas en la parrilla.
Colocar los pollos partidos por la mitad con la piel
hacia arriba en la parrilla.
Para recoger las gotas de grasa o el jugo de la carne,
colocar la parrilla en la bandeja de vidrio.
Algunos platos necesitan un tiempo de reposo en el
compartimento de cocción tras finalizar el programa.
Plato Tiempo de reposo
Verduras aprox. 5 minutos
Patatas aprox. 5 minutos
Vaciar primero el agua que se haya desprendido.
Arroz 5 a 10 minutos
Prestar atención a las señales para remover y dar la
vuelta.
Patatas al horno
Medios pollos
Tiempos de reposo
79
Alimentos Número de
programa
Margen de peso Recipiente y
accesorios
Descongelar
Carne y aves
Ć asado
Ć piezas de carne poco gruesas
Ć carne picada
Ć pollo, capón, pato
P1 0,2Ć2,0 kg Recipiente plano
sin tapa.
Pescado
pieza de pescado entero, filetes o rodajas
P2 0,1Ć1,0 kg Recipiente plano
sin tapa.
Pan y pasteles*
pan entero, hogaza o barra; pan en
rebanadas, pastel de masa batida, pastel
de levadura, pastel de frutas
P3 0,2Ć1,5 kg Recipiente plano
sin tapa.
Cocer
Patatas
patatas cocidas con sal, patatas cocidas
sin pelar
P4 0,2Ć1,0 kg Recipiente con
tapa.
Arroz P5 0,05Ć0,3 kg Recipiente alto con
tapa.
Verdura fresca
coliflor, brécol, zanahorias, colinabos,
puerros, pimientos, calabacines
P6 0,15Ć1,0 kg Recipiente con
tapa.
Verdura congelada
coliflor, brécol, zanahorias, colinabos,
lombarda, espinacas
P7 0,15Ć1,0 kg Recipiente con
tapa.
Patatas al horno
peso por patata, aprox. 200Ć250 g
P8 0,2Ć1,5 kg Parrilla
Producto para gratinar congelado,
p. ej., lasaña
P9 0,3Ć1,0 kg
Pollo, medio P10 0,5Ć1,8 kg Bandeja de vidrio
y parrilla.
* No son apropiadas las tartas de nata, tartas de crema, pasteles con cobertura, glaseado o gelatina.
80
Memoria
La función de memoria permite guardar
configuraciones personalizadas para sus platos
preferidos y acceder a ellas en cualquier momento.
Están disponibles dos posiciones en la memoria g"
y h".
La función de memoria resulta especialmente útil
cuando un mismo plato se prepara con frecuencia.
1. Pulsar la tecla %.
El aparato está listo para su funcionamiento.
2. Pulsar el botón del nivel de potencia del
microondas deseada.
En el indicador se muestran la potencia y una
duración recomendada.
3. Programar la duración del ciclo de cocción con el
mando giratorio.
4. Mantener pulsada la tecla g o h durante
4 segundos hasta que suene una señal.
La configuración se ha guardado y puede iniciarse en
cualquier momento.
Volver a programar y guardar. Se sobrescriben las
configuraciones anteriores.
Guardar
configuraciones en
la memoria
Guardar otra configuración
81
Las configuraciones guardadas para un plato se
pueden iniciar en cualquier momento.
1. Pulsar la tecla %.
El aparato está listo para su funcionamiento.
2. Pulsar la tecla g o h.
Se muestran las configuraciones guardadas.
3. Pulsar la tecla n.
Se inicia la memoria. En el indicador se muestra el
transcurso del tiempo programado r.
Consejos y advertencias
Tras la puesta en marcha, ya no se podrá modificar la
posición de memoria.
Los programas ajustados permanecen en la memoria
incluso después de un corte en el suministro
eléctrico.
Suena una señal. La memoria ha finalizado.
El tono de aviso se puede apagar con la tecla 0.
Apagar el aparato con la tecla % o volver a
programarlo.
Pulsar la tecla n o abrir la puerta del aparato. El
funcionamiento se interrumpe. Tras cerrar la puerta,
pulsar la tecla n. El programa continua.
Activar memoria
La duración del ciclo de
cocción ha transcurrido
Interrumpir
82
Modificar los ajustes básicos
Este aparato presenta distintos ajustes básicos que
pueden modificarse en cualquier momento.
En la tabla se especifican todos los ajustes básicos y
sus opciones de selección.
Ajuste básico Opciones Aclaración
™‚ Indicación reloj
‚ = encendido
Indicación reloj
ƒ = apagado
Indicador de la hora
™ƒ Tono de aviso de duración
ƒ = medio = 2 minutos
‚ = breve = 10 segundos
„ = largo = 5 minutos
Señal una vez transcurrida una
duración
™„ Sonido de tecla:
‚ = encendido
Sonido de tecla:
ƒ = apagado
Sonido de confirmación al pulsar
una tecla
™… Tiempo de espera
ƒ = medio = 5 segundos
‚ = breve = 2 segundos
„ = largo = 10 segundos
Tiempo de espera entre los
distintos pasos después de
configurar un ajuste
Condición: el aparato está apagado.
1. Pulsar la tecla 0 durante unos segundos.
En el indicador se muestra el primer ajuste básico.
2. Modificar el ajuste básico con el mando giratorio.
3. Confirmar con la tecla 0.
En el indicador se muestra el siguiente ajuste
básico. La tecla 0 permite recorrer todos los
ajustes básicos, mientras que el mando giratorio
sirve para modificarlos.
4. Para finalizar, mantener pulsada la tecla 0
durante unos segundos.
Todos los ajustes se han aplicado.
Los ajustes pueden volverse a modificar en cualquier
momento.
Ajustes básicos
83
Cuidados y limpieza
El microondas mantendrá durante mucho tiempo su
aspecto reluciente siempre y cuando se lleven a cabo
la limpieza y los cuidados pertinentes. A continuación
se describen los cuidados y la limpieza óptimos para
el aparato.
¡Peligro de cortocircuito!
No utilizar limpiado de alta presión ni por chorro de
vapor.
¡Peligro de quemaduras!
No realizar la limpieza inmediatamente después de la
desconexión. Dejar enfriar el aparato.
Consejos y advertencias
Es posible que aparezcan diferentes tonalidades en el
frontal del aparato debido a los diferentes materiales
como el vidrio, plástico o metal.
Las sombras con forma de estrías apreciables en el
vidrio de la puerta son los reflejos luminosos de la
lámpara de iluminación del horno.
Los olores desagradables, como los que se generan
después de preparar un pescado por ejemplo, se
pueden eliminar fácilmente. Añadir unas gotas de
limón a una taza con agua. Introducir una cuchara en
el recipiente para evitar el retardo de ebullición.
Calentar el agua entre 1 y 2 minutos a la máxima
potencia del microondas.
Tener en cuenta las indicaciones de la tabla para no
dañar las distintas superficies del aparato empleando
un limpiador inadecuado.
No utilizar lo siguiente:
H productos de limpieza abrasivos o ácidos,
H rascadores para metal o vidrio para la limpieza del
cristal de la puerta del aparato,
d
d
Productos de
limpieza
84
H rascadores para metal o vidrio para limpiar la junta
de la puerta,
H esponjas o estropajos duros.
Lavar bien las bayetas nuevas antes de utilizarlas.
Zona Productos de limpieza
Frontal del aparato Agua caliente con un poco de jabón:
Limpiar con un paño humedecido en agua con jabón y secar
con un paño suave.
No utilizar rascadores para metal o vidrio para la limpieza.
Acero inoxidable Agua caliente con un poco de jabón:
Limpiar con un paño humedecido en agua con jabón y secar
con un paño suave. Limpiar inmediatamente las manchas de
cal, grasa, almidón y clara de huevo, pues podría formarse
corrosión debajo de estas manchas.
Puede adquirir productos específicos para limpieza de acero en
el servicio de asistencia técnica o en comercios especializados.
Compartimento de cocción
Compartimento de cocción de
acero inoxidable
Agua caliente con un poco de jabón o agua con vinagre:
Limpiar con un paño humedecido en agua con jabón y secar
con un paño suave.
En caso de mucha suciedad:
Utilizar los limpiadores para hornos solo con el compartimento
de cocción frío.
No utilizar spray para hornos ni otros productos de limpieza
agresivos o abrasivos. Tampoco es apropiado utilizar estropajos
ni esponjas ásperas, ya que rayan la superficie.
Dejar secar las superficies interiores por completo.
Cristales de la puerta Limpiacristales:
Limpiar con un paño de limpieza.
No utilizar rascadores para metal o vidrio para la limpieza.
Junta de la puerta
¡No quitarla!
Agua caliente con un poco de jabón:
Limpiar con un paño de limpieza sin frotar.
No utilizar rascadores para metal o vidrio para la limpieza.
Accesorios Agua caliente con un poco de jabón:
Poner en remojo y limpiar con un paño o cepillo.
85
¿Qué hacer en caso de avería?
Con frecuencia, cuando se produce una avería, suele
tratarse de una pequeña anomalía fácil de subsanar.
Antes de avisar al Servicio de Asistencia Técnica,
deben tenerse en cuenta las siguientes indicaciones:
Si no se obtienen los resultados esperados de un
plato, consultar el capítulo Platos probados en
nuestro estudio de cocina. En este capítulo se
describen consejos y sugerencias para cocinar.
Avería Posible causa Solución/consejos
El aparato no funciona. El enchufe no está conectado. Conectar el enchufe.p
Corte en el suministro eléctrico. Comprobar si funciona la luz de
la cocina.
El fusible está defectuoso. Comprobar en la caja de
fusibles que el fusible del
aparato funciona
correctamente.
Manejo incorrecto. Desconectar el fusible de la
caja de fusibles. Volver a
conectarlo transcurridos unos
10 segundos.
El aparato no funciona. El indicador
muestra una duración.
No se ha pulsado la tecla n
después de la programación.
Pulsar la tecla n o apagar el
aparato.
El microondas no se conecta. La puerta no se ha cerrado
completamente.
Comprobar si la puerta está
atascada por restos de
alimentos o algún cuerpo
extraño.
No se ha pulsado la tecla n. Pulsar la tecla n.
Los alimentos se calientan más
lentamente que antes.
Se ha programado una
potencia de microondas
demasiado baja.
Seleccionar una potencia
mayor.
Se ha introducido una cantidad
mayor de lo habitual en el
aparato.
Cantidad doble, casi el doble
de tiempo de cocción.
86
Avería Solución/consejosPosible causa
Suena una señal. Los dos puntos
del indicador parpadean.
El aparato está en el modo
demo.
1. Pulsar la tecla 2.
2. Mantener pulsada la tecla
` durante 3 segundos.
El modo demo se ha
desactivado.
El aparato se apaga poco después
de pulsar la tecla Start. En el
indicador se muestra el mensaje
de error "H95".
La puerta no se ha cerrado
correctamente.
Volver a abrir la puerta y
cerrarla correctamente; si el
problema no se soluciona,
avisar al Servicio de Asistencia
Técnica.
En el indicador se muestra el
mensaje de error "E723".
La puerta no se ha cerrado
correctamente.
Abrir el aparato con la tecla ^
y cerrarlo otra vez.
En el indicador se muestra el
mensaje de error "Er1".
El sensor de temperatura está
defectuoso.
Ponerse en contacto con el
Servicio de Asistencia Técnica.
En el indicador aparece el mensaje
de error "Er11". "Tecla atascada"
Las teclas están sucias o el
mecanismo está atascado.
Pulsar varias veces todas las
teclas. Limpiar las teclas con
un paño seco. Abrir y cerrar la
puerta del aparato. Si no se
soluciona el problema, avisar al
servicio de asistencia técnica.
En el indicador se muestra el
mensaje de error "Er4".
Sobrecalentamiento peligroso
(eventualmente fuego en el
interior).
Potencia del microondas muy
elevada.
No abrir la puerta; extraer el
enchufe o desconectar los
fusibles en la caja de fusibles,
dejar enfriar.
En el indicador se muestra el
mensaje de error "Er18".
Fallo técnico. Ponerse en contacto con el
Servicio de Asistencia Técnica.
¡Peligro de descarga eléctrica!
Las reparaciones inadecuadas son peligrosas.
Las reparaciones sólo pueden ser efectuadas por
personal del Servicio de Asistencia Técnica
debidamente instruido.
d
87
Servicio de Asistencia Técnica
Nuestro Servicio de Asistencia Técnica se encuentra
a su disposición siempre que necesite la reparación
de su aparato. En la guía telefónica figuran el número
de teléfono y la dirección del Servicio de Asistencia
Técnica más cercano a su domicilio. Asimismo,
cualquiera de nuestros centros del Servicio de
Asistencia Técnica le informará encantado sobre la
delegación del Servicio de Asistencia Técnica más
cercana a su domicilio.
Al contactar con nuestro Servicio de Asistencia
Técnica, indicar el número de producto (E) y el
número de fabricación (FD) del aparato.
Si abre la puerta del aparato, a la derecha encontrará
la placa de características con estos números.
A fin de evitarse molestias en caso necesario, le
recomendamos anotar los datos de su aparato así
como el número de teléfono del Servicio de Asistencia
Técnica en el siguiente apartado.
N.º E: N.º FD:
Servicio de Asistencia Técnica %
Recuerde que, en caso de manejo incorrecto, la
asistencia del personal del Servicio de Asistencia
Técnica no es gratuita, incluso si todavía está dentro
del período de garantía.
Número de producto (E) y
número de fabricación (FD)
88
Suministro de corriente
eléctrica
220Ć240 V, 50 Hz
Potencia máx.
conectada
1990 W
Potencia del microondas 900 W (IEC 60705)
Frecuencia de las
microondas
2450 MHz
Grill 1300 W
Fusible Mínimo 10 A
Dimensiones (Al×An×F)
Ć Aparato 38,2 x 59,4 x 31,9 cm
Ć Compartimento de
cocción
22,0 x 35,0 x 27,0 cm
Homologación VDE sí
Distintivo CE sí
Este aparato cumple la normativa EN 55011 y
CISPR 11.
Es un producto del grupo 2, clase B.
Grupo 2 indica que los microondas se fabrican con el
fin de calentar alimentos.
La clase B indica que el aparato es apropiado para
uso privado en el ámbito doméstico.
Datos técnicos
89
Eliminación de residuos respetuosa con
el medio ambiente
Eliminar el embalaje de forma ecológica.
Este aparato está identificado conforme a la Directiva
de Residuos de Aparatos Eléctricos y Electrónicos
RAEE 2002/96/CE (waste electrical and electronic
equipment ĆWEEE).
Esta directiva define el marco de actuación para la
retirada y el reciclaje de aparatos usados en todo el
territorio europeo.
Platos probados en nuestro estudio
de cocina
A continuación presentamos una selección de
platos y los ajustes óptimos para ellos. Se detalla el
tipo de calentamiento, la temperatura o la potencia
del microondas más apropiada para cada uno.
Se ofrecen indicaciones sobre los accesorios
apropiados. Asimismo figuran consejos sobre
recipientes y el modo de preparación.
Consejos y advertencias
Los valores de la tabla son válidos para la preparación
de alimentos con el compartimento de cocción
vacío y frío. Precalentar solamente cuando así se
especifique en las tablas.
Antes de proceder a su utilización, retirar todos los
accesorios del compartimento de cocción que no
sean necesarios.
Las indicaciones de tiempo que figuran en las tablas
deben entenderse como valores orientativos. Vienen
determinados por la calidad y la composición de los
alimentos.
ó
Manual bosch   microondas inox pantalla digital hmt85 gl53

Mais conteúdo relacionado

Mais procurados (10)

Manual bosch microondas hmt75 m551
Manual bosch   microondas hmt75 m551Manual bosch   microondas hmt75 m551
Manual bosch microondas hmt75 m551
 
Balay oven user manual spanish
Balay oven user manual   spanishBalay oven user manual   spanish
Balay oven user manual spanish
 
Manual siemens microondas hf15g564
Manual siemens   microondas hf15g564Manual siemens   microondas hf15g564
Manual siemens microondas hf15g564
 
Nevera Balay 3FA4665X
Nevera Balay 3FA4665XNevera Balay 3FA4665X
Nevera Balay 3FA4665X
 
Manual bosch microondas hmt72 m654
Manual bosch   microondas hmt72 m654Manual bosch   microondas hmt72 m654
Manual bosch microondas hmt72 m654
 
Nevera BOSCH KAD92SB30
Nevera BOSCH KAD92SB30Nevera BOSCH KAD92SB30
Nevera BOSCH KAD92SB30
 
Manual bosch microondas hmt75 m654
Manual bosch   microondas hmt75 m654Manual bosch   microondas hmt75 m654
Manual bosch microondas hmt75 m654
 
Manual bosch congelador integrable gin25 p60
Manual bosch   congelador integrable gin25 p60Manual bosch   congelador integrable gin25 p60
Manual bosch congelador integrable gin25 p60
 
Encimera BOSCH PKY475FB1E
Encimera BOSCH PKY475FB1EEncimera BOSCH PKY475FB1E
Encimera BOSCH PKY475FB1E
 
Manual bosch microondas hmt84 g654
Manual bosch   microondas hmt84 g654Manual bosch   microondas hmt84 g654
Manual bosch microondas hmt84 g654
 

Destaque

Manual siemens microondas electrónico hf25 m5r2
Manual siemens   microondas electrónico hf25 m5r2Manual siemens   microondas electrónico hf25 m5r2
Manual siemens microondas electrónico hf25 m5r2Alsako Electrodomésticos
 
Manual bosch accesorio de unón para encimera hez394301
Manual bosch   accesorio de unón para encimera hez394301Manual bosch   accesorio de unón para encimera hez394301
Manual bosch accesorio de unón para encimera hez394301Alsako Electrodomésticos
 

Destaque (20)

lavadora Balay 3TI773B
lavadora Balay 3TI773B lavadora Balay 3TI773B
lavadora Balay 3TI773B
 
Manual balay campana 3bc8880g
Manual balay   campana 3bc8880gManual balay   campana 3bc8880g
Manual balay campana 3bc8880g
 
Horno BOSCH HSG636BS1
Horno BOSCH HSG636BS1 Horno BOSCH HSG636BS1
Horno BOSCH HSG636BS1
 
Manual bosch combi kgn46 h10
Manual bosch   combi kgn46 h10Manual bosch   combi kgn46 h10
Manual bosch combi kgn46 h10
 
CAMPANA TEKA DM-60
CAMPANA TEKA DM-60CAMPANA TEKA DM-60
CAMPANA TEKA DM-60
 
Manual siemens encimera modular er426ab70e
Manual siemens   encimera modular er426ab70eManual siemens   encimera modular er426ab70e
Manual siemens encimera modular er426ab70e
 
Encimera Balay 3ETX398BP
Encimera Balay 3ETX398BPEncimera Balay 3ETX398BP
Encimera Balay 3ETX398BP
 
Horno BOSCH HBG6750S1F
Horno BOSCH HBG6750S1FHorno BOSCH HBG6750S1F
Horno BOSCH HBG6750S1F
 
Horno BOSCH HBG635NS1
Horno BOSCH HBG635NS1Horno BOSCH HBG635NS1
Horno BOSCH HBG635NS1
 
Lavavajillas Siemens SX76N195EU
Lavavajillas Siemens SX76N195EULavavajillas Siemens SX76N195EU
Lavavajillas Siemens SX76N195EU
 
Lavavajillas BOSCH SMI57M25EU
Lavavajillas BOSCH SMI57M25EULavavajillas BOSCH SMI57M25EU
Lavavajillas BOSCH SMI57M25EU
 
Horno Balay 3HW441NC
Horno Balay 3HW441NC Horno Balay 3HW441NC
Horno Balay 3HW441NC
 
Nevera Zanussi ZRG16705WA
Nevera Zanussi ZRG16705WANevera Zanussi ZRG16705WA
Nevera Zanussi ZRG16705WA
 
Nevera AEG S93930CMX2
Nevera AEG S93930CMX2Nevera AEG S93930CMX2
Nevera AEG S93930CMX2
 
Encimera Bosch PCX815B90E
Encimera Bosch PCX815B90EEncimera Bosch PCX815B90E
Encimera Bosch PCX815B90E
 
Manual siemens microondas electrónico hf25 m5r2
Manual siemens   microondas electrónico hf25 m5r2Manual siemens   microondas electrónico hf25 m5r2
Manual siemens microondas electrónico hf25 m5r2
 
Nevera Balay 3KUB3253
Nevera Balay 3KUB3253Nevera Balay 3KUB3253
Nevera Balay 3KUB3253
 
Congelador LIEBHERR GTP2356
Congelador LIEBHERR GTP2356Congelador LIEBHERR GTP2356
Congelador LIEBHERR GTP2356
 
Manual bosch accesorio de unón para encimera hez394301
Manual bosch   accesorio de unón para encimera hez394301Manual bosch   accesorio de unón para encimera hez394301
Manual bosch accesorio de unón para encimera hez394301
 
Lavavajillas BOSCH SPS58M98EU
Lavavajillas BOSCH SPS58M98EULavavajillas BOSCH SPS58M98EU
Lavavajillas BOSCH SPS58M98EU
 

Semelhante a Manual bosch microondas inox pantalla digital hmt85 gl53

Manual siemens microondas electrónico hf25 g5l2
Manual siemens   microondas electrónico hf25 g5l2Manual siemens   microondas electrónico hf25 g5l2
Manual siemens microondas electrónico hf25 g5l2Alsako Electrodomésticos
 
Manual bosch microondas balnco pantalla digital hmt85 ml23
Manual bosch   microondas balnco pantalla digital hmt85 ml23 Manual bosch   microondas balnco pantalla digital hmt85 ml23
Manual bosch microondas balnco pantalla digital hmt85 ml23 Alsako Electrodomésticos
 
Manual bosch microondas inox pantalla digital hmt85 mr53
Manual bosch   microondas inox pantalla digital hmt85 mr53Manual bosch   microondas inox pantalla digital hmt85 mr53
Manual bosch microondas inox pantalla digital hmt85 mr53Alsako Electrodomésticos
 
Manual bosch microondas negro pantalla digital hmt85 ml63
Manual bosch   microondas negro pantalla digital hmt85 ml63 Manual bosch   microondas negro pantalla digital hmt85 ml63
Manual bosch microondas negro pantalla digital hmt85 ml63 Alsako Electrodomésticos
 
Manual bosch microondas pantalla inox hmt85 ml53
Manual bosch   microondas pantalla inox hmt85 ml53Manual bosch   microondas pantalla inox hmt85 ml53
Manual bosch microondas pantalla inox hmt85 ml53Alsako Electrodomésticos
 
Manual bosch microondas inox reloj electronico hmt75 m651
Manual bosch   microondas inox reloj electronico hmt75 m651 Manual bosch   microondas inox reloj electronico hmt75 m651
Manual bosch microondas inox reloj electronico hmt75 m651 Alsako Electrodomésticos
 
Manual siemens congelador integrable gu15da55
Manual siemens   congelador integrable gu15da55Manual siemens   congelador integrable gu15da55
Manual siemens congelador integrable gu15da55Alsako Electrodomésticos
 
Manual bosch frigorifico integrable kir38 a50
Manual bosch   frigorifico integrable kir38 a50Manual bosch   frigorifico integrable kir38 a50
Manual bosch frigorifico integrable kir38 a50Alsako Electrodomésticos
 

Semelhante a Manual bosch microondas inox pantalla digital hmt85 gl53 (20)

Manual siemens microondas electrónico hf25 g5l2
Manual siemens   microondas electrónico hf25 g5l2Manual siemens   microondas electrónico hf25 g5l2
Manual siemens microondas electrónico hf25 g5l2
 
Manual bosch microondas balnco pantalla digital hmt85 ml23
Manual bosch   microondas balnco pantalla digital hmt85 ml23 Manual bosch   microondas balnco pantalla digital hmt85 ml23
Manual bosch microondas balnco pantalla digital hmt85 ml23
 
Manual bosch microondas inox pantalla digital hmt85 mr53
Manual bosch   microondas inox pantalla digital hmt85 mr53Manual bosch   microondas inox pantalla digital hmt85 mr53
Manual bosch microondas inox pantalla digital hmt85 mr53
 
Manual bosch microondas negro pantalla digital hmt85 ml63
Manual bosch   microondas negro pantalla digital hmt85 ml63 Manual bosch   microondas negro pantalla digital hmt85 ml63
Manual bosch microondas negro pantalla digital hmt85 ml63
 
Manual bosch microondas pantalla inox hmt85 ml53
Manual bosch   microondas pantalla inox hmt85 ml53Manual bosch   microondas pantalla inox hmt85 ml53
Manual bosch microondas pantalla inox hmt85 ml53
 
Manual siemens microondas hf25m5l2
Manual siemens   microondas hf25m5l2Manual siemens   microondas hf25m5l2
Manual siemens microondas hf25m5l2
 
Manual siemens microondas hf25m5r2
Manual siemens   microondas hf25m5r2Manual siemens   microondas hf25m5r2
Manual siemens microondas hf25m5r2
 
Manual bosch microondas inox reloj electronico hmt75 m651
Manual bosch   microondas inox reloj electronico hmt75 m651 Manual bosch   microondas inox reloj electronico hmt75 m651
Manual bosch microondas inox reloj electronico hmt75 m651
 
Nevera Balay 3FIB3420
Nevera Balay 3FIB3420Nevera Balay 3FIB3420
Nevera Balay 3FIB3420
 
90001118752
9000111875290001118752
90001118752
 
vinoteca bosch KTW18V80
vinoteca bosch KTW18V80vinoteca bosch KTW18V80
vinoteca bosch KTW18V80
 
Manual siemens congelador gi38np60
Manual siemens   congelador gi38np60Manual siemens   congelador gi38np60
Manual siemens congelador gi38np60
 
Manual bosch cong. vertical gsn32 v73eu
Manual bosch   cong. vertical gsn32 v73euManual bosch   cong. vertical gsn32 v73eu
Manual bosch cong. vertical gsn32 v73eu
 
Manual siemens congelador integrable gu15da55
Manual siemens   congelador integrable gu15da55Manual siemens   congelador integrable gu15da55
Manual siemens congelador integrable gu15da55
 
Manual bosch frigorifico integrable kir38 a50
Manual bosch   frigorifico integrable kir38 a50Manual bosch   frigorifico integrable kir38 a50
Manual bosch frigorifico integrable kir38 a50
 
Nevera Balay 3FIB3620
Nevera Balay 3FIB3620Nevera Balay 3FIB3620
Nevera Balay 3FIB3620
 
Nevera Balay 3FIB3720
Nevera Balay 3FIB3720 Nevera Balay 3FIB3720
Nevera Balay 3FIB3720
 
Manual bosch cong. vertical gsn28 v43
Manual bosch   cong. vertical gsn28 v43Manual bosch   cong. vertical gsn28 v43
Manual bosch cong. vertical gsn28 v43
 
Encimera Bosch PCC615B80E
Encimera Bosch PCC615B80EEncimera Bosch PCC615B80E
Encimera Bosch PCC615B80E
 
Encimera Bosch PCR915B91E
Encimera Bosch PCR915B91EEncimera Bosch PCR915B91E
Encimera Bosch PCR915B91E
 

Mais de Alsako Electrodomésticos

Mais de Alsako Electrodomésticos (20)

Lavavajillas ZANUSSI ZDI22001XA
Lavavajillas ZANUSSI ZDI22001XALavavajillas ZANUSSI ZDI22001XA
Lavavajillas ZANUSSI ZDI22001XA
 
Secadora ZANUSSI ZDH8333PZ
Secadora ZANUSSI ZDH8333PZSecadora ZANUSSI ZDH8333PZ
Secadora ZANUSSI ZDH8333PZ
 
Congelador ZANUSSI ZFC1040WA
Congelador ZANUSSI ZFC1040WACongelador ZANUSSI ZFC1040WA
Congelador ZANUSSI ZFC1040WA
 
Nevera ZANUSSI ZUA14020SA
Nevera ZANUSSI ZUA14020SANevera ZANUSSI ZUA14020SA
Nevera ZANUSSI ZUA14020SA
 
Nevera ZANUSSI ZBB28460SA
Nevera ZANUSSI ZBB28460SANevera ZANUSSI ZBB28460SA
Nevera ZANUSSI ZBB28460SA
 
Encimera ZANUSSI ZGG66424XA
Encimera ZANUSSI ZGG66424XAEncimera ZANUSSI ZGG66424XA
Encimera ZANUSSI ZGG66424XA
 
Encimera ZANUSSI ZGO65414BA
Encimera ZANUSSI ZGO65414BAEncimera ZANUSSI ZGO65414BA
Encimera ZANUSSI ZGO65414BA
 
Encimera ZANUSSI ZEV6330FBA
Encimera ZANUSSI ZEV6330FBAEncimera ZANUSSI ZEV6330FBA
Encimera ZANUSSI ZEV6330FBA
 
Encimera ZANUSSI ZEI6840FBA
Encimera ZANUSSI ZEI6840FBAEncimera ZANUSSI ZEI6840FBA
Encimera ZANUSSI ZEI6840FBA
 
Encimera ZANUSSI ZEL6633FBA
Encimera ZANUSSI ZEL6633FBAEncimera ZANUSSI ZEL6633FBA
Encimera ZANUSSI ZEL6633FBA
 
Encimera ZANUSSI ZEV6040XBA
Encimera ZANUSSI ZEV6040XBAEncimera ZANUSSI ZEV6040XBA
Encimera ZANUSSI ZEV6040XBA
 
Encimera ZANUSSI ZEV6041XBA
Encimera ZANUSSI ZEV6041XBAEncimera ZANUSSI ZEV6041XBA
Encimera ZANUSSI ZEV6041XBA
 
Horno ZANUSSI ZZU10301WK
Horno ZANUSSI ZZU10301WKHorno ZANUSSI ZZU10301WK
Horno ZANUSSI ZZU10301WK
 
Horno ZANUSSI ZZU10301XK
Horno ZANUSSI ZZU10301XKHorno ZANUSSI ZZU10301XK
Horno ZANUSSI ZZU10301XK
 
Horno ZANUSSI ZOB20301XK
Horno ZANUSSI ZOB20301XKHorno ZANUSSI ZOB20301XK
Horno ZANUSSI ZOB20301XK
 
Horno ZANUSSI ZZB21601XV
Horno ZANUSSI ZZB21601XVHorno ZANUSSI ZZB21601XV
Horno ZANUSSI ZZB21601XV
 
Horno ZANUSSI ZOP37922XK
Horno ZANUSSI ZOP37922XKHorno ZANUSSI ZOP37922XK
Horno ZANUSSI ZOP37922XK
 
Horno ZANUSSI ZOP37912XK
Horno ZANUSSI ZOP37912XKHorno ZANUSSI ZOP37912XK
Horno ZANUSSI ZOP37912XK
 
Horno ZANUSSI ZOP37932XA
Horno ZANUSSI ZOP37932XAHorno ZANUSSI ZOP37932XA
Horno ZANUSSI ZOP37932XA
 
Lavadora Zanussi ZWF81243W
Lavadora Zanussi ZWF81243WLavadora Zanussi ZWF81243W
Lavadora Zanussi ZWF81243W
 

Manual bosch microondas inox pantalla digital hmt85 gl53

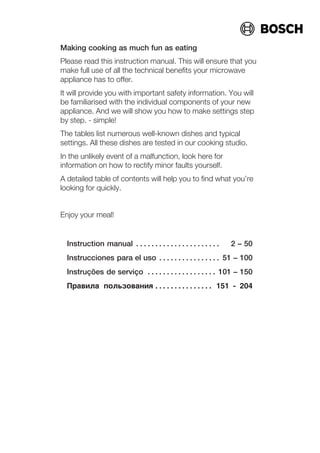
  • 1. Making cooking as much fun as eating Please read this instruction manual. This will ensure that you make full use of all the technical benefits your microwave appliance has to offer. It will provide you with important safety information. You will be familiarised with the individual components of your new appliance. And we will show you how to make settings step by step. Ć simple! The tables list numerous wellĆknown dishes and typical settings. All these dishes are tested in our cooking studio. In the unlikely event of a malfunction, look here for information on how to rectify minor faults yourself. A detailed table of contents will help you to find what you're looking for quickly. Enjoy your meal! Instruction manual 2 - 50. . . . . . . . . . . . . . . . . . . . . . Instrucciones para el uso 51 - 100. . . . . . . . . . . . . . . . Instruções de serviço 101 - 150. . . . . . . . . . . . . . . . . . ¥pa­åæa ÿo濵o­a¸åø 151 - 204. . . . . . . . . . . . . . .
  • 2. Table of contents 2 Safety information 4. . . . . . . . . . . . . . . . . . . . . . . . . . Before installation 4. . . . . . . . . . . . . . . . . . . . . . . . . . . . Information for your safety 4. . . . . . . . . . . . . . . . . . . . . Information on the microwave 6. . . . . . . . . . . . . . . . . . Causes of damage 9. . . . . . . . . . . . . . . . . . . . . . . . . . . Your new appliance 10. . . . . . . . . . . . . . . . . . . . . . . . . Control panel 10. . . . . . . . . . . . . . . . . . . . . . . . . . . . . . . . Buttons and display 11. . . . . . . . . . . . . . . . . . . . . . . . . . Accessories 12. . . . . . . . . . . . . . . . . . . . . . . . . . . . . . . . . Cooking compartment 12. . . . . . . . . . . . . . . . . . . . . . . . Switching the appliance on and off 13. . . . . . . . . . . Before using the appliance for the first time 14. . . Setting the time 14. . . . . . . . . . . . . . . . . . . . . . . . . . . . . . Heating up the cooking compartment 15. . . . . . . . . . . Cleaning accessories 15. . . . . . . . . . . . . . . . . . . . . . . . . The microwave 16. . . . . . . . . . . . . . . . . . . . . . . . . . . . . Notes regarding ovenware 16. . . . . . . . . . . . . . . . . . . . . Microwave power settings 17. . . . . . . . . . . . . . . . . . . . . Setting the microwave 17. . . . . . . . . . . . . . . . . . . . . . . . 1,2,3 followĆon mode 19. . . . . . . . . . . . . . . . . . . . . . . . Setting followĆon mode 19. . . . . . . . . . . . . . . . . . . . . . . Grilling 21. . . . . . . . . . . . . . . . . . . . . . . . . . . . . . . . . . . . . Setting the grill 21. . . . . . . . . . . . . . . . . . . . . . . . . . . . . . . MicroCombi operation 23. . . . . . . . . . . . . . . . . . . . . . Setting MicroCombi 23. . . . . . . . . . . . . . . . . . . . . . . . . .
  • 3. Table of contents 3 Automatic programmes 24. . . . . . . . . . . . . . . . . . . . . Setting the programme 24. . . . . . . . . . . . . . . . . . . . . . . Notes on automatic programming 26. . . . . . . . . . . . . . Memory 30. . . . . . . . . . . . . . . . . . . . . . . . . . . . . . . . . . . Storing settings in the memory 30. . . . . . . . . . . . . . . . . Starting the memory function 31. . . . . . . . . . . . . . . . . . Changing the basic settings 32. . . . . . . . . . . . . . . . . Basic settings 32. . . . . . . . . . . . . . . . . . . . . . . . . . . . . . . Care and cleaning 33. . . . . . . . . . . . . . . . . . . . . . . . . . Cleaning agents 33. . . . . . . . . . . . . . . . . . . . . . . . . . . . . Troubleshooting 35. . . . . . . . . . . . . . . . . . . . . . . . . . . . AfterĆsales service 37. . . . . . . . . . . . . . . . . . . . . . . . . . Technical data 38. . . . . . . . . . . . . . . . . . . . . . . . . . . . . . . EnvironmentallyĆfriendly disposal 39. . . . . . . . . . . . Dishes tested for you in our cooking studio 39. . . Defrosting, heating up and cooking with the microwave 40. . . . . . . . . . . . . . . . . . . . . . . . . . . Tips for microwave operation 46. . . . . . . . . . . . . . . . . . Grilling table 46. . . . . . . . . . . . . . . . . . . . . . . . . . . . . . . . . Combined grill and microwave 48. . . . . . . . . . . . . . . . . Test dishes in accordance with EN 60705 50. . . . .
  • 4. 4 d Safety information Read this instruction manual carefully. Only then will you really be able to operate your appliance safely and correctly. Please keep the instruction and installation manuals in a safe place. Please include these manuals if you pass on the appliance to a new owner. Check the appliance for damage after unpacking it. Do not connect the appliance if it has been damaged during transportation. Only allow a licensed professional to connect the appliance. Warranty claims for damage caused by incorrect connection will not be accepted. Please observe the special installation instructions. This appliance is intended for domestic use only. This appliance must only be used for preparing food and drink. Adults and children must not operate the appliance without supervision, H if they are physically or mentally incapable of doing so or H if they lack the knowledge and experience to operate it correctly and safety. Never let children play with the appliance. Before installation Transport damage Electrical connection Installation and connection Information for your safety
  • 5. 5 There is a risk of burns. Never touch the hot surfaces of heating and cooking appliances. Never touch the internal surfaces of the cooking compartment or the heating elements. Open the cooking compartment door carefully. Hot steam may escape. Small children must be kept at a safe distance from the appliance at all times. There is a risk of fire. Never store combustible items in the cooking compartment. Never open the cooking compartment door if smoke can be seen in the appliance. Switch off the appliance. Pull out the mains plug or switch off the fuse in the fuse box. There is a risk of a shortĆcircuit. Never trap cables of electrical appliances in the cooking compartment door when it is hot. The cable insulation could melt. There is a risk of burns. Never prepare food containing large quantities of drinks with a high alcohol content. Alcoholic vapours can catch fire in the cooking compartment. Use only small quantities of drinks with a high alcohol content and open the cooking compartment door carefully. There is a risk of burns. Always use an oven cloth or oven gloves to remove hot accessories from the appliance. There is a risk of serious damage to health. Never use the appliance if the cooking compartment door or the door seal is damaged. Otherwise microwave energy may escape. Only use the appliance again once it has been repaired. There is a risk of serious damage to health. The surface of the appliance could rust through over time if it is not cleaned properly. Microwave energy may escape. Clean the appliance on a regular basis. Hot cooking compartment Hot accessories Damaged cooking compartment door or door seal Heavily corroded surfaces
  • 6. 6 There is a risk of electric shock. Never remove the casing. The appliance is a highĆvoltage appliance. There is a risk of serious damage to health. Never remove the casing. It prevents microwave energy from escaping. There is a risk of shortĆcircuiting. Never expose the appliance to intense heat or humidity. There is a risk of electric shock. Incorrect repairs are dangerous. Repairs may only be carried out, and damaged power cables replaced, by one of our experienced afterĆsales engineers. You must not open the casing. The appliance is a highĆvoltage appliance. The casing prevents microwave energy from escaping. If the appliance is faulty, switch off the circuit breaker in the fuse box or disconnect the appliance at the mains. Call the afterĆsales service. There is a risk of fire. Only use the microwave to prepare food which is fit for consumption. Using the microwave for other purposes may be dangerous and may result in damage, e.g. heated slippers and grain or cereal pillows could catch fire, even several hours later. There is a risk of injury. Porcelain or ceramic ovenware can have small perforations in the handles or lids. These perforations conceal a cavity below. Moisture that has penetrated this cavity could cause the ovenware to crack. Only use ovenware that is suitable for use in a microwave. Casing open Hot or humid environment Incorrect repairs Information on the microwave Preparing food Ovenware
  • 7. 7 There is a risk of burns. Hot food can heat up ovenware. Always use an oven cloth or oven gloves to remove ovenware and accessories from the cooking compartment. There is a risk of fire. Do not select a microwave power or time setting that is higher than necessary. The food could catch fire and cause damage to the appliance. Follow the information provided in this instruction manual. There is a risk of fire. Never heat food in heatĆretaining packages. Do not leave food heating unattended in containers made of plastic, paper or other combustible materials. There is a risk of burns. Airtight packaging may burst when food is heated. Follow the information provided on the packaging. Always use an oven cloth or oven gloves to remove meals. There is a risk of scalding There is a possibility of delayed boiling when a liquid is heated. This means that the liquid reaches boiling temperature without the usual steam bubbles rising to the surface. If the container is only shaken a little, the hot liquid can suddenly boil over and spatter. When heating liquids, always place a spoon in the container. This will prevent delayed boiling. Microwave power and time Packaging Drinks
  • 8. 8 There is a risk of explosion. Never heat drinks or other food in containers that have been tightly sealed. Never overheat alcoholic drinks. There is a risk of burns. Never heat baby food in closed containers. Always remove the lid or teat. Stir or shake well after the food has been heated. This ensures even heat distribution. Check the temperature of the food before it is given to the child. There is a risk of burns. Never cook eggs in their shells. Never reheat hardĆboiled eggs as they can explode even after microwave operation has ended. The same applies to shellfish and crustaceans. Always prick the yoke when baking or poaching eggs. Always prick the skin of foodstuffs with solid peels or skins such as apples, tomatoes, potatoes and sausages before cooking to prevent the peel or skin from bursting. There is a risk of fire. Never use the microwave to dry food. There is a risk of fire. Never defrost or heat food with a low water content, e.g. bread, at too high a power or for too long. There is a risk of fire. Never use the microwave to heat cooking oil on its own. Baby food Foods with a shell or skin Drying food Food with a low water content Cooking oil
  • 9. 9 Never pour water into the hot cooking compartment. This will cause steam. The temperature change can cause damage to the ceramic floor panel. Only leave the cooking compartment to cool with the door closed. Do not trap anything in the appliance door. Even if the door is only slightly ajar, the fronts of adjacent units may be damaged over time. If the seal is very dirty, the appliance door will no longer close properly during operation. The fronts of adjacent units could be damaged. Always keep the seal clean. Do not switch on the microwave unless there is food in the cooking compartment. The appliance may be overloaded if it is switched on without any food inside. An exception to this rule is for brief testing of ovenware (see notes on ovenware). Causes of damage Water in the hot cooking compartment Cooling with the appliance door open Heavily soiled seal Operating the microwave without food
  • 10. 10 Your new appliance Use this section to familiarise yourself with your new appliance. The control panel and the individual controls are explained here. You will find information about the cooking compartment and the accessories. Here is an overview of the control panel. Depending on the appliance model, there may be differences in the particular details. Display Rotary selector Buttons Microwave power settings Button for a series of operations On/Off button The rotary selector is retractable. Press on the rotary selector to lock it in or out. Sensors are located under the individual buttons. They must not be pressed too firmly. Only touch the corresponding symbol. Exception: the button for the series of operations and the buttons for the microwave power settings are normal push buttons. Control panel Rotary selector Buttons
  • 11. 11 Using the buttons, you can set various additional functions. In the display, you can check the values that you have set. Symbol Button function % Switches the appliance on and off 90 Selects 90 wattmicrowave power 180 Selects 180 wattmicrowave power 360 Selects 360 wattmicrowave power 600 Selects 600 wattmicrowave power 900 Selects 900 wattmicrowave power 2 Selects followĆon mode ( Selects the grill 0 Opens and closes the timeĆsetting options menu g / h Selects memory ` Selects a programme f Selects weight ^ Opens the appliance door n Press briefly = starts/pauses operation Press and hold = cancels operation Notes The timeĆsetting options that are in the foreground of the display are indicated by the brackets [ ] around the relevant symbol. Exception: With the clock, the symbol 0 is lit up only if you are making changes. When you switch on the oven, the lamp in the cooking compartment comes on. Buttons and display
  • 12. 12 Your appliance is equipped with the following accessories: Wire rack as a surface for ovenware or for grilling and browning. Glass pan This can act as a splash guard if you are grilling food directly on the wire rack. Therefore, place the wire rack in the glass pan. The glass pan can also be used as a dish when using the microwave. The appliance is equipped with a cooling fan. The fan may run on even if the oven has been switched off. Notes The cooking compartment remains cold during microwave operation. The cooling fan will still switch on. The fan may run on even when microwave operation has ended. Condensation may appear on the door panel, interior walls and floor. This is normal and does not affect microwave operation. Wipe away the condensation after cooking. Accessories Cooking compartment Cooling fan
  • 13. 13 Switching the appliance on and off The % button allows you to switch the microwave oven on and off. Press the % button. Select the operating mode you require. H 90, 180, 360, 600 or 900 W button for the microwave power setting H 2 button = followĆon mode H ( button = grill H ` and f buttons = automatic programming H g or h button = memory programme You can find out how to make the settings in the individual sections. Press the % button. The appliance switches off and the clock appears in the display. Switching on Switching off
  • 14. 14 Before using the appliance for the first time Here you will find everything you need to do before using the microwave to prepare food for the first time. First read the Safety information section. When the microwave has been connected to the power supply, the [0] symbol and four zeros lights up in the display. Set the time. 1. Set the current time using the rotary selector. 2. Press the 0 button. The time is set. You can hide the time. You can then only see it when the oven is in operation. Read about this in the Changing basic settings section. Note In order to reduce the energy consumption of your appliance in standby, you can hide the clock. Read about this in the Changing basic settings section. Setting the time Hiding the clock
  • 15. 15 Heat up the empty cooking compartment with the door closed to remove the new smell. Make sure that there are no remains of packaging in the cooking compartment. Heat the cooking compartment for 10 minutes with the grill ( at level 3. 1. Press the % button. 2. Press the ( button. Grill, level 3 and 10:00 minutes appear in the display. 3. Press the n button. Operation begins. The n symbol lights up. After 10 minutes, switch off the appliance with button %. Before using the accessories for the first time, clean them thoroughly using a soft cloth and hot soapy water. Heating up the cooking compartment Cleaning accessories
  • 16. 16 The microwave Microwaves are converted to heat in foodstuffs. You can set the microwave on its own or in combination with the grill. You will find information about cookware and how to set the microwave. Note In the Tested for your in our cooking studio section, you will find examples for defrosting, heating and cooking with the microwave oven. Suitable dishes are heatĆresistant ovenware made of glass, glass ceramic, porcelain, ceramic or heatĆresistant plastic. These materials allow microwaves to pass through. You can also use serving dishes. This saves you having to transfer food from one dish to another. You should only use ovenware with decorative gold or silver trim if the manufacturer guarantees that they are suitable for use in microwaves. Metal ovenware is unsuitable. Metal does not allow microwaves to pass through. Food in covered metal containers will remain cold. Caution Metal Ć e.g. a spoon in a glass Ć must be kept at least 2 cm from the oven walls and the inside of the door. Sparks could destroy the glass on the inside of the door. Do not switch on the microwave unless there is food inside. The following ovenware test is the only exception to this rule. Notes regarding ovenware Suitable ovenware Unsuitable ovenware Ovenware test
  • 17. 17 Perform the following test if you are unsure whether your ovenware is suitable for use in the microwave: Heat the empty ovenware at maximum power for between 30 and 60 seconds. Check the temperature of the ovenware during this period. The ovenware should still be cold or warm to the touch. The ovenware is unsuitable if it becomes hot or sparks are generated. Use the button to set the desired microwave power. 90 watts for defrosting delicate foods 180 watts for defrosting and continued cooking 360 watts for cooking meat and heating delicate foods 600 watts for heating and cooking food 900 watts for heating liquids When you press a button, the selected power lights up. Note The microwave power can be set to 900 watts for a maximum of 30 minutes. A cooking time of 90 minutes is possible with all other power settings. Example: Microwave power 360 W, cooking time 17 minutes. 1. Press the % button. Your appliance is ready for use. 2. Press the button for the microwave power setting you require. The power is lit up in the display and a suggested cooking time is displayed. 3. Set the cooking time using the rotary selector. 4. Press the n button. Operation begins. The cooking time can be seen counting down. Microwave power settings Setting the microwave
  • 18. 18 A signal sounds. Microwave operation is finished. You can cancel the signal before it sounds using the 0 button. Use the % button to switch off the appliance. Cooking is paused. Press the n button briefly once you have closed the appliance door. The programme will then continue. This is possible at any time. Change the cooking time using the rotary selector. Press the button for the new microwave power setting. Use the rotary selector to set the cooking time and restart the microwave. Press the n button and switch off the appliance with the % button. Notes When you switch on the appliance with the % button, the highest microwave power always appears in the display as a suggestion. If you open the appliance door during cooking, the fan may continue to run. The cooking time has elapsed Opening the appliance door during cooking Changing the cooking time Changing the microwave power setting Cancelling cooking
  • 19. 19 1,2,3 followĆon mode You can use the followĆon mode to set up to three different microwave power settings and times one after the other and then start. You can also connect the grill to the microwave power settings. Always use heatĆresistant cookware which is suitable for microwaves. 1. Press the % button. Your appliance is ready for use. 2. Press the 2 button. The ª for the first followĆon mode appears in the display. 3. Set the first microwave power and cooking time. 4. Press the 2 button. The « for the second followĆon mode appears. 5. Set the second microwave power and cooking time. 6. Press the 2 button. The ¬ for the third followĆon mode appears. 7. Set the third microwave power and cooking time. 8. Press the n button. Operation begins. The total cooking time and ª symbol for the first followĆon mode appear in the display. A signal sounds. FollowĆon mode is finished. You can cancel the acoustic signal before it sounds using the 0 button. Changes can only be made before operation begins. Press the 2 button repeatedly until the number for the followĆon mode appears. Change the setting. Ovenware Setting followĆon mode The cooking time has elapsed Changing the setting
  • 20. 20 Cooking is paused. Press the nbutton again once you have closed the appliance door. The programme will then continue. Press the n button briefly. Operation is paused. Press the n button again to continue cooking. Press and hold the n button for approximately 4 seconds and switch off the appliance with the % button. Note You can also combine the grill with the followĆon mode. First, set the followĆon mode. Opening the appliance door during cooking Pausing cooking Cancelling cooking
  • 21. 21 Grilling The following grill settings are available: Grill Level 3 § high Press the ( button once Grill Level 2 ¦ medium Press the ( button twice Grill Level 1 ¥ low Press the ( button three times Example in the diagram: Grill setting 2, 15 minutes 1. Press the % button. Your appliance is ready for use. 2. Press the ( grill button twice. Grill, level 2 and 10:00 minutes appear in the display. To set a different grill setting, press the ( grill button again. Setting the grill
  • 22. 22 3. Set the cooking time using the rotary selector. 4. Press the n button. In the display, the timer can be seen counting down and the q symbol is in brackets. A signal sounds. 00:00 is shown in the display Press the n button and switch off the appliance with the % button. You can cancel the acoustic signal before it sounds using the 0 button. You can change the grill setting at any time. Then press the n button again. Open the appliance door. The microwave is interrupted. Press the n button again once you have closed the appliance door. Cooking resumes. Press and hold the n button for a few seconds and switch off the appliance with the % button. Note If you open the appliance door during cooking, the fan may continue to run. The cooking time has elapsed Changing the setting Pausing cooking Cancelling the setting
  • 23. 23 MicroCombi operation This involves simultaneous operation of the grill and the microwave. Using the microwave makes your dishes ready more quickly, but they are still nicely browned. You can switch on all microwave power settings. Exception: 900 and 600 watt. Example: microwave 360 W, 17 minutes and grill level 1. 1. Press the % button. Your appliance is ready for use. 2. Press the button for the microwave power setting you require. A suggested cooking time appears. 3. Set the cooking time using the rotary selector. 4. Press the ( button three times. The ¥ and [q] symbols are lit in the display. 5. Press the n button. Operation begins. The cooking time can be seen counting down. A signal sounds. Combination mode is finished. You can cancel the acoustic signal before it sounds using the 0 button. You may change the grill setting or cooking time at any time. Then, press the n button and cooking continues. Press the n button and switch off the appliance with the % button. Cooking is paused. When you have closed the door, press the n button and cooking continues. Setting MicroCombi The cooking time has elapsed Changing the settings Cancelling cooking Opening the appliance door during cooking
  • 24. 24 Press the n button briefly. The appliance is paused. Press n again and cooking resumes. Notes You can also set the grill setting first and then set the microwave power and cooking time. If you open the appliance door during cooking, the fan may continue to run. Automatic programmes The automatic programmes enable you to prepare food very easily. You select the programme and enter the weight of your food. The automatic programme makes the optimum setting. You can select from 10 programmes. Once you have selected a programme, set the oven as follows. Example in the diagram: programme 2 with 1 kg weight. 1. Press the % button. Your appliance is ready for use. 2. Press the ` button. The first programme number appears in the display. Pausing cooking Setting the programme
  • 25. 25 3. Select the programme number with the rotary selector. 4. Press the f button. The weight suggestion 0.50 kg appears in the display. 5. Turn the rotary selector to set the weight.
  • 26. 26 6. Press the n button. The programme starts. The [r] cooking time counts down in the display. A signal sounds. The programme has finished, the appliance no longer heats. Use the % button to switch off the appliance or make new settings. You can stop the acoustic signal early by pressing the 0 button. Press the % button. The appliance is switched off. Once the oven has started, the programme number and weight cannot be changed. With automatic programmes, you cannot change the cooking time. Take the food out of its packaging and weigh it. If it is not possible to enter the exact weight, you should round it up or down. For the programs, always use microwaveĆproof ovenware such as glass, ceramic, or the glass pan. Observe the accessories tips in the program table. Place the food in the cold appliance. A table of suitable food with weight ranges and accessories required can be found after the tips. It is not possible to set a weight outside the weight range. With many dishes, a signal sounds after a certain time. Turn or stir the food. If possible, freeze and store food flat and in portions at Ć18 ºC. Put the frozen food on a flat dish, e.g. a glass or porcelain plate. After defrosting, allow the food to defrost for a further 10 to 30 minutes until it reaches room temperature. Programme has finished Cancelling the programme Changing the programme Changing the cooking time Notes on automatic programming Defrosting
  • 27. 27 Liquid will be produced when defrosting meat, poultry or fish. Drain off this liquid when turning and under no circumstances should it be used for other purposes or be allowed to come into contact with other foods. Place beef, lamb and pork on the dish fattyĆside down first. Bread should only be defrosted in the required amounts, as it quickly becomes stale. After turning, remove any minced meat that has already defrosted. whole poultry should be placed in the dish breastĆside down and poultry pieces skinĆside down. Boiled potatoes: cut into pieces of a uniform size. Add 2 tablespoons of water per 100 g potatoes, and add salt to taste. Jacket potatoes: use potatoes of equal size. Wash the potatoes and prick them all over. Place the wet potatoes in a dish. Do not add water. Rice foams a lot during cooking. Therefore, use a highĆsided dish with a lid. Enter the uncooked weight (without liquid). Add two to two and a half times the amount of liquid to the rice. Do not use boilĆinĆtheĆbag rice. Vegetables, fresh: cut into pieces of equal size. Add two tablespoons of water for every 100 g vegetables. Vegetables, deepĆfrozen: this program is only suitable for blanched, not preĆcooked vegetables. The program is not suitable for frozen vegetables in cream sauce. Add 1 to 2 tablespoons of water per 100 g. Do not add water to spinach or red cabbage. Use potatoes of equal size. Wash the potatoes and prick them all over. Place the potatoes on the wire rack while they are still damp. Potatoes Rice Vegetables Baked potatoes
  • 28. 28 Place the chicken halves on the wire rack with the skin side facing up. Place the wire rack in the glass pan so that it catches the dripping fat or meat juices. Some dishes need some cooling down time in the cooking compartment after the program has ended. Meal Standing time Vegetables approx. 5 minutes Potatoes approx. 5 minutes. Strain the remaining water. Rice 5Ć10 minutes Observe the signals for stirring and turning. Chicken halves Standing time
  • 29. 29 Food Programme number Weight range Cookware/ accessories Defrosting Meat and poultry Ć Joints Ć Flat pieces of meat Ć Mince Ć Chicken, poulard, duck P1 0.2 Ć 2.0 kg Shallow cookware without lid. Fish Whole fish, fish fillet, fish cutlet P2 0.1 Ć 1.0 kg Shallow cookware without lid. Bread and cake* Bread, whole, round or long, bread in slices, sponge cake, yeast cake, fruit flan P3 0.2 Ć 1.5 kg Shallow cookware without lid. Cooking Potatoes Boiled potatoes, unpeeled boiled potatoes P4 0.2 Ć 1.0 kg Dish with lid. Rice P5 0.05 Ć 0.3 kg HighĆsided dish with lid. Fresh vegetables Cauliflower, broccoli, carrot, kohlrabi, leek, pepper, courgette P6 0.15 Ć 1.0 kg Dish with lid. Frozen vegetables Cauliflower, broccoli, carrot, kohlrabi, red cabbage, spinach P7 0.15 Ć 1.0 kg Dish with lid. Baked potatoes Weight per potato approx. 200 g Ć 250 g P8 0.2 Ć 1.5 kg Wire rack. Bake, frozen e.g. lasagne P9 0.3 Ć 1.0 kg Chicken, halved P10 0.5 Ć 1.8 kg Glass pan and wire rack. * Cream cakes, buttercream cakes, cakes with frosting, icing or gelatine are unsuitable.
  • 30. 30 Memory The memory allows you to store the setting for your favourite dish and call it up at any time. You have two memories available g" and h". The memory is useful if you prepare one dish particularly frequently. 1. Press the % button. Your appliance is ready for use. 2. Press the button for the microwave power setting you require. The power and a suggested cooking time appear in the display. 3. Set the cooking time using the rotary selector. 4. Press and hold the g or h button for approximately 4 seconds until a signal sounds. The setting is stored and can be started at any time. Make new settings and store them. The old settings are overwritten. Storing settings in the memory Storing another setting
  • 31. 31 The stored settings for your dish can be started at any time. 1. Press the % button. Your appliance is ready for use. 2. Press the g or h button. The stored settings are displayed. 3. Press the n button. The memory starts. The cooking time r counts down in the display. Notes Once the appliance has been started, you can no longer change the memory location. The programmes which have been set also remain stored if there is a power cut. A signal sounds. The memory has finished. Use the % button to switch off the appliance or make new settings. You can cancel the acoustic signal before it sounds using the 0 button. Press the n button or open the appliance door. Cooking is paused. Press the n button once you have closed the appliance door. The programme will then continue. Starting the memory function The cooking time has elapsed Pausing
  • 32. 32 Changing the basic settings Your appliance has various basic settings that you can change at any time. The table lists all of the basic settings and the options for making changes. Basic setting Options Explanation ™‚ Clock display ‚ = on Clock display ƒ = off Display of the clock ™ƒ Signal duration ƒ = medium = 2 minutes ‚ = short = 10 seconds „ = long = 5 minutes Signal after the cooking time has elapsed ™„ Button tone: ‚ = on Button tone: ƒ = off Confirmation tone when a button is pressed ™… Waiting time ƒ = medium = 5 seconds ‚ = short = 2 seconds „ = long = 10 seconds Waiting time between individual steps, after making a setting Prerequisite: Your appliance is switched off. 1. Press and hold the 0 button for several seconds. The first basic setting appears in the display. 2. Change the basic setting with the rotary selector. 3. Confirm with the 0 button. The next basic setting appears in the display. You can go through all of the basic settings with the 0 button and make changes with the rotary selector. 4. Finally, press and hold the 0 button for a few seconds. All settings are applied. You may change the settings at any time. Basic settings
  • 33. 33 Care and cleaning If carefully cleaned and taken care of, your microwave oven will remain fully functional and in a good condition for a long time to come. This section explains how to properly care for and clean your appliance. Danger of shortĆcircuiting. Never use highĆpressure cleaners or steam jets. Risk of burning. Do not clean the appliance immediately after switching it off. Allow the appliance to cool down. Notes Slight differences in the colours on the front of the appliance are caused by the use of different materials, such as glass, plastic and metal. Shadows on the door panel which look like streaks are light reflections from the oven light. Unpleasant smells, e.g. after preparing fish, can be removed quite easily. Add a few drops of lemon juice to a cup of water. Place a spoon in the container to prevent delayed boiling. Heat the water for 1 to 2 minutes at the maximum microwave power setting. Surfaces are different and damage caused by using the wrong cleaning agent can be avoided by observing the information in the table below. Do not use: H any caustic or abrasive cleaning agents. H metal or glass scrapers to clean the glass in the appliance door. H metal or glass scrapers to clean the door seal. H coarse scouring pads or cleaning sponges. Rinse out new sponge cloths thoroughly before use. d d Cleaning agents
  • 34. 34 Area Cleaning agents Appliance front Hot soapy water: Clean using a dish cloth and then dry with a soft cloth. Do not use metal or glass scrapers for cleaning. Stainless steel Hot soapy water: Clean using a dish cloth and then dry with a soft cloth. Remove any flecks of limescale, grease, starch and egg white immediately. Corrosion can form under such marks. Special stainless steel cleaning agents can be obtained from the afterĆsales service or from specialist retailers. Cooking compartment Cooking compartment made of stainless steel Hot soapy water or a vinegar solution: Clean using a dish cloth and then dry with a soft cloth. For heavy soiling: Only use oven cleaner in a cold cooking compartment. Do not use oven spray or other aggressive oven cleaners or abrasive materials. Scouring pads, rough sponges and pan cleaners are also unsuitable. These agents scratch the surface. Allow the interior surfaces to dry thoroughly. Door panels Glass cleaner: Clean with a dish cloth. Do not use metal or glass scrapers for cleaning. Door seal Do not remove. Hot soapy water: Clean with a dish cloth; do not scrub. Do not use metal or glass scrapers for cleaning. Accessories Hot soapy water: Soak and then clean with a dish cloth or a brush.
  • 35. 35 Troubleshooting Malfunctions often have simple explanations. Please read the following notes before calling the after-sales service. If one of your dishes does not turn out as you had hoped, please refer to the Tested for you in our cooking studio section. You will find many cooking tips and tricks there. Problem Possible cause Remedial action/notes The appliance does not work. The plug is not plugged into the mains. Plug it in. Power cut. Check whether the kitchen light switches on. Blown fuse. Look in the fuse box to make sure that the fuse for the appliance is OK. Operating error. Switch off the circuit breaker in the fuse box. After approx. 10 seconds switch it on again. The appliance is not in operation. A cooking time appears in the display. The n button was not pressed after the setting had been made. Press the n button or switch the appliance off. The microwave does not switch on. The door is not properly closed. Check whether leftover food or a foreign object is trapped in the door. The n button was not pressed. Press the n button. It takes longer than before for the food to heat up. The microwave power setting is too low. Select a higher microwave power setting.p You have placed a larger amount of food than normal in the appliance. Double the amount = almost double the cooking time.
  • 36. 36 Problem Remedial action/notesPossible cause A signal sounds. The two dots in the display are flashing. The appliance is in demonstration mode. 1. Press the 2 button. 2. Press and hold the ` button for 3 seconds. The demonstration mode is deactivated. The appliance switches off shortly after starting. Error message "H95" appears in the display. The door is not properly closed. Open the door again and close it properly, if this does not help, contact the afterĆsales service. Error message "E723" appears in the display. The door is not properly closed. Open and close the appliance with the ^ button. Error message "Er1" appears in the display. The temperature sensor is faulty. Call the afterĆsales service. Error message "Er11" appears in the display. "Button is jammed" The buttons are dirty or the mechanics have jammed. Press all the buttons several times. Clean the buttons with a dry cloth. Open and close the appliance door. If this does not help, consult the afterĆsales service. Error message "Er4" appears in the display. There is extreme overheating (possibly a fire inside). Microwave power setting too high. Do not open the door. Disconnect from the mains or switch off the fuse in the fuse box and allow to cool down. Error message "Er18" appears in the display. Technical fault. Call the afterĆsales service. Risk of electric shock. Incorrect repairs are dangerous. Repairs may only be carried out by one of our trained afterĆsales engineers. d
  • 37. 37 AfterĆsales service Our afterĆsales service is there for you if your appliance should need to be repaired. You will find the address and telephone number of your nearest afterĆsales service point in the phone book. The listed afterĆsales service centres will also be pleased to give you the details of an afterĆsales service point near you. Please quote the E number (product number) and the FD number (production number) of your appliance when contacting the afterĆsales service. The rating plate bearing these numbers can be found on the right hand side after opening the appliance door. You can make a note of the number of your appliance and the telephone number of the afterĆsales service in the space below to save time should it be required. E no. FD no. AfterĆsales service % Please note that a visit from an afterĆsales service engineer is not free of charge, even during the warranty period. E number and FD number
  • 38. 38 Power supply 220Ć240 V, 50 Hz Maximum total connected load 1,990 W Microwave power setting 900 W (IEC 60705) Microwave frequency 2,450 MHz Grill 1,300 W Fuse min. 10 A Dimensions (HxWxD) Ć appliance 38.2 x 59.4 x 31.9 cm Ć cooking compartment 22.0 x 35.0 x 27.0 cm VDE approved Yes CE mark Yes This appliance complies with standard EN 55011 or CISPR 11. It is a group 2, class B product. Group 2 means that microwaves are produced for the purpose of heating food. Class B indicates that the appliance is suitable for domestic use. Technical data
  • 39. 39 EnvironmentallyĆfriendly disposal Dispose of packaging in an environmentallyĆfriendly manner. This appliance is labelled in accordance with European Directive 2002/96/EU on Waste Electrical and Electronic Equipment Ć WEEE. The directive gives a framework for the collection and recycling of old appliances, which is valid across the EU. Dishes tested for you in our cooking studio Here you will find a selection of dishes and the ideal settings for them. We will show you which type of heating and which temperature or microwave power setting are ideal for your dish. You can find information about suitable accessories and there are tips about cookware and preparation. Notes The values in the table always apply to dishes placed in a cold and empty cooking compartment. Only preheat the appliance if this is specified in the tables. Before use, remove any accessories from the cooking compartment that you will not be using. The times specified in the tables are only guidelines. They depend on the quality and consistency of the food. Use the accessories supplied. Additional accessories may be obtained from specialist retailers or from the afterĆsales service. Always use an oven cloth or oven gloves when taking accessories or cookware out of the cooking compartment. ó
  • 40. 40 The following tables provide you with numerous options and settings for the microwave. The times specified in the tables are only guidelines. They may vary according to the ovenware used, the quality, temperature and consistency of the food. Time ranges are often specified in the tables. Set the shortest time first and then extend the time if necessary. It may be that you have different quantities from those specified in the tables. A rule of thumb can be applied: Double amount - just under double cooking time, half amount - half the cooking time. Stir or turn the food several times during the heating time. Check the temperature. Place the frozen food in an open container on the cooking compartment floor. Turn or stir the food once or twice during the defrosting time. Large pieces of food should be turned several times. Liquid will be produced when defrosting meat, poultry or fish. Drain off this liquid when turning and under no circumstances should it be used for other purposes or be allowed to come into contact with other foods. Leave defrosted items to stand at room temperature for a further 10 to 30 minutes so that the temperature can stabilise. The giblets can be removed from poultry at this point. Defrosting, heating up and cooking with the microwave Defrosting
  • 41. 41 Amount Microwavesetting in watts Timeinminutes Notes Whole joints of meat e.g. beef, pork or veal (with or without bones) 800 g 1,000 g 1,500 g 180 W, 15 min. + 90 W, 15 Ć 25 min. 180 W, 20 min. + 90 W, 20 Ć 30 min. 180 W, 25 min. + 90 W, 25 Ć 35 min. Turn several times. Diced or sliced beef, pork and veal 200 g 500 g 800 g 180 W, 5 Ć 8 min. + 90 W, 5 Ć 10 min. 180 W, 8 Ć 11 min. + 90 W, 10 Ć 15 min. 180 W, 12 Ć 15 min. + 90 W, 15 Ć 20 min. Separate the parts when turning. Mixed minced meat 200 g 500 g 800 g 180 W, 2 min. + 90 W, 5 Ć 10 min. 180 W, 6 min. + 90 W, 8 Ć 13 min. 180 W, 10 min. + 90 W, 15 Ć 20 min. Freeze flat if possible. Turn several times during defrosting and remove meat which has already been defrosted. Poultry or poultry portions 600 g 1,200 g 180 W, 8 min. + 90 W, 10 Ć 15 min. 180 W, 15 min. + 90 W, 20 Ć 25 min. Turn several times. Fish fillet, fish steak, slices 400 g 180 W, 5 min. + 90 W, 10 Ć 15 min. Separate defrosted items. Whole fish 300 g 600 g 180 W, 3 min. + 90 W, 10 Ć 15 min. 180 W, 8 min. + 90 W, 15 Ć 25 min. Turn half way through. Vegetables e.g. peas 300 g 180 W, 10 Ć 15 min. Fruit e.g.raspberries 300 g 500 g 180 W, 6 Ć 9 min. 180 W, 8 min. + 90 W, 5 Ć 10 min. Stir carefully during defrosting and separate the defrosted parts. Butter 125 g 250 g 180 W, 1 min. + 90 W, 1 Ć 2 min. 180 W, 1 min. + 90 W, 2 Ć 4 min. Remove all the packaging. Whole loaf 500 g 1,000 g 180 W, 8 min. + 90 W, 5 Ć 10 min. 180 W, 12 min. + 90 W, 10 Ć 20 min. Turn half way through. Dry cakes e.g. creaming method cakes 500 g 750 g 90 W, 10 Ć 15 min. 180 W, 5 min. + 90 W, 10 Ć 15 min. Separate the pieces of cake when turning them. Only for cakes without icing, cream or crème pâtissière. Juicy cakes e.g. fruit cake and quark cake 500 g 750 g 180 W, 5 min. + 90 W, 15 Ć 20 min. 180 W, 7 min. + 90 W, 15 Ć 20 min. Only for cakes without icing or gelatine.
  • 42. 42 Always place the ovenware on the cooking compartment floor. Always cover the food. If you do not have a suitable cover for your container, use a plate or special microwave foil. Take ready meals out of the packaging. They will heat up more quickly and evenly in microwaveable ovenware. The different components of the meal may not require the same amount of time to heat up. Food which lies flat will cook more quickly than food which is piled high. You should therefore distribute the food so that it is as flat as possible in the container. Stir or turn the food two or three times during the defrosting, heating or cooking time. After heating, allow the food to rest for a further 2 Ć 5 minutes until it reaches an even temperature. This will help the food retain its own distinct taste, so it will require less seasoning. Amount Microwave setting in watts Time in minutes Notes Menu, plated meal, readyĆmade meals in 2 to 3 parts 300Ć400g 600 W, 8 Ć 13 min. Soups 400 g 600 W, 8 Ć 12 min. Stews 500 g 600 W, 10 Ć 15 min. Meat in sauce e.g. goulash 500 g 600 W, 10 Ć 15 min. Separate the pieces of meat when stirring. Fish, e.g. fillets 400 g 600 W, 10 Ć 15 min. You may add water, lemon juice or wine. Bakes e.g. lasagne and cannelloni 450 g 600 W, 10 Ć 15 min. Side dishes rice and pasta 250 g 500 g 600 W, 3 Ć 7 min. 600 W, 8 Ć 12 min. Add a little liquid. Defrosting, heating up or cooking frozen food
  • 43. 43 NotesMicrowave setting in watts Time in minutes Amount Vegetables e.g. peas, broccoli and carrots 300 g 600 g 600 W, 7 Ć 11 min. 600 W, 14 Ć 17 min. Add water to cover the base of the dish. Creamed spinach 450 g 600 W, 10 Ć 15 min. Cook without adding any water. Always place the ovenware on the cooking compartment floor. Always cover the food. If you do not have a suitable cover for your container, use a plate or special microwave foil. Take readyĆtoĆeat meals out of the packaging. They will heat up more quickly and evenly in microwaveable ovenware. The different components of the meal may not require the same amount of time to heat up . When heating liquids, always place a spoon in the container to prevent delayed boiling. When delayed boiling occurs, this means that the liquid reaches boiling temperature without the usual steam bubbles rising to the surface. Even if the container only vibrates a little, the hot liquid can suddenly boil over or spatter. This can cause injuries and burns. Stir or turn the food several times during the heating time. Check the temperature. After heating, allow the food to rest for a further 2 to 5 minutes until it reaches an even temperature. Heating food d
  • 44. 44 Amount Microwave settings in watts Time in minutes Notes Menu, plated meal, readyĆmade meals in two to three parts 600 W, 5 Ć 8 min. Drinks 125 ml 200 ml 500 ml 900 W, ½ Ć 1 min. 900 W, 1 Ć 2 min. 900 W, 3 Ć 4 min. Place a spoon in the container. Do not overheat alcoholic drinks. Check during heating. Baby food e.g. baby's bottles 50 ml 100 ml 200 ml 360 W, ½ min. 360 W, ½ Ć 1 min. 360 W, 1 Ć 2 min. Without the lid or teat. Always shake well after heating. You must check the temperature. Soup 1 bowl 2 bowls 175 g 350 g 600 W, 1 Ć 2 min. 600 W, 2 Ć 3 min. Meat in sauce 500 g 600 W, 7 Ć 10 min. Separate slices of meat. Stew 400 g 800 g 600 W, 5 Ć 7 min. 600 W, 7 Ć 8 min. Vegetables1 portion 2 portions 150 g 300 g 600 W, 2 Ć 3 min. 600 W, 3 Ć 5 min.
  • 45. 45 Food which lies flat will cook more quickly than food which is piled high. You should therefore distribute the food so that it is as flat as possible in the container. Cook the food in covered ovenware. Food should be stirred or turned during cooking. This will help the food retain its own distinct taste, so it will require less seasoning. After cooking, allow the food to rest for a further 2 to 5 minutes until it reaches an even temperature. Quantity Microwave power setting in W and duration in minutes Notes Whole chicken, fresh without giblets 1,200 g 600 W, 25 Ć 30 mins Turn halfway through the cooking time. Fish fillet, fresh 400 g 600 W, 7 Ć 12 mins Vegetables, fresh 250 g 500 g 600 watts, 5 Ć 10 mins 600 watts, 10 Ć 15 mins Cut vegetables into pieces of equal size. Add 1 Ć 2 tbsp water per 100 g of vegetables. Side dishes, e.g. Potatoes Rice 250 g 500 g 750 g 125 g 250 g 600 W, 8 Ć 10 mins 600 W, 10 Ć 15 mins 600 W, 15 Ć 22 mins 600 W, 4 Ć 6 + 180 W 14 Ć 16 mins 600 W, 6 Ć 8 + 180 W 14 Ć 16 mins Cut potatoes into equal sized pieces. Add 1 Ć 2 tbsp water per 100 g, stir. Add double the amount of liquid. Desserts, e.g. Custard (instant) Fruit, compote 500 ml 500 g 600 W, 5 Ć 7 mins 600 W, 9 Ć 12 mins Uncovered dish Stir the custard thoroughly 2 to 3 times during cooking using an egg whisk. Cooking food
  • 46. 46 No settings are given for specified amounts of food. Increase or decrease the cooking times according to the following rule of thumb: Double the amount = almost double the time Half the amount = half the time The food becomes too dry. Set a shorter cooking time next time or select a lower microwave setting. Cover the food and add more liquid. After the time has elapsed, the food is not defrosted, is not hot or is not cooked. Set a longer time. Larger amounts and deeper dishes take longer to cook. At the end of the cooking time, the food is overcooked on the outside but undercooked in the middle. Stir the food during the cooking time and next time select a lower setting and a longer duration. After defrosting, the poultry or meat is cooked on the outside but still frozen in the middle. Next time select a lower microwave setting. In addition, turn large amounts of meat or poultry frequently when defrosting. Always grill on the wire rack with the cooking compartment door closed and do not preheat. All the values given are guidelines and can vary depending on the properties of your food. Rinse meat in cold water and dab it dry with kitchen towel. Do not add salt to the meat until it has been grilled. Place the wire rack on the glass pan so that it catches the meat juices. Use tongs to turn the pieces of food you are grilling. If you pierce the meat with a fork, the juices will run out and it will become dry. Tips for microwave operation Grilling table
  • 47. 47 Dark meat, e.g. beef, browns more quickly than lighterĆcoloured meat such as veal or pork. Do not let this worry you. When grilling lightĆcoloured meat or fish fillets, these often only brown slightly on the surface, although they are cooked and juicy on the inside. Quantity Weight Grill setting Time in minutes Notes Neck steaks 3 Ć 4 pieces approx. 120 g each high 1st side: approx. 15 minutes 2nd side: approx. 10 Ć 15 minutes 1 Ć 2 cm thick Grilled sausages 4 Ć 6 pieces approx. 150 g each high 1st side: approx. 5 Ć 10 minutes 2nd side: approx. 7 Ć 12 minutes Fish steak 2 Ć 3 pieces approx. 150 g each high 1st side: approx. 10 minutes 2nd side: approx. 8 Ć 12 minutes Grease the wire rack with oil before grilling. Fish, whole e.g. trout 2 Ć 3 pieces approx. 150 g each medium 1st side: approx. 10 minutes 2nd side: approx. 10 Ć 15 minutes Grease the wire rack with oil before grilling. PreĆtoasting bread 2 Ć 6 slices high 1st side: approx. 3 Ć 4 minutes 2nd side: approx. 3 Ć 4 minutes Toast with topping 2 Ć 6 slices medium or high Depending on topping: approx. 5 Ć 9 minutes Set the first time using the rotary knob. Turn the food and then set the time for the second side.
  • 48. 48 Use a highĆsided dish for roasting. This keeps the cooking compartment cleaner. Use large flat ovenware for bakes and gratins. Food takes longer to cook in narrow, deep containers and browns more on top. Check that your ovenware fits in the cooking compartment. It should not be too big. Always set the maximum cooking time. Check the food after the shorter time specified. Leave the meat to rest for another 5 Ć 10 minutes before cutting it. This allows the meat juices to be distributed evenly so that they do not run out when the meat is cut. Bakes and gratins should be left to cook in the appliance for a further 5 minutes after the appliance has been switched off. Use the wire rack to place the ovenware on. Combined grill and microwave
  • 49. 49 Quantity Weight Microwavepower setting in watts Grillsetting Cookingtimein minutes Notes Roast pork, e.g. neck of pork Approx. 750 g 360 W low 35 Ć 40 mins Turn after approx. 15 minutes. Meat loaf max. 7 cm deep Approx. 750 g 360 W medium Approx. 25 mins* Chicken, halved Approx. 1200 g 360 W high 40 mins Chicken portions, e.g. chicken quarters Approx. 800 g 360 W medium 20 Ć 25 mins Place with the skin side up. Do not turn. Duck breast Approx. 800 g 180 W high 25 Ć 30 mins Place with the skin side up. Do not turn. Pasta bake (using preĆcooked ingredients) Approx. 1000 g 360 W low 25 Ć 30 mins Sprinkle with cheese. Potato gratin (made from raw potatoes) max. 3 cm deep Approx. 1000 g 360 W medium Approx. 35 mins* Fish, scalloped Approx. 500 g 360 W high 15 mins Defrost frozen fish before cooking. Quark soufflé max. 5 cm deep Approx. 1000 g 360 W low 20 Ć 25 mins
  • 50. 50 Test dishes in accordance with EN 60705 The quality and correct operation of microwave appliances are tested by testing institutes using the following dishes. Dish Microwave power setting in W, cooking time in minutes Notes Custard, 1,000 g 600 W, 11 Ć 12 mins + 180 W, 8 Ć 10 mins Pyrex dish Sponge, 475 g 600 W, 7 Ć 9 mins Pyrex dish, dia. 22 cm Meat loaf, 900 g 600 W, 25 Ć 30 mins Square Pyrex dish*, 28 cm long * Use the wire rack to place the cookware on. Dish Microwave power setting in W, cooking time in minutes Notes Meat, 500 g Programme 1, 500 g or 180 W, 8 mins + 90 W 7 Ć 10 mins Pyrex dish, dia. 24 cm Dish Microwave power setting in W, grill setting, cooking time in minutes Notes Potato gratin, 1,100g 360 W, + grill setting II, 25 Ć 30 mins Round Pyrex dish, dia. 22 cm Cake Ć Not recommended Chicken, halved approx. 1,100 g 360 W, + grill setting III, 40 Ć 45 mins Wire rack, glass pan Solo microwave cooking Solo microwave defrosting Microwave and grill cooking
  • 51. Para disfrutar de la cocina tanto como de la comida, recomendamos leer las presentes instrucciones de uso. Sólo así podrá sacar el máximo partido a la tecnología de su aparato microondas. Además, se incluyen notas importantes en materia de seguridad. Conocerá en detalle todas las partes de su nuevo aparato. Aprenderá a realizar los ajustes paso a paso. Todo de forma muy sencilla. En las tablas podrá consultar los valores de ajuste necesarios para preparar los platos más habituales. Todos estos platos han sido probados en nuestro estudio de cocina. En caso de que surja alguna incidencia, aquí figuran las informaciones necesarias para solucionar las pequeñas averías. El indice detallado facilita la búsqueda de la información deseada. Buen provecho.
  • 52. Contenido 52 Consejos y advertencias de seguridad 54. . . . . . . . Antes del montaje 54. . . . . . . . . . . . . . . . . . . . . . . . . . . . Consejos y advertencias sobre seguridad 54. . . . . . . . Consejos y advertencias sobre el microondas 57. . . . Causas de los daños 59. . . . . . . . . . . . . . . . . . . . . . . . . Su nuevo aparato 60. . . . . . . . . . . . . . . . . . . . . . . . . . . Panel de mando 60. . . . . . . . . . . . . . . . . . . . . . . . . . . . . Teclas e indicadores 61. . . . . . . . . . . . . . . . . . . . . . . . . . Accesorios 62. . . . . . . . . . . . . . . . . . . . . . . . . . . . . . . . . . Compartimento de cocción 62. . . . . . . . . . . . . . . . . . . . Encender y apagar el aparato 63. . . . . . . . . . . . . . . . Antes del primer uso 64. . . . . . . . . . . . . . . . . . . . . . . . Ajustar la hora 64. . . . . . . . . . . . . . . . . . . . . . . . . . . . . . . Calentar el compartimento de cocción 65. . . . . . . . . . Limpieza de los accesorios 65. . . . . . . . . . . . . . . . . . . . El microondas 66. . . . . . . . . . . . . . . . . . . . . . . . . . . . . . Consejos y advertencias de los recipientes 66. . . . . . . Niveles de potencia del microondas 67. . . . . . . . . . . . . Programar el microondas 67. . . . . . . . . . . . . . . . . . . . . Funcionamiento secuencial 1,2,3 69. . . . . . . . . . . . . Programar el funcionamiento secuencial 69. . . . . . . . . Asar al grill 71. . . . . . . . . . . . . . . . . . . . . . . . . . . . . . . . . Programar el grill 71. . . . . . . . . . . . . . . . . . . . . . . . . . . . . Funcionamiento MicroCombi 73. . . . . . . . . . . . . . . . Programar el MicroCombi 73. . . . . . . . . . . . . . . . . . . . .
  • 53. Contenido 53 Programa automático 74. . . . . . . . . . . . . . . . . . . . . . . Seleccionar el programa 74. . . . . . . . . . . . . . . . . . . . . . Consejos y advertencias sobre el programa automático 76. . . . . . . . . . . . . . . . . . . . . . . . . Memoria 80. . . . . . . . . . . . . . . . . . . . . . . . . . . . . . . . . . . Guardar configuraciones en la memoria 80. . . . . . . . . Activar memoria 81. . . . . . . . . . . . . . . . . . . . . . . . . . . . . Modificar los ajustes básicos 82. . . . . . . . . . . . . . . . Ajustes básicos 82. . . . . . . . . . . . . . . . . . . . . . . . . . . . . . Cuidados y limpieza 83. . . . . . . . . . . . . . . . . . . . . . . . Productos de limpieza 83. . . . . . . . . . . . . . . . . . . . . . . . ¿Qué hacer en caso de avería? 85. . . . . . . . . . . . . . . Servicio de Asistencia Técnica 87. . . . . . . . . . . . . . . Datos técnicos 88. . . . . . . . . . . . . . . . . . . . . . . . . . . . . . Eliminación de residuos respetuosa con el medio ambiente 89. . . . . . . . . . . . . . . . . . . . . . Platos probados en nuestro estudio de cocina 89 Descongelar, calentar y cocer con el microondas 90. Consejos prácticos para usar el microondas 96. . . . . . Asado al grill 97. . . . . . . . . . . . . . . . . . . . . . . . . . . . . . . . Grill con microondas combinado 98. . . . . . . . . . . . . . . Comidas normalizadas según EN 60705 100. . . . . .
  • 54. 54 d Consejos y advertencias de seguridad Le recomendamos leer con atención las siguientes instrucciones de uso. Solo así se puede manejar el aparato de forma correcta y segura. Conservar las instrucciones de uso y montaje. En caso de traspasar el aparato debe incluirse el manual correspondiente. Al desembalar el aparato, debe comprobarse su estado. El aparato no debe conectarse en caso de haber sufrido daños durante el transporte. La conexión del aparato debe realizarse exclusivamente por un técnico especialista autorizado. La garantía no cubre los daños que se produzcan como consecuencia de una conexión incorrecta del aparato. Tener en cuenta las instrucciones especiales de montaje. Este aparato ha sido diseñado exclusivamente para su uso doméstico. Utilizar el aparato únicamente para la preparación de alimentos y bebidas. Los niños y adultos no deben manejar el aparato sin vigilancia H en caso de que sufran alguna disminución de sus capacidades físicas o mentales, o H en caso de que no tengan los conocimientos o la experiencia suficiente para manejar el aparato de forma correcta y segura. No dejar que los niños jueguen con el aparato. Antes del montaje Daños derivados del transporte Conexión eléctrica Instalación y conexión Consejos y advertenciassobre seguridad
  • 55. 55 ¡Peligro de quemaduras! No tocar las superficies calientes de los aparatos calefactores y de cocción. No tocar las superficies interiores calientes del compartimento de cocción ni los elementos calefactores. Abrir la puerta del compartimento de cocción con cuidado. Puede salir vapor caliente. Mantener alejados especialmente a los niños pequeños. ¡Peligro de incendio! No introducir objetos inflamables en el compartimento de cocción. No abrir la puerta en caso de que salga humo del aparato. Apagar el aparato. Extraer el enchufe o desconectar el fusible de la caja de fusibles. ¡Peligro de cortocircuito! No fijar cables de conexión de aparatos eléctricos a la puerta caliente del compartimento de cocción. El aislante del cable puede derretirse. ¡Peligro de quemaduras! No preparar comidas utilizando grandes cantidades de bebidas alcohólicas de alta graduación. Los vapores del alcohol pueden incendiarse en el compartimento de cocción. Utilizar bebidas alcohólicas de alta graduación solo en pequeñas dosis y abrir la puerta del compartimento de cocción con cuidado. ¡Peligro de quemaduras! No extraer los accesorios calientes del aparato sin utilizar agarradores. ¡Peligro de riesgos importantes para la salud! No utilizar el aparato si la puerta o la junta de la puerta del compartimento de cocción está dañada. Puede producirse un escape de energía de microondas. El aparato puede volverse a utilizar una vez se haya reparado. Compartimento de cocción caliente Accesorios calientes Puerta o junta de la puerta del compartimento de cocción deteriorada
  • 56. 56 ¡Peligro de riesgos importantes para la salud! Si la superficie del aparato no se limpia correctamente puede oxidarse con el paso del tiempo. Puede producirse un escape de energía de microondas. Limpiar el aparato con regularidad. ¡Peligro de descarga eléctrica! No retirar la carcasa del aparato. El aparato funciona con alta tensión. ¡Peligro de riesgos importantes para la salud! No retirar la carcasa del aparato. Evita escapes de energía de microondas. ¡Peligro de cortocircuito! No exponer el aparato a fuentes intensas de calor y humedad. ¡Peligro de descarga eléctrica! Las reparaciones inadecuadas son peligrosas. Únicamente los técnicos de nuestro Servicio de Asistencia Técnica debidamente instruidos están autorizados para realizar reparaciones y cambiar el cable de suministro de electricidad. No abrir nunca la carcasa del aparato. El aparato funciona con alta tensión. La carcasa evita escapes de energía de microondas. En caso de que el aparato esté defectuoso, desconectar el fusible de la caja de fusibles o desenchufar el aparato. Ponerse en contacto con el Servicio de Asistencia Técnica. Superficies oxidadas Carcasa abierta Entorno caliente o húmedo Reparaciones inadecuadas
  • 57. 57 ¡Peligro de incendio! Utilizar el microondas exclusivamente para la preparación de alimentos apropiados para el consumo. Otras aplicaciones pueden resultar peligrosas y ocasionar daños. Por ejemplo, en caso de calentar almohadillas rellenas de semillas o granos, estas pueden incendiarse incluso al cabo de unas horas. ¡Peligro de lesiones! Los recipientes de porcelana o cerámica pueden presentar finos orificios en asas y tapas. Estos orificios ocultan huecos. La posible humedad que haya penetrado en estos huecos puede hacer estallar el recipiente. No utilizar recipientes que no sean aptos para el microondas. ¡Peligro de quemaduras! Los alimentos calientes pueden calentar el recipiente. Extraer siempre los recipientes o accesorios del compartimento de cocción con un agarrador. ¡Peligro de incendio! No programar el microondas a una potencia o duración demasiado elevadas. Los alimentos pueden incendiarse y dañar el aparato. Seguir las indicaciones de estas instrucciones de uso. ¡Peligro de incendio! No calentar alimentos en envases de conservación del calor. No calentar sin vigilancia alimentos en recipientes de plástico, papel u otros materiales inflamables. ¡Peligro de quemaduras! Los envoltorios sellados de algunos alimentos pueden estallar. Seguir las indicaciones del envoltorio o envase. Extraer siempre los platos con un agarrador. Consejos y advertenciassobre el microondas Preparación de alimentos Recipientes Potencia y tiempo del microondas Envases y envoltorios
  • 58. 58 ¡Peligro de quemaduras! Al calentar líquidos puede producirse un retardo de ebullición, Esto quiere decir que se puede alcanzar la temperatura de ebullición sin que aparezcan las burbujas de vapor habituales. Un ligero movimiento del recipiente es suficiente para hacer que el líquido caliente empiece de repente a hervir y salpicar intensamente. Al calentar líquidos introducir siempre una cuchara en el recipiente. De este modo se evitan los retardos de ebullición. ¡Peligro de explosión! No calentar nunca líquidos u otros alimentos en recipientes tapados. No calentar bebidas alcohólicas a temperaturas demasiado elevadas. ¡Peligro de quemaduras! No calentar alimentos para bebés en recipientes tapados. Retirar siempre la tapa o la tetina. Remover o agitar bien tras el calentamiento. De este modo, el calor se reparte uniformemente. Controlar la temperatura antes de alimentar al bebé. ¡Peligro de quemaduras! No cocer huevos con cáscara. No calentar huevos duros. Pueden reventar incluso una vez finalizado el funcionamiento del microondas. Esto también es aplicable a los crustáceos. Con huevos fritos o huevos pasados por agua debe pincharse previamente la yema. Bebidas Alimentos para bebés Alimentos con cáscara o piel
  • 59. 59 En caso de alimentos con piel dura, como p. ej. manzanas, tomates, patatas o salchichas, la piel puede reventar. Antes de calentar, pinchar la cáscara o la piel. ¡Peligro de incendio! No secar alimentos con el microondas. ¡Peligro de incendio! Los alimentos con poco contenido en agua, como p. ej. el pan, no se deben descongelar o calentar a demasiada potencia o durante demasiado tiempo. ¡Peligro de incendio! No calentar aceite de mesa con el microondas. No derramar agua en el compartimento de cocción caliente. Se formará vapor de agua. El cambio de temperatura puede ocasionar daños en la placa base de cerámica. Dejar enfriar el compartimento de cocción únicamente con la puerta cerrada. No fijar nada a la puerta del aparato. Incluso aunque solo quede una rendija de la puerta abierta, los muebles contiguos podrían dañarse con el tiempo. Si la junta presenta mucha suciedad, la puerta del aparato no se cerrará correctamente. Los frontales de los muebles contiguos pueden deteriorarse. Mantener siempre limpia la junta. Encender el horno solo si previamente se han introducido alimentos en el compartimento de cocción. El aparato podría sobrecargarse sin alimentos. En todo caso se permite una prueba breve de la vajilla (véanse las indicaciones relativas a los recipientes). Secar alimentos Alimentos con poco contenido en agua Aceite de mesa Causas de los daños Agua en el compartimento de cocción caliente Enfriar con la puerta abierta Junta muy sucia Funcionamiento del microondas sin alimentos
  • 60. 60 Su nuevo aparato Aquí conocerá a su nuevo aparato. En este capítulo se explica el panel de mando y sus elementos individuales. Asimismo, se proporciona información sobre el compartimento de cocción y los accesorios. Le presentamos una vista general del panel de mando. Los elementos pueden variar según el modelo de aparato. Indicador Selector giratorio Teclas Potencias del microondas Tecla de funcionamiento secuencial Tecla on/off El selector giratorio es retráctil. Para enclavar o desenclavar el selector giratorio, presionarlo. Debajo de cada tecla hay sensores. No pulsar la superficie con fuerza. Pulsar sólo el símbolo correspondiente. Excepción: La tecla Func secuencial y las teclas para los niveles de potencia del microondas son teclas normales de pulsado. Panel de mando Selector giratorio Teclas
  • 61. 61 Las teclas sirven para configurar distintas funciones adicionales. En el indicador se muestran los valores configurados. Símbolo Función de la tecla % Encender y apagar el aparato 90 Seleccionar la potencia del microondas de 90 W 180 Seleccionar la potencia del microondas de 180 W 360 Seleccionar la potencia del microondas de 360 W 600 Seleccionar la potencia del microondas de 600 W 900 Seleccionar la potencia del microondas de 900 W 2 Seleccionar el funcionamiento secuencial ( Seleccionar el grill 0 Abrir y cerrar el menú de funciones de tiempo g / h Seleccionar la memoria ` Seleccionar un programa f Seleccionar el peso ^ Abrir la puerta del aparato n Pulsación breve = iniciar/interrumpir el funcionamiento Pulsación larga = cancelar el funcionamiento Consejos y advertencias En el indicador, los corchetes [ ] indican el símbolo correspondiente a la función de tiempo en primer plano. Excepción: el símbolo 0 de la hora sólo se ilumina cuando se modifica. Al pulsar la tecla start se ilumina la lámpara del compartimento de cocción. Teclas e indicadores
  • 62. 62 Su aparato está equipado con los siguientes accesorios: Parrilla como superficie para colocar la vajilla o para asar al grill y gratinar. Bandeja de vidrio Sirve de protección contra salpicaduras cuando se asan los alimentos al grill directamente sobre la parrilla. Para ello, colocar la parrilla en la bandeja de vidrio. La bandeja de vidrio puede utilizarse también como vajilla para el funcionamiento del microondas. El aparato está equipado con un ventilador. El ventilador puede seguir funcionando aunque ya se haya desconectado el aparato. Consejos y advertencias Durante el funcionamiento del microondas, el compartimento de cocción permanece frío. El ventilador se activa igualmente. Puede seguir funcionando incluso si el microondas ya no está en funcionamiento. Puede aparecer agua condensada en la ventana de la puerta, en las paredes interiores y en la base. Se trata de algo normal y el funcionamiento del microondas no se ve perjudicado. Limpie el agua condensada tras la cocción. Accesorios Compartimentode cocción Ventilador
  • 63. 63 Encender y apagar el aparato El microondas se enciende y se apaga con la tecla %. Pulsar la tecla %. Seleccionar el modo de funcionamiento deseado. H Tecla 90, 180, 360, 600 o 900 W para la potencia del microondas H Tecla 2 = funcionamiento secuencial H Tecla ( = grill H Teclas ` y f = programa automático H Teclas g o h = programa de la memoria Consultar los capítulos individuales para más información sobre el modo de programar. Pulsar la tecla %. El aparato se apaga; la hora se muestra en el indicador. Encender Apagar
  • 64. 64 Antes del primer uso A continuación se indican los pasos que deben seguirse antes de utilizar el microondas por primera vez. Leer antes el capítulo Consejos y advertencias de seguridad. Tras la conexión, en el indicador se ilumina el símbolo [0] y se muestran cuatro ceros. Ajustar la hora. 1. Ajustar la hora actual con el mando giratorio. 2. Pulsar la tecla 0. Se ha configurado la hora. Es posible ocultar la hora. De este modo, sólo se mostrará cuando el horno esté en funcionamiento. Consultar al respecto el capítulo Modificar los ajustes básicos. Nota Para reducir el consumo cuando el aparato está en el modo "stand by" se puede ocultar la indicación de la hora. Para obtener más información, consultar el capítulo Modificar los ajustes básicos. Ajustar la hora Ocultar la hora
  • 65. 65 A fin de eliminar el olor a aparato nuevo, calentar el compartimento de cocción vacío y con la puerta cerrada. Comprobar que no haya restos del embalaje en el compartimento de cocción. Calentar el compartimento de cocción durante 10 minutos con el grill ( nivel 3. 1. Pulsar la tecla %. 2. Pulsar la tecla (. En el indicador se muestran Grill, nivel 3 y 10:00 minutos. 3. Pulsar la tecla n. Se inicia el funcionamiento. El símbolo n se ilumina. Transcurridos 10 minutos apagar el aparato con la tecla %. Antes de utilizar los accesorios por primera vez, limpiarlos a fondo con agua caliente, un poco de jabón y un paño de limpieza suave. Calentar el compartimentode cocción Limpieza de los accesorios
  • 66. 66 El microondas Las microondas se transforman en calor dentro de los alimentos. Se puede utilizar únicamente el microondas o combinado con el grill. Le presentamos toda información necesaria sobre recipientes y sobre cómo programar el microondas. Nota En el capítulo Platos probados en nuestro estudio de cocina encontrará ejemplos sobre cómo descongelar, calentar y cocinar con microondas. Son adecuados los recipientes resistentes al calor de vidrio, vitrocerámica, porcelana, cerámica o plástico resistente al cambio de temperatura. Estos materiales dejan pasar las microondas. También puede utilizar recipientes para servir. Así no tiene que trasvasar los alimentos. Utilizar recipientes con decoración dorada o plateada sólo si el fabricante garantiza que son aptos para microondas. Los recipientes de metal no son aptos. El metal no deja pasar las microondas. La comida en recipientes de metal cerrados no se calienta ¡Atención! Los metales Ć p. ej., la cuchara en un vaso Ć deben estar separados al menos 2 cm de las paredes del horno y de la parte interior de la puerta del horno. La formación de chispas podría destruir el vidrio interior de la puerta del aparato. No encienda nunca el microondas sin alimentos en su interior, con excepción de la prueba de la vajilla siguiente. Consejos y advertencias de los recipientes Recipientes apropiados Recipientes no adecuados Prueba de la vajilla
  • 67. 67 Si no está seguro de si su recipiente es adecuado para el microondas, efectúe el siguiente test: Introducir el recipiente vacío en el aparato durante ½ hasta 1 minuto a la potencia máxima. Comprobar continuamente la temperatura. El recipiente debería estar frío o templado. Si se calienta o se generan chispas, no es adecuado para el microondas. Con las teclas ajustar la potencia del microondas deseada. 90 W para descongelar alimentos delicados 180 W para descongelar y continuar la cocción 360 W para cocer carne y para calentar alimentos delicados 600 W para calentar y cocer alimentos 900 W para calentar líquidos Al pulsar una tecla se ilumina la potencia seleccionada. Nota La potencia del microondas 900 W sólo se podrá ajustar para un máximo de 30 minutos. En el resto de potencias se podrán ajustar programas con una duración del ciclo de cocción de hasta 90 minutos. Ejemplo: potencia del microondas 360 W, duración del ciclo de cocción 17 minutos. 1. Pulsar la tecla %. El aparato está listo para su funcionamiento. 2. Pulsar el botón del nivel de potencia del microondas deseada. En el indicador se ilumina la potencia y se muestra una duración recomendada. 3. Programar la duración del ciclo de cocción con el mando giratorio. Niveles de potencia del microondas Programar el microondas
  • 68. 68 4. Pulsar la tecla n. Se inicia el funcionamiento. Se muestra el transcurso del tiempo programado. Suena una señal. El funcionamiento del microondas ha finalizado. La señal se puede apagar con la tecla 0. Apagar el aparato con la tecla %. El funcionamiento se interrumpe. Tras cerrar la puerta, pulsar brevemente la tecla n. El programa continua. Se puede realizar en cualquier momento. Modificar la duración del ciclo de cocción con el mando giratorio. Pulsar la tecla para el nuevo nivel de potencia del microondas. Programar la duración del ciclo de cocción con el mando giratorio y volver a iniciar. Pulsar la tecla n y apagar el aparato con la tecla %. Consejos y advertencias Cuando el aparato se enciende con la tecla %, en el indicador se recomienda siempre la potencia máxima del microondas. El ventilador sigue funcionando aunque se abra la puerta del aparato. La duración del ciclo de cocción ha transcurrido Abrir la puerta del aparato durante el funcionamiento Modificar la duración del ciclo de cocción Modificar la potencia del microondas Cancelar el funcionamiento
  • 69. 69 Funcionamiento secuencial 1,2,3 En el funcionamiento secuencial se pueden ajustar hasta tres potencias diferentes y tiempos consecutivos en el microondas y, a continuación, iniciar el funcionamiento. El grill también se puede activar a las potencias del microondas. Utilizar siempre un recipiente resistente al calor y apto para el microondas. 1. Pulsar la tecla %. El aparato está listo para su funcionamiento. 2. Pulsar la tecla 2. En el indicador se muestra el símbolo ª del primer funcionamiento secuencial. 3. Programar el primer nivel de potencia del microondas y la duración del ciclo de cocción. 4. Pulsar la tecla 2. Se muestra el símbolo « del segundo funcionamiento secuencial. 5. Programar el segundo nivel de potencia del microondas y la duración del ciclo de cocción. 6. Pulsar la tecla 2. Se muestra el símbolo ¬ del tercer funcionamiento secuencial. 7. Programar el tercer nivel de potencia del microondas y la duración del ciclo de cocción. 8. Pulsar la tecla n. Se inicia el funcionamiento. En el indicador se muestran la duración total y el símbolo ª del primer funcionamiento secuencial. Recipientes Programar el funcionamiento secuencial
  • 70. 70 Suena una señal. El funcionamiento secuencial ha finalizado. El tono de aviso se puede apagar con la tecla 0. Las modificaciones sólo son posibles antes de iniciar el funcionamiento. Pulsar repetidamente la tecla 2 hasta que se muestre el número del funcionamiento secuencial. Modificar el ajuste. El funcionamiento se interrumpe. Tras cerrar la puerta, volver a pulsar la tecla n. El programa continua. Pulsar brevemente la tecla n. El funcionamiento se interrumpe. Volver a pulsar la tecla n, el funcionamiento se reanuda. Mantener pulsada la tecla n durante 4 segundos y apagar el aparato con la tecla %. Nota El grill también se puede combinar con el funcionamiento secuencial. Programar primero el funcionamiento secuencial. La duración del ciclo de cocción ha transcurrido Modificar los ajustes Abrir la puerta del aparato durante el funcionamiento Interrumpir el funcionamiento Cancelar el funcionamiento
  • 71. 71 Asar al grill El aparato dispone de los siguientes niveles de grill: Grill Nivel 3 § fuerte Pulsar 1 vez la tecla ( Grill Nivel 2 ¦ medio Pulsar 2 veces la tecla ( Grill Nivel 1 ¥ bajo Pulsar 3 veces la tecla ( Ejemplo de la imagen: Grill nivel 2, 15 minutos 1. Pulsar la tecla %. El aparato está listo para su funcionamiento. 2. Pulsar dos veces la tecla Grill (. En el indicador se muestran Grill, nivel 2 y 10:00 minutos. Para programar otro nivel de grill, pulsar de nuevo la tecla Grill (. Programar el grill
  • 72. 72 3. Programar la duración del ciclo de cocción con el mando giratorio. 4. Pulsar la tecla n. Se muestra el transcurso del tiempo y el símbolo q se indica entre corchetes. Suena una señal. En el indicador se muestra 00:00. Pulsar la tecla n y apagar el aparato con la tecla %. El tono de aviso se puede apagar con la tecla 0. El nivel de grill se puede cambiar en cualquier momento. A continuación, volver a pulsar la tecla n. Abrir la puerta del aparato. El microondas interrumpe el programa. Tras cerrar la puerta, volver a pulsar la tecla n. El funcionamiento se reanuda. Mantener pulsada la tecla n durante unos segundos y apagar el aparato con la tecla %. Nota El ventilador sigue funcionando aunque se abra la puerta del aparato. La duración del ciclo de cocción ha transcurrido Modificar los ajustes Interrumpir el funcionamiento Borrar el ajuste
  • 73. 73 Funcionamiento MicroCombi El grill funciona simultáneamente con el microondas. El microondas se encarga de tener el plato listo con mayor rapidez y, además, con un bonito dorado. Se pueden activar todos los niveles de potencia del microondas. Excepción: 900 y 600 W. Ejemplo: microondas 360 W, 17 minutos y grill nivel 1. 1. Pulsar la tecla %. El aparato está listo para su funcionamiento. 2. Pulsar el botón del nivel de potencia del microondas deseada. Se muestra una duración recomendada. 3. Programar la duración del ciclo de cocción con el mando giratorio. 4. Pulsar 3 veces la tecla (. En el indicador se iluminan los símbolos ¥ y [q]. 5. Pulsar la tecla n. Se inicia el funcionamiento. Se muestra el transcurso del tiempo programado. Suena una señal. El funcionamiento combinado ha finalizado. El tono de aviso se puede apagar con la tecla 0. El nivel de grill o la duración del ciclo de cocción se pueden modificar en cualquier momento. A continuación, pulsar la tecla n, el funcionamiento se reanuda. Pulsar la tecla n y apagar el aparato con la tecla %. El funcionamiento se interrumpe. Tras cerrar la puerta, volver a pulsar la tecla n. El funcionamiento se reanuda. Programar el MicroCombi La duración del ciclo de cocción ha transcurrido Cambio de ajustes Cancelar el funcionamiento Abrir la puerta del aparato durante el funcionamiento
  • 74. 74 Pulsar brevemente la tecla n. El aparato pasa al estado de pausa. Volver a pulsar n, el funcionamiento se reanuda. Consejos y advertencias También se puede ajustar primero el grill y después la potencia del microondas y la duración del ciclo de cocción. El ventilador sigue funcionando aunque se abra la puerta del aparato. Programa automático Con el programa automático pueden prepararse platos de forma sencilla. Seleccionar el programa e introducir el peso de los alimentos. El programa automático configura el programa óptimo. Pueden seleccionarse hasta 10 programas. Una vez seleccionado un programa, proceder del modo siguiente. Ejemplo de la imagen: programa 2 con 1 kilo de peso. 1. Pulsar la tecla %. El aparato está listo para su funcionamiento. 2. Pulsar la tecla `. En el indicador se muestra el primer programa. Interrumpir el funcionamiento Seleccionar el programa
  • 75. 75 3. Seleccionar el número de programa con el mando giratorio. 4. Pulsar la tecla f. En el indicador se muestra el peso recomendado de 0,50 kilogramos. 5. Seleccionar el peso con el mando giratorio.
  • 76. 76 6. Pulsar la tecla n. Se inicia el programa. En el indicador se muestra el transcurso del tiempo programado [r]. Suena una señal. El programa ha finalizado y el aparato deja de calentar. Apagar el aparato con la tecla % o volver a programarlo. El tono de aviso se puede apagar con la tecla 0. Pulsar la tecla %. El aparato se apaga. El número de programa y el peso no pueden modificarse tras la puesta en marcha. La duración del programa automático no se puede modificar. Sacar el alimento de su envase y pesarlo. Si no se puede introducir el peso exacto, redondear hacia arriba o hacia abajo. Para estos programas utilizar siempre recipientes adecuados para el microondas, p. ej., recipientes de vidrio o cerámica o la bandeja universal. Consultar también los consejos y advertencias sobre los accesorios en la tabla de programación. Introducir los alimentos en el aparato frío. A continuación de estos consejos y advertencias encontrará una tabla con alimentos adecuados, el intervalo de peso correspondiente y los accesorios necesarios. No es posible programar pesos no incluidos dentro del intervalo de peso. Con muchos tipos de comida se oye una señal al cabo de un tiempo. Dar la vuelta o remover el alimento. Congelar los alimentos almacenados a ser posible en posición horizontal, repartidos en porciones y a Ć18 ºC. El programa ha finalizado Interrumpir el programa Modificar el programa Modificar la duración del ciclo de cocción Consejos y advertenciassobre el programa automático Descongelación
  • 77. 77 Colocar el alimento congelado en un recipiente plano, p. ej., un plato de cristal o de porcelana. Una vez descongelado, dejar reposar el alimento entre 10 y 30 minutos más para que la temperatura del mismo se estabilice. La descongelación de carne, aves o pescado produce siempre un líquido. Eliminar este líquido al dar la vuelta a la pieza y no utilizarlo de nuevo, ni ponerlo en contacto con otros alimentos. Colocar primero la carne de vacuno, cordero o cerdo por la parte con más grasa hacia abajo sobre el recipiente. Descongelar sólo la cantidad necesaria de pan, pues se volvería duro. Cuando se trate de carne picada, retirar la capa descongelada al darle la vuelta. Si el ave es entera, se coloca primero por el lado de la pechuga dentro del recipiente, si son trozos de ave, por el lado de la piel. Patata cocida con sal: cortarlas en trozos igual de grandes. Añadir 2 cucharadas de agua y un poco de sal por cada 100 g de patatas. Patata hervida sin pelar: utilizar patatas del mismo tamaño. Lavarlas y pinchar la cáscara varios veces. Colocar las patatas aún húmedas en un recipiente sin agua. El arroz genera abundante espuma durante la cocción. Utilizar por tanto un recipiente alto con tapa. Introducir el peso bruto (sin líquido). Añadir al arroz el doble o el doble y medio de cantidad de líquido. No utilizar arroz en bolsa para cocer. Verduras, frescas: cortarlas en trozos regulares. Añadir 2 cucharadas de agua por cada 100 g. Patatas Arroz Verduras
  • 78. 78 Verduras, congeladas: sólo son adecuadas las verduras escaldadas, no precocinadas. La verdura ultracongelada con salsa de nata no es adecuada. Añadir de 1 a 2 cucharadas de agua por cada 100 g. Para espinacas y col roja, no añadir agua. utilizar patatas del mismo tamaño. Lavarlas y pinchar la cáscara varios veces. Colocar las patatas húmedas en la parrilla. Colocar los pollos partidos por la mitad con la piel hacia arriba en la parrilla. Para recoger las gotas de grasa o el jugo de la carne, colocar la parrilla en la bandeja de vidrio. Algunos platos necesitan un tiempo de reposo en el compartimento de cocción tras finalizar el programa. Plato Tiempo de reposo Verduras aprox. 5 minutos Patatas aprox. 5 minutos Vaciar primero el agua que se haya desprendido. Arroz 5 a 10 minutos Prestar atención a las señales para remover y dar la vuelta. Patatas al horno Medios pollos Tiempos de reposo
  • 79. 79 Alimentos Número de programa Margen de peso Recipiente y accesorios Descongelar Carne y aves Ć asado Ć piezas de carne poco gruesas Ć carne picada Ć pollo, capón, pato P1 0,2Ć2,0 kg Recipiente plano sin tapa. Pescado pieza de pescado entero, filetes o rodajas P2 0,1Ć1,0 kg Recipiente plano sin tapa. Pan y pasteles* pan entero, hogaza o barra; pan en rebanadas, pastel de masa batida, pastel de levadura, pastel de frutas P3 0,2Ć1,5 kg Recipiente plano sin tapa. Cocer Patatas patatas cocidas con sal, patatas cocidas sin pelar P4 0,2Ć1,0 kg Recipiente con tapa. Arroz P5 0,05Ć0,3 kg Recipiente alto con tapa. Verdura fresca coliflor, brécol, zanahorias, colinabos, puerros, pimientos, calabacines P6 0,15Ć1,0 kg Recipiente con tapa. Verdura congelada coliflor, brécol, zanahorias, colinabos, lombarda, espinacas P7 0,15Ć1,0 kg Recipiente con tapa. Patatas al horno peso por patata, aprox. 200Ć250 g P8 0,2Ć1,5 kg Parrilla Producto para gratinar congelado, p. ej., lasaña P9 0,3Ć1,0 kg Pollo, medio P10 0,5Ć1,8 kg Bandeja de vidrio y parrilla. * No son apropiadas las tartas de nata, tartas de crema, pasteles con cobertura, glaseado o gelatina.
  • 80. 80 Memoria La función de memoria permite guardar configuraciones personalizadas para sus platos preferidos y acceder a ellas en cualquier momento. Están disponibles dos posiciones en la memoria g" y h". La función de memoria resulta especialmente útil cuando un mismo plato se prepara con frecuencia. 1. Pulsar la tecla %. El aparato está listo para su funcionamiento. 2. Pulsar el botón del nivel de potencia del microondas deseada. En el indicador se muestran la potencia y una duración recomendada. 3. Programar la duración del ciclo de cocción con el mando giratorio. 4. Mantener pulsada la tecla g o h durante 4 segundos hasta que suene una señal. La configuración se ha guardado y puede iniciarse en cualquier momento. Volver a programar y guardar. Se sobrescriben las configuraciones anteriores. Guardar configuraciones en la memoria Guardar otra configuración
  • 81. 81 Las configuraciones guardadas para un plato se pueden iniciar en cualquier momento. 1. Pulsar la tecla %. El aparato está listo para su funcionamiento. 2. Pulsar la tecla g o h. Se muestran las configuraciones guardadas. 3. Pulsar la tecla n. Se inicia la memoria. En el indicador se muestra el transcurso del tiempo programado r. Consejos y advertencias Tras la puesta en marcha, ya no se podrá modificar la posición de memoria. Los programas ajustados permanecen en la memoria incluso después de un corte en el suministro eléctrico. Suena una señal. La memoria ha finalizado. El tono de aviso se puede apagar con la tecla 0. Apagar el aparato con la tecla % o volver a programarlo. Pulsar la tecla n o abrir la puerta del aparato. El funcionamiento se interrumpe. Tras cerrar la puerta, pulsar la tecla n. El programa continua. Activar memoria La duración del ciclo de cocción ha transcurrido Interrumpir
  • 82. 82 Modificar los ajustes básicos Este aparato presenta distintos ajustes básicos que pueden modificarse en cualquier momento. En la tabla se especifican todos los ajustes básicos y sus opciones de selección. Ajuste básico Opciones Aclaración ™‚ Indicación reloj ‚ = encendido Indicación reloj ƒ = apagado Indicador de la hora ™ƒ Tono de aviso de duración ƒ = medio = 2 minutos ‚ = breve = 10 segundos „ = largo = 5 minutos Señal una vez transcurrida una duración ™„ Sonido de tecla: ‚ = encendido Sonido de tecla: ƒ = apagado Sonido de confirmación al pulsar una tecla ™… Tiempo de espera ƒ = medio = 5 segundos ‚ = breve = 2 segundos „ = largo = 10 segundos Tiempo de espera entre los distintos pasos después de configurar un ajuste Condición: el aparato está apagado. 1. Pulsar la tecla 0 durante unos segundos. En el indicador se muestra el primer ajuste básico. 2. Modificar el ajuste básico con el mando giratorio. 3. Confirmar con la tecla 0. En el indicador se muestra el siguiente ajuste básico. La tecla 0 permite recorrer todos los ajustes básicos, mientras que el mando giratorio sirve para modificarlos. 4. Para finalizar, mantener pulsada la tecla 0 durante unos segundos. Todos los ajustes se han aplicado. Los ajustes pueden volverse a modificar en cualquier momento. Ajustes básicos
  • 83. 83 Cuidados y limpieza El microondas mantendrá durante mucho tiempo su aspecto reluciente siempre y cuando se lleven a cabo la limpieza y los cuidados pertinentes. A continuación se describen los cuidados y la limpieza óptimos para el aparato. ¡Peligro de cortocircuito! No utilizar limpiado de alta presión ni por chorro de vapor. ¡Peligro de quemaduras! No realizar la limpieza inmediatamente después de la desconexión. Dejar enfriar el aparato. Consejos y advertencias Es posible que aparezcan diferentes tonalidades en el frontal del aparato debido a los diferentes materiales como el vidrio, plástico o metal. Las sombras con forma de estrías apreciables en el vidrio de la puerta son los reflejos luminosos de la lámpara de iluminación del horno. Los olores desagradables, como los que se generan después de preparar un pescado por ejemplo, se pueden eliminar fácilmente. Añadir unas gotas de limón a una taza con agua. Introducir una cuchara en el recipiente para evitar el retardo de ebullición. Calentar el agua entre 1 y 2 minutos a la máxima potencia del microondas. Tener en cuenta las indicaciones de la tabla para no dañar las distintas superficies del aparato empleando un limpiador inadecuado. No utilizar lo siguiente: H productos de limpieza abrasivos o ácidos, H rascadores para metal o vidrio para la limpieza del cristal de la puerta del aparato, d d Productos de limpieza
  • 84. 84 H rascadores para metal o vidrio para limpiar la junta de la puerta, H esponjas o estropajos duros. Lavar bien las bayetas nuevas antes de utilizarlas. Zona Productos de limpieza Frontal del aparato Agua caliente con un poco de jabón: Limpiar con un paño humedecido en agua con jabón y secar con un paño suave. No utilizar rascadores para metal o vidrio para la limpieza. Acero inoxidable Agua caliente con un poco de jabón: Limpiar con un paño humedecido en agua con jabón y secar con un paño suave. Limpiar inmediatamente las manchas de cal, grasa, almidón y clara de huevo, pues podría formarse corrosión debajo de estas manchas. Puede adquirir productos específicos para limpieza de acero en el servicio de asistencia técnica o en comercios especializados. Compartimento de cocción Compartimento de cocción de acero inoxidable Agua caliente con un poco de jabón o agua con vinagre: Limpiar con un paño humedecido en agua con jabón y secar con un paño suave. En caso de mucha suciedad: Utilizar los limpiadores para hornos solo con el compartimento de cocción frío. No utilizar spray para hornos ni otros productos de limpieza agresivos o abrasivos. Tampoco es apropiado utilizar estropajos ni esponjas ásperas, ya que rayan la superficie. Dejar secar las superficies interiores por completo. Cristales de la puerta Limpiacristales: Limpiar con un paño de limpieza. No utilizar rascadores para metal o vidrio para la limpieza. Junta de la puerta ¡No quitarla! Agua caliente con un poco de jabón: Limpiar con un paño de limpieza sin frotar. No utilizar rascadores para metal o vidrio para la limpieza. Accesorios Agua caliente con un poco de jabón: Poner en remojo y limpiar con un paño o cepillo.
  • 85. 85 ¿Qué hacer en caso de avería? Con frecuencia, cuando se produce una avería, suele tratarse de una pequeña anomalía fácil de subsanar. Antes de avisar al Servicio de Asistencia Técnica, deben tenerse en cuenta las siguientes indicaciones: Si no se obtienen los resultados esperados de un plato, consultar el capítulo Platos probados en nuestro estudio de cocina. En este capítulo se describen consejos y sugerencias para cocinar. Avería Posible causa Solución/consejos El aparato no funciona. El enchufe no está conectado. Conectar el enchufe.p Corte en el suministro eléctrico. Comprobar si funciona la luz de la cocina. El fusible está defectuoso. Comprobar en la caja de fusibles que el fusible del aparato funciona correctamente. Manejo incorrecto. Desconectar el fusible de la caja de fusibles. Volver a conectarlo transcurridos unos 10 segundos. El aparato no funciona. El indicador muestra una duración. No se ha pulsado la tecla n después de la programación. Pulsar la tecla n o apagar el aparato. El microondas no se conecta. La puerta no se ha cerrado completamente. Comprobar si la puerta está atascada por restos de alimentos o algún cuerpo extraño. No se ha pulsado la tecla n. Pulsar la tecla n. Los alimentos se calientan más lentamente que antes. Se ha programado una potencia de microondas demasiado baja. Seleccionar una potencia mayor. Se ha introducido una cantidad mayor de lo habitual en el aparato. Cantidad doble, casi el doble de tiempo de cocción.
  • 86. 86 Avería Solución/consejosPosible causa Suena una señal. Los dos puntos del indicador parpadean. El aparato está en el modo demo. 1. Pulsar la tecla 2. 2. Mantener pulsada la tecla ` durante 3 segundos. El modo demo se ha desactivado. El aparato se apaga poco después de pulsar la tecla Start. En el indicador se muestra el mensaje de error "H95". La puerta no se ha cerrado correctamente. Volver a abrir la puerta y cerrarla correctamente; si el problema no se soluciona, avisar al Servicio de Asistencia Técnica. En el indicador se muestra el mensaje de error "E723". La puerta no se ha cerrado correctamente. Abrir el aparato con la tecla ^ y cerrarlo otra vez. En el indicador se muestra el mensaje de error "Er1". El sensor de temperatura está defectuoso. Ponerse en contacto con el Servicio de Asistencia Técnica. En el indicador aparece el mensaje de error "Er11". "Tecla atascada" Las teclas están sucias o el mecanismo está atascado. Pulsar varias veces todas las teclas. Limpiar las teclas con un paño seco. Abrir y cerrar la puerta del aparato. Si no se soluciona el problema, avisar al servicio de asistencia técnica. En el indicador se muestra el mensaje de error "Er4". Sobrecalentamiento peligroso (eventualmente fuego en el interior). Potencia del microondas muy elevada. No abrir la puerta; extraer el enchufe o desconectar los fusibles en la caja de fusibles, dejar enfriar. En el indicador se muestra el mensaje de error "Er18". Fallo técnico. Ponerse en contacto con el Servicio de Asistencia Técnica. ¡Peligro de descarga eléctrica! Las reparaciones inadecuadas son peligrosas. Las reparaciones sólo pueden ser efectuadas por personal del Servicio de Asistencia Técnica debidamente instruido. d
  • 87. 87 Servicio de Asistencia Técnica Nuestro Servicio de Asistencia Técnica se encuentra a su disposición siempre que necesite la reparación de su aparato. En la guía telefónica figuran el número de teléfono y la dirección del Servicio de Asistencia Técnica más cercano a su domicilio. Asimismo, cualquiera de nuestros centros del Servicio de Asistencia Técnica le informará encantado sobre la delegación del Servicio de Asistencia Técnica más cercana a su domicilio. Al contactar con nuestro Servicio de Asistencia Técnica, indicar el número de producto (E) y el número de fabricación (FD) del aparato. Si abre la puerta del aparato, a la derecha encontrará la placa de características con estos números. A fin de evitarse molestias en caso necesario, le recomendamos anotar los datos de su aparato así como el número de teléfono del Servicio de Asistencia Técnica en el siguiente apartado. N.º E: N.º FD: Servicio de Asistencia Técnica % Recuerde que, en caso de manejo incorrecto, la asistencia del personal del Servicio de Asistencia Técnica no es gratuita, incluso si todavía está dentro del período de garantía. Número de producto (E) y número de fabricación (FD)
  • 88. 88 Suministro de corriente eléctrica 220Ć240 V, 50 Hz Potencia máx. conectada 1990 W Potencia del microondas 900 W (IEC 60705) Frecuencia de las microondas 2450 MHz Grill 1300 W Fusible Mínimo 10 A Dimensiones (Al×An×F) Ć Aparato 38,2 x 59,4 x 31,9 cm Ć Compartimento de cocción 22,0 x 35,0 x 27,0 cm Homologación VDE sí Distintivo CE sí Este aparato cumple la normativa EN 55011 y CISPR 11. Es un producto del grupo 2, clase B. Grupo 2 indica que los microondas se fabrican con el fin de calentar alimentos. La clase B indica que el aparato es apropiado para uso privado en el ámbito doméstico. Datos técnicos
  • 89. 89 Eliminación de residuos respetuosa con el medio ambiente Eliminar el embalaje de forma ecológica. Este aparato está identificado conforme a la Directiva de Residuos de Aparatos Eléctricos y Electrónicos RAEE 2002/96/CE (waste electrical and electronic equipment ĆWEEE). Esta directiva define el marco de actuación para la retirada y el reciclaje de aparatos usados en todo el territorio europeo. Platos probados en nuestro estudio de cocina A continuación presentamos una selección de platos y los ajustes óptimos para ellos. Se detalla el tipo de calentamiento, la temperatura o la potencia del microondas más apropiada para cada uno. Se ofrecen indicaciones sobre los accesorios apropiados. Asimismo figuran consejos sobre recipientes y el modo de preparación. Consejos y advertencias Los valores de la tabla son válidos para la preparación de alimentos con el compartimento de cocción vacío y frío. Precalentar solamente cuando así se especifique en las tablas. Antes de proceder a su utilización, retirar todos los accesorios del compartimento de cocción que no sean necesarios. Las indicaciones de tiempo que figuran en las tablas deben entenderse como valores orientativos. Vienen determinados por la calidad y la composición de los alimentos. ó