
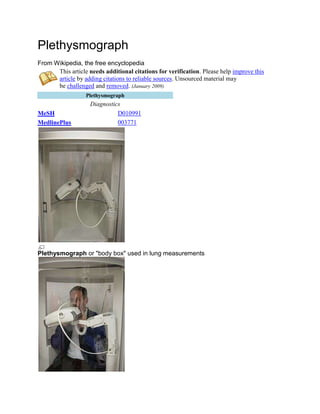
![A man undergoing whole body plethysmography
A modern body plethysmograph using ultrasound
A plethysmograph is an instrument for measuring changes in volume within
an organ or whole body (usually resulting from fluctuations in the amount of blood or air
it contains).
Contents
[hide]
1 Organs studied
o 1.1 Lungs
o 1.2 Limbs
o 1.3 Genitals
2 Use in preclinical research
o 2.1 Respiratory parameters from conscious freely moving animals: wholebody plethysmography
o 2.2 Respiratory parameters from conscious restrained animals: doublechamber / head-out plethysmography
o 2.3 Resistance/compliance from sedated animals
o 2.4 Cerebral blood flow
3 See also
4 References](data:image/gif;base64,R0lGODlhAQABAIAAAAAAAP///yH5BAEAAAAALAAAAAABAAEAAAIBRAA7)
Recomendados
Recomendados
Mais conteúdo relacionado
Mais procurados
Mais procurados (20)
Destaque
Semelhante a Shilpa
Semelhante a Shilpa (20)
Último
Último (20)
Shilpa
- 1. Plethysmograph From Wikipedia, the free encyclopedia This article needs additional citations for verification. Please help improve this article by adding citations to reliable sources. Unsourced material may be challenged and removed. (January 2009) Plethysmograph MeSH MedlinePlus Diagnostics D010991 003771 Plethysmograph or "body box" used in lung measurements
- 2. A man undergoing whole body plethysmography A modern body plethysmograph using ultrasound A plethysmograph is an instrument for measuring changes in volume within an organ or whole body (usually resulting from fluctuations in the amount of blood or air it contains). Contents [hide] 1 Organs studied o 1.1 Lungs o 1.2 Limbs o 1.3 Genitals 2 Use in preclinical research o 2.1 Respiratory parameters from conscious freely moving animals: wholebody plethysmography o 2.2 Respiratory parameters from conscious restrained animals: doublechamber / head-out plethysmography o 2.3 Resistance/compliance from sedated animals o 2.4 Cerebral blood flow 3 See also 4 References
- 3. 5 Further reading 6 External links Organs studied[edit] Lungs[edit] Pulmonary plethysmographs are commonly used to measure the functional residual capacity (FRC) of the lungs—the volume in the lungs when the muscles of respiration are relaxed—and total lung capacity. In a traditional plethysmograph, the test subject is placed inside a sealed chamber the size of a small telephone booth with a single mouthpiece. At the end of normal expiration, the mouthpiece is closed. The patient is then asked to make an inspiratory effort. As the patient tries to inhale (a maneuver which looks and feels like panting), the lungs expand, decreasing pressure within the lungs and increasing lung volume. This, in turn, increases the pressure within the box since it is a closed system and the volume of the box compartment has decreased to accommodate the new volume of the subject. Boyle's Law is used to calculate the unknown volume within the lungs. First, the change in volume of the chest is computed. The initial pressure and volume of the box are set equal to the known pressure after expansion times the unknown new volume. Once the new volume is found, the original volume minus the new volume is the change in volume in the box and also the change in volume in the chest. With this information, Boyle's Law is used again to determine the original volume of gas in the chest: the initial volume (unknown) times the initial pressure is equal to the final volume times the final pressure. The difference between full and empty lungs can be used to assess diseases and airway passage restrictions. An obstructive disease will show increased FRC because some airways do not empty normally, while a restrictive disease will show decreased FRC. Body plethysmography is particularly appropriate for patients who have air spaces which do not communicate with the bronchial tree; in such patients helium dilution would give an incorrectly low reading. Another important parameter, which can be calculated with a body plethysmograph is the airway resistance. During inhalation the chest expands, which increases the pressure within the box. While oberserving the so-called resistance loop (cabin pressure and flow), diseases can easily be recognized. If the resistance loop becomes planar, this shows a bad compliance of the lung. A COPD, for instance, can easily be discovered because of the unique shape of the corresponding resistance loop. Limbs[edit] Some plethysmograph devices are attached to arms, legs or other extremities and used to determine circulatory capacity. In water plethysmography an extremity, e.g. an arm, is
- 4. enclosed in a water-filled chamber where volume changes can be detected. Air plethysmography uses a similar principle but based on an air-filled long cuff, which is more convenient but less accurate. Another practical device is mercury-filled strain gauges used to continuously measure circumference of the extremity, e.g. at mid calf. Impedance plethysmography is a non-invasive method used to detect venous thrombosis in these areas of the body. Genitals[edit] Another common type of plethysmograph is the penile plethysmograph. This device is used to measure changes in blood flow in the penis. Although some researchers use this device to assess sexual arousal and sexual orientation, the data are usually not admissible in court cases in the United States. An approximate female equivalent to penile plethysmography is vaginal photoplethysmography, which optically measures blood flow in the vagina.[1] Use in preclinical research[edit] Plethysmography is a widely used method in basic and preclinical research to study respiration. Several techniques are used: Respiratory parameters from conscious freely moving animals: wholebody plethysmography[edit] Whole-body plethysmography is used to measure respiratory parameters in conscious unrestrained subjects, including quantification ofbronchoconstriction. The standard plethysmograph sizes are for the study of mice, rats and guinea pigs. On request, larger plethysmographs can also be manufactured for other animals, such as rabbits, dogs, pigs, or primates. The plethysmograph has two chambers, each fitted with a pneumotachograph. The subject is placed in one of them (subject chamber) and the other remains empty (reference chamber). The pressure change is measured by a differential pressure transducer with one port exposed to the subject chamber and the other to the reference chamber. Respiratory parameters from conscious restrained animals: doublechamber / head-out plethysmography[edit] The double-chamber plethysmograph (dcp) measures respiratory parameters in a conscious restrained subject, including airway resistance and conductance. Different sizes of plethysmograph exist to study mice, rats or guinea pigs.
- 5. The head-out configuration is identical to the standard configuration described above except that there is no head chamber. Of course the collar seal is still applied, so that the body chamber remains airtight. With only a thoracic signal, all parameters can be obtained except for specific airway resistance (SRaw) and specific airway conductance (Sgaw). Resistance/compliance from sedated animals[edit] In anesthetized plethysmography, lung resistance and dynamic compliance are measured directly because the subject is anesthetized. Depending on the level of sedation, the subject may be spontaneously breathing (SB configuration) or under mechanical ventilation (MV configuration). A flow signal and a pressure signal are required to calculate compliance and resistance. Cerebral blood flow[edit] Cerebral venous blood flow has been recently studied trying to establish a connection between Chronic cerebrospinal venous insufficiency and multiple sclerosis. The small study is not big enough to establish a conclusion, but some association has been shown.[2] Bone Marrow Aspiration and Biopsy Updated: Feb 21, 2013 Overview Preliminary Assessment Collection Site Procedure Unilateral Versus Bilateral Iliac Crest Biopsy Postprocedure Care Slide Preparation Morbidity/Mortality Special Concerns Medical-Legal Pitfalls Show All Multimedia Library References
- 6. Overview The procedure known as trepanning, or trephination, of bone is the oldest surgical practice that continues to have clinical relevance in modern times. The method dates as far back as the Neolithic period and initially entailed the drilling of cranial bones as a form of medical intervention for headaches and mental illnesses. However it was not until 1905, when the Italian physician Pianese reported bone marrow infiltration by the parasite Leishmania, that this procedure was applied toward clinical evaluation. [1] In the present day, inspection of the bone marrow is considered one of the most valuable diagnostic tools to evaluate hematologic disorders.[2] Indications have included the diagnosis, staging, and therapeutic monitoring for lymphoproliferative disorders such as chronic lymphocytic leukemia (CLL), Hodgkin and Non-Hodgkin lymphoma, hairy cell leukemia, myeloproliferative disorders, myelodysplatic syndrome and multiple myeloma. Furthermore, evaluation of cytopenia, thrombocytosis, leukocytosis, anemia, and iron status can be performed. The application of bone marrow analysis has grown to incorporate other, nonhematologic, conditions. For example, in the investigation for fever of unknown origin (FUO), specifically in those patients with autoimmune deficiency syndrome(AIDS), the marrow may reveal the presence of microorganisms, such as tuberculosis, Mycobacterium avium intracellulare (MAI) infections, histoplasmosis, leishmaniasis, and other disseminated fungal infections. Furthermore, the diagnosis of storage diseases (eg. NiemannPick disease and Gaucher disease[3]), as well as the assessment for metastatic carcinoma and granulomatous diseases (eg, sarcoidosis) can be performed. Bone marrow analysis may reveal toxic effects of certain offending medications or substances, such as alcohol, or nutritional deficiencies, such as copper/zinc or vitamin B-12/folate. Bone marrow analysis can also be performed in patients with idiopathic thrombocytopenia purpura (ITP), incidental elevated serum paraprotein levels, iron deficiency anemia, polycythemia vera, essential thrombocytosis, or infectious mononucleosis; but these conditions are often more appropriately diagnosed by routine laboratory evaluation.[4] Bone marrow consists of stem cells, which are large, "primitive," undifferentiated cells supported by fibrous tissue called stroma. There are 2 main types of stem cells and, therefore, the bone marrow consists of 2 types of cellular tissue. One type of stem cell is involved in producing blood cells and the other is involved in producing stromal cells, which are responsible for the supporting stroma. For more information about the relevant anatomy, see Bone Marrow Anatomy. Sampling of the marrow consists of either aspiration of the cellular component and/or acquirement of tissue fragments. Aspiration of the marrow, as shown below, has been primarily utilized for cytologic assessment, with analysis directed toward morphology and obtainment of a differential cell count. Further sampling allows for material to be directed toward other ancillary test such as cytogenetics, molecular studies, microbiologic cultures, immunohistochemistry, and flow cytometry. Biopsies, on the other hand, allow for studies of the marrow’s overall cellularity, detection of focal lesions, and extent of infiltration by various pathologic entities.[5, 6, 7] Bone marrow aspiration. For patient education information, visit eMedicineHealth's Osteoporosis Centerand Cancer Center, as well as Bone Marrow Biopsy. Next Section: Preliminary Assessment READ MORE ABOUT BONE MARROW ASPIRATION AND BIOPSY ON MEDSCAPE
- 7. Angiography From Wikipedia, the free encyclopedia (Redirected from Arteriography) Angiography Intervention Angiogram showing a transverse projection of the vertebrobasilar and posterior cerebralcirculation. ICD-9-CM 88.40-88.68 MeSH D000792 OPS-301 code: 3-60 Angiography or arteriography is a medical imaging technique used to visualize the inside, or lumen, of blood vessels and organs of the body, with particular interest in the arteries, veins and the heart chambers. This is traditionally done by injecting a radio-opaquecontrast agent into the blood vessel and imaging using Xray based techniques such as fluoroscopy. The word itself comes from the Greek words angeion, "vessel", and graphein, "to write" or "record". The film or image of the blood vessels is called an angiograph, or more commonly, an angiogram. Though the word itself
- 8. can describe both an arteriogram and avenogram, in its everyday usage, the terms angiogram and arteriogram are often used synonymously, whereas the term venogram is used more precisely. [1] The term angiography is strictly defined as based on projectional radiography; however, the term has been applied to newer vascular imaging techniques such as CT angiography and MR angiography. The term isotope angiography has also been used, although this more correctly is referred to as isotope perfusion scanning. Contents [hide] 1 History 2 Technique 3 Uses o 3.1 Coronary angiography o 3.2 Microangiography o 3.3 Neuro-vascular angiography o 3.4 Peripheral angiography o 3.5 Post mortem CT angiography for medicolegal cases 4 Complications o 4.1 Coronary angiography o 4.2 Cerebral angiography o 4.3 Additional Risks 5 See also 6 External links 7 References History[edit] The technique was first developed in 1927 by the Portuguese physician and neurologist Egas Moniz at the University of Lisbon to provide contrasted x-ray cerebral angiography in order to diagnose several kinds of nervous diseases, such as tumors, artery disease and arteriovenous malformations. He is usually recognized as one of the pioneers in this field. Moniz performed the first cerebral angiogram in Lisbon in 1927, and Reynaldo Cid dos Santos performed the first aortogram in the same city in 1929. With the introduction of theSeldinger technique in 1953, the procedure became markedly safer as no sharp introductory devices needed to remain inside the vascular lumen. Technique[edit]
- 9. Depending on the type of angiogram, access to the blood vessels is gained most commonly through the femoral artery, to look at the left side of the heart and at the arterial system; or the jugular or femoral vein, to look at the right side of the heart and at the venous system. Using a system of guide wires and catheters, a type of contrast agent (which shows up by absorbing the x-rays), is added to the blood to make it visible on the x-ray images. The X-ray images taken may either be still images, displayed on an image intensifier or film, or motion images. For all structures except the heart, the images are usually taken using a technique called digital subtraction angiography or DSA. Images in this case are usually taken at 2 - 3 frames per second, which allows the interventional radiologist to evaluate the flow of the blood through a vessel or vessels. This technique "subtracts" the bones and other organs so only the vessels filled with contrast agent can be seen. The heart images are taken at 15-30 frames per second, not using a subtraction technique. Because DSA requires the patient to remain motionless, it cannot be used on the heart. Both these techniques enable the interventional radiologist or cardiologist to see stenosis (blockages or narrowings) inside the vessel which may be inhibiting the flow of blood and causing pain. Catheterization Lab Uses[edit] Catheterization in selective angiography
- 10. Finger angioma Coronary angiography[edit] Main article: Coronary angiography One of the most common angiograms performed is to visualize the blood in the coronary arteries. A long, thin, flexible tube called acatheter is used to administer the X-ray contrast agent at the desired area to be visualized. The catheter is threaded into an artery in theforearm, and the tip is advanced through the arterial system into the major coronary artery. X-ray images of the transient radiocontrastdistribution within the blood flowing inside the coronary arteries allows visualization of the size of the artery openings. Presence or absence of atherosclerosis or atheroma within the walls of the arteries cannot be clearly determined. See coronary catheterization for more detail. To detect coronary artery disease, Computed Tomography (CT) Scan is better than Magnetic Resonance Imaging (MRI). The sensitivity and specificity between CT and MRI were (97.2 percent and 87.4 percent) and (87.1 percent and 70.3 percent), respectively. Therefore CT (mainly multislice CT) is more accepted, more widely available, more favored by patients, and more economic. Moreover, CT requires shorter breath-hold time than MRI.[2] Microangiography[edit] Microangiography is commonly used to visualize tiny blood vessels. Neuro-vascular angiography[edit]
- 11. Another increasingly common angiographic procedure is neuro-vascular digital subtraction angiography in order to visualise the arterial and venous supply to the brain. Intervention work such as coil-embolisation of aneurysms and AVM gluing can also be performed. Peripheral angiography[edit] Main article: Peripheral artery occlusive disease Angiography is also commonly performed to identify vessel narrowing in patients with leg claudication or cramps, caused by reduced blood flow down the legs and to the feet; in patients with renal stenosis (which commonly causes high blood pressure) and can be used in the head to find and repair stroke. These are all done routinely through the femoral artery, but can also be performed through the brachial or axillary (arm) artery. Any stenoses found may be treated by the use of atherectomy. Post mortem CT angiography for medicolegal cases[edit] Post mortem CT angiography for medicolegal cases is a method initially developed by the Virtopsy group. Originating from that project, both watery[3] and oily[4] solutions have been evaluated. While oily solutions[4] require special deposition equipment to collect waste water, watery[3] solutions seem to be regarded as less problematic. Watery solutions also were documented to enhance post mortem CT tissue differentiation whereas oily solutions were not. Conversely, oily solutions seem to only minimally disturb ensuing toxicological analysis, while watery solutions may significantly impede toxicological analysis, thus requiring blood sample preservation before post mortem CT angiography.[5] Complications[edit] Coronary angiography[edit] Coronary angiographies are common and major complications are rare. These include cardiac arrhythmias, damage, blood clots (which can cause heart attack or stroke),hypotension and pericardial effusion. Minor complications can include bleeding or bruising at the site where the contrast is injected, blood vessel damage on the route to the heart from the catheter (rare) and allergic reaction to the contrast.[6] Cerebral angiography[edit] Major complications in cerebral angiography are also rare but include stroke, an allergic reaction to the anaesthetic other medication or the contrast medium, blockage or damage to one of the access veins in the leg, or thrombosis and embolism formation. Bleeding or bruising at the site where the contrast is injected are minor complications, delayed bleeding can also occur but is rare.[6] Arteriography
- 12. Related Terms Angiography Digital Subtraction Arteriography (DSA) Specialists Cardiovascular Internist Radiologist Vascular Surgeon Comorbid Conditions Diabetes mellitus Factors Influencing Duration There is usually no disability after arteriography. However, disability may be associated with any complications that may occur or as a result of the findings of the procedure. Medical Codes ICD-9-CM: 88.4, 88.40, 88.41, 88.42, 88.43, 88.44, 88.45, 88.46, 88.47, 88.48, 88.49 Definition © Reed Group Arteriography is the radiologic examination of arteries using a contrast medium that is injected into an artery to make arteries visible. This type of examination can be performed most often using x-ray, althoughmagnetic resonance imaging (MRI) andcomputed tomography(CT scan) may also be used. When an x-ray or CT scan study is performed, a liquid, radio-opaque dye is used. Digital subtraction arteriography (DSA) has for the most part replaced film angiography. DSA uses computer techniques to process arteriographic images. In DSA, images of bone are removed (subtracted)
- 13. from the x-ray image, leaving only the image of the artery for study. This gives enhanced details useful for diagnostic and therapeutic purposes. Use of DSA is especially helpful for arteriography of the carotid and cerebral arteries of the head, since they are adjacent to or surrounded by bone. DSA images also have the advantage of being projected on a video screen in real time, allowing the radiologist to determine immediately whether he or she has acquired the information the physician needs or to immediately terminate the procedure if there is a complication. Digital images can also be easily transmitted over the Internet for consultation. Arteriography is usually performed under local anesthesia. It may also be performed in the operating room under general anesthesia during arterial graft surgery (such ascoronary bypass surgery). The procedure can take as little as a few minutes or up to 2 to 3 hours. An alternative to arteriography is the use of Doppler ultrasound. Source: Medical Disability Advisor Reason for Procedure Arteriography is done before operating on an artery to "see" its interior. This helps a physician decide if surgery is necessary and provides a road map for the surgeon to know exactly where to operate and how extensive an operation is necessary. Arteriography is performed before heart bypass surgery, aortic aneurysm repair, and other types of arterial surgery. Arteriography can be used for diagnosis and before certain treatments that may eliminate the need for surgery, such as percutaneous transluminal angioplasty (PTA). PTA consists of an inflatable balloon being guided into a plugged artery, where it is inflated in order to compress and push fatty plaque formations to the side within the artery, often followed by placement of a stent to keep the vessel open. Other therapeutic uses of arteriography include therapeutic embolism (injection of a foreign substance into an artery to reduce or shut off the blood supply to a tumor or to stop bleeding from a blood vessel), delivery of a medication to control bleeding directly into the bleeding vessel, and treatment of tumors by infusing medication directly into the artery supplying the organ containing the tumor. Source: Medical Disability Advisor How Procedure is Performed Arteriography is usually performed in a radiology or diagnostic-imaging department such as a heart catheterization laboratory. It can also be performed in the operating room during actual surgery. Except during surgery, when the individual is sedated with general anesthetic, a local anesthetic is used. When x-ray is used, the procedure is done on an artery in the groin, arm, or neck. The groin (femoral) artery is used most often, although use of the arm (brachial) artery is being used more often than in the past. A long, slender, hollow tube (catheter) is inserted into the artery through a very small incision. The contrast medium is then injected through the catheter into the artery. The contrast media moves through the body, making arteries in other locations visible to x-rays. Once the x-ray images have been made, the catheter is removed. Pressure is applied to the skin over the entry site to stop any bleeding. Stitches are usually unnecessary. The individual is observed in the recovery room or hospital room for 6 to 8 hours. The individual is then discharged the same day or the next morning. Source: Medical Disability Advisor
- 14. Prognosis The individual should return to performing all usual activities within 1 to 3 days after arteriography. If a complication of the procedure occurs, therapy will be required, and the individual may be delayed in returning to work. Source: Medical Disability Advisor Complications The most common complication of arteriography is formation of a blood clot (thrombus) in the artery at the entry site. Other complications include an allergic reaction to the dye, bleeding from the puncture site, dislodgment of plaque from the inside of the artery (embolization), separation of the wall of the artery (dissection), infection, and stroke.Dehydration may increase the risk of kidney complications from the xray dye because of reduced blood flow to the kidney. If an individual has impaired kidney function before arteriography, the risk of worsening kidney functioning afterward increases, and certain medications and/or fluids may be given to the individual to help prevent this. Individuals taking certain medications for diabetes may develop low blood sugar (hypoglycemia). Entry site complications are more frequent if there is hardening of the arteries (atherosclerosis) at the entry site. If arteriography is done during surgery (intraoperatively), complications may arise due to the general anesthetic used. Source: Medical Disability Advisor Return to Work (Restrictions / Accommodations) Ordinary walking and a return to work the same day or the next day are usually allowed. If work involves lifting more than 20 pounds or a lot of bending (if the groin site was used), 2 or 3 days off work are recommended to reduce the chance of re-bleeding from the entry site. Bending of the groin or elbow at whatever site was used for performance of the arteriography should be avoided for 1 day. A longer restriction of activity may be required if an individual sustained a complication from the procedure. Source: Medical Disability Advisor References General "Arteriography." American Heart Association. 19 May. 2005. American Heart Association, Inc. 19 May 2005 <h Cardiopulmonary Resuscitation (CPR)
- 15. CPR how to with detailed CPR steps and CPR instructions based upon 2010 CPR guidelines. This website is designed to provide comprehensive information related to the delivery of Cardiopulmonary Resuscitation (also known as CPR). Increased public knowledge and awareness on how to respond to cardiac arrest situations and deliver high qualityCPR can make the difference between life and death for victims of sudden cardiac arrest. What is Cardiopulmonary Resuscitation (CPR)? Cardiopulmonary Resuscitation or CPR is an emergency medical procedure indicated in victims of cardiac arrest and sometimes in victims of severe symptomatic cardiovascular and circulatory compromise. A victim of cardiac arrest is defined as a person who is unresponsive, pulseless, and apneic (or exhibiting agonal respirations). Agonal respirations are ineffective breaths produced with poor respiratory effort, volume, quality, or rate that are unsustainable of life. CPR technique typically includes external delivery of chest compressions and ventilations/breaths. CPR produces circulation in the absence of spontaneous cardiac output and allows for delivery of oxygen rich blood throughout the body. Effectively delivered CPR prolongs cellular death and may allow time for more definitive care to be delivered. Cardiopulmonary Resuscitation (CPR) Facts & Statistics The Sad Facts: There are approximately 350,000 out of hospital cardiac arrests each year in the United States. Of those cardiac arrests: 80% occur in a private residential setting at someone's home. 50% of the time there is another person present or immediately available during the event. However only 6% survive. The number one reason for this terrible statistic is the lack of public CPR knowledge and training. People simply do not know what to do. The goal of this website is to increase public knowledge and improve this terrible statistic.
- 16. Paying it Forward: We ask you to consider who would be there to take care of you if you were the victim of cardiac arrest. Would they know what to do? If not - We ask that you share this website and knowledge contained with your friends and loved ones. Knowledge is power and can make the difference between life and death. Face to face, Facebook, Twitter, or Email - the life you help save, might be your own. Emergency Situation Considerations Personal Safety Your number 1 priority in any situation should be your own personal safety. You should never put yourself in extreme danger to help someone else. You can not do any good for anyone if you become injured or hurt. If you are uncomfortable or in fear for yourself - retreat to safety and await professional help. Nature of Emergencies & Staying Calm Emergencies by nature are stressful and take a toll on everyone involved. To be able to help someone else you must remember to remain calm. You must make rational decisions based upon processing rapid information related to the situation you are in without influence of emotion. Failure to remain calm and/or separate emotion may cause you to make poor decisions. These poor decisions may cost you or someone else their life. Calm rescuers also equate to calm victims / bystanders.
- 17. Emergency Preparedness Before an emergency happens is the proper time to start preparing for it. Once the situation occurs there is little opportunity for planning and organization. In your daily life, look around and think about common situations that may occur and how you should respond to them. What would you do if a coworker collapsed while at work? Do you know the address to your workplace? Do you have an AED or First Aid Kit available? If so, where are they located? Are you familiar with their contents and operations? Simply taking a few minutes to figure what resources you have, where they are located, and how they work today -- before you need to use it for a real emergency -- may make a difference. Overcoming Hurdles: Persons faced with cardiac arrest situations often are hesitant to provide care due to fear of doing something wrong or making things worse. Remember that persons in cardiac arrest are clinically dead and there is nothing you can do to hurt them. Doing something is always better than doing nothing. The opportunity of survival you provide by providing CPR can mean the difference between life and death. If suspect someone needs CPR, you start the steps of CPR, and victim does not show any signs of life - CPR is indicated. Continue care until trained help arrives and takes over. Calling 911
- 18. If presented with an emergency situation that exceeds your available resources or you are unsure what to do – someone needs to call 911. 911 is a universal number across the United States that should connect you to your local Police/Fire/EMS dispatch center. When you call 911 remember to stay calm and answer each and every question asked to the best of your ability. Remember Who, What, Where, and How! Who? This includes who you are and who needs help. What is going on? This determines if a fire truck, police officer, or ambulance is needed. Where? Give the complete address if known. If not, describe the location by looking around and giving any information you can see. How to reconnect? Always give the telephone number in which you are calling from or can be reached at should you become disconnected. In addition the 911 dispatcher may ask you a seemingly endless list of questions. Try to remember to stay calm and patient when talking to a 911 dispatcher. Each question is important and helps deliver the most appropriate help to you and those in need. Based on your answers and the given situation the 911 dispatcher may help walk you through any steps that need to be completed before help arrives. Remember to listen carefully and do as instructed. Always ask questions if you do not understand what you are supposed to do. NEVER PUT YOURSELF IN DANGER. NEVER HANG UP FROM 911 UNLESS TOLD TO DO SO BY THE DISPATCHER. Know How To Use The Phone: If you have to dial 9, 7, or * to get an outside line - 911 may be 9911, 7911, or *911.
- 19. Cardiopulmonary Resuscitation (CPR) for Adults - CPR How To Quick Guide of Steps of CPR for Adults: Ensure Personal Safety Assess Victim (Tap and Shout) Assess Breathing Call 911 Circulation: Begin Chest Compressions Airway: Open the Victims Airway Breathing: Provide Rescue Breaths How to perform CPR for Adults: Scene Assessment/Personal Safety: You must make your personal safety the top priority in any emergency situation. If you become injured or killed you will not be able to do any good for anyone else. You becoming injured will take resources away from the original victim possibly worsening their outcome. Things may not be as they appear. Evaluate the scene to make sure there is no risk to yourself. Never put yourself in a situation you are not comfortable with. Think BEFORE Acting/Responding. After insuring your safety, evaluate the scene for clues, resources, and additional victims as your approach. Having good situational awareness helps you better help others. Remember whose emergency it is. THERE IS NO WAY OF CHANGING THE PAST OR RESERVSING WHAT HAS HAPPENED TO ANY VICTIM. YOU WANT TO MAKE THINGS BETTER - NOT WORSE. TRY TO REMAIN CALM. Assess the Victim: Upon finding a suspected victim of cardiac arrest and insuring your own safety - you should assess the victim for responsiveness and determine the appropriate actions for that person. You must remember that things may not be as they appear. Is every person found laying on a sidewalk or in a public place in need of CPR? They may be simply asleep; under the influence of drugs, alcohol; perhaps be homeless; or even mentally ill. You must determine what situation you are faced with before taking any other actions. To assess the victim you should tap and shake the victim physically and yell at the victim "ARE YOUR OKAY?". You want to use enough stimulus
- 20. that would awaken an average person. The victim may be deaf or hard of earring - by physically shaking and tapping the victim - we know with certainty their status. Assess Breathing: After Tapping/Shouting you should assess the victim for breathing. Remember Look, Listen, & Feel. Lower your head down and LOOK at the victims chest; LISTEN for coming out the victims mouth and nose; and FEEL for movement on the victims chest. You should Look, Listen, and Feel for 5 to 10 seconds unless it obvious the victim is not breathing (Blue, etc.). If the victim is NOT breathing or breathing normally - you should continue with the steps of CPR. Call 911 / Getting Additional Resources: If your assessment of the victim determines that they are unconscious & unresponsive or not acting appropriately you must call 911 and/or obtain additional resources. If you fail to call 911 or obtain additional resources you will be responsible for providing care indefinitely. An ambulance does not magically appear when someone is injured, hurt, or in cardiac arrest. You must remember to activate Emergency Medical Services (or other appropriate resources) as soon as possible. ABC's of Life: A = Airway, B = Breathing, C = Circulation - Now C.A.B. ABC is now CAB: CPR Compressions now are performed prior to opening the airway and giving breaths.
- 21. Circulation: Checking For A Pulse: Layperson rescuers should not check for a pulse while performing CPR. The average person has little practice in obtaining a pulse therefore it is unrealistic to expect accuracy during an emergency situation. You should assume that unless the victim wakes up during your assessment or shows signs of life during CPR that the person is pulseless and needs CPR to be continued. Healthcare Providers or persons trained in checking for a pulse may do so if they feel comfortable. If you check for a pulse and do not feel a pulse or are not sure if a pulse is present - begin CPR immediately. If a person is unresponsive, has a pulse, and CPR is performed: no ill effect (other than rib fracture) or cardiovascular damage will occur. Therefore, always err on the side that the victim is pulseless and begin CPR as soon as possible. Circulation: Chest Compressions The fundamental principle of CPR is that we want blood and oxygen circulating throughout the body at all times. Circulation equates to potentially prolonging and mitigating cellular injury and death. The primary intervention to be performed for circulation is Chest Compressions. Chest Compressions circulate blood and oxygen. When performing CPR with rescue breathing, give 30 compressions followed by 2 breaths (30:2 Compressions to Breaths Ratio). Transition from compressions to breaths and back to compressions as quickly as possible. Your goal should be to begin chest compressions within 10 seconds of discovery of the victim and to not interrupt compressions for more than 10 seconds for any reason unless absolutely necessary.
- 22. How to Perform Chest Compressions Make sure the victim is laying flat on their back, face up, on a HARD FIRM SURFACE. The floor is typically the best option in most situations. The transition of the victim from their location to the floor does not have to be a graceful one. You must get them on the floor (or other firm surface) as quickly as possible. Recognize that if the victim is not on a firm surface compressions will likely move the body up and down and not compress the chest (Visualize doing compressions on a water bed). Next, quickly remove any clothing covering the chest. This allows us to find the correct location to perform compressions and use an AED when it arrives. Locate the center of the chest, between the breasts and place the palm of one hand on top of the lower half of the sternum. Place the second hand on top of the first hand in a manner that is comfortable for you. You may overlay or interlock your fingers. Position yourself over the victim and use your entire body to push up and down on the persons chest. Keep you elbows locked and think of moving at the waist. This ensures you use your entire body to perform compressions. If you use your arms and not your
- 23. body - your arms will become fatigued quickly and you will not be pushing at the right rate and depth. Compress the chest at the rate of at least 100 compressions per minute. Think of the beat of the song "Staying Alive" by the Bee Gees. The beat of "Staying Alive" is 100 beats per minute. If you match compressions with this song - you will be performing compressions at the right speed. Remember to pace yourself so not to get fatigued. After each compression, allow the chest to return to its normal position before compressing again. This chest recoil allows the heart to refill with blood and provide the most effective CPR possible.
- 25. If performing rescue breathing, perform 30 compressions, perform a headtilt/chin-lift, give two rescue breaths (looking for chest rise and fall) and resume compressions as quickly as possible. If performing "Compression Only CPR" simply compress the chest at the rate of 100 compressions per minute without interruption or delay. Remember that when CPR is not being performed, blood and oxygen are not circulating, and cellular injury and death may occur. 2 Rescuers Present: If another rescuer is arrives or is present during the rescue effort perform CPR as described above expect you may alternate and switch roles as needed. One rescuer should perform 30 compressions and the second rescuer provide 2 rescue breaths. You should change roles every 2 minutes (or 5 sets of 30:2) or as needed to prevent fatigue. When working with another rescuer counting out loud when doing compressions will allow them to know when to give breaths. Teamwork is very important and each rescuer should evaluate the rescue effort and provide feedback as needed. Rib Fracture: While performing CPR rib fracture is common. You may feel ribs break, feel or hear bone rubbing on bone, or see free floating ribs on the victims chest. Chest compressions should continue without delay or modification. If the person survives the cardiac arrest their ribs will heal. Saving their life out weighs the risk of rib fracture.
- 26. To perform chest compressions effectively: 1.) Push Hard and Push Fast. Pushing hard and pushing fast helps keep circulation moving. 2.) Continue CPR continuously without delay or pause unless absolutely required. Reasons to stop or pause CPR include: The person wakes up/shows signs of life, someone else takes over, to use an AED, or you can no longer continue. 3.) Aim for the rate of at least 100 compressions per minute. Think "Staying Alive". Airway: Opening the Airway When a person becomes unconscious, they loose all muscle tone. The tongue being a muscle relaxes and may block the airway (trachea/windpipe) of the victim. The tongue is the most common cause of airway obstruction in an unconscious adult. To mitigate this and reopen the victims airway, we must perform a physical intervention to lift and move the tongue out of the way. The maneuver used to open a victims airway is called a head tilt/chin lift. With the victim laying face up on a hard firm surface place one hand on the forehead of the victim while grasping the bony portion of the chin with the other. Tilt the head and lift the chin at the same time. This lifts the tongue and creates a pocket for oxygen to travel. When you open the victims airway you may hear sounds of oxygen or gasses escaping and/or may see fluid, vomit, or froth escape from the victims
- 27. mouth. Anything blocked from the tongue in the trachea will potentially escape when the airway is opened. Do not confuse this with breathing or stop CPR if this occurs. Breathing: Rescue Breaths Rescue breaths are the process of giving artificial breathing to someone who isn't breathing on their own. When giving rescue breathing, give just enough air (volume) to see the chest rise. Giving too much volume may cause harm to the victim. Simply think of lungs as nothing more than balloons. If you over inflate/hyperventilate a balloon it pops; the same is potentially true with a human lung. In addition to causing injury to the lung from over inflation and hyperventilation - may cause air to enter the stomach which may induce or cause vomiting. Vomiting is dangerous as it may lead to aspiration and development of pneumonia if the victim survives. Breathing: Mouth to Mouth
- 28. Mouth to Mouth breathing is considered the easiest and most readily available option as it does not require any special equipment to perform. Mouth to Mouth breathing is performed by opening the victims airway (head-tilt/chin-lift), covering the victims mouth completely with your mouth, pinching the victims nose (to keep the oxygen from escaping back out the nose), and giving a regular breath for about 1 second into the victim. When giving the breath you should see the chest rise. Let the victim exhale and give the second breath just as you did with the first breath. If you do not see the chest rise and fall with each breath, readjust the head, making sure you have the airway open and attempt the breaths again. If the breaths do not make the chest rise and fall for a second time - move on to circulation and compressions. Despite the typically low risks of exposure during mouth to mouth breath many people are hesitant to provide mouth to mouth breathing to someone who they do not know. Mouth to Mouth breathing risks are real and may expose the rescuer to viral infections such as H1N1, the Flu, or Herpes. Rescuers should use their judgment and internal comfort when considering who and when to provide rescue breathing. Breathing: Mouth to Mask
- 29. Mouth to Mask Breathing is the delivery of rescue breaths through a barrier mask to protect the rescuer from becoming exposed to the victims bodily fluids. Barriers devices such as a pocket mask should be used to provide rescue breathing when available and delivering rescue breaths. Pocket Masks are usually made of plastic and contain a one way value designed to limit exposure to the rescuer to exhaled air, bodily fluids, and disease process. To use the mask, place it on the victims face with the pointy end over the bridge of the nose. Place one hand over the top of the mask holding it firmly on the face, Place the second hand on the bottom portion of the mask while grasping the chin; perform a head tilt/chin lift. Deliver breaths as in mouth to mouth breathing except place your mouth on the one way valve. Deliver each breath for about 1 second; looking for the chest to rise. Breathing: Rescue Breathing without Compressions: During a major medical event and sometimes prior to cardiac arrest, you may be faced with a victim who is not breathing or not breathing effectively but still is maintaining adequate
- 30. circulation and perfusion. When faced with these types of situations if in your opinion the victim does not yet need CPR with compressions but exhibits any signs or symptoms of poor oxygen exchange, Rescue Breathing should be considered. To provide rescue breathing: (after contacting 911 or obtaining additional resources): 1.) Open the victims airway with a head-tilt chin-lift as in CPR; 2.) Give 1 Rescue Breath Every 5 to 6 Seconds for Adults OR Every 3 to 5 Seconds for Pediatric Victims. Be sure with each breath to witness the chest rise and fall. Count each second slowly (One-One Thousand, Two-Mississippi) between rescue breaths to avoid hyperventilation or gastric inflation (air getting into the stomach) which may induce vomiting. If while facing an emergency, you can not remember how often to deliver a Rescue Breath to a victim of any age: 1.)Remain Calm 2.)Focus on Your Own Breathing 3:)Provide a Rescue Breath to the victim each time you breath (You Breath - They Breath) until other trained help arrives. Hands Only Cardiopulmonary Resuscitation (CPR) Compression Only Cardiopulmonary Resuscitation (CPR) Hands Only CPR / Compression Only CPR is a research tested alternative method of delivering CPR without rescue breaths. Rescuers during Hands Only CPR / Compression Only CPR should focus on continued non-stop effective compressions. How It Works: Hands Only CPR / Compression Only CPR works by primarily circulating the oxygen inspired by the victim prior to collapse. This preexisting oxygen is circulated during compressions to attempt to delay desaturation and cellular death. The amount of oxygen available and the time of efficiently with Hands Only CPR / Compression Only CPR is variable
- 31. upon the victim and circumstances related to the cardiac arrest. Regardless, Hands Only CPR / Compression Only CPR is a viable alternative option for providing cardiac arrest care over doing nothing; and is perfect for situations in which you discover or witness a sudden cardiac arrest, have no barrier device, and you do not feel comfortable giving unprotected mouth to mouth ventilations. Cardiopulmonary Resuscitation (CPR) for Children Cardiopulmonary Resuscitation (CPR) for Infants Differences in CPR for Children & Infants: Defining a child: A child is a victim who is over the age of 1 and up to the age of puberty. Puberty for this context is defined as breast development in females and underarm or facial hair in males. Puberty is used as the establishment of adulthood as developmental changes may effect aspects of CPR. In addition to puberty the overall size of the victim should be considered due to the current epidemic of obese children in the United States. If the victim is the size of an adult - treat them as an adult and not a child - regardless of age or puberty status. Reason for Cardiac Arrest in Children/Infants: Children and Infants suffer from cardiac arrest typically as a result of a respiratory event such as choking or respiratory arrest. Not from a cardiac condition - It is uncommon to hear of a child or infant having a heart attack. Children and Infants typically do not have a history of high blood pressure, smoking, or other conditions that are applicable to adults. Due to children and infants likely going into cardiac arrest due to respiratory event, we must recognize that oxygenation and circulation need to be initiated as quickly as possible for these age groups.
- 32. Hypoxia (or lack of oxygen inside the body) is a reversible cause of cardiac arrest. If oxygenation and circulation are performed quickly and effectively the cardiac arrest may improve or allow the person to recover. When to Call or Get Help for Children and Infants in Cardiac Arrest: Due to children and infants going into cardiac arrest most likely to respiratory cause; one must consider the value of outside resources in the life saving effort. You should recognize that time is the enemy, especially in pediatric victims, and delay in treatment or care may result in a poor outcome. The sooner care is initiated for a child or infant - the higher the chance of survivability. Therefore there are special guidelines for when to obtain or call 911 when faced with a pediatric cardiac arrest. If you are ALONE and FIND an infant or child in cardiac arrest: Perform the steps of CPR immediately without delay for 2 minutes or 5 sets of 30:2 before leaving the pediatric victim to get help or call 911. Due to finding the child and the unknown time involved since collapse, delaying starting CPR may result in cellular injury or death. By performing the steps of CPR for 2 minutes or 5 cycles of 30:2, we circulate blood and oxygen potentially restarting the clock on a poor outcome. This allows us to build the pediatric victim back up with oxygenation before leaving to call 911 or obtain help without fear of causing more harm (at least for a few minutes). If you witness the pediatric victim collapse or have someone else around: Treat the victim as an adult. Get additional resources and Call 911 (or have someone else do it) immediately then return to the victim and begin CPR. Cell Phones: If you are alone and have a cell phone it may be possible to call 911 & begin the steps of CPR at the same time regardless if you witness the arrest or not. Remember that time is the enemy.
- 33. ABC's of Life for Children (1 to Puberty): CAB - Compressions, Airway, Breathing Circulation: Same as an Adult. Remember to Push Hard and Push Fast. Do not hesitate or restrict compressions due to the smaller size of the child. Recognize that performing poor compression equates to poor circulation and cellular injury and death. Attempt to push 1/2 to 1/3 the chest depth of the child (approximately 2 inches). If the child is small in size, you may use one hand instead of two when performing compressions. You may use the second hand to maintain an open airway to allow for potential CPR induced ventilation; and stabilize the child from moving during compressions, if you prefer. Airway: Same as an Adult except look in the airway for a potential choking object that potentially could be removed. Breathing: Same as an Adult. If giving rescue breaths, give a lower volume of air when giving breaths. Give just enough breath to see the chest rise. ABC's of Life for Infants (Birth to Age 1): CAB - Compressions, Airway, Breathing
- 34. Circulation: Compressions have to performed differently for infants than they would be for larger children and adults due to their smaller size. To perform compressions on an infant, place the infant on a flat hard surface, face up, and locate the middle of the chest between the breasts. Place two fingers of one hand on top of the sternum about a fingers tips length below the nipple line. Place the second hand on the infants head to maintain an open airway and to stabilize the victim. Push on the chest using the two fingers at the rate of at least 100 compressions per minute at a depth of 1/3 the chest depth. If giving CPR with rescue breathing perform 30 compressions to 2 breaths (30:2 ratio). Airway & Breathing: Same as a Child. Automated External Defibrillators Automated External Defibrillator's (or AED's) are devices that treat the most common cause of sudden cardiac arrest by delivering a electrical shock to a persons body. What an AED treats is an abnormal heart rhythm called Ventricular Fibrillation (or V-Fib) that causes the heart to stop circulating blood. V-Fib is
- 35. a heart condition in which the ventricles of the heart quiver instead of mechanically pumping. The most effective treatment for V-Fib is CPR and use of a defibrillator. The longer it takes for CPR and an AED to be used, the less likely a person is to survive V-Fib. CPR should be stopped and an AED applied and used as soon as it is available. Automated External Defibrillators are designed to allow anyone to use them regardless if they have been formally trained on their operations. AED's accomplish this through use of voice instructions, pictures, and prompts. An AED will only deliver a shock if indicated and is safe when used correctly. Quick Guide to Using an AED: 1.) Open AED and Turn Unit On. 2.) Attach AED Pads to victims bare chest. 3.) Ensure AED Pads are attached to AED. 4:) Follow Prompts of the AED. 5:) Clear the Victim when Analyzing and Deliver Shock if indicated.
- 36. 6:) Continue CPR starting with Chest Compressions. 7.) Follow AED instructions until emergency personnel arrive. AED's function by taking an EKG of the victims heart to analyze the electrical activity in an attempt to determine if the victim is in V-Fib or another heart rhythm. If the AED analysis indicated V-Fib, a shock will be indicated and may be delivered by the rescuer and AED according to the device's operating instructions. If the AED analysis finds any other rhythm than V-Fib - a "No shock" instruction will be issued - and the AED will not allow a shock to be delivered. Pad Placement: AED pads typically go around the heart and are placed on the upper right side of the chest below the collar bone and on the lower left side below the nipple line near the armpit. The electricity delivered by an AED will travel in both directions between these two pads. Rescuers using an AED must always listen to the instructions of an AED. The AED will advise not to touch the patient while it is analyzing the victims heart and again if a shock is indicated. If the victim is touched or moved during analysis, the AED may interrupt those movements and cause a potential false positive for V-Fib. If any person is touching the victim when a shock is actually delivered, they may receive some of the shock - which may cause injury or even death. If you are operating an AED: verbally yell and physically look head to toe to make sure no person is touching when the victim when the AED advises not to touch the victim. The electricity delivered by an AED during a shock stuns the heart in an attempt to stop the abnormal rhythm. This stunning of the heart may halt the abnormal ventricular quivering and allow the heart to recover back into a regular rhythm. An AED does NOT restart the heart or fix a "flat line" as often shown on television. A flat line represents that there is no heart electrical activity at all. A flat line usually represents clinical death as it is rare to recover from a flat line rhythm. Recognize an AED attempts to correct the electrical system of the heart that is malfunctioning - not jump start it. If an AED recognizes a "flat line" it will indicate "No Shock Advised" and instruct you to resume CPR. Shocking a flat line will NOT benefit the patient and will not be allowed by an AED. If a shock is indicated and delivered, the heart may take up to 10 minutes to recover from the cardiac arrest. Therefore, immediately after delivering a shock (or a "No Shock" indication) the rescuers must resume CPR with compressions to help mechanically get the heart beating again. Effectiveness of a shock is greatly affected by how well CPR is performed immediately thereafter. Do 5 sets of 30:2 or 2 minutes of CPR. The AED will
- 37. automatically stop and give instructions exactly every 2 minutes. Repeat the process of operation and perform the tasks indicated by the AED. Remember when resuming CPR after AED usage to always being CPR with chest compressions. When a shock is delivered the victim will often convulse. You may also witness an arch of electricity travel across the victims body, smell burning hair or skin, or see smoke. This is normal as a large amount of electricity is entering the victims body. Continue with CPR and AED usage as indicated. Once an AED is placed, never remove the pads from the victims chest or turn the AED off until instructed to by trained healthcare professionals. If the victim wakes up or recovers they may suffer from V-Fib again and require additional AED treatment. Special Considerations When Using an AED: 1:) Hairy Chest: If the victim has a hairy chest you will need to remove the hair prior to placing the AED pads on the victims chest. You may do this with a razor that is typically found with an AED or by attaching one set of AED pads and pulling them off forcibly removing the hair. You should ensure you have another set of AED pads prior to using one set to remove hair or you may not be able to use the AED. Leaving hair in place may cause the AED pads not make contact with the patients chest and cause the shock to be ineffective. 2:) Medication Patches: If the victim has a medication patch on their skin in the area the AED pads are to be placed you must remove them prior to attaching the AED pads. Use gloved hands to remove the medication patch. Medications patches may divert the shock or represent a burn hazard if not removed. 3:) Covered in water: If the victim is covered in water or sweat attempt to dry the chest prior to applying the AED pads. Moisture may divert the shock from the heart. 4:) Implanted Pacemakers or Defibrillators: If the victim has an implanted pacemaker or defibrillator continue to use an AED as otherwise indicated for other patients. Ensure the AED pads are at least an inch away from the victims device prior to delivering a shock. You continue to use an AED as it is unknown if the implanted device is functioning correctly. An implanted
- 38. pacemaker or defibrillator will look like a small lump underneath the skin usually on the upper left side of the chest near the heart. 5:) Pediatric Patients: An AED may be used for any victim of any age. Pediatric pads deliver a smaller shock and should be used if available when dealing with infants and children. If pediatric pads are not available, use the adult pads as long as they do not overlap or touch. You may place AED pads with one pad on the front and one pad on on the back of very small victims. It should be noted many AED's will not have pediatric pads due to financial and logistical reasons. 6: ) Fully Automated AEDS: Fully automated AED's are devices they do not require a rescuer to push a button to deliver a shock to a victim once applied. It is imperative to always listen to an AED and follow the instructions given. If using a fully automated AED it may deliver a shock at anytime and pose injury or death to you or other rescuers if touching the victim when a shock is delivered. Healthcare Provider CPR / Professional Rescuer CPR Considerations Healthcare Providers and Professional Rescuers when performing CPR should consider the following considerations: Use of BVM or Bag Value Mask: A bag valve mask is a device that is commonly used in healthcare settings to deliver rescue breathing to person who is not breathing or is breathing ineffectively. A BVM delivers positive pressure ventilation and forces the volume of the air in the device into the victims lung. The device may be used with or without oxygen. If used with oxygen, high flow oxygen (greater than 12 liters per minute) should be used. Room air contains approximately 21% oxygen; with high flow oxygen attached to a BVM, approximately 90%
- 39. oxygen is delivered with each breath. A BVM should be used in rescue situations with two or more rescuers. The mask supplied with a BVM is similar to that used in a pocket mask. With one hand use the thumb and index finger to grasp the mask. Place the thumb over the raised portion of the mask. This visually looks like the letter C. Standing at the victims head, place the pointed end over the bridge of the victims nose. Place the remaining three fingers on the victims chin. This visually looks like an E. This technique is called the EC clamp technique and is the preferred method of using a BVM. With the second hand attach the bag portion of the device to mask and squeeze the bag slowly - touching finger to finger to deliver the majority of the volume of air within the bag device. Upon delivering a breath and seeing the chest rise, slowly release the bag allowing it to refill while holding the mask firmly on the victims face. Deliver additional breaths as indicated. Do not hyperventilate or forcefully squeeze the bag. BVM's come in Adult, Pediatric, and Neonate sizes - You should use the most appropriate sized mask/device dependent on patient size. Checking for a Pulse: Healthcare Providers should check for a pulse if they feel comfortable before performing chest compressions on a suspected victim of cardiac arrest. For Adults and Children, a pulse should be assessed in the carotid artery for 5 to 10 seconds. The carotid artery is assessed due to it being central and likely to
- 40. be palpable if a pulses exists. During cardiac compromise the body shunts circulation to the heart, lungs, and brain as they are most important for survival of life. Therefore it is possible a carotid pulse may be present while a peripheral pulse such as the radial may not. In an infant, a brachial pulse should be assessed as it will be larger and easier to evaluate. Ratio of Compressions for Infants and Children: Healthcare Providers should recognize that children likely are hypoxic and are in need of oxygen during CPR. Therefore, in a healthcare setting with two or more rescuers present, compressions should performed at the ratio of 15 compressions to 2 breaths instead of the traditional 30:2. By using 15:2, the victim receives breaths twice as frequent, increasing the overall oxygenation of the patient. This method is used when multiple rescuers are present to help reduce fatigue. If alone, use 30:2 until additional rescuers arrive. Compressions for Infants with two or more rescuers: Healthcare providers providing CPR to an infant in a healthcare setting may use an alternative technique to the standard two finger compression method. The alternative method is called the two thumbs encircling technique and allows for more effective compressions when working with another rescuer. The compressing rescuer encircles the infants body with both hands as in going to pick up the child. The rescuer compresses the chest while on a hard firm surface with both thumbs. The second rescuer delivers breaths every 15 compressions. The compressing rescuer never removes the hands from the victims body while breaths are being delivered to allow for immediate resumption of compressions. Advanced Airway: When an advanced airway such as an ET or Combitube is placed; CPR changes slightly. Compressions are performed at the rate of at least 100 compressions per minute without interruption and breathing is performed every 6 seconds (10 times per minute) continually. Compressions and breaths are performed simultaneously once an advanced airway is in place. 2010 CPR Guidelines
- 41. Rate of Compressions (Adult, Infants, & Children): At least 100 compressions per minute. Depth of Compressions (Adults & Children): 2 inches / 5 centimeters. Depth of Compressions (Infants): 1/3 the chest depth. Ratio of compressions to breaths (Adults): 30 compressions to 2 rescue breaths. Ratio of compressions to breaths (Children/Infants): 30 compressions to 2 rescue breaths. (Non Healthcare or Single Recuer) Ratio of compressions to breaths (Children/Infants): 15 compressions to 2 rescue breaths. (Healthcare in Team Rescue) PUSH HARD / PUSH FAST Chain of Survival: Immediate recognition of cardiac arrest and activation of the emergency response system Early CPR with an emphasis on chest compressions Rapid defibrillation (as soon as possible) Effective advanced life support Integrated post–cardiac arrest care Please note that the information contained within in this website reflects the most recent CPR Guidelines adopted by the International Liaison Committee on Resuscitation. This website is not affilated with the American Heart Association. Some content is based upon the clinical experience and opinion of the author. This website does not construct independent medical advice or provide medical direction for any situation. This website is not intended to replace a traditional face to face, hands on, CPR Class with a qualified CPR Instructor. Click here to find a CPR class in your area. Content provided for informational and educational purposes only. Linking to this website, contained content, and images with appropriate credit/citing is allowed. Author Information: This website was created and authored by Matthew Carter (Click to Email). Follow Me: Facebook - Twitter - Google
- 42. Link to this page: <a href="http://www.cardiopulmonaryresuscitation.net">Cardiopulmonary Resuscitation (CPR)</a> Cite this page: Matthew A. Carter (2013). Cardiopulmonary Resuscitation (CPR) Retrieved Month Day, Year you visited the website, from:http://www.cardiopulmonaryresuscitation.net/ Where to get CPR Certification - Find a CPR Class Last Updated: Saturday, September 21, 2013 1:15 Terms of Use - Privacy Policy © 2013 - Matthew A. Carter - All rights Reserved SITEMAP - Table of Contents: What is Cardiopulmonary Resuscitation (CPR)? Cardiopulmonary Resuscitation (CPR) Facts & Statistics Emergency Situation Considerations Calling 911 Cardiopulmonary Resuscitation (CPR) for Adults - CPR How To o Quick Guide of Steps of CPR for Adults o Scene Assessment / Personal Safety o Assess the Victim o Assess Breathing o Call 911 / Getting Additional Resources o ABC's of Life - Airway, Breathing, Circulation - Now CAB o Circulation: Checking For A Pulse o Circulation: Chest Compressions How to Perform Chest Compressions How to ensure you perform chest compressions effectively o 2 Rescuer Adult CPR o Airway: Opening the Airway o Breathing: Rescue Breaths
- 43. Breathing: Mouth to Mouth Breathing: Mouth to Mask o Breathing: Rescue Breathing without Compressions Hands Only Cardiopulmonary Resuscitation (CPR) Compression Only Cardiopulmonary Resuscitation (CPR) Cardiopulmonary Resuscitation (CPR) for Children - Child CPR How To Cardiopulmonary Resuscitation (CPR) for Infants - Infant CPR How To o Differences in CPR for Children & Infants o Defining a child o Reason for Cardiac Arrest in Children/Infants o When to Call or Get Help for Children and Infants in Cardiac Arrest o Reason for Cardiac Arrest in Children/Infants o If you are ALONE and FIND an infant or child in cardiac arrest o If you witness the pediatric victim collapse or have someone else around o ABC's of Life for Children (1 to Puberty): CAB - Child CPR How To o ABC's of Life for Infants (Birth to Age 1): CAB - Infant CPR How To Automated External Defibrillators o Quick Guide to Using an AED - How to use an AED o Special Considerations When Using an AED Healthcare Provider CPR / Professional Rescuer CPR Considerations - Basic Life Support o How to use an BVM o How to check for a pulse o Ratio of Compressions for Infants and Children o Compressions for Infants with two or more rescuers o Advanced Airways CPR Guidelines - 2010 AHA CPR Guidelines o o 133
- 44. 37 273 lucky leap Ads Trust Rating Not Yet Rated cardiopulmonaryresuscitation.net Related Searches:
- 45. Online CPR Online CPR Certification American Heart Association Cpr & First Aid Classes Automated External Defibrillators CPR Course First Aid And CPR Training CPR & First Aid CPR Training Adult CPR ShareThis Copy and Paste - See more at: http://www.cardiopulmonaryresuscitation.net/#sthash.aVKbiBer.dpuf