Baixar para ler offline

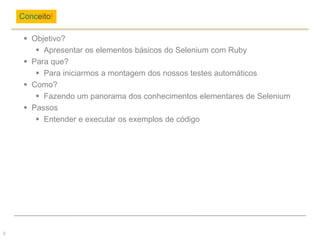
![Prática!
5
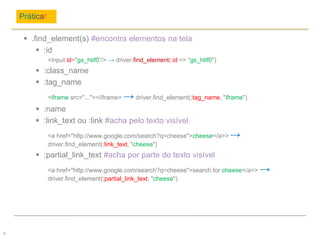
.find_element(s) #encontra elementos na tela
:xpath
<input id="gs_htif0“/> → driver.find_elements(:xpath, “.//*[@id='gs_htif0']")
:css
<div class="intro"><p>Meu nome é Paulo<span id="Lastname">Silva.</span></p>
→driver.find_element(:css, “.intro, #LastName")
Mais métodos
.send_keys #imputa uma string na caixa de texto
.text #retorna o texto visível do objeto
.click #clica em um objeto
.toggle #seleciona um radiobutton](https://image.slidesharecdn.com/rubyparatestersiii-170406223558/85/Ruby-para-testers-III-Selenium-5-320.jpg)
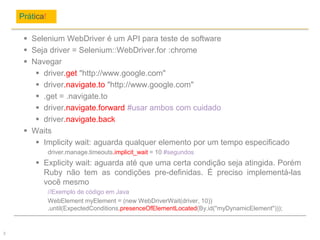
![Prática!
7
Mais métodos
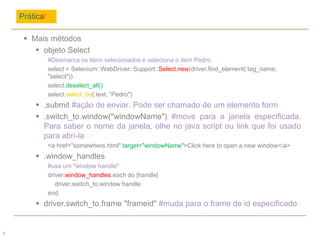
Popups
driver.switch_to.alert #com o objeto em mãos é possível aceitar, inserir usuário e senha,
cancelar entre outras ações
Alterando as configurações do browser
driver = Selenium::WebDriver.for :firefox, :profile => profile
profile = Selenium::WebDriver::Firefox::Profile.new
profile['network.proxy.http'] = 'localhost'
profile['network.proxy.http_port'] = 9090
#ver mais em http://kb.mozillazine.org/About:config_entries
ActionBuilder #operações complexas
driver.action.drag_and_drop(element, target).perform
driver.action.click_and_hold(element).perform
driver.action.double_click(element).perform](https://image.slidesharecdn.com/rubyparatestersiii-170406223558/85/Ruby-para-testers-III-Selenium-7-320.jpg)

O documento apresenta uma introdução ao Selenium com Ruby, focando na automação de testes de software. Ele aborda conceitos básicos como navegação, localização de elementos e métodos para interagir com diferentes componentes da página. Além disso, inclui exemplos práticos e referências a materiais complementares sobre o uso do Selenium.


![[Testes] frameworks de testes end to-end baseados em node js](https://cdn.slidesharecdn.com/ss_thumbnails/testesframeworksdetestesend-to-endbaseadosemnodejs-180719104447-thumbnail.jpg?width=640&height=640&fit=bounds)


![[Curso Java Básico] Aula 06: Passando argumentos para o programa](https://cdn.slidesharecdn.com/ss_thumbnails/curso-javase-aula06-131117133626-phpapp02-thumbnail.jpg?width=640&height=640&fit=bounds)


![[Curso Java Basico] Aula 12: Lendo dados do teclado usando a classe Scanner](https://cdn.slidesharecdn.com/ss_thumbnails/curso-javase-aula12-150114075252-conversion-gate01-thumbnail.jpg?width=640&height=640&fit=bounds)