The document provides instructions for finger exercises that are designed to build coordination between the right and left hand for playing the guitar. The exercises involve playing repeating finger patterns on each string to build motor skill control for picking and fingering. Practicing these exercises with an even steady rhythm will help players quickly develop the coordination needed for controlled guitar playing.
Beginners Guide to TikTok for Search - Rachel Pearson - We are Tilt __ Bright...
Guitarra - Aula 1
1. the right key at any musical instrument: allinstrument do is play itself.
It's easy to play the right time and the you have to will touch
the right key at the right time and the instrument will play itself.
~ J.S. Bach
the right key at the right time and the instrument will play itself.
~ J.S. Bach
~~J.S. Bach
J.S. Bach
The Parts of the Guitar
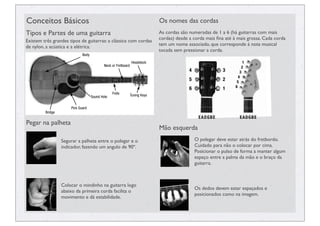
Conceitos Básicos TheOs nomesof the Strings
Names das cordas
ThereThe Parts of guitars, the steel-string acoustic,
TheThe Parts thethe Guitar
are three main types of the Guitar
Parts of of Guitar The six stringsThe Names from first to sixth
The Names numbered of the Strings
TheofNames of the Strings
a guitar are the Strings
Tipos string or classical guitar, ofguitarrasteel-string acoustic, startingAssix stringssãoaanumeradas deup tofrom(há guitarras com sixth
the nylon e are three main types and the electricsteel-string acoustic, The theThe sixofstring andareguitar areanumberedsixth first to mais
There arePartes de uma ofguitars, the guitar.acoustic,
There three main types types guitars,steel-string
There are three main of guitars, the the
on cordas strings of counting 1 from first tofrom
The six strings of guitar a numbered 6 first to sixth
thinnest
guitar numbered the thick-
est string. The strings onathe thinnestnames that corre-thick-
cordas) the also corda mais fina até to the grossa. Cada corda
on desde have letter counting up à mais
Existem nylongrandes tipos de guitarras: athe electric com cordas starting startingthinnest stringnames of yourup to the thick-to the thick-
the nylon string string or classicalguitar, the electric guitar.guitar. spond tostarting on thethinnest string and string and counting up
the trêsnylon or classical guitar, and and the electric
the string or classical guitar, and clássica guitar. and counting
temstring.TheMemorize stringsque corresponde à nota musical
est um nome associado, also havestrings.corre- that corre-
each string. strings also have letter names that
est
the
Thestrings also have letter names thatnames
est string. string. The letter corre-
de nylon, a acústica e a elétrica.
Body
tocadaeach string. MemorizeMemorizeof your strings. your strings.
spond spond to each string. corda. the names of
spond to to sem string. Memorize the names of your strings.
each pressionar a the names
1
Body Body Headstock
Body
Neck or Fretboard 2
Headstock 4 3 3 11
Headstock
Neck or Fretboard Headstock 2 1
Neck or Fretboard 4 34 2 2
Neck or Fretboard 5 4 2 35 3
4 4
33
3
6 5 1 2
6
54
5 2 4
6 5 1 65 2
5
Frets 6 1 6
Sound Hole Tuning Keys 6
Frets Tuning Keys
6 1
Sound Hole
Frets
Sound Hole Tuning Keys
Pick Guard Frets Tuning Keys
Bridge Pick Guard Sound Hole EADGBE EADGBE
Bridge Pick Guard EADGBE EADGBE
Bridge Pick Guard EADGBE EADGBE
Pegar na Right Right Hand Technique
Proper palhetaHand Technique
Proper
Bridge
Proper LeftLeft HandETechniqueD G B E
Proper HandA D G B
E
Technique E A
Mão esquerda
Proper Right Hand Technique
Hold the pick between your thumb and Proper Left HandonTechnique
Hold your thumb the back of the
Proper Segurar aHoldfinger.entre o polegar e should
Rightfirst the pick between yourpick o and
Hand Technique
first finger. palheta thumb
The thumb and pick should
The thumb and
Proper O polegaronupperthe backsidethedo fretbordo.
Left Hand Technique
fingerboard your the deve estar ofof
Hold on thumb on side atrás
fingerboard the upper of
formHold90 degree angle. your de 90º.
a the pick between The pick
indicador, fazendo um angulo thumb and the neck. Be careful not não oyour of thepor cima.
Cuidadothumb onput back
Hold your para to the colocar
form a 90 degree angle. The pick the neck. Be careful not to put your
should be sticking out from underneath
first finger. The thumbout from underneath
and pick should thumbPosicionarthe pulso de forma a manter algum
on top of o neck. Your
fingerboard onofthe upper side of
Hold 1/4 be 1/2 between your thumb and
should pick
theto sticking inch.
the thumb a 90 degree angle. The pick
a of an
thumb onHold your thumb on the back of the
top the neck. Your
wrist should be entre a palmaair mão e o braço da
form the thumb a 1/4 to 1/2 of an inch. espaço lowbe lowsometoda air
with not put
the neck. Be carefulwith some your
wrist should
firstbe sticking out from underneathshould
should finger. The thumb and pick space guitarra.your palm andonand the
thumb between your palmthethe upper side of
between fingerboard neck. Your
space on top of the
the form aa 90 to 1/2 of an inch. The pick
thumb 1/4 degree angle. neck ofneck guitar. guitar. Be careful not to put your
the should neck.
the
wrist of the be low with some air
should be sticking out from underneath space between your palm of the neck. Your
thumb on top and the
Bracing the thumbgives your1/2 your hand the
your hand a 1/4 to hand the inch.
Bracing your hand gives of an Your four fingersfingersshould be evenlywith some air
neckfour wrist should be low
Your of the guitar.be evenly
should
Colocarstability to accurately switch switch
needed needed stability guitarra logo
o mindinho na to accurately spaced. Noticespace the middleyour palm and the
how between
spaced. Notice how the middle
Os dedos devem estar espaçados e
abaixo dastrings. hand givesfacilita o theare
primeira corda your are
between between strings. Although there
Bracing your Although there hand two fingersfour neck ofcoming be evenly
Your fingerscomingthe guitar.
two arefingers should straight
are straight
posicionados como na imagem.
movimento stability to ways toplacing placing
many different dá estabilidade. brace,
needed e ways to brace,
many different accurately switch onto the fretboard. Yourhow the middle
first and and
spaced. fretboard. Your first
onto the Notice
yourbetweenon pinky soundboard right are
pinky strings. on Although there right
your the the soundboard fourth two fingers curved slightlystraight
fingers are are curved
fourth fingersare coming slightly
Bracing the first the mosttheyour hand the
youris string is com- com-
hand gives most
below thebelowstringways to brace, placing
many first stability to accurately switch towardtoward the frets. fingers should be evenly
Your four
different
needed need to need to press onto frets.
the
the fretboard. Notice how the middle
spaced. Your first and
mon way. mon way. You don'tpress hard. hard.
You don't
your pinky on the soundboard right are fourth fingers fingers areslightly straight
between strings. Although there two are curved coming
below the first string is the most com- toward the frets.
2. Finger ExercisesFigure 1 Staff
Finger ExercisesTablature
The Single Notes in Tablature
Figure 2
Chords in Tablature
Figure 3
As 6 linhas representam as 6 cordas, de
Tablatura are designed to build coordination between your right and left hand. baixo para cima:and fingering hand
Strings
These finger exercises are designed to build coordination
These finger exercises
Notas na tablatura
right and left hand. Proper picking E A D G B E. hand
Proper picking and fingering hand
fingering
1 0
T 3 3 2 1 0 0 Os números indicam os0frets que devem
É um tipo 1st - notação musical, que os guitarristas
de E
2nd to T
coordination is para indicar controlled guitar playing. T
utilizam vital B good corda que está a ser tocada
coordination is vital- to goodacontrolled guitar playing. e
1
A A A
3rd - G
os frets que -devem ser pressionados.
4th D 2
ser pressionados em cada corda.
Directions: Play5th - A finger pattern on each string. Start on the first string, then the second, third, B Although a little dif-
Directions: Playeach finger pattern on each string. Start B
each B
- string, then the second, third, etc... Although a little dif-
etc... 2 little dif-
6th E
ficult at first, these exercises quickly build the motor skill 0
to play the guitar effectively. Practice with an even,
effectively. Practice with an even,
ficult at first, these exercises quickly build the motor skill control needed to play the guitar Cada número correspondean um dedo, o 1 a even,
The 6 lines correspond to the 6 strings on The numbers tell you which frets you need to In this example you would play all of the
steady rhythm. The goal is control, not speed.
steady rhythm. The goal is guitar.
your
control, not speed. put your fingers on and which strings to use.
é o indicador,at the same time. The first, o anelar e o
strings
o 2 o médio, o 3 second
Exercícios para treinar os dedos In this example you would play the first string4 o
fretted at the first fret. The next note would
mindinho. strings would be open. Your first
and sixth
finger would fret the first fret on the third
be the first string at the third fret. Then, the string. The fourth and fifth strings would have
1 1 1 1 2 2 2 2 3 3 3
1 1 1 1 2 2 2 2 3 3 3 3 second string at4the third fret and3 on.3 3
4 4 4 4 3 3 3 3 4 3 so 2
2 2 2 on the second frets of each string.
2 2 2 1 11 11 11
2 1 1 1 1
T
T fingers
1. A
1. A
B Finger Exercises
B
Picking: Down-Up-Down-Up. Repetir para todascoordination between your right and left hand. Proper picking and fingering hand
Right Hand Picking: Down-Up-Down-Up build as cordas
These finger exercises are designed to
Right Hand Picking: Down-Up-Down-Up Repeat for all Strings
Repeat for all Strings
all Strings
coordination is vital to good controlled guitar playing.
T
T Directions: Play each finger pattern 3 each 3
2. A
2. A 11 1
1 2
2 2
2
on string. Start on the first string, then the second, third, etc... Although a little dif-
4 4
4 3
3 3
3 2
2 22 11 11
1
ficult at first, these exercises quickly build the motor skill control needed to play the guitar effectively. Practice with an even,
B
B steady rhythm. The goal is control, not speed.
Right Hand Picking: Down-Up todas as2cordas2 3 3 3 3 4 4 4 4 3 3 3 3 2 2Repeat for1all 1Strings
Right Hand Picking: Down-Up
Picking: Down-Up. Repetir para 1 2
1 1 1 2
Repeat for all Strings
2 2 all Strings
1 1
T
T 1.
1 2 3 4 3
3 2
2 11
1
T 1
A 2 3 4
3. A
3. A B
B
B Right Hand Picking: Down-Up-Down-Up Repeat for all Strings
T
Picking: All Picking: All Down
Right Hand Down. Repetir para
Picking: All Down
Right Hand Picking: All Down todas as cordas Repeat for all Strings
Repeat for all Strings
all Strings
2. A 1 1 2 2 3 3 4 4 3 3 2 2 1 1
SESSION 1
SESSION 1
SESSION 1
B 4
4 Starting Off Right
Starting Off Right
Starting Off Right
3. Learn & Master Guitar
!
1 2 1 3 1 4 1 3 1 2 1
T
"#$%!&$'()*!)+)*,$%)!$%!-).'/!/0!1)2)304!&$'()*!$'1)4)'1)',)5!!6*.,/$,)!$/!%30738!./!&$*%/9!(*.1:.338!$',*).%$'(!%4))15!;0!
>?>>@AB!C!D0':%!E)%0:*,)%!!
1 2 1 3 1 4 1 3 1 2 1
T
).,#!)+)*,$%)!0'!.33!0&!/#)!%/*$'(%5!!<%)!/#)!4$,=$'(!-0/$0'!'0/./)1!&0*!).,#!)+)*,$%)5!!6*.,/$,)!7$/#!.'!)2)'!%/).18!
4.*#8/#-5!!"#)!(0.3!$%!,0'/*039!'0/!%4))15!
A
!
4."#$%&'($)'*!+)'*%&!,-%&.)/%!!
! A
B
!
!
B Repeat for all Strings
Picking: All Down. Repetir para todas as cordas Repeat for all Strings
"#$%!&$'()*!)+)*,$%)!$%!-).'/!/0!1)2)304!&$'()*!$'1)4)'1)',)5!!6*.,/$,)!$/!%30738!./!&$*%/9!(*.1:.338!$',*).%$'(!%4))15!;0!
T
).,#!)+)*,$%)!0'!.33!0&!/#)!%/*$'(%5!!<%)!/#)!4$,=$'(!-0/$0'!'0/./)1!&0*!).,#!)+)*,$%)5!!6*.,/$,)!7$/#!.'!)2)'!%/).18!
5. A T
*#8/#-5!!"#)!(0.3!$%!,0'/*039!'0/!%4))15!
5.! B
!
A 4
B 4 3
3
4
4
2
2
4
4
1
1
4
4
3
3
4
4
2 4 1
2 Repeat for all Strings
4 1
Picking: All Down. Repetir para todas as cordas
Repeat for all Strings
How to Read Chord Blocks
How to Read Chord Blocks
CHORD BLOCKS are diagrams that tell you how a chord is to be played. They include information about which frets are to be
played byPicking:fingers and which strings are toparaplayedto be played. They include information about which frets are to be
CHORD BLOCKS are diagrams that tell you how abe todas as not.
which Down-Up-Down-Up. Repetir chord is or cordas
played by which fingers and which strings are to be played or not.
Strings
Strings
6th 5th 4th 3rd 2nd 1st
E A D G B E
6th 5th 4th 3rd 2nd 1st
Don’t Play String
Chord Name
Chord Name C
C Play Strings Open
Picking: Down-Up. Repetir para todas as cordas Play String
E A D G B E Nut Don’t Play Strings Open
Nut Put 1st Finger on
1 Put 1st Finger 1st Fret
2nd String at on
1st Fret 1 2nd String at 1st Fret
Put 2nd Finger on
1st Fret
Put 2nd Finger onFret
4th String at 2nd 2 · An open circle means play
2nd Fret 4th String at 2nd Fret 2 · An open circle means play
the appropriate string open.
2nd Fret Put 3rd Finger on
Put 3rd Finger on Fret
5th String at 3nd 3 the appropriate string open.
· A filled circle means play
3rd Fret
Picking: All Down. Repetir para todas as cordas
5th String at 3nd Fret 3 · A filled circlethat particular
the note on means play
3rd Fret the note on that particular
fret and string.
4th Fret fret and string.
· An X means to not play
4th Fret · An X means to not play