
Recomendados
Mais conteúdo relacionado
Mais procurados
Destaque
Destaque (16)
Semelhante a Google earth is not just for geography teachers guide
Semelhante a Google earth is not just for geography teachers guide (20)
Mais de clemaitre
Mais de clemaitre (20)
Último
Último (20)
Google earth is not just for geography teachers guide
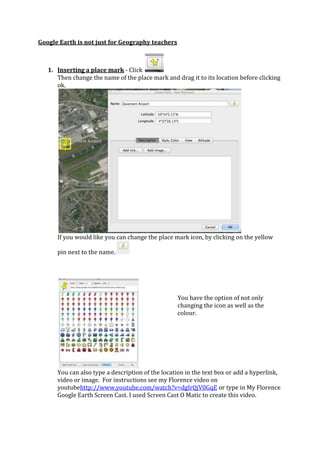
- 1. Google Earth is not just for Geography teachers 1. Inserting a place mark - Click Then change the name of the place mark and drag it to its location before clicking ok. If you would like you can change the place mark icon, by clicking on the yellow pin next to the name. You have the option of not only changing the icon as well as the colour. You can also type a description of the location in the text box or add a hyperlink, video or image. For instructions see my Florence video on youtubehttp://www.youtube.com/watch?v=dgIrQjV0GqE or type in My Florence Google Earth Screen Cast. I used Screen Cast O Matic to create this video.
- 2. 2) Creating a tour. Once the students have added several place marks they can crate a tour. To do this they click the video icon at the top. They then click on each link and can also create a narration if they want.
- 3. 3)Looking at the history of an area in Google Earth Click Then you can change the time by dragging back the arrow on the bar. New Orleans after Hurricane Katrina hit in 2005. 4) Measuring & using elevation in Google Earth You can use the route icon or the ruler icon If you click the ruler tool you will be given the option of a path (route) or straight line. You then just click directly on the satellite image.
- 4. I have decided to choose a path to create a running route in a ski resort – see below. Now I have my route, I want to see the elevation of the run. To do this I must click edit. and show elevation profile.
- 5. Once you have clicked the profile you will see the profile of the route at the bottom of the screen and you can drag the arrow along the route to se the height at various points.