Mais conteúdo relacionado Semelhante a Wattle & Daub (20) 1. TradiTional Building MeThods
Wattle and daub
Used in Britain for around four thousand years, wattle and daub is a
cheap, quick way to build walls out of little more than twigs and mud.
The Ye
o
man’s
house
© Engli
, Bigno
sh Herit
a ge . N M
r
R
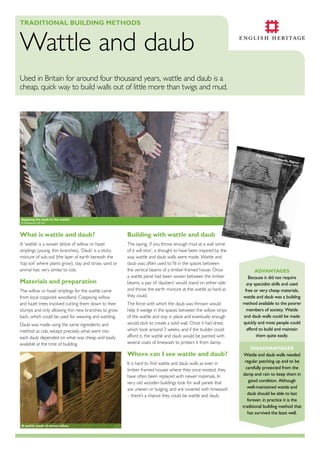
applying the daub to the wattle
© Owlsworth IJP Ltd
What is wattle and daub?
Building with wattle and daub
A ‘wattle’ is a woven lattice of willow or hazel
striplings (young, thin branches). ‘Daub’ is a sticky
mixture of sub-soil (the layer of earth beneath the
‘top soil’ where plants grow), clay and straw, sand or
animal hair, very similar to cob.
The saying, ‘if you throw enough mud at a wall some
of it will stick’, is thought to have been inspired by the
way wattle and daub walls were made. Wattle and
daub was often used to fill in the spaces between
the vertical beams of a timber-framed house. Once
a wattle panel had been woven between the timber
beams, a pair of ‘daubers’ would stand on either side
and throw the earth mixture at the wattle as hard as
they could.
Materials and preparation
The willow or hazel striplings for the wattle came
from local coppiced woodland. Coppicing willow
and hazel trees involved cutting them down to their
stumps and only allowing thin new branches to grow
back, which could be used for weaving and wattling.
Daub was made using the same ingredients and
method as cob, except precisely what went into
each daub depended on what was cheap and easily
available at the time of building.
The force with which the daub was thrown would
help it wedge in the spaces between the willow strips
of the wattle and stay in place and eventually enough
would stick to create a solid wall. Once it had dried,
which took around 3 weeks, and if the builder could
afford it, the wattle and daub would be painted with
several coats of limewash to protect it from damp.
Where can i see wattle and daub?
It is hard to find wattle and daub walls as even in
timber framed houses where they once existed, they
have often been replaced with newer materials. In
very old wooden buildings look for wall panels that
are uneven or bulging, and are covered with limewash
– there’s a chance they could be wattle and daub.
a wattle made of woven willow
advanTages
Because it did not require
any specialist skills and used
free or very cheap materials,
wattle and daub was a building
method available to the poorer
members of society. Wattle
and daub walls could be made
quickly and most people could
afford to build and maintain
them quite easily.
disadvanTages
Wattle and daub walls needed
regular patching up and to be
carefully protected from the
damp and rain to keep them in
good condition. Although
well-maintained wattle and
daub should be able to last
forever, in practice it is the
traditional building method that
has survived the least well.
2. TradiTional Building MeThods
Willow weaving
An ancient craft requiring strength and skill, willow weaving is a bit like
weaving cloth, except using young tree branches instead of thread.
Willow
for sale
in l a u
ncesto
n
Weaving with willow
© Cornish Willow
What is willow weaving?
Building with willow
Willow weaving is the skilled craft of twisting young
willow branches together to make fences, animal pens,
shelters, gates, household furniture, baskets and more.
Willow weaving was even used to make walls for
houses, as it was used to make the ‘wattle’ in wattle
and daub.
Willow is still woven in the same way
as it was at the time Launceston
Castle was built. To make a woven
willow ‘hurdle’, or fence, thicker
branches of dried willow are stuck in a
frame, called a ‘jig’, and then thinner willow ‘withies’
(young branches) are woven in between the vertical
sticks. Once the hurdles were ready to be put in
place, wooden posts were driven into the ground and
the hurdles tied to them to create a fence.
Materials and preparation
Young willow branches would have been gathered
from areas of local woodland that had been coppiced.
To coppice a willow tree, it was cut right back to
its stump, which encouraged it to grow lots of new
branches quickly. These young thin branches, which
were perfect for weaving, were then harvested and,
once soaked in water to make them more flexible,
could be used straight away.
In marshy flat areas willow could also be grown in
‘willow beds’. In a willow bed, live branches of willow
were planted upright, where they took root and grew
quickly. They were then harvested annually and used
in the same way as willow from coppices.
To make willow baskets and furniture more
decorative, the willow withies could stripped of their
bark, leaving the white wood underneath, or steamed
which turned the bark black. A combination of
colours could then be used.
Where can i see willow weaving?
Exposed to the elements, woven willow could not
survive decades, let alone centuries. However, if
completely covered up, as it was in the case of wattle
and daub walls, it could last for a very long time.
Wattle and daub wall panels, with woven willow
centres, still exist in some very old timber-framed
buildings but you cannot see the willow underneath
the daub.
advanTages
Woven willow, whether in a
fence or a basket, looks very
beautiful which is why people
still use it today.
disadvanTages
Willow was not a long-lasting
material for outdoor structures
like fences.
3. TradiTional Building MeThods
Thatch
Reeds and grasses have been used in Britain for thousands of years
to make warm, waterproof roofs for all sorts of buildings.
a thatcher sews courses of straw onto a roof
What is thatch?
Thatch is a roof covering usually made from straw or
reeds. In Devon and Cornwall thatched roofs were
made from ‘combed wheat reed’, actually wheat or
rye straws with long stems that were grown locally.
Materials and preparation
After harvesting wheat or rye and ‘threshing’ it to
remove the grain, the remaining straw was arranged
with all the stems the same way up and ‘combed’ to
get rid of any short or broken straws. Finally, it was
tied in large bundles, called ‘nitches’, ready to be used
on a roof.
Building with thatch
Different thatchers had their own methods of roofing,
but they all started by fixing a layer of straw at the
eaves (lower edges of the roof) and then working
their way along and up in layers or ‘courses’. The ridge
of the roof was covered with a long horizontal roll
of straw, over which more straw was folded and tied
down. These days, thatched roofs often have patterns
sewn into their ridges, but in medieval times they
would have looked much plainer.
The courses of straw were sewn onto the wooden
frame of the roof with cord made from hedgerow
plants or straw, using a special giant thatcher’s needle.
The expression ‘like finding a needle in a haystack’
comes from the fact that thatchers, who had to do all
their work from the outside of a roof since medieval
houses rarely had lofts, often had difficulty finding
their needle again once they had pushed it under the
straw and roof timbers.
The straw is pushed tightly into position using a leggatt
Once they had finally been secured, each course
would be pushed tightly into position with a special
tool called a ‘leggatt’. Lastly, the straw would be
trimmed at the eaves with a sort of sickle called an
‘eaves’ or ‘shears hook’ to make it look neat and
tidy. A well-thatched roof had steep sides with even,
flat surfaces so that rain ran quickly off the roof and
did not sink into the straw. To stop the rain running
off the roof onto the building’s walls, the thatch also
jutted far out over the tops of the walls.
Where can i see thatch?
There are about 4,000 thatched buildings in Devon
– more than anywhere else in Britain. Around
Launceston you can see thatched houses in villages
like Yeolmbridge and Daws House.
advanTages
The material needed for thatch
was cheap (or free), easy to
transport and readily available
locally, which made it a good
choice for poorer people to
roof their houses and barns.
Thatched roofs also look
beautiful, which is why people
still like to have them today,
even though they are no longer
cheap to build and maintain.
disadvanTages
Rain and fire are the enemies
of thatched roofs. Before
modern fire-resistant chemicals
were invented, thatched roofs
had to be protected from
fire more carefully. Thatched
roofs in very rainy areas need
repairing and renewing more
often, which can be expensive
because nowadays the
materials and craftspeople who
know how to use them are
fewer and more expensive.
a thatched cottage in Werrington, north Cornwall
© Jo Gorman. Source English Heritage. NMR
4. TradiTional Building MeThods
Cob
Britain’s very own version of mud huts, Cob buildings are literally
made from the ground beneath our feet!
dressing the cob
Compacting the cob by thwacking
© Kevin McCabe
What is cob?
Building with cob
‘Cob’ is what people in the South West called the
mixture of sub-soil (the layer of earth beneath the
‘top soil’ where plants grow), straw and water that
was used to build houses and other buildings in
the area from the 13th century until the Industrial
Revolution. It was a particularly popular building
method in this part of Cornwall because there was
just right amount of clay in the soil here to make a
good, strong cob.
Cob walls usually rested on a stone foundation and
were built up slowly in layers, called ‘lifts’ – a bit like
making a coil clay pot. After each ‘lift’ was added it
was squashed down as much as possible by beating
it with a flat paddle and then allowed to dry out.
As the vertical sides of the lifts were very uneven,
the workman would trim them back with a sharp
spade to give smoother walls which could finally be
waterproofed with limewash. Cob buildings were
usually covered by thatched roofs. A local saying goes,
‘All cob needs is a good hat and a good pair of boots’,
the boots being the stone foundation and the hat the
straw thatch.
Materials and preparation
First, soil was dug from the ground and the top soil
and any large stones removed, leaving a sub-soil
containing lots of small stones. Then, fresh, dry straw
was added to give the soil mixture extra strength,
help it bind together and to prevent the clay in the soil
shrinking too much when it dried.
It was very important to mix the cob well so all the
ingredients were evenly distributed. To do this, a thin
layer of the earth and straw mixture was spread on
the ground and water poured onto it. Then people,
and sometimes animals, trampled all over it, squelching
the cob with their feet. Sometimes the animals added
their dung to the mix!
Where can i see cob?
Cornwall has the most cob buildings in Britain.
Dockacre House in Launceston, Cullacott Farm in
Yeolmbridge and many old farm buildings around
Launceston have cob walls.
dockacre house, launceston
© Bryon Mason. Source English Heritage. NMR
Mixing
b
the co
Trimm
i
ng bac
k
th
© Kevin e cob
M cC a b
e
advanTages
A simple but very effective
building method, cob required
few specialist tools and cheap
(or even free), locally abundant
materials. This meant that
people could build their own
homes. If properly made, a cob
building could last for hundreds
of years. And because cob walls
were very thick, they provided
good insulation and retained a
great deal of heat.
disadvanTages
Slow and labour-intensive,
cob building is out of favour
in our hurried modern world,
where labour is expensive and
we like to use machines to
do jobs quickly. Cob buildings
need regular maintenance to
keep them sound – and these
days very few craftsmen know
how to build with cob, so it is
difficult and expensive to repair
old buildings or build new ones.
5. TradiTional Building MeThods
Lime mortar
Before cement was discovered in the 19th century, limestone was
used to make the mortar, render and paint for building.
applying lime render to a wall
© Clayworks Ltd
Cullacott house in north Cornwall
© Cullacott Farm
What is lime mortar?
Building with lime mortar
Not to be confused with the bright green fruit, the
‘lime’ in lime mortar, is limestone, otherwise known as
chalk, that has been processed and mixed with water
to turn it into a useful building material. ‘Mortar’ is the
squidgy filling between bricks or stones in a wall that
holds everything together when it sets (goes dry and
hard). ‘Lime mortar’ was a mixture of the processed
limestone and water, plus sand and animal hair to add
strength and prevent cracking.
Although it is a very different product,
lime mortar was used in a very similar
way to how modern builders use
concrete and cement; to build walls
and plaster over them. Perhaps the
most fun part of using lime mortar was ‘harling’
the first coat of render on a wall, which involved
adding extra water to make it runny and then
flinging it with a special trowel onto the wall to
give a textured surface.
Materials and preparation
The base of lime mortar is a cream cheese-like paste
called lime putty, which is made by putting limestone
through a series of chemical reactions. First, the
limestone (calcium carbonate) is burnt in a kiln, a sort
of large outdoor oven. As it is burning, the limestone
gives off carbon dioxide, changing into calcium oxide,
otherwise known as ‘quicklime’. Water is then added
to the quicklime to make calcium hydroxide, or ‘fat
lime’; a process known as ‘slaking’. The fat lime is then
left to mature and dry out for several months, ending
up as ‘lime putty’.
Where can i see lime mortar?
Right here at Launceston castle! All the stones in
the castle and its walls are held together with lime
mortar. If you walk up the steps in the high tower, you
can also see the white limewash coating on the walls
that would have originally covered the whole castle,
making it look a bit like a giant wedding cake!
g a rd e
ner ’s C
ottage
,
Pelyn,
Cornw
a
© Engli
sh Herit
a ge . N M
ll
R
advanTages
Lime mortar was the only
option for builders before
the 19th century invention of
cement. It is much better for
the environment than cement
because it can be recycled and
does not need as much energy
to be manufactured.
disadvanTages
Lime mortar is not as strong
or hard as modern materials
and so will need repairing and
renewing more often.
It takes much longer to set
(go hard), especially in wet
and cold climates, where extra
ingredients must be added
to make it set.
The lime putty is mixed with animal hair and sand
to make lime mortar and render (another name for
plaster, which we use to create a smooth surface on
a wall). The putty can also be thinned with water to
make ‘limewash’, a sort of paint.
launceston Castle
© English Heritage Photo Library
6. If you would like this document in a different format, please contact
our Customer Services department:
Telephone: 0870 333 1181
Fax: 01793 414926
Textphone: 01793 414878
E-mail: customers@english-heritage.org.uk