Apidays New York 2024 - The Good, the Bad and the Governed by David O'Neill, ...
Chat php
1. In this tutorial we will learn about the basics of text chat.
And to do that, we will use a simple idea for text chat box routines.
Before you start:
We will use multiple programming languages in this tutorial, so please make sure before you start
that you know:
1-The basics of HTML elements and Objects.
2-The basics of CSS to create a simple layout for the chat box elements.
3-Intermediate skills in Javascript to control all the chat box functionality (client side).
4-Intermediate skills in php to process incoming and outgoing information (server side).
And we will use an Ajax script to create a connection between the Server and Clients.
So I will use Ajax snippet I posted here before.
And that Ajax snippet will allow you to call another function when the server responses.
Now let’s get into work:
What are the procedures to accomplish a basic chat?
To do List:
- Create the user interface.
- Style user interface.
- Coding Client/Server.
Creating user interface :(index.htm)
Within the document’s body we need to add:
1-Form for Sign-in / Sign-out operations and let’s give it an id and set it to "signInForm"
Inside that form create the following elements and give it the associated id
Element id
---------- --
Textbox "userName"
Submit button "signInButt"
Span "signInNmae"
Now, since I decided to use the same button for signing in and out I will give that button a name and
I will change it accordingly.
That’s why I’ll give the submit button a name="signIn" as initial value.
2-Div element to view the messages, give it id="chatBox"
3-Div element to show currently online users, give it id ="usersOnLine".
4-Another Form to handle message submitting, give it id ="messageForm" that contains the
following elements:
Element id
---------- --
Textbox "message"
2. Submit button "send"
Div "serverRes"
<html>
02
03 <head>
04 <title>DIC ChatBox Beta 1</title>
05 </head>
06
07 <body>
08
09 <h1></DIC> Chat Box</h1>
10 <form id="signInForm">
11 <input id="userName" type="text">
12 <input id="signInButt" name="signIn" type="submit" value="Sign in">
13 <span id="signInName">User name</span>
14 </form>
15
16 <div id="chatBox"></div>
17
18 <div id="usersOnLine"></div>
19
20 <form id="messageForm">
21 <input id="message" type="text">
22 <input id="send" type="submit" value="Send">
23 <div id="serverRes"></div>
24 </form>
25 </body>
26 </html>
That’s all elements we need, let’s save our HTML document as "index.htm".
Creating the style sheet: (cb_style.css)
Let’s make it simple and clean so everyone else can edit it easily.
We will style each element depending on its id
Here is the CSS we need, it’s very simple so no need to add any comment
#signInForm, #messageForm {
02 margin:0px;
03 margin-bottom:1px;
04 }
05 #userName {
06 width: 150px;
07 height: 22px;
4. 54 #serverRes{
55 width:150px;
56 height:22px;
57 border: 1px teal solid;
58 float:left;
59 margin:1px;
60 }
Save that style as "cb_style.css" to same directory where we saved the index.htm before.
Now, we need to link the index.htm with cb_style.css.
At the document’s header part add this code
view source
print?
1 <link rel="stylesheet" type="text/css" href="cb_style.css">
Take a look at the screen shot it must be similar, if not please make sure that you typed the
previous code correctly.
Resized to 83% (was 607 x 491) - Click image to enlarge
After we finished working on the HTML elements and the style we’ll work on coding these
elements to do what it has to do.
Coding:
In this part we will code the client side in javascript and the server side in php
5. As everybody knows there are 4 basic procedures in every text chat application which are:
1- Signing in 2- Sending messages 3- Updating user’s data 4- Signing out
And of course we need some interface to transfer the data between the client and the server
Here I will use XMLHTTP request which is known as AJAX
I'm not going to talk about Ajax and how it works, so I will use an old snippet of Ajax that I
posted here.
I will just mention its syntax
To send data we just call the Ajax function, give it the sending method("GET"/"POST"),"the
requested URL","data as name=value pairs",the function handler that will receive the server
response)
1 Ajax_Send("POST","my_url","name1=ahmad&name2=511",reponseFunc);
Save the snippet in the same directory and rename it to "ajax.js"
So let’s link this snippet to the index.htm like this:
In the document header add this code
1 <script type="text/javascript" src="ajax.js"></script>
Client side: (chatBox.js / hideShow()): Function
First create the function "hideShow(hs)" that will control signInForm and messageFrom
visibility
We need to pass a string parameter to show/hide forms accordingly.
By default we want the messageForm to be hidden, that’s so we need to pass the function
"show" as parameter that will hide the signInForm and show the messageForm
The name/value attributes of signInButt and the signInName will change too.
And when we pass it "hide" the things will go reverse
Open a new text document and type our hideShow() function
function hideShow(hs){
02 if(hs=="hide"){
03 signInForm.signInButt.value="Sign in"
04 signInForm.signInButt.name="signIn"
05 messageForm.style.display="none"
06 signInForm.userName.style.display="block"
07 signInName.innerHTML=""
08 }
09 if(hs=="show"){
10 signInForm.signInButt.value="Sign out"
11 signInForm.signInButt.name="signOut"
12 messageForm.style.display="block"
13 signInForm.userName.style.display="none"
14 signInName.innerHTML=signInForm.userName.value
15 }
6. 16 }
Save the file as "chatbox.js" to the same directory we already working in
Open the index.htm file and link "chatbox.js" to it by adding this code in the document’s
header
1 <script type="text/javascript" src="chatbox.js"></script>
As we said before we need the meesageForm to be hidden by default so edit the body tag to
call hideShow() function to hide the messageForm on body’s load event like this
1 <body onload="hideShow('hide')">
Create two empty text files:
"onlineusers.txt" will store the already signed in users
"room1.txt" will store the recently sent messages (last 20 in our case)
Make sure that the tow files are having write permission.
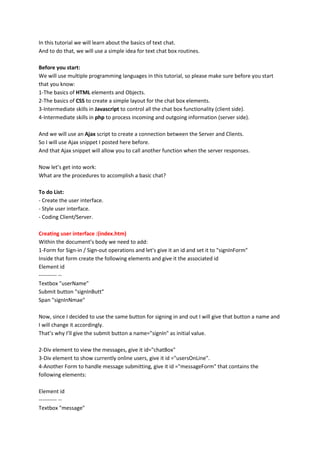
Notes:
Take a look at the flowchart in each procedure, it will give you a better understanding about
how things are goes.
Part#1: Singing in
7. Resized to 97% (was 519 x 799) - Click image to enlarge
Client side: (chatbox.js / signInOut()): Function
User will enter the user name he want and hit [signInButt] which has "signIn" as name’s
value right now
The [signInForm] form will call the function [signInOut()] on submit event and exit.
[signInOut()] function will validate the user name for existing spaces (you can add any
8. validation rules at this part.
The function will check the [signInButt] name if it’s equal to "signIn" (which already is)
If so, collect the user name and the sign in operation as name=value pairs
Send the data to server-side script "users.php" and let the Ajax to call [checkSignIn] function
on server response.
Exit the function
01 // Sign in and Out
02 function signInOut(){
03 // Validation
if (signInForm.userName.value=="" || signInForm.userName.value.indexOf("
04
")>-1){
alert("Not valid user namenPlease make sure your user name didn't
05
contains a spacenOr it's not empty.");
06 signInForm.userName.focus();
07 return false;
08 }
09
10 // Sign in
11 if (signInForm.signInButt.name=="signIn"){
12 data="user=" + signInForm.userName.value +"&oper=signin"
13 Ajax_Send("POST","users.php",data,checkSignIn);
14 return false
15 }
16 }
Server side: (users.php)
users.php will load the "onlineusers.txt" file to $onlineusers_file using built in (file) function
which will converts the file to an array
Check if the client sent the user and the oper variables
If so, search the $onlieusers_file if the sent user name is exist, if so get the user index
If the operation is "signin" and user is not exist, add this user to $onlineusers_file array
Call the function [saveUsers()] to save the changes.
Send the "signin" string to the client and exit
If the user is exist send the "userexist" string to the client and exit
The [saveUsers()] function will receive an array
Open the onlineusers.txt file for over writing
Lock the file
Write the array elements with linefeed character
Unlock the file
Close the file
function saveUsers($onlineusers_file){
9. 02 $file_save=fopen("onlineusers.txt","w+");
03 flock($file_save,LOCK_EX);
04 for($line=0;$line<count($onlineusers_file);$line++){
05 fputs($file_save,$onlineusers_file[$line]."n");
06 };
07 flock($file_save,LOCK_UN);
08 fclose($file_save);
09 }
10
11 $onlineusers_file=file("onlineusers.txt",FILE_IGNORE_NEW_LINES);
12 if (isset($_POST['user'],$_POST['oper'])){
13 $user=$_POST['user'];
14 $oper=$_POST['oper'];
15 $userexist=in_array($user,$onlineusers_file);
16 if ($userexist)$userindex=array_search($user,$onlineusers_file);
17
18 if($oper=="signin" && $userexist==false){
19 $onlineusers_file[]=$user;
20 saveUsers($onlineusers_file);
21 echo "signin";
22 exit();
23 }
24
25 if($oper=="signin" && $userexist==true){
26 echo "userexist";
27 exit();
28 }
29 }
After the user.php sent the data, the Ajax will detect server response and execute the function
we specified [checkSignIn()]
Client side: (chatbox.js / checkSignIn()) Function:
The function will read the server response text (res)
If the server response is "userexist" the function will alert the user to change his sign in name
If response text is equal to "signin" that means the user name was accepted and it’s ready to
use
Call [hideShow()] function to hide the [signInForm] and show the [messageForm]
And the [hideShow()] function now will set the name of the [signInButt] to "signOut" and its
value to "Sign out" to be used in signing out procedure
Create an interval [updateIntrerval] to call each 3 seconds a new function we will create later
[updateInfo()] which will handle the update of online users and sent messages.
Show "Sign in" notification in the [serverRes] DIV
01 // Sign in response
02 function checkSignIn(res){
03 if(res=="userexist"){
alert("The user name you typed is already existnPlease try another
04
one");
11. Client side: (chatbox.js / sendMessage()) Function
The user types a message in the [message] text box and hit [send] button
The form submit event will call the [sendMessage()] function
The function will collect the user name and the message in one string as name=value pairs
Use Ajax to send the data to "send.php" script on the server and call the function [sentOk]
when server response
1 // Send message
2 function sendMessage(){
3 data="message="+messageForm.message.value+"&user="+signInForm.userName.va
12. lue
4 serverRes.innerHTML="Sending"
5 Ajax_Send("POST","send.php",data,sentOk)
6}
Server side: (send.php)
send.php receives the message and strips the HTML/PHP tags and slashes right away
Receives the user too
Load the room1.txt file into $room_file and convert it to array using built in(file) function.
Create a new array element that contain the server time at the beginning, the string "<!@!>"
as separator, the user name , ": " and the message
Note: "<!@!>" has no meaning, it’s just a string we think that it will never occurs in the
messages and we will use it again to separate the server time from the messages
Check if the $room_file array element’s count is greater than 20(last 20 recently sent
messages), when it’s true remove the first elements in the array (the oldest message), and
that’s will work just like a buffer for the sent messages
Note:
The number (20) means that the maximum number of messages that the client can receive in
each update is 20
So maximizing this number will provides more messages buffer size
Anyway, send.php will open the "room1.txt" file for over writing now
Lock the file
Write the array’s elements with line feed character
Unlock the file
Close the file
Send "sentok" string to the client which will be received by [sentOk()] function that will
execute on server response.
Exit
01 $message=strip_tags($_POST['message']);
02 $message=stripslashes($message);
03 $user=$_POST['user'];
04
05 $room_file=file("room1.txt",FILE_IGNORE_NEW_LINES);
06
07 $room_file[]=time()."<!@!>".$user.": ".$message;
08 if (count($room_file)>20)$room_file=array_slice($room_file,1);
09 $file_save=fopen("room1.txt","w+");
10 flock($file_save,LOCK_EX);
11 for($line=0;$line<count($room_file);$line++){
12 fputs($file_save,$room_file[$line]."n");
13 };
14 flock($file_save,LOCK_UN);
15 fclose($file_save);
16 echo "sentok";
13. 17 exit();
Save the file as "send.php" to the same directory we are working in
Client side: (chatbox.js / sentOk()) Function
The function check if the response text is "sentok"
If so, clear the [message] text box value
Set the focus the [message] text box
Show the notification "Sent" in the [serverRes] DIV
If the server response is not equals to "sentok" the function will show "Not sent" in the
[serverRes] DIV
01 // Sent Ok
02 function sentOk(res){
03 if(res=="sentok"){
04 messageForm.message.value=""
05 messageForm.message.focus()
06 serverRes.innerHTML="Sent"
07 }
08 else{
09 serverRes.innerHTML="Not sent"
10 }
11 }
Part#3: Updating user’s data
Here we have two types of the data we need to update (online users and the messages)
If you still remember, we create the [updateInterval] after sign in procedure done, and this
interval will call the [updateInfo()] function every 3 seconds
Client side: (chatbox.js / updateInfo()) Function
Show the "Updating" string in the [serverRes] DIV
Use Ajax to call "user.php" script on server with no data to send and direct it to call
[showUsers()] function on server response
Use Ajax to call "receive.php" on the server and send the variable lastReceived then call
[showMessages()] function on server response
Now before we write this function we need to define the lastReceived variable out side the
function making it have a global scope which will allow us to change/read its value from
within [updateInfo()] and [showMessages()] functions
And maybe you will use it as a counter for the received messages
So at the top part of [chatbox.js] and outside any function let’s add this:
1 lastReceived=0
And here is the function
1 // Update info
2 function updateInfo(){
14. 3 serverRes.innerHTML="Updating"
4 Ajax_Send("POST","users.php","",showUsers)
5 Ajax_Send("POST","receive.php","lastreceived="+lastReceived,showMessages)
6}
Updating online users:
Server side: (users.php)
When the user.php receives nothing from the client it will load the onlineuser.txt file to
$onlineusers_file array
Join that array with the string "<br>" and then send the joined array to the [sowUsers()]
function on the client’s machines
Open the users.php file and add these two lines to it (at the bottom)
1 $olu=join("<br>",$onlineusers_file);
2 echo $olu;
Save the file
Client side: (chatbox.js / showUsers()) Function
This function will receive the online-users joined array from the server and display it as it is
inside the [usersOnLine] DIV
1 // update online users
2 function showUsers(res){
15. 3 usersOnLine.innerHTML=res
4}
Updating messages:
Server side: (receive.php)
receive.php will receive the lastreceived variable from the client and assign it to $lastreceived
Load the room1.txt file to $room_file array
Loop all over the array elements
Read each element and split the server time from the message (using the "<!@!>" string we
16. added before) to $messageArr
Now the message time is $messageArr[0] and the username with the message is
$messageArr[1]
Check if the message time > $lastreceived then send this message with HTM line break tag to
the client because he didn’t receive it yet. (Depending on the lastreceived time the client sent)
After loop is done, send "<SRVTM>" string and the $messageArr[0] (which is now carry the
last message’s time) to the client
Note: the string "<SRVTM>" has no meaning, we will just use it to separate the messages
from the last message received time
1 $lastreceived=$_POST['lastreceived'];
2 $room_file=file("room1.txt",FILE_IGNORE_NEW_LINES);
3 for($line=0;$line<count($room_file);$line++){
4 $messageArr=split("<!@!>",$room_file[$line]);
5 if($messageArr[0]>$lastreceived)echo $messageArr[1]."<br>";
6}
7 echo "<SRVTM>".$messageArr[0];
Save the file as "receive.php" to the same directory we are working in.
Client side: (chatbox.js / showMessages()) Function
The function will receive a string with all messages connected together with "<br>" and the
last element is the last message time and it’s connected with "<SRVTM>"
First, we will clear the [serverRes] DIV
Then we split the last received time from the messages into msgTmArr array using the string
"<SRVTM>"
Now we have array with two elements:
msgTmArr[0] contains all none received yet messages
msgTmArr[1] contains the last message’s time that delivered to the client
Now Assign the msgTmArr[1] to lastReceived variable (that we defined it before),so we will
use it again in the next [updateInfo()] call
Create a new HTML span element to contain the received messages
Insert the msgTmArr[0] in the Span inner html
Append the span to the [chatbox] DIV
Update the [chatbox] DIV vertical scroll bar to show the last inserted line
01 // Update messages view
02 function showMessages(res){
03 serverRes.innerHTML=""
04 msgTmArr=res.split("<SRVTM>")
05 lastReceived=msgTmArr[1]
06 messages=document.createElement("span")
07 messages.innerHTML=msgTmArr[0]
08 chatBox.appendChild(messages)
09 chatBox.scrollTop=chatBox.scrollHeight
10 }
17. Part#4: Signing out
Client side: (chatbox.js / signInOut()) Function
User click on the singInButt (its value now is "Sign out" and its name is "signOut")
The [signInForm] will call the [signInOut()] function and now the signInButt has the name
"signOut"
The function will check the user name validation. (The validation is useless here because the
user is passed this validation when he signed in)
The function will check if the signInButt name is equals to "signOut"
Collect user and oper data
Send the data using Ajax to users.php and tell Ajax to execute [checksignOut()] function on
server response
Inside the [signInOut()] function and just before closing brackets add this code:
1 // Sign out
2 if (signInForm.signInButt.name=="signOut"){
18. 3 data="user=" + signInForm.userName.value +"&oper=signout"
4 Ajax_Send("POST","users.php",data,checkSignOut);
5 return false
6}
Server side: (users.php)
users.php will load the onlineusers.txt file to $onlineusers_file array
Receive the user and oper variables from the client
Search the array if the user exists; if so get its index
Check if the oper is equals to "signout" and the user is exist
If so, splice the user from the array
Send "signout" string to the client
Exit
If the user not exists send "usernotfound" to the client and exit.
Open the users.php file and add this code after the part of the sign in procedure (before the
closing bracket of (if isset) statement)
So if the sign in and out check failed, we will then join the array and send it back to the client
01 if($oper=="signout" && $userexist==true){
02 array_splice($onlineusers_file,$userindex,1);
03 saveUsers($onlineusers_file);
04 echo "signout";
05 exit();
06 }
07
08 if($oper=="signout" && $userexist==false){
09 echo "usernotfound";
10 exit();
11 }
Client side: (chatbox.js / checkSignOut())
The [checkSignOut()] function reads the server response and if it’s equals to "usernotfound"
show "Sign out error" in the [serverRes] DIV and change the response text to "signout"
If the server response text is equals to "signout", hide the [messageForm] and show the
[signInForm]
Clear the updateInterval
Show "Sign out" string in [serverRes] DIV
Note: the [hideShow()] function will rename the signInButt to "signIn" and chage its value to
"Sign in" too
Exit
01 // Sign out response
02 function checkSignOut(res){
03 if(res=="usernotfound"){
04 serverRes.innerHTML="Sign out error";
05 res="signout"
19. 06 }
07 if(res=="signout"){
08 hideShow("hide")
09 signInForm.userName.focus()
10 clearInterval(updateInterval)
11 serverRes.innerHTML="Sign out"
12 return false
13 }
14 }
One other thing we have to do
If the user leave the site he must sign out automatically, that’s so we will call the
[signInOut()] function on unload or on beforeunload event
And to do that we have to change the [signInButt] name to"signOut" then we call the function
[signInOut()]
Edit the document’s body tag to be like this:
<body onbeforeunload="signInForm.signInButt.name='signOut';signInOut()"
1
onload="hideShow('hide')">
And that’s all
You must have now 9 files:
1-ajax.js
2-chatbox.js
3-index.htm
4-cb_style.css
5-users.php
6-send.php
7-receive.php
8-onlineusers.txt
9-room1.txt
Again make sure that you have write permission on the onlineusers.txt and room1.txt
Upload those files and brows index.htm