
Recomendados
Mais conteúdo relacionado
Destaque
Destaque (13)
Semelhante a South Carolina Smart Gardener Handbook
Semelhante a South Carolina Smart Gardener Handbook (20)
Mais de Danousis85z
Mais de Danousis85z (20)
Último
Último (20)
South Carolina Smart Gardener Handbook
- 1. SOUTH CAROLINA HANDBOOK Down-to-Earth Tips, Guidance and Information on How to ‘Go Green’ in Your Backyard
- 2. Compost Food Web Typical Composting Bins 3rd Level Consumers Ground Beetle (Carabid) Centipedes Rove beetles (Staphylinid) Pseudoscorpion Ant (Formicid) Predatory mite Feather-winged Beetles (Ptiliids) Roundworms 2nd Level (Nematodes) Consumers Protozoa Round Composting Bin Food Composting Cone Bin Rotifera Soil Flatworms (Turbellarians) Springtails (Collembola) Mold mite (Acarina) Fly (Dipera) Roundworms (Nematodes) Sowbug (Isopod) Earthworms Beetle mites Land snails/slugs Screen Composting Bin Worm Composting Bin White worms Potworms (Enchyraeids) Bacteria Actinomycetes Molds (Fungi) Organic residues Three-way Composting Bin and Cinder Block Composting Bin 1st Level Consumers
- 3. SOUTH CAROLINA HANDBOOK Down-to-Earth Tips, Guidance and Information on How to ‘Go Green’ in Your Backyard S.C. Smart Gardener Handbook Printed on RECYCLED Paper DHEC OR-0838 6/09 1
- 4. Introduction Contents ... Foreword....................................... 3 The S.C. Smart Gardener Handbook is designed to help you learn the Part One: basics of going green in your backyard. Start with healthy soil.. ................... 4 . Healthy Soil: An Investment The handbook, which is the centerpiece of the S.C. Smart Gardener in Your Garden................................... 4 Program, covers a variety of topics including healthy soil, composting, Understand your soil.......................... 4 natural lawn care and smart watering as well as limiting or eliminating Protect your soil’s health.................... 5 your use of pesticides. Any of these recommendations, if turned into Enrich your soil before planting......... 5 practices by you at home, will help conserve resources, protect South How do I know good compost?......... 5 Carolina’s environment and maybe even save you money. Mulch your plantings......................... 6 Fertilize moderately Composting at home is the perfect example. Consider the many green and responsibly.................................. 6 benefits. Compost is a valuable product that: Test your soil...................................... 8 Part Two: Composting at Home.... 9 n reduces the amount of waste a household generates; A Guide to Managing Organic Yard Trimmings..................... 9 n improves soil quality; Composting Organisms. .................... 9 . n increases the ability of soil to hold water; The Compost Process....................... 10 n insulates plants against extreme temperatures; Factors Affecting the Composting Process................... 11 n helps plants absorb nutrients; and Organic Materials............................. 11 n suppresses plant diseases and pests. Building a Compost Pile................... 13 Composting Alternatives.................. 15 These benefits reduce your need to water as often and reduce the need Using Compost................................ 16 . to buy and use fertilizers and pesticides. That lessens potential runoff Compost Questions and Answers. ... 16 . pollution to nearby streams, rivers and lakes and saves you money. Composting Food Scraps................. 18 . Worm Bin Composting In short, even the smallest individual actions can have lasting (or Vermicomposting)...................... 19 environmental benefits. This handbook provides the information, tips Summary: Successful Composting. .. 20 . and guidance for you to take those actions to go green at home. Part Three: Smart Watering. ....... 22 . Smart watering is as easy The S.C. Department of Health and Environmental Control’s Office of as 1, 2, 3.......................................... 22 Solid Waste Reduction and Recycling (Office) produces this handbook Part Four: Natural Pest, in partnership with Clemson Extension, the S.C. Conservation Districts Weed and Disease Control............. 26 Employee Association and the S.C. Department of Natural Resources. Basic Steps to Manage Your Garden Naturally...................... 26 This handbook is adapted from “The Natural Lawn and Garden: Start with prevention....................... 26 Healthy Landscapes for a Healthy Environment” series developed by Reduce the need for pesticides........ 27 . the City of Seattle’s Saving Water Partnership. For more information, What can you do if a pest problem develops?................ 29 visit www.cityofseattle.net/util/rescons. All text and material are used Use least toxic pesticides when with permission. Photographs are provided by Ian Edelstein and Richard physical controls don’t work............ 30 Hartlag unless otherwise noted. All illustrations are by Wilda Boyd. Use synthetic pesticides only as a last resort.......................... 30 In addition to this handbook, the S.C. Smart Gardener Program also What about weeds?......................... 31 includes workshops and technical assistance as well as other printed Part Five: The Right Plants........... 34 materials. For more information on the S.C. Smart Gardener Program, Hints about Shape, Size, visit www.scdhec.gov/compost or call the Office at 1-800-768-7348. Color and Fragrance......................... 35 Is it evergreen or deciduous?........... 35 How to Select the Right Plants for a Beautiful, Thank You ... Trouble-free Garden......................... 36 Part Six: Natural Lawn Care......... 41 Special thanks to the steering committee that helped develop this Try going natural.............................. 41 handbook. Six Steps to Natural Lawn Care........ 41 . 2 S.C. Smart Gardener Handbook
- 5. Foreword By Robert Polomski Extension Associate/Consumer Horticulture Coordinator, Department of Horticulture, Clemson University Gardening is the most popular hobby in America This sustainable practice “feeds” your plants and and rightfully so. It offers the benefits of beauty, improves the soil; nourishment and exercise. Also, gardening n conserving water by watering efficiently establishes connections with friends and neighbors at the right time and with the right amount; in the community and serves as a bridge between generations of young and not-so-young gardeners. n managing pests – weeds, insects, and diseases I still have fond childhood memories of my – by learning how to avoid them and how to grandfather sharing stories with me while we deal with pests when they appear. This section worked side-by-side in the garden. will introduce you to non-chemical approaches, such as managing insects by handpicking, Whether you have a garden or a landscape at trapping or using barriers, before resorting home or in the community, strive to become a to less toxic pesticides. When pesticides are knowledgeable and responsible gardener. Watering, absolutely necessary, applying them properly will fertilizing and controlling pests affect the health avoid harming beneficial insects and animals as well as contaminating soil, surface water and and appearance of the plants in your garden and groundwater; and landscape. These activities, however, also have an impact on the environment. Therefore, gardeners selecting the right plants for the right location n have the responsibility of safeguarding our land and in South Carolina landscapes. Growing adapted, water resources. pest-resistant plants will make gardening less about controlling pests and more about growing “The S.C. Smart Gardener Handbook” contains and enjoying plants. information and techniques that will improve your gardening skills and help you protect and preserve At the end of most chapters you will find a list of our environment. A few of the practices that are books, organizations, Web sites and other helpful discussed in the handbook include: resources. n building healthy, fertile soil with organic matter “The S.C. Smart Gardener Handbook” will inform and selecting and using appropriate fertilizers. and inspire you. It will fuel your desire to grow Soil is the foundation of the garden and vegetables, flowers, shrubs and trees. The handbook landscape. Improving its fertility and selecting the may even encourage you to teach your friends and right fertilizers will keep the plants healthy and neighbors about composting, fertilizing, watering protect water quality; wisely and managing pests responsibly. Enjoy your adventure as you learn how to protect our natural n reducing waste by recycling yard trimmings and resources as you create and maintain nourishing food scraps back into the garden and landscape. gardens and beautiful landscapes. Contact Information ... Readers are encouraged to contact their local Clemson Extension office for more information throughout this handbook. A list of county offices and telephone numbers is available at www.clemson.edu/extension, then click on COUNTY OFFICES on the left menu. Readers may call Clemson Extension’s Home and Garden Information Center at 1-888-656-9988. For more information about the S.C. Smart Gardener Program and other recycling programs, call DHEC’s Office of Solid Waste Reduction and Recycling at 1-800-768-7348 or visit www.scdhec.gov/compost. S.C. Smart Gardener Handbook 3
- 6. Part One: Start with healthy soil. Adding compost and other There are three general types of soil determined by the size organics improves your soil. of the soil particles. This affects how the soil functions. You Did you know that by simply improving your soil, may have more than one kind you can beautify your lawn, garden and flower beds, of soil in different areas of cut your water bill, improve water quality in our your garden. streams, reduce your work outdoors and improve the value of your home? Healthy soil is the key. Anyone Sandy soils contain large Sand can improve the quality of their soil. It is as easy as particles that are visible to adding compost and other organic amendments to the naked eye. They feel gritty your soil. and will not form a ball when squeezed in your hand. Sandy Compost is the dark, earthy material naturally soils are loose and drain easily, produced by decaying plants and animal waste. This but do not store water or mix of living and dead organic matter supports an nutrients for plants. intricate web of soil life, which in turn keeps your soil loose, moisture-holding, fertile and well-drained. Clay soils are made of tiny particles that feel sticky when Clay Here are three simple steps for improving the quality wet and dry into dense chunks of your soil. or fine powder. They hold nutrients and water well, but n Before planting, amend the soil throughout the drain poorly. entire planting area with compost. Loamy soils are a mix of n Mulch existing plantings with compost, leaves, sand, clay and organic matter. grass clippings, pine bark or wood chips. When squeezed in your hand, moist loam forms a ball Loam n When you need to feed plants, use natural organic and slow-release fertilizers. which crumbles when poked with a finger. Loamy soils are generally loose, well-drained and able to store Understand your soil. moisture and nutrients. Organic matter and soil life keep plants healthy by: Dirt is the mineral portion of the soil that supports plants, supplies nutrients and stores water. n supplying balanced nutrients to growing plants; Air and water are essential elements that transport n fighting plant diseases and pests; nutrients to plants and carry away waste. They make n storing fertilizers and natural nutrients for up half the volume of healthy soil. Compacted or gradual release, while preventing them from heavy clay soils may not have adequate space for air washing into water bodies; and water to move freely to plant roots. n storing water, which reduces runoff and your Organic matter and soil life (e.g., earthworms, garden’s irrigation needs; beetles, bacteria, microorganisms) make up just a n making clay soils better drained and easier to small part of the soil volume, but are the glue that work; and holds healthy soil together. Decomposing plant materials, like compost, support a great variety of n trapping and breaking down pesticide residues beneficial organisms. and polluted runoff. 4 S.C. Smart Gardener Handbook
- 7. Protect your soil’s health. individual trees and shrubs in lawns or existing beds, amend an area at least 3 feet wide, or at least four to five times as wide as root balls more than 12 inches Excessive use of chemicals, overwatering and soil in diameter. Rototill large areas where digging is compaction can harm beneficial soil organisms and impractical. reduce their ability to keep soil healthy. What? Different types of organic amendments n Think twice before using pesticides that may may provide special benefits for certain plants or soil damage soil life. types, as the chart below describes. But any clean n Don’t overfertilize. More is not better. composted or aged organic amendment will improve the soil. The best advice is to use what is reasonably n Avoid overwatering. Too much moisture can priced, plentiful and readily available. promote plant disease and exclude air from roots. n Prevent soil compaction by walking on garden beds as little as possible, keeping heavy How do I know good compost? equipment and cars off lawns as well as minimizing the use of rototillers. Poor quality compost can introduce weeds to a planting bed and make nutrients unavailable to plants while it finishes decomposing. Signs of good Enrich your soil before planting. compost are: The best way to improve the soil is to add plenty of n sweet, earthy smell; compost or other organic matter throughout the entire planting area before planting. Thoroughly n dark brown or black color; mixing these materials deep into the soil helps n fibrous texture (like peat); and provide water, air and nutrients to plant roots. n weed sprouts, mushrooms or other growths. no When? Mix in organic material before: How much compost? n planting lawns, perennials, trees and shrubs; (Mix into 100 SQUARE FEET of planting area.) n replanting annual beds; Lawns: Mix compost down to 6-inch depth. n dividing perennials; and Clay soils: 8 cubic feet (.3 cubic yard) = 1-inch layer of compost Sandy soils: 13 cubic feet (.5 cubic yard) = 1.5-inch layer of compost n repotting container plants. Gardens: Mix compost to 10- to 12-inch depth. How? Use a shovel or digging fork to mix Clay soils: 16 cubic feet (.6 cubic yard) = 2-inch layer of compost for amendments into the top 6 to 12 inches of soil. new gardens. Use 1 inch per year in established gardens. It is important to amend the entire planting bed – Sandy soils: 24 cubic feet (.9 cubic yard) = 3-inch layer of compost not just small holes for each plant. When planting for new gardens. Use 1-2 inches per year in established gardens. Which soil amendment to use? AMENDMENT CHOICE PROS AND CONS Best All-Purpose Materials Compost made from yard trimmings, R ecycled and readily available. Balanced nutrients. Yard trimmings can be composted food scraps or barnyard manure at home. Properly composted materials are free of weeds, pests and diseases. Leaves (composted or fresh) Free. Rich in nutrients. Usually contain a few weed seeds. Other Materials Aged bark or sawdust I mproves drainage in clay soils. Good for trees and shrubs. Fresh materials must be composted until dark brown in color or they can tie up nutrients and inhibit plant growth. Peat moss I mproves moisture and nutrient storage in sandy soils, but does not support soil life (nonrenewable resource). Coconut coir I mproves moisture and nutrient storage in sandy soils, but does not support soil life. Renewable product from coconut palms. Topsoil mixes G ood for raised beds on top of compacted or poorly drained soil. May contain poor fill soil or weeds. Best to use mixes containing only compost and clean sand. S.C. Smart Gardener Handbook 5
- 8. Mulch your plantings. How? n Remove weeds and grass before spreading Mulch refers to a material placed on the soil surface. mulches. Although usually organic, mulches also can be n Use porous weed barriers such as woven products such as gravel, tire mulch and landscape landscape fabric or cardboard to smother fabric. Mulches reduce evaporation, limit weed aggressive perennial weeds before mulching. growth and limit soil erosion that can choke streams and fish. Most mulch products provide these benefits, How much? but organic mulches – such as compost or bark – can n Grass clippings: 1/2 to 1 inch deep. be especially beneficial because earthworms and n Compost, leaves, sawdust or medium- or other soil life gradually break them down, mixing fine-ground bark: 1 to 2 inches deep. them into the soil to nourish plants. n Coarsely shredded bark, wood chips or tree trimmings: 2 to 4 inches deep. When? Note: One cubic foot of mulch covers 12 square feet 1 inch deep. n Apply annually or as needed. One cubic yard will cover 324 square feet 1 inch deep or 108 square feet 3 inches deep. n ulch in early summer to conserve moisture, feed M plants and prevent weed seeds from sprouting. n ulch in fall to protect soil from erosion, smother M Fertilize moderately weeds and retain warmth. and responsibly. Where? n Fertilize moderately with natural organic n ulch annual and perennial planting beds as well M and slow-release fertilizers to grow healthy, as the surface of container plantings. easy-to-maintain plants. Too much fertilizer can produce excess growth that is easily damaged n over entire tree and shrub planting beds or C by pests, wind, frost and drought. Many of the make mulch rings at least three feet wide around nutrients in quick-release fertilizers may wash off each plant in lawns. to pollute lakes, streams and groundwater. Which mulch to use? Mulch Choice Pros and Cons Annuals, Perennials, Berries and Roses Annuals and perennials benefit from mulches like compost, aged manure or grass clippings which feed plants quickly and can be mixed into the soil without tying up nutrients. Composted yard debris, bark, barnyard manure or biosolids N eat appearance. Important to use aged manure or quality compost that is free of weed seeds. Leaves and grass clippings F ree and readily available. May spread weed seeds or disease. For a finer texture, leaves can be composted or run over with a lawn mower before being applied. May be considered unattractive. Other Shrubs and Trees The best mulches for shrubs and trees are coarse, woody materials that protect the soil for a year or longer, slowly releasing nutrients for steady plant growth. Fresh bark T idy appearance and readily available. May inhibit growth of some plants. Sawdust/wood shavings U sually free. Best if aged. Cannot be from chemically treated lumber. May be considered unattractive. Wood chip/shredded prunings N atural look. Free and readily available. May spread weed seeds or disease. Newspapers layered under other mulch materials D ecompose to feed soil. Aggressive weeds may grow through. Woven fabric weed barrier L ong lasting, but does not break down to feed soil. May get tangled in weeding hoes. Aggressive weeds may grow through fabric over time. 6 S.C. Smart Gardener Handbook
- 9. n Most established trees and shrubs do not Keep the following tips in mind when fertilizing. need regular fertilization. Mulching can provide all their nutrient needs in most cases. Even n Amend the soil in the entire planting area heavy feeders – like roses, annuals and flowering instead of making individual holes for plants. perennials – take in adequate nutrients through As in a forest soil, organic matter should be yearly mulch applications. concentrated near the surface. n When choosing a fertilizer, look for the words n Mulch the entire area, keeping mulch away from natural organic or slow-release on the fertilizer the base of trees and shrubs. bag. Though these fertilizers may cost more, n Fertilize established trees and shrubs only if they they offer better value and greater protection of are stunted or show signs of need. water quality as more of their nutrients actually feed plants instead of washing into streams or groundwater. Reality Check n Natural organic fertilizers include rock Fertilizing should ideally be based on observed plant phosphate and other minerals, plant products needs or soil tests. If you would like to have your soil such as alfalfa meal and animal by-products tested, call Clemson University’s Agricultural Service like bone or fish meal. Most nutrients in natural Laboratory at (864) 656-2068. Detailed information fertilizers must be digested by bacteria before also is available at www.clemson.edu/agsrvlb. they dissolve in water and plants can use them. These nutrients are slowly released when warm soil stimulates the bacteria, which is when they By the Numbers ... are needed by actively growing plants. Soil tests recommend actual pounds of nutrients n Slow-release fertilizers such as sulfur-coated to apply, yet fertilizer labels list nutrient contents urea become available as outer coatings are by percentages. The three numbers prominently dissolved by moisture and soil bacteria when displayed on fertilizer packages are the percentages plants are actively growing. of nitrogen, phosphorous and potassium. To figure out how many pounds of fertilizer are needed to get n Quick-release fertilizers like urea and 1 pound of a nutrient, divide 100 by the percentage ammonium sulfate quickly dissolve in water. They of the nutrient contained in the fertilizer. See the wash through the soil with rain or irrigation if example below. not immediately used by plants or absorbed by organic matter. Recommendation: Apply 1 pound of nitrogen per 1,000 square feet. Fertilizer nutrient content: 5:3:2 = 5 percent Basic Fertilizing Schedule nitrogen, 3 percent phosphorous and 2 percent Pounds of potassium. Calculate: 100/5 = 20 pounds of fertilizer Nitrogen per Lawn grass 1,000 sq. feet When to Apply per 1,000 square feet to supply 1 pound of nitrogen. per application* Bahia grass 1/2 May, July May, June, July, Bermuda grass 1 August Centipede grass 1/2 May**, July May, June, July, St. Augustine grass 1/2 August Zoysia grass 1/2 April, July, August February, Fescue, Bluegrass 1/2 to 1 September, November * Split into at least two or three parts ** Use a complete balanced (N-P-K) fertilizer in which some of the nitrogen is slowly available. Fertilize centipede grass using a low phosphorus, high potassium fertilizer. S.C. Smart Gardener Handbook 7
- 10. If you use soluble fertilizers, you can reduce nutrient The cost of a standard soil test is less than n runoff by applying half the suggested amount twice $10 for each sample. This test provides as often as recommended. Avoid using any fertilizer scientific information on the soil pH value, near bodies of water to prevent pollution. the current soil levels of phosphorus, potassium, calcium, magnesium, zinc and manganese as well as fertilizer and lime recommendations, Test your soil. if needed. There are several nutrients that are essential for plant Clemson Extension recommends soil testing each growth. A soil test is used to determine the amount year. Soil samples can be taken at any time, but it is of these nutrients in your soil. The resulting report best to sample the soil a couple of months before also will tell you the pH value – how acidic or basic planting or fertilizing. your soil is – and it will make a recommendation for the amount and type of fertilizer and/or lime you need to add. This allows you to customize your soil Soil Test Results ... fertilizer and lime applications to your plants’ needs. Within seven to 14 days, your soil analysis will be mailed to you from the Agricultural Service How to Take Soil Samples ... Laboratory. Your Clemson Extension office also will receive a copy. Your soil analysis will include bar n have a soil analysis done, collect soil from To graph showing the amount of soil nutrients found 12 or more places in your yard that will be and the soil pH value. combined as one composite sample. A garden trowel or shovel can be used to collect the The primary nutrients for healthy plant growth are samples. The samples should include soil from nitrogen (N), phosphorus (P) and potassium (K). the surface to a depth of 6 inches in all areas of Secondary nutrients calcium (Ca), magnesium (Mg) gardens/landscaping or 2 to 3 inches in lawns. and sulfur (S) are required in less quantity, but also are essential for good plant growth. Zinc and Follow the sampling procedure above for each n manganese are micronutrients required in very small area of your yard or garden to be tested. amounts, easily corrected by keeping the soil at the Testing results may be very different for lawns optimum pH value. and garden areas. You may want one sample in your turf area, one in any foundation or The report will show how much lime (if needed) perennial bed and one in your vegetable garden. to add for each 1,000 square feet. The comments page will tell you what type of fertilizer you need, n you have a problem area where plants do not If how much you need and how to apply it. These seem to grow well, take a separate soil sample recommendations are specific to whatever type of from that location. plant you want to grow (as indicated on the soil test record sheet). Place the samples in a clean plastic bucket n and mix them thoroughly. Use clean sampling Questions? tools because pesticide or fertilizer residues will create misleading results. The sample must not Please contact your Clemson Extension office. be excessively wet before it goes to the lab. It For a county-by-county list of contacts, visit should be crumbly and break apart easily. www.clemson.edu/extension and click on COUNTY OFFICES on the left menu. n Bring a minimum of 2 cups of soil per sample to your Clemson Extension office. Credits n sure to keep track of where the sample was Be taken in your yard. The Clemson Extension office This section was adapted from information provided will ask you to provide the information on a soil by Marjan Kluepfel, Home and Garden Information test box, fill out a record sheet and check the Center, Information Specialist and Dr. Bob Lippert, appropriate boxes for the analyses desired. Extension Soil Fertility Specialist, Clemson University. 8 S.C. Smart Gardener Handbook
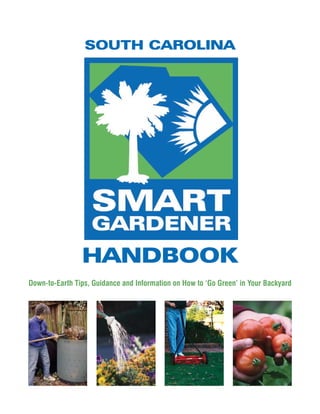
- 11. Part Two: Composting at Home Composting Organisms A Guide to Managing Most composting organisms fall into two general Organic Yard Trimmings* groups – microorganisms and invertebrates. Among the microorganisms, aerobic bacteria are the most Garden and yard trimmings (e.g, leaves, grass important in terms of beginning the decomposition clippings) account for up to 20 percent of the process and generating heat. waste disposed of in landfills. Obviously, it makes sense to divert these materials to mulch The organisms present in a compost pile can be or compost. Through these processes organic separated into three types. First-level consumers trimmings can be recycled to improve and attract and become food for second-level consumers. beautify the garden and landscape. Third-level consumers (e.g., centipedes, rove Composting is a biological process in which beetles, ground beetles, ants) prey on second-level microorganisms convert organic materials (such consumers. See the “Compost Food Web” on the as leaves, grass, manure and food scraps) into an front inside cover. end product called compost – a dark, crumbly, earthy-smelling form of organic matter that Bacteria are one-celled colorless organisms that reveals no hint of its origin. Composting is the cannot make their own food through photosynthesis. same process that decays leaves and other organic remains in nature, except that composting controls the conditions so that the materials decompose faster. Composting can occur under either aerobic (in the presence of oxygen) or anaerobic (without oxygen) conditions. Microorganisms involved in aerobic composting require oxygen. The amount of oxygen needed in the compost pile must be greater than 5 percent. (By comparison, fresh air is about 21 percent oxygen.) Anaerobic microorganisms prefer an absence of oxygen. Aerobic decomposition is the preferred composting technique because it is the most rapid and efficient. When mixed with soil, compost increases the organic matter content, improves the physical properties of the soil and supplies essential nutrients, enhancing the soil’s ability to support plant growth. The practice of applying materials such as compost, leaves or grass clippings to the soil surface is called mulching. Mulching conserves moisture, controls weeds, reduces erosion, improves appearance and keeps the soil from gaining or losing heat too rapidly. * From the “S.C. Master Gardening Training Manual” prepared by Robert Polomski, Extension Associate, Consumer Horticulture Coordinator, Department of Horticulture, Clemson University S.C. Smart Gardener Handbook 9
- 12. They reproduce by splitting, producing billions of blue-gray to a light green, powdery or cobweb-like offspring over a relatively short time, although the layer in the outer 4 to 6 inches of compost. Fungi life span of any particular generation may only be 20 generally intermingle with the actinomycetes. to 30 minutes long. As a group, they can eat almost any type of organic matter, although specific bacterial When the inner pile starts to heat up, most populations will differ from pile to pile depending on invertebrates are killed or migrate to cooler areas of the makeup of the pile and the decomposition stage. the pile. In the cooler areas, nematodes prey upon bacteria, protozoa and fungal spores. Larger mites Psychrophilic bacteria are active when a pile is and springtails also feed on fungi. The life cycle first made, especially in the fall when the weather within the pile continues to become more complex as is cool. Optimum activity occurs at about 55˚F, but predaceous mites and pseudoscorpions feed on other these bacteria are still active at 0˚F. The bacterial mites as well as nematodes. Complex invertebrates, activity creates heat and sets the stage for the most like centipedes and ground beetles, feed on lower efficient decomposers, the mesophilic bacteria, life forms, and decaying plant life in the pile attracts which are most active when the temperature of the sowbugs, snails, slugs and earthworms. pile is between 70˚F and 100˚F. As the temperature increases, thermophilic bacteria take over from 113˚F to 155˚F. Earthworms Actinomycetes and fungi, similar to bacteria, give If bacteria are the champion microscopic the compost pile its faintly earthy odor. At the end decomposers, then the heavyweight champion is of the composting process, they may appear as a doubtlessly the earthworm. Ever since it became known that the earthworm spends most of its time tilling and enriching the soil, pages of praise have been written on this creature. The great English The Compost Process naturalist Charles Darwin was the first to suggest that all the fertile areas of this planet have at least once Composting is the biological decomposition of passed through the bodies of earthworms. organic matter. While decomposition occurs naturally, it can be accelerated and improved by The earthworm consists mainly of an alimentary human involvement. To produce a high-quality canal which ingests, decomposes and deposits casts end product, it is important to understand the continually during the earthworm’s active periods. composting process. The microorganisms and Fresh casts are markedly higher in bacteria, organic invertebrates that decompose yard trimmings and food scraps require oxygen and water. The heat produced by bacterial activity increases the temperature in the compost pile to as high as 160˚F. As the process nears completion (after one month to one year), the pile temperature once again approaches the surrounding air temperature. Nitrogen contained in yard trimmings and food scraps are necessary for the microorganisms to carry out decomposition efficiently. The conversion of carbon in waste to carbon dioxide results in a reduction in both the weight and the volume of the pile. Finished compost is composed of microorganisms and invertebrates, their skeletons and decomposition products and organic matter that is not broken down by these organisms. 10 S.C. Smart Gardener Handbook
- 13. material, available nitrogen, calcium and magnesium, “browns” and “greens,” or better yet, as “dry” or and available phosphorus and potassium than soil “fresh” to remember which is which. These C:N itself. ratios are significant because microbial activity is greatest when the C:N ratio is 30:1. The tiny Earthworms thrive on compost and contribute composters need about one part nitrogen for every to its quality through both physical and chemical 30 parts carbon. processes. They reproduce readily in a well-managed pile. Since earthworms can play such a large part in Average Carbon-to-Nitrogen (C:N) composting, smart gardeners adjust their composting Ratios for Organic Materials methods to take full advantage of the earthworm’s Greens/ C:N Browns/ C:N special talents. Nitrogen Ratio Carbon Ratio Pig manure 5-7:1 Leaves 30-80:1 Food Web of the Compost Pile Poultry manure 10:1 Cornstalks 60:1 (fresh) Some of the visible creatures in the compost pile Alfalfa or sweet 12:1 Straw 40-100:1 feed directly on organic wastes. Others wait until clover hay microorganisms have begun the process. See the Vegetable scraps 12-20:1 Bark 100-130:1 “Compost Food Web” on the front inside cover. Poultry manure 13-18:1 Paper 150-200:1 with litter Factors Affecting Coffee grounds Grass clippings 20:1 12-25:1 Sawdust Wood chips 400:1 800:1 the Composting Process Cow manure 20:1 Horse manure 25:1 All natural organic material eventually decomposes. Horse manure 30-60:1 The length of the breakdown process, however, can with litter be accelerated through composting, or rather, the efficient “farming of microorganisms.” Any factor Source: Clemson Extension Master Gardener Program that slows or halts the growth of these microbes also impedes the composting process. The following Remember, this ratio describes the chemical factors affect the length of the composting process: composition of a material and does not mean you need 30 times the volume of brown to green. n organic materials (carbon and nitrogen contents of the food source); Pretend you are filling your compost bin. You have leaves (60:1), food scraps (15:1) and grass clippings n volume; (17:1). Add the three numbers on the carbon side n aeration; of the ratio (60, 15, 17) and divide by the number of materials (i.e., three) 92 ÷ 3 = about 31:1. Some n moisture; people think of it as two parts green to one part n particle size; and brown. Many people have success with equal parts green and brown. n temperatures reached during composting. The dominant organic waste in most backyard Organic Materials compost piles is leaves. Grass clippings may compact and restrict air flow. Branches and twigs All organic materials contain carbon and nitrogen. greater than 1/4 inch in diameter should be put One of the most critical factors in composting is the through a shredder/chipper first. Spent plants and balance of carbon and nitrogen within the plant trimmings from vegetable gardens and flower beds waste added to the pile. The carbon to nitrogen are excellent sources of nitrogen for the compost ratio is commonly expressed as “C:N” or “C/N.” pile and may be added with small amounts of soil. Microorganisms require carbon for energy and Food scraps (e.g., vegetable peelings, coffee grounds, nitrogen to make protein. Leaves, straw and sawdust eggshells) are appropriate additions to the compost are high in carbon while grass clippings, manure, pile. Other organic materials used to add nutrients coffee grounds and vegetable scraps are higher to the pile are blood meal, bone meal and livestock in nitrogen. It helps to think of these materials as manure. S.C. Smart Gardener Handbook 11
- 14. Volume A pile should be large enough to hold heat and small enough to admit air to its center. As a rule of thumb, the minimum dimensions of a pile should be 3 X 3 X 3 feet (1 cubic yard) to hold heat. Aeration Oxygen is required for microbes to decompose organic waste efficiently. Some decomposition can occur in the absence of oxygen (anaerobic conditions); however, the process is slow and foul odors may develop. Also, anaerobic decomposition leads to the production of chemical compounds that are toxic to plants. Organic matter allowed to decompose anaerobically should be exposed to air for several days or sometimes months to complete the composting process and to destroy any plant-toxic compounds. Because of the odor problem, composting without oxygen is not usually recommended in a residential setting. Mixing or turning the pile once or twice a month provides the necessary oxygen and significantly hastens the composting process. A pile that is not mixed or turned may take three to four times longer to decompose. Raising the pile off the ground allows air to be drawn through the pile as the material decomposes. Coarse materials should be placed on the bottom as the pile is built. Another way to introduce air is to place perforated PVC pipes within the pile. Moisture Adequate moisture is essential for microbial activity. Materials in a dry compost pile will not decompose efficiently. If rainfall is limited, the pile must be watered periodically to maintain a steady decomposition rate. Enough water should be added to completely moisten the pile, but overwatering should be avoided. Too much moisture will force out the air and suffocate the microorganisms, resulting in anaerobic conditions, slowing down the decomposition process and causing foul odors. Water the pile so it is damp but does not remain soggy. Squeeze compost in your hand to judge moisture content. If the material feels like a damp sponge and yields only a few drops when squeezed tightly, its moisture content is sufficient. Piles that are too wet should be turned to increase air content; piles that are too dry should be turned and sprinkled with a hose. Particle Size The more surface area the microorganisms have to work, the faster the materials will decompose. Grinding the organic material before composting greatly reduces decomposition time. A shredder is useful for chipping or shredding most yard trimmings and is essential if brush or sticks are to be composted. A low-cost method of reducing the size of fallen tree leaves is to mow the lawn before raking. Windrowing the leaves 12 S.C. Smart Gardener Handbook
- 15. into long narrow piles 1 foot high will make the compost pile near a well or on a slope that drains shredding process more efficient. If the mower has to surface water, such as a stream or a pond. an appropriate bag attachment, the shredded leaves Locating the pile too close to trees also may create can be collected directly. A few twigs and sticks can problems, as roots may grow into the bottom of be left in the pile for aeration. the pile, making turning and handling the compost difficult. Temperature The pile will do best where it is protected from drying The temperature of the compost pile is very winds and is in partial sunlight to help provide heat. important to the biological activity taking place. The more the pile is exposed to wind and sun, the Heat generated by microorganisms as they break more water it will need. down organic materials increases compost pile temperatures. The microbes that are so essential There are no set rules when building a compost pile. to the decomposition process fall into two Pay attention to the items covered in the “Factors categories: mesophilic, those that live and function Affecting the Composting Process” on page 11 in temperatures of 70˚F to 100˚F, and thermophilic, and use good judgement and common sense. The those that thrive at temperatures from 113˚F to following two recipes should help you create a “fast” 155˚F. While high temperatures have the advantage or “slow” compost pile. of killing disease organisms and weed seeds, moderate temperatures encourage the growth of ‘Fast’ Compost Recipe mesophilic bacteria, the most effective decomposers. Pile temperatures between 90˚F and 140˚F indicate Fast compost is labor intensive and requires a lot of rapid composting. Temperatures greater than 140˚F turning. Maintaining a 30:1 carbon to nitrogen ratio kill or reduce the activity of many of the most active, is very important in fast composting. This method can beneficial organisms. If temperatures exceed 140˚F, produce compost in a couple of months or less. the pile should be turned to cool it. If the pile does not reach at least 120˚F, more nitrogen or water may The ingredients and tools needed include: be needed. n greens, fresh material (nitrogen); Building a Compost Pile n browns, dry material (carbon); n water; The compost pile should be located near the place where the compost will be used. Composting is best n garden soil (optional); done in a location screened from your view and that of neighbors. n a pitchfork; n a tarp or cover (optional); and Good locations for the pile are near the garden or between the garage and house. Do not locate the n a hotbed thermometer (optional). S.C. Smart Gardener Handbook 13
- 16. ‘Fast’ Compost Recipe: Step-by-Step 3. Mix it up. Use your pitchfork to turn the materials added to the pile. When you’re done, 1. Collect material to create a 1-cubic-yard make the top of the pile slant to the center to pile (3 X 3 X 3 feet). Chop or shred any coarse catch rainfall. At times, you may want to cover materials to increase their surface area. Start the the pile with a plastic covering or tarp to regulate pile with a 4 to 6 inch layer of “browns” (dry), the amount of moisture entering the pile. The high-carbon materials (high C:N ratio). Next, cover should not rest on the pile because it may add a 4- to 6-inch layer of “greens” (fresh), cut off oxygen. high-nitrogen materials (low C:N ratio). Add additional nitrogen if necessary. Vegetative food 4. Consider the porosity of the mixture. If scraps should be added in this layer. If food dense materials, such as manure or wet leaves scraps are included, an additional thin layer of are used, wood chips, straw or dry bulky material soil, sawdust, leaves, straw or compost should be should be added to improve porosity. The added to absorb odors. thickness of the layers will depend on the C:N ratio of the materials being used. Mix the layers. 2. Layer material until the pile is about 3 to 4 feet high. Remember to water each layer 5. Conduct a squeeze test to evaluate the as you construct the pile. Apply about a moisture content of the compost. Add water until quarter-inch layer of soil or finished compost squeezing a handful will yield one or two drops between layers. One reason for adding soil of water. Adding too much water may leach out is to ensure that the pile is inoculated with nutrients. decomposing microbes. The use of soil in a compost pile is optional. In most cases, organic ‘Slow’ Compost Recipe yard trimmings such as grass clippings or leaves contain enough microorganisms on the surface Slow composting takes the least labor and time of to cause decomposition. Studies have shown that the many ways to compost. It’s ideal for people who there is no advantage in purchasing a compost don’t have a large amount of yard trimmings to starter or inoculum. The microbes already in the compost all at once. This method can take from six soil and on organic materials are just as efficient months to two years or longer to produce compost, in decomposing the waste as those provided by so be patient. the commercial inoculum. One way to ensure that activator microbes are present in the new Stacking cinder blocks on three sides (as pictured on compost is to mix in some old compost as the page 13) makes an inexpensive bin. A standard-sized pile is prepared. garbage can with eight or more slots in the sides Troubleshooting Tips for Composting Yard Trimmings Symptoms Cause Solutions The pile smells like rotten eggs or garbage. The pile is too wet. There is not enough air. Turn pile and add dry stalks, leaves or straw. The pile is dry inside. There is not enough water in the pile. Turn and moisten materials, then cover pile. There is too much woody material in the Mix in fresh greens or nitrogen fertilizer pile. such as urea, blood meal or chicken manure. Chop or remove coarse woody materials. The pile is too small. Add material to fill bin or make 3 X 3 X 3 feet pile. The pile is damp inside, but not The pile lacks “greens.” Mix in fresh greens or nitrogen fertilizer. composting. Chop or remove excess woody material. The pile has shrunken, but materials are not The outside of pile is dry, but inside has Use material that has not decomposed decomposing. probably composted. in a new batch. The pile has clumps of slimy grass and an The pile has too much fresh grass. Leave grass clippings on lawn or mix in ammonia smell. brown leaves or straw. 14 S.C. Smart Gardener Handbook
- 17. of the can for ventilation and five in the bottom for the decomposition of resistant compounds, organic drainage also can be used. In all cases, elevate the acids, large particles and clumps of material that bin 1 foot off the ground or start the pile with a 3- to remain after active composting. As a result, the pH 6-inch layer of small twigs or chopped corn stalks to shifts toward neutral, the C:N ratio decreases and the improve air movement and drainage. If you choose concentration of humus increases. When the compost not to use a container, cover the heap with a layer of pile’s temperature no longer reheats after turning, yard trimmings or soil to prevent moisture loss. the curing stage begins. Curing may be considered complete when the pile temperature falls close to The ingredients and tools needed are the same as air temperature (without the pile being anaerobic or those for “fast” compost. Add greens and browns overly dry). to the pile whenever they become available. Turn the pile occasionally to mix the materials together Unfinished compost can be toxic, especially to to prevent them from clumping together and to seedlings and newly established plants. Therefore, avoid anaerobic decomposition. You will know that compost must be allowed to decompose thoroughly materials are decaying without oxygen by the foul before use. odor: a tell-tale sign that it is time to turn the pile. Look for ready-to-use compost near the bottom of the pile. Composting Alternatives Curing n Sheet composting in the garden Curing is an important and often neglected stage involves applying raw composting materials of composting during which the compost matures directly on top of the soil in layers. Shredded at low, mesophilic temperatures. Curing finishes organic matter can be applied between plants as a type of mulch and allowed to decompose slowly. Material can then be incorporated directly into the soil after frost in the fall. n Trench composting involves digging a trench about 8 to 12 inches deep and filling it up with shredded organic materials. Vegetable and other food scraps (excluding meat, bones and fatty foods) and yard trimmings (especially diseased or insect-infested plants) can be used. Microorganisms and earthworms will slowly convert these materials to usable organic matter. Covered trenches are often used as paths between rows of vegetables while the organic matter is decomposing. n Compost hole digging is similar to trench composting, except that it involves smaller areas. A post-hole digger can be used to make holes between vegetables or ornamental shrubs and trees. Fill the holes with food scraps and cover them with soil. By the following spring, the organic matter should be decomposed. n VERMICOMPOSTING is the production of compost using worms to digest organic waste. S.C. Smart Gardener Handbook 15
- 18. Using Compost the potting mix should be compost. Too much compost may result in waterlogging and poor aeration for roots. n Soil amendment: Compost is used as an organic amendment to improve physical, Although proper composting destroys most weed chemical and biological properties of soil. Adding seeds and disease-causing organisms, some may compost will increase the moisture-holding still survive because of incomplete mixing. To capacity of sandy soils, thereby reducing drought obtain a completely pasteurized compost for use damage to plants. When added to heavy clay in the potting mixture, heat the material in an soils, compost improves drainage and aeration oven at 160˚F for 30 minutes. and reduces waterlogging damage to plants. Compost increases the ability of the soil to hold n Mulch: A 2- to 3-inch layer of compost can and release essential nutrients. The activity of be used as a mulch around vegetables and earthworms and soil microorganisms beneficial to ornamental plants. Extend the mulch layer up plant growth is promoted with compost. Other to or beyond the drip line of shrubs and trees. benefits of adding compost include improved The drip line is defined by the outer edge of the seedling emergence and water infiltration plant’s branches. Applying compost will help because of a reduction in soil crusting. Over time, conserve moisture and keep the soil cool in the yearly additions of compost create a desirable summer and warm in the winter. soil structure, making the soil much easier to work. For improving a soil’s physical properties, incorporate 1 to 2 inches of well-decomposed compost into the top 6 to 8 inches of soil. Use Compost Questions and Answers less for sandy soils and more for clay soils. Q. What is compost? To a limited extent, compost is a source of A. Compost is the partially decomposed remains of nutrients. Nutrients are slowly released from plants. In its final state of decomposition, it is compost and, often, the nutrient content is too referred to as humus. low to supply all the nutrients necessary for plant growth. It is usually necessary to supplement Q. Does compost have any value as a fertilizer? compost with some fertilizer, particularly A. Yes. Decomposed materials have some nitrogen, nitrogen. If the C:N ratio of the compost is less phosphorous and potassium content, though in than 20 to 1, nitrogen tends to be released rather small amounts. The addition of garden fertilizers than tied up. For the majority of yard trimmings to speed decomposition supplies some of the composts, the C:N ratio is less than 20 to 1. nutrients as well. Thus, while compost may not supply significant amounts of nitrogen, especially in the short run, nitrogen tie-up should not be a major concern Q. Can compost be used as a substitute for fertilizer in the garden? with most yard trimmings. About 1 cup of ammonium nitrate (0.15 pound actual nitrogen) A. It can be used as a source of nutrients; however, per 3 bushels (100 pounds) compost is required there are not enough nutrients present in to provide the additional nitrogen needed by compost to supply the needs of vegetable crops. most garden plants. The lack of large amounts of nutrients in compost is far outweighed by the other advantages of the Have your soil tested annually to determine organic material. whether supplemental phosphorus and potassium are required. The pH of most composts Q. Is it necessary to add lime (calcium) to the made from yard trimmings is usually 7.0. The compost pile? neutral pH of compost should not pose any problems when mixed into the soil and, in fact, is A. No. Too much lime may cause a loss of nitrogen beneficial to plants growing in acidic soils. from the pile. Most finished compost will have a nearly neutral pH. n Potting soil: Compost can be used as a component of potting mixes. Generally, no more Q. Is it necessary to add inoculum to the compost than one quarter to one third by volume of pile to activate the composting process? 16 S.C. Smart Gardener Handbook
- 19. A. No. Inoculation with prepared microbes may Q. How do you gauge the proper moisture hasten the process, but there are enough content for composting? microbes present in the material being composted to initiate the process. A. Materials should feel like a wrung-out sponge, moist but when squeezed in your hand no more than a drop or two of water should come out. Q. Should compost piles be covered? Some very dry materials (straw, cardboard and A. A compost pile that has a good moisture content others) may need prolonged soaking to reach (like a damp, wrung-out sponge) will benefit adequate moisture levels. from being covered with plastic or carpet scraps. Covering helps to keep piles moist in summer and Q. Do compost piles have offensive odors? prevents them from getting too soggy in winter. A. In general, compost does not produce offensive If a pile is too dry or soggy to start, covering may odors if composted in a bin with adequate make the problem worse. ventilation. If animal manure is used, some odor may be detected in the first or second day, but Q. What are the best materials for composting? will dissipate as the process accelerates. A. Most plant material can be used for composting. Leaves are perhaps the best material because of Q. What can be done about a smelly pile? their availability and organic content; however, A. Smelly piles are most often caused by poor other types of organic materials, such as animal aeration. The bacteria which live in such manure (no dog or cat feces), grass clippings, “anaerobic” piles produce a rotten egg smell. vegetable scraps, small tree limbs and shrubbery Smelly piles should be turned to introduce air and trimmings, coffee grounds and rotted sawdust encourage “aerobic” bacteria. Wet, compacted are considered good composting materials. areas should be broken up with a pitch fork and Invasive weeds (e.g., Florida betony, nutsedge) coarse, dry materials – such as straw or corn should be left on pavement to thoroughly dry stalks – may be mixed in to aid drainage, absorb out before composting. Avoid composting moisture and create air spaces. feces, meat and dairy products or materials contaminated with chemicals. Q. When is compost ready to use? Q. How do you know when you have the A. When the pile returns to normal temperature and best carbon to nitrogen ratio (C:N) for fast the organic material crumbles easily, compost composting? is ready to use. At this point you should not be able to recognize the material that you put in A. Experimentation is the best way to get a good the original pile. The composting process in the sense of carbon and nitrogen ratios in different average pile takes about 6 to 8 months, though materials. Composting books often have tables an ideally mixed and tended pile may take less giving some rough figures. See the chart on than 8 weeks to become compost. page 11 for carbon-to-nitrogen ratios for organic materials. Q. How can I use compost? Q. Is it necessary to shred materials for the A. Compost can be used to enrich the garden, to compost pile? improve the soil around trees and shrubs, to amend the soil for house plants and seed-starting A. The finer the material that goes into the compost mixes (when screened) or to top-dress lawns. pile, the quicker and more thorough the decomposition. Q. What is the difference between compost and mulch? Q. Do compost piles need turning? A. Compost is decomposed organic material. A. Yes and no. Turning the pile will supply more Mulches are materials – organic or inorganic – oxygen for the microbe population and will shift used as a surface treatment on soil to suppress undecomposed material on the edge of the pile weeds, hold moisture and prevent erosion. to the center where it too will be decomposed. Compost is just one of many mulch materials. Compost can be created without turning, though Other mulches include gravel, wood chips, it will take longer. plastic, fabrics and sawdust. S.C. Smart Gardener Handbook 17
- 20. Q. How can wood/bark chips be made to Materials to Avoid in a Compost Pile ... compost faster? A. Rechipping to open more surface area Some materials may pose a health hazard or create a and adding nitrogen will both speed up nuisance and, therefore, should not be used to make decomposition of wood chips to some extent. compost. Human or pet feces should not be used because they can transmit diseases. Although animal Q. Why can’t dairy products, meat and fish scraps remains can be safely decomposed in commercial be composted? composters, wastes such as meat, bones, grease, peanut butter, whole eggs and dairy products should A. Animal products attract flies, rodents and other be avoided in home compost piles because they may pests which carry diseases. attract rodents. Q. Do compost “tumblers” work? What CAN be composted at home? A. Compost tumblers work very efficiently if wastes are chopped, moistened and contain adequate n Greens (Fresh material): Fruit and nitrogen. Tumblers with flat sides or internal vegetable scraps, bread and grains, coffee bafflers are recommended since they mix and grounds and filters, tea bags and trimmings aerate materials more thoroughly than those with from yard smooth sides. n Browns (dry Material): Non-recyclable paper, paperboard, fall leaves, clean sawdust and Composting Food Scraps wood shavings n Burying food scraps in the garden is a simple method requiring no special tools. What CANNOT be composted at home? n Food “digesters” provide a convenient and n Meat, fish, poultry or dairy products: Put pest-resistant way to compost food scraps. them in your household garbage. n Worm bins are a fun and interesting method for n Evergreen leaves, sawdust or shavings composting food scraps to produce rich compost from painted or treated wood and and worms for fishing. coated paper How to Store Food Scraps in the Kitchen ... A plastic container with a lid is great for storing food scraps in the kitchen until you are ready to take them outside. Empty the container into your worm bin, a hole in the garden or compost bin every two days so food scraps don’t start to smell. A 5-gallon bucket with tight lid can be used outside to store food scraps for longer periods if it is inconvenient to add them to the compost, but odors and flies may become a problem – especially in summer. Sprinkling an inch or two of sawdust, peat or coconut coir on top of layers helps prevent flies and odors. Food scraps also can be stored in a plastic container in the freezer to control these problems. Do what works best for you. 18 S.C. Smart Gardener Handbook
- 21. Worm Bin Composting n Step 1: Get a bin. Use a sturdy wood or plastic box with a tight-fitting lid to keep out pests and (or Vermicomposting) retain moisture. Holes drilled in the bottom are essential for drainage. A box about 1 foot deep Worm bins are a fascinating way to turn food scraps is best, since worms must live near the surface into high-quality compost. Follow these easy steps to breathe. Worm bins can be made from old to start your own worm bin. Read Mary Appelhof’s cupboards, crates or plywood. Bins made from book, “Worms Eat My Garbage,” for more detailed recycled plastic are available through mail-order information on composting with worms. catalogs or your local discount store. Worm bins should have 1 square foot of surface for each pound of food scraps added per week. A 2 X 4 X 1 feet deep worm box can process about 8 pounds of food scraps a week – usually enough for two people. Weigh your food scraps for a few weeks before buying or building a bin. Keep worm bins in a basement or enclosed garage if possible. Cold winter weather and hot summer temperatures can dramatically slow worm composting. If the bin is kept outside, find a spot that is shady in summer but gets some winter sun. Outdoor bins can be insulated with rigid foam insulation tacked to the lid and sides. n Step 2: Fill the bin with bedding. Carbon-rich bedding supplies worms with a balanced diet and helps prevent flies and odors. Good beddings include moist autumn leaves, shredded cardboard or newspaper, straw or untreated coarse sawdust and wood shavings. A mix of these works best. Immerse dry bedding in a garbage can full of water for several minutes Worm Bin Troubleshooting Symptoms Cause Solutions The bin smells like rotten eggs or garbage. The pile is too wet. Mix in dry leaves, peat moss or sawdust. Meat, fish, dairy products or pet waste has Keep these items out of the bin. been added to the bin. Food scraps have not been covered. Cover food with bedding when added. The bedding is dry and has few worms. There is not enough water in the pile. Mix and moisten the bedding. Cover with plastic or cardboard. Move the bin out of sunlight. Food scraps are accumulating. There is too much food in the bin. Limit the amount of food scraps added. Add more worms. Build another bin. The bin is too hot or too cold. Move the bin to a cool basement or garage. Keep the bin filled with bedding. Maggots are in the bin. Meat, fish, dairy products or pet waste has Keep these items out of the bin. Cover been added to the bin. bedding with cardboard or plastic. Fruit flies swarm out when the bin is Food scraps are exposed. Always cover food scraps with bedding. opened. If you still have fruit flies, add an inch of sawdust or peat moss to the top of the bedding or cover it with cardboard. Worms are crawling up the sides of the bin. There is too much food in the bin, the Limit the amount of food scraps added. bedding is too wet or the contents are fully Build another bin or add dry bedding. decomposed. S.C. Smart Gardener Handbook 19
- 22. before adding to worm bin or mix and spray with for fishing. To harvest more worms to start bins, hose until everything is moist like a wrung-out shovel a few gallons of compost into a pile in sponge. Fill the bin to the top with loose bedding bright sunlight. After 15 minutes, scrape away to keep the worms from freezing in winter or the outer layer of compost until the worms are getting too hot in summer. (Tip: Save a few bags visible. Repeat until the worms are concentrated of leaves each fall to rebed your bin later.) at the bottom of the pile. n Step 3: Add worms. Red worms – also known as “red wrigglers” or “manure worms” – are Stackable Worm Bins best for composting. “Earthworms” or “night crawlers” are not suitable for composting. A number of worm bins are for sale that use stacking Start with about 1 pound of worms (about trays to take advantage of the worms’ tendency 1 pint of pure worms) to keep up with food to feed on the surface and migrate out of finished scraps. Get worms from a friend’s bin or visit compost. The top tray is fed fresh food scraps. www.wormfarmingsecrets.com for sources. When material in the bottom level is decomposed and worms move up into fresh materials, the tray is n Step 4: Bury food scraps. Pull aside bedding removed, harvested and then rebedded and replaced to make holes or trenches large enough to on top. lay food scraps 1 to 2 inches thick and deep enough to cover scraps with a few inches of bedding. Bury in a different spot each week to Summary: give the worms a balanced diet of food scraps and bedding. Place a sheet of plastic or moist Successful Composting newspaper on top of the bedding to keep moisture in and flies out. It’s not a secret. Simply place garden scraps in a pile and bacteria, bugs and fungi will turn it into n Step 5: Harvest compost and worms. compost, but it may take a year or longer. For quicker After 6 to 12 months, most of the bedding composting, provide the decomposer organisms with should look like dark, rich soil. To harvest proper food and conditions. compost and rebed the bin, push the compost to one side (it shrinks as it composts) and fill the 1. A balanced diet: Composting bacteria thrive empty side with fresh bedding. Then bury food on a mix of succulent “greens” like fruit and scraps only in the new bedding until any food vegetable scraps, annual weeds and flowers, and scraps in the old bedding finish decomposing and on woodier “browns,” such as autumn leaves and most worms have migrated to the fresh food. corn stalks. An equal mix of greens and browns Harvest finished compost and replace with fresh works well. Too many greens can produce a bedding. It is simple to pick out a few worms smelly, soggy mess. A pile that is mostly browns To Compost or Not to Compost? DO compost in piles or bins DO NOT compost at home Greens (Fresh Material) Fruit and vegetable scraps, coffee grounds, eggshells, Clippings recently treated with “Weed Feed” or other herbicide – put in etc. curbside yard waste collection. Fresh garden trimmings, flowers and plant leaves Insect-infested or diseased plants – put in curbside yard waste collection. Barnyard manure (horse, cow, chicken) Pet feces (dog, cat, rodent, exotic bird) Garden vegetable leaves and stalks, fallen fruit Meat, fish, poultry, dairy products – put in disposal or household garbage. Weed leaves, stems and flowers Weed seed heads and roots of spreading weeds like ivy, buttercup, morning glory and quackgrass – put in curbside yard waste collection. House plants and potting mix No meat, bones or fat Browns (Dry material) Autumn leaves Large amounts of evergreen leaves, needles or cones Twigs and stalks Branches over 1/2 inch in diameter; berry brambles, rose stems, holly Coarse sawdust or shavings Sawdust from plywood, treated or painted wood Shredded paper, cardboard, paper towels Coated photo or copy paper, colored paper, waxed cardboard 20 S.C. Smart Gardener Handbook