How to produce a good science fair display
•
1 gostou•648 visualizações

This document explains how to design a good display for your science fair project.

Recomendados
Mais conteúdo relacionado
Mais procurados
Mais procurados (16)
Semelhante a How to produce a good science fair display
Semelhante a How to produce a good science fair display (20)
Mais de Javier Aguirre
Mais de Javier Aguirre (20)
Último
Último (20)
How to produce a good science fair display
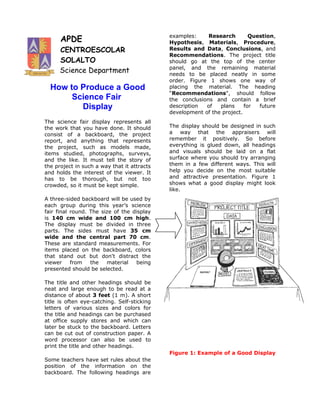
- 1. examples: Research Question, APDE Hypothesis, Materials, Procedure, CENTROESCOLAR Results and Data, Conclusions, and Recommendations. The project title SOLALTO should go at the top of the center panel, and the remaining material Science Department needs to be placed neatly in some order. Figure 1 shows one way of How to Produce a Good placing the material. The heading “Recommendations", should follow Science Fair the conclusions and contain a brief Display description of plans for future development of the project. The science fair display represents all the work that you have done. It should The display should be designed in such consist of a backboard, the project a way that the appraisers will report, and anything that represents remember it positively. So before the project, such as models made, everything is glued down, all headings items studied, photographs, surveys, and visuals should be laid on a flat and the like. It must tell the story of surface where you should try arranging the project in such a way that it attracts them in a few different ways. This will and holds the interest of the viewer. It help you decide on the most suitable has to be thorough, but not too and attractive presentation. Figure 1 crowded, so it must be kept simple. shows what a good display might look like. A three-sided backboard will be used by each group during this year’s science fair final round. The size of the display is 140 cm wide and 100 cm high. The display must be divided in three parts. The sides must have 35 cm wide and the central part 70 cm. These are standard measurements. For items placed on the backboard, colors that stand out but don't distract the viewer from the material being presented should be selected. The title and other headings should be neat and large enough to be read at a distance of about 3 feet (1 m). A short title is often eye-catching. Self-sticking letters of various sizes and colors for the title and headings can be purchased at office supply stores and which can later be stuck to the backboard. Letters can be cut out of construction paper. A word processor can also be used to print the title and other headings. Figure 1: Example of a Good Display Some teachers have set rules about the position of the information on the backboard. The following headings are
- 2. Do balance the arrangement of materials on the backboard. This means evenly distributing the materials on the Helpful Hints board so that they cover about the same amount of space on each panel. 1. All typed material should be placed on a colored backing, Do use glue sticks or double-sided tape such as construction paper. A to attach graphs, results, photographs border of 1/4 to 1/2 inch (0.63 or others to construction paper. White to 1.25 cm) should be left school glue causes the paper to wrinkle. around the edges of each piece of typed material. Don't leave large empty spaces on the 2. It is a good idea to make the backboard. project title stand out by using larger letters for it and smaller Don't leave the table in front of the letters for all other headings. backboard empty. Display your models 3. If electricity is needed for the (if any), report, copies of your abstract, project, be sure the wiring and your journal here. meets all safety standards. 4. You may bring an emergency kit Don't hang electrical equipment on the with extra letters, glue, tape, backboard so that the electric cord runs construction paper, stapler, down the front of the backboard. scissors, pencils, pens, touch-up paint, markers, and so forth. Don't make the title or headings hard This kit should contain anything to read by using uneven lettering, you might need to make last- words with letters of different colors, or minute repairs to your display. disorganized placement of materials. Do's and Don'ts Don't attach folders that fall open on the backboard. Do use computer-generated graphs. Don't make mistakes in spelling words Do display photos representing the or writing formulas. procedure and the results. Do use contrasting colors. Safety Do limit the number of colors used. Basically, anything that is or could be hazardous to other students or the public is prohibited and cannot be Figure 2: Example of a Bad Display displayed. The following is a list of things unacceptable for display. This Do display models when applicable. If prevents students from working on an possible, make the models match the unsafe project and from wasting time color scheme of the backboard. on a project that would be disqualified. Models or photographs can be used Do attach charts neatly. If there are instead of things that are restricted many, place them on top of each other from display. so that the top chart can be lifted to reveal the ones below.
- 3. Unacceptable for Display • Live animals • Microbial cultures or fungi, living or dead • Animal or human parts, except for teeth, hair, nails, and dried animal bones • Liquids, including water • Chemicals and/or their empty containers, including caustics, acids, and household cleaners • Open or concealed flames • Batteries with open-top cells • Combustible materials • Aerosol cans of household solvents • Controlled substances, poisons, or drugs • Any equipment or device that would be hazardous to the public • Sharp items, such as syringes, knives, and needles • Gases Examples of Science Fair Displays