Mais conteúdo relacionado
Semelhante a Os php-wiki1-pdf (20)
Os php-wiki1-pdf
- 1. Create an interactive production wiki using PHP,
Part 1: Introduction and scaffolding
Skill Level: Intermediate
Duane O'Brien
PHP developer
#####
13 Feb 2007
This "Create an interactive production wiki using PHP" series creates a wiki from
scratch using PHP, with value-added features useful for tracking production. Wikis
are widely used as tools to help speed development, increase productivity, and
educate others. Each part of the series develops integral parts of the wiki until it is
complete and ready for primetime, with features including file uploading, a
calendaring "milestone" system, and an open blog. The wiki will also contain projects
whose permissions are customizable to certain users.
Section 1. Before you start
This "Create an interactive production wiki using PHP" series is designed for PHP
application developers who want to to take a run at making their own custom wikis.
You'll define everything about the application, from the database all the way up to
the wiki markup you want to use. In the final product, you will be able to configure
much of the application at a granular level, from who can edit pages to how open the
blog really is.
At the end of this tutorial, you will have learned what goes into making a wiki,
considerations in defining your wiki markup, potential pitfalls and challenges in
dealing with file uploads, and some implications involved when setting up an
environment where content is edited by a collective, rather than an individual. Some
of these issues can make wikis tricky. But they can also make them great.
Introduction and scaffolding Trademarks
© Copyright IBM Corporation 2007. All rights reserved. Page 1 of 22
- 2. developerWorks® ibm.com/developerWorks
About this series
Part 1 of this series will draw the big picture. You will determine how you want the
application to look, flow, work, and behave. You'll design the database and
rough-out some scaffolding. Part 2 focuses on the primary wiki development,
including defining the markup, tracking changes, and file uploads. In Part 3, you
define some users and groups, as well as a way to control access to certain aspects
of individual Wiki pages and uploaded files. Part 4 deals with a Calendaring and
Milestones feature to track tasks, to-dos, and progress against set goals. And in Part
5, you put together an open blog to allow discussion of production topics and
concerns.
About this tutorial
PHP is a popular language choice when developing Web applications. Binary and
source versions are available, and while the binaries are Windows®-specific, the
source can be complied for most common platforms. PHP is widely available at most
third-party hosting companies. It's easy to learn, but at the same time, it's powerful,
flexible, and capable. All of these things make PHP a good choice for writing a wiki
engine.
This tutorial focuses on application design. After you get your prerequisites out of the
way, you'll get a picture for how the application is going to look, and jump into the
database design and scaffolding parts. You're building the beginnings of your
custom PHP wiki engine. But rather than refer to it as "your custom PHP wiki
engine," you are going to have to give it an easy-to-remember name, such as Criki.
Topics include:
• What makes a wiki?
• Criki's architecture
• Database design
• Scaffolding
Prerequisites
It is assumed that you have some experience working with PHP and MySQL. We
won't be doing a lot of deep database tuning, so as long as you know the basic ins
and outs, you should be fine. You may find it helpful to download and install
phpMyAdmin, a browser-based administration console for your MySQL database.
Introduction and scaffolding Trademarks
© Copyright IBM Corporation 2007. All rights reserved. Page 2 of 22
- 3. ibm.com/developerWorks developerWorks®
System requirements
Before you begin, you need to have an environment in which you can work. The
general requirements are reasonably minimal:
• An HTTP server that supports sessions (and preferably mod_rewrite).
This tutorial was written using Apache V1.3 with mod_rewrite enabled.
• PHP V4.3.2 or later (including PHP V5). This was written using PHP
V5.0.4
• Any version of MySQL from the last few years will do. This was written
using MySQL V4.1.15.
You'll also need a database and database user ready for your application to use.
The tutorial will provide syntax for creating any necessary tables in MySQL.
Additionally, to save time, we will be developing Criki using a PHP framework called
CakePHP. Download CakePHP by visiting CakeForge.org and downloading the
latest stable version. This tutorial was written using V1.1.13. For information about
installing and configuring CakePHP, check out the tutorial series titled "Cook up Web
sites fast with CakePHP" (see Resources).
Section 2. Introduction
If you've ever had to work on a project with people who were scattered
geographically, you've probably used something to collaborate online. Historically,
collaboration software has been heavy, overbearing, and pointlessly complicated,
often a hindrance to collaboration. But as wikis have risen into common usage,
people have put them to good use as a tool in support of collaboration.
Wikis can be fun tools to use. They derive a lot of power from their openness and
simplicity. Building your own wiki engine from scratch can be an enlightening
exercise as you get a good look at what's going on behind the scenes. But before
you start, you should get an idea for what a wiki typically looks like.
What makes a wiki?
There are many wiki flavors, and wiki engines (the software behind the wiki) have
been written in just about every language suitable for the Web. But most of these
Introduction and scaffolding Trademarks
© Copyright IBM Corporation 2007. All rights reserved. Page 3 of 22
- 4. developerWorks® ibm.com/developerWorks
have the same kinds of features:
Browser-based
A wiki typically runs in the context of a Web browser.
Open editing
Generally, anyone who can access the wiki can add to or edit the content.
Wiki markup
A wiki typically uses a sort of meta-language for formatting that acts as a
shorthand version of HTML.
Simplicity
Because wikis are used for collaboration, they are generally designed as
simple tools that can easily used by most anyone. The focus is on authoring
and presentation of information.
Some wikis require user registration and are less open. Some allow for use of raw
HTML, rather than a markup language. But these general features hold true when
looking at most Wiki engines.
Section 3. Architecture
In the process of planning the development of Criki, there are several things to
consider. Start by determining how the application is going to flow and consider what
kind of markup will be used, how uploaded files will be stored, what levels of user
permissions will be used, how users will be promoted (and demoted), and how
pages will be protected (and unprotected). Considering these beforehand will give
you a clearer path when coding later.
How is Criki going to flow?
Before you write a line of code, you should spend some time getting a clear picture
for how your application is going to flow. You don't have to have precise
determinations for UI specifics at this point (though having them won't hurt you), but
you need a clear idea of what happens when you submit a page, add a user, edit
text, upload a file, etc. As you go through this process, it is important to keep your
target audience in mind. Sure, it may make sense to you, but you are not the only
one using the application.
Introduction and scaffolding Trademarks
© Copyright IBM Corporation 2007. All rights reserved. Page 4 of 22
- 5. ibm.com/developerWorks developerWorks®
Types of users in Criki
What kinds of users will be using Criki? You shouldn't overthink this. Keeping in
mind the open nature of wikis in general, defining every possible kind of user would
be an exercise in frustration. Keep it simple:
Administrators
The highest level of user. Usually there would only be one administrator.
Administrators will have full access to all users and pages within Criki.
Editors
Since Criki is to be used to manage projects, the project managers, team
leaders, or tech leads might be editors. They will have some rights over some
users and some rights over some pages.
Contributors
This is your average run-of-the-mill user. Contributors will have no rights over
other users and minimal rights over some pages.
That should be enough user type definition. Remember, wikis derive much of their
power from their openness. As you begin to use Criki more, you may find it
beneficial to add other user types, but for now, these three should suffice.
Administering Criki
You are probably going to be the one administering Criki. And this can serve as a
good place to start. Not because this will represent the most common of your tasks
but because it will represent the most complex of your tasks. And it's the complex
tasks, not the common ones, that will shape the bulk of the back end to Criki.
Start by identifying the tasks only an administrator will be able to perform:
1. Changing Criki configuration options
2. Removing a page completely from Criki
3. Removing a user from Criki
4. Removing an uploaded file from Criki
5. Promoting or Demoting any page to any access level
6. Promoting or Demoting any user to any access level
Introduction and scaffolding Trademarks
© Copyright IBM Corporation 2007. All rights reserved. Page 5 of 22
- 6. developerWorks® ibm.com/developerWorks
Promotion and demotion could be accomplished with a single button click. Removing
a page, user, or uploaded file should have a confirmation box or the ability to recover
from mistakes. For simplicity, a confirmation box will be used. Changing Criki
configuration options will require its own page.
Editor tasks in Criki
There could be any number of editors using Criki. They should have access to more
features than contributors, but they should not be able to access administrative
tasks. Specifically, editors should be able to:
• Promote or demote any page to or from editor-level access
• Promote or demote any user to or from editor-level access
Again, promotion and demotion could be accomplished with a single button click.
There's no need to overcomplicate the flow.
The security-minded might raise a hand at this point and point out the potential
problems that come from this kind of structure. If two editors were to get into a
disagreement, one of them could simply demote the other, causing arguments,
escalations, hurt feelings, floods, fires, earthquakes, and plagues of locust. These
kinds of concerns are worth considering when dealing with a wiki, but keep in mind
that the general nature of a wiki and, indeed, what gives a wiki its power is its
openness. There is inherent trust in the power structure.
But there doesn't have to be. Editor rights could just as easily be controlled by
configuration settings, indicating what editors can and cannot promote or demote. By
giving the administrator this level of control of the application configuration, you give
the administrator the ability to configure the application to meet the needs at hand.
User registration in Criki
User registration in Criki could take a couple different forms:
• A user could self-register by entering e-mail address, name, and
password.
• Users could only be able to register using a link from an invitation sent by
an administrator or editor.
• Administrators and editors could have the ability to register users directly.
In all three cases, the user registration forms will look identical -- an e-mail field, a
display name, and a password (and confirmation box). The primary difference
Introduction and scaffolding Trademarks
© Copyright IBM Corporation 2007. All rights reserved. Page 6 of 22
- 7. ibm.com/developerWorks developerWorks®
between them is who can perform the action.
In the first case, the user registration page is wide open. Anyone can access it and
create an account. In the second case, the user registration page requires a valid
invitation code to work properly, but the access levels for the page are the same as
the first case. In the third case, access to the registration page is restricted.
In all three cases, the user registration process will flow exactly the same way: The
form is filled out, the user is created, and a welcome e-mail is sent. Given the
similarities of the three options, why do them all? The method used can be
controlled using a configuration setting. This allows the administrator to determine
which method works best.
Adding pages to Criki
Is Criki going to allow anyone to add pages to the wiki or will this be restricted to
contributors? This is another place where putting the choice into a configuration
setting can give the administrator power. Regardless of who can add pages to the
wiki, the form to add the page will look exactly the same.
Generally, adding a page to a wiki is a two-part process. First, someone creates a
link to the page that has not yet been created. When the wiki engine renders this link
and sees that the page does not exist, the link is visually changed in some fashion
and is changed to point to the edit page. Then, when someone clicks the link, the
edit page is loaded. When the form is submitted, the page is created.
This is a sensible approach to adding pages to Criki. You could give Criki the ability
to add a page directly, but unless it is linked to by another page, the page will be an
orphan in that it won't be visible from anywhere in the wiki unless you make a page
to show all pages that are not linked to from any other page.
Once you get in the mindset that adding pages is just like editing pages -- potentially
with differing access levels -- all the important questions are answered by identifying
what happens when a page is edited.
Editing pages in Criki
Who can edit pages in Criki? Anyone? Only contributors? Only editors? The same
people who can add pages? Once again, this can be put into a configuration setting,
so the administrator can determine what works best. Generally, if someone can add
a page, someone can edit a page. But that may not always be the case. In some
cases, the administrator may want to restrict edits by default.
More important to consider is what happens when a page is edited? Specifically:
Introduction and scaffolding Trademarks
© Copyright IBM Corporation 2007. All rights reserved. Page 7 of 22
- 8. developerWorks® ibm.com/developerWorks
• Is the page locked for editing when someone clicks the Edit button?
• If so, what happens if a user starts an edit and closes the browser?
• If not, what happens if two users edit the same page?
• Can the user preview changes?
• Does the user have to preview changes before submission?
• Is the page history tracked?
• Are you going to provide revision diffs?
• What information are you going to track about edits?
Most of these things wouldn't be of much use as a configuration setting. For
simplicity, Criki will not lock a page when a user clicks an Edit button. If two users
edit the same page at the same time, the last one submitted will win. A full history of
edits will be kept, including the user and IP address of the person who edited the
page. A user can preview pages, but doesn't have to. Criki won't provide version
diffs.
Reading pages in Criki
Now you are getting down to the more mundane tasks in the wiki. Reading pages
will be the bulk of what your users will be doing. Reading a page should be as
simple as passing the page name to a controller, verifying that the user has rights to
read the page, and retrieving the text for display.
Access verification should be a simple matter, as the permissions on the actual wiki
pages will be fairly open. But some pages will be only readable by editors and
administrators. Keep in mind that, since the page text was stored in the database in
wiki markup, it is during page retrieval and formatting that this markup will need to be
rendered into HTML.
Uploading files to Criki
Uploading files is a powerful feature, but it needs to be handled with care. Once you
give users the ability to upload files to your application, you open up a world of
potential security issues. For example, if you allow any user to upload any kind of
file, and if the file was directly accessible via a browser, a malicious user could
upload his own PHP file that could be used to manipulate the file system, delete
files, elevate access rights, etc.
Therefore, it follows that file types should be restricted or uploaded files should not
Introduction and scaffolding Trademarks
© Copyright IBM Corporation 2007. All rights reserved. Page 8 of 22
- 9. ibm.com/developerWorks developerWorks®
be directly accessible via a browser, or both. For Criki, you will allow the
administrator to control what file types can be uploaded via a configuration setting.
The files will be stored on the file system. Taking this approach puts both the power
and the responsibility firmly in the hands of the administrator.
If a file is uploaded that has the same name as an existing file, the existing file will
be backed up and marked with a revision number.
What markup will Criki use?
No two wiki engines use exactly the same markup. Since you are writing Criki from
scratch, you can tailor the markup to suit your specific needs. For our purposes, the
markup will be kept fairly simple:
• Wrapping text in three equal signs (===) will cause the text to be wrapped
in <h3> tags.
• Wrapping text in three single quotes (''') will cause the text to be wrapped
in <i> tags.
• Wrapping text in three exclamation points (!!!) will cause the test to be
wrapped <b> tags.
• Wrapping text in three underscores (___) will cause the text to be
wrapped in <u> tags.
• Wrapping text in three ampersands (&&&) will cause the text to be
wrapped in <pre> tags.
• Wrapping text in triple braces ([[[like this]]]) will cause the text to be turned
into a link. If the text does not appear to be a URL, the link will be
interpreted as a link to another page on the wiki, stripping out
nonalphanumerics. An alternate name may be provided following a pipe
(|). For example:
• [[[ftp://ftp.yourdomain.com]]] will output a link to ftp.yourdomain.com
with the text "ftp.yourdomain.com"
• [[[ftp://ftp.yourdomain.com|my ftp site]]] will output a link to
ftp.yourdomain.com with the text "my ftp site"
• [[[how to do it]]], [[[howtodoit]]], [[[HowToDoIt]]] and [[[how_to_do_it]]]
will all output links to the wiki page "howtodoit." The text of the link will
be whatever was wrapped in the braces.
• [[[howtodoit|Instructions]]] will output a link to the wiki page
"howtodoit" with the text "Instructions."
Introduction and scaffolding Trademarks
© Copyright IBM Corporation 2007. All rights reserved. Page 9 of 22
- 10. developerWorks® ibm.com/developerWorks
• Consecutive lines beginning with an asterisk (*) will be rendered as an
unordered list (<ul>).
• Consecutive lines beginning with a pound sign (#) will be rendered as an
ordered list (<ol>).
• Three dashes (---) on a line by themselves will be rendered as an <hr />
tag.
• URLS beginning with 'http://' will automatically turned into hyperlinks.
When applying the markup, it will be important to consider the order in which you
apply the various markups. Specifically, the &&& markup should be applied first, as it
is most likely to contain code fragments and comments that could be interpreted as
markup. You should experiment with the application of the various markups to
determine what happens when markups are nested. Criki should handle nested
markup gracefully. That is to say: It's not as important to render the markup properly
as it is to not render the markup badly.
For example, consider the following lines.
===I don't want to fight
*unless I have to===
What's the proper way to render these lines? Taken literally, they would be rendered
something like Listing 1.
Listing 1. Improper rendering of lines
<h3>I don't want to fight
<ul>
<li>unless I have to</li>
</ul>
</h3>
That's probably not going to look the way it's intended to or the way the user wanted
it to. But it's not as simple as grabbing the biggest match for your patterns (greedy
pattern matching). Consider the following lines:
Listing 2. Lines to be rendered
===I don't want to fight===
*unless I have to
*And I don't want to
===If you have to fight===
*Fight Dirty
*Win
Introduction and scaffolding Trademarks
© Copyright IBM Corporation 2007. All rights reserved. Page 10 of 22
- 11. ibm.com/developerWorks developerWorks®
Greedy pattern matching might render the text as shown below.
Listing 3. Poorly rendered lines
<h3>I don't want to fight===
*unless I have to
*and I don't want to
===If you have to fight</h3>
<ul>
<li>Fight Dirty</li>
<li>Win</li>
</ul>
Again -- not what you're after. You don't have to solve this problem right now, but it's
a good idea to keep it in the back of your mind, so you can chew on it while you
design the rest of the Criki.
Section 4. How will Criki do all that?
So you know basically how you want Criki to work. Now you can start working out
how you are going to put it together. Since we're doing this in CakePHP, we'll be
using a standard Model-View-Controller (MVC) design.
MVC overview
Model-View-Controller (MVC) refers to a specific method of designing an application.
While a full discussion of MVC is outside the scope of this tutorial, the main points
will be touched on briefly.
MVC breaks an application into three distinctive pieces: Model, View, and Controller.
Each part of the application is responsible for specific tasks.
The Model is primarily concerned with saving and retrieving data. All database
interaction takes place within the Model. The Model takes data from the Controller
and saves it into the database, and the Model retrieves data from the database and
passes it on to the Controller.
The Controller is primarily concerned with logic. This is where the bulk of the
application workload is done. The Controller takes data from the Model, applies
logic, and passes output to the View to be displayed to the user. The Controller also
takes input from user, applies logic, and makes decisions based on the input (such
as passing the input to the Model to be saved or passing other information to the
Introduction and scaffolding Trademarks
© Copyright IBM Corporation 2007. All rights reserved. Page 11 of 22
- 12. developerWorks® ibm.com/developerWorks
View to be displayed).
The View is primarily concerned with presentation. This is where the HTML lives.
The View takes output from the Controller, and formats it for display to the user. In
MVC, application logic is separated completely from presentation logic.
Taking the MVC approach has many benefits. If you need to switch to a new
database vendor, for example, you can update the Model code without having to
wade through presentation and application logic. To change the look of the
application, you can update the View code without having to touch the application
logic or database code. Keeping the three layers separate generally makes each
layer and, thus, the application as a whole, easier to maintain.
Designing the database
Now that you have a fairly good idea for how you want Criki to be used and how it
will be put together, you can start thinking about how Criki will go about
accomplishing its various tasks. Looking back through the list of tasks, you should
start to get an idea for how the database is going to look. You're going to need:
1. A table to hold user data -- This will need to hold at least a user name
(unique), e-mail (unique), password, and access level. Other information
you may want would include a numeric ID for the user, creation date, and
last login date.
2. A table to hold page data -- This will need to hold at least a page name
(unique), page content, page access level, last-modified date, user who
last edited the page, and the IP address of that user (for when user
registration is not required). Other information you may want would
include a numeric ID for the page, as well as maybe a revision number
and last-accessed timestamp.
3. A table to hold uploaded file data -- You could probably get by without
this, but by putting uploaded file information into its own table, you
eliminate the need to walk the directory where files have been uploaded,
while making it easier to store things like file access rights. This table will
need to hold at least a file name (unique), location, revision number, and
access rights. Other information you may want would include a numeric
ID for the file, user who uploaded the file, and IP address of the user
uploaded the file (for times when file upload does not require user
registration).
4. A table to hold page history -- This will look exactly like the page table,
with the exception that page name need not be unique.
Introduction and scaffolding Trademarks
© Copyright IBM Corporation 2007. All rights reserved. Page 12 of 22
- 13. ibm.com/developerWorks developerWorks®
5. A table to hold file history -- This will look exactly like the file table, with
the exception that page name need not be unique.
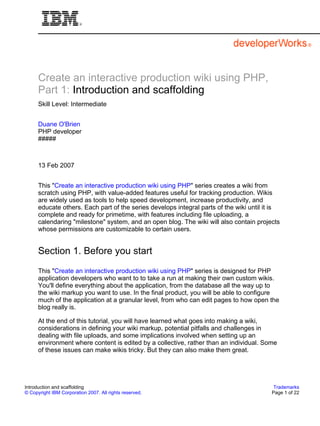
6. A table to hold configuration settings -- This would probably work best
as an entity-attribute-value (EAV) table. An EAV table is designed to hold
an arbitrary number of values by using generic column names such as
"id" and "value," rather than specific column names like
"enable_fileupload" or "access_level." By storing the configuration
settings in this fashion, you allow yourself room to easily add additional
configuration options to Criki in future releases, while at the same time
making it easier for the administrator to change the configuration options
via a browser interface, rather than via a configuration file. For Criki,
you're going to add a field called "description" that will be used as the
label for the configuration field. See Figure 1.
Figure 1. Criki tables
Six tables -- that's all you should need to get the basics of Criki in place. Go ahead
and run the SQL script included with the source code now. Then we'll use some
built-in CakePHP shortcuts to help us get a leg up on the application.
Introduction and scaffolding Trademarks
© Copyright IBM Corporation 2007. All rights reserved. Page 13 of 22
- 14. developerWorks® ibm.com/developerWorks
Section 5. Scaffolding
You have the database created. It's time to get cracking. CakePHP ships with a
script called Bake that will help get you up and running, but before you bake your
controllers and views, you need to create your models.
Creating the models
All the models you create will go in the appmodels directory where you installed
Cake. Keep in mind that in CakePHP, models are singular, while database table
names are plural. For example, the basic model for the entries table would be called
entry.php and would look like this:
Listing 4. Basic model entries table
<?php
class Entry extends AppModel {
var $name = 'Entry';
}
?>
Yes -- CakePHP is smart enough to know that the plural form of "entry" is "entries."
Save the entry model and create models for entry_revision, settings, upload,
upload_revision, and user. All the models will look almost identical to the one above
-- just a class definition and a $name. If you're not sure you got them right, check the
models in the accompanying source code.
Baking the controllers
Now that you have the database and models in place, you can use the Bake code
generator tool that ships with CakePHP to get a quick scaffold up for Criki. Before
you proceed, you should back up the app directory for your CakePHP installation, as
Bake will overwrite some files that exist there. If you are doing all of your work on a
fresh install, you shouldn't need to back anything up. Additionally, if this is your first
time using the Bake code generator, you may need to change the value of
max_input_time in the php.ini file, as Bake might time out if you take too long.
In this case, running Bake is a snap. cd into the directory where you installed
CakePHP and execute the bake.php script located in cakescripts. For example, if
Introduction and scaffolding Trademarks
© Copyright IBM Corporation 2007. All rights reserved. Page 14 of 22
- 15. ibm.com/developerWorks developerWorks®
you installed CakePHP in the directory htdocs, you need to cd into htdocs and run
php cakescriptsbake.php.
If you have problems getting Bake to run, make sure you are in the directory where
you installed Cake and that the php.exe is in a directory located in your path. If it's
not, you should just be able to specify the full path to the php.exe binary.
To start, you'll be presented with the Bake menu.
Figure 2. Bake menu
Since you have already built the models, you can jump right in to building the
controllers.
Figure 3. Building the controllers
Introduction and scaffolding Trademarks
© Copyright IBM Corporation 2007. All rights reserved. Page 15 of 22
- 16. developerWorks® ibm.com/developerWorks
Start from the top and work your way down:
1. Bake will ask, "Would you like bake to build your controller interactively?"
Unless you feel like going down that route, press n to skip interactive
baking.
2. Bake will then ask, "Would you like to include some basic class
methods?" Press y for yes.
3. Bake will then ask, "Would you like to create the methods for admin
routing?" Go ahead and press n for no.
4. Finally, Bake may ask if you want to build unit test files. The unit test files
will not be covered in the tutorial series. Press n and Bake will exit.
Figure 4. Exiting Bake
Introduction and scaffolding Trademarks
© Copyright IBM Corporation 2007. All rights reserved. Page 16 of 22
- 17. ibm.com/developerWorks developerWorks®
Repeat these steps for each of the controllers.
Baking the views
Baking the views is almost exactly like baking the controllers. When you select views
from the Bake menu, you are again presented with a list of views that you can
create.
Figure 5. Select views from the Bake menu
Start again from the top and work your way down. Bake will ask if you want to build
your views interactively, and if you want to create the views for admin routing. Say
Introduction and scaffolding Trademarks
© Copyright IBM Corporation 2007. All rights reserved. Page 17 of 22
- 18. developerWorks® ibm.com/developerWorks
no to both and just let Bake build up the basic views.
Figure 6. Letting Bake build up the basic views
Repeat the above steps for each of the views. Once you're done, access your
application and take a look around. http://localhost/users should take you to the
users list, where you can add, edit and view users. Likewise, http://localhost/entries,
http://localhost/entry_revisions, http://localhost/settings, http://localhost/uploads, and
http://localhost/upload_revisions should take you to the various scaffolds for those
controllers, as well. Feel free to test out putting some data in. In Part 2, start
customizing the views and controllers.
Section 6. Summary
You've got your database together, and you've cobbled together some basic views.
But you're not going to want to use the default layout for Criki. Spend some time
thinking about how you want it to look. For example, where do you want your links?
What colors do you want to use?
Create a default layout (app/views/layouts/default.thtml) and experiment with some
different looks. Use the default template in
cake/lib/views/templates/layouts/default.thtml as a guide when building your new
layout. Just make sure you don't change the original.
Happy coding. Be sure to read Part 2, where we focus on the primary wiki
development, including defining the markup, tracking changes, and file uploads.
Introduction and scaffolding Trademarks
© Copyright IBM Corporation 2007. All rights reserved. Page 18 of 22
- 19. ibm.com/developerWorks developerWorks®
Introduction and scaffolding Trademarks
© Copyright IBM Corporation 2007. All rights reserved. Page 19 of 22
- 20. developerWorks® ibm.com/developerWorks
Downloads
Description Name Size Download
method
Part 1 source code os-php-wiki1.source.zip 14KB HTTP
Information about download methods
Introduction and scaffolding Trademarks
© Copyright IBM Corporation 2007. All rights reserved. Page 20 of 22
- 21. ibm.com/developerWorks developerWorks®
Resources
Learn
• It seems natural to start with the Wikipedia entry for wiki.
• Check out WikiWikiWeb for a good discussion about wikis.
• Visit the official home of CakePHP.
• Check out the "Cook up Web sites fast with CakePHP" tutorial series for a good
place to get started.
• The CakePHP API has been thoroughly documented. This is the place to get
the most up-to-date documentation for CakePHP.
• There's a ton of information available at The Bakery, the CakePHP user
community.
• Find out more about how PHP handles sessions.
• Check out the official PHP documentation.
• Start with the "Considering Ajax" series to learn what you need to know before
using Ajax techniques when creating a Web site.
• Read the five-part "Mastering Ajax" series on developerWorks for a
comprehensive overview of Ajax.
• CakePHP Data Validation uses PHP Perl-compatible regular expressions.
• See a tutorial on "How to use regular expressions in PHP."
• Want to learn more about design patterns? Check out Design Patterns:
Elements of Reusable Object-Oriented Software , also known as the "Gang Of
Four" book.
• Source material for creating users.
• Check out the Model-View-Controller on Wikipedia.
• Here is more useful background on the Model-View-Controller.
• Here's a whole list of different types of software design patterns.
• Read about Design Patterns.
• PHP.net is the resource for PHP developers.
• Check out the "Recommended PHP reading list."
• Browse all the PHP content on developerWorks.
• Expand your PHP skills by checking out IBM developerWorks' PHP project
Introduction and scaffolding Trademarks
© Copyright IBM Corporation 2007. All rights reserved. Page 21 of 22
- 22. developerWorks® ibm.com/developerWorks
resources.
• To listen to interesting interviews and discussions for software developers,
check out developerWorks' podcasts.
• Stay current with developerWorks' technical events and webcasts.
• Check out upcoming conferences, trade shows, webcasts, and other Events
around the world that are of interest to IBM open source developers.
• Visit the developerWorks Open source zone for extensive how-to information,
tools, and project updates to help you develop with open source technologies
and use them with IBM's products.
• Visit Safari Books Online for a wealth of resources for open source
technologies.
Get products and technologies
• Innovate your next open source development project with IBM trial software,
available for download or on DVD.
Discuss
• Participate in developerWorks blogs and get involved in the developerWorks
community.
• Participate in the developerWorks PHP Developer Forum.
About the author
Duane O'Brien
Duane O'Brien has been a technological Swiss Army knife since the
Oregon Trail was text only. His favorite color is sushi. He has never
been to the moon.
Introduction and scaffolding Trademarks
© Copyright IBM Corporation 2007. All rights reserved. Page 22 of 22