
Recomendados
Mais conteúdo relacionado
Mais procurados
Mais procurados (19)
Destaque
Semelhante a waagen-ecard
Semelhante a waagen-ecard (20)
Mais de tutorialsruby
Mais de tutorialsruby (20)
Último
Último (20)
waagen-ecard
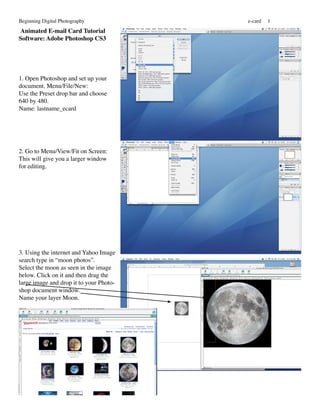
- 1. Beginning Digital Photography e-card 1 Animated E-mail Card Tutorial Software: Adobe Photoshop CS3 1. Open Photoshop and set up your document. Menu/File/New: Use the Preset drop bar and choose 640 by 480. Name: lastname_ecard 2. Go to Menu/View/Fit on Screen: This will give you a larger window for editing. 3. Using the internet and Yahoo Image search type in “moon photos”. Select the moon as seen in the image below. Click on it and then drag the large image and drop it to your Photo- shop document window. Name your layer Moon.
- 2. Beginning Digital Photography e_card 2 4. Resize your moon to fit the win- dow. Go to Menu/Edit/FreeTrans- form: Hold your shift key to keep it proportional and grab the corner anchor point of the moon. Let go of your mouse key before you let go of the shift key! While resizing if you move your mouse inside the image, you can move it and then continue resizing. Hit the return key when satisfied with what you have done. 5. Fill the background layer with black. Click on the background layer in the layers palette. Choose black for your forground color in Tools. Click on the paint bucket tool. Click in your document window. You should now have a black back- ground. Another way to fill the background layer with black is by going to Menu/Edit/Fill and in the Use dropbar choose Black. 6. Activate your moon layer by clicking on it. Then go to your inter- net browser and using Yahoo images type in bat clip art. Choose the bat I have chosen. Click on it and drag the large image to your document window. Name your layer Bat.
- 3. Beginning Digital Photography e-card 3 7. Using the Bucket in your tools fill both the eyes with a color (yellow or red). Then using your Magic Wand in Tools click on the white pixels and delete them. 8. Resize your bat and move it to the top of the moon. To resize go to Menu/ Edit/FreeTransform. Hold shift key to keep it proportional. 9. At www.halloween-clipart.com click on ghosts in the side bar. Find a simple ghost and drag it to your document. Name the layer ghost.
- 4. Beginning Digital Photography e_card 4 Making layers for being able to ani- mate the bat wings: 10. In Tools select the Elliptical Mar- quee (oval shaped selection tool). Drag it around the bats head and copy and paste it. This will create a new layer with just the bats head. Name it body.
- 5. Beginning Digital Photography e-card 5 11. Select each wing using the Lasso tool or Polygonal Lasso Tool and copy and paste each wing. Name each layer: rightwing and leftwing. Note: Make sure you are on the layer you are editing. You have to go to the bat layer after you paste the first wing to be able to select and copy the second wing. 12. Turn the visibility off for the Bat Layer by clicking on the eye of that layer. Go to Menu/Edit/Free Transform: Rotate each wing and move the wings to fit the body. Note: to rotate you need to have your curser on the side of the corner anchor point not over it. N Now you have 4 layers for the bat. Later we will be able to do a simple animation to make the bat look like it is flapping its wings.
- 6. Beginning Digital Photography e_card 6 13. Click on you ghost layer. Go to Menu/layer/duplicate layer. Name the layer lg ghost. 14. Go to Menu/Edit/Free Transform. Resize the ghost into a larger size. Hold the shift key to keep the ghost proportional. Remember to let go of the mouse key first and then the shift key. Hit the return key when done. 15. Erase the pixalated edges of the large ghost using a brush eraser. Erase the eyes and mouth also.
- 7. Beginning Digital Photography e-card 7 Text: You can download scarry fonts from http://www.1001fonts.com/ In the menu to the right of the web- site you pick the type of font you are interested in such as scarry. Then when you see the font you want you download it (Mac or Windows). Then add it to your font book by clicking on the font file. Click on install font in the font window.
- 8. Beginning Digital Photography e_card 8 16. Click on the Type tool. In the options bar choose a font. Type in 200 for size, left align, and choose a Halloween color such as red. Click in your lower window near the left side and type BOO in caps (click on you caps key before typing). 17. Save your file in your lessons folder in Documents. 18. Go to Menu/Window/Animation
- 9. Beginning Digital Photography e-card 9 19. This will bring up the Animation Palette that will show at the bottom of your document window. Animation Palette frame tween timing garbage Play Animation Makes new frames 20. Click off all the eyes in your layers palette except for the background and the moon. Note that now in the anima- tion palette only the background and the moon show in the frame.
- 10. Beginning Digital Photography e_card 10 21. Make a new frame in the Animation Palette by clicking on the new frame icon at the bottom left next to the garbage can. Click on the eye for the bat layer in the Layer’s Pallete. 22. Add a new frame in the Animation Palette. Click off the bat layer eye and click on the bat body, left and right wing layers in the Layer’s Palette. Repeat steps 21 and 22. You now have 6 frames. Turn on the eye for the small ghost in Layers (6th frame). In the Animation Palette press the play button to see your animation. The animation plays slower than it will play on a browser win- dow. Timing will be adjusted later. 23. Make a new frame. Move the small ghost so it is ontop of the bat.
- 11. Beginning Digital Photography e-card 11 Tween 24. Click on the Tween Icon in your animation palette. A tween window will appear. Frames to Add--5, Layers--All Layers, Param- eters--Click them all. Note: In the added frames the ghost moves. You can go to the added frames and change frames to make the bats wings flap by changing the eyes for those layers in the Layers Palette. 25. Make a new frame and turn off bat eye and small ghost eye in layers and turn on the eye for the Large Ghost. Do another tween. This time the opacity will be changed. 26. Add a frame and turn on Text eye. Change the time for the frame to 1 sec.
- 12. Beginning Digital Photography e_card 12 27. Timing: Select all but the last frame (shift key). Change the timing to 0.1 seconds. (after no delay) 28. Go to Menu /Save for Web and Devices 29. This brings up a window that will show you your animation. Make sure that your file format is GIF. Press the play button to see your animation play. 30. Click on the save button. Save it to your lessons folder in Documents. . Note that the file extension is a gif. This is the file that you attach to an e-mail to send someone an animated e-card.
- 13. Beginning Digital Photography e-card 13 31. Open an internet window. 32. Go to the menu to file open. Open your GIF file in your lessons folder (lastname_ecard.gif). You can then view your animation. Note that the file extension is a gif. This is the file that you attach to an e-mail to send someone an animated e-card.
- 14. Beginning Digital Photography e_card 14 To e-mail your animation you attach it to your e-mail message. You will see an Attach button. Click on attach and then browse your files and select the file you want to attach. Once attached you will see it below the subject line. To practice send yourself a message and attach your lesson file (lastname_ecard.gif). Open the e-mail you sent yourself and view the attachment.