
Recomendados
Mais conteúdo relacionado
Mais procurados
Mais procurados (17)
Destaque
Semelhante a Tutorial5
Semelhante a Tutorial5 (20)
Mais de tutorialsruby
Mais de tutorialsruby (20)
Último
Último (20)
Tutorial5
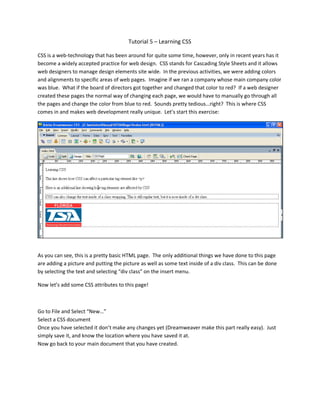
- 1. Tutorial 5 – Learning CSS CSS is a web-technology that has been around for quite some time, however, only in recent years has it become a widely accepted practice for web design. CSS stands for Cascading Style Sheets and it allows web designers to manage design elements site wide. In the previous activities, we were adding colors and alignments to specific areas of web pages. Imagine if we ran a company whose main company color was blue. What if the board of directors got together and changed that color to red? If a web designer created these pages the normal way of changing each page, we would have to manually go through all the pages and change the color from blue to red. Sounds pretty tedious…right? This is where CSS comes in and makes web development really unique. Let’s start this exercise: As you can see, this is a pretty basic HTML page. The only additional things we have done to this page are adding a picture and putting the picture as well as some text inside of a div class. This can be done by selecting the text and selecting “div class” on the insert menu. Now let’s add some CSS attributes to this page! Go to File and Select “New…” Select a CSS document Once you have selected it don’t make any changes yet (Dreamweaver make this part really easy). Just simply save it, and know the location where you have saved it at. Now go back to your main document that you have created.
- 2. From your “index.html” page, Click the “Attach Style Sheet…” button Now click on the “Browse…” button and select your file. For this tutorial, we will add this CSS sheet as a link, but feel free to mess around with either setting. Now click “OK” As you can now see, the name of your file should be on the right hand side under the CSS panel. Now let’s add some properties for our CSS page. Click on the “New CSS rule” button
- 3. This window is the gateway to all your CSS development. It gives you the 3 types of definitions in CSS. As the window describes, the 3 type types of CSS Rules can apply to: Class – Using this type of CSS will change all tags that fall within a certain section of the HTML code. Tag – This will change the appearance of any HTML element. For example the <p> element can be changed to a predefined size or color. Advanced – Different types of advanced CSS which can include the state of your links (normal, active or clicked) For the first example, let’s choose “tag” and from the drop down box, let’s choose the “p” element
- 4. You are now brought to another window that will let you alter the different attributes of the <p> tag. Let’s make the Font Arial the color Red and the Text 18pt . Once you had made these changes, click “OK” to accept.
- 5. Now look at our HTML page! All the different lines of text that had the <p> tag have now been changed to our specifications. To change the attributes again, you will now see a “p” in the CSS panel underneath the name of your CSS page. Double click that to make additional changes. Now let’s go back and make another CSS rule, except this time, we’ll make it a class that we are going to call “.text” (In these tutorials, we are adding a “.” to the beginning of each class make to make the differentiation that they are a class in the HTML page) Now click “OK”
- 6. Let’s add the following properties: Font – Courier New, Courier, monspace Size – 24 pixels Color – Green (#00FF00) Click Ok once you have made the changes WAIT A SEC! Why aren’t my changes made yet? The reason is that your HTML needs to specify what area of the page we want affected by the new CSS class that we just defined. If you click the div tag that is holding the text, you will see something really neat: Dreamweaver is giving you the choices that you can apply. Choose the “text” class and your text will now be changed to meet the criteria specified earlier.
- 7. You can now see that the page has been changed according to what we specified the “.text” class to be!
- 8. For the last part of this CSS tutorial, let’s take a look at the Florida TSA image located at the bottom portion of the page. We know that there are three types of alignment – Left, Center and Right. For the sake of this example, let’s say that we want to put our image in the area between left and center. It doesn’t seem that something like this would be possible…but that is not the case with CSS. Let’s do the following: Create a new CSS rule Call the rule: “.picclass” Once the CSS Rule Definition page comes up, let’s add the following attributes: On the left side, click on the Box tab and change the “Left Padding” to 100px
- 9. Our final page is now complete, based on what we went over in the tutorial, it should look something like this: Continue playing with CSS and make your pages look drastically different. The key point about using CSS is that these attributes can apply to all the pages in a website. So rather than make changes individually, you can link to a CSS page, and only have to make changes one time rather than one time per page. Hopefully this tutorial will help you get your feet wet with CSS!