This document provides information about a workshop on creating Hollywood special effects with Adobe Premiere Pro CS3. The workshop agenda includes introductions, self-paced tutorials, a teaching strategies discussion, more tutorials, and a wrap-up with evaluations. The document discusses the tutorials that will be covered, including using multi-camera editing, animating layered Photoshop sequences, video effects, time remapping, and compositing. It also provides teaching strategy tips for using clip notes, the project manager, screen capture software, and free tutorials.
Boost Fertility New Invention Ups Success Rates.pdf
handout
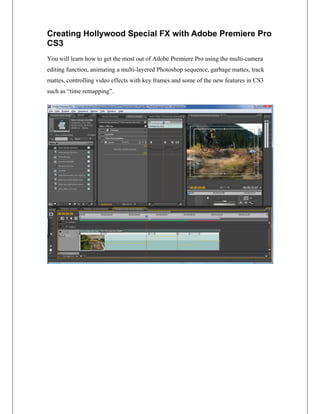
1. Creating Hollywood Special FX with Adobe Premiere Pro
CS3
You will learn how to get the most out of Adobe Premiere Pro using the multi-camera
editing function, animating a multi-layered Photoshop sequence, garbage mattes, track
mattes, controlling video effects with key frames and some of the new features in CS3
such as “time remapping”.
2. Creating Hollywood Special FX with Adobe Premiere Pro
Agenda
Introductions
Tutorials (self paced)
Teaching Strategies Discussion
Tutorials (self paced)
Wrap-up and Evaluations
Learning Resources
Since all my lessons are online and on the DVD you got from the workshop you
can immediately start using these lessons with your students or share them with the
faculty at our school/district. I encourage you to personally take on projects that allow
you to practice these techniques. Continue to read some of the excellent books that cover
these amazing software applications, explore the many online resources and learn from
your students as they push the limits. I have included a list of my favorite online learning
resources.
When you attend my workshop I give you a DVD that contains a bunch of sample
files that you are welcome to use while you practice the techniques in the workshop. I
encourage you to start with these files and then experiment with the same techniques on
your own video files. Please copy the files from the disk to your computer. Feel free to
download a copy of your own images to a folder in the same location. If you are checking
this workshop out online, the video files are tool large.
Disk Content
Advanced_projects: These are the practice files for the “Beyond the Basics” or
advanced Adobe Premiere Pro training. Within each folder is a Premiere file and
all the media you will need to complete each lesson.
Beyond_basics: This is the web site, the tutorials and all the handouts for the
advanced workshop on Adobe Premiere Pro.
Encore: This is a workshop on Adobe’s DVD production and design software.
Intro_project: These are the practice files for the “Introduction to Premiere Pro”
training. With this folder you will find some cool footage of a sports car and some
music that you and your students can use to learn the basics of editing with
Premiere Pro.
Introduction: This is the web site, the tutorials and all the handouts for the
introduction to editing with Adobe Premiere Pro.
Sample_files: This is some fun sample video files that I use with my students.
Feel free to have fun with these video clips.
.
Joe Dockery, Adobe Education Leader | dockeryj@svsd410.org 2
3. Workshop Teaching Strategy
I have created Flash based tutorials for all the projects we will cover. This method
of teaching/learning might be new to you but I think you may find it extremely powerful
once you get into it. By putting all my lessons into this web site you have control of your
learning. You can go as fast or slow as your learning style requires. You can stop the
lesson at any time and practice the techniques or ask me for more clarification. As you
watch the tutorial, make sure to pause and practice the technique using the sample files.
Once you complete a project, look at the agenda, and if you are ahead of schedule take
the time to practice what you just learned to ensure that you understand the concept.
*** All the tutorials you should watch are marked with Tutorial>>
Project files: All the files you will need to complete these tutorials are located on the
desktop of this computer in a folder called “premiere_pro/advanced_projects”. You will
also find all these files and much more on the DVD included in the handout. Feel free to
post the tutorials online for your students. Due to file size, make sure to copy the project
folders onto the hard drives of your student computers or simply duplicate the DVD and
hand them out to students.
Other Tutorials: If you really want to take your knowledge and skills to the next level,
look into purchasing the Total Training Online tutorials. They are worth their weight in
gold! You can also find many useful tutorials for yourself and your students at the Online
Resources page.
Prep Tutorials
Tutorial>> Learning Strategies (4:22)
If this is your first time taking a workshop from me, please watch this tutorial. It will
review how to get the most out of this class.
Joe Dockery, Adobe Education Leader | dockeryj@svsd410.org 3
4. Notes
Joe Dockery, Adobe Education Leader | dockeryj@svsd410.org 4
5. Video Effects
In this project you do a series of very short little tutorials that will give you just a taste of
how to get started having fun and flexing your creativity with the effects in Adobe
Premiere Pro.
You will learn how to:
□ Adjust levels (fix poorly exposed video – too dark or too light)
□ Color correction – (fix bad white balance – or at least make it a little better!)
□ Superimpose video onto an object (computer monitor)
□ Create that pro mist soft glowing look
□ Create a track matte using both alpha and luma
□ Composite using garbage mattes
□ Use a variety of keyboard shortcuts
Getting Started
Levels Adjustment
In this tutorial you will learn how to improve the exposure of a video clip once it is
captured. Of course, the goal is to use lighting gear and properly set the exposure on the
camera, but we all know this doesn’t always happen. You will apply the levels effect to
the video clip and then use the “setup” dialog box to adjust the levels.
Open “Project01_Effects”
Open “01_levels”
Double click the Adobe Premiere file “levels.prproj”
• Levels.avi is a short clip taken from an interview one of my students did while
doing a documentary on the Courage Classic.
>> Tutorial (9:09)
Tutorialsppro_levelsppro_levels.html
Fast Color Correction
In this tutorial you will learn how to improve the exposure and white balance of a video
clip once it is captured. Of course, the goal is to properly set the white balance on the
camera but it is nice to be able to improve the color when you get back to the lab. In this
tutorial you will start by applying a Levels adjustment and then add the Fast Color
Corrections effect. Then you will adjust and fine tune the color correction.
Open “02_color_correction”
Double click the Adobe Premiere file “color.prproj”
• Color_correction.avi is an short clip taken from a dramatic narrative shot in a
barn.
>> Tutorial (4:43)
Tutorialscolorcolor.html
Joe Dockery, Adobe Education Leader | dockeryj@svsd410.org 5
6. Notes
Joe Dockery, Adobe Education Leader | dockeryj@svsd410.org 6
7. Superimpose
In this tutorial you will learn how to quickly and easily superimpose a video clip onto
another clip or image while adjusting for the perspective of the image or clip.
Open “03_superimpose”
Double click the Adobe Premiere file “superimpose.prproj”
• The two images consist of Monitor.jpg and Monitor.psd the Photoshop file that I
used to get just the monitor on a layer so it could be nested over another sequence
once we superimposed the video clip.
• Monitor.avi is the video clip you will superimpose on the monitor.
>> Tutorial (4:10)
Tutorialsppro_supersuper.html
Pro Mist
Photographers spend hundreds of dollars buying filters that create that warm soft focus
effect that makes video clips look romantic. In this tutorial, you will learn how to create
that effect quickly and then be able to fine tune your results.
Open “04_Mist”
Double click the Adobe Premiere file “mist.prproj”
• Mist.avi is short clip from a dramatic narrative and Saleen_Car_06.avi is a clip
from the Adobe training files.
>> Tutorial (3:49)
Tutorialsmistmist.html
Joe Dockery, Adobe Education Leader | dockeryj@svsd410.org 7
8. Notes
Joe Dockery, Adobe Education Leader | dockeryj@svsd410.org 8
9. Track Matte
In this tutorial you will learn how to create a track matte. In other words, you will use text
or an image to show video through the white (light) areas of the track. Some of my
students prefer to think of it as a mask.
Open “05_track_matte”
Double click the Adobe Premiere file “track_matte.prproj”
• Ice_track.avi and fire_track.avi are short clips created in After Effects using
preset backgrounds. Saleen_Car_03.avi is from the Adobe training files.
• The fire_track sequence and ice_track sequence will give you practice building a
track matte. The combination sequence will allow you to use the track matte in a
project and nest sequences. The luma sequence will allow you to see the
difference between the alpha and luma track matte option.
>> Tutorial (7:39)
Tutorialstracktrack.html
Joe Dockery, Adobe Education Leader | dockeryj@svsd410.org 9
10. Notes
Joe Dockery, Adobe Education Leader | dockeryj@svsd410.org 10
11. Garbage Matte
In this tutorial you will learn how to use the “garbage matte” effect to create a three
layered composite. This tutorial is way too much fun and your students will love creating
projects using this concept to amaze their friends.
Open “06_compositing/01_garbage_matte”
Double click the Adobe Premiere file “garbage_matte.prproj”
• Dextar01.avi, Dextinger02.avi, Drumexter02.avi are three clips from the award
winning student produced music video “The Hardware Store”. NW-V Hardware
Store 16 by 9.avi is the first part of the music video so you can see how this was
used in the real project.
• Music Video Outline.pdf is the outline used with the students that created the
example files in this tutorial.
>> Tutorial (6:46)
Tutorialsgarbagegarbage.html
Joe Dockery, Adobe Education Leader | dockeryj@svsd410.org 11
12. Notes
Joe Dockery, Adobe Education Leader | dockeryj@svsd410.org 12
13. Lighting Effects
In this tutorial you will learn how to use the “lighting” effect to create mood and
atmosphere in your shots without a bunch of expensive lights.
Open “07_lighting”
Double click the Adobe Premiere file “lighting.prproj”
• 1 line interviews.avi is a clip from our recent documentary on over crowding at
our high school. Clip 2.avi and drew to adam 01 02.avi are two of the interviews
you can play around with.
>> Tutorial (9:00)
Tutorialslightinglighting.html
Green Screen
In this tutorial you will learn how to use the “green screen” effect to create that
weatherman effect you see on the nightly news. Of course they have better lighting so
don’t expect yours to be perfect.
Open “08_greenscreen”
Double click the Adobe Premiere file “greenscreen.prproj”
• Fire_track.avi will be the video you composite the actors over. Green_Group.avi
and Green_Sophia.avi are from the Adobe Premiere Pro 1.0 training files.
>> Tutorial (4:11)
Tutorialsgreenscreengreenscreen.html
Working with Video in Photoshop Extended
In this tutorial you will learn how to use the video editing capabilities of Adobe
Photoshop CS3 Extended. The possibilities are mind boggling.
Open Adobe Photoshop CS3 from the start menu.
• Bike 1.mov is the raw footage of a BMX rider doing a flip you will use in the
tutorial. Example1.mov and Example2.mov are the example footage I exported.
• Brick_wall.jpg is an image to play around with.
• Docs_example1.psd and docs_example2.psd are two Photoshop files I created.
>> Tutorial (11:43)
Tutorialsphotoshopextendedphotoshopextended.html
Joe Dockery, Adobe Education Leader | dockeryj@svsd410.org 13
14. Notes
Joe Dockery, Adobe Education Leader | dockeryj@svsd410.org 14
15. Time Remapping
In this project you will learn how to control the speed of clips and create speed ramps
with unprecedented precision with the new “Time Remapping” effect in Adobe Premiere
Pro CS3.
Getting Started
Project Files
Open “Project02_ Time_Remapping”
Double click the Adobe Premiere file “time_remap.prproj”
• Mt Bike footage provided by Adobe for their trade show demos.
>> Tutorials
Tutorialsremapremap.html (9:22)
Tutorialsreversereverse.html (3:30)
Keyboard Shortcut Function
Ctrl + Click New Keyframe
Alt + drag Drag new position
Ctrl + drag Backwards
Ctrl + Alt + drag Hold
Joe Dockery, Adobe Education Leader | dockeryj@svsd410.org 15
16. Notes
Joe Dockery, Adobe Education Leader | dockeryj@svsd410.org 16
17. Animating a multi-layered Photoshop sequence
In this project you will learn how to import a multi-layered Photoshop file into Premiere
Pro as a “sequence” and then easily animate it using key frames in the effects controls.
You will learn how to:
□ Import a Photoshop file as a sequence
□ Nest sequences
□ Use the effects controls to animated the position of multiple layers
□ Work with key frames and easing
□ Launch and edit a Photoshop file from Premiere Pro
□ Add a drop shadow and stroke to a layer in Photoshop
□ Use a variety of keyboard shortcuts
Getting Started
Project Files
Open “Project02_ Animating_Photoshop”
Open “lesson01”
Double click the Adobe Premiere file “photoshopL2.prproj”
• Backup_logo_layers.psd is just a copy of the Photoshop file in case you make a
mistake.
• Saleen_Car.avi and Saleen_logo_Layers.psd are the video and Photoshop files
provided by Adobe when you purchased Adobe Premiere Pro.
• Lesson02 contains the files for another animated logo. Inside that folder you will
find “Prp2it_multicam.pdf” which is the step-by-step directions for this project
from the Adobe tutorials web site
http://www.adobe.com/uk/designcenter/tutorials/. Feel free to try this project if
you have extra time.
>> Tutorial (12:36)
Tutorialsphotoshopphotoshop.html
Extra Credit
If you finish early, “close” this Premiere file and open the Premiere file in “lesson02”
called “photoshop.prproj”. Use the directions in the pdf file in the same folder titled
“prp2it_animatepshop.pdf”. A print version is also included in your handouts.
Joe Dockery, Adobe Education Leader | dockeryj@svsd410.org 17
18. Notes
Joe Dockery, Adobe Education Leader | dockeryj@svsd410.org 18
19. Project 04 Teaching Strategies
Tip01: Clip Notes
Clip notes are a great way to give your students valuable timeline based feedback they
can use to improve their projects. Set a due date for clips notes to be turned in (I usually
make it a Friday so I can review them over the weekend). Then plan on giving the
students at least 1-2 days to import the clip notes back into Premiere Pro and make the
appropriate changes.
>> Tutorial (5:07)
Tutorialsppro_clipnotesppro_clipnotes.htm
Tip02: Project Manager
The project manager is a great way to manage files size when you are working with large
projects or archive an important project. The Adobe Premiere Pro Project Manager can
help facilitate an efficient workflow by performing two functions: reducing the storage
needs of a project, and consolidating the files associated with a project. Go to
Project>Project Manager and then create a new trimmed project. Select the location for
the new folder. Premiere will automatically create a new project with all the trimmed
clips used in the sequence and a Premiere project file with all the clips on the timeline
ready to edit. This can be a significant file size reduction.
>> Tutorial (3:30)
Tutorialsproject_managerproject_manager.html
Tip03 Screen Capture Software
Adobe Captivate 3: http://www.adobe.com/products/captivate/
Adobe® Captivate™ 3 software enables anyone to rapidly create powerful and engaging
simulations, software demonstrations, and scenario-based training without programming
knowledge or multimedia skills.
Camtasia Studio 5: http://www.techsmith.com/camtasia.asp
Camtasia Studio is the complete professional solution for recording, editing and sharing
high-quality screen video on the Web, CD-ROM and portable media players, including
iPod.
Easily record your screen, PowerPoint, multiple audio tracks, and webcam video
to create compelling training videos, screencasts, and presentations without ever leaving
your desk. With the power of interactive Camtasia Studio videos, you can deliver high-
quality content anytime, to even your most remote audience.
Tip04: Free Tutorials
iTunes Podcast: http://www.apple.com/itunes/
This is a great source of free tutorials that students can watch/listen to on their computers
or iPods. Many of them are very short (2-3 minutes) and make a great starter activity
while you take attendance. Download and install iTunes. Then have students go to the
“iTunes Store” and use the search box to find “Adobe Premiere” or any other product you
are working with.
>> Tutorial (4:17)
Tutorialspodcastpodcast.html
DJTV (Digital Juice TV) http://www.digitaljuice.com/djtv
These are excellent 4-8 minute videos on all aspects of video production. This is a great
filler when students complete a project early or you want a short activity.
Joe Dockery, Adobe Education Leader | dockeryj@svsd410.org 19
20. Notes
Joe Dockery, Adobe Education Leader | dockeryj@svsd410.org 20
21. Extra Credit: Multi-Camera Edit
In this project you will learn how to creating a multi-camera edit using multiple video
clips from different camera angles. You will learn how to:
□ Mark clips and synchronize them
□ Nest sequences
□ Use the multi-camera monitor
□ Switch camera angles
□ Use the rolling edit tool to adjust edit points
□ Use a variety of keyboard shortcuts
Getting Started
Project Files
Open “Project01_ MultiCamera_Edit”
Double click the Adobe Premiere file “Multicam.prproj”
• Personal_profile_assignment folder has a couple word documents from a multi
camera assignment I do in my Video Foundations course.
• Feet.avi, Hands.avi, Low.avi and Overhead.avi are the video files provided by
Adobe when you purchased Adobe Premiere Pro 2.0.
• Prp2it_multicam.pdf is the step-by-step directions for this project from the Adobe
tutorials web site http://www.adobe.com/uk/designcenter/tutorials/.
• Multicam_tutorial folder contains the tutorial for this project. Open it and click on
the web page “multicam.html” or click on the link below.
• Multi_example2.avi is an example from a dance recital we produced in 2006.
>> Tutorial (11:02)
Tutorialsmulticammulticam.html
Extra Credit
Bonus Tutorials
Picture in Picture
>> Tutorial (3:09) Tutorialspippip.html
Creating Soundbooth Scores
>> Tutorial (5:46) Tutorialssoundboothsoundbooth.html
Ripping Audio off a CD with Windows Media Player 11
>> Tutorial (3:20) Tutorialsriprip.html
Lighting
>> Tutorial (1:20) Tutorialslightninglightning.html
Joe Dockery, Adobe Education Leader | dockeryj@svsd410.org 21
22. Notes
Joe Dockery, Adobe Education Leader | dockeryj@svsd410.org 22
23. Thank you
Sponsors
This workshop was made possible by the following organizations.
Snoqualmie Valley
School District
http://www.adobe.com http://www.svsd410. http://government.hp.com/
org
Contributors
I would like to give a special thank you to the other educators that provided materials for
this workshop.
Keith Mack: Award winning and nationally recognized educator and technology
integration specialist with creative strengths in audio, video, and educational web design.
Educational consultant and professional development instructor.
http://www.mackzone.com/index.htm
Adobe Education Leaders
Kevin McMahon is a working designer and editor who teaches graphic design, 3D
modeling, and video production to high school students. His greatest satisfaction comes
from empowering them with the means to create professional-level work. So McMahon
provides his students with professional multimedia authoring challenges — everything
from creating logos and t-shirts to 3D animations, documentary films, and original shorts.
Brian Reedy, a teacher at Carson High School in Nevada, is an expert in the use of
Adobe® Premiere® Pro and Premiere Elements software. A former technical writer in
Silicon Valley, Reedy encourages his students to absorb what he teaches them — and
then go beyond. He believes that if the students are given the right tools and opportunities
that can be incredible ambassadors for positive change in this world.
Joe Dockery, Adobe Education Leader | dockeryj@svsd410.org 23
24. Video Online Resources
Foundations of Video Design and Production Curriculum
http://www.adobe.com/education/instruction/teach/dvcurriculum.html
Joe Dockery’s Video Class Web Site
http://sharepoint.snoqualmie.k12.wa.us/mshs/dockeryj/video/default.aspx
Additional Online Training
Total Training Online: High quality training
http://www.totaltraining.com/online/howitworks.asp
Lynda Training Online: Huge library
http://movielibrary.lynda.com/html/index.asp
Atomic Learning Online: Designed for schools, well established company
http://movies.atomiclearning.com/k12/home
Adobe Video Workshop: Great tutorials covering the new CS3 products
http://www.adobe.com/designcenter/video_workshop/
Joe Dockery, Adobe Education Leader | dockeryj@svsd410.org 24