
Recomendados
Recomendados
Mais conteúdo relacionado
Mais procurados
Mais procurados (20)
Destaque
Destaque (20)
Semelhante a Nursing project
Semelhante a Nursing project (20)
Último
Último (20)
Nursing project
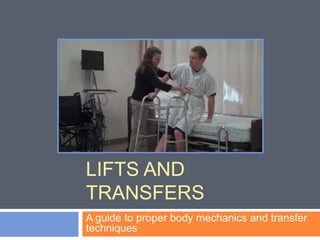
- 1. Lifts and Transfers A guide to proper body mechanics and transfer techniques
- 2. Basic Biomechanics – Key Points 1. Gravity and friction add resistance. In order to produce safe & efficient movement we want to minimize the effects of gravity and friction or use them to our advantage. 2. We want to position our center of gravity close to the patient’s or object’s center of gravity. We want to use our major muscles because it is easier and more efficient. When we hold the object close our strongest muscles are able to do more of the work. 3. We want to increase our base of support. This is done by widening the stance. When we widen our base of support we improve stability. When our center of gravity falls outside of the base of support stability is lost. 4. We also want to position our feet according to the direction of movement. This will decrease friction. It will also save you from twisting your trunk which should be avoided. 5. Lastly, we should always try to maintain the normal curvature of our back when lifting heavy objects or transferring patients.
- 3. Traditional Lift Start facing the object. Squat with the feet on either side of the object. Grasp the object with the arms parallel to each other, lift it and pull it close. With the object held close, use the legs to raise the body. Maintain the normal curve of the back throughout the lift.
- 4. One-leg Stance Lift (Golfer’s Lift) This lift is only used to pick up light objects that can easily be lifted with one arm. Begin by facing the object with legs staggered. The majority of the body weight is on the front leg. Flex the hip and knee of the front leg while extending the rear leg to widen the base of support. Maintain the normal curvature of the back while extending one arm to lift the object and return to an upright position.
- 5. Half Kneeling Lift Begin by placing one knee in front of the object to be lifted and the foot of the other leg next to the object. Grasp and lift the object to the flexed knee, moving it close to the body. Return to standing using the back leg to assist. Keep the back in normal curvature and the object close to the body throughout the lift. (This lift should be avoided by anyone with a knee condition.)
- 6. Stoop Lift Used when an object is below the waist but a squat is unnecessary to lift the object. Stagger the feet to increase the base of support Flex the hips and knees keeping the normal curvature of the spine. Grasp the object pulling it close to the body and use the legs to raise the body and object.
- 8. Correct Guarding Technique When standing or walking with a patient you should guard the patient by placing one hand on the underside of the gait belt at the patient’s back, and the other hand lightly on the shoulder. You should stand or walk to the side of the patient so that you can see their face and communicate with them. You should never stand behind the patient while guarding.
- 9. Glossary of Abbreviations CVA – CerebroVascular Accident (Stroke) FWW – Front Wheel Walker L Hemi – Left Hemiplasia LLE – Left Lower Leg Max A – Maximum Assistance (Patient does 25-50%) Min A – Minimum Assistance (Patient does 75%) Mod A – Moderate Assistance (Patient does 50-75%) NWB – Non-Weight Bearing RLE – Right Lower Leg THR – Total Hip Replacement WC – Wheel Chair
- 10. Stand Step Pivot w/ FWW, Min A, No Precautions, bed-commode Assist the patient with bending the knees and turning to a side lying position. Help the patient to a seated position on the edge of the bed. Apply gait belt. Scoot to edge, nose over toes, hand on walker, and stand. Pivot until the legs touch the back of the commode or chair. Reach back for arm rest and slowly lower to sitting.
- 11. 1 2 3 4 5
- 12. Stand-Step Pivot w/ FWW, Mod A, THR Posterior Approach, wc-bed Do not adduct, internally rotate, or flex hip past 90 degrees. Extend affected leg, scoot to edge, nose over toes, hand on walker, and stand. Pivot, until standing in front of bed. Back up until legs touch edge of bed. Extend affected leg, reach back for bed, and slowly lower to sitting. Patient should lean back to avoid flexing hip past 90 degrees. Help patient to side lying position. Place pillow between legs to avoid internal rotation and adduction.
- 13. 1 2 3
- 14. Stand-Step Pivot w/ crutches, LLE NWB w/ immobilizer donned, bedside chair-bed Extend affected leg, scoot to edge, nose over toes. Have patient hold crutches in one hand and stand with affected leg extended. Transfer crutches to both hands. Pivot to stand in front of bed. Back up until leg touches bed. Transfer crutches to one hand. Extend affected leg, reach back with free hand, and slowly lower to sitting.
- 15. 1 2 3 4
- 16. Low-Pivot Reach, CVA, L Hemi, Max A, bed-wc Aid the patient in flexing the knees and rolling to a side lying position. Aid the patient to a seated position on edge of bed. Scoot to the edge of the bed. Patient leans over your shoulder with the head pointed away from the target chair. Point your feet in direction of chair and use gait belt to raise the patient and pivot to chair. Return patient to upright position.
- 17. 1 2 3 4 5
- 18. Slide Board Transfer, Paraplegic, Max A, bed-chair or bed-wc Help the patient to an upright seated position on edge of bed. Position the slide board under the patient’s upper legs with the other end on the seat of the wheelchair. Stand in front of the patient, brace the legs with your knees, and guard the trunk. Help her to move across the board using her upper body strength. Place the patient’s feet in the foot rests and replace arm rest.
- 19. 1 2 3 5 4
- 20. Scan with your smart phone for quick easy access from anywhere. Use a QR code scanner, available from Android Marketplace or Apple’s ITunes