
Recomendados
Mais conteúdo relacionado
Mais procurados
Mais procurados (20)
Destaque
Destaque (20)
Semelhante a 3. hand out
Semelhante a 3. hand out (20)
Mais de shammasm
Último
Último (20)
3. hand out
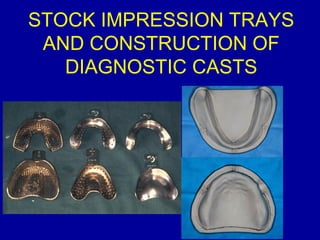
- 1. STOCK IMPRESSION TRAYS AND CONSTRUCTION OF DIAGNOSTIC CASTS
- 2. Learning outcomes Define impression trays and list the parts of the tray. Describe the various types of trays. Define preliminary impressions and explain the objectives of making an impression. List the materials for making impressions.
- 3. Patient Visit #1 Visit 1 Clinical procedure Lab. procedure Taking case history Selecting the stock tray Preliminary Cast Pouring Preliminary Casts Preliminary impression Wax Spacer Custom Trays
- 4. Impression tray: A device that is used to carry, confine, and control impression material while making an impression.
- 5. Requirements of an impression tray Should be strong and rigid yet be adjustable Should be able to sterilize effectively Should be made of biocompatible material to be used in the oral cavity Should not react with any impression material
- 6. Should not distort during the setting of impression material Should have sufficient flange height to record the full sulcus depth Should cover all anatomical landmarks of the oral cavity Should come in different sizes
- 7. Parts of an Impression Tray 1. Handle 2. Flange 3. Body
- 9. Impression trays can be of various types: 1. According to the material used to fabricate the trays: a. Metallic trays (stainless steel, Aluminum) b. Non-metallic trays (plastic trays, acrylic resin trays)
- 10. TYPES OF STOCK TRAYS Plastic Perforated tray Metal Rim-lock tray
- 11. 2. According to the method of fabrication of trays: a. Stock trays Full arch trays Sectional trays Quadrant trays b. Custom trays or Special trays
- 12. 3. According to the teeth present /absent in mouth: a. Edentulous trays b. Dentulous trays
- 13. 4. According to the method of interlocking of material: a. Perforated trays b. Non-perforated trays c. Rim-lock trays i. Water-cooled ii. Non water-cooled
- 14. Rim lock trays: i. Water- cooled ii. Non water-cooled
- 15. Sterilizing trays Trays should be cleaned properly and sterilized before use Disposable trays are recommended Sterilization can be achieved by autoclaving, dry heat or chemical vapors
- 16. Preliminary Impression: a negative likeness made for the purpose of diagnosis, treatment planning, or the fabrication of a tray.
- 17. Objectives of an impressionObjectives of an impression PreservationPreservation SupportSupport StabilityStability EstheticsEsthetics RetentionRetention
- 18. Preservation: Preservation of the remaining residual ridge
- 19. The impression material and impression technique has a definite effect on health of both hard and soft tissues of the mouth.
- 20. Pressure in the impression technique is reflected as pressure in the denture and results in soft tissue damage and bone resorption.
- 21. Support: Maximum coverage provides the “snowshoe” effect,
- 22. Which distributes applied forces over as wide an area as possible. This helps in preservation, stability, and retention.
- 23. Stability: Close adaptation to the undistorted mucosa is most important. Stability, or the resistance to horizontal movement, decreases with the loss of vertical height of the ridges or with the increase in flabby, movable tissue.
- 25. Border thickness should be varied with the needs of each patient in accordance with the extent of residual ridge.
- 26. The vestibule should be filled, but not overfilled, to restore facial contour.
- 27. Retention: Resistance to vertical displacement away from the denture bearing surfaces.
- 28. The factors affecting retention are: i. Adhesion ii. Cohesion iii. Mechanical locking into undercuts iv. Atmospheric pressure v. Muscle control and patient tolerance
- 29. Adhesion: Adhesion is the physical attraction of unlike molecules for each other. It is the attraction of saliva to the mucous membrane and the denture.
- 30. Cohesion: Cohesion is the physical attraction of like molecules for each other. It is a retentive force because it occurs within the layer of saliva that is present between the denture base and the mucosa.
- 31. The chain of intermolecular forces between the denture and the mucosa contributing to retention.
- 32. Mechanical locking into undercuts: Undercuts of the lateral tuberosities, maxillary premolar areas, distolingual areas, and lingual mandibular premolar areas can be extremely helpful to the retention of the dentures.
- 33. Undercut
- 34. Atmospheric pressure: Atmospheric pressure can act to resist dislodging forces applied to dentures, if the dentures have an effective seal around their borders.
- 35. For atmospheric pressure to be effective, the denture must have a perfect seal around its entire border.
- 36. Muscle control and patient tolerance: Muscular control refers to the functional forces exerted by the musculature of the patient that can affect the retention. This is primarily a learned process.
- 37. Certain patients have the ability to wear their dentures and function without complaint despite the fact that they may be ill-fitting, unstable or even broken because of the adaptability of the muscles of oral cavity and patient tolerance.
- 38. 1. Elastic A) Hydrocolloids Reversible hydrocolloid (Agar) Irreversible hydrocolloid (Alginate) B) Elastomers – Polysulfide – Addition Silicone – Condensation Silicone – Polyether 2. Rigid Zinc oxide eugenol impression paste Impression wax Impression compound Impression plaster CLASSIFICATION OF IMPRESSION MATERIALS
- 39. 1. Impression Compound 2. Irreversible Hydrocolloid (Alginate) 3. Elastomers (Putty consistency) Materials used for making preliminary impressions:
- 40. Preliminary Cast: a cast formed from a preliminary impression for use in diagnosis or the fabrication of an impression tray.
- 41. Materials used for making preliminary casts: 1.Beta hemihydrate (dental plaster) 2.Alpha hemihydrate (dental stone)
- 42. Dispense materials Powder is ideally weighed on a scale and water measured in graduated cylinder
- 43. Mixing Add water 1st that slowly wet the powder and get rid of any bubbles trapped in the plaster/stone Spatulate for 30-60 seconds in rubber mixing bowl by hand Vibrate mix to reduce bubbles
- 44. Pouring the model Dry the surface of the impression of excess water Hold impression on vibrator and let the mix run from one end on the impression Flow material all around impression and vibrate lightly Fill the impression sufficiently Extra material from bowl will be used to form the base of the cast
- 45. Inversion method of pouring the casts
- 46. The base should have a minimum thickness of 15-16 mm at its thinnest portion.
- 47. The cast should be separated from the impression about an hour after the initial set, trimmed and finished.
- 48. Outline of Bases for Trimmed Casts Follow the contour of the ridges, with rounded angles Mandibular Maxillary