SlideShare uma empresa Scribd logo
1 de 5
Learning Technology Services, a Unit of Learning & Information Technology

              Creating and Editing Movies Using Windows Live Movie Maker

 Once you have collected footage using a video camera, you can assemble and edit it in Windows
 Live Movie Maker. Once your movie is finished, you can produce it and upload it to the Internet.
 Please note that this tutorial is designed using Windows Live Movie Maker. If you are using an older
 version of Movie Maker, there are some differences.

 To edit footage, you must first save it to your computer. If you do not save it to your computer, Movie
 Maker will not be able to access it and you will not be able to complete your project.


 After you save the footage to your computer, you must
 import it to Movie Maker. The easiest way is the drag &
 drop method. To do this, open Movie Maker and then
 open the folder where the video footage is stored, so
 both are visible on your screen.


 Select the files you need and click
 and drag them into the Content
 area of Movie Maker.


 After you click and drag, you should
 see your clips in the Content area.
 You should also see the first frame
 of the first clip in the playback area.
 You can rearrange the order of the
 clips by clicking and dragging them
 to different places in the order.


University of Wisconsin-Stout                       2012 © University of Wisconsin Board of Regents
Learning Technology Services, a Unit of Learning & Information Technology


Once you are certain the footage you need has been imported,
you should save your video project. Open the dropdown menu
to the left of Home and choose Save Project. From there you
will be able to choose a name and location to save your project.
Remember to save your project occasionally as you work on it so
that edits you make will be saved.


To review your clips before editing, go to the Playback area and
click on the Play button on the controller at the bottom of the window.


As you go through the playback, you will see
a vertical black line move through your clips.
While you are doing the playback, you should
also have the Edit menu open so you can have
access to the Split,Trim, and other editing tools.


Use the Split tool to cut clips into smaller pieces.
Use the Trim tool to trim out parts of clips that you
will need use. You can also click and drag individual
clips to change the order in which they will appear
in your video.

To create a split, stop playback at the point where
you want to create the split. Use the Previous
Frame and Next Frame buttons by the Play/Pause
button to get to the exact point where you want to
create the split. When you get to that point, click
on the Split button in the Edit area.

University of Wisconsin-Stout             2          2011 © University of Wisconsin Board of Regents
                                                     2012
Learning Technology Services, a Unit of Learning & Information Technology

After you click the Split button, you will see that
the clip is now separated into two pieces. If you
want to delete one of the two pieces created, you
can click on it to select it and then click the Delete
key on your keyboard.


To remove footage at the beginning of a clip,
end of a clip, or both, use the Trim tool. For the
beginning, play to the point where you want it to
start and click the Set start point button. For the
end, play to where you want it to end and click
the Set end point button. To trim both, set a start
and end point.


After you do the trimming, you will see that the clip
is now shorter.


You may want to put animations (often called wipes
or transitions) in between clips. Do this by setting the
black line in between two clips and then choosing an
animation. You can set the duration in the Duration
area. When the video is played, the two clips will be
blended using the effect you have chosen.


To add a title, click before the first clip and then click
the Title button in the Home menu area. You can
choose different texts and effects. You can also add
titles between clips if you need to do so.


Captions can help identify people or objects in
videos. To add a caption, pause at the place where
you want to add a caption and click on the Caption
button in the Home menu area. You can set the color,
size, font, transparency, and duration of the caption.


You can also add credits that will appear at the end
of your video. To add credits, click on the Credits
button in the Home menu area. You can set the color,
size, font, and speed of the credits.


University of Wisconsin-Stout              3             2011 © University of Wisconsin Board of Regents
                                                         2012
Learning Technology Services, a Unit of Learning & Information Technology

When you are finished making all your editing, you can produce a movie that can be shared in a
number of ways. You may choose to produce the movie more than once depending on your needs.


To save your movie for local use, go to the dropdown menu
to the left of the Home menu and choose Save movie. Under
Save movie, choose the option that most closely meets your
needs.


You can also produce your movie for popular online sites like
YouTube, Facebook, and Flickr. To produce for one of these
sites, go to the dropdown menu to the left of the Home menu
and choose Publish movie. Then choose the online site for
which you want to produce.


You will need to choose the resolution for your movie. There
is normally a recommended resolution which you can choose.


University of Wisconsin-Stout          4        2011 © University of Wisconsin Board of Regents
                                                2012
Learning Technology Services, a Unit of Learning & Information Technology


Most of the online sites will require you to have
an account before you can upload to the site. If
you have an account, you can sign in and then
you will be able to upload your movie.


                                      Things to Keep in Mind

•   Having a movie project is not the same as having a produced movie. To share something with
    others, you must produce your movie.
•   Captions must be readable to be useful. Try using different colors and options for your captions
    to ensure that viewers can read them.
•   When choosing animations, titles, and other effects, simplest is best. Too many different effects
    and too many “flashy” effects will make your movie look unprofessional.
•   Clean edits make for a more professional looking movie. Make full use of the Previous Frame and
    Next Frame buttons to make your edits as clean as possible.
•   Editing can be a very time consuming process. Budget adequate time and start early on editing
    so you won’t be rushed to finish.
•   If you are new to making movies, you might want to consider using storyboards or flowcharts to
    help you organize your ideas and the flow of your movie.
•   If you are uploading to an open, public site, you must get talent releases from the people in your
    movie before uploading it. You should also let people know if you intend to make the movie public
    before you start filming so they can opt out of being on screen.
•   Ensure that you have the capability to hook up your camera or insert the card from you camera
    into your computer before you start filming.
•   If you plan on uploading to a public site, it is best to set up an account ahead of time so you can
    upload quickly when your movie is ready.
•   Different public sites will have varying restrictions and terms. You should be certain that you can
    agree to all the terms before uploading your movie.


University of Wisconsin-Stout           5           2011 © University of Wisconsin Board of Regents
                                                    2012

Mais conteúdo relacionado

Mais procurados

Microsoft PowerPoint: Video and Audio
Microsoft PowerPoint: Video and AudioMicrosoft PowerPoint: Video and Audio
Microsoft PowerPoint: Video and Audioslharlow
 
Wlmm stepby step
Wlmm stepby stepWlmm stepby step
Wlmm stepby stepthinkict
 
Invisible cloth streaming video presentation
Invisible cloth streaming video presentationInvisible cloth streaming video presentation
Invisible cloth streaming video presentationMarybeth O'Brien
 
Firecoresoft video converter user guide
Firecoresoft video converter user guideFirecoresoft video converter user guide
Firecoresoft video converter user guideamalejackie
 
Microsoft Movie Maker
Microsoft Movie MakerMicrosoft Movie Maker
Microsoft Movie Makerslharlow
 
Windows Live Movie Maker Tutorial
Windows Live Movie Maker TutorialWindows Live Movie Maker Tutorial
Windows Live Movie Maker TutorialMindy McAdams
 
Windows Movie Maker 2012 basic tutoral
Windows Movie Maker 2012 basic tutoralWindows Movie Maker 2012 basic tutoral
Windows Movie Maker 2012 basic tutoralsanzochan
 
Digital Storytelling - Windows and Apple
Digital Storytelling - Windows and AppleDigital Storytelling - Windows and Apple
Digital Storytelling - Windows and AppleJennifer Dorman
 
PowerPoint Tips & Techniques
PowerPoint Tips & TechniquesPowerPoint Tips & Techniques
PowerPoint Tips & TechniquesSandy McVey
 
Windows Moviemake Tutorial Guide Presenation
Windows Moviemake Tutorial Guide PresenationWindows Moviemake Tutorial Guide Presenation
Windows Moviemake Tutorial Guide PresenationCHERRY CHUA
 
Button Movie Maker Training Aid
Button Movie Maker Training AidButton Movie Maker Training Aid
Button Movie Maker Training Aidabutton1
 
Movies At A Click Version 3
Movies At A Click Version 3Movies At A Click Version 3
Movies At A Click Version 3Kristin Hokanson
 
iMovie Basics
iMovie BasicsiMovie Basics
iMovie Basicsbnipper
 

Mais procurados (20)

Microsoft PowerPoint: Video and Audio
Microsoft PowerPoint: Video and AudioMicrosoft PowerPoint: Video and Audio
Microsoft PowerPoint: Video and Audio
 
Wlmm stepby step
Wlmm stepby stepWlmm stepby step
Wlmm stepby step
 
Invisible cloth streaming video presentation
Invisible cloth streaming video presentationInvisible cloth streaming video presentation
Invisible cloth streaming video presentation
 
Animatics
AnimaticsAnimatics
Animatics
 
Firecoresoft video converter user guide
Firecoresoft video converter user guideFirecoresoft video converter user guide
Firecoresoft video converter user guide
 
Microsoft Movie Maker
Microsoft Movie MakerMicrosoft Movie Maker
Microsoft Movie Maker
 
Windows Live Movie Maker Tutorial
Windows Live Movie Maker TutorialWindows Live Movie Maker Tutorial
Windows Live Movie Maker Tutorial
 
Slidecasting
SlidecastingSlidecasting
Slidecasting
 
Windows Movie Maker 2012 basic tutoral
Windows Movie Maker 2012 basic tutoralWindows Movie Maker 2012 basic tutoral
Windows Movie Maker 2012 basic tutoral
 
Assignment "Video"
Assignment "Video"Assignment "Video"
Assignment "Video"
 
Movie maker
Movie makerMovie maker
Movie maker
 
Digital Storytelling - Windows and Apple
Digital Storytelling - Windows and AppleDigital Storytelling - Windows and Apple
Digital Storytelling - Windows and Apple
 
PowerPoint Tips & Techniques
PowerPoint Tips & TechniquesPowerPoint Tips & Techniques
PowerPoint Tips & Techniques
 
Power point
Power pointPower point
Power point
 
Noah’S Ark New Computer Technology Class 6, 2010
Noah’S Ark New Computer Technology Class 6, 2010Noah’S Ark New Computer Technology Class 6, 2010
Noah’S Ark New Computer Technology Class 6, 2010
 
Windows Moviemake Tutorial Guide Presenation
Windows Moviemake Tutorial Guide PresenationWindows Moviemake Tutorial Guide Presenation
Windows Moviemake Tutorial Guide Presenation
 
Simple Animations
Simple AnimationsSimple Animations
Simple Animations
 
Button Movie Maker Training Aid
Button Movie Maker Training AidButton Movie Maker Training Aid
Button Movie Maker Training Aid
 
Movies At A Click Version 3
Movies At A Click Version 3Movies At A Click Version 3
Movies At A Click Version 3
 
iMovie Basics
iMovie BasicsiMovie Basics
iMovie Basics
 

Destaque

Leveraging Recorded Mini-Lectures to Increase Student Learning
Leveraging Recorded Mini-Lectures to Increase Student LearningLeveraging Recorded Mini-Lectures to Increase Student Learning
Leveraging Recorded Mini-Lectures to Increase Student LearningRichard Berg
 
Creative Commons Licensed Content in Flickr
Creative Commons Licensed Content in FlickrCreative Commons Licensed Content in Flickr
Creative Commons Licensed Content in FlickrRichard Berg
 
τρόποι εκμετάλλευσης ηλίου & αέρα
τρόποι εκμετάλλευσης ηλίου & αέρατρόποι εκμετάλλευσης ηλίου & αέρα
τρόποι εκμετάλλευσης ηλίου & αέραIreneJohnLora
 
Designing an Enterprise Video Capture System
Designing an Enterprise Video Capture SystemDesigning an Enterprise Video Capture System
Designing an Enterprise Video Capture Systemsetstanford
 
Leadership Symposium on Digital Media in Healthcare
Leadership Symposium on Digital Media in HealthcareLeadership Symposium on Digital Media in Healthcare
Leadership Symposium on Digital Media in Healthcaresetstanford
 
Fostering Open Culture In Higher Education
Fostering Open Culture In Higher Education Fostering Open Culture In Higher Education
Fostering Open Culture In Higher Education setstanford
 
Stanford IRT 360 Review
Stanford IRT 360 ReviewStanford IRT 360 Review
Stanford IRT 360 Reviewsetstanford
 
Mobile Biofuel Technologies
Mobile Biofuel Technologies Mobile Biofuel Technologies
Mobile Biofuel Technologies Blake Snowden
 
Developing Your Research Posters
Developing Your Research PostersDeveloping Your Research Posters
Developing Your Research PostersRichard Berg
 
Editing Slides
Editing SlidesEditing Slides
Editing SlidesBeckyboo4
 
Blackboard Collaborate Training
Blackboard Collaborate TrainingBlackboard Collaborate Training
Blackboard Collaborate TrainingRichard Berg
 
Digital storytelling overview
Digital storytelling overviewDigital storytelling overview
Digital storytelling overviewRichard Berg
 
Blackboard collaborate
Blackboard collaborateBlackboard collaborate
Blackboard collaborateRichard Berg
 
Off the radar-group_treatment!!!
Off the radar-group_treatment!!!Off the radar-group_treatment!!!
Off the radar-group_treatment!!!Beckyboo4
 

Destaque (20)

Leveraging Recorded Mini-Lectures to Increase Student Learning
Leveraging Recorded Mini-Lectures to Increase Student LearningLeveraging Recorded Mini-Lectures to Increase Student Learning
Leveraging Recorded Mini-Lectures to Increase Student Learning
 
Creative Commons Licensed Content in Flickr
Creative Commons Licensed Content in FlickrCreative Commons Licensed Content in Flickr
Creative Commons Licensed Content in Flickr
 
τρόποι εκμετάλλευσης ηλίου & αέρα
τρόποι εκμετάλλευσης ηλίου & αέρατρόποι εκμετάλλευσης ηλίου & αέρα
τρόποι εκμετάλλευσης ηλίου & αέρα
 
Final Form
Final FormFinal Form
Final Form
 
Shadow range
Shadow rangeShadow range
Shadow range
 
υλικά
υλικάυλικά
υλικά
 
Designing an Enterprise Video Capture System
Designing an Enterprise Video Capture SystemDesigning an Enterprise Video Capture System
Designing an Enterprise Video Capture System
 
Leadership Symposium on Digital Media in Healthcare
Leadership Symposium on Digital Media in HealthcareLeadership Symposium on Digital Media in Healthcare
Leadership Symposium on Digital Media in Healthcare
 
Fostering Open Culture In Higher Education
Fostering Open Culture In Higher Education Fostering Open Culture In Higher Education
Fostering Open Culture In Higher Education
 
Stanford IRT 360 Review
Stanford IRT 360 ReviewStanford IRT 360 Review
Stanford IRT 360 Review
 
Mobile Biofuel Technologies
Mobile Biofuel Technologies Mobile Biofuel Technologies
Mobile Biofuel Technologies
 
Developing Your Research Posters
Developing Your Research PostersDeveloping Your Research Posters
Developing Your Research Posters
 
Slide Deck
Slide Deck Slide Deck
Slide Deck
 
Camtasia overview
Camtasia overviewCamtasia overview
Camtasia overview
 
Flipped Classroom
Flipped ClassroomFlipped Classroom
Flipped Classroom
 
Editing Slides
Editing SlidesEditing Slides
Editing Slides
 
Blackboard Collaborate Training
Blackboard Collaborate TrainingBlackboard Collaborate Training
Blackboard Collaborate Training
 
Digital storytelling overview
Digital storytelling overviewDigital storytelling overview
Digital storytelling overview
 
Blackboard collaborate
Blackboard collaborateBlackboard collaborate
Blackboard collaborate
 
Off the radar-group_treatment!!!
Off the radar-group_treatment!!!Off the radar-group_treatment!!!
Off the radar-group_treatment!!!
 

Semelhante a Using Windows Live Movie Maker

User manuel-for-wondershare-video-editor-windows-v-4-8
User manuel-for-wondershare-video-editor-windows-v-4-8User manuel-for-wondershare-video-editor-windows-v-4-8
User manuel-for-wondershare-video-editor-windows-v-4-8Fajar Baskoro
 
User Manuel for Wondershare Video Editor Windows V. 4.8+
User Manuel for Wondershare Video Editor Windows V. 4.8+User Manuel for Wondershare Video Editor Windows V. 4.8+
User Manuel for Wondershare Video Editor Windows V. 4.8+Liza Brown
 
7464 Movie Maker How To Guide Mtl
7464  Movie Maker  How To  Guide Mtl7464  Movie Maker  How To  Guide Mtl
7464 Movie Maker How To Guide Mtlmlofton62
 
Powerpoint: Video and Audio
Powerpoint: Video and AudioPowerpoint: Video and Audio
Powerpoint: Video and Audiosamharlow
 
Non interactive materials
Non interactive materialsNon interactive materials
Non interactive materialsu082929
 
Using Windows Movie Maker
Using Windows Movie MakerUsing Windows Movie Maker
Using Windows Movie Makeru083133
 
423480261-Filmora-Presentation.pptx
423480261-Filmora-Presentation.pptx423480261-Filmora-Presentation.pptx
423480261-Filmora-Presentation.pptxJHONROISAPIAN
 
Lesson 4 - Introduction to Filmora.pptx
Lesson 4 - Introduction to Filmora.pptxLesson 4 - Introduction to Filmora.pptx
Lesson 4 - Introduction to Filmora.pptxJohnLagman3
 
Presentation1
Presentation1Presentation1
Presentation1ameera11
 
Moviemaker Powerpoint
Moviemaker PowerpointMoviemaker Powerpoint
Moviemaker Powerpointeboswell
 
FILMORA Video editing Filmora presintation for video and audio editing
FILMORA Video editing Filmora presintation for video and audio editingFILMORA Video editing Filmora presintation for video and audio editing
FILMORA Video editing Filmora presintation for video and audio editingMichael Montarde
 
Au digital-video-editing-imovie11
Au digital-video-editing-imovie11Au digital-video-editing-imovie11
Au digital-video-editing-imovie11Carolyn Guertin
 
Abc open windows_livemoviemaker
Abc open windows_livemoviemakerAbc open windows_livemoviemaker
Abc open windows_livemoviemakergreenfrog88
 
2010 Creating Videocast Lectures
2010 Creating Videocast Lectures2010 Creating Videocast Lectures
2010 Creating Videocast LecturesWCET
 
2010 Creating Videocast Lectures for Online Courses
2010 Creating Videocast Lectures for Online Courses2010 Creating Videocast Lectures for Online Courses
2010 Creating Videocast Lectures for Online CoursesWCET
 

Semelhante a Using Windows Live Movie Maker (20)

User manuel-for-wondershare-video-editor-windows-v-4-8
User manuel-for-wondershare-video-editor-windows-v-4-8User manuel-for-wondershare-video-editor-windows-v-4-8
User manuel-for-wondershare-video-editor-windows-v-4-8
 
User Manuel for Wondershare Video Editor Windows V. 4.8+
User Manuel for Wondershare Video Editor Windows V. 4.8+User Manuel for Wondershare Video Editor Windows V. 4.8+
User Manuel for Wondershare Video Editor Windows V. 4.8+
 
7464 Movie Maker How To Guide Mtl
7464  Movie Maker  How To  Guide Mtl7464  Movie Maker  How To  Guide Mtl
7464 Movie Maker How To Guide Mtl
 
Powerpoint: Video and Audio
Powerpoint: Video and AudioPowerpoint: Video and Audio
Powerpoint: Video and Audio
 
Non interactive materials
Non interactive materialsNon interactive materials
Non interactive materials
 
Customizing a video in iMovie
Customizing a video in iMovieCustomizing a video in iMovie
Customizing a video in iMovie
 
Producer
ProducerProducer
Producer
 
Using Windows Movie Maker
Using Windows Movie MakerUsing Windows Movie Maker
Using Windows Movie Maker
 
423480261-Filmora-Presentation.pptx
423480261-Filmora-Presentation.pptx423480261-Filmora-Presentation.pptx
423480261-Filmora-Presentation.pptx
 
Lesson 4 - Introduction to Filmora.pptx
Lesson 4 - Introduction to Filmora.pptxLesson 4 - Introduction to Filmora.pptx
Lesson 4 - Introduction to Filmora.pptx
 
Presentation1
Presentation1Presentation1
Presentation1
 
Moviemaker Powerpoint
Moviemaker PowerpointMoviemaker Powerpoint
Moviemaker Powerpoint
 
FILMORA Video editing Filmora presintation for video and audio editing
FILMORA Video editing Filmora presintation for video and audio editingFILMORA Video editing Filmora presintation for video and audio editing
FILMORA Video editing Filmora presintation for video and audio editing
 
Au digital-video-editing-imovie11
Au digital-video-editing-imovie11Au digital-video-editing-imovie11
Au digital-video-editing-imovie11
 
Final exam
Final examFinal exam
Final exam
 
Abc open windows_livemoviemaker
Abc open windows_livemoviemakerAbc open windows_livemoviemaker
Abc open windows_livemoviemaker
 
Digital Storytelling Feb 2010
Digital Storytelling Feb 2010Digital Storytelling Feb 2010
Digital Storytelling Feb 2010
 
Moviemaker report
Moviemaker reportMoviemaker report
Moviemaker report
 
2010 Creating Videocast Lectures
2010 Creating Videocast Lectures2010 Creating Videocast Lectures
2010 Creating Videocast Lectures
 
2010 Creating Videocast Lectures for Online Courses
2010 Creating Videocast Lectures for Online Courses2010 Creating Videocast Lectures for Online Courses
2010 Creating Videocast Lectures for Online Courses
 

Mais de Richard Berg

Blackboard Collaborate Ultra - Muting Participants
Blackboard Collaborate Ultra - Muting ParticipantsBlackboard Collaborate Ultra - Muting Participants
Blackboard Collaborate Ultra - Muting ParticipantsRichard Berg
 
Blackboard Collaborate Ultra Training
Blackboard Collaborate Ultra TrainingBlackboard Collaborate Ultra Training
Blackboard Collaborate Ultra TrainingRichard Berg
 
Blackboard Collaborate Ultra - Viewing Session Reports
Blackboard Collaborate Ultra - Viewing Session ReportsBlackboard Collaborate Ultra - Viewing Session Reports
Blackboard Collaborate Ultra - Viewing Session ReportsRichard Berg
 
Blackboard Collaborate Ultra - Setting Up the Camera and Microphone Manually
Blackboard Collaborate Ultra - Setting Up the Camera and Microphone ManuallyBlackboard Collaborate Ultra - Setting Up the Camera and Microphone Manually
Blackboard Collaborate Ultra - Setting Up the Camera and Microphone ManuallyRichard Berg
 
Blackboard Collaborate Ultra - Entering a Session
Blackboard Collaborate Ultra - Entering a SessionBlackboard Collaborate Ultra - Entering a Session
Blackboard Collaborate Ultra - Entering a SessionRichard Berg
 
Blackboard Collaborate Ultra - Checking Participant Network Connections
Blackboard Collaborate Ultra - Checking Participant Network ConnectionsBlackboard Collaborate Ultra - Checking Participant Network Connections
Blackboard Collaborate Ultra - Checking Participant Network ConnectionsRichard Berg
 
Blackboard Collaborate Ultra - Using the Chat Tool
Blackboard Collaborate Ultra - Using the Chat ToolBlackboard Collaborate Ultra - Using the Chat Tool
Blackboard Collaborate Ultra - Using the Chat ToolRichard Berg
 
Blackboard Collaborate Ultra - Setting Up Breakout Groups
Blackboard Collaborate Ultra - Setting Up Breakout GroupsBlackboard Collaborate Ultra - Setting Up Breakout Groups
Blackboard Collaborate Ultra - Setting Up Breakout GroupsRichard Berg
 
Blackboard Collaborate Ultra - Promoting and Demoting Participants
Blackboard Collaborate Ultra - Promoting and Demoting ParticipantsBlackboard Collaborate Ultra - Promoting and Demoting Participants
Blackboard Collaborate Ultra - Promoting and Demoting ParticipantsRichard Berg
 
Blackboard Collaborate Ultra - Allowing unenrolled guests to enter your session.
Blackboard Collaborate Ultra - Allowing unenrolled guests to enter your session.Blackboard Collaborate Ultra - Allowing unenrolled guests to enter your session.
Blackboard Collaborate Ultra - Allowing unenrolled guests to enter your session.Richard Berg
 
How to Design and Deliver Recorded Mini-Lectures
How to Design and Deliver Recorded Mini-LecturesHow to Design and Deliver Recorded Mini-Lectures
How to Design and Deliver Recorded Mini-LecturesRichard Berg
 
Recording Mini-Lectures in Camtasia
Recording Mini-Lectures in CamtasiaRecording Mini-Lectures in Camtasia
Recording Mini-Lectures in CamtasiaRichard Berg
 
7 Things You Need to Know About Recorded Lectures
7 Things You Need to Know About Recorded Lectures7 Things You Need to Know About Recorded Lectures
7 Things You Need to Know About Recorded LecturesRichard Berg
 
Short video overview
Short video overviewShort video overview
Short video overviewRichard Berg
 

Mais de Richard Berg (14)

Blackboard Collaborate Ultra - Muting Participants
Blackboard Collaborate Ultra - Muting ParticipantsBlackboard Collaborate Ultra - Muting Participants
Blackboard Collaborate Ultra - Muting Participants
 
Blackboard Collaborate Ultra Training
Blackboard Collaborate Ultra TrainingBlackboard Collaborate Ultra Training
Blackboard Collaborate Ultra Training
 
Blackboard Collaborate Ultra - Viewing Session Reports
Blackboard Collaborate Ultra - Viewing Session ReportsBlackboard Collaborate Ultra - Viewing Session Reports
Blackboard Collaborate Ultra - Viewing Session Reports
 
Blackboard Collaborate Ultra - Setting Up the Camera and Microphone Manually
Blackboard Collaborate Ultra - Setting Up the Camera and Microphone ManuallyBlackboard Collaborate Ultra - Setting Up the Camera and Microphone Manually
Blackboard Collaborate Ultra - Setting Up the Camera and Microphone Manually
 
Blackboard Collaborate Ultra - Entering a Session
Blackboard Collaborate Ultra - Entering a SessionBlackboard Collaborate Ultra - Entering a Session
Blackboard Collaborate Ultra - Entering a Session
 
Blackboard Collaborate Ultra - Checking Participant Network Connections
Blackboard Collaborate Ultra - Checking Participant Network ConnectionsBlackboard Collaborate Ultra - Checking Participant Network Connections
Blackboard Collaborate Ultra - Checking Participant Network Connections
 
Blackboard Collaborate Ultra - Using the Chat Tool
Blackboard Collaborate Ultra - Using the Chat ToolBlackboard Collaborate Ultra - Using the Chat Tool
Blackboard Collaborate Ultra - Using the Chat Tool
 
Blackboard Collaborate Ultra - Setting Up Breakout Groups
Blackboard Collaborate Ultra - Setting Up Breakout GroupsBlackboard Collaborate Ultra - Setting Up Breakout Groups
Blackboard Collaborate Ultra - Setting Up Breakout Groups
 
Blackboard Collaborate Ultra - Promoting and Demoting Participants
Blackboard Collaborate Ultra - Promoting and Demoting ParticipantsBlackboard Collaborate Ultra - Promoting and Demoting Participants
Blackboard Collaborate Ultra - Promoting and Demoting Participants
 
Blackboard Collaborate Ultra - Allowing unenrolled guests to enter your session.
Blackboard Collaborate Ultra - Allowing unenrolled guests to enter your session.Blackboard Collaborate Ultra - Allowing unenrolled guests to enter your session.
Blackboard Collaborate Ultra - Allowing unenrolled guests to enter your session.
 
How to Design and Deliver Recorded Mini-Lectures
How to Design and Deliver Recorded Mini-LecturesHow to Design and Deliver Recorded Mini-Lectures
How to Design and Deliver Recorded Mini-Lectures
 
Recording Mini-Lectures in Camtasia
Recording Mini-Lectures in CamtasiaRecording Mini-Lectures in Camtasia
Recording Mini-Lectures in Camtasia
 
7 Things You Need to Know About Recorded Lectures
7 Things You Need to Know About Recorded Lectures7 Things You Need to Know About Recorded Lectures
7 Things You Need to Know About Recorded Lectures
 
Short video overview
Short video overviewShort video overview
Short video overview
 

Último

LC_YouSaidYes_NewBelieverBookletDone.pdf
LC_YouSaidYes_NewBelieverBookletDone.pdfLC_YouSaidYes_NewBelieverBookletDone.pdf
LC_YouSaidYes_NewBelieverBookletDone.pdfpastor83
 
9892124323, Call Girls in mumbai, Vashi Call Girls , Kurla Call girls
9892124323, Call Girls in mumbai, Vashi Call Girls , Kurla Call girls9892124323, Call Girls in mumbai, Vashi Call Girls , Kurla Call girls
9892124323, Call Girls in mumbai, Vashi Call Girls , Kurla Call girlsPooja Nehwal
 
The Selfspace Journal Preview by Mindbrush
The Selfspace Journal Preview by MindbrushThe Selfspace Journal Preview by Mindbrush
The Selfspace Journal Preview by MindbrushShivain97
 
8377087607 Full Enjoy @24/7-CLEAN-Call Girls In Chhatarpur,
8377087607 Full Enjoy @24/7-CLEAN-Call Girls In Chhatarpur,8377087607 Full Enjoy @24/7-CLEAN-Call Girls In Chhatarpur,
8377087607 Full Enjoy @24/7-CLEAN-Call Girls In Chhatarpur,dollysharma2066
 
2k Shots ≽ 9205541914 ≼ Call Girls In Jasola (Delhi)
2k Shots ≽ 9205541914 ≼ Call Girls In Jasola (Delhi)2k Shots ≽ 9205541914 ≼ Call Girls In Jasola (Delhi)
2k Shots ≽ 9205541914 ≼ Call Girls In Jasola (Delhi)Delhi Call girls
 
Top Rated Pune Call Girls Tingre Nagar ⟟ 6297143586 ⟟ Call Me For Genuine Se...
Top Rated  Pune Call Girls Tingre Nagar ⟟ 6297143586 ⟟ Call Me For Genuine Se...Top Rated  Pune Call Girls Tingre Nagar ⟟ 6297143586 ⟟ Call Me For Genuine Se...
Top Rated Pune Call Girls Tingre Nagar ⟟ 6297143586 ⟟ Call Me For Genuine Se...Call Girls in Nagpur High Profile
 
2k Shots ≽ 9205541914 ≼ Call Girls In Palam (Delhi)
2k Shots ≽ 9205541914 ≼ Call Girls In Palam (Delhi)2k Shots ≽ 9205541914 ≼ Call Girls In Palam (Delhi)
2k Shots ≽ 9205541914 ≼ Call Girls In Palam (Delhi)Delhi Call girls
 
2k Shots ≽ 9205541914 ≼ Call Girls In Dashrath Puri (Delhi)
2k Shots ≽ 9205541914 ≼ Call Girls In Dashrath Puri (Delhi)2k Shots ≽ 9205541914 ≼ Call Girls In Dashrath Puri (Delhi)
2k Shots ≽ 9205541914 ≼ Call Girls In Dashrath Puri (Delhi)Delhi Call girls
 
call Now 9811711561 Cash Payment乂 Call Girls in Dwarka Mor
call Now 9811711561 Cash Payment乂 Call Girls in Dwarka Morcall Now 9811711561 Cash Payment乂 Call Girls in Dwarka Mor
call Now 9811711561 Cash Payment乂 Call Girls in Dwarka Morvikas rana
 
WOMEN EMPOWERMENT women empowerment.pptx
WOMEN EMPOWERMENT women empowerment.pptxWOMEN EMPOWERMENT women empowerment.pptx
WOMEN EMPOWERMENT women empowerment.pptxpadhand000
 
Pokemon Go... Unraveling the Conspiracy Theory
Pokemon Go... Unraveling the Conspiracy TheoryPokemon Go... Unraveling the Conspiracy Theory
Pokemon Go... Unraveling the Conspiracy Theorydrae5
 
$ Love Spells^ 💎 (310) 882-6330 in West Virginia, WV | Psychic Reading Best B...
$ Love Spells^ 💎 (310) 882-6330 in West Virginia, WV | Psychic Reading Best B...$ Love Spells^ 💎 (310) 882-6330 in West Virginia, WV | Psychic Reading Best B...
$ Love Spells^ 💎 (310) 882-6330 in West Virginia, WV | Psychic Reading Best B...PsychicRuben LoveSpells
 
2k Shots ≽ 9205541914 ≼ Call Girls In Mukherjee Nagar (Delhi)
2k Shots ≽ 9205541914 ≼ Call Girls In Mukherjee Nagar (Delhi)2k Shots ≽ 9205541914 ≼ Call Girls In Mukherjee Nagar (Delhi)
2k Shots ≽ 9205541914 ≼ Call Girls In Mukherjee Nagar (Delhi)Delhi Call girls
 

Último (15)

LC_YouSaidYes_NewBelieverBookletDone.pdf
LC_YouSaidYes_NewBelieverBookletDone.pdfLC_YouSaidYes_NewBelieverBookletDone.pdf
LC_YouSaidYes_NewBelieverBookletDone.pdf
 
9892124323, Call Girls in mumbai, Vashi Call Girls , Kurla Call girls
9892124323, Call Girls in mumbai, Vashi Call Girls , Kurla Call girls9892124323, Call Girls in mumbai, Vashi Call Girls , Kurla Call girls
9892124323, Call Girls in mumbai, Vashi Call Girls , Kurla Call girls
 
The Selfspace Journal Preview by Mindbrush
The Selfspace Journal Preview by MindbrushThe Selfspace Journal Preview by Mindbrush
The Selfspace Journal Preview by Mindbrush
 
8377087607 Full Enjoy @24/7-CLEAN-Call Girls In Chhatarpur,
8377087607 Full Enjoy @24/7-CLEAN-Call Girls In Chhatarpur,8377087607 Full Enjoy @24/7-CLEAN-Call Girls In Chhatarpur,
8377087607 Full Enjoy @24/7-CLEAN-Call Girls In Chhatarpur,
 
2k Shots ≽ 9205541914 ≼ Call Girls In Jasola (Delhi)
2k Shots ≽ 9205541914 ≼ Call Girls In Jasola (Delhi)2k Shots ≽ 9205541914 ≼ Call Girls In Jasola (Delhi)
2k Shots ≽ 9205541914 ≼ Call Girls In Jasola (Delhi)
 
Top Rated Pune Call Girls Tingre Nagar ⟟ 6297143586 ⟟ Call Me For Genuine Se...
Top Rated  Pune Call Girls Tingre Nagar ⟟ 6297143586 ⟟ Call Me For Genuine Se...Top Rated  Pune Call Girls Tingre Nagar ⟟ 6297143586 ⟟ Call Me For Genuine Se...
Top Rated Pune Call Girls Tingre Nagar ⟟ 6297143586 ⟟ Call Me For Genuine Se...
 
2k Shots ≽ 9205541914 ≼ Call Girls In Palam (Delhi)
2k Shots ≽ 9205541914 ≼ Call Girls In Palam (Delhi)2k Shots ≽ 9205541914 ≼ Call Girls In Palam (Delhi)
2k Shots ≽ 9205541914 ≼ Call Girls In Palam (Delhi)
 
2k Shots ≽ 9205541914 ≼ Call Girls In Dashrath Puri (Delhi)
2k Shots ≽ 9205541914 ≼ Call Girls In Dashrath Puri (Delhi)2k Shots ≽ 9205541914 ≼ Call Girls In Dashrath Puri (Delhi)
2k Shots ≽ 9205541914 ≼ Call Girls In Dashrath Puri (Delhi)
 
call Now 9811711561 Cash Payment乂 Call Girls in Dwarka Mor
call Now 9811711561 Cash Payment乂 Call Girls in Dwarka Morcall Now 9811711561 Cash Payment乂 Call Girls in Dwarka Mor
call Now 9811711561 Cash Payment乂 Call Girls in Dwarka Mor
 
(Aarini) Russian Call Girls Surat Call Now 8250077686 Surat Escorts 24x7
(Aarini) Russian Call Girls Surat Call Now 8250077686 Surat Escorts 24x7(Aarini) Russian Call Girls Surat Call Now 8250077686 Surat Escorts 24x7
(Aarini) Russian Call Girls Surat Call Now 8250077686 Surat Escorts 24x7
 
WOMEN EMPOWERMENT women empowerment.pptx
WOMEN EMPOWERMENT women empowerment.pptxWOMEN EMPOWERMENT women empowerment.pptx
WOMEN EMPOWERMENT women empowerment.pptx
 
Pokemon Go... Unraveling the Conspiracy Theory
Pokemon Go... Unraveling the Conspiracy TheoryPokemon Go... Unraveling the Conspiracy Theory
Pokemon Go... Unraveling the Conspiracy Theory
 
$ Love Spells^ 💎 (310) 882-6330 in West Virginia, WV | Psychic Reading Best B...
$ Love Spells^ 💎 (310) 882-6330 in West Virginia, WV | Psychic Reading Best B...$ Love Spells^ 💎 (310) 882-6330 in West Virginia, WV | Psychic Reading Best B...
$ Love Spells^ 💎 (310) 882-6330 in West Virginia, WV | Psychic Reading Best B...
 
(Anamika) VIP Call Girls Navi Mumbai Call Now 8250077686 Navi Mumbai Escorts ...
(Anamika) VIP Call Girls Navi Mumbai Call Now 8250077686 Navi Mumbai Escorts ...(Anamika) VIP Call Girls Navi Mumbai Call Now 8250077686 Navi Mumbai Escorts ...
(Anamika) VIP Call Girls Navi Mumbai Call Now 8250077686 Navi Mumbai Escorts ...
 
2k Shots ≽ 9205541914 ≼ Call Girls In Mukherjee Nagar (Delhi)
2k Shots ≽ 9205541914 ≼ Call Girls In Mukherjee Nagar (Delhi)2k Shots ≽ 9205541914 ≼ Call Girls In Mukherjee Nagar (Delhi)
2k Shots ≽ 9205541914 ≼ Call Girls In Mukherjee Nagar (Delhi)
 

Using Windows Live Movie Maker

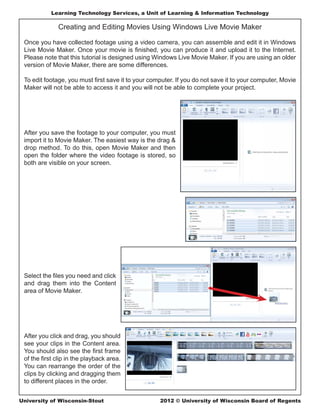
  • 1. Learning Technology Services, a Unit of Learning & Information Technology Creating and Editing Movies Using Windows Live Movie Maker Once you have collected footage using a video camera, you can assemble and edit it in Windows Live Movie Maker. Once your movie is finished, you can produce it and upload it to the Internet. Please note that this tutorial is designed using Windows Live Movie Maker. If you are using an older version of Movie Maker, there are some differences. To edit footage, you must first save it to your computer. If you do not save it to your computer, Movie Maker will not be able to access it and you will not be able to complete your project. After you save the footage to your computer, you must import it to Movie Maker. The easiest way is the drag & drop method. To do this, open Movie Maker and then open the folder where the video footage is stored, so both are visible on your screen. Select the files you need and click and drag them into the Content area of Movie Maker. After you click and drag, you should see your clips in the Content area. You should also see the first frame of the first clip in the playback area. You can rearrange the order of the clips by clicking and dragging them to different places in the order. University of Wisconsin-Stout 2012 © University of Wisconsin Board of Regents
  • 2. Learning Technology Services, a Unit of Learning & Information Technology Once you are certain the footage you need has been imported, you should save your video project. Open the dropdown menu to the left of Home and choose Save Project. From there you will be able to choose a name and location to save your project. Remember to save your project occasionally as you work on it so that edits you make will be saved. To review your clips before editing, go to the Playback area and click on the Play button on the controller at the bottom of the window. As you go through the playback, you will see a vertical black line move through your clips. While you are doing the playback, you should also have the Edit menu open so you can have access to the Split,Trim, and other editing tools. Use the Split tool to cut clips into smaller pieces. Use the Trim tool to trim out parts of clips that you will need use. You can also click and drag individual clips to change the order in which they will appear in your video. To create a split, stop playback at the point where you want to create the split. Use the Previous Frame and Next Frame buttons by the Play/Pause button to get to the exact point where you want to create the split. When you get to that point, click on the Split button in the Edit area. University of Wisconsin-Stout 2 2011 © University of Wisconsin Board of Regents 2012
  • 3. Learning Technology Services, a Unit of Learning & Information Technology After you click the Split button, you will see that the clip is now separated into two pieces. If you want to delete one of the two pieces created, you can click on it to select it and then click the Delete key on your keyboard. To remove footage at the beginning of a clip, end of a clip, or both, use the Trim tool. For the beginning, play to the point where you want it to start and click the Set start point button. For the end, play to where you want it to end and click the Set end point button. To trim both, set a start and end point. After you do the trimming, you will see that the clip is now shorter. You may want to put animations (often called wipes or transitions) in between clips. Do this by setting the black line in between two clips and then choosing an animation. You can set the duration in the Duration area. When the video is played, the two clips will be blended using the effect you have chosen. To add a title, click before the first clip and then click the Title button in the Home menu area. You can choose different texts and effects. You can also add titles between clips if you need to do so. Captions can help identify people or objects in videos. To add a caption, pause at the place where you want to add a caption and click on the Caption button in the Home menu area. You can set the color, size, font, transparency, and duration of the caption. You can also add credits that will appear at the end of your video. To add credits, click on the Credits button in the Home menu area. You can set the color, size, font, and speed of the credits. University of Wisconsin-Stout 3 2011 © University of Wisconsin Board of Regents 2012
  • 4. Learning Technology Services, a Unit of Learning & Information Technology When you are finished making all your editing, you can produce a movie that can be shared in a number of ways. You may choose to produce the movie more than once depending on your needs. To save your movie for local use, go to the dropdown menu to the left of the Home menu and choose Save movie. Under Save movie, choose the option that most closely meets your needs. You can also produce your movie for popular online sites like YouTube, Facebook, and Flickr. To produce for one of these sites, go to the dropdown menu to the left of the Home menu and choose Publish movie. Then choose the online site for which you want to produce. You will need to choose the resolution for your movie. There is normally a recommended resolution which you can choose. University of Wisconsin-Stout 4 2011 © University of Wisconsin Board of Regents 2012
  • 5. Learning Technology Services, a Unit of Learning & Information Technology Most of the online sites will require you to have an account before you can upload to the site. If you have an account, you can sign in and then you will be able to upload your movie. Things to Keep in Mind • Having a movie project is not the same as having a produced movie. To share something with others, you must produce your movie. • Captions must be readable to be useful. Try using different colors and options for your captions to ensure that viewers can read them. • When choosing animations, titles, and other effects, simplest is best. Too many different effects and too many “flashy” effects will make your movie look unprofessional. • Clean edits make for a more professional looking movie. Make full use of the Previous Frame and Next Frame buttons to make your edits as clean as possible. • Editing can be a very time consuming process. Budget adequate time and start early on editing so you won’t be rushed to finish. • If you are new to making movies, you might want to consider using storyboards or flowcharts to help you organize your ideas and the flow of your movie. • If you are uploading to an open, public site, you must get talent releases from the people in your movie before uploading it. You should also let people know if you intend to make the movie public before you start filming so they can opt out of being on screen. • Ensure that you have the capability to hook up your camera or insert the card from you camera into your computer before you start filming. • If you plan on uploading to a public site, it is best to set up an account ahead of time so you can upload quickly when your movie is ready. • Different public sites will have varying restrictions and terms. You should be certain that you can agree to all the terms before uploading your movie. University of Wisconsin-Stout 5 2011 © University of Wisconsin Board of Regents 2012