Boost PC performance: How more available memory can improve productivity
Visio tutorial 2013
1. Visio 2010 Tutorial
Spring 2013
Introduction
Microsoft Office Visio 2010 is drawing and diagramming software that helps transform concepts
into a visual representation. This tutorial is designed for people who are new to Visio. For the
purposes of this tutorial, we are going to focus on how to create a logical diagram and flow chart
when drawn in Visio.
Objective
After this tutorial, you will have learned how to:
a. Create a logical diagram
b. Add text to a diagram and format the text
c. Create a flowchart diagram using shapes and connectors
Getting Started
① Logical Diagram Plot
Start the Visio Drawing
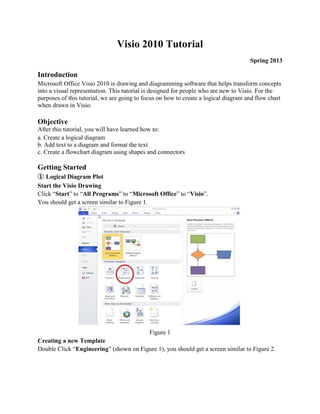
Click “Start” to “All Programs” to “Microsoft Office” to “Visio”.
You should get a screen similar to Figure 1.
Figure 1
Creating a new Template
Double Click “Engineering” (shown on Figure 1), you should get a screen similar to Figure 2.
2. Figure 2
Creating a new Drawing
Double Click “Circuits and Logic” (shown on Figure 2), you should get a screen similar to
Figure 3.
Figure 3
Adding new Stencils
Click “More Shapes” to “Engineering” to “Electrical Engineering”, you can choose the
stencils you need. Here, we add “Analog and Digital Logic (US units)”, “Integrated Circuit
3. Components (US units)”, “Terminals and Connectors (US units)”, “Transmission Paths (US
units)”. You should get a screen similar to Figure 4.
Figure 4
Drawing Logic Diagram (SN74LS00)
Click on the triangle on the left of “Pointer Tool”, choose “Line” to draw rectangle, and choose
“Arc” to draw arc. You should get a screen similar to Figure 5.
Figure 5
4. Choose “Rectangle” to draw pins. You should get a screen similar to Figure 6.
Figure 6
Select all the rectangles, click “right” key of the mouse, choose “Group”, after that you can move
those rectangles as a whole part. You should get a screen similar to Figure 7.
Figure 7
5. Adding Text on the Diagrams
Click “Text” to add text on the diagram, here you can change the font size and font face. Select
all the text, click “right” key of the mouse, choose “Group”. You should get a screen similar to
Figure 8.
Figure 8
Adding Logic gates
Draw “Logic gate 2” from the “Analog and Digital Logic (US units)” stencil into the drawing
window. You should get a screen similar to Figure 9.
Figure 9
6. Click the “right” key of the mouse, choose “Configure Logic Gate. You should get a screen
similar to Figure 10.
Figure 10
Click “Configure Logic Gate”. Here, you can change the gate type and numbers of input and
output. You should get a screen similar to Figure 11.
Figure 11
7. Click the gate, and rotate the gate. You should get a screen similar to Figure 12.
Figure 12
Adding Wires to the gates
Click “Connector” or “Line” to add wires to the gates and pins. You should get a screen similar
to Figure 12.
Figure 13
8. Adding different types of gates to the input of SL74S00 chip
Click the gate, select “Configure Logic Gate”, adjust the parameters, you can get different gates.
Here we get “3-input OR-gate”, “2-input NOR-gate”, “4-input NAND-gate”, and “2-input OR-
gate”. You should get a screen similar to Figure 14.
Figure 14
Adding different types of Flip-Flops to the output of SL74S00 chip
Draw “flip-flop” from the “Analog and Digital Logic (US units)” to the drawing window. Click
on the “right” key of the mouse, select “Configure Flip-Flop” to change the flip-flop types. You
should get a screen similar to Figure 15.
9. Figure 15
Click “Configure Flip-Flop” to choose different types of flip-flop. You should get a screen
similar to Figure 16.
Figure 16
10. Adding wires to flip-flops
Select “Connector” or “Line” to add wires between the output pins of the chip and the flip-flop.
You should get a screen similar to Figure 17.
Figure 17
Adding I/O port to the chip
Draw “I/O port” from the “Analog and Digital Logic (US units)” to the drawing window. Select
“Connector” or “Line” to add wires to “VCC”, “GND”, “Output” and “Input”. You should get a
screen similar to Figure 18.
Figure 18
11. ② Flow chart
Step 1: From the categories areas select Basic Flow Chart, and select Flow Chart (Figure 4).
Figure 4
12. Step 2: Double click on Flow Chart, you will see Visio Screen Layout (Figure 5).
Figure 5
Working with Shapes from a Basic Flow chart Template
Layout your screen as follows
13. Adding Text to the shape
Adding the Connector
a. Select the Diamond Shape
b. Select the connector tool button from the home tab
c. Move the mouse to the position shown below note the cursor has changed to reveal the
connector tool. As you position to a point you can connect to the shape a small red square will
appear.
d. Depress the left mouse key and drag the mouse pointer to the center left edge connection point
of the shape above.
14. e. Release the mouse Button and you will see a connector from the diamond to the
rectangle above and shown.
Add text to connectors
a. Double click on the connector line to type in text
b. Enter your required text then click away from the Line
c. Layout Document as below.
Reference: Microsoft Visio 2010, http://www.mousetraining.co.uk/