Infiltration and Flow Through Planters for Droughts
•
0 gostou•528 visualizações

Infiltration and Flow Through Planters for Droughts

Recomendados
Mais conteúdo relacionado
Mais procurados
Mais procurados (18)
Semelhante a Infiltration and Flow Through Planters for Droughts
Semelhante a Infiltration and Flow Through Planters for Droughts (20)
Mais de School Vegetable Gardening - Victory Gardens
Mais de School Vegetable Gardening - Victory Gardens (20)
Último
Último (20)
Infiltration and Flow Through Planters for Droughts
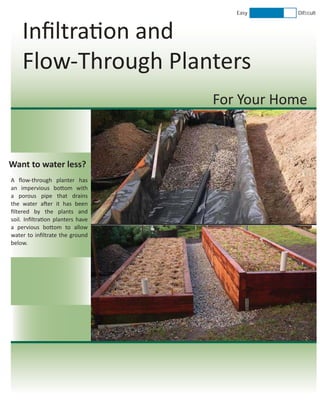
- 1. Infiltra on and Flow-Through Planters DifficultEasy Want to water less? A flow-through planter has an impervious bo om with a porous pipe that drains the water a er it has been filtered by the plants and soil. Infiltra on planters have a pervious bo om to allow water to infiltrate the ground below. For Your Home
- 2. Materials: Planter or raised bed Gravel Universal downspout adapter or flexible down spout extension Po ng soil Mulch Plants Geotex le fabric Silicon caulking PVC pipe to correspond to the length of the planter or raised bed Tools: Drill One-inch drill bit Small drill bit Keyhole saw These types of planters require less watering, provide filtration of pollutants, and are suitable in areas with limited space. Planters or raised beds can be constructed during the winter months and installed after the ground thaws in the spring. Installing a Flow-Through Planter: 1. Find a suitable area on your property: a. Note the direc on of runoff and low spots where water collects. These would be good loca ons for a dry well as long as they follow the loca on constraints below. b. Only roof runoff should be redirected into a dry well. c. Make sure that the chosen loca on is downhill and at least ten feet away from buildings with basements. d. Loca on should not be on or near sep c tanks or wellheads. It is not advisable to plant a garden on top of the dry well. e. Before you dig, be aware of underground service lines or u li es on your property. Call 1-800-478-3121 or go online at www.akonecall.com to have the underground lines marked for you. 2. Using a one-inch drill bit, drill a hole about two inches from the bo om in the middle of one of the long sides of the planter. This is for the inflow from the downspout to enter. Use the keyhole saw to make the hole large enough for the downspout adapter or flexible down spout extension. 3. Drill another hole about six inches from the bo om in the front of the planter close to the other end of the planter without the inflow with the one-inch drill bit and use the keyhole saw to make the hole large enough for the smaller PVC pipe. 4. Fill the bo om of the planter with about three inches of gravel. 5. With the small drill bit, drill holes about one-half to one inch apart in the larger PVC pipe. Leave about three inches of one end un-perforated. 6. With the one inch drill bit, in the middle of the perforated PVC pipe drill a hole that will be large enough for the downspout adapter or extension. 7. Set up overflow system: a. Drill a series of holes (about six inches apart) on the long side of the planter opposite of the inflow pipe. b. Place the holes at the top of where the gravel layer will be. 8. Seal the gap around the PVC pipe that extends from the planter with silicon caulking. 9. Modify the downspout so that it directs water into the planter: Cold Climate Considerations: The infiltration and flow-through planters must be disconnected from the downspout in the fall to prevent ice dams from forming in the gutters.
- 3. a. Use a hacksaw to cut the downspout at the appropriate height. b. A ach the universal downspout adapter or flexible downspout extension, mmaking sure the adapter/ extension is long enough to reach the planter. c. Bury the adapter/extension, or lay it on the ground. d. Insert the adapter/extension into the drilled hole on long side of the planter. e. A ach the adapter/extension to the perforated PVC pipe with silicon caulking, then seal the gap between the adapter/extension and the planter hole. 10. Put another two-inch layer of gravel all along the planter. 11. Lay down a geotex le fabric to separate the gravel and soil. 12. Fill the planter with soil. The soil should contain a high level of organic ma er. Try to not use soil with clay or silt in it. This will ensure that the soil is able to support the wicking func on. 13. Plant. Many plants will do well in the moist-to-slightly-moist soil condi ons which these planters will provide. Ask your local nursery for advice on plants that will be happy in this kind of se ng. Installing an Infiltration Planter: Follow the same direc ons above with a few excep ons: a. There should not be a bo om on the planter or foam along the bo om of the planter. This means that you may have to cut off the bo om of a planter or drill large holes in the bo om if you buy it pre-made. b. Do not want to build an infiltra on planter in permafrost. c. You will also need to test the infiltra on rate of your soil.
- 4. For more informa on about the Green Infrastructure Project please visit: www.cchrc.org/green-infrastructure Sources: Charles River Watershed Associa on, Low Impact Best Management Prac ce (BMP) Informa on Sheet www.crwa.org/projects/bmpfactsheets/crwa_stormwater_planter.pdf City of Portland Environmental Services, Flow-Through Planters www.portlandonline.com/BES/index.cfm?a=127475&c=31870 Hébert, Michele. Building the Ul mate Alaska Raised Box Garden by www.uaf.edu/ces/michele/ar cles/general_gardening/raisedBoxGardening.pdf University of Alaska Fairbanks Coopera ve Extension Service, Raised Bed Gardening in Alaska www.uaf.edu/ces/publica ons-db/catalog/anr/HGA-00132.pdf Cost Es mate: • between $60 and $250 depending on size and materials. Pros: • Can be placed right next to a building • Reduces water runoff • Increases groundwater infiltra on • Requires limited space • Minimal maintenance required • Easy to install • Inexpensive • Aesthe cally pleasing Cons: • Surface freezing in the fall reduces the water reten on poten al • A restricted list of suitable plants. Only use plants that like moist to slightly moist soils. • The perforated pipe can become blocked by ice or soil • Needs good soil for proper wicking Time Es mate: • This project could take one to two days to complete. Maintenance: • Disconnect the downspout from the planter a er the first freeze in the fall. • Weed when and if necessary. • Clean gu ers once a year to help keep debris out of the inflow pipe of the planter. To test the infiltra on rate of your soil: a. Dig an eight by eight inch hole within the designated area a er the ground has thawed in the spring. b. Fill the hole with water and check the depth of the water every hour for at least three hours. c. If the water level in the hole goes down on average at least one inch an hour your soil will be able to drain effec vely. d. If it takes longer than eight hours for the hole to completely drain, then you will want to put a gravel layer under your planter. e. Most loca ons in Fairbanks have well draining soils. If you live in the hills surrounding Fairbanks, you may have poorly draining soils.