
Recomendados
Mais conteúdo relacionado
Semelhante a Rose tutorial
Semelhante a Rose tutorial (20)
Último
Último (20)
Rose tutorial
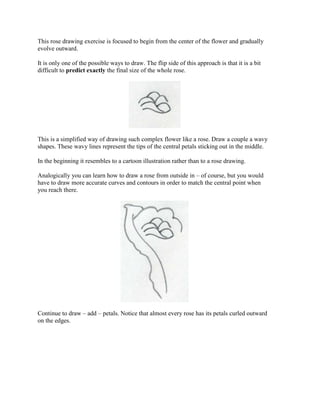
- 1. This rose drawing exercise is focused to begin from the center of the flower and gradually evolve outward. It is only one of the possible ways to draw. The flip side of this approach is that it is a bit difficult to predict exactly the final size of the whole rose. This is a simplified way of drawing such complex flower like a rose. Draw a couple a wavy shapes. These wavy lines represent the tips of the central petals sticking out in the middle. In the beginning it resembles to a cartoon illustration rather than to a rose drawing. Analogically you can learn how to draw a rose from outside in – of course, but you would have to draw more accurate curves and contours in order to match the central point when you reach there. Continue to draw – add – petals. Notice that almost every rose has its petals curled outward on the edges.
- 2. Draw only the outline contours of petals. You need not to draw them absolutely perfectly and exactly; you are a human not a scanner. click the image to enlarge Shape of the rose’s head is gradually emerging.
- 3. click the image to enlarge Draw the last petal on the bottom and add three visible sepals. Then by single pencil line outline the stem. This line is the guideline around which you draw two parallel lines. See the picture. You choose how long or how curved will be the stem. I made it like this but you can make yours as you like.
- 4. click the image to enlarge Outline the petioles and leaf lines as you see on the picture. Using this simple technique you’ll learn how to draw a rose that will look as realistic as possible. click the image to enlarge
- 5. You can notice that on every flower stem there are several petioles with leaves. The shape of rose’s leaves is very simple and very easy to draw. Notice that every leaf has visible veins. You can outline the side veins as you like but the central vein is always running along the leaf. click the image to enlarge When you are learning how to draw a rose, do not forget to add a few thorns.
- 6. click the image to enlarge The process of coloring the rose is virtually the same like Hibiscus or Tulip Flowers or any other flower. You need two color pencils: pink and light green. Over the graphite pencil lines, outline the contours of the rose. This time make sure the lines are exact. Head of the rose is pink and the rest is light green. When you are done, erase the rest of initial graphite pencil lines. The only colored pencil lines remain – similar like on this picture. Now you have a perfect “how to draw a rose template”.
- 7. click the image to enlarge Begin to color the head in pink and the leaves in light green. No shading, no pushing the color pencil at this stage. Just gentle and even basic coloring as you see on the picture.
- 8. click the image to enlarge First, start to shade the rose from the head. Use the same pink color pencil and create shade by stronger pencil strokes. Be careful, always move your pencil strokes the same direction as the petals are growing. Observe these pictures, you’ll get the idea. click the image to enlarge The pencil strokes are better visible here. They should always follow the direction of petal growing. Always remember this important point when you learn how to draw a rose.
- 9. click the image to enlarge Gradually create shade and the rose head is getting nicer. Always try to make it better than mine! click the image to enlarge One more detail. Let’s give this rose even better look. Refine the shade byshort round
- 10. strokes only on the edges of the petals. If you have kneaded eraser you can create the lighter part on the edges. Kneaded eraser is good because you can remove the color simply by touching that part on the rose by eraser. click the image to enlarge This rose head looks a little like from an old painting…;-) When practicing how to draw a rose, you may discover your own new ways of adding up final touches. This will give your rose drawing a personal print. Now you know how to do both. Make your drawings always better than mine!
- 11. click the image to enlarge Get your dark green color pencil and continue to color the rest. Start with the sepals first. click the image to enlarge Darken the flower stem and the leaves. Add a gentle touch of dark red color along the stem before you darken it with green color. This will add to the rose stem a natural look.
- 12. The thorns should be colored with combination of green, red and brown. On the eaves, please leave area around the vein lines brighter. click the image to enlarge Color the leaves by dark green color pencil. Brighter areas around the vein lines give the drawing an impression of three-dimensionality. As you see, learning how to draw a rose is not only making the perfect rose head but quite a many details on the green parts too.
- 13. click the image to enlarge When you’re done with leaves, now, take a dark red color pencil and slightly, really very gently add a weak red color shade on the leaves. Do You Love Drawing Roses? Click HERE To Share Your Own ROSE Drawings Let’s Learn How to Draw a Rose Head
- 14. click on the image to enlarge There are many different approaches of how to draw something. It means, yes, there are many ways of how to draw a rose too. It all depends…if you draw only a rose head, then you can relax and begin to draw it from any point because the rose head is the only object. You can do it from the center, starting by drawing a chalice, or you can begin to draw from the outline contour. click on the image to enlarge Start from the central part by sketching a peanut-like or chalice-like noodle. The upper part is prolonged because it includes also the contour of one petal. This will be the basic shape from which you will gradually develop the whole rose head.
- 15. click on the image to enlarge You can gradually begin to add the rose petals. The rose petals open – fold outwards on the top of the rose head. This is one of the typical features that you notice when you’re learning how to draw a rose. click on the image to enlarge At this stage the picture is a grotesque rough sketch rather than drawing, but as you proceed the shape of the rose will slowly emerge.
- 16. click on the image to enlarge When you draw larger petals, those petals that are opened, the rose head begins to get its typical shape. click on the image to enlarge So far we were sketching the basic contours of a rose head only by graphite pencil. Since graphite pencil tends to make the paper dirty we shall replace it with a pink color pencil. Using now a pink color pencil draw a single line over the initial graphite pencil contour sketch. When you are ready, erase the graphite pencil lines. Graphite pencil lines will disappear but the pink colored pencil line remains - weak, but remains. So, the process of how to draw a rose will be a delicious coloring page like work from now on.
- 17. click on the image to enlarge You can start to shade the petals from anywhere you like. I would recommend to shade very weakly first all petals only by pink color. Shade first only the darkest parts. Before you start to shade, observe for a while the ready picture. I would like to focus your attention especially on those parts of petals that are thebrightest. Those parts should remain bright when your drawing is finished, whatever final color you choose. click on the image to enlarge It is not necessary to philosophize too much over “how to draw a rose” - process, nor over the shading of its petals. Observe as carefully as you can and simply draw what you see. I know it is easier said than done, but that is how it works. Every drawing is first and
- 18. foremost a careful observation and study. The more you sketch and draw (whatever) the more you learn how to observe better. That’s it. click on the image to enlarge Shade the whole rose head in pink color first. Pink color will be the basic layer on which you will build the next red color layer. By combination of pink as the basic and red as second layer you will obtain a kind of pink- red color combination that is closest to a real rose color. click on the image to enlarge Pencil strokes should always follow the direction of growth of the petals, which is from the bottom to the top.
- 19. click on the image to enlarge Put as much red color as you feel necessary. There is no standard or prescription to this. You are the artist, you do the job. Consider this exercise also as a good lesson to learn how to sketch and how to draw a rose. Do You Love Drawing Roses? Click HERE To Share Your Own ROSE Drawings How About This Rose? So, again, let’s “how to draw a rose”...but, this time another one. I won’t bother you with too much of my comment on this because all is pretty obvious from the pictures, and you have already learned the basic sequence from the previous rose drawings. Start with a light wavy line. That represents the stem of the rose. Then draw a chalice- shaped curve, which is the basic line of head of the rose. The final shape of your rose will depend on this initial chalice shape. If it is slim and longer, your rose will have a prolonged elegant shape. If the chalice is short
- 20. and fat, the shape of your rose will be similar. My advice is – if you are uncertain – make it similar to this one, because this shape is rather neutral. Now, when you’ve learned how to draw a rose, you can always draw, as many new roses as you wish. click on the image to enlarge At this stage it is more just a rose bud than a rose. Draw the ending of not yet fully opened petals on the top of the head. click on the image to enlarge Now, start to use your imagination. How would the petals look like when they are just about to open…?
- 21. click on the image to enlarge Go ahead, draw the petals, and do not mind so much about the shape. click on the image to enlarge As you draw the petals, try to make the upper edge of the petals folded over a bit. Always remember that you are learning a process of how to draw a rose, and no one expects you to be perfect on your first try.
- 22. click on the image to enlarge You can add now some more opened petals, the outer ones. You decide the shape. click on the image to enlarge And, yes, erase the help lines and the previous petal lines that may still remain.
- 23. click on the image to enlarge Let’s add some leaves. Just roughly sketch the contours of the leaves. Now your drawing is getting closer to its final shape. At this point you may begin to feel that you too have learned how to draw a rose. click on the image to enlarge Add the veins….and… click on the image to enlarge …and we finally got to the stage where the real fun begins. From now on it is a kind of coloring-book work.
- 24. click on the image to enlarge Use a HB pencil to add grayish tone, to shade the folds on the petals and the darker parts so the rose gets gradually three-dimensional. When you click to enlarge the image, you will notice how the pencil strokes have been done. If possible try to follow the petal shape with the pencil strokes. click on the image to enlarge When you enlarge the image, you also notice that my pencil strokes aren’t perfect too..;-) While shading the leaves, please follow the veins with the pencil strokes; make the strokes in the same direction. Do not cross the veins with pencil. It will be visible and difficult to erase.
- 25. click on the image to enlarge By now you should have a complete drawing on your table. If you are not fully satisfied with the strokes, or if some of them did not come out as you expected, simply take a cotton swab and blur or soften the strokes. Be very careful because the cotton swab is thicker than tip of the pencil and you may easily enter the white or lighter areas. click on the image to enlarge