Mais conteúdo relacionado
Semelhante a Outlook configuration in Microsoft Office (20)
Outlook configuration in Microsoft Office
- 1. Internet Email Configuration – Outlook
How to configure Outlook to send and receive Internet
Email:
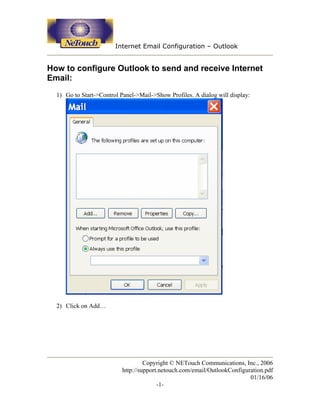
1) Go to Start->Control Panel->Mail->Show Profiles. A dialog will display:
2) Click on Add…
Copyright © NETouch Communications, Inc., 2006
http://support.netouch.com/email/OutlookConfiguration.pdf
01/16/06
-1-
- 2. Internet Email Configuration – Outlook
3) A dialog will be displayed requesting a “Profile Name:”. Enter a name (i.e.
Internet):
4) A dialog will display. Click on “Add a new e-mail account” and click Next:
Copyright © NETouch Communications, Inc., 2006
http://support.netouch.com/email/OutlookConfiguration.pdf
01/16/06
-2-
- 3. Internet Email Configuration – Outlook
5) The next dialog will request the Server Type. Click on POP3 and click Next:
Copyright © NETouch Communications, Inc., 2006
http://support.netouch.com/email/OutlookConfiguration.pdf
01/16/06
-3-
- 4. Internet Email Configuration – Outlook
6) The next dialog will request your name, email, userid, POP3 server, and SMTP
server. Please use these values supplied to you with your emailbox information.
After entering in this information, click on “More Settings”:
Copyright © NETouch Communications, Inc., 2006
http://support.netouch.com/email/OutlookConfiguration.pdf
01/16/06
-4-
- 5. Internet Email Configuration – Outlook
7) A dialog will display:
Copyright © NETouch Communications, Inc., 2006
http://support.netouch.com/email/OutlookConfiguration.pdf
01/16/06
-5-
- 6. Internet Email Configuration – Outlook
8) Click on the “Outgoing Server” tab:
Make sure the “My outgoing server (SMTP) requires authentication” checkbox is
checked. Click on OK.
9) You will now be back at the E-mail Accounts dialog from step 6. Click on Next.
You will now see a dialog congratulating you on successfully entering in the
information required to use Outlook. Click on Finish.
Copyright © NETouch Communications, Inc., 2006
http://support.netouch.com/email/OutlookConfiguration.pdf
01/16/06
-6-
- 7. Internet Email Configuration – Outlook
10) You will now be back at the dialog from step 1. Make sure the radio button
labeled “Always use this profile” is checked and make sure the pulldown below it
displays the profile you created. Click on OK.
11) Open up Outlook and you may now send and receive Internet email.
Copyright © NETouch Communications, Inc., 2006
http://support.netouch.com/email/OutlookConfiguration.pdf
01/16/06
-7-