1. Title Silhouetted Scenes
Author Nancy Walkup
Director, North Texas Institute for Educators on the Visual Arts
Grade level 9th-12th Grade
Time duration 3-4 45 minute classes
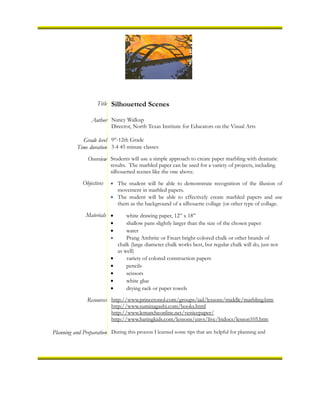
Overview Students will use a simple approach to create paper marbling with dramatic
results. The marbled paper can be used for a variety of projects, including
silhouetted scenes like the one above.
Objectives • The student will be able to demonstrate recognition of the illusion of
movement in marbled papers.
• The student will be able to effectively create marbled papers and use
them as the background of a silhouette collage (or other type of collage.
Materials • white drawing paper, 12” x 18”
• shallow pans slightly larger than the size of the chosen paper
• water
• Prang Ambrite or Freart bright-colored chalk or other brands of
chalk (large diameter chalk works best, but regular chalk will do, just not
as well)
• variety of colored construction papers
• pencils
• scissors
• white glue
• drying rack or paper towels
Resources http://www.princetonol.com/groups/iad/lessons/middle/marbling.htm
http://www.suminagashi.com/books.html
http://www.lemarcheonline.net/venicepaper/
http://www.haringkids.com/lessons/envs/live/htdocs/lesson105.htm
Planning and Preparation During this process I learned some tips that are helpful for planning and
2. preparation:
• I first tried a number of paper marbling methods, including some
commercial kits, but had the most success with the simplest ingredients –
just colored chalk and water. The brand of chalk that works the best is
Prang’s FREART chalk, the large size.
• Because of space limitations, students could not all marble their
papers at the same time, so they began working on their drawings for
the silhouettes they would add to their finished marbled backgrounds
when they were dry. While they started their drawings, they took turns
at the sink to marble the paper.
Background Information Paper marbling is a means to create remarkable decorative surface designs.
To marble paper, some kind of pigment, usually oil or acrylic paint, is floated
upon the surface of a liquid such as water or liquid starch. In the method
historically used in Europe, water and carrageenan are combined to make a
thickened liquid or size upon which oil paints are floated and moved with
tools to make flowing patterns.
A number of scholars believe that marbling originated in China over 2000
years ago and spread to Japan early as the 12th century, where it is still
known as sumingashi. Marbled paper probably reached Europe along the
silk route from the Far East to Turkey, where the process became secretive
as marbled papers were cleverly used as forgery-proof backgrounds for
official documents. Returning crusaders brought the knowledge of the
techniques of marbling to Western Europe where it became popular,
especially for book endpapers. Today Venice is the European city most
identified with paper marbling.
There are a number of contemporary artists who use paper cutting that are
great to share with students. One is Beatrice Coron, who has a great TED
video at
http://www.ted.com/talks/beatrice_coron_stories_cut_from_paper.html.
Others include Kara Walker (http://learn.walkerart.org/karawalker),
Carmen Lomas Garza (http://carmenlomasgarza.com/), and Kathy
Trenchard (http://www.cut-it-out.org/about/).
Vocabulary • marbled paper/ sumingashi
• silhouette
• surface tension
Procedures for Marbling Paper Pour water in a shallow pan to a depth of ½-1 inch. Select three bright
colors of chalk. Hold one piece of the chalk over the pan of water and
scrape it with a sharp straight edge such as a blade of an open pair of
scissors so that the chalk dust falls over the water. Keep scraping and
distribute the chalk dust all over the water. Some of the chalk dust will sink
2
3. to the bottom of the pan but most will float on the top of the water.
Repeat the same procedures with the other two colors. Using a wide tooth
comb or pencil, gently swirl the water to form curvilinear patterns in the
chalk or blow on it gently from the side. (Science connection: the chalk
dust floats on the water due to the fact that the surface tension of the
water is stronger than the weight of the chalk.)
Hold a piece of paper that will fit in the pan in a “U” shape over the water.
Let the center of the paper touch the water first, and then release it so that
the whole piece is flat on top of the water. Quickly remove the paper with
fingers or tongs as soon as it fully contacts the water. (It should not soak
up the water; it should just collect the chalk dust on the surface of the
water.) Let the paper drip over the water a minute and then lay it on a
drying rack or paper towels to dry. Press flat when dry (Cover a stack of
the marbled papers with heavy books overnight).
To finish, students add their silhouettes to the dried marbled paper.
Summary and Closure Display all finished work and ask students to discuss the effects of
movement in the marbled paper and the effectiveness of the cutout
silhouette.
Assessment To what extent:
• is a sense of movement depicted in the marbled paper?
• is the silhouette effectively detailed and recognizable?
Extensions Other approaches to paper marbling include the use of specific colors of
both chalk and background colors, cutting shapes for collage out of the
marbled paper (similar to author Eric Carle’s approach), painting on the
marbled paper, or using it as the covers of a book. The results of this
simple process, using materials commonly found in the art room, are
spectacular, however they are incorporated into works of art.
Correlated Standards Art I (Proposed TEKS)
(1)(B) identify and understand the Elements of Art including line, shape,
(color, texture, form, space, value as the fundamentals of art in personal
artworks. Other Elements of Art may be evident as media evolve (such as text
and time);
(2)(A) utilize visual solutions to create original artworks by problem-solving
through direct observation, original sources, experiences, and imagination;
(3)(B) describe general characteristics in artworks from a variety of cultures;
(4)(A) interpret, evaluate, and justify artistic decisions in artworks by the
student, peers, and other artists.
3