Kindle 3 Handout with Hands-On Exercises (12/2014)
•Transferir como DOCX, PDF•
1 gostou•781 visualizações

This material was created as part of the 2010 Institute of Museum and Library Services 21st Century Librarian program grant to the Nebraska Library Commission.

Recomendados
Mais conteúdo relacionado
Mais procurados
Mais procurados (20)
Destaque
Destaque (6)
Semelhante a Kindle 3 Handout with Hands-On Exercises (12/2014)
Semelhante a Kindle 3 Handout with Hands-On Exercises (12/2014) (20)
Mais de Nebraska Library Commission
Mais de Nebraska Library Commission (20)
Último
Último (20)
Kindle 3 Handout with Hands-On Exercises (12/2014)
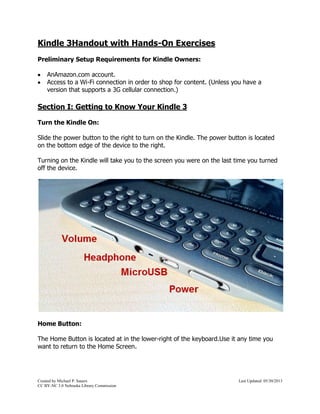
- 1. Kindle 3 Handout with Hands-On Exercises Preliminary Setup Requirements for Kindle Owners: An Amazon.com account. Access to a Wi-Fi connection in order to shop for content. (Unless you have a version that supports a 3G cellular connection.) Section I: Getting to Know Your Kindle 3 Turn the Kindle On: Slide the power button to the right to turn on the Kindle. The power button is located on the bottom edge of the device to the right. Turning on the Kindle will take you to the screen you were on the last time you turned off the device. Home Button: The Home Button is located at in the lower-right of the keyboard. Use it any time you want to return to the Home Screen. Created by Michael P. Sauers Last Updated: 11/24/2014 CC BY-NC 3.0 Nebraska Library Commission
- 2. Home Screen: The home screen shows you the titles that you currently have on your Kindle. Use the cursor buttons to move within this list. Up and down will move you through the list. Pressing left will give you the option to delete the title you have currently selected while pressing right will give you additional details about the selected title. The dotted line beneath each title represents the approximate length of the book along with how far along you have read. From here you can also move up the line above the titles. Once there, press right to see additional title sorting options. Use the page left and page right buttons to move to the next and previous pages on the home screen. The current page number and total number of pages will be displayed at the bottom of the screen. The Menu Button: The menu button is located above the directional controller on the keyboard and is contextual. In other words, depending on the screen you’re currently on, the menu button will give you different options. You navigate through the menu using the directional controller. To exit a menu press the Menu button again. Open a Book: To open a book, select the title from the menu and press the select button. (The button at the center of the directional controller with the dot) Turn Pages in a Book To turn pages in a book use the Previous Page and Next Page buttons located on both sides of the screen. Please be aware that unlike Web browsing the buttons on the left do not automatically mean “go back”. This design is to support both left-handed and right-handed readers. Additionally, notice that the Next Page button is the larger of the two since it tends to be used more often. Created by Michael P. Sauers Last Updated: 11/24/2014 CC BY-NC 3.0 Nebraska Library Commission
- 3. Section I: Getting to Know Your Kindle 3 – Review Spend your first few minutes of hands-on time making sure you are familiar with the location and functionality of the following: Power Button – Where is it? Home Button – What does it do? Menu Button – What menu options are available from the library? Searching – Try searching your library for Nebraska. Home Screen – Can you page back and forth through the library? Opening a book – Find and open Zendegi by Greg Egan? Menu Button – What menu options are available from within a book? Created by Michael P. Sauers Last Updated: 11/24/2014 CC BY-NC 3.0 Nebraska Library Commission
- 4. Section II: Using Your Kindle 3 with OverDrive Checking out and downloading OverDrive eBooks on a Kindle 1, 2 or 3 does involve a computer and a Web browser. You may also need the USB cable for your Kindle if you are downloading books from particular publishers. First you will need an Amazon.com account. This should have been created as part of the original setup of your Kindle. This can also be done @ Amazon.com (You do not need to create an account as part of this workshop. We have done that for you already.) Section II: Getting to Know Your Kindle 3 1. On your assigned computer, go to http://nebraska.lib.overdrive.com. 2. Sign in using your temporary patron information (Chadron Public Library and library card number provided at your station). 3. Browse the collection for a Kindle eBook (not audiobook) to check out. (Be sure to use the option for showing only available titles and don’t worry about finding a title you actually want to read.) 4. Check out the book. 5. Click the “Download (Select one format)” button, select “Kindle Book”, then click “Confirm & Download”. This will send you over to Amazon.com. 6. Sign into your account if needed. (Check with the instructors if you are asked to log in to Amazon.com.) See the first screenshot on next page for help in determining the next step. If the book can be delivered wirelessly: Select your device and click Get Library Book. Switch over to the Kindle and make sure you have an active WiFi connection. Book should start downloading to the Kindle. There is no need to click the Download now button. If the book cannot be delivered wirelessly: Click “Get Library Book”, choose your device, then click Continue to save the file to your computer. Connect your Kindle to your computer via USB cable and transfer the file to your device’s Documents folder just as you would move a file to a flash drive. Created by Michael P. Sauers Last Updated: 11/24/2014 CC BY-NC 3.0 Nebraska Library Commission
- 5. Created by Michael P. Sauers Last Updated: 11/24/2014 CC BY-NC 3.0 Nebraska Library Commission
- 6. To Return a book: 1. If you’re already in the Amazon.com site in your computer’s browser look for a “Manage your Kindle” link. Otherwise you can go directly to kindle.amazon.com, and find it there under “Hello username” in the upper-right corner. (You may be asked to log into your Amazon.com account.) 2. Find your library book in the list (it’s probably at or near the top) and click the Actions… button and select “Return this book”. 3. 4. Once the book has been returned you can click the Actions… button again to delete it from your reading history if you wish. Created by Michael P. Sauers Last Updated: 11/24/2014 CC BY-NC 3.0 Nebraska Library Commission
- 7. 5. The Kindle should automatically update itself and make the book unreadable. To delete the book off the Kindle, select the book in the library, navigate left, and press enter. Example e-mail from Amazon.com sent three days prior to your book being due: Example e-mail from Amazon.com sent when the book has been returned: Created by Michael P. Sauers Last Updated: 11/24/2014 CC BY-NC 3.0 Nebraska Library Commission
- 8. Section III: Reading eBooks on Your Kindle 3 Text Tools Once you’ve opened a book the Text key (the one to the right of the space bar labeled AA) will give you controls for adjusting the text size, typeface, line spacing, words per line, text-to-speech (if available for the title), and screen rotation. Use the directional controller to navigate and change these options. Navigating within a book One of the menu items in a book is “Go to…” Selecting this option will give you the ability to navigate within the open title. Here you can choose default options such as the table of contents, beginning and end among others. You can also enter a page number to go directly to that page. Created by Michael P. Sauers Last Updated: 11/24/2014 CC BY-NC 3.0 Nebraska Library Commission
- 9. Search This Book While in a book, press the Menu button and navigate to “Search This Book”. You are now given a search box at the bottom of the screen. Here you can type in the keyword(s) you are looking for. Once you have entered your search you can either navigate right to “find” and press the select button, or more easily, press the enter key on the keyboard. (Shown right.) Bookmarks By default, the Kindle remembers where you last left off in a book. However, you may want to bookmark a spot in the book for an easy return later. Bookmarks can be found under the Menu button. Selecting “Add a bookmark” will automatically do just that for the page you’re currently on. Once you have added a bookmark for a particular page, that menu item will change to “Delete bookmark” while you’re on that page. To find your bookmarks open the Menu and select My Notes & Marks. Notes & Highlights Press the Menu button again and select Add a Note or Highlight. Once you do that a cursor will appear on the screen at the bottom-left. Using the directional controller move your cursor to the place where you would like the highlighting to start or your note to appear. To highlight (underline) a passage, press the select button. Then move the cursor to the end of the passage and press the select button again. The passage should now be underlined. To add a note, once your cursor is in position, start typing your note using the keyboard. When done select the “save note” option. (Save & Share saves your note but also shares it out to social networks you’ve connected your device to. We have not enabled this option on the Commissions’ Kindle.) As with bookmarks, you can find your notes and highlights under the View notes & highlights menu option. View Popular Highlights One of the things that Amazon does with highlighted content is sync it to your account in Amazon.com and share that information with others. It doesn’t say who highlighted what but selecting View Popular Highlights from the Menu will show you commonly highlighted passages from the current title. Created by Michael P. Sauers Last Updated: 11/24/2014 CC BY-NC 3.0 Nebraska Library Commission
- 10. Settings Let’s head back home and see what other things we can change about our Kindle experience as a whole. At home, press Menu, and then select Settings. Here there are three pages of settings. (Please do not actually change any of them.) Registration — this is the Amazon account name to which your Kindle is registered. All Kindle Store and other charges will be applied to the credit card associated with your 1-Click account. Device Name — lets you personalize your Kindle by giving it a name. This name shows at the top of the Home screen. Wi-Fi Settings — displays the number of available (detected) Wi-Fi networks, and shows the name of the Wi-Fi network you are currently connected to. If you are not connected to a Wi-Fi network, the “Network” field displays “not connected.” Select “view” to view detected Wi-Fi networks or set up a new Wi-Fi network. Device Info — displays the Wi-Fi MAC Address, serial number, and network capability (Wi-Fi or Wi-Fi and 3G) of your device. Voice Guide — lets you navigate your Kindle with spoken menus, selectable items, and descriptions. Device E-mail — this is the e-mail address of your Kindle. You and your friends can send documents to this address and they will be converted by Amazon and sent to your Kindle. To edit this e-mail address, go to: http://www.amazon.com/manageyourkindle (U.S. and other countries) http://www.amazon.co.uk/manageyourkindle (UK customers) Device Password — secure your Kindle and restrict access to your content by setting a password. If you set a password, you will be prompted to enter it when you turn your Kindle on or wake it from sleep. If your Kindle is sleeping when you attach it to a computer using the USB cable, you will also be prompted to enter your password in order to attach your Kindle to your computer. Device Time — lets you set the current local time on your Kindle. On Kindle models that include 3G, you can have Kindle automatically set the device time. Social Networks — allows you to link your Kindle to your social network accounts so that you can share your notes and highlights with others in your social network. Popular Highlights — allows you to turn on or off the display of popular passages highlighted by others in the books you are reading. Public Notes — allows you to turn on or off the display of the notes and highlights of people you follow in the books you are reading. Created by Michael P. Sauers Last Updated: 11/24/2014 CC BY-NC 3.0 Nebraska Library Commission
- 11. Annotations Backup — allows you to turn on or off the automatic backup of your annotations, last page read, and collections at Amazon. Disable this feature if you do not want your annotations backed up or shared in Popular Highlights. Personal Info — enter your contact information here such as an address or phone number, in case you lose your Kindle. Press the Symbol key to enter numbers or symbols not present on the Kindle keyboard. Experimental The last item under the home Menu is Experimental. Selecting that will give you three options: Web Browser, Play MP3, and Text-to-Speech The Web browser is functional but since the Kindle is an eInk device it’s not the most user friendly browser you’ve ever used. The other issue is that since there is no mouse, you need to rely on the directional controller to move around on the screen. The Play MP3 option takes you to the directory on your Kindle that contains any uploaded MP3 files. Unfortunately, there is no music installed on our Kindle. The Text-to-Speech section here is purely a description. Depending on the titles installed this feature may or may not work. Section III: Reading eBooks on the Kindle 3 - Review For this hands-on exercise you will need to experiment with the functionality of the reading tools built in to the NOOK Color and the reading tools available through the OverDrive Media Console app. Here are some ideas about what to try in each reading environment: Turn pages Jump to a particular page/location Search for text Experiment with text display options Investigate added features, like highlighting, bookmarks, text-to-speech, and popular highlights etc. This material was created as part of the 2010 Institute of Museum and Library Services 21st Century Librarian program grant to the Nebraska Library Commission Created by Michael P. Sauers Last Updated: 11/24/2014 CC BY-NC 3.0 Nebraska Library Commission