ODROID Magazine August 2014
•
1 gostou•6,418 visualizações

ODROID August 2014 magazine is out and this time I contributed Android article titled: "Using the Linux Kernel : A Guide to the Android specific drivers"

Recomendados
Recomendados
Mais conteúdo relacionado
Semelhante a ODROID Magazine August 2014
Semelhante a ODROID Magazine August 2014 (20)
Mais de Nanik Tolaram
Mais de Nanik Tolaram (14)
Último
Último (20)
ODROID Magazine August 2014
- 1. ODROIDODROID
- 2. What we stand for. We strive to symbolize the edge technology, future, youth, humanity, and engineering. Our philosophy is based on Developers. And our efforts to keep close relationships with developers around the world. For that, you can always count on having the quality and sophistication that is the hallmark of our products. Simple, modern and distinctive. So you can have the best to accomplish everything you can dream of. We are now shipping the ODROID U3 devices to EU countries! Come and visit our online store to shop! Address: Max-Pollin-Straße 1 85104 Pförring Germany Telephone Fax phone : +49 (0) 8403 / 920-920 email : service@pollin.de Our ODROID products can be found at: http://www.pollin.de/shop/suchergebnis.html?S_ TEXT=odroidlog=internal
- 3. Samsung Exynos5422 Cortex™-A15 2.0Ghz quad core and Cortex™-•
- 4. A7 quad core CPUs Mali-T628 MP6 GPU supporting OpenGL ES 3.0/2.0/1.1 and OpenCL•
- 5. 1.1
- 6. Full
- 7. profile Built-in energy sensors like the XU-E•
- 9. ODROID I’m a computer programmer liv- ing and working in San Francisco, CA, de- signing and building web applica- tions for local clients on my network cluster of ODROIDs. My primary languages are jQuery, Angular JS and HTML5/CSS3. I also develop pre-built operating systems, custom kernels and optimized applications for the ODROID platform based on
- 10. Hardkernel’s
- 11. official
- 12. releases,
- 13. for
- 14. which I have won several Monthly Forum Awards. I use my ODROIDs for a variety of purposes, including media center, web server, applica- tion development, workstation, and gaming console. You can check out my 100GB collection of ODROID software, prebuilt kernels and OS images at http://bit.ly/1fsaXQs. I am President of Respectech, Inc., a technology consultancy in Ukiah, CA, USA that I founded in 2001. From my background in electronics and computerprogramming,Imanageateam of technologists, plus develop custom solutions for companies ranging from small businesses to worldwide corpora- tions. ODROIDs are one of the weap- ons in my arsenal for tackling these proj- ects. My favorite development languages are Rebol and Red, both of which run fabulously on ARM-based systems like the ODROID-U3. Regarding hobbies, if you need some, I’d be happy to give you some of mine as I have too many. That would help me to have more time to spend with my wonderful wife of 23 years and my four beautiful children. I am 31 years old and live in Seville, Spain, and was born in Granada. I have recently become a father, and my son is now 5 months old. It is an incredible experi- ence! A few years ago I worked as a computer technician and programmer, but my current job is related to quality management and information technol- ogy: ISO 9001, ISO 27001, and ISO 20000. I am passionate about comput- er science, especially micro computers such as the ODROID, Raspberry Pi, etc. My other great hobby is mountain biking, and I occasionally participate in semi-professional competitions. Is enjoying his time off on vacation for the month of August. I am currently a Digital Strategist and Transmedia Producer who specializ- es in online optimization and inbound marketing strategies, social media di- recting and team coordination, as well as media production for print, TV, film,
- 15. and
- 16. web.
- 18. I
- 19. also
- 20. have
- 21. experience
- 22. in graphic and website design, social networking management and advertis- ing, video editing and DVD authoring. I own an ODROID-U3 which I use to run a sandbox web server, live in the California Bay Area, and enjoy hiking, camping and playing music. Check out my web page at http://www.ni- colecscott.com.
- 24. CONFIG_ANDROID=y CONFIG_ANDROID_BINDER_IPC=y CONFIG_ANDROID_LOGGER=y CONFIG_ANDROID_RAM_CONSOLE=y CONFIG_ANDROID_RAM_CONSOLE_EN- ABLE_VERBOSE=y CONFIG_ANDROID_RAM_CONSOLE_ER- ROR_CORRECTION=y CONFIG_ANDROID_RAM_CONSOLE_ER- ROR_CORRECTION_DATA_SIZE=128 CONFIG_ANDROID_RAM_CONSOLE_ER- ROR_CORRECTION_ECC_SIZE=16 CONFIG_ANDROID_RAM_CONSOLE_ER- ROR_CORRECTION_SYMBOL_SIZE=8 CONFIG_ANDROID_RAM_CONSOLE_ERROR_ CORRECTION_POLYNOMIAL=0x11d CONFIG_ANDROID_TIMED_OUTPUT=y CONFIG_ANDROID_TIMED_GPIO=y CONFIG_ANDROID_LOW_MEMORY_ KILLER=y CONFIG_ASHMEM=y If you look inside the Makefile, which is located inside the drivers/staging/ android directory, you will see the ker- nel drivers that are specific to Android. In the following sections we are going to take a closer look at the different driv- ers inside this directory, starting with the binder driver. inux is the heart of Android, and it depends heavily on it for its op- eration, and without it Android would not be able to run. However, Android does not use a “plain vanilla” Linux kernel, which means you cannot download a kernel from www.kernel.org and immediately use it to run Android. There are a number of drivers, code and configuration options to be added in or- der for Android to work properly, and this article will walk through those spe- cific drivers and configuration, as well as discuss the drivers that are needed to ‘Android’-ify the Linux kernel upon which the Android framework depends. Most of the driver code that needs to be added is located inside the kernel/driv- ers/staging/android folder as can be seen in Figure 1. There are also a number of drivers that are located outside the base direc- tory /staging/android that are already in the Linux Kernel mainline. This ar- ticle is by no means an exhaustive list for all of the drivers needed, but is a good starting point to get a better understand- ing of the different drivers needed for Android. Below are the configuration options that need to be included as part of the kernel zImage. The following configura- tion is taken from the file odroidu_an- droid_defconfig inside the kernel/ arch/arm/configs folder, as shown in the following table. The binder driver is the main back- bone driver for applications in Android, and is the gatekeeper of communication between different processes that are run- ning, written in native (C/C++) or Java. Without this driver, Android applica- tions will not work at all, since it mounts the essential /dev/binder virtual filesys- tem. Android uses the binder driver extensively, and because applications utilize this framework, any application is indirectly reliant on the binder driver.
- 25. Location: /kernel/mm/ The name ashmem stands for An- droid Shared Memory, and as the name implies, is a driver that facilitates mem- ory sharing between processes , nd pro- vides a mechanism for Linux to reclaim memory if it finds itself under memory pressure. Ashmem makes the /dev/ash- mem directory available for applications to access its functionality. The driver works using a file descrip- tor which can be shared by processes by utilizing the binder driver that was dis- cussed previously. The unique character- istic of ashmem is that when the process dies, the memory goes with it, so there will not be any orphaned memory. It is also smart enough to allow applications to specify which memory area can be re- claimed or not, which is known as un- pinning and pinning. In order to save memory space, the unpinned pages are periodically re- claimed by using the LRU algorithm. Ashmem has its own shrinker that is called when available memory gets low. The normal use case on using ashmem is shown in the float chart in Figure 3, to the bottom-right. Location: /kernel/power This is the a controversial driver that started the heated discussion between the Android kernel team and Linux kernel developers back in the days when Google had just starting committing its code for the mainline kernel, and was considered by purists to be a hack. This driver gives userspace applications the ability to re- quest certain services that use always-on hardware so that they still operate when the device goes to sleep in order to con- serve battery power. The wakelock driver is built on top of Linux power management driver. Linux provides power management functions such as suspend and resume, where it al- lows the device to be ‘suspended’ by run- ning on a low power mode, or ‘resumed’ by coming back from sleep. The wake- lock driver is a communication mecha- nism allowing user space applications and system tasks to determine whether the device is allowed to go to suspend mode. The driver will not suspend the device if there are active wakelocks in the system. Imagine if you are running a music player on your mobile phone and the system decided that it’s time to suspend, your music player stopped playing. Or, imagine if the system is about to suspend and there is an incoming phone call, but you can’t receive it since the system is in the process of suspending. Wakel- ock makes it possible to avoid the above described scenarios, allowing you to use your device without having to worry when it will go to suspend mode. The wakelock driver introduced a new virtual filesystem called /proc/wakelocks. Power management, wakelock and early suspend drivers work together as one unit to manage power resources in an Android device. The sample screenshot shows the content of the wakelock virtual filesystem inside the Nexus 7. The RAM console drive can be la- belled as a Linux log helper driver. Its function is to save the content of the Linux log to a different memory loca- tion before the device reboots. The content of the Linux log (which nor- mally is accessed using dmesg) can be viewed after reboot in the /proc/last_ kmsg virtual file system. If the device shuts down completely with no power supplied to it, the last Linux log will not be stored the next time you startup the device. This is because the device is completely shut down and there is no power to retain the content of the memory. As long as there is power sup- plied to the device, the next time you restart, you will be able to extract the last Linux log through the last_kmsg virtual filesystem. This driver is very
- 26. adj minfree 0 8192 1 10240 2 12288 4 14336 9 16384 15 20480 into different categories: main, events, radio and system. The following vir- tual filesystem are made available from the driver: /dev/log/system /dev/log/radio /dev/log/events /dev/log/main Android provides a log viewer ap- plication called logcat that allows us to view the log in a more hu- man readable format. The screen- shot shows a sample of the content of the /dev/log/radio in its raw form, which is not very easy to read This driver takes care of killing pro- cesses from memory when the amount of free memory hits a certain threshold. Every time an application is launched, it is assigned a value to indicate what kind of application it is. This ‘marker’ will indicate to the driver whether this process can be killed. As an example, looks at the phone application that you use to receive and make calls. The application will be ‘marked’ to a value that indicates to the driver to kill the application only when the last low memory threshold is hit, which means that only when the memory falls to the lowest free mem- ory available than the application will be killed. The following table lists the different value that the framework will use to assign to launched process: HIDDEN_APP_MAX_ADJ HIDDEN_APP_MIN_ADJ SERVICE_B_ADJ PREVIOUS_APP_ADJ HOME_APP_ADJ SERVICE_ADJ BACKUP_APP_ADJ HEAVY_WEIGHT_APP_ADJ PERCEPTIBLE_APP_ADJ VISIBLE_APP_ADJ FOREGROUND_APP_ADJ PERSISTENT_PROC_ADJ SYSTEM_ADJ MIN_HIDDEN_APPS Internally, the driver only accomo- dates a maximum of 6 different values, so the framework does an internal con- version to fit it to the available slots. The different values can be found in the /sys/module/lowmemorykiller/pa- rameters/adj virtual filesystem. The settings of free available mem- ory threshold are linked in a 1:1 ratio with the adj value, and it is stored in the /sys/module/lowmemorykiller/pa- rameters/minfree virtual filesystem. The minfree value is in pages of 4k. For example, if it says the free memory is 8192, it means (8192 * 4k) = 32768 which converts to 32KB (32768 / 1024). The way in which the minfree threshold is mapped with the value from adj is explained in this chart: useful for troubleshooting issues such as kernel panic, out of memory or any other kind of problem that causes a kernel panic. Location: /kernel/power You can see this driver in action when you leave your device inactive for few minutes and the screen turns off by itself. It’s responsible for mak- ing sure all the necessary components inside your device are ‘suspended’ to conserve energy. This driver and wakelock go hand-in-hand. It relies on Linux’s power management driver, and can be triggered by sending state information to the following /sys/ power/state filesystem. If you have root access to your de- vice, you can trigger the early suspend by executing the following command: echo mem /sys/power/state The logger driver is the central log- ging driver used by Android system, which is also made available to user ap- plications via the built-in logger API. Internally, the driver splits the logging
- 27. henbootingfromaneMMC module, the SD card slot can be used for extra storage instead of a USB drive. To begin, insert a EXT4-formatted SD card, then turn on the ODROID and boot up your fa- vorite Linux distro. Note that since the SD slot is not hot-pluggable, the card needs to be inserted before the system is booted. Type the following into the Terminal window in order to determine the device name for the SD card: $ sudo fdisk -l Device Boot Start ... /dev/mmcblk0p1 8192 ... /dev/mmcblk1p1 8192 ... On an X2 or U3, the /dev/ mmcblk0 device is the SD card, and /dev/mmcblk1 is the eMMC module, but on an XU they are reversed. To mount the SD card, substitute your username and device name in the fol- lowing sample script: $ cd ~ $ mkdir sdcard $ sudo mount /dev/mmcblk0p1 /home/USERNAME/sdcard $ sudo chown USERNAME:USERNAME Now you can store your data in /home/USERNAME/sdcard and it will reside on the SD card instead. This technique can be used to mount the SD card at any location, including /var/www for a web server. To automatically mount the SD card at boot, add a line to /etc/fstab by substituting the device and username: # should be on a single line /dev/mmcblk0p1 /home/USERNAME/sdcard ext4 defaults,noatime,nobootwait 0 2 What the mapping means is that if the free memory threshold is less than 20480 (20480 x 4k = 80k), the driver will start killing processes which have value of 15 and above. The same thing happens when the free memory avail- able is less than 8192 (8192 x 4k = 32k). In that case, any process that has value larger than 0 will be killed. These combo drivers are use for driving a particular GPIO hardware pins for a certain period of time, and is made available to give code running in userspace access to the GPIO pins. In order to use this driver, you must know which pin you want to drive, high or low signal, and for how long. In de- vices that have this driver enabled, it exposes the /sys/bus/platform/driv- ers/timed-gpio virtual filesystem. The timed_gpio depends on anoth- er driver called timed_output, where its main function is to keep track of timed GPIO drivers registration as they happen. The timed_gpio is one of the drivers that register itself to timed_ output, and the other is the vibration driver. As you may have guessed, the vibration component is responsible for making your phone vibrate. Location: /kernel/drivers/rtc The alarm driver relies on high res- olution timer infrastructure provided in Linux. The driver has got its own virtual filesystem, /dev/alarm, that is used by the user application to com- municate with the driver. This driver is tied to the wakelock functionality, allowing the alarm to continue working even when the de- vice is in sleep mode, which is the sole reason why the alarm driver exists. It provides the alarm management that is used in our user applications or frame- work, in order to support key services. Next month, we’ll take a look in- side the Android APK file.
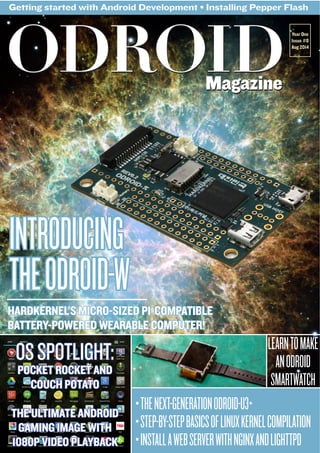
- 28. DC/DC step-up converter for 5Volt rails (USB host and HDMI) from a Li-Polymer bat- tery USB Host port can be placed on top or bottom as preferred DIY friendly 100mil/2.54mm pitch GPIO ports (up to 32 ports) for handy prototyping The ODROID-W = RPI + RTC + ADC + UPS + Battery Gauge with significant minimalism. In early 2014, we had an important project with our partner companies to help them with prototyping a few wear- able Internet of Things (IoT) devices. We first considered using the ODROID-U3 as a base platform. Al- though the ODROID-U3 is 8~12 times faster than the Raspberry Pi, the power consumption of the U3 isn’t suitable for wearable devices like watches or necklac- es. We even considered using the Rasp- berry Pi itself due to the lower power re- quirements and nice Linux BSP support, but the PCB of the RPi was huge (much bigger than the ODROID-U3). To create the smallest wearable ac- he ODROID-W is a min- iature wearable comput- ing module which is ful- ly compatible with all software available for the Raspberry Pi (RPi). The W stands for: Wearable device development Widely applicable Internet of Things (IoT) development Workable DIY electronics prototyp- ing The ODROID-W measures a very small 60 x 36 x 7mm (2.4 x 1.4 x 0.3”). It also includes many new features and improvements over the original Pi: Li-polymer rechargeable battery charger and fuel gauge circuit for wearable and robotics ap- plications Real Time Clock (RTC) to keep accurate time without an Internet connection by adding a coin battery 12-bit precision ADC to mea- sure the dynamic voltage signals via two single-ended inputs DC/DC step-down converters for higher power efficiency cessory possible, we decided to make our own (tiny) version of a Raspberry Pi, which allows full use of many widely available Pi peripherals such the Pi Cam- era module connector and 26-pin GPIO port. The HDMI port and SD slot were changed to micro-sized connectors, and the MIPI DSI port was removed due to limited PCB space. In addition to its smaller size, the ODROID-W maintains
- 29. Processor: Broadcom BCM2835 ARM11 700Mhz Memory: Samsung 4Gbit (512MB) LPDDR2 SDRAM PMIC: Ricoh RC5T619 includes DCDCs, LDOs, ADCs, RTC, Battery charger and Fuel gauge DCDC: TI TPS61259 is 5V step-up DCDC for USB host and HDMI block Video output: HDMI type-D (Micro-HDMI) USB: High-speed USB 2.0 host GPIO connectors: Rasperry Pi-com- patible 13x2-pin header on the top side as well as bottom side for 2-way stacking 20+6 pin header for addition- al GPIO/RTC/USB connection. GPIOs: A total of 32 GPIOs and 2 ADCs are available. Camera connector: 15pin MIPI-CSI2 Memory card slot: Micro-SD (T- Flash) Power: Micro-USB socket for 5V input. Li-Polymer battery connector (Molex 53398-0271) RTC Power: Backup battery connec- tor (Molex 53398-0271) Overall PCB Dimensions: 60 x 36 mm full compatibility with all existing Rasp- berry Pi software and peripherals. The first sample ODROID-W PCB was designed on April 14, 2014, and had a few jumper wires. The second run was designed on May 19, 2014, which cor- rected some of the electronics designs and added an eMMC module socket for test purposes, even though the eMMC is not much faster than SD card due to the slow eMMC host speed in the SoC. In testing the eMMC speeds, we discovered only ~10% improvement. The third sample (rev 0.3) was thoroughly tested, and is ready for mass production. The unit price for the ODROID-W is US $30 and it will be available for purchase from the Hardkernel Store at http://www.hardkernel.com.
- 30. The Docking Board accessory, which attaches to the ODROID-W on either the top or bottom, offers 4 USB host ports and an Ethernet port. You can also choose a 320x240 QVGA TFT LCD-included ver- sion. Please watch our Youtube video of the ODROID-W Docking Board (http://bit.ly/1rII5Li) for a live dem- onstration of the board’s capabilities. The base price for the Docking Board is $20, and the TFT LCD-included version is $30. The PCB schematic for the ODROID-W is shown to the right for reference. This DIY smartwatch has some limited but very cool features, and is intended to be tightly coupled with your Android smartphone via Blu- etooth. Whenever a message arrives on your phone, a notification is sent to the watch, as seen in our video at http://bit.ly/1sOkTOC.
- 32. ugalabs offers an Android app from the Google Play store that can change the resolution of the desktop in order to fix HDMI monitor overscan issues. For more details, please visit its Google Play Store page at http://bit.ly/XYfZ51. or a retro-style Google experi- ence, visit the Google BBS at http://bit.ly/1iXk8yF. Don’t forget to bring your moon boots and walkman! Micro-HDMI cable Micro-USB cable 5V/2A Power supply for the Docking board, which is required only when the USB devices need 600mA or higher. ODROID-VU (9-inch 1280x800 TFT HDMI monitor with touch screen) This tiny version of the Raspberry Pi can run a full Raspbian desktop environ- ment on its own, or be used in conjunc- tion with pre-existing and widely avail- able Pi hardware to create an extremely portable yet powerful computing solu- tion, perfect for wearable applications. Please post any questions that you may have to the ODROID forums at http:// forum.odroid.com. Debian (Raspbian) OS is run-• ning on the Linux Kernel 3.10. LXDE x11 window manager• (This can be removed if you want) Qt 4.8.4 framework library• Qt application to display the• clock and SMS / Mail / Call notification Android application software• (written in Java) to push the notification to the smartwatch from a smartphone The full source code will be released via Github at http://www.github.com/ hardkernel. Docking board with TFT LCD Docking board without TFT LCD Connector package (26-Pin header, 26-Pin header socket, 20-Pin header socket, 7-Pin header socket and USB host right-angle type) RTC Backup battery (CR2032 with Molex 51021-0200 wired connector) Lithium Polymer battery (3.7V/720mAh with Molex 51021-0200 wired connector) Micro-SD 8GB(UHS-1 class) card of Raspbian with RTC/ PMIC device driver patch RTL8188CUS based USB WiFi module 720p USB Webcam
- 33. he Exynos-4412 CPU includes an eMMC 4.41 compatible host controller, with a maximum bus speed limited to 100MB/sec, an actual clock speed of 48Mhz with DDR. The ODROID-X, X2, U2, U3, Q and Q2 are all based on the Exynos-4412 CPU. The Exynos-5410 CPU, which is used by the the ODROID-XU, XU+E and XU-Lite, includes an eMMC 5.0 compatible host controller. However, the hardware design was unable to sup- port the eMMC 5.0 HS400 mode, be- cause there was no public specification of eMMC 5.0 when we designed the ODROID-XU. As a result, all the XU series have the eMMC 4.5 (HS200) specification which reaches a maximum speed of 160MB/sec since the actual clock speed is 160Mhz with SDR. The Exynos-5422 CPU also has an eMMC 5.0 compatible host controller. The ODROID-XU3 is based on Exynos- 5422 and supports the eMMC HS400 mode. The actual clock is 166Mhz and 330MB/sec of host bus bandwidth by DDR. We’ve been selling 2 different eMMC modules: The Green or Blue PCB has the eMMC 4.5 chips. The Red PCB has the eMMC 5.0 chips. The eMMC 5.0 chip is slightly smaller but it has the same BGA array size, so that we can keep using the same PCB. Most eMMC manufactures are mov- ing to eMMC 5.0. So it is hard to pur- chase the eMMC 4.5 chips anymore ex- cept for the lower capacity like 4GB and 8GB. Recently, we started using 16GB and 32GB eMMC chips from Sandisk while we keep buying 8GB and 64GB eMMC from Toshiba. When you install a new OS image onto the eMMC module, you need a USB memory card reader and an eM- MC-to-MicroSD converter board (read- er board). Please refer to the images be- low to understand how to use it. The reader board can’t be detected by a few USB memory card readers. So it is worthwhile to check the compatibility list at http://bit.ly/1nPBE4i. The chart on the following page is the full list of eMMC modules we are selling now. The round label indicates the OS and capacity. The eMMC 4.5 Blue(or Green) PCBs will be obsolete soon except for 8GB models. Even you have a different or wrong eMMC, you can use it for your ODROID if you install a proper boot loader and OS image. The eMMC board schematics http://bit.ly/1p4TX6N The reader board schematics http://bit.ly/1p9j0Z3
- 35. $ uname -a Linux u3-2 3.8.13.26 #1 SMP PRE- EMPT Wed Jul 9 22:14:37 UTC 2014 armv7l armv7l armv7l GNU/Linux This output indicates the image used is based on the 3.8.y.z kernel, built on Wed Jul 9 22:14:37 UTC 2014. You can get additional image infor- mation using the following commands and observing the output: $ cat /proc/version Linux version 3.8.13.26 (root@ THEserver) (gcc version 4.7.2 (crosstool-NG 1.17.0) ) #1 SMP PREEMPT Wed Jul 9 22:14:37 UTC 2014 $ cat /etc/lsb-release DISTRIB_ID=Ubuntu DISTRIB_RELEASE=14.04 DISTRIB_CODENAME=trusty DISTRIB_DESCRIPTION=”Ubuntu 14.04 LTS” $ lsb_release -a No LSB modules are available. Distributor ID: Ubuntu Description: Ubuntu 14.04 LTS Release: 14.04 Codename: trusty s you make progress in using Linux, it is inevitable that you would want to tweak your setup in order to accommodate changes in your hardware setup, such as integrating an external device. Such tasks usually re- quire modifications to the Linux kernel or linking to a new driver. This article provides details on starting with natively building a pristine kernel using only the ODROID itself. This article does not address cross-compiling, which relates to building an ODROID kernel using a secondary host machine such as an x86. 1. Any ODROID board, with an ap- propriate power adapter. 2. A bootable 8+ GB MicroSD card or eMMC module containing the lat- est Lubuntu image available from the Hardkernel website. 3. A network where the device has ac- cess to the Internet and the ODROID forums. 4. Optional SSH access to the U3 via utilities like PuTTY (MS Windows 7+) or Terminal (Mac, linux to perform the steps from a remote host computer. Initially, for reference, it is a good idea to note the version of the initial ker- nel version included with the installed image with the following command: $ cat /etc/os-release NAME=”Ubuntu” VERSION=”14.04, Trusty Tahr” ID=ubuntu ID_LIKE=debian PRETTY_NAME=”Ubuntu 14.04 LTS” VERSION_ID=”14.04” HOME_URL=”http://www.ubuntu.com/” SUPPORT_URL=”http://help.ubuntu. com/” BUG_REPORT_URL=”http://bugs. launchpad.net/ubuntu/” After installing a newly built kernel, the above information is useful for com- parison when verifying that the kernel has actually been updated. Prior to building a kernel, you would need to setup the appropriate software environment. First, launch a terminal session and switch to the root user, using the command: $ sudo -s All build related activities need to be performed by the root user, which can be enabled with the su command after typing the root password. Install the initial set of needed com- ponents, using the following installation command:
- 36. # apt-get install build-essential libqt4-dev perl python git Enter Y to accept proposed option, and allow for the command to com- plete. This is a comprehensive version of the command, highlighting all components required for building a kernel. Some of the required components may already be installed in your present image, which will not be affected by the above com- mand since only missing components will be installed. The installation output may suggest additional optional components. Al- though not mandatory, you may install those using the component list, like this: # apt-get install nas libqt4- declarative-folderlistmodel libqt4-declarative-gestures libqt4-declarative-particles libqt4-declarative-shaders For desktop images, presuming the default window-system backend is based on X11/Xorg, you should install libxcb and its accompanying packages. This is also used for building QT4. It is in- stalled using the command: # sudo apt-get install “^libx- cb.*” libx11-xcb-dev libglu1-me- sa-dev libxrender-dev Enter Y to accept proposed option. QT4 support may not exist on Hardker- nel images by default. It is essential to make sure the system is ready for compilation. In this example case, the following commands/outputs are useful to verify that all of the tools are available and up to date: # gcc --version gcc-4.8.real (Ubuntu/Linaro 4.8.2-19ubuntu1) 4.8.2 Copyright (C) 2013 Free Software Foundation, Inc. This is free software; see the source for copying conditions. There is NO warranty; not even for MERCHANT- ABILITY or FITNESS FOR A PARTICU- LAR PURPOSE. #
- 37. pkg-config
- 38. --modversion
- 39. QtCore 4.8.6 # perl --version This is perl 5, version 18, sub- version 2 (v5.18.2) built for arm-linux-gnueabihf-thread-multi- 64int (with 41 registered patches, see perl -V for more detail) Copyright 1987-2013, Larry Wall ... # python --version Python 2.7.6 # git --version git version 1.9.1 Create a temporary directory in your home directory and navigate to it using the commands: # mkdir hk-src # cd hk-src Your copy of the downloaded source code will reside here. Hardkernel uses GitHub for the source-control of its open-source software for U3. Use the following command to check out the 3.8 repository, which is recom- mended for the X2 and U3: # git clone --depth 1 https:// github.com/hardkernel/linux.git -b odroid-3.8.y odroid-3.8.y Cloning into ‘odroid-3.8.y’... remote: Counting objects: 44530, done.
- 40. remote: Compressing objects: 100% (42780/42780), done. remote: Total 44530 (delta 3428), reused 16016 (delta 1191) Receiving objects: 100% (44530/44530), 122.03 MiB | 161.00 KiB/s, done. Resolving deltas: 100% (3428/3428), done. Checking connectivity... done. Checking
- 41. out
- 42. files:
- 43. 100%
- 44. (42143/42143), done. In this case, we will fetch a cloned copy of only the latest commit to the 3.8.y kernel, instead the entire reposi- tory. Please note that if you are using an ODROID-XU, clone the 3.4.y branch instead: # git clone --depth 1 https:// github.com/hardkernel/linux.git -b odroid-3.4.y odroid-3.4.y Change to the source root directory using the command: # cd odroid-3.8.y/ This is where all build related activi- ties are launched from. Check the list of supported defconfig files using the com- mand: #
- 45. ls
- 46. -lsa
- 47. arch/arm/configs/ odroid*defconfig 100 -rw-r--r-- 1 root root 101207 Jul
- 48. 14
- 49. 13:11
- 50. odroidu_defconfig 96 -rw-r--r-- 1 root root 96792 Jul
- 51. 14
- 52. 13:11
- 53. odroidx2_defconfig 96 -rw-r--r-- 1 root root 96797 Jul
- 54. 14
- 55. 13:11
- 56. odroidx_defconfig In our case, we will select the odroidu_defconfig version, which con- tains hardware configuration options specific to the U3. Now, perform the first build step by executing the follow- ing command, ignoring any warnings: root@u3-2:~/odroid-3.8.y# make odroidu_defconfig
- 58. HOSTCC
- 61. configuration
- 62. written
- 63. to
- 64. .config # In this example case, since QT4 sup- port was added (xconfig is a QT4 UI), the xconfig module needs to be built us- ing the following command to launch an editor for the selection of options: #
- 65. make
- 66. xconfig CHECK qt
- 68. MOC
- 71. HOSTCXX
- 74. HOSTLD
- 75. scripts/kconfig/qconf Novice users should review and go through the options list but not alter any selections. Experienced users may want to adjust the selections in the kernel con- figuration menu based on their in-depth knowledge of the kernel. To understand the implications of the build process on resource usage, it is useful to get a picture of the resource usage, before and during, the build pro- cess, as shown in the screenshot of the command top. To compile the kernel as fast as pos- sible, using all 4 processors available in the U3, type the following command in the Terminal window:
- 76. # make -j5 zImage modules It is recommended to perform the build process on an ODROID that uses active fan cooling. You can experiment with higher -j values only if you are able to keep the temperature of the ODROID below the thermal limits. For the above command, the build process may take 15 ~ 30 mins, depending on pre-existing system activity. Pay attention to build- time warnings, especially related to your changes, if any. It is interesting the note the very high cpu-core usage (~90%) during the build process, as seen in the above figure. As expected, the fan was spinning non- stop! The freshly built kernel and mod- ules can be installed using the following commands: # cp arch/arm/boot/zImage /media/ boot/zImage # make modules_install Prior to boot-up using the new ker- nel, the following steps need to be per- formed to create the initial RAM filesys- tem (initramfs). First, copy the current config to /boot so update-initramfs can run properly, using the command: #
- 77. cp
- 78. .config
- 80. in- clude/config/kernel.release` # ls -lsa /boot/conf* 100 -rwxrwxrwx 1 root root 101420
- 81. Jun
- 82. 13
- 83. 01:02
- 84. /boot/config- 3.8.13.23 100 -rwxrwxrwx 1 root root 101207
- 85. Jul
- 86. 14
- 87. 14:15
- 88. /boot/config- 3.8.13.26 Recreate the initramfs using the com- mand: #
- 90. -c
- 91. -k
- 92. `cat
- 93. include/config/kernel.release` update-initramfs: Generating / boot/initrd.img-3.8.13.26 Convert the current initrd into a u- boot compatible version, which adds a 64byte u-boot header: # mkimage -A arm -O linux -T ram- disk -C none -a 0 -e 0 -n uInitrd -d
- 97. include/config/kernel. release` Image Name: uInitrd Created: Mon Jul 14 14:17:02 2014 Image Type: ARM Linux RAMDisk Image (uncompressed) Data Size: 2196336 Bytes = 2144.86 kB = 2.09 MB Load Address: 00000000 Entry Point: 00000000 Save the current uInitrd using the command: # cp /media/boot/uInitrd /boot/ uInitrd-`uname
- 98. -r` # ls -lsa /boot/u* 2144 -rwxrwxrwx 1 root root 2195134 Jul 13 22:43 /boot/uIni- trd 2144 -rwxrwxrwx 1 root root 2195134 Jul 14 14:17 /boot/uIni- trd-3.8.13.26 Enable the new uInitrd using the command:
- 99. #
- 100. cp
- 101. /boot/uInitrd-`cat
- 103. /media/ boot/uInitrd # ls -lsa /boot/u* 2144 -rwxrwxrwx 1 root root 2195134 Jul 14 14:18 /boot/uIni- trd 2144 -rwxrwxrwx 1 root root 2195134 Jul 14 14:17 /boot/uIni- trd-3.8.13.26 If no errors have been encounterd, reboot the system using the following commands so that the new kernel may take effect: # sync reboot After the reboot has completed, you can verify that the new kernel is installed using the uname command to compare the timestamp and kernel version from before and after the build: # uname -a Linux u3-2 3.8.13.26 #1 SMP PRE- EMPT Mon Jul 14 14:02:33 PDT 2014 armv7l armv7l armv7l GNU/Linux For questions, please visit the original forum post at http://bit.ly/1ucMAlN. Is your Youtube defaulting to the HTML5 player, and any Chrome Web-Store addon that you’ve tried does not work for forcing Flash Play- er instead? Are you tired of not using the resolution you want on Youtube or the bland white look of Youtube’s Skin? Knowing a trick or two about Youtube can help you address these issues, and even give you the option for a full screen or windowed version of your video clip for faster multi- tasking. Here’s a neat simple trick using Tampermonkey and a short script! Tampermonkey is like Grease- monkey (Firefox) but for Chrome. And for those who don’t know what GreaseMonkey is, it’s an extension that injects scripts into the website you are using and other neat features using scripts. You can go to Chrome’s Webstore and grab the Extension from http://bit. ly/1iL5YRd. You can use scripts on any website that does not have a security against scripts. There’s endless possibilities for devel- opers and an easy interface for beginners that allows for quick and easy manage- ment of your scripts. If you are using an earlier build of Chromium for use on early Debian Builds, install the Legacy Tamper- monkey instead. This requires you to Download the CRX from this website
- 104. at http://tampermonkey.net. To install, Right-click and Save As to the folder of your choice, then open up Chromium settings and click on the Extension tab. Drag ‘n’ Drop the CRX file you have downloaded from the link above onto the Extension Tab Page. Finally, test out the new options by going to http://www. youtube.com and watching a video. This script gives you access to op- tions you may have never seen before on Youtube. You get to make use of Auto Resolution to adjust the video to the res- olution of your choice, set the width and height of the windowed player, enable or disable use of Dash Playback (which is block buffering instead of loading the full clip for safe use on 3G). You can also add a download button on each video you watch to select the format of your choice, add a repeat but- ton if you like that song you’re playing, and many more features. One of the more useful options is the HTML5 Alternative, Flash Play- back. Go to Youtube Center’s Github at http://bit.ly/MANHYG, scroll down to Download and click Dropbox. Your Tampermonkey should open up right away and prompt you if you want to in- stall the script you have chosen. Click install, then open up your You- tube and a window will prompt you to show you where the new settings are. Click on the Player tab and enable Flash Playback in Player Type. if you have a fast connection, disable Dash Playback for faster loading and fix vari- ous hiccups made by a weak wifi signal. You now have access to more options you can think of, and can customize You- tube in any way you like, even changing the player theme and color. The script can be disabled by clicking on the Tampermonkey button in the ex- tension bar beside the Address bar, then clicking Dashboard and unchecking the extensions of your choice. Have fun enjoying YouTube! ant to see some of the fun side of Linux? Try these commands: $ sudo apt-get install sl $ sl $ sudo apt-get install fortune-mod $ fortune $ sudo apt-get install cowsay $ cowsay ‘ODROIDS are cool!’ $ sudo apt-get install cowsay sudo apt-get install fortune-mod $ fortune | cowsay $ sudo apt-get install xcowsay sudo apt-get install fortune-mod $ fortune | xcowsay
- 105. e’ve been shipping the ODROID-U3+ (Rev 0.5) since the end of June 2014, with 4 main im- provements over the original U3: Micro-USB port is able to work in USB host mode. The USB host power protector IC was changed from AP2411 to NCP380. HDMI reverse-current blocking IC AP2331 was placed on the correct place. HW SPI port was added. By adding a power control IC RT9715, the Micro-USB port can work in the USB host mode as well as in USB device mode, which we call Dual-Role- Device (DRD). Just plug in an OTG- to-Host cable and you will have another USB host available for peripherals, so that you can enjoy 4 USB ports without using an external bulky USB hub. It’s a dual-use port that works both ways! AP2411 was used in Rev 0.2 PCB as a USB bus power protector. However, some users reported that it could be damaged by an electrical shock on the USB port. To solve this issue, we removed the chip and added a wire, which changed it to more durable NCP380 that includes many reliable features like Under volt- age lock-out, Built-in Soft start, Ther- mal Protection, Soft turn-off, Reverse voltage Protection, ESD Compliance to IEC61000-4-2 (Level 4), 8.0 kV (Con- tact), and 15 kV (Air). Some monitors or TVs have leak- age current on the HDMI port. It puts the PMIC into an undefined state and it prevents the auto-power-on function. We moved the reverse current protection IC from HDMI connector side to CPU/ PMIC side, which solved the problem- atic auto-power-on issue. Now we can turn on the board automatically by sim- ply inserting the DC power jack even when the HDMI is connected. The Serial Peripheral Interface (SPI) bus is a synchronous serial data link that operates in full duplex mode. The SPI bus is added on the new J5 (IO Port #2) 4-pin connector on the PCB. Note that SPI ports support only master mode and a 1.8V interface like the other IO ports on Exynos processor. You can use 4 pins as GPIO mode as well as SPI mode. Af- ter booting, the pins are in GPIO mode by default.
- 106. This example script sets all pins to output and toggle 5 times at 1Hz fre- quency. At the beginning of the appli- cation launch, it unloads the SPI driver modules to make sure the GPIO mode, and releases the GPIOs for the next us- age at the end. modprobe spi-s3c64xx modprobe odroid-ioboard dmesg | grep ioboard modprobe -r odroid-ioboard modprobe -r spi-s3c64xx count=0 stop=5 echo 20 /sys/class/gpio/export echo 21 /sys/class/gpio/export echo 22 /sys/class/gpio/export echo 23 /sys/class/gpio/export echo out /sys/class/gpio/ gpio20/direction echo out /sys/class/gpio/ gpio21/direction echo out /sys/class/gpio/ gpio22/direction echo out /sys/class/gpio/ gpio23/direction while : do count=$(($count+1)) echo 1 /sys/class/gpio/gpio20/ value; echo 1 /sys/class/gpio/gpio21/ value; echo 1 /sys/class/gpio/gpio22/ value; echo 1 /sys/class/gpio/gpio23/ value; echo “GPB[4],GPB[5],GPB[6],GPB[7] set output HIGH” sleep 1; echo 0 /sys/class/gpio/gpio20/ value; echo 0 /sys/class/gpio/gpio21/ value; echo 0 /sys/class/gpio/gpio22/ value; echo 0 /sys/class/gpio/gpio23/ value; echo “GPB[4],GPB[5],GPB[6],GPB[7] set output LOW” sleep 1; if [ $count -eq $stop ]; then echo “GPIO TEST STOP” echo 20 /sys/class/gpio/unex- port echo 21 /sys/class/gpio/unex- port echo 22 /sys/class/gpio/unex- port echo 23 /sys/class/gpio/unex- port exit 0
- 109. fi done Let’s access the SPI mode. If the ver- sion of your kernel was downloaded be- fore July 17, 2014, you must first update the kernel first. For generic SPI usage, first load the module to activate the SPI host. $ sudo modprobe spi-s3c64xx Then, load the module to activate the generic SPI, and you will have a standard SPI node. $ sudo modprobe spidev $ /dev/spidev1.0 The procedure for Serial Flash also begins by loading the module to active the SPI host. $ sudo modprobe spi-s3c64xx Then, load the serial flash (misc) driver, and you will have a Serial Flash node. $ sudo modprobe odroid-ioboard $ /dev/ioboard-spi-misc Please note that spidev.ko and odroid- ioboard.ko can’t be loaded at the same time. SPI host interface driver: http://bit.ly/1qz8gHs SPI generic driver http://bit.ly/1rILc5X Serial SPI Flash add-on driver ex- ample http://bit.ly/1sOpccA We tested a Serial SPI Flash memory SST25WF020A on the new IO Shield, and the maximum speed was 40Mhz of SPI clock. To learn more about the SPI- DEV driver in detail, please visit http:// bit.ly/WAgUYC. The ODROID-U3 Rev 0.5 has some great hardware improvements, so we called it the ODROID-U3+. You can find the latest U3 Rev 0.5 schemat- ics here: http://bit.ly/1nd5GDx. In ad- dition, the new U3 IO Shield Rev 0.3 has been improved to include a new SPI Flash memory which can be connected to an SPI bus (http://bit.ly/1nSPTFj).
- 110. ant to see some more of the fun side of Linux? Try these commands: $ sudo apt-get install toilet $ toilet -f mono12 -F metal ODROID Magazine ne of the most common uses for a Linux machine is to create a web server for the purposes of hosting a website, which is an essential component to any business strategy or personal project. Whether you want to create a live production server or a per- sonal one for your home intranet, this article describes the steps involved in enabling two of the popular light-weight web servers: nginx lighttpd (aka lighty). Although Apache server is also a pop- ular choice for Linux web hosting, it is covered extensively on the PHP website at http://bit.ly/1wXDju1 with specific instructions for the ODROID located at http://bit.ly/1rIb9Te. The instructions also include add- ing support for a secure web server (openSSL-based HTTPS) and scriptable web applications (PHP5-FPM). FPM, which stands for FastCGI Process Man- ager, is an efficient alternative to the classic FastCGI implementation. If you are concerned about security related is- sues and configuration when hosting a website, it is recommended to research it well and implement relevant procedures before enabling access to the Internet. Periodic OS updates are also recom- mended. 1. Any ODROID board, with an ap- propriate power adapter. 2. A bootable 8+ GB MicroSD card or eMMC module containing the lat- est U3 Lubuntu image available from the Hardkernel website. 3. A network where the device has access to the Internet and the ODROID forums. 4. Optional SSH access to the U3 via utilities like PuTTY (MS Win- dows 7+) or Terminal (Mac, linux to perform the steps from a remote host computer. Although it is possible to install both web servers on the U3 at the same time, the steps below assume that only one web server is being installed. For simultaneous use, any configurations conflicts, such as the use of the default web port 80 by both servers, should be resolved first. $ sudo apt-get install cmatrix $ cmatrix $ sudo apt-get install oneko $ oneko $ sudo apt-get install espeak $ espeak ‘Do you want to play a game?’ $ sudo apt-get install libaa-bin $
- 111. aafire
- 112. sudo -s # sudo apt-get install nginx # sudo service nginx stop # sudo service nginx start # sudo apt-get install lighttpd # sudo service lighttpd stop # sudo service lighttpd start # mkdir /etc/nginx/ssl # sudo openssl req -x509 -nodes -days 365 -newkey rsa:2048 -keyout /etc/nginx/ssl/nginx.key -out /etc/nginx/ssl/nginx.crt Country Name (2 letter code) [AU]:US State or Province Name [Some-State]:CA Locality Name (eg, city):San Jose Organization Name:YourCompany # lighttpd -v lighttpd/1.4.33 (ssl) - a light and fast webserver Build-Date: Jan 28 2014 17:19:37 # mkdir /etc/lighttpd/ssl # sudo openssl req -x509 -nodes -days 365 -newkey rsa:2048 -keyout /etc/lighttpd/ssl/lighttpd. key -out /etc/lighttpd/ssl/lighttpd.crt
- 113. Organizational Unit Name:Engineering Common Name:YourName Email Address:you@yourcompany.com # openssl s_client -connect localhost:443 -re- connect # cd /etc/nginx/sites-available # cp default default-orig # medit default server { listen 80 default_server; listen [::]:80 default_server ipv6only=on; # ssl support listen 443 ssl; root /usr/share/nginx/html; index index.html index.htm; # Make site accessible from http://localhost/ server_name localhost;
- 117. ssl_certificate
- 122. ssl_certificate_key
- 131. #
- 132. First
- 133. attempt
- 134. to
- 135. serve
- 136. request
- 137. as
- 138. file,
- 139. then # as directory, then fall back to displaying a 404.
- 147. try_files
- 148. $uri
- 149. $uri/
- 150. =404;; # Uncomment to enable naxsi on this location # include /etc/nginx/naxsi.rules } # sudo service nginx stop # sudo service nginx start # cd /etc/lighttpd/ssl # cat lighttpd.key lighttpd.crt | sudo tee lighttpd.pem # cd /etc/lighttpd/ # cp lighttpd.conf lighttpd.conf-orig # medit lighttpd.conf $SERVER[“socket”] == “:443” { ssl.engine = “enable”
- 151. ssl.pemfile
- 152. =
- 153. “/etc/lighttpd/ssl/lighttpd.pem” server.document-root = “/var/www” } # sudo lighttpd -t -f /etc/lighttpd/lighttpd. conf Syntax OK # sudo service lighttpd stop # sudo service lighttpd start I understand the Risks Add Exception
- 154. I understand the Risks Add Exception
- 155. Confirm
- 156. Security
- 157. Option # apt-get install php5-cgi autoconf automake autotools-dev curl libapr1 libtool curl libcurl4-openssl- dev php-pear php-xml-parser php5 php5-cli php5-common php5-curl php5-dev php5-gd php5-sqlite php5-fpm php5- mysql # cd /etc/nginx/sites-available/ # medit default … index index.html index.htm index.php; location ~ .php$ { fastcgi_split_path_info ^(.+.php)(/.+)$; fastcgi_pass unix:/var/run/php5-fpm.sock; fastcgi_index index.php; include fastcgi_ params; } # cd /etc/lighttpd/conf- available/ # cp 15-fastcgi-php.conf 15-fastcgi-php.conf-orig # medit 15-fastcgi-php.conf fastcgi.server += ( “.php” = (( “socket” = “/var/run/php5-fpm.sock”,
- 166. =
- 167. “enable” )) )
- 168. # grep -w ‘^[^#]*root’ /etc/nginx/sites-available/de- fault root /usr/share/nginx/www; # cd /usr/share/nginx/www # echo ‘?php phpinfo(); ?’ info.php # service php5-fpm stop sudo service nginx stop # sudo service nginx start service php5-fpm start # grep -w ‘^[^#]*root’ /etc/nginx/sites-available/de- fault root /usr/share/nginx/www; # cd /usr/share/nginx/www # echo ‘?php phpinfo(); ?’ info.php # service php5-fpm stop sudo service nginx stop # sudo service nginx start service php5-fpm start # lighttpd-enable-mod fastcgi # lighttpd-enable-mod fastcgi-php # ls -lsa /etc/lighttpd/conf-enabled total 0 lrwxrwxrwx 1 root root 33 Jul 13 16:14 10-fastcgi. conf - ../conf-available/10-fastcgi.conf lrwxrwxrwx 1 root root 37 Jul 13 16:15 15-fastcgi- php.conf - ../conf-available/15-fastcgi-php.conf # cd /etc/php5/fpm/pool.d/ # cp www.conf www.conf-orig # medit www.conf listen = /var/run/php5-fpm.sock # cd /etc/php5/fpm/ # medit php.ini cgi.fix_pathinfo=1
- 169. ou’d think that, with the massive growth in tablet computing, it should be an easy matter to: 1. Locate a small high-definition (HD) LCD screen 2. Connect it to an HDMI/LCD driver board 3. Attach a capacitive multi touch screen on the LCD 4. Hook that up to your ODROID or other HDMI device Unfortunately, it’s not quite that simple at all, or we’d all have done it al- ready! The ODROID computers can a price tag to match! And most of them have no touch screen option. So we decided to develop a 9-inch uni- versal HDMI screen with 10-points ca- pacitive multi touch input for ODROID users. The name of display is ODROID- VU, which is pronounced as “view”. We hope this product can be a “View point” for your computer. Display: 9-inch 1280 x 800 pixels TFT LCD Touch screen: Capacitive multi- touch 10 points input (USB HID) Dimensions: 224 x 153 x 11 mm with the plastic frame. Power: 5V/1A DC Ports: Power, Micro-USB, Type-A HDMI, Audio jack (3.5mm stereo) 5 keys: Volume control, Brightness control, Power on/off display 1920x1080, and you can buy a full-size monitor at that resolution, but that’s not what we’re about. We’re looking for something small and por- table, which is where it gets a bit tricky. There are very few small, portable, HDMI screens available on the mar- ket. Most of the ones out there have 800x480 or 800x600 pixels. These are largely aimed at professional pho- tographers and videographers, with
- 170. points at the same time. It also has the USB HID Multi-touch standard proto- col which is compatible with Linux and Windows. The USB VID:PID is 2808:81c9 which is very important information when you modify the HID kernel driv- er. You can connect the ODROID-VU to ODROID boards as well as PC, TV and other embedded boards if they have HDMI output. Some ODROID boards can’t gen- erate a proper HDMI master clock for 1280x800 native resolution of ODROID-VU. So 1280x720(720p) is scaled up to 1280x800 to fit the full screen. 1920x1080 input is also sup- ported via scale-down function. You can purchase the ODROID- VU, which comes with a power supply and micro-USB cable, at the Hardker- nel store (http://bit.ly/UmZEod). The HDMI to LVDS converter IC MST7871KM has an HDMI receiver and an LVDS transmitter with analog audio output. The IC also has an inter- nal frame buffer to scale up/down the image to fit into the 1280x800 output. Volume up/down and Backlight bright- ness control are also managed by the IC with On-Screen user interface. The single-chip capacitive touch panel controller FT5826QSL supports mutual capacitive touch panel up to 10-
- 171. the Terminal window: $ sudo pcmanfm Right-click the icon for the down- loaded tarball, which should be visible in the right-most pane, and selecting the Extract Here menu option. The plugin will be extracted to the /home/odroid/Downloads/Pepper- Flash directory, as shown in the second screenshot. It is easier for some users to use the command-line terminal window almost entirely for these next steps. However, using pcmanfm simplifies the process for those wanting to save some typing. In pcmanfm, copy the PepperFlash directory and paste it into the /usr/lib he Adobe Flash Player for the Chrome web browser in Ubuntu was discontinued by Adobe sev- eral years ago, with no alternative avail- able for playing Flash videos in Linux until recently. Google recently released an updated Flash-compatible player pl- ugin called PepperFlash, which includes an ARM Ubuntu version. This article describes the steps needed to download this plugin from Google and add it to the Chrome web browser running Lubuntu 14.04 LTS on any ODROID board, in- cluding the X, U and XU series. Any ODROID board, with an1. appropriate power adapter. A bootable 8+ GB MicroSD2. card or eMMC module contain- ing the latest Lubuntu image available from the Hardkernel website. A network where the device has3. access to the Internet and the ODROID forums. Optional SSH access to the4. ODROID via utilities like PuTTY (MS Windows 7+) or Terminal (Mac, linux to perform the steps from a remote host computer. PepperFlash Ver. 12.0.0.77 for5. Lubuntu 14.04 PCMan File Manager (pcman-6. fm) for Lubuntu 14.04 Login to the ODROID using the default username of “odroid”, and download the precompiled packaged version of the ODROID compatible PepperFlash by navigating to http:// bit.ly/1yYEDQf in the Chrome brows- er window, which will be saved to the / home/odroid/Downloads directory. Launch a terminal session and navi- gate to the downloads directory, then launch pcmanfm with root privileges by typing the following command in
- 172. After closing pcmanfm, launch the medit (installed by default in Lubuntu) editor and open the default configura- tion file of PepperFlash by using the command: $ sudo medit /etc/chromium-browser/default Modify the CHROMIUM_FLAGS configuration paramete as a single line: CHROMIUM_FLAGS=”
- 174. --ppapi-flash- version=11.7.700.225” Save the configuration file and close medit as well as Chrome. Verify that the PepperFlash plugin has been installed correctly by re-launching the Chrome web browser and navigat- ing to the URL chrome://plugins. Se- lect the PepperFlash plugin and click on the Details option at the right side of the webpage. Check the details ensuring the plugin information matches what is listed in the screenshot. Finally, enable the Always allowed option by checking the check- box and close all Chrome windows. To make sure that the plugin is in- stalled properly, reboot the ODROID, then launch Chrome again. Navigate to any page with Flash content, such as the Adobe Flash Samples website at http:// adobe.ly/UmTzrV. For additional information or ques- tions, please visit the original informa- tion sources at http://bit.ly/1lstuyP. directory. Paste the copied directory into the system library directory at /usr/lib/ re- sulting in /usr/lib/PepperFlash. If using the command line isntead, copy the PepperFlash directory to the system library directory by typing the following command: $ sudo cp PepperFlash /usr/lib/ upen64Plus is a Nin- tendo 64 emulator for the Android platform, and it runs great on the ODROID! To install Mupen64plus, visit the Mupen64Plus Play Store page at http:// bit.ly/1mE82Ye,connectyourjoysticks, and immerse yourself in the glory that was the Nintendo 64!
- 175. root@odroid:/sys/class/gpio# cd gpio304 root@odroid:/sys/class/gpio/ gpio304# echo out direction root@odroid:/sys/class/gpio/ gpio304# echo 1 value ;Turns on the pin root@odroid:/sys/class/gpio/ gpio304# echo 0 value ;Turns off the pin This is what I needed to start devel- oping my IO-Shield dialect, which I de- cided to name gpio. After quite a bit of thought and de- sign, here are some examples of what I wanted my dialect to be able to do: gpio [ init out P17 ;initialize pin P17 as an output on ;turn on P17 wait .1 ;wait .1 seconds off ;turn off P17 deinit P17 ;deinitialize pin P17 ] during the fourth step, I find it necessary to fine-tune the design produced during the third step. Of course, the fourth step also involves testing and refining of the design based on the results of testing. When I first attempted to use the IO Shield on Ubuntu, I had trouble find- ing concise instructions for getting it to work using the method that is easiest for Rebol to interface with. That took me to the forums where I was eventually able to piece together this set of basic instruc- tions: Update the Ubuntu kernel by fol- lowing instructions in this forum post: http://bit.ly/1o3vMJx. Type the following into Terminal: odroid@odroid:/sys/class/gpio$ sudo su root@odroid:/sys/class/gpio# mod- probe gpio-pca953x root@odroid:/sys/class/gpio# modprobe i2c-gpio-custom bus0=4,200,199 root@odroid:/sys/class/gpio# echo tca6416 0x20 /sys/devices/plat- form/i2c-gpio.4/i2c-4/new_device root@odroid:/sys/class/gpio# echo 304 export ;304 is equivalent to P17 on the IO Shield was recently contracted to work on a project that would require a U3 to potentially control valves, actuators and other devices and read inputs. That was exciting, because I knew I’d have a chance to work with the U3 IO Shield -- something that I’ve wanted to do since it was released, but haven’t had a chance to do because of my busy work schedule. My first step when working with any new hardware is to see if I can get it to work using the supplied examples, and my second step is usually to post ques- tions to forum.odroid.com about setup issues I discover. This continues until I succeed in getting it to work. The third and fourth steps, however, are ones that I particularly enjoy. The challenge of the third step is to boil down the functionality of the new hardware to the most simple, elegant, flexible and efficient form as possible while throwing out any pre- conceived notions of how that hardware is currently designed to be accessed or controlled. This doesn’t involve any coding, but rather is a process of design- ing a dialect to act as an intermediary between the user and the hardware while achieving all the stated goals. The fourth step is to convert that dialect into code using Rebol’s power- ful parse feature. Amazingly, once the hard part of the third step is done, the fourth part is quite simple. Most often
- 176. of an easier way to write a dialect, the open-source developers of Rebol would love to hear about it. During testing on the U3, I found that utilizing PWM sometimes leads to instability in the operating system. I think this might have something to do with the constant interrupts required to make PWM work at high speeds in a software system. I also found that some- times even at slow period/pulse speeds, PWM was sometimes laggy and inaccu- rate. Also found during testing was that using Rebol’s write command would sometimes not work, but other times it would work fine. I haven’t yet been able to determine the circumstances that lead to this undesirable behavior. Rebol also has an echo command that would work sometimes even when write would not. The most reliable (but by far the slowest) method was to initiate a bash- based echo command from within Re- bol. In my testing, this method was over 25 times slower than the native write and echo commands in Rebol. You can download the dialect for your own use at http://respectech.com/ odroid/gpio.r3, where you can leave feedback. The gpio.r3 dialect definition script is editable, so feel free to make changes and improvements! gpio [ init in [P00 P01] ;Set pins P00 and P01 as inputs init out [P02 P03 P06];Set pins P02, P03 and P06 as outputs init pwm 1 .1 P04 ;Set pin P04 as a pulse-width-modulated output with a ; period of 1 second and a pulse of .1 seconds [P02 P06] on ;Turn pins P02 and P06 on init .1 .01 P05 ;Set pin P05 as a pwm output - the last initialization ; (P04) was a pwm, so it was remembered for this init. init gpio in P07 ;To change back to standard I/O, specify gpio. wait .01 ;Wait .01 seconds P06 off ;Turn pin P06 off P03 on ;Turn pin P03 on read speed P00 ;Read the value of pin P00 into system/ gpio/val/speed read rpm P01 ;Read the value of pin P01 into system/ gpio/val/rpm wait 5 ;Wait 5 seconds deinit [P04 P05] ];Deini- tialize pins P04 P05 (this is the way to turn off ; a PWM pin) wait 1 ;wait 1 second reset ;Deinitial- ize all standard I/O and PWM pins ] In order to get to this level of abstrac- tion, the following hurdles had to be overcome by the dialect: Whenever gpio is called, de- termine whether the IO Shield subsystem had already been ini- tialized. If it hadn’t, initialize it. Convert the disparate timing systems to a standardized time system (PWM uses microsec- onds, wait uses seconds). Sec- onds are more easily handled by most people, so decided to standardize on seconds. Provide a level of abstraction be- tween the printed port numbers on the IO Shield with the /sys/ class/gpio port numbers. Allow handling standard I/O and PWM within the same dialect without any need for understanding the underlying mechanism. Reduce the required wordiness of the dialect by allowing single or multiple ports to be operated on simultaneously, and unneces- sary words to not be required, but allowed when the user uses them, and to remember the last pin initialization types and ports so the following commands don’t need to re-specify them unnecessarily. Testing had to be performed with different methods of read- ing/writing to/from the /sys/ class/gpio and writing to the sys/class/soft_pwm directories for reliability and performance under different conditions. Fortunately, incorporating this type of functionality within Rebol’s parse is quite straightforward and easy once you become familiar with it. Incidentally, parse uses a dialect to al- low you to easily define the rules for your dialect! Because of this, if you can think
- 177. The latest version can be download- ed from github: $ mkdir ~/src; cd ~/src $ git clone https://github.com hardkernel/ODROID-SHOW $ cd ODROID-SHOW You will find directories named “ex- ample/”, where you will find programs to run on the ODROID or PC host, “show_main/”, where you will find the main program to run on the SHOW, and “libraries/”, where the various Ar- duino support libraries live. Depending on when you downloaded the sources from github, you may see other direc- tories, too, such as one for the weather module, which I won’t cover in these articles. You may already have looked at the programs in the “example/” direc- tory. If not, now might be a good time to have a look, so that you can familiar- ize yourself with some of the capabilities of the ODROID-SHOW. You can also check out the previous articles for more revious issues of ODROID Mag- azine covered the basics of setting up the ODROID-SHOW hard- ware and using it as a display for vari- ous data generated by your ODROID or PC. While this has many useful ap- plications, it only scratches the surface of what’s possible with the SHOW. At the heart of the device is an ATMega328p chip, which is the same kind of mi- crocontroller that’s contained in many models of the popular Arduino plat- form. This means that almost anything that you could imagine using an Arduino for could just as easily be made to run on the ODROID-SHOW. This series of articles aims to dig below the surface, so to speak, and to introduce you to using the ODROID- SHOW as a programming platform in its own right. In this installment, I’ll cover the software components that come pre- installed on the ODROID-SHOW, how they work, and how you can modify them and upload your changes to the de- vice. I’ll use a simple example of a Man- delbrot Set viewer to demonstrate this. In the second article, I’ll deal with some options for connecting the SHOW to some simple electronic components via the two GPIO headers. Finally, the third article will look at building a com- plete, self-contained game on the hard- ware itself. information. For this article, I’ll be concerned with looking at contents of the “show_main/” and “libraries/” directories, which are ex- plained in the block diagram shown on this page. Terminals (meaning some kind of keyboard and display combination) have been around for over a century, even be- fore the first computers were built! As computers became more commonplace, many of the old terminal devices were put to use as dumb data entry and dis- play devices. In the early days, instead of personal PCs, it was much more com- mon to have a large and powerful com- puter (such as a mainframe computer) connected to lots of different terminals. Because of the wide variety of differ- ent kinds of terminal devices, as well as the wide range of features that newer, more sophisticated terminals offered (such as coloured text, an audible bell, ability to position the cursor or clear the screen, etc.), some sort of standardisa-
- 178. All the software components includ- ed in the official software for the SHOW device are written in C++. If you know C++ (or even C) already, you should have no problem starting out on program- ming for this platform. There are some minor some differences in the way C++ is used on the Arduino, and you should be aware of them. For example: Instead of using low-level com- mands like “gcc” and “make”, all your editing, compilation and uploading of programs is done in a graphical IDE (Integrated Development Environment) named, appropriately, Arduino. Programs written for the Ardu- ino are often called “sketches”, and generally have a “.ino” file extension Programs do not have a “main()” function, since this is supplied by the Arduino com- pile system All initialisation is done in the program’s “setup()” function Arduino programs also require a “loop()” function. As the name suggests, this function is called in an infinite loop directly after the “setup()” function returns These are all relatively minor differ- ences to working on a “real” computer, so it’s actually quite easy to dive into de- veloping programs for the Arduino (and SHOW!) platform. For our first step with programming theSHOW,we’lljustcompileandreinstall the official software. Let’s get started by installing the Arduino IDE. On Debian/ Ubuntu systems this is done by typing: $ sudo apt-get install arduino This will install a lot of other pro- grams besides the IDE, including a cross-compiler (“avr-gcc”) and some sup- porting tools (“avrdude” being the main one). For the most part, you don’t need to worry about all these extra tools, since the Arduino IDE will call them transpar- ently for you when it needs to. Later on, if you want to change over to using these tools directly (with your favourite edi- tor and Makefiles), you’ll be able to do so. For these articles, however, I’ll stick with the simple IDE option. There are four other important setup steps: Tell the IDE where you will1. store your “sketches” (not where you downloaded the sources from github!) Tell it which serial port to use to2. communicate with ODROID- SHOW (this may change if you reboot or move USB devices around) Tell it which version of the3. Arduino is being used Tell it where to find your librar-4. ies All steps except Step 3 are covered in the official ODROID wiki page at http://bit.ly/1p8uitU, so I won’t repeat them here. For Step 3, select “Tools Board Arduino Uno”. The ODROID- SHOW is fully compatible with the pre- built Arduino Uno configuration. If you are running an older version of the Arduino program (for example, my Debian Wheezy distribution only provides version 1.0.1 of the program), then in Step 4 there may not be an “Add Library ...” option under the “Sketch Import Library” menu option. If your tion was needed. The list of “ANSI es- cape code” (such as “ESC[2J;” to clear the screen) was the result. While this might sound like quite an archaic system (after all, we all have PCs, laptops and tablets now, not terminals!), actually it’s still in common use today. If you use “xterm” or a more modern equivalent (like “gnome-terminal”) you can still use the ANSI escape codes for all the things that used to be done on dedicated terminals. More importantly for our discussion here, this is exactly what the “show_ main” program block in the diagram above is implementing by programming the Arduino to behave as if it was a ter- minal screen. You can check out the full list of “escape codes” that the software im- plements by referring to http://bit. ly/1nkYKUt. I’ll come back to this lat- er when I add an ANSI-like escape for drawing a single pixel on the screen. The other box on the left is for the se- rial connection to the PC (or ODROID) host. It’s used both for receiving data from the PC and also for printing de- bug information, which can be very handy when writing Arduino/SHOW programs. On the right-hand side, we have two libraries that were also developed by Adafruit. The top one implements high-level graphical primitives, such as printing a character, drawing points, lines and circles, and filling in rectangu- lar areas with solid colours. This can be seen as the platform-independent part of the stack. Below that, we have the platform- specific part of the graphics code. It knows about how the ATMega chip is wired up to the TFT module, as well as the protocols needed to communicate with the actual hardware, as shown in the box below. We won’t be delving too deeply into how this side works, but you may be interested in examining the code if that interests you.
- 179. When I first used the ODROID- SHOW (v1.1 of the software), it sup- ported lots of ANSI escape characters for drawing text on the screen, but it didn’t include any other graphics primitives. I decided to change that by adding a new escape sequence to let it plot a single point on the screen. Here’s how I went about adding that feature. The first thing that I did was to see if there was an existing ANSI escape code for plotting points. As it turns out, there isn’t, so I chose this as the syntax for the new command: ESC [ row ; col X By examining the code in “show_ main.ino”, You can see that the “par- sechar()” function is called every time a new character is read from the PC over the serial port. The parser uses what’s called a “Finite State Machine” (or “FSM”). This is quite commonly used in any application where you have to build up complex commands one char- acter at a time. A FSM-based parser is simply a list of “states” (which track partially recognised commands) and “transitions” (which are followed by seeing a new character from version of Arduino is too old like mine, then you will have to add the “GFX” and “ILI9340” libraries manually by creating symbolic links from the “libraries” direc- tory of your sketchbook directory (set up in Step 1) to the individual library directories as contained in the code that you downloaded from Github. For ex- ample, if you downloaded into the “~/ src/ODROID-SHOW” directory, you can create the links with: $ cd ~/sketchbook $ mkdir libraries; cd libraries $ for d in ~/src/ODROID-SHOW/libraries/*; do ln -s $d .; $ done After these setup steps, we can load “show_main.ino” into the IDE. Af- ter that, there’s only one more thing to do before reprogramming the device, and that’s to attach the programming jumper. This is used to short-circuit a set of two pins labelled P2 on the board. They’re located between the reset switch (marked ‘Reset’) and the power LED (marked ‘Alive’). Once you’ve done that, all you have to do is click on the green “right arrow” mark in the row of icons directly underneath the menu bar. If all goes well, you should get some sort of indication in the message panel at the bottom, and the SHOW will then reboot. After a successful flash and re- boot, you’ll need to remove the jumper before running any tests, such as those in the “examples/” directory. Jumpers tend to be small and fiddly, so try to re- member where you put it after removing it! Alternatively, leave it attached to just one of the pins on the P2 header. You can also get different types of jumper that have an extra tab on top. They tend to be a lot easier to attach and remove and are a little bit harder to lose because they’re bigger. You don’t need to have one of these, but I find that it helps. If things didn’t go well, then you can check the message panel to give some idea of what went wrong. You’ll get dif- ferent messages depending on whether the compilation failed (eg, due to miss- ing libraries or syntax errors) or there was a problem with uploading (like if you forgot to reattach the jumper). It’s pretty user-friendly and you should be able to figure out what went wrong based on these messages.
- 180. A common first step when checking out any new graphics hardware is to dis- play the Mandlebrot Set on it. In the unlikely event that you’ve never heard of this before, the Wikipedia page at http://bit.ly/1mQ75y3 is a good place to start. That page also includes pseudo- code for generating the Set, so I won’t need to cover that here. You can download my code from a fork I made of the official Hardkernel SHOW repository by typing the follow- ing commands: $ cd ~/src $ git clone https://github.com/declanmalone/ ODROID-SHOW.git SHOW-fork $ cd SHOW-fork There are actually two versions of the code included here. The first, in the “examples/” directory is called “mandelbrot.c”, and it’s intended to be run on the host (PC) side. A “Makefile” is included to compile it automatically on an ODROID machine or another Li- nux system. There are a few things to note about this code: the input). Please refer to the diagram to the right, which shows some of the FSM for the ANSI parser. This is not a 100% accurate or com- plete depiction, but it should help to ex- plain how the parser works in general. I have highlighted in green the path that would be taken for the parser to recogn- ise my new point-plotting command. As you can see, the code is simply “grafted” onto the existing graph structure. Once I knew where the new code would go, the code to implement the new com- mand was very simple: case ‘X’: row = (row right_edge0) ? right_edge0 : row; col = (tmpnum bottom_edge0) ? bottom_edge0 : tmpnum; tft.drawPixel(row, col, foregroundColor); break; This does bounds-checking on the supplied row and column values then calls the appropriate method from the GFX object (“tft.drawPixel()”) using the current foreground colour. These changes were since incorpo- rated into a later version of the official software, so you can check for yourself where the code was added. If you can understand how the parser is organised, then it should be possible to add more features to it by following the same method as above. You could, for example, add more escape sequences for drawing circles, lines or boxes, all of which are available from the GFX li- brary but not currently exposed to the PC side. It would be quite straightforward to implement a set of LOGO-style primi- tives, for example, with commands for moving forward or backward, rotating the “turtle”, putting the pen up or down, and so on.
- 181. data with two calls to “spi- write()”. It takes the ATMega chip just over two minutes to render the full im- age with a maximum iteration value of 1000. Considering that the chip has no floating point capability and it only runs at 16MHz, this isn’t too bad. The native code also has one advantage over the PC code: since it doesn’t receive any data over the serial connection, it doesn’t need to delay after writing each pixel. When I wrote the code, I had initially intended to use a potentiometer and two push buttons to allow the user to zoom in and out on a particular screen area (in a similar way to the video at http:// bit.ly/1yZ0UgB, but I never completed that part. As a result, only some of the code to support this, such as definition of hardware pins and ability to paint in- dividual “panels”, for easier scrolling, are actually implemented. We’ve had a lot of ground to cover in this article. I hope that it has served as a good introduction to the basics of programming the ODROID-SHOW and has helped to explain some of the things that the platform is capable of. I think you’ll agree that it’s actually not that difficult to get started with writing code for it. In the next article, I’ll get to grips with hooking up the SHOW to other components via the GPIO pins. I also wrote a version of the Mandel- brot Set program as a sketch designed to run independently on the ODROID- SHOW, without needing any host PC. The sketch can be found in the “duino_fractal/” directory. Compiling and installing is done in the same way as you did for the official terminal emula- tor software, as described earlier. The native code is broadly similar to the version for the PC, with some dif- ferences: It’s written in Arduino-style C++, with a “setup()” and (an empty) “loop()” function It makes use of the GFX and ILI9340 libraries directly It sends back debug messages over the serial connection with “Serial.print()” calls It also uses the Arduino’s inter- nal timer function “getmillis()” to time how long it takes to render the screen It writes to the TFT screen’s memory directly rather than calling “drawPixel()”. This means that it calls “setAddrWin- dow()” once for each “panel”, then write each pixel’s colour It includes some code based on1. the official “port_open.c” pro- gram. This code opens the USB serial port and sets the baud rate and other important param- eters. This means that the code does not need to have a separate “port_open” program running. The “plot_point()” function2. sends the appropriate “ESC [ x ; y X” string over the serial port. It also sends a separate “ESC 3 ? m” string to set the colour of the point. That function also includes3. appropriate error-checking to make sure that the full string was actually written to the device. If the send buffer overflows, then “write()” will fail and set the error value to “EAGAIN”. The code correctly handles this case by advancing the write buffer and trying the “write()” again until the full string has been sent. There is a call to “usleep()” af-4. ter every write. This is needed because the ATMega is only a single-threaded computer and if the PC side sends data too quickly, it is possible that some of the data will be lost. Adding a short, user-adjustable delay after every write is a simple way of working around this. Although I wrote this version of the program to use the “X” escape code, it would also be possible to send the data across by first sending an “ESC [ x1 ; y1 , x2 ; y2 i” escape sequence and then send- ing the colour data for each pixel as if you were sending an image. Please refer to the “images.sh” exam- ple program from the official sources to see how that can be accomplished.
- 182. he ODROID family of comput- ers was originally marketed as an Open Android system, offering Android programmers an alternative to purchasing and rooting an Android phone and rooting it. ODROIDs runs Android extremely well, while offering many built-in features such as hardware video decoding, joystick drivers, all of which would need to be installed sepa- rately on a comparable Linux X11-based system. When I began using ODROIDs, I set up a set-top box using an Ubuntu desk- top environment called LXDE, which let me stream and download media files, then play them using Xine or XBMC. It could render 720p videos well, but only some 1080p videos, with lots of dropped frames, and was watchable but chop- py. After trying several tweaks to achieve smooth video, including overclocking and tweaking kernel options, I reformat- ted my SD card and installed Android Jelly Bean 4.1.2 on my U2 instead. The Jelly Bean 1080p video experi- ence was incredible, and exactly what I was looking for! Using both XBMC and MX player, the ODROID could smoothly play even the densest videos on the XBMC website (such as Big Buck Bunny), which are known to bring other systems to a stuttering halt. The video decoding on every Android build (X, U, and XU) is flawless when using MX Player, and plays videos of any resolution and encoding. At the time, I had also purchased an Apple TV, which has a friendly interface, but I couldn’t install new applications, since the iTunes store isn’t available for the Apple TV. However, an ODROID Android system allows free installation and removal of applications just like an Android phone, with thousands of ap- plications and games available from the Google Play Store. Android is already rooted, so the operating system can be tweaked, custom apps can be installed, and administrative functions can be per- formed as the root user. BeforepurchasingmyfirstODROID, I had never before considered using An- droid as my main operating system, but after putting together the Pocket Rocket image, I realized the advantages of it. Android is an extremely stable operating system, and even when an app crashes or starts to slow down, the OS makes it easy to shutdown the application. An- droid has a shallow learning curve, with large, friendly icons, as well as shortcut buttons that are intentionally similar to other operating systems. In order to navigate Android effi- ciently, I use the built-in keyboard short- cuts, which are intentionally similar to other operating systems such as Win- dows, Ubuntu and OSX.
- 183. Ctrl-C Copy Ctrl-V Paste Ctrl-A Select all Ctrl-W Close Window Ctrl-Right Arrow Move right one word Ctrl-Left Arrow Move left one word Ctrl-Shift-Right Arrow Select word to the right Ctrl-Shift-Left Arrow Select word to the left Alt-Tab Switch program Alt-Esc Desktop Control-L Go to address bar Android is especially suitable for be- ginners, or anyone that has experience with a mobile phone interface. How- ever, even as an expert computer user, sometimes I just want to perform a task without having to adjust settings, navi- gate menus or move windows. Android is perfect for this, and can perform basi- cally any task that a desktop PC can per- form, but in a different way. As an example, most desktop PCs have a word processor and save its files to the local hard drive. In Android, the software used for editing documents is called Google Drive, which stores your information on the cloud. With Google Drive, you can pick up any mobile de- vice, laptop, tablet, or desktop PC, log into Google Drive, and have access to all of your documents without needing to carry a USB thumb drive with you. One notable difference with Android is that the right mouse button is actu- ally used as the “Back” button. To bring up menus that would normally be done with a right click, use a “long click” in- stead by depressing the left mouse but- ton for several seconds. For example, in ES File Explorer, to select multiple folders, long click the first folder, which will then bring up a checkbox interface, where other folders can be selected with a single click. Android is designed to run from an eMMC module, and a distinct advan- tage of ODROID computers is that this module can be removed and re- placed. Although an SD card will tech- nically run Android, the slow speed of the SD card hinders the experience be- cause of the disk I/O. I stopped releas- ing Pocket Rocket images on SD card because of the amount of time spent clicking the Android “not responding” popups while customizing the image. However, I discovered that the Ice Cream Sandwich (ICS) version of An- droid runs smoother than Jelly Bean, when comparing them both using an SD card. As a result, I created a special SD card version of Pocket Rocket called Couch Potato that has all of the same applications as Pocket Rocket, but uses ICS for better disk performance. If you don’t have the eMMC mod- ule, then you can install Couch Po- tato instead, and enjoy all of the same features as Pocket Rocket. Occasion-
- 184. ally, Couch Potato will interrupt with a “not responding” popup, such as when downloading multiple applications from the Play Store, but they are less frequent than when running Jelly Bean from SD card. Both images offer the exact same applications, and only differ in the ver- sion of Android 4.0 vs. 4.1. The Google Play Store is accessed by pressing the Apps icon made of 6 small squares on the upper right of the An- droid desktop, then pressing the Shop button on the upper right corner of the Apps menu. After logging into the Play Store using a Google or Gmail account, a vast library of applications and games becomes available, with many of them offering free versions. This is also how applications are updated, and notifica- tions will periodically appear requesting permission to update them. If you already have an Android phone, you can quickly install your fa- vorite applications by selecting the “My Apps” section from the upper left of the Play Store, then pressing the “All” tab which keeps track of any applications that you’ve used on any other Android device. There are only a few browsers avail- able for the Android platform, with Fire- fox and Chromium being the most pop- ular. Chromium has several features that aren’t available in Firefox, such as touch- pad swiping and keyboard shortcuts. Ei- ther browser can be synchronized with other devices to automatically download any bookmarks that were made on the same Google account. Youtube videos should be played using the native You- tube app, in order to use the ODROID’s video decoding hardware. More than one Google account may be added in the Settings app, and both Gmail and Google Drive offer an ac- count dropdown as a way to easily switch between multiple accounts. Google Drive includes word processing, spread- sheet, presentation, forms, and draw- ing applications which are intended as a lightweight alternative to Microsoft Office. The advantage of using these cloud-based applications is that if there is an issue with the storage device, and the operating system needs to be re- stored, no documents will be lost, since they are stored on the cloud rather than a local hard drive. What set-top box would be complete without a killer media player? Both XBMC and MX Player offer top-notch 1080p viewing experiences, with ad- vanced features such as multi-language subtitles, audio visualizations, net- work streaming and Samba file shar- ing. XBMC also supports add-ons that offer TV channels and other media ser- vices. MX Player is arguably the best audio and video player available for Android, and is able to play nearly any kind of media file. It also has a full screen op- tion that hides the Android buttons at the bottom of the screen automatically, which remain visible while watching videos in XBMC. Make sure to turn on all of the HW+ decoding options in the Settings menu. Torrents are automatically associated by Chromium with the tTorrent app, which is a peer-to-peer network down- loader suitable for large media files. Completed files are, by default, saved to the /mnt/sdcard/Downloads directory, with the option to choose an alternate location. Keep in mind that tTorrent is extremely resource-intensive, and high disk activity may slow down the An- droid interface. It’s usually best to move any torrents or download activities to a second ODROID running Linux ser- vices, and access the completed files us- ing the Samba sharing built into ES File Explorer.
- 185. Netflix is what every entertainment system needs, and the ODROID can run it in full 1080p on your giant living room screen. This subscription-based service not only offers a massive catalog of mov- ies, there are several original shows that can only be seen on Netflix. The Netflix Android app is easy to use, with a simi- lar interface to the desktop version, and movies can be searched using an actual keyboard instead of picking letters with a tiny remote from an alphabetic list like a 1980s arcade game. The Youtube app runs extraordinari- ly well, and can play 1080p streaming videos at full screen resolution without playback glitching. The TED Talks app provides hours of educational and in- spirational videos on a huge variety of topics, presented by a non-profit organi- zation. For more information on TED Talks, visit www.ted.com. The ODROID, when paired with an external camera such as the Logitech C920, supports 1080p video in Hang- outs, just like a desktop PC. Either the internal camera microphone or an exter- nal microphone headset may be used. One of the most popular mobile games of all time is even more fun on the ODROID! The developers adapted the game for use with a keyboard and mouse. Holding down the left mouse button is the identical to dragging on a touchscreen. Free versions of Star Wars, Star Wars II, and Space are already in- stalled, and other versions, including more recent releases, can be downloaded from the Google Play Store. Pocket Rocket can turn an ODROID into a family gaming super-console with these emulator apps. Both Mupen64 Plus and Retroarch support up to 4 si- multaneous controllers, and support tens of thousands of console games. The Google Play Store includes many free emulators, and I tested a few of them for both game and controller compatibility before deciding to include Mupen64 Plus and Retroarch. Retroarch is a multi-system emula- tor, and comes with many console cores that range from Atari 2600 to SNES to Sega Genesis to PlayStation Portable and PlayStation 1. It’s an open-source app that combines many generations of retro and modern console video gaming consoles into a single system, and allows continuous hopping from console to console without having to reconfigure the controllers. Please refer to the July issue of ODROID Magazine for instruc- tions on connecting Xbox 360 wireless
- 186. controllers to Retroarch, which I have found to be the most compatible con- trollers for use with Android. Mupen64 Plus is an excellent Nin- tendo 64 emulator, and was the least buggy of all those that I tried. It has a great interface for setting up controllers quickly, and comes with several pre-built controller profiles, including Xbox 360 wireless. Both Retroarch and Mupen64 Plus allow use of the keyboard as a con- troller, as well as an alternative touch- screen controller interface, which is ideal for use with an ODROID-VU external touchscreen. Pandora is a subscription-based app that chooses music for you based on your past preferences and personal taste. If you want to have a continuous non-stop music mix for a party or din- ner, put on a Pandora station and press the power button on the top of the U3 (or keyboard power button) to turn off the screen. PC Radio is an Internet Ra- dio app that includes broadcasts from all over the world. ES File Explorer and Ultra Explorer These file explorers are more full- featured than some desktop explorers, offering Samba sharing, built-in zip ex- traction, application file associations, and multiple copy/paste blocks. Ultra Explorer is available as an open-source project where developers are encour- aged to contribute their own modifica- tions: http://bit.ly/1AzAeVG. I used ES File Explorer’s LAN tab to connect with my media server, so that when I click on media files, they au- tomatically launch in MX Player, and MX Player streams them over the net- work. Additional local hard drives may be hot-plugged into the USB ports and accessed using ES File Explorer’s Local tab, which lists each USB drive after au- to-mounting them. I use Android as my main operat- ing system primarily because of bVNC- Free. With this excellent VNC appli- cation, I can login to any of my Linux computers and use the remote Ubuntu desktop as if it were a native Android app. By setting up a VNC server on the second ODROID using Vino, I need only a single monitor, keyboard and mouse, which can be shared among many computers. JuiceSSH provides the same functions as the Linux version of SSH, with a nice graphical interface to organize the recent computers list. Terminal Emulator and BusyBox Free Terminal Emulator is an Android version of BASH terminal, and can be used in conjunction with BusyBox Free to perform all of the Linux administra- tive tasks that are not included with Android, such as mount, grep, ping and uname. For more information on the BusyBox commands, please refer to the official Wikipedia page at http://bit. ly/1zwVNEP. Jota+ is a standard text editor, with nearly all of the features that would normally be included in a desktop text editor such as TextPad. Jota+ can be also used for web development by using the ES File Explorer to associate .html and .php files with Jota+. I created a Samba share on my ODROID web server to al- low direct remote editing of the website files, and often use Jota+ to make quick changes to files via the Samba share without the overhead of starting up a full IDE such as Netbeans on Linux.