
Recomendados
Recomendados
Mais conteúdo relacionado
Destaque
Semelhante a Git Tutorial EclipseCon France 2014 - Gerrit Exercise 3 - push change to gerrit
Semelhante a Git Tutorial EclipseCon France 2014 - Gerrit Exercise 3 - push change to gerrit (20)
Mais de msohn
Mais de msohn (20)
Último
Último (20)
Git Tutorial EclipseCon France 2014 - Gerrit Exercise 3 - push change to gerrit
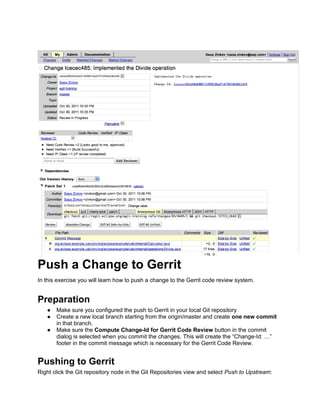
- 1. Push a Change to Gerrit In this exercise you will learn how to push a change to the Gerrit code review system. Preparation ● Make sure you configured the push to Gerrit in your local Git repository ● Create a new local branch starting from the origin/master and create one new commit in that branch. ● Make sure the Compute Change-Id for Gerrit Code Review button in the commit dialog is selected when you commit the changes. This will create the “Change-Id: …” footer in the commit message which is necessary for the Gerrit Code Review. Pushing to Gerrit Right click the Git repository node in the Git Repositories view and select Push to Upstream:
- 2. After the change is pushed a confirmation dialog is shown: The confirmation dialog shows the URL of the change in Gerrit. We also see that the numerical ID of the change is 1 in this case. Check your Change in Gerrit ● copy the URL of the change from the confirmation dialog to the clipboard and open it in a web browser ● alternatively open the Gerrit UI in a web browser and find your change in the list of open changes. Usually, it is the one on the top as the entries are sorted by modification time Finally, in your web browser you should see your change. It will look like:
- 3. Get familiar with the information Gerrit displays on the change page. The change contains one patch set on its creation. A patch set corresponds to one Git commit. Click on a file to see the Side-by-Side diff. Compare the local commit SHA1 and the SHA1 of the Patch Set 1. Are they the same? Copyright © 2014 by C. Halstrick, E. Kempin, S. Lay, S. Zivkov