SlideShare uma empresa Scribd logo
1 de 1
Baixar para ler offline
INSTALLATION
WHERE TO INSTALL CO ALARMS
The National Fire Protection Association (NFPA) recommends that a CO
Alarm should be centrally located outside of each separate sleeping
area in the immediate vicinity of the bedrooms. For added protection,
install additional CO Alarms in each separate bedroom, and on every
level of your home.
If your bedroom hallway is longer than 40 feet (12 meters), install a CO
Alarm at BOTH ends of the hallway.
In a Single-level Home:
• Install at least one CO Alarm near or within each separate sleeping
area.
• For added protection, install an additional CO Alarm at least 20 feet
(6 meters) away from the furnace or fuel burning heat source.
In a Multi-level Home:
• Install at least one CO Alarm near or within each separate sleeping
area.
• For added protection, install at least one CO Alarm on each level of
the home. If you have a basement, install that CO Alarm at the top
of the basement stairs.
• For added protection, install an additional CO Alarm at least 20 feet
(6 meters) away from the furnace or fuel burning heat source.
This unit should receive continuous electrical power. (The battery
is meant for emergency back-up only). Choose an outlet where it
cannot be accidentally unplugged or switched off by children. Keep
small children away from the unit. Teach them not to play with it or
unplug it. Explain what the alarms mean.
WHERE CO ALARMS SHOULD NOT BE
INSTALLED
DO NOT LOCATE THIS CO ALARM:
• In garages, kitchens, furnace rooms, or in any extremely dusty,
dirty or greasy areas.
• Closer than 15 feet (4.6 meters) from a furnace or other fuel burning
heat source, or fuel burning appliances like a water heater.
• Within 5 feet (1.5 meters) of any cooking appliance.
• In extremely humid areas. This Alarm should be at least 10 feet
(3 meters) from a bath or shower, sauna, humidifier, vaporizer, dish-
washer, laundry room, utility room or other source of high humidity.
• In areas where temperature is colder than 40˚ F (4˚ C) or hotter
than 100˚ F (38˚ C). These areas include non-airconditioned crawl
spaces, unfinished attics, uninsulated or poorly insulated ceilings,
porches, and garages.
• In turbulent air, like near ceiling fans, heat vents, air conditioners,
fresh air returns, or open windows. Blowing air may prevent CO
from reaching the sensors.
• In direct sunlight.
• In outlets covered by curtains or other obstruction.
• This CO Alarm is designed for use inside a single-family home
or apartment. It is not meant to be used in common lobbies,
hallways, or basements of multi-family buildings unless working
CO Alarms are also installed in each family living unit.
CO Alarms in common areas may not be heard from inside
individual family living units.
• This CO Alarm alone is not a suitable substitute for complete
detection systems in places which house many people, like hotels
or dormitories, unless a CO Alarm is also placed in each unit.
• DO NOT use this CO Alarm in warehouses, industrial or com-
mercial buildings, special-purpose non-residential buildings, or
airplanes. This CO Alarm is specifically designed for residential
use, and may not provide adequate protection in non-residential
applications.
USER’S MANUAL
120V PLUG-IN CARBON MONOXIDE ALARM WITH
BATTERY BACK-UP AND SILENCE FEATURE
M08-0206-003 S 08/10 Printed in Mexico
IMPORTANT!
PLEASE READ CAREFULLY AND SAVE.
This user’s manual contains important information about your Carbon
Monoxide (CO) Alarm’s operation. If you are installing this CO Alarm
for use by others, you must leave this manual—or a copy of it—with
the end user.
TABLE OF CONTENTS
Introduction . . . . . . . . . . . . . . . . . . . . . . . . . . . . . . . . . . . . . . . . . . . . . .1
Basic Safety Information . . . . . . . . . . . . . . . . . . . . . . . . . . . . . . .1
How Your CO Alarm Works . . . . . . . . . . . . . . . . . . . . . . . . . . . . .1
Understanding Your CO Alarm . . . . . . . . . . . . . . . . . . . . . . . . . .2
Installation . . . . . . . . . . . . . . . . . . . . . . . . . . . . . . . . . . . . . . . . . . . . .2-3
Where to Install CO Alarms . . . . . . . . . . . . . . . . . . . . . . . . . . . . .2
Where CO Alarms Should NOT Be Installed . . . . . . . . . . . . . . . .2
How to Install Your CO Alarm . . . . . . . . . . . . . . . . . . . . . . . . . . .3
If Your CO Alarm Sounds . . . . . . . . . . . . . . . . . . . . . . . . . . . . . . . . .3-4
If the Alarm Signal Sounds . . . . . . . . . . . . . . . . . . . . . . . . . . . . .3
Using the Silence Features . . . . . . . . . . . . . . . . . . . . . . . . . . .3-4
Testing and Maintenance . . . . . . . . . . . . . . . . . . . . . . . . . . . . . . . . . . .4
Weekly Testing . . . . . . . . . . . . . . . . . . . . . . . . . . . . . . . . . . . . . . .4
Regular Maintenance . . . . . . . . . . . . . . . . . . . . . . . . . . . . . . . . . .4
Replacing the Battery . . . . . . . . . . . . . . . . . . . . . . . . . . . . . . . . .4
What You Need To Know About CO . . . . . . . . . . . . . . . . . . . . . . . .4-6
What is CO? . . . . . . . . . . . . . . . . . . . . . . . . . . . . . . . . . . . . . . . .4
Symptoms of CO Poisoning . . . . . . . . . . . . . . . . . . . . . . . . . . . .4
Finding the Source of CO After an Alarm . . . . . . . . . . . . . . . . . .4
How Can I Protect My Family? . . . . . . . . . . . . . . . . . . . . . . . . . .4
Potential Sources Of CO In The Home . . . . . . . . . . . . . . . . . .5-6
Regulatory Information for CO Alarms . . . . . . . . . . . . . . . . . . . . . .5-6
General Limitations Of CO Alarms . . . . . . . . . . . . . . . . . . . . . . . . .5-6
Troubleshooting Guide . . . . . . . . . . . . . . . . . . . . . . . . . . . . . . . . . . .5-6
Limited Warranty . . . . . . . . . . . . . . . . . . . . . . . . . . . . . . . . . . . . . . . .5-6
© 2010 BRK Brands, Inc. All rights reserved.
Distributed by BRK Brands, Inc.
3901 Liberty Street Road, Aurora, IL 60504-8122
Consumer Affairs: (800) 323-9005 • www.firstalert.com
INTRODUCTION
BASIC SAFETY INFORMATION
• Dangers, Warnings, and Cautions alert you to important
operating instructions or to potentially hazardous situations.
Pay special attention to these items.
• THIS IS NOT A SMOKE ALARM! This CO Alarm is designed to
detect carbon monoxide from ANY source of combustion. It is
NOT designed to detect smoke, fire, or any other gas.
• This CO Alarm is approved for use in single-family residences.
• This CO Alarm will only indicate the presence of carbon
monoxide gas at the sensor. Carbon monoxide gas may be
present in other areas.
• The Silence Feature is for your convenience only and will not
correct a CO problem. Always check your home for a potential
problem after any alarm. Failure to do so can result in injury or
death.
• This CO Alarm should receive continuous 120VAC, 60 Hz, pure
sine wave electrical power. (The battery is meant for emergency
back-up only). Do not use in an extension cord or outlet
controlled by a dimmer or switch. In order for the emergency
battery back-up to work, a working (fresh) battery must be
properly installed.
• NEVER ignore your Carbon Monoxide Alarm if it alarms. Refer
to “If Your CO Alarm Sounds” for more information. Failure to
do so can result in injury or death.
• Test the CO Alarm once a week. If the CO Alarm ever fails to
test correctly, have it replaced immediately! If the CO Alarm is
not working properly, it cannot alert you to a problem.
• This product is intended for use in ordinary indoor locations of
family living units. It is not designed to measure CO levels in
compliance with Occupational Safety and Health Administration
(OSHA) commercial or industrial standards. Individuals with
medical conditions that may make them more sensitive to
carbon monoxide may consider using warning devices which
provide audible and visual signals for carbon monoxide con-
centrations under 30 ppm. For additional information on carbon
monoxide and your medical condition contact your physician.
HOW YOUR CO ALARM WORKS
GENERAL INFORMATION
Leave your CO Alarm plugged in year-round. CO problems can
occur any time during the year, and this Alarm can only alert you if
it is plugged in and receiving power.
This CO Alarm is intended for use in a standard, unswitched 120V AC
wall outlet. It is not intended for use in extension cords, power strips, or
outlets controlled by a switch or dimmer. These may not provide contin-
uous power to the unit. When fully powered, the unit samples the air
and takes a new reading about every second. A microchip inside the
unit stores each reading, and remembers the levels of CO it has been
exposed to over time. The Alarm sounds when it has been exposed to
a “critical” level of CO (measured in parts per million or “ppm”) within a
specified time (measured in minutes). This CO Alarm features a perma-
nently installed sensor, an indicator light, and an 85dB alarm horn. It also
has a Silence Feature to temporarily quiet the alarm horn.
MALFUNCTION WARNING
This unit performs self-diagnostic tests. If the Alarm malfunctions, it
should be replaced immediately. See "IF THE CO ALARM IS NOT
OPERATING PROPERLY" for more information.
THE PARTS OF YOUR CO ALARM
1 2 3
1 Open door here
2 Test/Silence Button
3 POWER/ALARM Light
(Red)
4 Battery Compartment
5 (Behind Cover) Alarm
Horn: 85 dB audible
alarm for test, alarm,
and unit malfunction
warning.
UNDERSTANDING YOUR CO ALARM
WHAT YOU SEE AND HEAR DURING INSTALLATION
GARAGE
SUGGESTED AREAS FOR INSTALLING ADDITIONAL CO ALARMS
BEDROOMBEDROOM
HALLLIVING ROOM
KITCHEN
BASEMENT
BEDROOM
REQUIRED TO MEET NFPA RECOMMENDATIONS
HOW TO INSTALL YOUR CO ALARM
Read “Where To Install CO Alarms” before starting.
Before you start installation, find the pair of self-adhesive labels
included with this CO Alarm. On each label write in the phone number
of your emergency responder (like 911) and a qualified appliance tech-
nician. Place one label near the CO Alarm, and the other label in the
“fresh air” location you plan to go if the alarm sounds.
IF YOUR CO ALARM SOUNDS
Actuation of your CO Alarm indicates the presence of carbon
monoxide (CO) which can kill you. In other words, when your CO
Alarm sounds, you must not ignore it!
IF THE ALARM SIGNAL SOUNDS:
1. Operate the Test/Silence button.
2. Call your emergency services, fire department or 911. Write down
the number of your local emergency service here:
____________________________________________________________
3. Immediately move to fresh air—outdoors or by an open door or
window. Do a head count to check that all persons are accounted
for. Do not re-enter the premises, or move away from the open
door or window until the emergency services responder has
arrived, the premises have been aired out, and your CO Alarm
remains in its normal condition.
4. After following steps 1-3, if your CO Alarm reactivates within a
24-hour period, repeat steps 1-3 and call a qualified appliance
technician to investigate for sources of CO from fuel-burning
equipment and appliances, and inspect for proper operation of this
equipment. If problems are identified during this inspection have the
equipment serviced immediately. Note any combustion equipment
not inspected by the technician, and consult the manufacturers’
instructions, or contact the manufacturers directly, for more
information about CO safety and this equipment. Make sure that
motor vehicles are not, and have not, been operating in an attached
garage or adjacent to the residence. Write down the number of a
qualified appliance technician here:
____________________________________________________________
Alarms have various limitations. See "General Limitations of CO
Alarms" for details.
USING THE SILENCE FEATURES
• The Silence Feature is for your convenience only and will
not correct a CO problem. Always check your home for a
potential problem after any alarm. Failure to do so can result
in injury or death.
• NEVER remove the batteries from your CO Alarm to silence
the horn. Use the silence feature. Removing the batteries
removes your protection! See “If Your CO Alarm Sounds” for
details on responding to an alarm.
The Silence Feature is intended to temporarily silence your CO Alarm’s
alarm horn while you correct the problem—it will not correct a CO prob-
lem. While the alarm is silenced it will continue to monitor the air for CO.
When CO reaches alarm levels the alarm will sound— repeating horn
pattern: 4 beeps, a pause, 4 beeps, etc. Press and hold the Test/Silence
button until the horn is silent. The initial Silence cycle will last approxi-
mately 4 minutes.
NOTE: After initial 4-minute Silence cycle, the CO Alarm re-evaluates
present CO levels and responds accordingly. If CO levels remain poten-
tially dangerous—or start rising higher—the horn will start sounding again.
While the detector is silenced:
“ALARM-MOVE TO FRESH AIR”
If you hear the alarm horn and the red light is flashing, move
everyone to a source of fresh air. DO NOT unplug the CO Alarm!
WHAT Y
WHAT IS C
CO is an invis
do not burn c
appliances ty
These fuels i
kerosene, and
Common app
maintained, a
quickly. CO is
“Air-tight” hom
weatherproofi
SYMPTOM
These sympto
discussed wit
Mild Exposur
Slight headac
Medium Exp
Throbbing he
Extreme Exp
Convulsions,
carbon mono
Some individ
people with c
pregnant mo
severely affe
consult their
FINDING T
Carbon mono
difficult to loc
the factors th
• House w
• Problem
• Transient
Because CO
be difficult to
obligated to
call.
HOW CAN
A CO Alarm is
sounds a loud
for average, h
A CO Alarm
appliances.
To help preve
• Clean ch
and nests
rust and
prevent p
or cover
• Test and
local gas
inspectio
• Make reg
Check ap
flame on
A yellow
may be p
vents or f
Make sur
barbecue
• Check fo
hood on
furnace h
• Check th
• Keep win
escaping
windows
In addition, f
this manual i
do if your CO
TESTIN
WEEKLY
Press the Tes
During testing
4 beeps, paus
The alarm seq
sure the unit i
does not alarm
• If the Ala
Products
replacem
• DO NOT
Exposure
When te
• NEVER u
damage
REGULA
To keep the C
• Test it ev
• Vacuum t
brush att
they may
• Replace
Warning”
The Low (or
minute.
REPLACIN
Choosing a R
This CO Alarm
batteries are a
replacement b
Use only the
operate prope
since they ma
To Replace T
1. Open the
2. Use the t
3. Insert the
battery c
4. Close the
pressing
5. Plug the
DO NOT spra
near the CO
may cause p
• Househo
can affec
CO Alarm
• If your ho
put it wh
fumigatio
back in a
120V AC ~,
60 Hz, 0.09A
WHEN YOU FIRST INSTALL THE BATTERY:
HORN: Chirps once
POWER/ALARM LIGHT: Flashes once
UNDER NORMAL CONDITIONS (AC POWER):
HORN: Silent
POWER/ALARM LIGHT: Shines continuously
WHEN YOU TEST THE CO ALARM:
HORN: Sounds loudly - 4 beeps, pause, 4 beeps, pause
POWER/ALARM LIGHT: The LED flashes with the same pattern as
the horn.
WHAT YOU SEE AND HEAR UNDER DIFFERENT CONDITIONS
DURING A POWER FAILURE (IN BATTERY BACK-UP):
HORN: Silent
POWER/ALARM LIGHT: Flashes once a minute.
WHEN THE ELECTRICITY COMES BACK ON AFTER A POWER FAILURE:
HORN: Silent
POWER/ALARM LIGHT: Shines continuously.
IF BATTERY BECOMES LOW OR IS MISSING:
HORN: Chirps once a minute
POWER/ALARM LIGHT: Shines continuously if AC is present or
flashes coincident with the horn-chirp if AC is not present.
IF THE CO ALARM IS NOT OPERATING PROPERLY (MALFUNCTION
SIGNAL):
HORN: 3 chirps every minute
POWER/ALARM LIGHT: Flashes three times with the horn.
IF THE CO ALARM HAS REACHED ITS END OF LIFE:
HORN: 5 chirps every minute
POWER/ALARM LIGHT: 5 flashes approximately once a minute.
WHAT YOU SEE AND HEAR IF CO IS DETECTED
ALARM LEVELS OF CO ARE DETECTED:
HORN: Sounds loudly - 4 beeps, pause, 4 beeps, pause.
This sequence repeats for as long as the unit is in alarm.
POWER/ALARM LIGHT: The LED flashes with the same pattern as
the horn.
IF YOU SILENCE THE ALARM:
HORN: Silent for about 4 minutes
POWER/ALARM LIGHT: Flashes rapidly
Note: After 4 minutes, if CO levels drop below alarm levels, the unit
will remain silent and return to normal operation.
If CO presence still indicates a potentially dangerous situation, the
horn will sound again.
IF THE CO LEVELS RETURN TO NORMAL:
HORN: Silent
POWER/ALARM LIGHT: Shines continuously
3
4
5
1
2
USING THE
If the CO Alarm...
Is silent for only 4 minutes,
then starts sounding loudly—
4 beeps, pause,
4 beeps, pause
This means...
CO levels are still potentially
dangerous.
If the CO Alarm...
Remains silent after you
pressed the Test/Silence
button
This means...
CO levels are dropping.
Model
CO606
LISTED TO
UL 2034
STANDARD
DIRECT PLUG ALARM INTO AN OUTLET
This Alarm can be plugged directly into a wall outlet located close to
the floor.
1. Choose a standard UNSWITCHED 120V AC outlet.
2. Plug Alarm in.
IF OUTLET IS MOUNTED HORIZONTALLY (SIDEWAYS)
If you are going to use your Alarm as a direct plug into an outlet that is
mounted horizontally (sideways), you may want to rotate the adapter
90º, as follows:
1. With back of unit facing you (AC blades on your left), place your left
thumb on adapter release and grab AC blades with your right hand
to release the left side.
2. Repeat for the other side adapter thumb release. This will allow
adapter to slide out.
3. Remove adapter.
4. Rotate the adapter 90º and snap firmly back into place.
5. Plug Alarm into AC outlet.
WALL MOUNTED ALARM
Installation tips for power cord models: The power cord option
provides more flexibility in mounting locations and allows the Alarm to
be easily installed at or above eye level.
NOTE: If you mount the Alarm high on a wall, make sure it is at least 4
inches (102 mm) down from the ceiling. Any higher than this, it will be
in “dead air” space and carbon monoxide may not reach the sensor.
NOTE: Do not cover the Alarm with a curtain.
To install for a wall-mount, you will need to pull out the removable
adapter and power cord, as follows:
1. Repeat steps 1 to 3 as described above in “to rotate the adapter”.
2. With adapter out, pull out power cord and unwrap it.
3. Insert the screws provided until head is approx. 1/8 inch (3 mm)
from wall (if mounting in plaster board or drywall, drill 3/16 inch (5
mm) hole and use plastic anchor provided).
4. Hook the Alarm over the screw onto the keyhole in back of unit.
5. Plug power cord into AC outlet.
Tools you will need: Screwdriver, drill.
1. Determine the best location for your CO Alarm.
2. Your Alarm is equipped to be mounted as a corded unit or a direct
plug unit. The unit can be plugged directly into a wall outlet. If your
outlets are mounted horizontally, refer to “If Outlet is Mounted
Horizontally (Sideways)”.
If the adapter is taken out of the unit, the Alarm can be installed
high on the wall, while the adapter is plugged into a wall outlet.
ACTIVATING THE BATTERY BACK-UP
Activate the battery back-up by
installing the two (2) AA batteries.
The battery is for back-up only and
is not intended to power the Alarm
for an extended period of time in
the absence of AC.
SILENCING
This silence fe
“chirp” for up
by pressing th
that the End o
After approxim
approximately
SILENCING THE LOW BATTERY WARNING
Pressing the silence button can stop the low battery “chirp” for up to 8
hours; do not remove the battery or unplug the Alarm, unless changing
the battery. Activation of low battery silence is acknowledged with a
“chirp”.
Once the low battery warning “chirp” silence feature is activated, the
unit continues to flash the red light once a minute for 8 hours. After 8
hours, the low battery “chirp” will resume. Replace the batteries as
soon as possible.
If you cannot silence the low battery warning, replace the
batteries immediately.

Mais conteúdo relacionado

Mais procurados (7)

Fundamental training on Fire Detection & Alarm System
Fundamental training on Fire Detection & Alarm SystemFundamental training on Fire Detection & Alarm System
Fundamental training on Fire Detection & Alarm System
 
Fire Alarm Control Panel Operations
Fire Alarm Control Panel OperationsFire Alarm Control Panel Operations
Fire Alarm Control Panel Operations
 
Fire fighting
Fire fightingFire fighting
Fire fighting
 
Smoke Detection System
Smoke Detection SystemSmoke Detection System
Smoke Detection System
 
CINT alarm systems
CINT alarm systemsCINT alarm systems
CINT alarm systems
 
Chapter 07
Chapter 07Chapter 07
Chapter 07
 
FIRE DETECTION AND ALARM SYSTEM IN HOTEL
FIRE DETECTION AND ALARM SYSTEM IN HOTELFIRE DETECTION AND ALARM SYSTEM IN HOTEL
FIRE DETECTION AND ALARM SYSTEM IN HOTEL
 

Semelhante a FIRST ALERT CO606 120V PLUG-IN CARBON MONOXIDE ALARM WITH BATTERY BACK-UP AND SILENCE FEATURE

Huong dan su dung trung tam bao chay hochiki thuong
Huong dan su dung trung tam bao chay hochiki thuongHuong dan su dung trung tam bao chay hochiki thuong
Huong dan su dung trung tam bao chay hochiki thuong
Camera Hanoi
 

Semelhante a FIRST ALERT CO606 120V PLUG-IN CARBON MONOXIDE ALARM WITH BATTERY BACK-UP AND SILENCE FEATURE (13)

Instruction Manual | ATN OTS-XLT | Optics Trade
Instruction Manual | ATN OTS-XLT | Optics TradeInstruction Manual | ATN OTS-XLT | Optics Trade
Instruction Manual | ATN OTS-XLT | Optics Trade
 
Av r500 uk
Av r500 ukAv r500 uk
Av r500 uk
 
ES1_KORG.pdf
ES1_KORG.pdfES1_KORG.pdf
ES1_KORG.pdf
 
Detector de co american sensors
Detector de co american sensorsDetector de co american sensors
Detector de co american sensors
 
Innova 3145 Ford OBD1 Code Reader User Manual
Innova 3145 Ford OBD1 Code Reader User ManualInnova 3145 Ford OBD1 Code Reader User Manual
Innova 3145 Ford OBD1 Code Reader User Manual
 
1623 operators manual
1623 operators manual1623 operators manual
1623 operators manual
 
Huong dan su dung trung tam bao chay hochiki thuong
Huong dan su dung trung tam bao chay hochiki thuongHuong dan su dung trung tam bao chay hochiki thuong
Huong dan su dung trung tam bao chay hochiki thuong
 
M 1623 om-eng_ 35100_h
M 1623 om-eng_ 35100_hM 1623 om-eng_ 35100_h
M 1623 om-eng_ 35100_h
 
M 1623 om-eng_35100_h
M 1623 om-eng_35100_hM 1623 om-eng_35100_h
M 1623 om-eng_35100_h
 
John deere 4400 compact utility tractor service repair manual
John deere 4400 compact utility tractor service repair manualJohn deere 4400 compact utility tractor service repair manual
John deere 4400 compact utility tractor service repair manual
 
John deere 4200 compact utility tractor service repair manual
John deere 4200 compact utility tractor service repair manualJohn deere 4200 compact utility tractor service repair manual
John deere 4200 compact utility tractor service repair manual
 
John deere 4400 compact utility tractor service repair manual
John deere 4400 compact utility tractor service repair manualJohn deere 4400 compact utility tractor service repair manual
John deere 4400 compact utility tractor service repair manual
 
John deere 4400 compact utility tractor service repair manual
John deere 4400 compact utility tractor service repair manualJohn deere 4400 compact utility tractor service repair manual
John deere 4400 compact utility tractor service repair manual
 

Mais de Toy Hut

Ionization smoke alarm model 0916
Ionization smoke alarm model 0916Ionization smoke alarm model 0916
Ionization smoke alarm model 0916
Toy Hut
 
Kidde smoke alarm 0916,44037502,21006655 english,spanish 8200898 b
Kidde smoke alarm 0916,44037502,21006655 english,spanish 8200898 bKidde smoke alarm 0916,44037502,21006655 english,spanish 8200898 b
Kidde smoke alarm 0916,44037502,21006655 english,spanish 8200898 b
Toy Hut
 
Kiddie smoke detector 0916 manual
Kiddie smoke detector 0916 manualKiddie smoke detector 0916 manual
Kiddie smoke detector 0916 manual
Toy Hut
 
Kidde smoke alarm 0916 manual
Kidde smoke alarm 0916 manualKidde smoke alarm 0916 manual
Kidde smoke alarm 0916 manual
Toy Hut
 
Plantronics 84372 01 adapter cable 2.5 3
Plantronics 84372 01 adapter cable 2.5 3Plantronics 84372 01 adapter cable 2.5 3
Plantronics 84372 01 adapter cable 2.5 3
Toy Hut
 

Mais de Toy Hut (10)

Borax Material Data Sheet - MDS Sodium Tetraborate Decahydrate
Borax Material Data Sheet - MDS Sodium Tetraborate DecahydrateBorax Material Data Sheet - MDS Sodium Tetraborate Decahydrate
Borax Material Data Sheet - MDS Sodium Tetraborate Decahydrate
 
TP Link N750 WDR-4300 Router User Guide
TP Link N750 WDR-4300 Router User GuideTP Link N750 WDR-4300 Router User Guide
TP Link N750 WDR-4300 Router User Guide
 
Ionization smoke alarm model 0916
Ionization smoke alarm model 0916Ionization smoke alarm model 0916
Ionization smoke alarm model 0916
 
Kidde smoke alarm 0916,44037502,21006655 english,spanish 8200898 b
Kidde smoke alarm 0916,44037502,21006655 english,spanish 8200898 bKidde smoke alarm 0916,44037502,21006655 english,spanish 8200898 b
Kidde smoke alarm 0916,44037502,21006655 english,spanish 8200898 b
 
Kiddie smoke detector 0916 manual
Kiddie smoke detector 0916 manualKiddie smoke detector 0916 manual
Kiddie smoke detector 0916 manual
 
Kidde smoke alarm 0916 manual
Kidde smoke alarm 0916 manualKidde smoke alarm 0916 manual
Kidde smoke alarm 0916 manual
 
HDMI 5 Types of Connectors Wikipedia
HDMI 5 Types of Connectors WikipediaHDMI 5 Types of Connectors Wikipedia
HDMI 5 Types of Connectors Wikipedia
 
Plantronics 84372 01 adapter cable 2.5 3
Plantronics 84372 01 adapter cable 2.5 3Plantronics 84372 01 adapter cable 2.5 3
Plantronics 84372 01 adapter cable 2.5 3
 
Plantronics Discovery 975 User Guide
Plantronics Discovery 975 User GuidePlantronics Discovery 975 User Guide
Plantronics Discovery 975 User Guide
 
Booklet panasonic speaker sc ne1 manual.pdf
Booklet panasonic speaker sc ne1 manual.pdfBooklet panasonic speaker sc ne1 manual.pdf
Booklet panasonic speaker sc ne1 manual.pdf
 

Último

IAC 2024 - IA Fast Track to Search Focused AI Solutions
IAC 2024 - IA Fast Track to Search Focused AI SolutionsIAC 2024 - IA Fast Track to Search Focused AI Solutions
IAC 2024 - IA Fast Track to Search Focused AI Solutions
Enterprise Knowledge
 
EIS-Webinar-Prompt-Knowledge-Eng-2024-04-08.pptx
EIS-Webinar-Prompt-Knowledge-Eng-2024-04-08.pptxEIS-Webinar-Prompt-Knowledge-Eng-2024-04-08.pptx
EIS-Webinar-Prompt-Knowledge-Eng-2024-04-08.pptx
Earley Information Science
 

Último (20)

Mastering MySQL Database Architecture: Deep Dive into MySQL Shell and MySQL R...
Mastering MySQL Database Architecture: Deep Dive into MySQL Shell and MySQL R...Mastering MySQL Database Architecture: Deep Dive into MySQL Shell and MySQL R...
Mastering MySQL Database Architecture: Deep Dive into MySQL Shell and MySQL R...
 
Scaling API-first – The story of a global engineering organization
Scaling API-first – The story of a global engineering organizationScaling API-first – The story of a global engineering organization
Scaling API-first – The story of a global engineering organization
 
04-2024-HHUG-Sales-and-Marketing-Alignment.pptx
04-2024-HHUG-Sales-and-Marketing-Alignment.pptx04-2024-HHUG-Sales-and-Marketing-Alignment.pptx
04-2024-HHUG-Sales-and-Marketing-Alignment.pptx
 
Exploring the Future Potential of AI-Enabled Smartphone Processors
Exploring the Future Potential of AI-Enabled Smartphone ProcessorsExploring the Future Potential of AI-Enabled Smartphone Processors
Exploring the Future Potential of AI-Enabled Smartphone Processors
 
GenAI Risks & Security Meetup 01052024.pdf
GenAI Risks & Security Meetup 01052024.pdfGenAI Risks & Security Meetup 01052024.pdf
GenAI Risks & Security Meetup 01052024.pdf
 
Powerful Google developer tools for immediate impact! (2023-24 C)
Powerful Google developer tools for immediate impact! (2023-24 C)Powerful Google developer tools for immediate impact! (2023-24 C)
Powerful Google developer tools for immediate impact! (2023-24 C)
 
Strategies for Landing an Oracle DBA Job as a Fresher
Strategies for Landing an Oracle DBA Job as a FresherStrategies for Landing an Oracle DBA Job as a Fresher
Strategies for Landing an Oracle DBA Job as a Fresher
 
Driving Behavioral Change for Information Management through Data-Driven Gree...
Driving Behavioral Change for Information Management through Data-Driven Gree...Driving Behavioral Change for Information Management through Data-Driven Gree...
Driving Behavioral Change for Information Management through Data-Driven Gree...
 
IAC 2024 - IA Fast Track to Search Focused AI Solutions
IAC 2024 - IA Fast Track to Search Focused AI SolutionsIAC 2024 - IA Fast Track to Search Focused AI Solutions
IAC 2024 - IA Fast Track to Search Focused AI Solutions
 
08448380779 Call Girls In Diplomatic Enclave Women Seeking Men
08448380779 Call Girls In Diplomatic Enclave Women Seeking Men08448380779 Call Girls In Diplomatic Enclave Women Seeking Men
08448380779 Call Girls In Diplomatic Enclave Women Seeking Men
 
08448380779 Call Girls In Civil Lines Women Seeking Men
08448380779 Call Girls In Civil Lines Women Seeking Men08448380779 Call Girls In Civil Lines Women Seeking Men
08448380779 Call Girls In Civil Lines Women Seeking Men
 
Finology Group – Insurtech Innovation Award 2024
Finology Group – Insurtech Innovation Award 2024Finology Group – Insurtech Innovation Award 2024
Finology Group – Insurtech Innovation Award 2024
 
How to Troubleshoot Apps for the Modern Connected Worker
How to Troubleshoot Apps for the Modern Connected WorkerHow to Troubleshoot Apps for the Modern Connected Worker
How to Troubleshoot Apps for the Modern Connected Worker
 
Understanding Discord NSFW Servers A Guide for Responsible Users.pdf
Understanding Discord NSFW Servers A Guide for Responsible Users.pdfUnderstanding Discord NSFW Servers A Guide for Responsible Users.pdf
Understanding Discord NSFW Servers A Guide for Responsible Users.pdf
 
presentation ICT roal in 21st century education
presentation ICT roal in 21st century educationpresentation ICT roal in 21st century education
presentation ICT roal in 21st century education
 
Data Cloud, More than a CDP by Matt Robison
Data Cloud, More than a CDP by Matt RobisonData Cloud, More than a CDP by Matt Robison
Data Cloud, More than a CDP by Matt Robison
 
🐬 The future of MySQL is Postgres 🐘
🐬  The future of MySQL is Postgres   🐘🐬  The future of MySQL is Postgres   🐘
🐬 The future of MySQL is Postgres 🐘
 
From Event to Action: Accelerate Your Decision Making with Real-Time Automation
From Event to Action: Accelerate Your Decision Making with Real-Time AutomationFrom Event to Action: Accelerate Your Decision Making with Real-Time Automation
From Event to Action: Accelerate Your Decision Making with Real-Time Automation
 
Tech Trends Report 2024 Future Today Institute.pdf
Tech Trends Report 2024 Future Today Institute.pdfTech Trends Report 2024 Future Today Institute.pdf
Tech Trends Report 2024 Future Today Institute.pdf
 
EIS-Webinar-Prompt-Knowledge-Eng-2024-04-08.pptx
EIS-Webinar-Prompt-Knowledge-Eng-2024-04-08.pptxEIS-Webinar-Prompt-Knowledge-Eng-2024-04-08.pptx
EIS-Webinar-Prompt-Knowledge-Eng-2024-04-08.pptx
 

FIRST ALERT CO606 120V PLUG-IN CARBON MONOXIDE ALARM WITH BATTERY BACK-UP AND SILENCE FEATURE

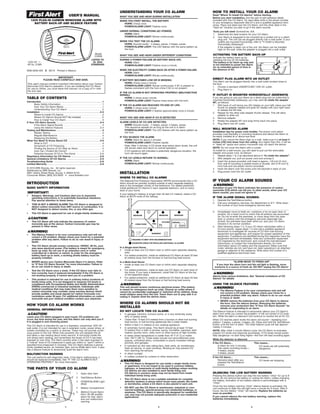
  • 1. INSTALLATION WHERE TO INSTALL CO ALARMS The National Fire Protection Association (NFPA) recommends that a CO Alarm should be centrally located outside of each separate sleeping area in the immediate vicinity of the bedrooms. For added protection, install additional CO Alarms in each separate bedroom, and on every level of your home. If your bedroom hallway is longer than 40 feet (12 meters), install a CO Alarm at BOTH ends of the hallway. In a Single-level Home: • Install at least one CO Alarm near or within each separate sleeping area. • For added protection, install an additional CO Alarm at least 20 feet (6 meters) away from the furnace or fuel burning heat source. In a Multi-level Home: • Install at least one CO Alarm near or within each separate sleeping area. • For added protection, install at least one CO Alarm on each level of the home. If you have a basement, install that CO Alarm at the top of the basement stairs. • For added protection, install an additional CO Alarm at least 20 feet (6 meters) away from the furnace or fuel burning heat source. This unit should receive continuous electrical power. (The battery is meant for emergency back-up only). Choose an outlet where it cannot be accidentally unplugged or switched off by children. Keep small children away from the unit. Teach them not to play with it or unplug it. Explain what the alarms mean. WHERE CO ALARMS SHOULD NOT BE INSTALLED DO NOT LOCATE THIS CO ALARM: • In garages, kitchens, furnace rooms, or in any extremely dusty, dirty or greasy areas. • Closer than 15 feet (4.6 meters) from a furnace or other fuel burning heat source, or fuel burning appliances like a water heater. • Within 5 feet (1.5 meters) of any cooking appliance. • In extremely humid areas. This Alarm should be at least 10 feet (3 meters) from a bath or shower, sauna, humidifier, vaporizer, dish- washer, laundry room, utility room or other source of high humidity. • In areas where temperature is colder than 40˚ F (4˚ C) or hotter than 100˚ F (38˚ C). These areas include non-airconditioned crawl spaces, unfinished attics, uninsulated or poorly insulated ceilings, porches, and garages. • In turbulent air, like near ceiling fans, heat vents, air conditioners, fresh air returns, or open windows. Blowing air may prevent CO from reaching the sensors. • In direct sunlight. • In outlets covered by curtains or other obstruction. • This CO Alarm is designed for use inside a single-family home or apartment. It is not meant to be used in common lobbies, hallways, or basements of multi-family buildings unless working CO Alarms are also installed in each family living unit. CO Alarms in common areas may not be heard from inside individual family living units. • This CO Alarm alone is not a suitable substitute for complete detection systems in places which house many people, like hotels or dormitories, unless a CO Alarm is also placed in each unit. • DO NOT use this CO Alarm in warehouses, industrial or com- mercial buildings, special-purpose non-residential buildings, or airplanes. This CO Alarm is specifically designed for residential use, and may not provide adequate protection in non-residential applications. USER’S MANUAL 120V PLUG-IN CARBON MONOXIDE ALARM WITH BATTERY BACK-UP AND SILENCE FEATURE M08-0206-003 S 08/10 Printed in Mexico IMPORTANT! PLEASE READ CAREFULLY AND SAVE. This user’s manual contains important information about your Carbon Monoxide (CO) Alarm’s operation. If you are installing this CO Alarm for use by others, you must leave this manual—or a copy of it—with the end user. TABLE OF CONTENTS Introduction . . . . . . . . . . . . . . . . . . . . . . . . . . . . . . . . . . . . . . . . . . . . . .1 Basic Safety Information . . . . . . . . . . . . . . . . . . . . . . . . . . . . . . .1 How Your CO Alarm Works . . . . . . . . . . . . . . . . . . . . . . . . . . . . .1 Understanding Your CO Alarm . . . . . . . . . . . . . . . . . . . . . . . . . .2 Installation . . . . . . . . . . . . . . . . . . . . . . . . . . . . . . . . . . . . . . . . . . . . .2-3 Where to Install CO Alarms . . . . . . . . . . . . . . . . . . . . . . . . . . . . .2 Where CO Alarms Should NOT Be Installed . . . . . . . . . . . . . . . .2 How to Install Your CO Alarm . . . . . . . . . . . . . . . . . . . . . . . . . . .3 If Your CO Alarm Sounds . . . . . . . . . . . . . . . . . . . . . . . . . . . . . . . . .3-4 If the Alarm Signal Sounds . . . . . . . . . . . . . . . . . . . . . . . . . . . . .3 Using the Silence Features . . . . . . . . . . . . . . . . . . . . . . . . . . .3-4 Testing and Maintenance . . . . . . . . . . . . . . . . . . . . . . . . . . . . . . . . . . .4 Weekly Testing . . . . . . . . . . . . . . . . . . . . . . . . . . . . . . . . . . . . . . .4 Regular Maintenance . . . . . . . . . . . . . . . . . . . . . . . . . . . . . . . . . .4 Replacing the Battery . . . . . . . . . . . . . . . . . . . . . . . . . . . . . . . . .4 What You Need To Know About CO . . . . . . . . . . . . . . . . . . . . . . . .4-6 What is CO? . . . . . . . . . . . . . . . . . . . . . . . . . . . . . . . . . . . . . . . .4 Symptoms of CO Poisoning . . . . . . . . . . . . . . . . . . . . . . . . . . . .4 Finding the Source of CO After an Alarm . . . . . . . . . . . . . . . . . .4 How Can I Protect My Family? . . . . . . . . . . . . . . . . . . . . . . . . . .4 Potential Sources Of CO In The Home . . . . . . . . . . . . . . . . . .5-6 Regulatory Information for CO Alarms . . . . . . . . . . . . . . . . . . . . . .5-6 General Limitations Of CO Alarms . . . . . . . . . . . . . . . . . . . . . . . . .5-6 Troubleshooting Guide . . . . . . . . . . . . . . . . . . . . . . . . . . . . . . . . . . .5-6 Limited Warranty . . . . . . . . . . . . . . . . . . . . . . . . . . . . . . . . . . . . . . . .5-6 © 2010 BRK Brands, Inc. All rights reserved. Distributed by BRK Brands, Inc. 3901 Liberty Street Road, Aurora, IL 60504-8122 Consumer Affairs: (800) 323-9005 • www.firstalert.com INTRODUCTION BASIC SAFETY INFORMATION • Dangers, Warnings, and Cautions alert you to important operating instructions or to potentially hazardous situations. Pay special attention to these items. • THIS IS NOT A SMOKE ALARM! This CO Alarm is designed to detect carbon monoxide from ANY source of combustion. It is NOT designed to detect smoke, fire, or any other gas. • This CO Alarm is approved for use in single-family residences. • This CO Alarm will only indicate the presence of carbon monoxide gas at the sensor. Carbon monoxide gas may be present in other areas. • The Silence Feature is for your convenience only and will not correct a CO problem. Always check your home for a potential problem after any alarm. Failure to do so can result in injury or death. • This CO Alarm should receive continuous 120VAC, 60 Hz, pure sine wave electrical power. (The battery is meant for emergency back-up only). Do not use in an extension cord or outlet controlled by a dimmer or switch. In order for the emergency battery back-up to work, a working (fresh) battery must be properly installed. • NEVER ignore your Carbon Monoxide Alarm if it alarms. Refer to “If Your CO Alarm Sounds” for more information. Failure to do so can result in injury or death. • Test the CO Alarm once a week. If the CO Alarm ever fails to test correctly, have it replaced immediately! If the CO Alarm is not working properly, it cannot alert you to a problem. • This product is intended for use in ordinary indoor locations of family living units. It is not designed to measure CO levels in compliance with Occupational Safety and Health Administration (OSHA) commercial or industrial standards. Individuals with medical conditions that may make them more sensitive to carbon monoxide may consider using warning devices which provide audible and visual signals for carbon monoxide con- centrations under 30 ppm. For additional information on carbon monoxide and your medical condition contact your physician. HOW YOUR CO ALARM WORKS GENERAL INFORMATION Leave your CO Alarm plugged in year-round. CO problems can occur any time during the year, and this Alarm can only alert you if it is plugged in and receiving power. This CO Alarm is intended for use in a standard, unswitched 120V AC wall outlet. It is not intended for use in extension cords, power strips, or outlets controlled by a switch or dimmer. These may not provide contin- uous power to the unit. When fully powered, the unit samples the air and takes a new reading about every second. A microchip inside the unit stores each reading, and remembers the levels of CO it has been exposed to over time. The Alarm sounds when it has been exposed to a “critical” level of CO (measured in parts per million or “ppm”) within a specified time (measured in minutes). This CO Alarm features a perma- nently installed sensor, an indicator light, and an 85dB alarm horn. It also has a Silence Feature to temporarily quiet the alarm horn. MALFUNCTION WARNING This unit performs self-diagnostic tests. If the Alarm malfunctions, it should be replaced immediately. See "IF THE CO ALARM IS NOT OPERATING PROPERLY" for more information. THE PARTS OF YOUR CO ALARM 1 2 3 1 Open door here 2 Test/Silence Button 3 POWER/ALARM Light (Red) 4 Battery Compartment 5 (Behind Cover) Alarm Horn: 85 dB audible alarm for test, alarm, and unit malfunction warning. UNDERSTANDING YOUR CO ALARM WHAT YOU SEE AND HEAR DURING INSTALLATION GARAGE SUGGESTED AREAS FOR INSTALLING ADDITIONAL CO ALARMS BEDROOMBEDROOM HALLLIVING ROOM KITCHEN BASEMENT BEDROOM REQUIRED TO MEET NFPA RECOMMENDATIONS HOW TO INSTALL YOUR CO ALARM Read “Where To Install CO Alarms” before starting. Before you start installation, find the pair of self-adhesive labels included with this CO Alarm. On each label write in the phone number of your emergency responder (like 911) and a qualified appliance tech- nician. Place one label near the CO Alarm, and the other label in the “fresh air” location you plan to go if the alarm sounds. IF YOUR CO ALARM SOUNDS Actuation of your CO Alarm indicates the presence of carbon monoxide (CO) which can kill you. In other words, when your CO Alarm sounds, you must not ignore it! IF THE ALARM SIGNAL SOUNDS: 1. Operate the Test/Silence button. 2. Call your emergency services, fire department or 911. Write down the number of your local emergency service here: ____________________________________________________________ 3. Immediately move to fresh air—outdoors or by an open door or window. Do a head count to check that all persons are accounted for. Do not re-enter the premises, or move away from the open door or window until the emergency services responder has arrived, the premises have been aired out, and your CO Alarm remains in its normal condition. 4. After following steps 1-3, if your CO Alarm reactivates within a 24-hour period, repeat steps 1-3 and call a qualified appliance technician to investigate for sources of CO from fuel-burning equipment and appliances, and inspect for proper operation of this equipment. If problems are identified during this inspection have the equipment serviced immediately. Note any combustion equipment not inspected by the technician, and consult the manufacturers’ instructions, or contact the manufacturers directly, for more information about CO safety and this equipment. Make sure that motor vehicles are not, and have not, been operating in an attached garage or adjacent to the residence. Write down the number of a qualified appliance technician here: ____________________________________________________________ Alarms have various limitations. See "General Limitations of CO Alarms" for details. USING THE SILENCE FEATURES • The Silence Feature is for your convenience only and will not correct a CO problem. Always check your home for a potential problem after any alarm. Failure to do so can result in injury or death. • NEVER remove the batteries from your CO Alarm to silence the horn. Use the silence feature. Removing the batteries removes your protection! See “If Your CO Alarm Sounds” for details on responding to an alarm. The Silence Feature is intended to temporarily silence your CO Alarm’s alarm horn while you correct the problem—it will not correct a CO prob- lem. While the alarm is silenced it will continue to monitor the air for CO. When CO reaches alarm levels the alarm will sound— repeating horn pattern: 4 beeps, a pause, 4 beeps, etc. Press and hold the Test/Silence button until the horn is silent. The initial Silence cycle will last approxi- mately 4 minutes. NOTE: After initial 4-minute Silence cycle, the CO Alarm re-evaluates present CO levels and responds accordingly. If CO levels remain poten- tially dangerous—or start rising higher—the horn will start sounding again. While the detector is silenced: “ALARM-MOVE TO FRESH AIR” If you hear the alarm horn and the red light is flashing, move everyone to a source of fresh air. DO NOT unplug the CO Alarm! WHAT Y WHAT IS C CO is an invis do not burn c appliances ty These fuels i kerosene, and Common app maintained, a quickly. CO is “Air-tight” hom weatherproofi SYMPTOM These sympto discussed wit Mild Exposur Slight headac Medium Exp Throbbing he Extreme Exp Convulsions, carbon mono Some individ people with c pregnant mo severely affe consult their FINDING T Carbon mono difficult to loc the factors th • House w • Problem • Transient Because CO be difficult to obligated to call. HOW CAN A CO Alarm is sounds a loud for average, h A CO Alarm appliances. To help preve • Clean ch and nests rust and prevent p or cover • Test and local gas inspectio • Make reg Check ap flame on A yellow may be p vents or f Make sur barbecue • Check fo hood on furnace h • Check th • Keep win escaping windows In addition, f this manual i do if your CO TESTIN WEEKLY Press the Tes During testing 4 beeps, paus The alarm seq sure the unit i does not alarm • If the Ala Products replacem • DO NOT Exposure When te • NEVER u damage REGULA To keep the C • Test it ev • Vacuum t brush att they may • Replace Warning” The Low (or minute. REPLACIN Choosing a R This CO Alarm batteries are a replacement b Use only the operate prope since they ma To Replace T 1. Open the 2. Use the t 3. Insert the battery c 4. Close the pressing 5. Plug the DO NOT spra near the CO may cause p • Househo can affec CO Alarm • If your ho put it wh fumigatio back in a 120V AC ~, 60 Hz, 0.09A WHEN YOU FIRST INSTALL THE BATTERY: HORN: Chirps once POWER/ALARM LIGHT: Flashes once UNDER NORMAL CONDITIONS (AC POWER): HORN: Silent POWER/ALARM LIGHT: Shines continuously WHEN YOU TEST THE CO ALARM: HORN: Sounds loudly - 4 beeps, pause, 4 beeps, pause POWER/ALARM LIGHT: The LED flashes with the same pattern as the horn. WHAT YOU SEE AND HEAR UNDER DIFFERENT CONDITIONS DURING A POWER FAILURE (IN BATTERY BACK-UP): HORN: Silent POWER/ALARM LIGHT: Flashes once a minute. WHEN THE ELECTRICITY COMES BACK ON AFTER A POWER FAILURE: HORN: Silent POWER/ALARM LIGHT: Shines continuously. IF BATTERY BECOMES LOW OR IS MISSING: HORN: Chirps once a minute POWER/ALARM LIGHT: Shines continuously if AC is present or flashes coincident with the horn-chirp if AC is not present. IF THE CO ALARM IS NOT OPERATING PROPERLY (MALFUNCTION SIGNAL): HORN: 3 chirps every minute POWER/ALARM LIGHT: Flashes three times with the horn. IF THE CO ALARM HAS REACHED ITS END OF LIFE: HORN: 5 chirps every minute POWER/ALARM LIGHT: 5 flashes approximately once a minute. WHAT YOU SEE AND HEAR IF CO IS DETECTED ALARM LEVELS OF CO ARE DETECTED: HORN: Sounds loudly - 4 beeps, pause, 4 beeps, pause. This sequence repeats for as long as the unit is in alarm. POWER/ALARM LIGHT: The LED flashes with the same pattern as the horn. IF YOU SILENCE THE ALARM: HORN: Silent for about 4 minutes POWER/ALARM LIGHT: Flashes rapidly Note: After 4 minutes, if CO levels drop below alarm levels, the unit will remain silent and return to normal operation. If CO presence still indicates a potentially dangerous situation, the horn will sound again. IF THE CO LEVELS RETURN TO NORMAL: HORN: Silent POWER/ALARM LIGHT: Shines continuously 3 4 5 1 2 USING THE If the CO Alarm... Is silent for only 4 minutes, then starts sounding loudly— 4 beeps, pause, 4 beeps, pause This means... CO levels are still potentially dangerous. If the CO Alarm... Remains silent after you pressed the Test/Silence button This means... CO levels are dropping. Model CO606 LISTED TO UL 2034 STANDARD DIRECT PLUG ALARM INTO AN OUTLET This Alarm can be plugged directly into a wall outlet located close to the floor. 1. Choose a standard UNSWITCHED 120V AC outlet. 2. Plug Alarm in. IF OUTLET IS MOUNTED HORIZONTALLY (SIDEWAYS) If you are going to use your Alarm as a direct plug into an outlet that is mounted horizontally (sideways), you may want to rotate the adapter 90º, as follows: 1. With back of unit facing you (AC blades on your left), place your left thumb on adapter release and grab AC blades with your right hand to release the left side. 2. Repeat for the other side adapter thumb release. This will allow adapter to slide out. 3. Remove adapter. 4. Rotate the adapter 90º and snap firmly back into place. 5. Plug Alarm into AC outlet. WALL MOUNTED ALARM Installation tips for power cord models: The power cord option provides more flexibility in mounting locations and allows the Alarm to be easily installed at or above eye level. NOTE: If you mount the Alarm high on a wall, make sure it is at least 4 inches (102 mm) down from the ceiling. Any higher than this, it will be in “dead air” space and carbon monoxide may not reach the sensor. NOTE: Do not cover the Alarm with a curtain. To install for a wall-mount, you will need to pull out the removable adapter and power cord, as follows: 1. Repeat steps 1 to 3 as described above in “to rotate the adapter”. 2. With adapter out, pull out power cord and unwrap it. 3. Insert the screws provided until head is approx. 1/8 inch (3 mm) from wall (if mounting in plaster board or drywall, drill 3/16 inch (5 mm) hole and use plastic anchor provided). 4. Hook the Alarm over the screw onto the keyhole in back of unit. 5. Plug power cord into AC outlet. Tools you will need: Screwdriver, drill. 1. Determine the best location for your CO Alarm. 2. Your Alarm is equipped to be mounted as a corded unit or a direct plug unit. The unit can be plugged directly into a wall outlet. If your outlets are mounted horizontally, refer to “If Outlet is Mounted Horizontally (Sideways)”. If the adapter is taken out of the unit, the Alarm can be installed high on the wall, while the adapter is plugged into a wall outlet. ACTIVATING THE BATTERY BACK-UP Activate the battery back-up by installing the two (2) AA batteries. The battery is for back-up only and is not intended to power the Alarm for an extended period of time in the absence of AC. SILENCING This silence fe “chirp” for up by pressing th that the End o After approxim approximately SILENCING THE LOW BATTERY WARNING Pressing the silence button can stop the low battery “chirp” for up to 8 hours; do not remove the battery or unplug the Alarm, unless changing the battery. Activation of low battery silence is acknowledged with a “chirp”. Once the low battery warning “chirp” silence feature is activated, the unit continues to flash the red light once a minute for 8 hours. After 8 hours, the low battery “chirp” will resume. Replace the batteries as soon as possible. If you cannot silence the low battery warning, replace the batteries immediately.