08448380779 Call Girls In Greater Kailash - I Women Seeking Men
Dhcp migration from 2003 to 2012 server
1. PREPARED BY RAVI KUMAR LANKE Page 1
Step-By-Step: Migration of
DHCP from Windows Server
2003 to Windows Server 2012
Migration from Windows Server 2003 to 2012 has been deemed troublesome by few as
the netsh DHCP command-line was replaced in Windows Server 2012 by
PowerShell. The process however is actually quite easy and can be completed in a few
steps.
Prerequisite
Download Windows Server 2012. If you plan on completing this Step-By-Step in a
virtual lab, it is recommended to download the FREE Hyper-V Server 2012 first.
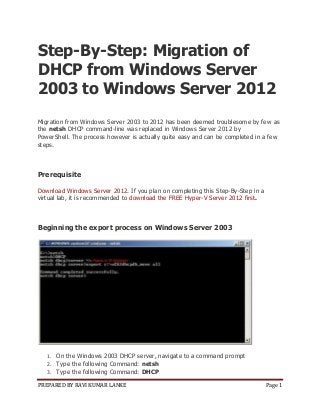
Beginning the export process on Windows Server 2003
1. On the Windows 2003 DHCP server, navigate to a command prompt
2. Type the following Command: netsh
3. Type the following Command: DHCP
2. PREPARED BY RAVI KUMAR LANKE Page 2
4. Type the following Command: server Name or IP Address
5. Type the following Command: export c:w2k3DHCPdb all
Note You must have local administrator permissions to export the data.
Importing the DHCP database on Windows Server 2012
1. Copy the exported DHCP database file to the local hard disk of the Windows
Server 2008-based computer.
2. From within Server Manager, select Add roles and features
3. PREPARED BY RAVI KUMAR LANKE Page 3
3. Select Role-based of featured-based installation and select Next.
4. On the Server Selection window, leave the default and select Next. When
the Server Roles window opens, select DHCP. Select Add Features in the pop-
up window, then select Next.
4. PREPARED BY RAVI KUMAR LANKE Page 4
5. Once the DHCP install has been completed, select DHCP located in the Server
Manager dashboard
6. Right click the designated DHCP server in the services pane, then select Stop.
7. Delete the DHCP.mdb file under c:windowssystem32DHCP folder.
8. Return to DHCP located in the Server Manager dashboard
9. Right click the designated DHCP server in the services pane, then select Start.
10. Right-click on the bottom left hand side of the desktop screen to invoke the
admin menu
5. PREPARED BY RAVI KUMAR LANKE Page 5
11. Select Command Prompt (Admin) to open the cmd prompt using elevated
privileges.
12. Type the following Command: netsh
13. Type the following Command: DHCP
14. Type the following Command: server Name or IP Address
15. Type the following Command: import c:w2k3DHCPdb
16. Close the command prompt when completed.
17. Return to DHCP located in the Server Manager dashboard.
18. Right click the designated DHCP server in the services pane,
then select Restart.
19. Disable and remove DHCP from the Windows 2003 server.
Simply setup your scope options for your new Windows Server 2012 DHCP server and
then Authorize it within your domain and the migration is complete.