Mais conteúdo relacionado
Photo story 3_guide
- 1. Creating Multimedia Video Files using Microsoft Photo Story 3
Microsoft® Photo Story 3 allows you to create fantastic multimedia video presentations
using still images combined with text, narration and music. If you haven’t already
downloaded Microsoft Photo Story 3 then visit the Microsoft website to download this
complimentary program. Photo Story 3 works with Microsoft Windows XP. You also
need Microsoft Media Player Version 10 which you can access from the Microsoft
website. Now that you have everything installed and ready to run, let’s get started.
Microsoft Photo Story 3
Microsoft Photo Story 3 runs on a wizard which will take you step by step through the
process of creating your own multimedia video file. Remember to click Save Project
after each step of the process so you don’t loose all your work.
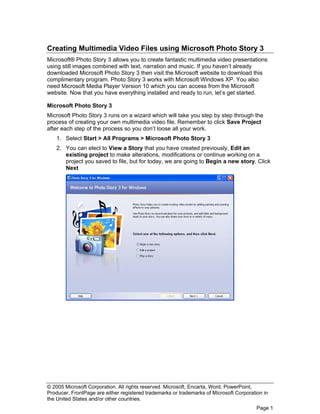
1. Select Start > All Programs > Microsoft Photo Story 3
2. You can elect to View a Story that you have created previously, Edit an
existing project to make alterations, modifications or continue working on a
project you saved to file, but for today, we are going to Begin a new story. Click
Next
© 2005 Microsoft Corporation. All rights reserved. Microsoft, Encarta, Word, PowerPoint,
Producer, FrontPage are either registered trademarks or trademarks of Microsoft Corporation in
the United States and/or other countries.
Page 1
- 2. Importing and Editing Images
You can use still images that you have downloaded from a digital camera, scanned, or
saved from the web. When searching for images from the web don’t forget to check out
Microsoft® Encarta which has a great range of copyright free images for you to use.
1. Click Import Images
2. From the directory, open the folder where you have saved your images
3. Select the images you would like to import by clicking on them. If you would like
to import multiple images simultaneously, hold down the Ctrl key while selecting
your pictures
© 2005 Microsoft Corporation. All rights reserved. Microsoft, Encarta, Word, PowerPoint,
Producer, FrontPage are either registered trademarks or trademarks of Microsoft Corporation in
the United States and/or other countries.
Page 2
- 3. 4. Your images will be imported to the timeline. You can adjust the order or your
images by dragging and dropping them on the timeline or by highlighting the
image and using the left and right arrows to move its position
5. Microsoft Photo Story has several image editing options including the ability to
adjust the colour levels, crop or rotate the image, remove red eye, and apply
effects such as black and white or watercolour filters. Microsoft Photo Story will
even remove the black borders from your images to optimise the appearance of
your final product
6. Edit your images to suit and select Next
Adding Text
You may like to add text to your images such as a title for your presentation.
1. Select your image on the timeline and type in your text
2. Adjust the font, colour and position of your text to suit
© 2005 Microsoft Corporation. All rights reserved. Microsoft, Encarta, Word, PowerPoint,
Producer, FrontPage are either registered trademarks or trademarks of Microsoft Corporation in
the United States and/or other countries.
Page 3
- 4. 3. When you have completed adding text to your images, select Next
Recording Narration and Customising Motion and Transitions
Now it’s time to record the narration to accompany each slide, set the zooming and
panning effects for your images, and apply transition effects. It is often a good idea to
record your narration before setting your motion effects as the duration of your narration
can impact on the speed of your zooms and pans.
Recording the narration
1. Type in the notes for your narration. You can even copy and paste your text from
other documents such as Microsoft® Word
© 2005 Microsoft Corporation. All rights reserved. Microsoft, Encarta, Word, PowerPoint,
Producer, FrontPage are either registered trademarks or trademarks of Microsoft Corporation in
the United States and/or other countries.
Page 4
- 5. 2. Plug your microphone in. If this is the first time you are using Microsoft Photo
Story, you may like to configure your microphone first to ensure that you are
getting the best possible sound quality
3. Click the red record button and speak clearly into the microphone. You can
continue to record your narration by simply clicking on the next image in your
timeline. Alternatively, you may like to stop and compose yourself before
beginning the next image, in which case click the stop button, click on the next
image in the timeline, then click the record button when you’re ready. If you make
a mistake you can simply erase your narration and record it again. With your
notes typed in, you always know where you are up to
4. Select Preview to view your project
Customising Motion
1. Click Customise Motion
2. Two copies of your image is displayed where your image will start and finish. You
may like to stay with the suggestion that the program has made for you.
Alternatively, you can select Specify start and end position of motion. Adjust
the start and end position by dragging and resizing each image to suit
3. You can elect to have the program choose the duration that the motion will take
or alternatively, you may like to adjust this yourself. If you have recorded
narration, the duration of the motion can not be less than the length of the
recording
© 2005 Microsoft Corporation. All rights reserved. Microsoft, Encarta, Word, PowerPoint,
Producer, FrontPage are either registered trademarks or trademarks of Microsoft Corporation in
the United States and/or other countries.
Page 5
- 6. Transition
1. Click on the Transition tab
2. View the many different transition effects by clicking on them. Once you have
chosen a transition to suit, click Save
3. Continue to add transitions to each of your images. Once you have finished
adding transition and customise motions, click Close, then click Next
Add Background Music
Music is a wonderful way of adding mood to your project. You may like to use a music
file that you have saved to file, or create your own masterpiece within the program.
1. To add a piece of music that you have saved to file, click Select Music
2. Locate your music file from the directory and click Open
3. You can select several different pieces of music to play throughout your project.
Click on the image on the timeline that you would like the second piece of music
to begin from and click Select Music and open the second music file you would
like to import. Each time you add another piece of music, the colour bar on the
time line will change to distinguish each individual music file
NB: If you do not use your own photos, pictures and music, please ensure you
include a bibliography in your photo story. Please respect copyright in your photo
story and only use photos, pictures or music for which you have the rights.
© 2005 Microsoft Corporation. All rights reserved. Microsoft, Encarta, Word, PowerPoint,
Producer, FrontPage are either registered trademarks or trademarks of Microsoft Corporation in
the United States and/or other countries.
Page 6
- 7. 4. You may like to compose your own piece of music to accompany your project by
clicking Create Music. Select a genre, style, band and mood to suit. Click OK to
insert your composition onto the timeline
5. Adjust the volume of the music to suit. If you have included a recorded narration,
you will need to adjust the volume lower so that your voice can be heard over the
music. By selecting Preview and viewing your presentation in play mode, you will
be able to make those fine tuning adjustments so that your project is just right
© 2005 Microsoft Corporation. All rights reserved. Microsoft, Encarta, Word, PowerPoint,
Producer, FrontPage are either registered trademarks or trademarks of Microsoft Corporation in
the United States and/or other countries.
Page 7
- 8. Save your story
Photo Story publishes your completed project as a .wmv file. There are a number of
save settings to choose from depending on how and where you would like your file to be
viewed.
1. Select what you would like to do with your story from the list of options
2. Click Browse and select where you would like your story to be saved to
3. Give your story a name and select Save
4. If you want to make specific changes to the quality and size of the completed file,
select Settings, otherwise leave it on the default setting
5. Click Next
Photo Story will now publish your completed story in the format that you have selected.
You will be given the option to view the file.
© 2005 Microsoft Corporation. All rights reserved. Microsoft, Encarta, Word, PowerPoint,
Producer, FrontPage are either registered trademarks or trademarks of Microsoft Corporation in
the United States and/or other countries.
Page 8
- 9. If you remembered to Save Project throughout the creation process, you can easily and
quickly go back to the project to make any necessary changes.
What next?
Now that you have completed and published your Photo Story, what are you going to do
with it?
Did you know that you can use Microsoft® Producer to synchronise PowerPoint
slides with video and audio files?
Have you thought about importing your Photo Story to Microsoft Movie Maker to
add further effects and features?
Have you considered importing your Photo Story to a web page created in
Microsoft® Front Page?
There are so many options, which one will you take? Your students will have hundreds
more ideas, so let them loose with it and watch while they discover, learn and have fun
using this fantastic multimedia program.
To access more Photo Story resources, please visit the Microsoft Education Resource
Centre at www.microsoft.com/australia/education/resourcecentre/k12resources.aspx
© 2005 Microsoft Corporation. All rights reserved. Microsoft, Encarta, Word, PowerPoint,
Producer, FrontPage are either registered trademarks or trademarks of Microsoft Corporation in
the United States and/or other countries.
Page 9