SlideShare uma empresa Scribd logo
1 de 19
Baixar para ler offline
Contents

I.     Introduction…………………………………….……….....................p.1

II.    User Interface…………………………………….…………………..p.2

III.   Obtaining Software…………………………………………………..p.3-4

IV.    Installation…………………………………………….……………...p.4-9

V.     Opening Aptana Studio 3…………………………………….………p.10-11

VI.    Creating a new file in Aptana Studio 3………………………………p.12-15

VII.   Running a program in Aptana Studio 3……………………………....p.16-17

VIII. Saving a file or project in Aptana Studio 3…………………………..p.18
I.      Introduction

        Aptana Studio is an open source INTEGRATED DEVELOPMENT ENVIRONMENT(IDE) for
building Ajax web applications. It supports JavaScript, HTML, DOM and CSS with code-completion,
outlining, JavaScript debugging, error and warning notifications and integrated documentation. Additional
plugins allow Aptana Studio to support Ruby on Rails, PHP, Python, Perl, Adobe AIR, Apple iPhone and
Nokia WRT (Web Runtime). Aptana Studio is based on Eclipse and is available as a standalone on
Windows, Mac OS X and Linux, or as a plugin for Eclipse. Aptana Studio provides support for Python in the
form of the PyDev plugin. This provides color syntax highlighting, code assist, code outlining, debugging
and integrated support for Python, Jython and IronPython interpreters. Aptana announced that their
previously commercial Pydev Extensions are now open sourced. Aptana is currently led by Paul Colton,
Founder and CEO, Uri Sarid, CTO/VP, Engineering and Kevin Hakman, Director of Evangelism. The staff
headcount surpassed 25 after September 1, 2008. Aptana is an active participant in the OpenAjax Alliance,
with Hakman serving as director of the IDE Working Group.

Aptana was acquired by Appcelerator, Inc. on January 7, 2011. Employees of Aptana were absorbed to the
Mountain View campus of Appcelerator and work is scheduled to continue on the release of Aptana 3.0.
Appcelerator in their webcast made users aware of their intention to integrate their mobile application
framework with Aptana Studio, with a planned beta within Q1 2011. Emphasis on visual workflow was
indicated for both of the products and continued support will continue for existing Aptana products.
Appcelerator put Jaxer on github.


                                                                                                        Page 1 of 18

 Introduction to        BSIT - 2A                 Date developed:        Issued by: Mr. Joel Laurencio II
 Aptana Studio 3        TVET - 211                July 23, 2012
                                                                         Revision # 0.0
II.           User Interface

          7                                        8
                                                                                                      4
                                                       6


              3
                                                                     1


                         5


                                              2


1             Code editor- the work       4       Debug and web               7       Themes icon – where a
              area.                               perspective view                    user can change the
                                                                                      color of fonts and
2             Problem view: Shows the     5                                           background of the work
                                                  App explorer, Outline,
              errors and warnings in a                                                area
                                                  and sample tabs
              users code

3             Project explorer            6       File/project tabs at        8       Run Icon – to run the
              view- Navigate and                  top of code editor to               program in a web
              manage projects                     switch between open                 browser
              and files                           files


                                                                                                          Page 2 of 18

Introduction to              BSIT - 2A                 Date developed:     Issued by: Mr. Joel Laurencio II
Aptana Studio 3              TVET - 211                July 23, 2012
                                                                           Revision # 0.0
III.    Obtaining software

  1. Go to this website/link: http://www.aptana.com/

  2. And then click                       to download it. Don’t worry its virus-free and no registration is
     needed ‘it’s free.’


  3. And it will link to this page at then to finally download it click the download button bellow.


                                                                                                      Page 3 of 18

Introduction to       BSIT - 2A                  Date developed:       Issued by: Mr. Joel Laurencio II
Aptana Studio 3       TVET - 211                 July 23, 2012
                                                                       Revision # 0.0
4. And the downloading process will start automatically


  IV.     Installation

  1. Once the download I complete go to the download folder destination.
     Ex.


                                                                                                  Page 4 of 18

Introduction to      BSIT - 2A                Date developed:      Issued by: Mr. Joel Laurencio II
Aptana Studio 3      TVET - 211               July 23, 2012
                                                                   Revision # 0.0
2. And then click to start the installation and click YES.


  3. And the Aptana studio 3 can now be install, click next.


                                                                                                  Page 5 of 18

Introduction to       BSIT - 2A                  Date developed:   Issued by: Mr. Joel Laurencio II
Aptana Studio 3       TVET - 211                 July 23, 2012
                                                                   Revision # 0.0
4. Choose a folder in which to install Aptana studio and click next.


  5. Select the folder in which to create start menu shortcuts Aptana Studio and click next.


                                                                                                        Page 6 of 18

Introduction to       BSIT - 2A                 Date developed:          Issued by: Mr. Joel Laurencio II
Aptana Studio 3       TVET - 211                July 23, 2012
                                                                         Revision # 0.0
6. Select which file extension you wish associated with this application and click next.


  7. Set up has finished gathering information and is ready to install aptana studio. Set up is ready to
     install Aptana studio 3 on your computer. Click install to start installation.


                                                                                                       Page 7 of 18

Introduction to       BSIT - 2A                  Date developed:        Issued by: Mr. Joel Laurencio II
Aptana Studio 3       TVET - 211                 July 23, 2012
                                                                        Revision # 0.0
8. Just wait wail the Aptana Studio 3 is being installed this will just take few minutes.


  9. All of the components of Aptana Studio 3 were successfully is copied to your computer. Click next.


                                                                                                       Page 8 of 18

Introduction to       BSIT - 2A                  Date developed:        Issued by: Mr. Joel Laurencio II
Aptana Studio 3       TVET - 211                 July 23, 2012
                                                                        Revision # 0.0
10. Installation complete. Click close to exit set up.


                                                                                                    Page 9 of 18

Introduction to        BSIT - 2A                   Date developed:   Issued by: Mr. Joel Laurencio II
Aptana Studio 3        TVET - 211                  July 23, 2012
                                                                     Revision # 0.0
V.      Opening Aptana Studio 3

  1. Open/click Aptana studio 3 on your desktop or start menu.


  2. It will open and ask for a workspace (Aptana studio 3 a stores your project in folder called
     Workspace). Choose a workspace folder to use in current session.


                                                                                                     Page 10 of 18

Introduction to       BSIT - 2A                  Date developed:       Issued by: Mr. Joel Laurencio II
Aptana Studio 3       TVET - 211                 July 23, 2012
                                                                       Revision # 0.0
3. And this is the Aptana when opened.


                                                                                           Page 11 of 18

Introduction to     BSIT - 2A              Date developed:   Issued by: Mr. Joel Laurencio II
Aptana Studio 3     TVET - 211             July 23, 2012
                                                             Revision # 0.0
VI.    Creating a new file in Aptana Studio 3
  1. Click File on the menu tab.
  2. Select new and then
  3. Select File


                                                                                       Page 12 of 18

Introduction to   BSIT - 2A            Date developed:   Issued by: Mr. Joel Laurencio II
Aptana Studio 3   TVET - 211           July 23, 2012
                                                         Revision # 0.0
4. Type the Filename (ex. Hello.html)


                                                                               Select a folder to save
                                                                               file.


                                                                                This is where to type
                                                                                the file name


  5. If a user will click
     next this will appear.
                                                                                A user can select
                                                                                either of these
                                                                                available templates


                                                                                This is the code of
                                                                                a selected
                                                                                template.


                                                                                          Page 13 of 18

Introduction to       BSIT - 2A           Date developed:   Issued by: Mr. Joel Laurencio II
Aptana Studio 3       TVET - 211          July 23, 2012
                                                            Revision # 0.0
6. But if a user will click finish button he/she can start coding on his/her own.


Another way of creating new file from template

       1. Click File->New From Template->HTML and XHTML – 1.0 Transitional Template (*.html)


                                                                                                      Page 14 of 18

 Introduction to       BSIT - 2A                  Date developed:       Issued by: Mr. Joel Laurencio II
 Aptana Studio 3       TVET - 211                 July 23, 2012
                                                                        Revision # 0.0
2. And this is the code.


        There is no difference in expected output of a page in using Aptana studio or a notepad. The thing is,
using Aptana Studio will help the user to create or type the codes easily, because when a user type a tag or
element there are suggestions that will appear and it will automatically create a closing tag. A user can also
detect the errors easily and conveniently.


                                                                                                       Page 15 of 18

 Introduction to           BSIT - 2A               Date developed:       Issued by: Mr. Joel Laurencio II
 Aptana Studio 3           TVET - 211              July 23, 2012
                                                                         Revision # 0.0
VII.    Running a program in Aptana Studio 3

  There are 4 methods a user can run the program:

  1. By going to the folder or location where a user saved his/her file.


                                                                                                 Just click any of a
                                                                                                 saved file to view in a
                                                                                                 web browser.


  2. By using a shortcut key “ctrl+F11” And the file will automatically open in a web browser.

  3. By Clicking the “Run                                       icon”        above the Aptana Studio.


                                                                                                      Page 16 of 18

Introduction to       BSIT - 2A                  Date developed:        Issued by: Mr. Joel Laurencio II
Aptana Studio 3       TVET - 211                 July 23, 2012
                                                                        Revision # 0.0
4. Or by selecting the file to be run in the left portion of Aptana Studio.

          o Right click the file
          o Select “Open with”
          o And select “Web browser”


  Web browser (firefox)


   Using Aptana Studio Web Browser


                                                                                                      Page 17 of 18

Introduction to       BSIT - 2A                   Date developed:       Issued by: Mr. Joel Laurencio II
Aptana Studio 3       TVET - 211                  July 23, 2012
                                                                        Revision # 0.0
VIII. Saving a file or project in Aptana Studio 3
  o Upon creating a file a user also save his/her files or project in a selected folder. After coding, before
     running a program a user must save the changes in his/her file he/she created.
  o Using shortcut key “ctrl+s”
  o Or go to ‘File’ and select ‘save’


                                                                                                      Page 18 of 18

Introduction to       BSIT - 2A                  Date developed:        Issued by: Mr. Joel Laurencio II
Aptana Studio 3       TVET - 211                 July 23, 2012
                                                                        Revision # 0.0

Mais conteúdo relacionado

Semelhante a Introduction to Aptana

Creating_Installers_for_Java_Applications-report
Creating_Installers_for_Java_Applications-reportCreating_Installers_for_Java_Applications-report
Creating_Installers_for_Java_Applications-report
tutorialsruby
 
Creating_Installers_for_Java_Applications-report
Creating_Installers_for_Java_Applications-reportCreating_Installers_for_Java_Applications-report
Creating_Installers_for_Java_Applications-report
tutorialsruby
 
Troubleshooting guide
Troubleshooting guideTroubleshooting guide
Troubleshooting guide
jameszzzzz
 
Troubleshooting guide
Troubleshooting guideTroubleshooting guide
Troubleshooting guide
jameszzzz
 
ContentsTeam Work Schedule3Team Task Assignment3Project .docx
ContentsTeam Work Schedule3Team Task Assignment3Project .docxContentsTeam Work Schedule3Team Task Assignment3Project .docx
ContentsTeam Work Schedule3Team Task Assignment3Project .docx
bobbywlane695641
 
INSTALLING SOFTWARE
INSTALLING SOFTWAREINSTALLING SOFTWARE
INSTALLING SOFTWARE
EchelleOgatis
 

Semelhante a Introduction to Aptana (20)

00 how to_test_app
00 how to_test_app00 how to_test_app
00 how to_test_app
 
Getting started windows phone unity
Getting started windows phone unityGetting started windows phone unity
Getting started windows phone unity
 
Tobii Studio 2.0 Release Notes
Tobii Studio 2.0 Release NotesTobii Studio 2.0 Release Notes
Tobii Studio 2.0 Release Notes
 
Creating_Installers_for_Java_Applications-report
Creating_Installers_for_Java_Applications-reportCreating_Installers_for_Java_Applications-report
Creating_Installers_for_Java_Applications-report
 
Creating_Installers_for_Java_Applications-report
Creating_Installers_for_Java_Applications-reportCreating_Installers_for_Java_Applications-report
Creating_Installers_for_Java_Applications-report
 
New in orangescrum bug and issue tracking feature released
New in orangescrum   bug and issue tracking feature releasedNew in orangescrum   bug and issue tracking feature released
New in orangescrum bug and issue tracking feature released
 
The Different Versions of Dot NET
The Different Versions of Dot NETThe Different Versions of Dot NET
The Different Versions of Dot NET
 
Girl Gets Ring
Girl Gets RingGirl Gets Ring
Girl Gets Ring
 
Troubleshooting guide
Troubleshooting guideTroubleshooting guide
Troubleshooting guide
 
Troubleshooting guide
Troubleshooting guideTroubleshooting guide
Troubleshooting guide
 
Jenkins
JenkinsJenkins
Jenkins
 
JUnit and MUnit Set Up In Anypoint Studio
JUnit and MUnit Set Up In Anypoint StudioJUnit and MUnit Set Up In Anypoint Studio
JUnit and MUnit Set Up In Anypoint Studio
 
manual vvtk camera_st7501
manual vvtk camera_st7501manual vvtk camera_st7501
manual vvtk camera_st7501
 
Netbeans gui tutorial
Netbeans gui tutorialNetbeans gui tutorial
Netbeans gui tutorial
 
ContentsTeam Work Schedule3Team Task Assignment3Project .docx
ContentsTeam Work Schedule3Team Task Assignment3Project .docxContentsTeam Work Schedule3Team Task Assignment3Project .docx
ContentsTeam Work Schedule3Team Task Assignment3Project .docx
 
INSTALLING SOFTWARE
INSTALLING SOFTWAREINSTALLING SOFTWARE
INSTALLING SOFTWARE
 
CI & CD- mobile application
CI & CD- mobile applicationCI & CD- mobile application
CI & CD- mobile application
 
CI & CD- mobile application
CI & CD- mobile applicationCI & CD- mobile application
CI & CD- mobile application
 
Creating first project in mikroC PRO for 8051
Creating first project in mikroC PRO for 8051Creating first project in mikroC PRO for 8051
Creating first project in mikroC PRO for 8051
 
video-editor-windows-7.docx
video-editor-windows-7.docxvideo-editor-windows-7.docx
video-editor-windows-7.docx
 

Mais de Kevin III

Ang Pananaliksik at Mananliksik -Filipino 002
Ang Pananaliksik at Mananliksik -Filipino 002Ang Pananaliksik at Mananliksik -Filipino 002
Ang Pananaliksik at Mananliksik -Filipino 002
Kevin III
 
Employment of ict graduates in region 2
Employment of ict graduates in region 2Employment of ict graduates in region 2
Employment of ict graduates in region 2
Kevin III
 
History of Zynga
History of Zynga History of Zynga
History of Zynga
Kevin III
 
Confirmation ppt report
Confirmation ppt reportConfirmation ppt report
Confirmation ppt report
Kevin III
 
Organizational communication english reporrt
Organizational communication english reporrtOrganizational communication english reporrt
Organizational communication english reporrt
Kevin III
 
Data structures / C++ Program examples
Data structures / C++ Program examplesData structures / C++ Program examples
Data structures / C++ Program examples
Kevin III
 

Mais de Kevin III (6)

Ang Pananaliksik at Mananliksik -Filipino 002
Ang Pananaliksik at Mananliksik -Filipino 002Ang Pananaliksik at Mananliksik -Filipino 002
Ang Pananaliksik at Mananliksik -Filipino 002
 
Employment of ict graduates in region 2
Employment of ict graduates in region 2Employment of ict graduates in region 2
Employment of ict graduates in region 2
 
History of Zynga
History of Zynga History of Zynga
History of Zynga
 
Confirmation ppt report
Confirmation ppt reportConfirmation ppt report
Confirmation ppt report
 
Organizational communication english reporrt
Organizational communication english reporrtOrganizational communication english reporrt
Organizational communication english reporrt
 
Data structures / C++ Program examples
Data structures / C++ Program examplesData structures / C++ Program examples
Data structures / C++ Program examples
 

Último

The basics of sentences session 3pptx.pptx
The basics of sentences session 3pptx.pptxThe basics of sentences session 3pptx.pptx
The basics of sentences session 3pptx.pptx
heathfieldcps1
 

Último (20)

On_Translating_a_Tamil_Poem_by_A_K_Ramanujan.pptx
On_Translating_a_Tamil_Poem_by_A_K_Ramanujan.pptxOn_Translating_a_Tamil_Poem_by_A_K_Ramanujan.pptx
On_Translating_a_Tamil_Poem_by_A_K_Ramanujan.pptx
 
Basic Civil Engineering first year Notes- Chapter 4 Building.pptx
Basic Civil Engineering first year Notes- Chapter 4 Building.pptxBasic Civil Engineering first year Notes- Chapter 4 Building.pptx
Basic Civil Engineering first year Notes- Chapter 4 Building.pptx
 
Basic Intentional Injuries Health Education
Basic Intentional Injuries Health EducationBasic Intentional Injuries Health Education
Basic Intentional Injuries Health Education
 
HMCS Vancouver Pre-Deployment Brief - May 2024 (Web Version).pptx
HMCS Vancouver Pre-Deployment Brief - May 2024 (Web Version).pptxHMCS Vancouver Pre-Deployment Brief - May 2024 (Web Version).pptx
HMCS Vancouver Pre-Deployment Brief - May 2024 (Web Version).pptx
 
Interdisciplinary_Insights_Data_Collection_Methods.pptx
Interdisciplinary_Insights_Data_Collection_Methods.pptxInterdisciplinary_Insights_Data_Collection_Methods.pptx
Interdisciplinary_Insights_Data_Collection_Methods.pptx
 
How to Create and Manage Wizard in Odoo 17
How to Create and Manage Wizard in Odoo 17How to Create and Manage Wizard in Odoo 17
How to Create and Manage Wizard in Odoo 17
 
This PowerPoint helps students to consider the concept of infinity.
This PowerPoint helps students to consider the concept of infinity.This PowerPoint helps students to consider the concept of infinity.
This PowerPoint helps students to consider the concept of infinity.
 
Wellbeing inclusion and digital dystopias.pptx
Wellbeing inclusion and digital dystopias.pptxWellbeing inclusion and digital dystopias.pptx
Wellbeing inclusion and digital dystopias.pptx
 
The basics of sentences session 3pptx.pptx
The basics of sentences session 3pptx.pptxThe basics of sentences session 3pptx.pptx
The basics of sentences session 3pptx.pptx
 
REMIFENTANIL: An Ultra short acting opioid.pptx
REMIFENTANIL: An Ultra short acting opioid.pptxREMIFENTANIL: An Ultra short acting opioid.pptx
REMIFENTANIL: An Ultra short acting opioid.pptx
 
TỔNG ÔN TẬP THI VÀO LỚP 10 MÔN TIẾNG ANH NĂM HỌC 2023 - 2024 CÓ ĐÁP ÁN (NGỮ Â...
TỔNG ÔN TẬP THI VÀO LỚP 10 MÔN TIẾNG ANH NĂM HỌC 2023 - 2024 CÓ ĐÁP ÁN (NGỮ Â...TỔNG ÔN TẬP THI VÀO LỚP 10 MÔN TIẾNG ANH NĂM HỌC 2023 - 2024 CÓ ĐÁP ÁN (NGỮ Â...
TỔNG ÔN TẬP THI VÀO LỚP 10 MÔN TIẾNG ANH NĂM HỌC 2023 - 2024 CÓ ĐÁP ÁN (NGỮ Â...
 
ICT Role in 21st Century Education & its Challenges.pptx
ICT Role in 21st Century Education & its Challenges.pptxICT Role in 21st Century Education & its Challenges.pptx
ICT Role in 21st Century Education & its Challenges.pptx
 
Mehran University Newsletter Vol-X, Issue-I, 2024
Mehran University Newsletter Vol-X, Issue-I, 2024Mehran University Newsletter Vol-X, Issue-I, 2024
Mehran University Newsletter Vol-X, Issue-I, 2024
 
Accessible Digital Futures project (20/03/2024)
Accessible Digital Futures project (20/03/2024)Accessible Digital Futures project (20/03/2024)
Accessible Digital Futures project (20/03/2024)
 
Food safety_Challenges food safety laboratories_.pdf
Food safety_Challenges food safety laboratories_.pdfFood safety_Challenges food safety laboratories_.pdf
Food safety_Challenges food safety laboratories_.pdf
 
How to setup Pycharm environment for Odoo 17.pptx
How to setup Pycharm environment for Odoo 17.pptxHow to setup Pycharm environment for Odoo 17.pptx
How to setup Pycharm environment for Odoo 17.pptx
 
HMCS Max Bernays Pre-Deployment Brief (May 2024).pptx
HMCS Max Bernays Pre-Deployment Brief (May 2024).pptxHMCS Max Bernays Pre-Deployment Brief (May 2024).pptx
HMCS Max Bernays Pre-Deployment Brief (May 2024).pptx
 
Graduate Outcomes Presentation Slides - English
Graduate Outcomes Presentation Slides - EnglishGraduate Outcomes Presentation Slides - English
Graduate Outcomes Presentation Slides - English
 
COMMUNICATING NEGATIVE NEWS - APPROACHES .pptx
COMMUNICATING NEGATIVE NEWS - APPROACHES .pptxCOMMUNICATING NEGATIVE NEWS - APPROACHES .pptx
COMMUNICATING NEGATIVE NEWS - APPROACHES .pptx
 
OSCM Unit 2_Operations Processes & Systems
OSCM Unit 2_Operations Processes & SystemsOSCM Unit 2_Operations Processes & Systems
OSCM Unit 2_Operations Processes & Systems
 

Introduction to Aptana

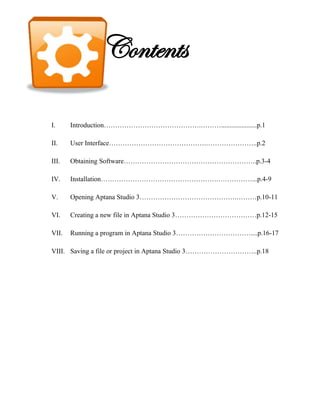
  • 1. Contents I. Introduction…………………………………….……….....................p.1 II. User Interface…………………………………….…………………..p.2 III. Obtaining Software…………………………………………………..p.3-4 IV. Installation…………………………………………….……………...p.4-9 V. Opening Aptana Studio 3…………………………………….………p.10-11 VI. Creating a new file in Aptana Studio 3………………………………p.12-15 VII. Running a program in Aptana Studio 3……………………………....p.16-17 VIII. Saving a file or project in Aptana Studio 3…………………………..p.18
  • 2. I. Introduction Aptana Studio is an open source INTEGRATED DEVELOPMENT ENVIRONMENT(IDE) for building Ajax web applications. It supports JavaScript, HTML, DOM and CSS with code-completion, outlining, JavaScript debugging, error and warning notifications and integrated documentation. Additional plugins allow Aptana Studio to support Ruby on Rails, PHP, Python, Perl, Adobe AIR, Apple iPhone and Nokia WRT (Web Runtime). Aptana Studio is based on Eclipse and is available as a standalone on Windows, Mac OS X and Linux, or as a plugin for Eclipse. Aptana Studio provides support for Python in the form of the PyDev plugin. This provides color syntax highlighting, code assist, code outlining, debugging and integrated support for Python, Jython and IronPython interpreters. Aptana announced that their previously commercial Pydev Extensions are now open sourced. Aptana is currently led by Paul Colton, Founder and CEO, Uri Sarid, CTO/VP, Engineering and Kevin Hakman, Director of Evangelism. The staff headcount surpassed 25 after September 1, 2008. Aptana is an active participant in the OpenAjax Alliance, with Hakman serving as director of the IDE Working Group. Aptana was acquired by Appcelerator, Inc. on January 7, 2011. Employees of Aptana were absorbed to the Mountain View campus of Appcelerator and work is scheduled to continue on the release of Aptana 3.0. Appcelerator in their webcast made users aware of their intention to integrate their mobile application framework with Aptana Studio, with a planned beta within Q1 2011. Emphasis on visual workflow was indicated for both of the products and continued support will continue for existing Aptana products. Appcelerator put Jaxer on github. Page 1 of 18 Introduction to BSIT - 2A Date developed: Issued by: Mr. Joel Laurencio II Aptana Studio 3 TVET - 211 July 23, 2012 Revision # 0.0
  • 3. II. User Interface 7 8 4 6 3 1 5 2 1 Code editor- the work 4 Debug and web 7 Themes icon – where a area. perspective view user can change the color of fonts and 2 Problem view: Shows the 5 background of the work App explorer, Outline, errors and warnings in a area and sample tabs users code 3 Project explorer 6 File/project tabs at 8 Run Icon – to run the view- Navigate and top of code editor to program in a web manage projects switch between open browser and files files Page 2 of 18 Introduction to BSIT - 2A Date developed: Issued by: Mr. Joel Laurencio II Aptana Studio 3 TVET - 211 July 23, 2012 Revision # 0.0
  • 4. III. Obtaining software 1. Go to this website/link: http://www.aptana.com/ 2. And then click to download it. Don’t worry its virus-free and no registration is needed ‘it’s free.’ 3. And it will link to this page at then to finally download it click the download button bellow. Page 3 of 18 Introduction to BSIT - 2A Date developed: Issued by: Mr. Joel Laurencio II Aptana Studio 3 TVET - 211 July 23, 2012 Revision # 0.0
  • 5. 4. And the downloading process will start automatically IV. Installation 1. Once the download I complete go to the download folder destination. Ex. Page 4 of 18 Introduction to BSIT - 2A Date developed: Issued by: Mr. Joel Laurencio II Aptana Studio 3 TVET - 211 July 23, 2012 Revision # 0.0
  • 6. 2. And then click to start the installation and click YES. 3. And the Aptana studio 3 can now be install, click next. Page 5 of 18 Introduction to BSIT - 2A Date developed: Issued by: Mr. Joel Laurencio II Aptana Studio 3 TVET - 211 July 23, 2012 Revision # 0.0
  • 7. 4. Choose a folder in which to install Aptana studio and click next. 5. Select the folder in which to create start menu shortcuts Aptana Studio and click next. Page 6 of 18 Introduction to BSIT - 2A Date developed: Issued by: Mr. Joel Laurencio II Aptana Studio 3 TVET - 211 July 23, 2012 Revision # 0.0
  • 8. 6. Select which file extension you wish associated with this application and click next. 7. Set up has finished gathering information and is ready to install aptana studio. Set up is ready to install Aptana studio 3 on your computer. Click install to start installation. Page 7 of 18 Introduction to BSIT - 2A Date developed: Issued by: Mr. Joel Laurencio II Aptana Studio 3 TVET - 211 July 23, 2012 Revision # 0.0
  • 9. 8. Just wait wail the Aptana Studio 3 is being installed this will just take few minutes. 9. All of the components of Aptana Studio 3 were successfully is copied to your computer. Click next. Page 8 of 18 Introduction to BSIT - 2A Date developed: Issued by: Mr. Joel Laurencio II Aptana Studio 3 TVET - 211 July 23, 2012 Revision # 0.0
  • 10. 10. Installation complete. Click close to exit set up. Page 9 of 18 Introduction to BSIT - 2A Date developed: Issued by: Mr. Joel Laurencio II Aptana Studio 3 TVET - 211 July 23, 2012 Revision # 0.0
  • 11. V. Opening Aptana Studio 3 1. Open/click Aptana studio 3 on your desktop or start menu. 2. It will open and ask for a workspace (Aptana studio 3 a stores your project in folder called Workspace). Choose a workspace folder to use in current session. Page 10 of 18 Introduction to BSIT - 2A Date developed: Issued by: Mr. Joel Laurencio II Aptana Studio 3 TVET - 211 July 23, 2012 Revision # 0.0
  • 12. 3. And this is the Aptana when opened. Page 11 of 18 Introduction to BSIT - 2A Date developed: Issued by: Mr. Joel Laurencio II Aptana Studio 3 TVET - 211 July 23, 2012 Revision # 0.0
  • 13. VI. Creating a new file in Aptana Studio 3 1. Click File on the menu tab. 2. Select new and then 3. Select File Page 12 of 18 Introduction to BSIT - 2A Date developed: Issued by: Mr. Joel Laurencio II Aptana Studio 3 TVET - 211 July 23, 2012 Revision # 0.0
  • 14. 4. Type the Filename (ex. Hello.html) Select a folder to save file. This is where to type the file name 5. If a user will click next this will appear. A user can select either of these available templates This is the code of a selected template. Page 13 of 18 Introduction to BSIT - 2A Date developed: Issued by: Mr. Joel Laurencio II Aptana Studio 3 TVET - 211 July 23, 2012 Revision # 0.0
  • 15. 6. But if a user will click finish button he/she can start coding on his/her own. Another way of creating new file from template 1. Click File->New From Template->HTML and XHTML – 1.0 Transitional Template (*.html) Page 14 of 18 Introduction to BSIT - 2A Date developed: Issued by: Mr. Joel Laurencio II Aptana Studio 3 TVET - 211 July 23, 2012 Revision # 0.0
  • 16. 2. And this is the code. There is no difference in expected output of a page in using Aptana studio or a notepad. The thing is, using Aptana Studio will help the user to create or type the codes easily, because when a user type a tag or element there are suggestions that will appear and it will automatically create a closing tag. A user can also detect the errors easily and conveniently. Page 15 of 18 Introduction to BSIT - 2A Date developed: Issued by: Mr. Joel Laurencio II Aptana Studio 3 TVET - 211 July 23, 2012 Revision # 0.0
  • 17. VII. Running a program in Aptana Studio 3 There are 4 methods a user can run the program: 1. By going to the folder or location where a user saved his/her file. Just click any of a saved file to view in a web browser. 2. By using a shortcut key “ctrl+F11” And the file will automatically open in a web browser. 3. By Clicking the “Run icon” above the Aptana Studio. Page 16 of 18 Introduction to BSIT - 2A Date developed: Issued by: Mr. Joel Laurencio II Aptana Studio 3 TVET - 211 July 23, 2012 Revision # 0.0
  • 18. 4. Or by selecting the file to be run in the left portion of Aptana Studio. o Right click the file o Select “Open with” o And select “Web browser” Web browser (firefox) Using Aptana Studio Web Browser Page 17 of 18 Introduction to BSIT - 2A Date developed: Issued by: Mr. Joel Laurencio II Aptana Studio 3 TVET - 211 July 23, 2012 Revision # 0.0
  • 19. VIII. Saving a file or project in Aptana Studio 3 o Upon creating a file a user also save his/her files or project in a selected folder. After coding, before running a program a user must save the changes in his/her file he/she created. o Using shortcut key “ctrl+s” o Or go to ‘File’ and select ‘save’ Page 18 of 18 Introduction to BSIT - 2A Date developed: Issued by: Mr. Joel Laurencio II Aptana Studio 3 TVET - 211 July 23, 2012 Revision # 0.0