SlideShare uma empresa Scribd logo
1 de 65
Baixar para ler offline
1. AUDIO/VIDEO SYSTEM OPERATION
1. QUICK REFERENCE

Operations such as selecting a preset station and adjusting the sound balance are
carried out on the screen. Press the “RADIO” or “MEDIA” button to display the
audio screen.


  No.         Name                                Function                         Page

                             Touch the screen tabs to select the desired radio
        Function menu tab                                                           177
                             or media mode.

        Function menu dis-   Touch the screen buttons to control the selected
                                                                                    177
        play screen          radio or media mode.

                             Turn to change to the next or previous preset sta-
        “TUNE·SCROLL”        tion, track or DVD chapter etc. Also, the knob can   181, 189,
        knob                 be used to enter selections on the track/file and      201
                             album/folder screens by pressing it.

        “ ·CLOSE” but-
                             Press to insert or eject a disc.                     179, 194
        ton

        “SETUP” button       Press to display the “Setup” screen.                   239


174
1. AUDIO/VIDEO SYSTEM OPERATION


No.        Name                             Function                          Page

                       Press the “ ” or “ ” button to seek up or down
      “SEEK/TRACK”
                       for a station, or to access a desired track, file or   182
      button
                       chapter.

      “MEDIA” button   Press to display the media control screen.             177

      “RADIO” button   Press to display the radio control screen.             177

                       Press to turn the audio system on and off, and
      “PWR·VOL” knob                                                          177
                       turn to adjust the volume.


                                                                                                  5


                                                                                           AUDIO/VIDEO SYSTEM


                                                                                     175
1. AUDIO/VIDEO SYSTEM OPERATION
2. SOME BASICS

This section describes some of the ba-                 NOTICE
sic features of the audio/video system.
Some information may not pertain to              ● To prevent the 12-volt battery from being
your system.                                       discharged, do not leave the audio/video
                                                   system on longer than necessary when
  Vehicles with a smart key system                 the hybrid system is off <the engine is
Your audio/video system works when                 not running>.
the “POWER” <“ENGINE START
STOP”> switch is turned to ACCES-
SORY or ON <IGNITION ON> mode.                   VOICE COMMAND SYSTEM
  Vehicles without a smart key system
                                                 Press this switch to operate the voice
Your audio/video system works when               command system.
the engine switch is turned to the
“ACC” or “ON” position.

       CAUTION

● For vehicles sold in U.S.A. and Canada:
  Part 15 of the FCC Rules
  FCC Warning: Changes or modifications
  in construction not expressly approved
  by the party responsible for compliance
  could void the user’s authority to operate
  the equipment. Radio frequency expo-
  sure. This device is approved for Mobile
  Application only and, to comply with             For the operation of the voice command
  applicable FCC radio frequency expo-             system and its list of commands, see
  sure regulations, must be used with a            pages 242 and 250.
  distance of at least 7.9 in. (20 cm)
  between the antenna and the body of
  any person at all time during use.             AUDIO SPLIT SCREEN
● Laser products                                 DISPLAY
  • Do not take this unit apart or attempt to
    make any changes yourself. This is an        The audio split screen can be dis-
    intricate unit that uses a laser pickup to
    retrieve information from the surface of
                                                 played while the map screen is dis-
    compact discs. The laser is carefully        played. For details, see page 39.
    shielded so that its rays remain inside
    the cabinet. Therefore, never try to dis-
    assemble the player or alter any of its
    parts since you may be exposed to
    laser rays and dangerous voltages.
  • This product utilizes a laser. Use of
    controls or adjustments or perfor-
    mance of procedures other than those
    specified herein may result in hazard-
    ous radiation exposure.


176
1. AUDIO/VIDEO SYSTEM OPERATION


                                               “MEDIA” button: To display the “DISC”,
 TURNING THE SYSTEM ON                         “BT Audio”, “AUX”, “USB” and “iPod”
 AND OFF                                       tabs on the screen. (Media mode)

                                                    Up to 4 tabs can be displayed on the
                                                    screen. Touch           or       , located
                                                    either side of the screen tabs, to display
                                                    tabs from the previous or next page.
                                                    The desired audio mode can be found
                                                    by touching           or        and then
                                                    selecting that audio mode tab.


                                                   INFORMATION
                                               ● If a disc is not inserted, the DVD player
“RADIO”, “MEDIA” button: Press to dis-           cannot be turned on.
play screen buttons for the audio system.      ● The DVD player can be turned off by
“PWR·VOL” knob: Press to turn the audio          ejecting a disc.
system on and off. Turn this knob to adjust    ● When radio or media mode is selected,
the volume. The system turns on in the last      the respective screen buttons are dis-
mode used.                                       played on the screen.
                                                                                                        5
                                               ● Dimmed screen buttons cannot be oper-
    A function that enables automatic return     ated.
    to the previous screen from the audio      ● If the system does not respond to a


                                                                                                 AUDIO/VIDEO SYSTEM
    screen can be selected. See page 42          touch of a screen button, move your fin-
    for details.                                 ger away from the screen and then
                                                 touch it again.
                                               ● Wipe off fingerprints using a glass clean-
 SWITCHING BETWEEN                               ing cloth. Do not use chemical cleaners
                                                 to clean the screen.
 FUNCTIONS

1   Every time the “RADIO” or “MEDIA”
    button is pressed, the audio control
                                                DSP CONTROL
    mode changes.
                                               1    Press the “RADIO” or “MEDIA” but-
                                                    ton.
                                               2    Touch          .


“RADIO” button: To display the “AM”,
“FM”, “SAT” and “Apps” tabs on the
screen. (Radio mode)


                                                                                           177
1. AUDIO/VIDEO SYSTEM OPERATION


3     Touch the “DSP” tab to display this          BALANCE
      screen.
                                             A good balance of the left and right ste-
                                             reo channels and of the front and rear
                                             sound levels is also important.
                                             Keep in mind that when listening to a
                                             stereo recording or broadcast, chang-
                                             ing the right/left balance will increase
                                             the volume of one group of sounds
                                             while decreasing the volume of anoth-
4     Touch the desired items to be set.     er.
5     Touch “OK”.                            1   Touch the “Sound” tab to display this
                                                 screen.
       AUTOMATIC SOUND
       LEVELIZER (ASL)

The system adjusts to the optimum vol-
ume and tone quality according to ve-
hicle speed to compensate for
increased vehicle noise.

1     Touch “On” of “Automatic Sound
      Levelizer”.
                                             2   Touch the desired screen button.

2     Touch “OK”.                                Screen button          Function

                                                   “Treble”      Touch to adjust high-
       SURROUND FUNCTION                           “+” or “-”    pitched tones.

1     Touch “On” of “Surround”.                      “Mid”       Touch to adjust mid-
                                                   “+” or “-”    pitched tones.
2     Touch “OK”.
                                                    “Bass”       Touch to adjust low-
                                                   “+” or “-”    pitched tones.
 TONE AND BALANCE
                                                                 Touch to adjust the
                                                                 sound balance between
                                             “Front” or “Rear”
       TONE                                                      the front and rear
                                                                 speakers.
How good an audio program sounds is                              Touch to adjust the
largely determined by the mix of the                             sound balance between
                                                   “L” or “R”
treble, mid and bass levels. In fact, dif-                       the left and right speak-
ferent kinds of music and vocal pro-                             ers.
grams usually sound better with
different mixes of treble, mid and bass.     3   Touch “OK”.


178
1. AUDIO/VIDEO SYSTEM OPERATION


    INFORMATION                                Screen button           Function
● The tone of each mode (such as AM,                           Touch to display a 3 : 4
  FM and DVD player) can be adjusted.            “Normal”      screen, with either side
                                                               in black.

                                                               Touch to widen the 3 : 4
SELECTING SCREEN SIZE                            “Wide 1”      screen horizontally to fill
                                                               the screen.
Before selecting screen size, it is nec-
                                                               Touch to widen the 3 : 4
essary to insert a DVD disc and select
                                                               screen vertically and
DISC mode.                                       “Wide 2”
                                                               horizontally, by the same
                                                               ratio, to fill the screen.
1    Press the “MEDIA” button.

2    Touch the “DISC” tab.                     When            is touched, the previous
                                               screen is displayed.
3    Touch “Options”.
                                           6    Touch “Save”.


                                           DVD PLAYER
                                                                                                    5
                                           1    When inserting a disc, press the
                                                “ ·CLOSE” button and gently insert


                                                                                             AUDIO/VIDEO SYSTEM
                                                the disc with the label facing up.

4    Touch “Wide”.


5    Touch the desired screen button.               NOTICE

                                           ● Never try to disassemble or oil any part
                                             of the DVD player. Do not insert any-
                                             thing other than a disc into the slot.


                                               INFORMATION
                                           ● The player is intended for use with 4.7
                                             in. (12 cm) discs only.


                                                                                       179
1. AUDIO/VIDEO SYSTEM OPERATION


 AUX PORT                                      USB PORT

The sound of portable audio players            A USB memory/iPod can be connect-
connected to the AUX port can be en-           ed to the USB port. For details, see
joyed. For details, refer to “Owner’s          “CONNECTING A USB MEMORY” on
Manual”.                                       page 212 and “CONNECTING iPod”
                                               on page 217.
1     Press the “MEDIA” button to display
      the media control screen and touch the   1    Press the “MEDIA” button to display
      “AUX” tab or press the “MEDIA” but-           the media control screen and touch the
      ton repeatedly to change to AUX               “USB” or “iPod” tab or press the
      mode.                                         “MEDIA” button repeatedly to change
                                                    to USB memory/iPod mode.
    INFORMATION
● When the portable audio player is not            INFORMATION
  connected to the AUX port, the tab will      ● When a USB memory/iPod is not con-
  be dimmed.                                     nected with the USB port, the tab will be
                                                 dimmed.


180
1. AUDIO/VIDEO SYSTEM OPERATION
3. RADIO OPERATION

 LISTENING TO THE RADIO                       PRESETTING A STATION

                                              Radio mode has a mix preset function,
      SELECTING A RADIO STATION
                                              which can store up to 36 stations (6
1    Press the “RADIO” button to display      stations per page x 6 pages) from any
     the radio control screen.                of the AM, FM or SAT bands.

                                              1    Tune in the desired station.

                                              2    Touch one of the left side screen but-
                                                   tons (1-6) and hold it until a beep is
                                                   heard. This sets the frequency to the
                                                   screen button. The station’s frequency
                                                   will be displayed in the screen button.


2    Touch the “AM”, “FM”, “SAT” or
     “Apps” tab or press the “RADIO” but-
                                                                                                       5
     ton repeatedly to select the desired
     tab.


                                                                                                AUDIO/VIDEO SYSTEM
      STEP UP AND DOWN THE                        To change the preset station to a different
      STATION BAND                                one, follow the same procedure.

1    Turn the knob clockwise to step up the
     station band or counterclockwise to
     step down.


    INFORMATION
● The radio automatically changes to ste-
  reo reception when a stereo broadcast
  is received.


                                                                                         181
1. AUDIO/VIDEO SYSTEM OPERATION


 SELECTING A STATION                           RADIO BROADCAST DATA
                                               SYSTEM
Tune in the desired station using one
of the following methods.                      This audio system is equipped with Ra-
Preset tuning: Touch one of the mix pre-       dio Broadcast Data Systems (RBDS).
set channels on the left side of the screen    RBDS mode allows text messages to
to select the desired station. The screen      be received from radio stations that uti-
button is highlighted and the station fre-     lize RBDS transmitters.
quency appears on the screen.                  When RBDS is on, the radio can
Seek tuning: Press the “ ” or “ ” button       — only select stations of a particular
of “SEEK/TRACK”. The radio will begin          program type,
seeking up or down for a station of the        — display messages from radio sta-
nearest frequency and will stop when a         tions,
station is found. Each time the button is      — search for a stronger signal station.
pressed, the stations will be searched au-     RBDS features are available only
tomatically one after another.                 when listening to an FM station that
To scan all the frequencies: Touch             broadcasts RBDS information and the
“SCAN”. “SCAN” will appear on the              “FM info” indicator is on.
screen. The radio will find the next station
and stay there for 10 seconds if “All” or
“HD Only” is selected, or 5 seconds if              SELECTING A DESIRED TYPE
“Analog” is selected, and then scan
again. To stay tuned to a station and stop     1   Touch “Options”.
the scanning, touch “SCAN” again. (To
set HD Radio™ system, see page 239.)


182
1. AUDIO/VIDEO SYSTEM OPERATION


2    Touch “TYPE ” or “ TYPE” to                     TRAFFIC ANNOUNCEMENT
     move forward and backward through
     the program list.
                                                    A station that regularly broadcasts traf-
                                                    fic information is automatically located.


    Once a program type has been set,
    “TYPE SEEK” will appear on the screen.
    The program list is in the following order:     “Traffic”: Touch to seek a traffic program
    • Classical                                     station. “TRAF SEEK” will appear on the
    • Country
                                                    screen.
    • EasyLis (Easy Listening)
    • Inform (Information)
    • Jazz                                           INFORMATION
    • News                                          ● If no traffic program station is found, “No
    • Oldies                                                                                               5
                                                      Traffic” will appear on the screen.
    • Other
    • Pop Music                                     ● If a traffic program station is found, the
    • Religion                                        name of the traffic program station will


                                                                                                    AUDIO/VIDEO SYSTEM
    • Rock                                            be displayed for a while.
    • R&B (Rhythm and Blues)
    • Sports
    • Talk
    • Traffic (Not available when “HD Radio
      Settings” are set to analog.)
    • Alert (Emergency Alert)
3    Touch “TYPE SEEK” and the system
     will start to seek for stations in the rele-
     vant program type.

    INFORMATION
● If no relevant program can be found, “no
  type” will appear on the screen.


                                                                                              183
1. AUDIO/VIDEO SYSTEM OPERATION
4. HD Radio™ TECHNOLOGY INFORMATION

                                                 As a user works through the analog radio
HD Radio™ Technology is the digital              stations, (where applicable) the radio
evolution of analog AM/FM radio. Your            receiver will automatically tune from an
radio product has a special receiver             analog signal to a digital signal within 5
which allows it to receive digital               seconds.
broadcasts (where available) in                  An orange “HD)” logo indicator will be dis-
                                                 played on the screen when in digital. The
addition to the analog broadcasts it
                                                 “HD)” logo will first appear in a gray color
already receives. Digital broadcasts             indicating the station is indeed (an analog
have better sound quality than analog            and) a digital station. Once the digital sig-
broadcasts as digital broadcasts                 nal is acquired, the logo will change to a
provide free, crystal clear audio with no        bright orange color.
static or distortion. For more                   The song title, artist name and music
                                                 genre will appear on the screen when
information, and a guide to available            available by the radio station.
radio stations and programming, refer
to www.hdradio.com.                          3    This screen will be displayed if
                                                  “Options” is touched.

 USING HD Radio™
 TECHNOLOGY

1     Press the “RADIO” button to display
      the radio control screen.


                                                 When “Text” is touched, information such
                                                 as the artist name, song title, album title
                                                 and music genre of the track being lis-
                                                 tened to are displayed on the text screen.
                                                 To display messages from the station,
                                                 touch “Additional Information”.
                                                 When “TYPE        ” or “       TYPE” is
                                                 touched, a program type will be searched.
                                                 Once a program type has been set,
2     Touch the “AM” or “FM” tab or press        “TYPE SEEK” will appear on the screen.
                                                 (See “SELECTING A DESIRED TYPE” on
      the “RADIO” button repeatedly to se-       page 182.)
      lect the desired tab.


184
1. AUDIO/VIDEO SYSTEM OPERATION


AVAILABLE HD Radio™                              2    Press the lid.
TECHNOLOGY

       MULTICAST

On the FM radio frequency most digital
stations have “multiple” or supplemen-
tal programs on one FM station.

1    Touch “Multicast”.

                                                 3    Open the cover and connect iPod us-
                                                      ing an iPod cable.


    Each time “Multicast” is touched, the                                                                5
    supplemental program changes.
    If “Multicast” is touched when tuned to


                                                                                                  AUDIO/VIDEO SYSTEM
    the last of the supplemental programs, the
    main program will be returned to.
                                                     Turn on the power of the iPod if it is not
       TAG                                           turned on.
                                                     Once an iPod is connected, the music tag
1    Touch “Tag” to bookmark the music               moves from the radio into the iPod.
     information.                                    When the iPod is connected to iTunes, the
                                                     “tagged” information of the songs which
                                                     were tagged while listening to the radio
                                                     can be viewed. Then a user may decide to
                                                     purchase the song or CD/Album which
                                                     had been listened to on their radio.

                                                     INFORMATION
                                                 ● If tagging the music information fails,
                                                   “Saving the HD Radio tag failed.” will be
                                                   displayed on the screen. If this occurs,
                                                   tag the information again.
                                                 ● HD Radio™ stations can be preset.


                                                                                           185
1. AUDIO/VIDEO SYSTEM OPERATION


 TROUBLESHOOTING GUIDE

         Experience                        Cause                               Action

 Mismatch of time align-
                                 The radio stations analog
 ment- a user may hear a
                                 and digital volume is not      None, radio broadcast issue. A
 short period of program-
                                 properly aligned or the sta-   user can contact the radio station.
 ming replayed or an echo,
                                 tion is in ballgame mode.
 stutter or skip.

                                                                Reception issue, may clear-up as
 Sound fades, blending in        Radio is shifting between      the vehicle continues to be driven.
 and out.                        analog and digital audio.      Touching “Analog” can force ra-
                                                                dio in an analog audio.

                                                                This is normal behavior, wait until
 Audio mute condition when       The radio does not have
                                                                the digital signal returns. If out of
 an HD2/HD3 multicast            access to digital signals at
                                                                the coverage area, seek a new
 channel had been playing.       the moment.
                                                                station.

                                 The digital multicast con-
                                 tent is not available until
 Audio mute delay when se-
                                 HD Radio™ broadcast can        This is normal behavior, wait for
 lecting an HD2/HD3 multi-
                                 be decoded and make the        the audio to become available.
 cast channel preset.
                                 audio available. This takes
                                 up to 7 seconds.

                                                                Broadcaster should be notified.
 Text information does not
                                 Data service issue by the      Complete          the       form;
 match the present song au-
                                 radio broadcaster.             www.ibiquity.com/automotive/
 dio.
                                                                report_radio_station_experiences.

                                                                Broadcaster should be notified.
 No text information shown
                                 Data service issue by the      Complete          the       form;
 for the present selected fre-
                                 radio broadcaster.             www.ibiquity.com/automotive/
 quency.
                                                                report_radio_station_experiences.


186
1. AUDIO/VIDEO SYSTEM OPERATION


HD Radio Technology manufactured under license from iBiquity Digital Corpora-
tion. U.S. and Foreign Patents. HD Radio™ and the HD, HD Radio, and “Arc” logos
are proprietary trademarks of iBiquity Digital Corp.


                                                                                          5


                                                                                   AUDIO/VIDEO SYSTEM


                                                                             187
1. AUDIO/VIDEO SYSTEM OPERATION
5. RADIO OPERATION (XM Satellite Radio BROADCAST)

 HOW TO SUBSCRIBE TO AN                       INFORMATION
 XM Satellite Radio                          ● XM Satellite Radio is solely responsible
                                               for the quality, availability and content of
To listen to a satellite radio broadcast       the satellite radio services provided,
                                               which are subject to the terms and con-
in the vehicle, a subscription to the XM       ditions of the XM Satellite Radio cus-
Satellite Radio service is necessary.          tomer service agreement.
An XM Satellite Radio is a tuner de-         ● Customers should have their radio ID
signed exclusively to receive broad-           ready; the radio ID can be found by tun-
                                               ing to “CH 000” on the radio. For details,
casts provided under a separate                see “DISPLAYING THE RADIO ID”
subscription. Availability is limited to       below.
the 48 contiguous U.S. states and            ● All fees and programming are the
some Canadian provinces.                       responsibility of XM Satellite Radio and
                                               are subject to change.

      HOW TO SUBSCRIBE
                                                 SATELLITE TUNER
It is necessary to enter into a separate
                                                 TECHNOLOGY NOTICE
service agreement with XM Satellite
Radio in order to receive satellite          Toyota’s satellite radio tuners are
broadcast programming in the vehicle.        awarded Type Approval Certificates
Additional activation and service sub-       from XM Satellite Radio Inc. as proof of
scription fees apply that are not includ-    compatibility with the services offered
ed in the purchase price of the vehicle      by XM Satellite Radio.
and digital satellite tuner.

  For complete information on subscrip-      DISPLAYING THE RADIO ID
  tion rates and terms, or to subscribe to
  XM Satellite Radio:                        Each XM tuner is identified with a
  U.S.A.                                     unique radio ID. The radio ID is re-
  Refer to www.siriusxm.com or call          quired when activating an XM service
  1-800-967-2346.                            or when reporting a problem.
  Canada                                      If “CH 000” is selected using the
  Refer to www.xmradio.ca or call             “TUNE·SCROLL” knob, the ID code,
  1-877-209-0079.                             which is 8 alphanumeric characters, will
                                              be displayed. If another channel is
                                              selected, the ID code will no longer be dis-
                                              played. The channel (000) alternates
                                              between displaying the radio ID and the
                                              specific radio code.


188
1. AUDIO/VIDEO SYSTEM OPERATION


LISTENING TO SATELLITE                      CHANNEL CATEGORY
RADIO
                                            1    Touch either “TYPE ” or “ TYPE”
1    Press the “RADIO” button to display         to go to the next or previous category.
     the radio control screen.


                                            PRESETTING A CHANNEL

2    Touch the “SAT” tab or press the
                                            1    Tune in the desired channel.
     “RADIO” button repeatedly until the    2    Touch one of the left side screen but-
     “SAT” tab is selected to choose a           tons (1-6) and hold it until a beep is
     satellite broadcast channel.                heard. This sets the frequency to the             5
                                                 screen button. The channel number
                                                 will be displayed in the screen button.


                                                                                            AUDIO/VIDEO SYSTEM
3    Turn the “TUNE·SCROLL” knob to se-
     lect the next or previous channel.
    Turning the knob quickly allows rapid       To change the preset channel to a differ-
    scrolling through the channel list.         ent one, follow the same procedure.


                                                                                     189
1. AUDIO/VIDEO SYSTEM OPERATION


 SELECTING A CHANNEL                           DISPLAYING THE TITLE AND
                                               NAME
Tune in the desired channel using one
of the following methods.                      1    Touch “Text” to display the artist name
                                                    and song title currently being listening
Preset tuning: Touch the channel selector
                                                    to.
screen button (1-6) to listen to the desired
channel. The selected screen button (1-6)
is highlighted and its related information
appears on the right side of the screen.
To select a channel within the current
category: Press the “ ” or “ ” button of
“SEEK/TRACK”. The radio will change up
or down to a channel within the current
channel category.
                                                   INFORMATION
                                               ● Up to 64 alphanumeric characters can
                                                 be displayed. (Some information will not
                                                 be fully displayed.)


To scan the currently selected channel
category: Touch “SCAN”. “SCAN” ap-
pears on the screen. The radio will find the
next channel in the same channel catego-
ry, stay there for a few seconds, and then
scan again. To select a channel, touch
“SCAN” again.


190
1. AUDIO/VIDEO SYSTEM OPERATION


IF THE SATELLITE RADIO TUNER MALFUNCTIONS

When problems occur with the XM tuner, a message will appear on the screen. Re-
ferring to the table below to identify the problem, take the suggested corrective ac-
tion.

       Message                                        Explanation

                         The XM antenna is not connected. Check whether the XM antenna
                         cable is attached securely.
      Ck Antenna
                         A short circuit occurs in the antenna or the surrounding antenna ca-
                         ble. See a Toyota certified dealer for assistance.

                         You have not subscribed to XM Satellite Radio. The radio is being
                         updated with the latest encryption code. Contact XM Satellite Radio
                         for subscription information. When a contract is canceled, you can
                         choose “CH 000” and all free-to-air channels.
      Ch Unauth
                         The premium channel you selected is not authorized. Wait for about
                         2 seconds until the radio returns to the previous channel or “CH001”.
                         If it does not change automatically, select another channel. To listen            5
                         to the premium channel, contact XM Satellite Radio.


                                                                                                    AUDIO/VIDEO SYSTEM
                         The XM signal is too weak at the current location. Wait until your ve-
       No Signal
                         hicle reaches a location with a stronger signal.

                         The unit is acquiring audio or program information. Wait until the unit
        Loading
                         has received the information.

                         The channel you selected is not broadcasting any programming. Se-
       Ch Off Air
                         lect another channel.

                         There is no song/program title or artist name/feature associated with
          -----
                         the channel at that time. No action is required.

                         The channel you selected is no longer available. Wait for about 2
      Ch Unavail         seconds until the radio returns to the previous channel or “CH 001”.
                         If it does not change automatically, select another channel.


 INFORMATION
● Contact the XM Listener Care Center at 1-800-967-2346 (U.S.A.) or 1-877-209-0079
  (Canada).


                                                                                              191
1. AUDIO/VIDEO SYSTEM OPERATION


      NOTICE                                    INFORMATION
                                               ● This XM tuner supports “Audio Services”
● This equipment has been tested and             (Music and Talk) of only XM Satellite
  found to comply with the limits for a          Radio and “Text Information*” linked to
  class B digital device, pursuant to Part       the respective “Audio Services”.
  15 of the FCC Rules. These limits are          *: Text Information includes, Station
  designed to provide reasonable protec-         Name, (Artist) Name, (Song) Title and
  tion against harmful interference in a         Category Name.
  residential installation. This equipment
  generates, uses and can radiate radio
  frequency energy and, if not installed
  and used in accordance with the instruc-
  tions, may cause harmful interference to
  radio communications. However, there
  is no guarantee that interference will not
  occur in a particular installation.
● If this equipment does cause harmful
  interference to radio or television recep-
  tion, which can be determined by turning
  the equipment off and on, the user is
  encouraged to try to correct the interfer-
  ence by one or more of the following
  measures:
  • Reorient or relocate the receiving
    antenna.
  • Increase the separation between the
    equipment and receiver.
  • Connect the equipment into an outlet
    on a circuit different from that to
    which the receiver is connected.
  • Consult the dealer or an experienced
    radio/TV technician for help.
● Information to user
  • Alternation or modifications carried
    out without appropriate authorization
    may invalidate the user’s right to
    operate the equipment.


192
1. AUDIO/VIDEO SYSTEM OPERATION
6. RADIO OPERATION (INTERNET RADIO BROADCAST)

 LISTENING TO INTERNET                           3     Touch “View Application Screen”.
 RADIO                                                The internet radio application screen is
                                                      displayed.
                                                      Perform operations according to the dis-
One of Entune’s features is the ability               played application screen.
to listen to internet radio. In order to              By pressing the “RADIO” button, the
use this service, an Entune compatible                “Audio” screen can be returned to.
phone and the navigation system
needs to be set. For details, refer to the            INFORMATION
“ENTUNE SERVICE” section. (See                   ● Other applications can be activated
page 276.)                                         while listening to internet radio.
                                                 ● An iPhone cannot be connected via
1    Press the “RADIO” button.                     Bluetooth® and USB connection at the
                                                   same time. However, it is possible to
                                                   recharge an iPhone while using Entune
                                                   by connecting via USB. The system
                                                   uses the connection method that was
                                                   used last. Therefore, if connected via
                                                   USB after Bluetooth® connection, it is
                                                   necessary to reconnect the iPhone via
                                                   Bluetooth®.
                                                                                                        5
                                                 ● Services requiring a separate contract
                                                   can also be used.*
                                                 ● Some parts of “Apps” can be adjusted


                                                                                                 AUDIO/VIDEO SYSTEM
                                                   using the switches on the steering
2    Touch the “Apps” tab on the screen or         wheel.
     press the “RADIO” button repeatedly         ● If internet radio has never been listened
     until the “Apps” tab is selected.             to by activating “Apps” from the “Infor-
                                                   mation” screen, the “Apps” tab will be
                                                   dimmed.

                                                 *:  For    details, refer  to   http://
                                                 www.toyota.com/entune/ or call 1-800-
                                                 331-4331.


    If a compatible phone is already regis-
    tered, it will be connected automatically.
    If a compatible phone has not been regis-
    tered or the Bluetooth® connection cannot
    be completed correctly, touch “Connect”
    to register and/or connect your phone.
    (See page 161.)
    When connection is complete, the applica-
    tion screen can be displayed.


                                                                                          193
1. AUDIO/VIDEO SYSTEM OPERATION
7. DVD PLAYER OPERATION

For safety reasons, the DVD video                  After insertion, the disc is automatically
                                                   loaded.
discs can only be viewed when the fol-
lowing conditions are met:                     3    Press the “    ·CLOSE” button.
(a)The vehicle is completely stopped.              The display will slide up, closing the DVD
                                                   slot.
(b)The “POWER” <“ENGINE START
                                                   Touching “     Disc” ejects the currently
   STOP”> switch is in ACCESSORY                   inserted disc.
   or ON <IGNITION ON> mode. (Ve-
   hicles with a smart key system)
   The engine switch is in the “ACC” or        EJECTING A DISC
   “ON” position. (Vehicles without a
   smart key system)                           1    Press the “ ·CLOSE” button to slide
                                                    the display down.
(c)The parking brake is applied.
While driving in DVD video mode, only
the DVD’s audio can be heard.


 INSERTING A DISC

1     Press the “ ·CLOSE” button to slide
      the display down.


                                                   When the “ ·CLOSE” button is
                                                   pressed, the disc will be automatically
                                                   ejected.
                                               2    Press the “    ·CLOSE” button to close
                                                    the display.

                                                        CAUTION

    The display will slide down, opening the   ● Do not place anything on the opened
    DVD slot.                                    display, as such items may be thrown
                                                 about and possibly injure people in the
2     Insert a disc into the disc slot.          vehicle during sudden braking or in an
                                                 accident.
                                               ● To reduce the chance of injury in case of
                                                 an accident or sudden stop while driv-
                                                 ing, keep the display closed.
                                               ● Take care not to jam your hand while the
                                                 display is moving. Otherwise, you could
                                                 be injured.


194
1. AUDIO/VIDEO SYSTEM OPERATION


                                                    When CD-TEXT information exists, the
        NOTICE                                      name and artist of the CD currently being
                                                    listened to will be displayed.
● Do not obstruct the display while it is
  moving. It could damage your audio sys-
                                                      : Touch to pause the track.
  tem.                                                : Touch to resume playing the track.


    INFORMATION
                                                       SELECTING A DESIRED
                                                       TRACK
● Under extremely cold conditions, the
  screen may react slowly or operation
  sound may become louder.                      ■ON THE AUDIO TOP SCREEN
● If a disc is inserted with the label facing
  down, it cannot be played.


PLAYING A DISC

1    Press the “MEDIA” button if a disc has
     already been loaded in the disc slot.
                                                “SEEK/TRACK” button: Press the “ ” or
2    Touch the “DISC” tab or press the                                                                 5
                                                “ ” button of “SEEK/TRACK” repeatedly
     “MEDIA” button repeatedly until the
                                                until the desired track number appears on
     “DISC” tab is selected.
                                                the screen. The player will start playing the


                                                                                                AUDIO/VIDEO SYSTEM
                                                selected track from the beginning.
                                                “TUNE·SCROLL” knob: Turn the knob
                                                clockwise or counterclockwise to skip to
                                                the desired track.

                                                ■ON THE TRACK LIST SCREEN
                                                1    Touch the track name screen button to
                                                     display the CD’s track list.

PLAYING AN AUDIO DISC

1    Touch the “DISC” tab.


                                                2    Touch the desired track number. The
                                                     player will start playing the selected
                                                     track from the beginning.


                                                                                         195
1. AUDIO/VIDEO SYSTEM OPERATION


  , : Touch to move the list up or down                REPEATING
by 5 track groups. If either of these screen
buttons is touched when the top/bottom          The track currently being listened to
page of the list is displayed, the last/first   can be repeated.
page is displayed.
“SEEK/TRACK” button: Press the “ ” or           ■REPEATING A TRACK
“ ” button of “SEEK/TRACK” to scroll            1    Touch “RPT” while the track is play-
through the track list one by one.                   ing.
“TUNE·SCROLL” knob: Turn the knob
clockwise or counterclockwise to quickly
scroll up or down the track list. To select
the desired track, press the knob.
   , : If    appears to the right of an item
name, the complete name is too long for
the screen. Touch    to scroll to the end of
the name. Touch     to scroll to the begin-
ning of the name.                                   “RPT” appears on the screen. When the
                                                    track is finished, the player will automati-
                                                    cally play it again. To cancel this function,
■FAST FORWARDING OR REWIND-                         touch “RPT” again.
    ING
1     Press and hold the “ ” or “ ” button             RANDOM ORDER
      of “SEEK/TRACK” to fast forward or
      rewind the disc.                          Tracks or albums can be automatically
                                                and randomly selected.

                                                ■PLAYING THE TRACKS ON THE
                                                    DISC IN RANDOM ORDER
                                                1    Touch “RAND” while the disc is play-
                                                     ing.


     When the button is released, the player
    resumes playing from that position.


                                                    Once “RAND” appears on the screen, the
                                                    system selects a track randomly from the
                                                    disc currently being listened to. To cancel
                                                    this function, touch “RAND” again.


196
1. AUDIO/VIDEO SYSTEM OPERATION


    INFORMATION
                                                ■ON THE FOLDER LIST SCREEN
● If a CD-TEXT disc is inserted, the title of   1   Touch the folder name screen button
  the disc and track will be displayed. Up          to display the following folder list
  to 32 characters can be displayed.                screen.


 PLAYING AN MP3/WMA DISC

1    Touch the “DISC” tab.


                                                2   Touch the desired folder number to
                                                    display the folder’s file list. From the file
                                                    list, select the desired file number.

                                                  , : Touch to move the list up or down
    The file name, folder name and artist       by 5 folder groups. If either of these screen
    name currently being listened to and the    buttons is touched when the top/bottom                     5
    disc icon are displayed on the screen.      page of the list is displayed, the last/first
     : Touch to pause the file.                 page is displayed.


                                                                                                    AUDIO/VIDEO SYSTEM
     : Touch to resume playing the file.        “SEEK/TRACK” button: Press the “ ” or
                                                “ ” button of “SEEK/TRACK” to scroll
      SELECTING A DESIRED                       through the folder list one by one.
      FOLDER                                    “TUNE·SCROLL” knob: Turn the knob
                                                clockwise or counterclockwise to quickly
■ON THE AUDIO TOP SCREEN                        scroll up or down the folder list. To select
                                                the desired folder, press the knob.
                                                   , : If    appears to the right of an item
                                                name, the complete name is too long for
                                                the screen. Touch    to scroll to the end of
                                                the name. Touch     to scroll to the begin-
                                                ning of the name.


  , : Touch to skip to the next or previ-
ous folder.


                                                                                             197
1. AUDIO/VIDEO SYSTEM OPERATION


■FAST FORWARDING OR REWIND-                     ■ON THE FILE LIST SCREEN
    ING
                                                1   Touch the file name screen button to
1     Press and hold the “ ” or “ ” button          display the following file list screen.
      of “SEEK/TRACK” to fast forward or
      rewind the file.


                                                2   Touch the desired file number. The
                                                    player will start playing the selected file
                                                    from the beginning.

    When the button is released, the player       , : Touch to move the list up or down
    resumes playing from that position.         by 5 file groups. If either of these screen
                                                buttons is touched when the top/bottom
       SELECTING A DESIRED FILE                 page of the list is displayed, the last/first
                                                page is displayed.
■ON THE AUDIO TOP SCREEN                        “SEEK/TRACK” button: Press the “ ” or
                                                “ ” button of “SEEK/TRACK” to scroll
                                                through the file list one by one.
                                                “TUNE·SCROLL” knob: Turn the knob
                                                clockwise or counterclockwise to quickly
                                                scroll up or down the file list. To select the
                                                desired file, press the knob.
                                                   , : If    appears to the right of an item
                                                name, the complete name is too long for
“SEEK/TRACK” button: Press the “ ” or
                                                the screen. Touch    to scroll to the end of
“ ” button of “SEEK/TRACK” repeatedly
                                                the name. Touch     to scroll to the begin-
until the desired file number appears on
                                                ning of the name.
the screen. The player will start playing the
selected file from the beginning.
“TUNE·SCROLL” knob: Turn the knob
clockwise or counterclockwise to skip to
the desired file.


198
1. AUDIO/VIDEO SYSTEM OPERATION


■FAST FORWARDING OR REWIND-                           ■REPEATING A FOLDER
    ING
                                                      1    Touch   “RPT”     repeatedly   until
1    Press and hold the “ ” or “ ” button                  “FLD.RPT” appears on the screen.
     of “SEEK/TRACK” to fast forward or                   When the folder is finished, the player will
     rewind the file.                                     automatically go back to the beginning of
                                                          the folder and play it again. To cancel this
                                                          function, touch “RPT” again.

                                                             RANDOM ORDER

                                                      Files or folders can be automatically
                                                      and randomly selected.

                                                      ■PLAYING FILES FROM ONE FOLD-
                                                          ER IN RANDOM ORDER
    When the button is released, the player           1    Touch “RAND” while the disc is play-
    resumes playing from that position.                    ing.

       REPEATING                                                                                                5

The file or folder currently being lis-


                                                                                                         AUDIO/VIDEO SYSTEM
tened to can be repeated.

■REPEATING A FILE
1    Touch “RPT” while the file is playing.
                                                          Each time “RAND” is touched, the mode
                                                          changes as follows:
                                                          • Random (1 Folder Random)→
                                                            Folder Random (1 Disc Random)→Off
                                                          Once “RAND” appears on the screen, the
                                                          system selects a file randomly from the
                                                          folder currently being listened to. To can-
                                                          cel this function, touch “RAND” repeat-
                                                          edly until the random mode turns off.
    Each time “RPT” is touched, the mode
    changes as follows:
    When “RAND” is off
    • File Repeat→Folder Repeat→Off
    When “RAND” is on
    • File Repeat→Off
    “RPT” appears on the screen. When the
    file is finished, the player will automatically
    play it again. To cancel this function, touch
    “RPT” repeatedly until the repeat mode
    turns off.

                                                                                                  199
1. AUDIO/VIDEO SYSTEM OPERATION


■PLAYING THE FILES IN ALL THE                         PRECAUTIONS ON DVD VIDEO
    FOLDERS ON THE DISC IN RAN-                       DISC
    DOM ORDER
1     Touch “RAND” repeatedly until
                                                  When recording with a DVD video, au-
                                                  dio tracks may not record in some cas-
      “FLD.RAND” appears on the screen.
                                                  es while the menu is displayed. As
    Once “FLD.RAND” appears on the
    screen, the system selects a file randomly
                                                  audio will not play in this case, verify
    from all of the existing folders. To cancel   that the video tracks are playing and
    this function, touch “RAND” again.            then activate playback.
                                                  When playback of a disc is completed:
    INFORMATION
                                                  If an audio CD or MP3/WMA disc is
● When a file is skipped or the system is
                                                  playing, the first track or file starts.
  inoperative, touch “RAND” to reset.
                                                  If a DVD video is playing, playback will
                                                  stop or the menu screen will be dis-
 OPERATING A DVD DISC                             played.
                                                  The title/chapter number and playback
The playback condition of some DVD                time display may not appear while
discs may be determined by the DVD                playing back certain DVD video discs.
software producer. This DVD player
plays a disc as the software producer                   CAUTION
intended. As such some functions may
not work properly. Be sure to read the            ● Conversational speech on some DVDs
instruction manual that comes with the              is recorded at a low volume to empha-
individual DVD disc. For detailed infor-            size the impact of sound effects. If you
                                                    adjust the volume assuming that the
mation about DVD video discs, see                   conversations represent the maximum
“DVD PLAYER AND DVD VIDEO                           volume level that the DVD will play, you
DISC INFORMATION” on page 210.                      may be startled by louder sound effects
                                                    or when you change to a different audio
                                                    source. The louder sounds may have a
                                                    significant impact on the human body or
                                                    pose a driving hazard. Keep this in mind
                                                    when you adjust the volume.


200
1. AUDIO/VIDEO SYSTEM OPERATION


PLAYING A DVD DISC                                      DESCRIPTION OF DVD VIDEO
                                                        CONTROLS
1    Press the “MEDIA” button.
                                                   Screen button           Function
2    Touch the “DISC” tab or press the
     “MEDIA” button repeatedly until the                “Menu”,    Touch to display the menu
                                                      “Top Menu”   screen for DVD video.
     “DISC” tab is selected.
                                                                   The menu control key ap-
                                                                   pears on the screen. (See
                                                                   page 201.)

                                                                   Touch to pause the video
                                                                   screen.

                                                                   Touch to rewind during
                                                                   playback.

    Touch “Options” on the “DVD” screen,                           Touch to stop the video
    then touch “Wide” on the “DVD Options”                         screen.
    screen. The screen mode can be
    changed.                                                       Touch to resume normal
    If “Full Screen” is touched when the vehi-                     play during pause.
                                                                                                        5
    cle is completely stopped and the parking
                                                                   Touch to fast forward dur-
    brake is applied, the video screen returns.
                                                                   ing playback and forward


                                                                                                 AUDIO/VIDEO SYSTEM
                                                                   frame by frame during
       DISPLAYING DVD CONTROLS                                     pause.


                                                  ■CHANGING A CHAPTER
                                                  1   Press and hold the “ ” or “ ” button
                                                      of “SEEK/TRACK” or turn the
                                                      “TUNE·SCROLL” knob to change the
                                                      chapter.


    If    is touched, while watching a DVD,
    the DVD controls will appear.

    INFORMATION

● If     appears on the screen when a con-
  trol is touched the operation relevant to
  the control is not permitted.


                                                                                           201
1. AUDIO/VIDEO SYSTEM OPERATION


       SELECTING A MENU ITEM                        4    The “DVD Options” screen will appear.

1     Select the menu item using                ,
            ,        and            and touch
      “Enter”. The player starts playing the
      disc from the start of the selected item.


                                                         Screen
                                                                           Function           Page
                                                         button

                                                                     Touch to display the
                                                        “Search”                              203
                                                                     title search screen.
    When any part of the screen is touched,                          Touch to display the
    the controls will disappear. To display                          predetermined scene
    them again, touch any part of the screen.           “Return”                               -
                                                                     on the screen and
    When            is touched, the previous                         start playing.
    screen is displayed.
                                                                     Touch to display the
                                                        “Audio”                               203
                                                                     audio editing screen.
    INFORMATION
● According to the DVD disc, some menu                               Touch to display the
  items can be selected by touching them                “Subtitle”   subtitle   selection     203
  directly. (For details, see the manual that                        screen.
  comes with the DVD disc provided sepa-
                                                                     Touch to display the
  rately.)
                                                        “Angle”      angle      selection     203
                                                                     screen.

 DVD OPTIONS                                             “Wide”
                                                                     Touch to display the
                                                                                              179
                                                                     screen mode screen.
1     Press the “MEDIA” button.                                      Touch to display the
                                                        “Display”    image quality adjust-    204
2     Touch the “DISC” tab or press the
                                                                     ment screen.
      “MEDIA” button repeatedly until the
      “DISC” tab is selected.                            “DVD        Touch to display the
                                                                                              204
                                                        Settings”    initial set up screen.
3     Touch “Options”.


202
1. AUDIO/VIDEO SYSTEM OPERATION


       SEARCHING BY TITLE                                   CHANGING THE SUBTITLE
                                                            LANGUAGE
1    Touch “Search” on the “DVD Options”
     screen.                                         1    Touch “Subtitle” on the “DVD Op-
                                                          tions” screen.
2    Enter the title number and touch “OK”.
                                                     2    Each time “Change” is touched, the
                                                          language the subtitles are displayed in
                                                          is changed.
                                                         The languages available are restricted to
                                                         those available on the DVD disc.


    The player starts playing video for that title
    number.
    If the wrong numbers are entered, touch
           to delete the numbers.
    When            is touched, the previous
    screen is displayed.                                 When “Hide” is touched, the subtitles can          5
                                                         be hidden.
       CHANGING THE AUDIO                                When           is touched, the previous


                                                                                                     AUDIO/VIDEO SYSTEM
                                                         screen is displayed.
       LANGUAGE

1    Touch “Audio” on the “DVD Options”                     CHANGING THE ANGLE
     screen.
                                                     The angle can be selected for discs
2    Each time “Change” is touched, the              that are multi-angle compatible when
     audio language is changed.                      the angle mark appears on the screen.
    The languages available are restricted to
    those available on the DVD disc.                 1    Touch “Angle” on the “DVD Options”
                                                          screen.
                                                     2    Each time “Change” is touched, the
                                                          angle is changed.
                                                         The angles available are restricted to
                                                         those available on the DVD disc.


    When            is touched, the previous
    screen is displayed.


                                                                                              203
1. AUDIO/VIDEO SYSTEM OPERATION


    When            is touched, the previous          Screen button            Function
    screen is displayed.
                                                                       Touch to weaken the
                                                        “Tone” “-”
                                                                       tone of the screen.
       AUDIO SCREEN ADJUSTMENT

The brightness, contrast, color and
                                                  3    After adjusting the screen, touch
                                                       “OK”.
tone of the screen can be adjusted. In
addition, the display can be turned off               The screen goes off when “Screen Off” is
                                                      touched. To turn the display screen back
and the screen can be changed to ei-                  on, press any button. The selected screen
ther day or night mode.                               appears.

■CONTRAST, BRIGHTNESS, COLOR                             DVD SETTINGS
    AND TONE ADJUSTMENT
1     Touch “Display” on the “DVD Op-
                                                  1    Touch “DVD Settings” on the “DVD
                                                       Options” screen.
      tions” screen.
2     Touch “ ” or “ ” to display the de-
                                                  2    Touch the items to be set.
      sired item to be adjusted.


    Screen button             Function

                       Touch to strengthen the
    “Contrast” “+”
                       contrast of the screen.

                       Touch to weaken the
     “Contrast” “-”
                       contrast of the screen.

 “Brightness” “+”
                       Touch to brighten the      3    After the initial setting has been
                       screen.
                                                       changed, touch “Save”.
                       Touch to darken the            The initial screen will close, and the sys-
    “Brightness” “-”
                       screen.                        tem will return to the previous screen.
                                                      When “Default” is touched, all menus are
                       Touch to strengthen the
      “Color” “R”                                     initialized.
                       red color of the screen.

                       Touch to strengthen the
      “Color” “G”      green color of the
                       screen.

                       Touch to strengthen the
      “Tone” “+”
                       tone of the screen.

204
1. AUDIO/VIDEO SYSTEM OPERATION


■AUDIO LANGUAGE                                  2    Touch the desired language to be read
                                                      on the “Menu Language” screen.
The audio language can be changed.                   If the desired language to be read cannot
                                                     be found on this screen, touch “Other”
1    Touch “Audio Language” on the                   and enter a language code. For entry of a
     “DVD Settings” screen.                          language code, see “ENTER AUDIO/
                                                     SUBTITLE/MENU LANGUAGE CODE” on
2    Touch the desired language to be                page 206.
     heard on the “Audio Language”                   To return to the “DVD Settings” screen,
     screen.                                         touch        .
    If the desired language to be heard cannot
    be found on this screen, touch “Other”       3    Touch “Save” on the “DVD Settings”
    and enter a language code. For entry of a         screen.
    language code, see “ENTER AUDIO/
    SUBTITLE/MENU LANGUAGE CODE” on              ■ANGLE MARK
    page 206.
    To return to the “DVD Settings” screen,      The multi-angle mark can be turned on
    touch        .                               or off on the screen while discs that are
3    Touch “Save” on the “DVD Settings”          multi-angle compatible are being
     screen.                                     played.
                                                                                                        5
■SUBTITLE LANGUAGE                               1    Touch “Angle Mark” on the “DVD Set-
                                                      tings” screen.
The subtitle language can be changed.


                                                                                                 AUDIO/VIDEO SYSTEM
                                                 2    Touch “On” or “Off”.
1    Touch “Subtitle Language” on the            3    Touch “Save” on the “DVD Settings”
     “DVD Settings” screen.                           screen.
2    Touch the desired language to be read
                                                 ■PARENTAL LOCK
     on the “Subtitle Language” screen.
    If the desired language to be read cannot    The level of viewer restrictions can be
    be found on this screen, touch “Other”       changed.
    and enter a language code. For entry of a
    language code, see “ENTER AUDIO/             1    Touch “Parental Lock” on the “DVD
    SUBTITLE/MENU LANGUAGE CODE” on
    page 206.                                         Settings” screen.
    To return to the “DVD Settings” screen,      2    Enter the 4-digit personal code on the
    touch        .                                    “Key Code” screen.
3    Touch “Save” on the “DVD Settings”              If the wrong numbers are entered, touch
     screen.                                                to delete the numbers.
                                                     To return to the “DVD Settings” screen,
■MENU LANGUAGE                                       touch        .

The language on the DVD video menu               3    Touch a parental level (1-8) on the “Se-
can be changed.                                       lect Restriction Level” screen.
                                                     To return to the “DVD Settings” screen,
1    Touch “Menu Language” on the                    touch       .
     “DVD Settings” screen.

                                                                                          205
1. AUDIO/VIDEO SYSTEM OPERATION


4     Touch “Save” on the “DVD Settings”          ENTER AUDIO/SUBTITLE/
      screen.                                     MENU LANGUAGE CODE
■AUTO START PLAYBACK                        If “Other” on the “Audio Language”
                                            screen, “Subtitle Language” screen or
Discs that are inserted while the vehi-
                                            “Menu Language” screen is touched,
cle is in motion will automatically start
                                            the desired language to be heard or
playing. Certain discs may not play.
                                            read can be selected by entering a
1     Touch “Auto Start Playback” on the    language code.
      “DVD Settings” screen.
                                            1    Enter the 4-digit language code.
2     Touch “On” or “Off”.

3     Touch “Save” on the “DVD Settings”
      screen.

■SOUND DYNAMIC RANGE
The difference between the lowest vol-
ume and the highest volume can be
adjusted.                                       If the wrong numbers are entered, touch
                                                       to delete the numbers.
1     Touch “Sound Dynamic Range” on            To return to the “DVD Settings” screen,
      the “DVD Settings” screen.                touch        .
2     Touch “MAX”, “STD” or “MIN”.          2    Touch “OK”.
3     Touch “Save” on the “DVD Settings”    3    Touch “Save” on the “DVD Settings”
      screen.                                    screen.

■PROLOGIC
Prologic is a matrix decoding technolo-
gy that converts 2-channel audio to
5.1-channel audio.

1     Touch “Pro Logic” on the “DVD Set-
      tings” screen.
2     Touch “On” or “Off”.

3     Touch “Save” on the “DVD Settings”
      screen.


206
1. AUDIO/VIDEO SYSTEM OPERATION


Code                 Language   Code                  Language

0514   English                  0301    Catalan

1001   Japanese                 0315    Corsican

0618   French                   0319    Czech

0405   German                   0325    Welsh

0920   Italian                  0401    Danish

0519   Spanish                  0426    Bhutani

2608   Chinese                  0515    Esperanto

1412   Dutch                    0520    Estonian

1620   Portuguese               0521    Basque

1922   Swedish                  0601    Persian

1821   Russian                  0609    Finnish

1115   Korean                   0610    Fiji
                                                                              5
0512   Greek                    0615    Faroese

0101   Afar                     0625    Frisian


                                                                       AUDIO/VIDEO SYSTEM
0102   Abkhazian                0701    Irish

0106   Afrikaans                0704    Scottish-Gaelic

0113   Amharic                  0712    Galician

0118   Arabic                   0714    Guarani

0119   Assamese                 0721    Gujarati

0125   Aymara                   0801    Hausa

0126   Azerbaijani              0809    Hindi

0201   Bashkir                  0818    Croatian

0205   Byelorussian             0821    Hungarian

0207   Bulgarian                0825    Armenian

0208   Bihari                   0901    Interlingua

0209   Bislama                  0905    Interlingue

0214   Bengali, Bangla          0911    Inupiak

0215   Tibetan                  0914    Indonesian

0218   Breton                   0919    Icelandic


                                                                 207
1. AUDIO/VIDEO SYSTEM OPERATION


  Code                Language    Code               Language

 0923    Hebrew                   1503   Occitan

 1009    Yiddish                  1513   (Afan) Oromo

 1023    Javanese                 1518   Oriya

 1101    Georgian                 1601   Panjabi

 1111    Kazakh                   1612   Polish

 1112    Greenlandic              1619   Pashto, Pushto

 1113    Cambodian                1721   Quechua

 1114    Kannada                  1813   Rhaeto-Romance

 1119    Kashmiri                 1814   Kirundi

 1121    Kurdish                  1815   Romanian

 1125    Kirghiz                  1823   Kinyarwanda

 1201    Latin                    1901   Sanskrit

 1214    Lingala                  1904   Sindhi

 1215    Laotian                  1907   Sango

 1220    Lithuanian               1908   Serbo-Croatian

 1222    Latvian, Lettish         1909   Sinhalese

 1307    Malagasy                 1911   Slovak

 1309    Maori                    1912   Slovenian

 1311    Macedonian               1913   Samoan

 1312    Malayalam                1914   Shona

 1314    Mongolian                1915   Somali

 1315    Moldavian                1917   Albanian

 1318    Marathi                  1918   Serbian

 1319    Malay                    1919   Siswati

 1320    Maltese                  1920   Sesotho

 1325    Burmese                  1921   Sundanese

 1401    Nauru                    1923   Swahili

 1405    Nepali                   2001   Tamil

 1415    Norwegian                2005   Telugu


208
1. AUDIO/VIDEO SYSTEM OPERATION


Code               Language    IF THE PLAYER
2007   Tajik                   MALFUNCTIONS
2008   Thai
                              If the player or another unit equipped
2009   Tigrinya               with the player malfunctions the audio/
                              video system will display a message.
2011   Turkmen
                              These are described below.
2012   Tagalog
                              If “Check DISC” appears on the screen:
2014   Setswana               It indicates that the disc is dirty, damaged,
                              or it was inserted upside down. Clean the
2015   Tongan
                              disc or insert it correctly. If a disc which is
2018   Turkish                not playable is inserted, “Check DISC” will
                              also appear on the screen. For appropriate
2019   Tsonga                 discs for this player, see “AUDIO/VIDEO
2020   Tatar                  SYSTEM OPERATING HINTS” on page
                              230.
2023   Twi
                              If “Region code error” appears on the
2111   Ukrainian              screen: It indicates that the DVD region
                              code is not set properly.                                5
2118   Urdu
                              If the malfunction is not rectified: Take
2126   Uzbek                  your vehicle to your Toyota dealer.


                                                                                AUDIO/VIDEO SYSTEM
2209   Vietnamese
                                INFORMATION
2215   Volapük                ● If an MP3/WMA disc contains CD-DA
                                files only, the CD-DA files can be played.
2315   Wolof                    If an MP3/WMA disc contains CD-DA
2408   Xhosa                    files and files other than CD-DA files,
                                only MP3/WMA files can be played.
2515   Yoruba

2621   Zulu


                                                                         209
1. AUDIO/VIDEO SYSTEM OPERATION


 DVD PLAYER AND DVD                                                  Indicates a region
                                                                     code by which this vid-
 VIDEO DISC INFORMATION                                              eo disc can be played.
                                                                     ALL: in all countries
      DVD VIDEO DISCS                                                Number: region code


This DVD player conforms to NTSC/                   DVD VIDEO DISC GLOSSARY
PAL color TV formats. DVD video discs
conforming to another format such as           DVD video discs: Digital Versatile Disc
SECAM cannot be used.                          that holds video. DVD video discs have
                                               adopted “MPEG2”, one of the world stan-
Region codes: Some DVD video discs             dards of digital compression technologies.
have a region code indicating which coun-      The picture data is compressed by 1/40 on
tries the DVD video disc can be played in      average and stored. Variable rate encoded
on this DVD player. If the DVD video disc      technology in which the volume of data as-
is not labeled as “ALL” or “1”, you cannot     signed to the picture is changed depend-
use it on this DVD player. If you attempt to   ing on the picture format has also been
play an inappropriate DVD video disc on        adopted. Audio data is stored using PCM
this player, “Region code error” appears       and Dolby Digital, which enables higher
on the screen. Even if the DVD video disc      quality of sound. Furthermore, multi-angle
does not have a region code, there are         and multi-language features will also help
cases when it cannot be used.                  users enjoy the more advanced technolo-
                                               gy of DVD video.
■MARKS SHOWN ON DVD VIDEO                      Viewer restrictions: This feature limits
  DISCS                                        what can be viewed in conformity with a
                                               level of restrictions of the country. The lev-
                     Indicates NTSC/PAL
      NTSC/PAL                                 el of restrictions varies depending on the
                     format of color TV.
                                               DVD video disc. Some DVD video discs
                                               cannot be played at all, or violent scenes
                     Indicates the number      are skipped or replaced with other scenes.
                     of audio tracks.            • Level 1: DVD video discs for children
                                                   can be played.
                                                 • Level 2 - 7: DVD video discs for children
                     Indicates the number          and G-rated movie can be played.
                     of language subtitles.      • Level 8: All types of the DVD video discs
                                                   can be played.
                                               Multi-angle feature: The same scene can
                     Indicates the number      be enjoyed from different angles.
                     of angles.
                                               Multi-language feature: The subtitle and
                                               audio language can be selected.
                     Indicates the screen
                     to be selected.           Region codes: The region codes are pro-
                     Wide screen: 16:9         vided on DVD players and DVD discs. If
                     Standard: 4:3             the DVD video disc does not have the
                                               same region code as the DVD player, you
                                               cannot play the disc on the DVD player.
                                               For region codes, see page 210.


210
1. AUDIO/VIDEO SYSTEM OPERATION


Audio: This DVD player can play liner
PCM, Dolby Digital and MPEG audio for-
mat DVDs. Other decoded types cannot
be played.
Title and chapter: Video and audio pro-
grams stored in DVD video discs are divid-
ed into parts by title and chapter.
Title: The largest unit of the video and au-
dio programs stored on DVD video discs.
Usually, one movie, one album, or one au-
dio program is assigned as a title.
Chapter: A unit smaller than that of title. A
title comprises of several chapters.

   Manufactured under license from Dolby
   Laboratories. “Dolby”, “Pro Logic”, and
   the double-D symbol are trademarks of
   Dolby Laboratories.
   This product incorporates copyright pro-
   tection technology that is protected by
                                                                                         5
   U.S. patents and other intellectual prop-
   erty rights. Use of this copyright protec-
   tion technology must be authorized by


                                                                                  AUDIO/VIDEO SYSTEM
   Rovi Corporation, and is intended for
   home and other limited viewing uses
   only unless otherwise authorized by
   Rovi Corporation. Reverse engineering
   or disassembly is prohibited.


                                                                            211
1. AUDIO/VIDEO SYSTEM OPERATION
8. USB MEMORY OPERATION

Connecting a USB memory enables                 CONNECTING A USB
users to enjoy music from the vehicle           MEMORY
speakers.
                                                1    Press the lid.
       CAUTION

● Do not operate the player’s controls or
  connect the USB memory while driving.


       NOTICE
● Depending on the size and shape of the
  USB memory that is connected to the
  system, the auxiliary box lid may not
  close fully. In this case, do not forcibly
  close the lid as this may damage the          2    Open the cover and connect a USB
  USB memory or the terminal, etc.                   memory.
● Do not leave your portable player in the
  car. In particular, high temperatures
  inside the vehicle may damage the por-
  table player.
● Do not push down on or apply unneces-
  sary pressure to the portable player
  while it is connected as this may dam-
  age the portable player or its terminal.
● Do not insert foreign objects into the port
  as this may damage the portable player
  or its terminal.

                                                    Turn on the power of the USB memory if it
                                                    is not turned on.
                                                3    Press the “MEDIA” button.


212
1. AUDIO/VIDEO SYSTEM OPERATION


PLAYING A USB MEMORY                               INFORMATION
                                               ● When the USB memory is connected
                                                 and the audio source is changed to USB
      PLAYING AND PAUSING A USB                  memory mode, the USB memory will
      MEMORY                                     start playing the first file in the first
                                                 folder. If the same device is removed
    Tag mode                                     and reinserted (and the contents have
                                                 not been changed), the USB memory
                                                 will resume playing from the same point
                                                 it was last used.
                                               ● Depending on the USB memory that is
                                                 connected to the system, certain func-
                                                 tions may not be available.


                                                     SELECTING A DESIRED
    Folder mode                                      FOLDER/ALBUM

                                               ■ON THE USB TOP SCREEN

                                                                                                    5


                                                                                             AUDIO/VIDEO SYSTEM
1    If a USB memory has already been
     connected, touch the “USB” tab to se-
     lect USB mode. Pressing the “MEDIA”         , : Touch to skip to the next or previ-
     button repeatedly can also select the     ous folder/album.
     tab.
                                                     SELECTING A DESIRED
    INFORMATION
                                                     FOLDER, ARTIST OR ALBUM
● If tag information exists, the file/folder
  names will be changed to track/album         1    Touch the folder/album name screen
  names.                                            button.

     : Touch to start playing the music.
     : Touch to pause the music.
     : Touch to start playing the music
       again.


                                                                                       213
1. AUDIO/VIDEO SYSTEM OPERATION


2     Touch the desired tab and select the           “TUNE·SCROLL” knob: Turn the knob
      desired folder, artist or album.               clockwise or counterclockwise to skip to
                                                     the desired file/track.

                                                     ■ON THE FILE/TRACK LIST SCREEN
                                                     1   Touch the file/track name screen but-
                                                         ton to display the following file/track list
                                                         screen.


    Character screen buttons, “ABC”, “DEF”
    etc., allow a direct jump to list entries that
    begin with the same letter as the character
    button.
    Each time the same character screen but-
    ton is touched, the list starting with the
    subsequent character is displayed.
   , : Touch to move the list up or down             2   Touch the desired file/track number.
by 5 folder/artist/album groups. If either of            The player will start playing the select-
these screen buttons is touched when the                 ed file/track from the beginning.
top/bottom page of the list is displayed, the
                                                        , : Touch to move the list up or down
last/first page is displayed.
                                                     by 5 file/track groups. If either of these
   , : If    appears to the right of an item         screen buttons is touched when the top/
name, the complete name is too long for              bottom page of the list is displayed, the
the screen. Touch    to scroll to the end of         last/first page is displayed.
the name. Touch     to scroll to the begin-          “SEEK/TRACK” button: Press the “ ” or
ning of the name.                                    “ ” button of “SEEK/TRACK” to scroll
                                                     through the file/track list one by one.
       SELECTING A DESIRED FILE/                     “TUNE·SCROLL” knob: Turn the knob
       TRACK                                         clockwise or counterclockwise to quickly
                                                     scroll up or down the file/track list. To se-
■ON THE USB TOP SCREEN                               lect the desired file/track, press the knob.
                                                        , : If    appears to the right of an item
                                                     name, the complete name is too long for
                                                     the screen. Touch    to scroll to the end of
                                                     the name. Touch     to scroll to the begin-
                                                     ning of the name.


“SEEK/TRACK” button: Press the “ ” or
“ ” button of “SEEK/ TRACK” repeatedly
until the desired file/track number appears
on the screen. The player will start playing
the selected file/track from the beginning.
214
1. AUDIO/VIDEO SYSTEM OPERATION


■FAST FORWARDING OR REWIND-                          REPEATING
    ING
1    Press and hold the “ ” or “ ” button
                                              The file or folder currently being lis-
                                              tened to can be repeated.
     of “SEEK/TRACK” to fast forward or
     rewind the file/track.
                                              ■REPEATING A FILE/TRACK
                                              1    Touch “RPT” while the file or track is
                                                   playing.


    When the button is released, the player
    resumes playing from that position.           Each time “RPT” is touched, the mode
                                                  changes as follows:
                                                  When “RAND” is off                                     5
                                                  • File/Track Repeat      →    Folder/Album
                                                    Repeat → Off


                                                                                                  AUDIO/VIDEO SYSTEM
                                                  When “RAND” is on
                                                  • File/Track Repeat → Off
                                                  “RPT” appears on the screen. When the
                                                  file/track is finished, the player will auto-
                                                  matically play it again. To cancel this func-
                                                  tion, touch “RPT” repeatedly until the
                                                  repeat mode turns off.

                                              ■REPEATING A FOLDER/ALBUM
                                              1    Touch   “RPT”     repeatedly   until
                                                   “FLD.RPT” appears on the screen.
                                                  When the folder/album is finished, the
                                                  player will automatically go back to the
                                                  beginning of the folder/album and play it
                                                  again. To cancel this function, touch
                                                  “RPT” again.


                                                                                           215
2012 Toyota Camry Audio System Baltimore, Maryland

Mais conteúdo relacionado

Destaque

2012 Toyota Sequoia Audio & Video Systems
2012 Toyota Sequoia Audio & Video Systems2012 Toyota Sequoia Audio & Video Systems
2012 Toyota Sequoia Audio & Video SystemsJerry's Toyota
 
2012 Toyota Sienna Rear Entertainment System
2012 Toyota Sienna Rear Entertainment System2012 Toyota Sienna Rear Entertainment System
2012 Toyota Sienna Rear Entertainment SystemJerry's Toyota
 
School nurse cover letter
School nurse cover letterSchool nurse cover letter
School nurse cover letteralissaturner627
 
Top 14 common mistakes in job interviews
Top 14 common mistakes in job interviewsTop 14 common mistakes in job interviews
Top 14 common mistakes in job interviewsjobguide247
 
10 things to do after a job interview
10 things to do after a job interview10 things to do after a job interview
10 things to do after a job interviewjobguide247
 
5 steps to answer behavioral interview questions
5 steps to answer behavioral interview questions5 steps to answer behavioral interview questions
5 steps to answer behavioral interview questionsjobguide247
 
Top 16 ways to make money online forever
Top 16 ways to make money online foreverTop 16 ways to make money online forever
Top 16 ways to make money online foreverjobguide247
 

Destaque (7)

2012 Toyota Sequoia Audio & Video Systems
2012 Toyota Sequoia Audio & Video Systems2012 Toyota Sequoia Audio & Video Systems
2012 Toyota Sequoia Audio & Video Systems
 
2012 Toyota Sienna Rear Entertainment System
2012 Toyota Sienna Rear Entertainment System2012 Toyota Sienna Rear Entertainment System
2012 Toyota Sienna Rear Entertainment System
 
School nurse cover letter
School nurse cover letterSchool nurse cover letter
School nurse cover letter
 
Top 14 common mistakes in job interviews
Top 14 common mistakes in job interviewsTop 14 common mistakes in job interviews
Top 14 common mistakes in job interviews
 
10 things to do after a job interview
10 things to do after a job interview10 things to do after a job interview
10 things to do after a job interview
 
5 steps to answer behavioral interview questions
5 steps to answer behavioral interview questions5 steps to answer behavioral interview questions
5 steps to answer behavioral interview questions
 
Top 16 ways to make money online forever
Top 16 ways to make money online foreverTop 16 ways to make money online forever
Top 16 ways to make money online forever
 

Semelhante a 2012 Toyota Camry Audio System Baltimore, Maryland

2012 Toyota Sienna Audio System
2012 Toyota Sienna Audio System2012 Toyota Sienna Audio System
2012 Toyota Sienna Audio SystemJerry's Toyota
 
2012 Toyota Avalon Audio System Baltimore, Maryland
2012 Toyota Avalon Audio System Baltimore, Maryland2012 Toyota Avalon Audio System Baltimore, Maryland
2012 Toyota Avalon Audio System Baltimore, MarylandJerry's Toyota
 
2012 Toyota Highlander Audio/Video Information
2012 Toyota Highlander Audio/Video Information2012 Toyota Highlander Audio/Video Information
2012 Toyota Highlander Audio/Video InformationJerry's Toyota
 
Stanton C313 Eng
Stanton C313 EngStanton C313 Eng
Stanton C313 Engguestb0ecb3
 
Sanyo Vpchd1010-title, chang
Sanyo Vpchd1010-title, changSanyo Vpchd1010-title, chang
Sanyo Vpchd1010-title, changaplaxo
 
97expedition audio
97expedition audio97expedition audio
97expedition audiorukford1
 
GP-100_Online Manual_EN_Firmware V1.3_200714.pdf
GP-100_Online Manual_EN_Firmware V1.3_200714.pdfGP-100_Online Manual_EN_Firmware V1.3_200714.pdf
GP-100_Online Manual_EN_Firmware V1.3_200714.pdfJose Cervantes
 
Guide to Using the Canon VIXIA HF G30
Guide to Using the Canon VIXIA HF G30Guide to Using the Canon VIXIA HF G30
Guide to Using the Canon VIXIA HF G30Campbell Cameras
 
Your Guide On How To Use The Canon XA20/25
Your Guide On How To Use The Canon XA20/25Your Guide On How To Use The Canon XA20/25
Your Guide On How To Use The Canon XA20/25Campbell Cameras
 
2011 Buick Regal Toledo Get to know
2011 Buick Regal Toledo Get to know2011 Buick Regal Toledo Get to know
2011 Buick Regal Toledo Get to knowBallas Buick GMC
 
Sony dcs901-operating-instructions-65e3daf
Sony dcs901-operating-instructions-65e3dafSony dcs901-operating-instructions-65e3daf
Sony dcs901-operating-instructions-65e3dafMYPRINTINGDREAMS
 
Mouse DVR User Manual
Mouse DVR User ManualMouse DVR User Manual
Mouse DVR User Manualdashcamtalk
 
2012 Toyota Prius Audio System
2012 Toyota Prius Audio System2012 Toyota Prius Audio System
2012 Toyota Prius Audio SystemJerry's Toyota
 

Semelhante a 2012 Toyota Camry Audio System Baltimore, Maryland (20)

2012 Toyota Sienna Audio System
2012 Toyota Sienna Audio System2012 Toyota Sienna Audio System
2012 Toyota Sienna Audio System
 
2012 Toyota Avalon Audio System Baltimore, Maryland
2012 Toyota Avalon Audio System Baltimore, Maryland2012 Toyota Avalon Audio System Baltimore, Maryland
2012 Toyota Avalon Audio System Baltimore, Maryland
 
2012 Toyota Highlander Audio/Video Information
2012 Toyota Highlander Audio/Video Information2012 Toyota Highlander Audio/Video Information
2012 Toyota Highlander Audio/Video Information
 
Sjx40 fb 9xaf
Sjx40 fb 9xafSjx40 fb 9xaf
Sjx40 fb 9xaf
 
CL139
CL139CL139
CL139
 
CL119
CL119CL119
CL119
 
Jeep 2014 Uconnect 5.0 Owners Manual
Jeep 2014 Uconnect 5.0 Owners Manual Jeep 2014 Uconnect 5.0 Owners Manual
Jeep 2014 Uconnect 5.0 Owners Manual
 
Stanton C313 Eng
Stanton C313 EngStanton C313 Eng
Stanton C313 Eng
 
Stanton C313
Stanton C313Stanton C313
Stanton C313
 
Cl135
Cl135Cl135
Cl135
 
Sanyo Vpchd1010-title, chang
Sanyo Vpchd1010-title, changSanyo Vpchd1010-title, chang
Sanyo Vpchd1010-title, chang
 
97expedition audio
97expedition audio97expedition audio
97expedition audio
 
GP-100_Online Manual_EN_Firmware V1.3_200714.pdf
GP-100_Online Manual_EN_Firmware V1.3_200714.pdfGP-100_Online Manual_EN_Firmware V1.3_200714.pdf
GP-100_Online Manual_EN_Firmware V1.3_200714.pdf
 
Guide to Using the Canon VIXIA HF G30
Guide to Using the Canon VIXIA HF G30Guide to Using the Canon VIXIA HF G30
Guide to Using the Canon VIXIA HF G30
 
Your Guide On How To Use The Canon XA20/25
Your Guide On How To Use The Canon XA20/25Your Guide On How To Use The Canon XA20/25
Your Guide On How To Use The Canon XA20/25
 
Manual
ManualManual
Manual
 
2011 Buick Regal Toledo Get to know
2011 Buick Regal Toledo Get to know2011 Buick Regal Toledo Get to know
2011 Buick Regal Toledo Get to know
 
Sony dcs901-operating-instructions-65e3daf
Sony dcs901-operating-instructions-65e3dafSony dcs901-operating-instructions-65e3daf
Sony dcs901-operating-instructions-65e3daf
 
Mouse DVR User Manual
Mouse DVR User ManualMouse DVR User Manual
Mouse DVR User Manual
 
2012 Toyota Prius Audio System
2012 Toyota Prius Audio System2012 Toyota Prius Audio System
2012 Toyota Prius Audio System
 

Mais de Jerry's Toyota

2014 Toyota Prius V in Baltimore, Maryland
2014 Toyota Prius V in Baltimore, Maryland2014 Toyota Prius V in Baltimore, Maryland
2014 Toyota Prius V in Baltimore, MarylandJerry's Toyota
 
2014 Toyota Prius Plug-in in Baltimore, Maryland
2014 Toyota Prius Plug-in in Baltimore, Maryland2014 Toyota Prius Plug-in in Baltimore, Maryland
2014 Toyota Prius Plug-in in Baltimore, MarylandJerry's Toyota
 
2014 Toyota Prius C in Baltimore, Maryland
2014 Toyota Prius C in Baltimore, Maryland2014 Toyota Prius C in Baltimore, Maryland
2014 Toyota Prius C in Baltimore, MarylandJerry's Toyota
 
2014 Toyota Prius in Baltimore, Maryland
2014 Toyota Prius in Baltimore, Maryland2014 Toyota Prius in Baltimore, Maryland
2014 Toyota Prius in Baltimore, MarylandJerry's Toyota
 
2014 Toyota Venza in Baltimore, Maryland
2014 Toyota Venza in Baltimore, Maryland2014 Toyota Venza in Baltimore, Maryland
2014 Toyota Venza in Baltimore, MarylandJerry's Toyota
 
2014 Toyota Rav4 in Baltimore, Maryland
2014 Toyota Rav4 in Baltimore, Maryland2014 Toyota Rav4 in Baltimore, Maryland
2014 Toyota Rav4 in Baltimore, MarylandJerry's Toyota
 
2014 Toyota Sequoia in Baltimore, Maryland
2014 Toyota Sequoia in Baltimore, Maryland2014 Toyota Sequoia in Baltimore, Maryland
2014 Toyota Sequoia in Baltimore, MarylandJerry's Toyota
 
2014 Toyota Highlander in Baltimore, Maryland
2014 Toyota Highlander in Baltimore, Maryland2014 Toyota Highlander in Baltimore, Maryland
2014 Toyota Highlander in Baltimore, MarylandJerry's Toyota
 
2014 Toyota 4Runner in Baltimore, Maryland
2014 Toyota 4Runner in Baltimore, Maryland2014 Toyota 4Runner in Baltimore, Maryland
2014 Toyota 4Runner in Baltimore, MarylandJerry's Toyota
 
2014 Toyota FJ Cruiser in Baltimore, Maryland
2014 Toyota FJ Cruiser in Baltimore, Maryland2014 Toyota FJ Cruiser in Baltimore, Maryland
2014 Toyota FJ Cruiser in Baltimore, MarylandJerry's Toyota
 
2014 Toyota Tundra in Baltimore, Maryland
2014 Toyota Tundra in Baltimore, Maryland2014 Toyota Tundra in Baltimore, Maryland
2014 Toyota Tundra in Baltimore, MarylandJerry's Toyota
 
2014 Toyota Tacoma in Baltimore, Maryland
2014 Toyota Tacoma in Baltimore, Maryland2014 Toyota Tacoma in Baltimore, Maryland
2014 Toyota Tacoma in Baltimore, MarylandJerry's Toyota
 
2014 Toyota Yaris in Baltimore, Maryland
2014 Toyota Yaris in Baltimore, Maryland2014 Toyota Yaris in Baltimore, Maryland
2014 Toyota Yaris in Baltimore, MarylandJerry's Toyota
 
2014 Toyota Sienna in Baltimore, Maryland
2014 Toyota Sienna in Baltimore, Maryland2014 Toyota Sienna in Baltimore, Maryland
2014 Toyota Sienna in Baltimore, MarylandJerry's Toyota
 
2014 Toyota Corolla in Baltimore, Maryland
2014 Toyota Corolla in Baltimore, Maryland2014 Toyota Corolla in Baltimore, Maryland
2014 Toyota Corolla in Baltimore, MarylandJerry's Toyota
 
2014 Toyota Avalon in Baltimore, Maryland
2014 Toyota Avalon in Baltimore, Maryland2014 Toyota Avalon in Baltimore, Maryland
2014 Toyota Avalon in Baltimore, MarylandJerry's Toyota
 
2014 Toyota Camry in Baltimore, Maryland
2014 Toyota Camry in Baltimore, Maryland2014 Toyota Camry in Baltimore, Maryland
2014 Toyota Camry in Baltimore, MarylandJerry's Toyota
 
Certified Used Car Financing at Jerrys Toyota in Baltimore, Maryland
Certified Used Car Financing at Jerrys Toyota in Baltimore, MarylandCertified Used Car Financing at Jerrys Toyota in Baltimore, Maryland
Certified Used Car Financing at Jerrys Toyota in Baltimore, MarylandJerry's Toyota
 
2014 Toyota Sienna at Jerrys Toyota in Baltimore, Maryland
2014 Toyota Sienna at Jerrys Toyota in Baltimore, Maryland2014 Toyota Sienna at Jerrys Toyota in Baltimore, Maryland
2014 Toyota Sienna at Jerrys Toyota in Baltimore, MarylandJerry's Toyota
 
2013 Toyota Highlander at Jerrys Toyota in Baltimore, Maryland
2013 Toyota Highlander at Jerrys Toyota in Baltimore, Maryland2013 Toyota Highlander at Jerrys Toyota in Baltimore, Maryland
2013 Toyota Highlander at Jerrys Toyota in Baltimore, MarylandJerry's Toyota
 

Mais de Jerry's Toyota (20)

2014 Toyota Prius V in Baltimore, Maryland
2014 Toyota Prius V in Baltimore, Maryland2014 Toyota Prius V in Baltimore, Maryland
2014 Toyota Prius V in Baltimore, Maryland
 
2014 Toyota Prius Plug-in in Baltimore, Maryland
2014 Toyota Prius Plug-in in Baltimore, Maryland2014 Toyota Prius Plug-in in Baltimore, Maryland
2014 Toyota Prius Plug-in in Baltimore, Maryland
 
2014 Toyota Prius C in Baltimore, Maryland
2014 Toyota Prius C in Baltimore, Maryland2014 Toyota Prius C in Baltimore, Maryland
2014 Toyota Prius C in Baltimore, Maryland
 
2014 Toyota Prius in Baltimore, Maryland
2014 Toyota Prius in Baltimore, Maryland2014 Toyota Prius in Baltimore, Maryland
2014 Toyota Prius in Baltimore, Maryland
 
2014 Toyota Venza in Baltimore, Maryland
2014 Toyota Venza in Baltimore, Maryland2014 Toyota Venza in Baltimore, Maryland
2014 Toyota Venza in Baltimore, Maryland
 
2014 Toyota Rav4 in Baltimore, Maryland
2014 Toyota Rav4 in Baltimore, Maryland2014 Toyota Rav4 in Baltimore, Maryland
2014 Toyota Rav4 in Baltimore, Maryland
 
2014 Toyota Sequoia in Baltimore, Maryland
2014 Toyota Sequoia in Baltimore, Maryland2014 Toyota Sequoia in Baltimore, Maryland
2014 Toyota Sequoia in Baltimore, Maryland
 
2014 Toyota Highlander in Baltimore, Maryland
2014 Toyota Highlander in Baltimore, Maryland2014 Toyota Highlander in Baltimore, Maryland
2014 Toyota Highlander in Baltimore, Maryland
 
2014 Toyota 4Runner in Baltimore, Maryland
2014 Toyota 4Runner in Baltimore, Maryland2014 Toyota 4Runner in Baltimore, Maryland
2014 Toyota 4Runner in Baltimore, Maryland
 
2014 Toyota FJ Cruiser in Baltimore, Maryland
2014 Toyota FJ Cruiser in Baltimore, Maryland2014 Toyota FJ Cruiser in Baltimore, Maryland
2014 Toyota FJ Cruiser in Baltimore, Maryland
 
2014 Toyota Tundra in Baltimore, Maryland
2014 Toyota Tundra in Baltimore, Maryland2014 Toyota Tundra in Baltimore, Maryland
2014 Toyota Tundra in Baltimore, Maryland
 
2014 Toyota Tacoma in Baltimore, Maryland
2014 Toyota Tacoma in Baltimore, Maryland2014 Toyota Tacoma in Baltimore, Maryland
2014 Toyota Tacoma in Baltimore, Maryland
 
2014 Toyota Yaris in Baltimore, Maryland
2014 Toyota Yaris in Baltimore, Maryland2014 Toyota Yaris in Baltimore, Maryland
2014 Toyota Yaris in Baltimore, Maryland
 
2014 Toyota Sienna in Baltimore, Maryland
2014 Toyota Sienna in Baltimore, Maryland2014 Toyota Sienna in Baltimore, Maryland
2014 Toyota Sienna in Baltimore, Maryland
 
2014 Toyota Corolla in Baltimore, Maryland
2014 Toyota Corolla in Baltimore, Maryland2014 Toyota Corolla in Baltimore, Maryland
2014 Toyota Corolla in Baltimore, Maryland
 
2014 Toyota Avalon in Baltimore, Maryland
2014 Toyota Avalon in Baltimore, Maryland2014 Toyota Avalon in Baltimore, Maryland
2014 Toyota Avalon in Baltimore, Maryland
 
2014 Toyota Camry in Baltimore, Maryland
2014 Toyota Camry in Baltimore, Maryland2014 Toyota Camry in Baltimore, Maryland
2014 Toyota Camry in Baltimore, Maryland
 
Certified Used Car Financing at Jerrys Toyota in Baltimore, Maryland
Certified Used Car Financing at Jerrys Toyota in Baltimore, MarylandCertified Used Car Financing at Jerrys Toyota in Baltimore, Maryland
Certified Used Car Financing at Jerrys Toyota in Baltimore, Maryland
 
2014 Toyota Sienna at Jerrys Toyota in Baltimore, Maryland
2014 Toyota Sienna at Jerrys Toyota in Baltimore, Maryland2014 Toyota Sienna at Jerrys Toyota in Baltimore, Maryland
2014 Toyota Sienna at Jerrys Toyota in Baltimore, Maryland
 
2013 Toyota Highlander at Jerrys Toyota in Baltimore, Maryland
2013 Toyota Highlander at Jerrys Toyota in Baltimore, Maryland2013 Toyota Highlander at Jerrys Toyota in Baltimore, Maryland
2013 Toyota Highlander at Jerrys Toyota in Baltimore, Maryland
 

Último

Top profile Call Girls In Darbhanga [ 7014168258 ] Call Me For Genuine Models...
Top profile Call Girls In Darbhanga [ 7014168258 ] Call Me For Genuine Models...Top profile Call Girls In Darbhanga [ 7014168258 ] Call Me For Genuine Models...
Top profile Call Girls In Darbhanga [ 7014168258 ] Call Me For Genuine Models...nirzagarg
 
Top profile Call Girls In dharamshala [ 7014168258 ] Call Me For Genuine Mode...
Top profile Call Girls In dharamshala [ 7014168258 ] Call Me For Genuine Mode...Top profile Call Girls In dharamshala [ 7014168258 ] Call Me For Genuine Mode...
Top profile Call Girls In dharamshala [ 7014168258 ] Call Me For Genuine Mode...gajnagarg
 
CELLULAR RESPIRATION. Helpful slides for
CELLULAR RESPIRATION. Helpful slides forCELLULAR RESPIRATION. Helpful slides for
CELLULAR RESPIRATION. Helpful slides foreuphemism22
 
Top profile Call Girls In Mangalore [ 7014168258 ] Call Me For Genuine Models...
Top profile Call Girls In Mangalore [ 7014168258 ] Call Me For Genuine Models...Top profile Call Girls In Mangalore [ 7014168258 ] Call Me For Genuine Models...
Top profile Call Girls In Mangalore [ 7014168258 ] Call Me For Genuine Models...gajnagarg
 
一比一原版西安大略大学毕业证(UWO毕业证)成绩单原件一模一样
一比一原版西安大略大学毕业证(UWO毕业证)成绩单原件一模一样一比一原版西安大略大学毕业证(UWO毕业证)成绩单原件一模一样
一比一原版西安大略大学毕业证(UWO毕业证)成绩单原件一模一样wsppdmt
 
Vip Begusarai Escorts Service Girl ^ 9332606886, WhatsApp Anytime Begusarai
Vip Begusarai Escorts Service Girl ^ 9332606886, WhatsApp Anytime BegusaraiVip Begusarai Escorts Service Girl ^ 9332606886, WhatsApp Anytime Begusarai
Vip Begusarai Escorts Service Girl ^ 9332606886, WhatsApp Anytime Begusaraimeghakumariji156
 
如何办理(NCL毕业证书)纽卡斯尔大学毕业证毕业证成绩单原版一比一
如何办理(NCL毕业证书)纽卡斯尔大学毕业证毕业证成绩单原版一比一如何办理(NCL毕业证书)纽卡斯尔大学毕业证毕业证成绩单原版一比一
如何办理(NCL毕业证书)纽卡斯尔大学毕业证毕业证成绩单原版一比一avy6anjnd
 
一比一原版(UdeM学位证书)蒙特利尔大学毕业证学历认证怎样办
一比一原版(UdeM学位证书)蒙特利尔大学毕业证学历认证怎样办一比一原版(UdeM学位证书)蒙特利尔大学毕业证学历认证怎样办
一比一原版(UdeM学位证书)蒙特利尔大学毕业证学历认证怎样办ezgenuh
 
Changodar Call Girls Book Now 7737669865 Top Class Escort Service Available
Changodar Call Girls Book Now 7737669865 Top Class Escort Service AvailableChangodar Call Girls Book Now 7737669865 Top Class Escort Service Available
Changodar Call Girls Book Now 7737669865 Top Class Escort Service Availablegargpaaro
 
一比一原版(Greenwich毕业证书)格林威治大学毕业证如何办理
一比一原版(Greenwich毕业证书)格林威治大学毕业证如何办理一比一原版(Greenwich毕业证书)格林威治大学毕业证如何办理
一比一原版(Greenwich毕业证书)格林威治大学毕业证如何办理bd2c5966a56d
 
SEM 922 MOTOR GRADER PARTS LIST, ALL WHEEL DRIVE
SEM 922 MOTOR GRADER PARTS LIST, ALL WHEEL DRIVESEM 922 MOTOR GRADER PARTS LIST, ALL WHEEL DRIVE
SEM 922 MOTOR GRADER PARTS LIST, ALL WHEEL DRIVEZhandosBuzheyev
 
T.L.E 5S's (Seiri, Seiton, Seiso, Seiketsu, Shitsuke).pptx
T.L.E 5S's (Seiri, Seiton, Seiso, Seiketsu, Shitsuke).pptxT.L.E 5S's (Seiri, Seiton, Seiso, Seiketsu, Shitsuke).pptx
T.L.E 5S's (Seiri, Seiton, Seiso, Seiketsu, Shitsuke).pptxBernardLongboan
 
Top profile Call Girls In Anand [ 7014168258 ] Call Me For Genuine Models We ...
Top profile Call Girls In Anand [ 7014168258 ] Call Me For Genuine Models We ...Top profile Call Girls In Anand [ 7014168258 ] Call Me For Genuine Models We ...
Top profile Call Girls In Anand [ 7014168258 ] Call Me For Genuine Models We ...gajnagarg
 
如何办理伦敦商学院毕业证(LBS毕业证)毕业证成绩单原版一比一
如何办理伦敦商学院毕业证(LBS毕业证)毕业证成绩单原版一比一如何办理伦敦商学院毕业证(LBS毕业证)毕业证成绩单原版一比一
如何办理伦敦商学院毕业证(LBS毕业证)毕业证成绩单原版一比一avy6anjnd
 
Top profile Call Girls In Ranchi [ 7014168258 ] Call Me For Genuine Models We...
Top profile Call Girls In Ranchi [ 7014168258 ] Call Me For Genuine Models We...Top profile Call Girls In Ranchi [ 7014168258 ] Call Me For Genuine Models We...
Top profile Call Girls In Ranchi [ 7014168258 ] Call Me For Genuine Models We...gajnagarg
 
Is Your Mercedes Benz Trunk Refusing To Close Here's What Might Be Wrong
Is Your Mercedes Benz Trunk Refusing To Close Here's What Might Be WrongIs Your Mercedes Benz Trunk Refusing To Close Here's What Might Be Wrong
Is Your Mercedes Benz Trunk Refusing To Close Here's What Might Be WrongMomentum Motorworks
 
Effortless Driving Experience Premier Mercedes Sprinter Suspension Service
Effortless Driving Experience Premier Mercedes Sprinter Suspension ServiceEffortless Driving Experience Premier Mercedes Sprinter Suspension Service
Effortless Driving Experience Premier Mercedes Sprinter Suspension ServiceSprinter Gurus
 
一比一原版(PU学位证书)普渡大学毕业证学历认证加急办理
一比一原版(PU学位证书)普渡大学毕业证学历认证加急办理一比一原版(PU学位证书)普渡大学毕业证学历认证加急办理
一比一原版(PU学位证书)普渡大学毕业证学历认证加急办理ezgenuh
 
Is Your Volvo XC90 Displaying Anti-Skid Service Required Alert Here's Why
Is Your Volvo XC90 Displaying Anti-Skid Service Required Alert Here's WhyIs Your Volvo XC90 Displaying Anti-Skid Service Required Alert Here's Why
Is Your Volvo XC90 Displaying Anti-Skid Service Required Alert Here's WhyBavarium Autoworks
 
Is Your BMW PDC Malfunctioning Discover How to Easily Reset It
Is Your BMW PDC Malfunctioning Discover How to Easily Reset ItIs Your BMW PDC Malfunctioning Discover How to Easily Reset It
Is Your BMW PDC Malfunctioning Discover How to Easily Reset ItEuroService Automotive
 

Último (20)

Top profile Call Girls In Darbhanga [ 7014168258 ] Call Me For Genuine Models...
Top profile Call Girls In Darbhanga [ 7014168258 ] Call Me For Genuine Models...Top profile Call Girls In Darbhanga [ 7014168258 ] Call Me For Genuine Models...
Top profile Call Girls In Darbhanga [ 7014168258 ] Call Me For Genuine Models...
 
Top profile Call Girls In dharamshala [ 7014168258 ] Call Me For Genuine Mode...
Top profile Call Girls In dharamshala [ 7014168258 ] Call Me For Genuine Mode...Top profile Call Girls In dharamshala [ 7014168258 ] Call Me For Genuine Mode...
Top profile Call Girls In dharamshala [ 7014168258 ] Call Me For Genuine Mode...
 
CELLULAR RESPIRATION. Helpful slides for
CELLULAR RESPIRATION. Helpful slides forCELLULAR RESPIRATION. Helpful slides for
CELLULAR RESPIRATION. Helpful slides for
 
Top profile Call Girls In Mangalore [ 7014168258 ] Call Me For Genuine Models...
Top profile Call Girls In Mangalore [ 7014168258 ] Call Me For Genuine Models...Top profile Call Girls In Mangalore [ 7014168258 ] Call Me For Genuine Models...
Top profile Call Girls In Mangalore [ 7014168258 ] Call Me For Genuine Models...
 
一比一原版西安大略大学毕业证(UWO毕业证)成绩单原件一模一样
一比一原版西安大略大学毕业证(UWO毕业证)成绩单原件一模一样一比一原版西安大略大学毕业证(UWO毕业证)成绩单原件一模一样
一比一原版西安大略大学毕业证(UWO毕业证)成绩单原件一模一样
 
Vip Begusarai Escorts Service Girl ^ 9332606886, WhatsApp Anytime Begusarai
Vip Begusarai Escorts Service Girl ^ 9332606886, WhatsApp Anytime BegusaraiVip Begusarai Escorts Service Girl ^ 9332606886, WhatsApp Anytime Begusarai
Vip Begusarai Escorts Service Girl ^ 9332606886, WhatsApp Anytime Begusarai
 
如何办理(NCL毕业证书)纽卡斯尔大学毕业证毕业证成绩单原版一比一
如何办理(NCL毕业证书)纽卡斯尔大学毕业证毕业证成绩单原版一比一如何办理(NCL毕业证书)纽卡斯尔大学毕业证毕业证成绩单原版一比一
如何办理(NCL毕业证书)纽卡斯尔大学毕业证毕业证成绩单原版一比一
 
一比一原版(UdeM学位证书)蒙特利尔大学毕业证学历认证怎样办
一比一原版(UdeM学位证书)蒙特利尔大学毕业证学历认证怎样办一比一原版(UdeM学位证书)蒙特利尔大学毕业证学历认证怎样办
一比一原版(UdeM学位证书)蒙特利尔大学毕业证学历认证怎样办
 
Changodar Call Girls Book Now 7737669865 Top Class Escort Service Available
Changodar Call Girls Book Now 7737669865 Top Class Escort Service AvailableChangodar Call Girls Book Now 7737669865 Top Class Escort Service Available
Changodar Call Girls Book Now 7737669865 Top Class Escort Service Available
 
一比一原版(Greenwich毕业证书)格林威治大学毕业证如何办理
一比一原版(Greenwich毕业证书)格林威治大学毕业证如何办理一比一原版(Greenwich毕业证书)格林威治大学毕业证如何办理
一比一原版(Greenwich毕业证书)格林威治大学毕业证如何办理
 
SEM 922 MOTOR GRADER PARTS LIST, ALL WHEEL DRIVE
SEM 922 MOTOR GRADER PARTS LIST, ALL WHEEL DRIVESEM 922 MOTOR GRADER PARTS LIST, ALL WHEEL DRIVE
SEM 922 MOTOR GRADER PARTS LIST, ALL WHEEL DRIVE
 
T.L.E 5S's (Seiri, Seiton, Seiso, Seiketsu, Shitsuke).pptx
T.L.E 5S's (Seiri, Seiton, Seiso, Seiketsu, Shitsuke).pptxT.L.E 5S's (Seiri, Seiton, Seiso, Seiketsu, Shitsuke).pptx
T.L.E 5S's (Seiri, Seiton, Seiso, Seiketsu, Shitsuke).pptx
 
Top profile Call Girls In Anand [ 7014168258 ] Call Me For Genuine Models We ...
Top profile Call Girls In Anand [ 7014168258 ] Call Me For Genuine Models We ...Top profile Call Girls In Anand [ 7014168258 ] Call Me For Genuine Models We ...
Top profile Call Girls In Anand [ 7014168258 ] Call Me For Genuine Models We ...
 
如何办理伦敦商学院毕业证(LBS毕业证)毕业证成绩单原版一比一
如何办理伦敦商学院毕业证(LBS毕业证)毕业证成绩单原版一比一如何办理伦敦商学院毕业证(LBS毕业证)毕业证成绩单原版一比一
如何办理伦敦商学院毕业证(LBS毕业证)毕业证成绩单原版一比一
 
Top profile Call Girls In Ranchi [ 7014168258 ] Call Me For Genuine Models We...
Top profile Call Girls In Ranchi [ 7014168258 ] Call Me For Genuine Models We...Top profile Call Girls In Ranchi [ 7014168258 ] Call Me For Genuine Models We...
Top profile Call Girls In Ranchi [ 7014168258 ] Call Me For Genuine Models We...
 
Is Your Mercedes Benz Trunk Refusing To Close Here's What Might Be Wrong
Is Your Mercedes Benz Trunk Refusing To Close Here's What Might Be WrongIs Your Mercedes Benz Trunk Refusing To Close Here's What Might Be Wrong
Is Your Mercedes Benz Trunk Refusing To Close Here's What Might Be Wrong
 
Effortless Driving Experience Premier Mercedes Sprinter Suspension Service
Effortless Driving Experience Premier Mercedes Sprinter Suspension ServiceEffortless Driving Experience Premier Mercedes Sprinter Suspension Service
Effortless Driving Experience Premier Mercedes Sprinter Suspension Service
 
一比一原版(PU学位证书)普渡大学毕业证学历认证加急办理
一比一原版(PU学位证书)普渡大学毕业证学历认证加急办理一比一原版(PU学位证书)普渡大学毕业证学历认证加急办理
一比一原版(PU学位证书)普渡大学毕业证学历认证加急办理
 
Is Your Volvo XC90 Displaying Anti-Skid Service Required Alert Here's Why
Is Your Volvo XC90 Displaying Anti-Skid Service Required Alert Here's WhyIs Your Volvo XC90 Displaying Anti-Skid Service Required Alert Here's Why
Is Your Volvo XC90 Displaying Anti-Skid Service Required Alert Here's Why
 
Is Your BMW PDC Malfunctioning Discover How to Easily Reset It
Is Your BMW PDC Malfunctioning Discover How to Easily Reset ItIs Your BMW PDC Malfunctioning Discover How to Easily Reset It
Is Your BMW PDC Malfunctioning Discover How to Easily Reset It
 

2012 Toyota Camry Audio System Baltimore, Maryland

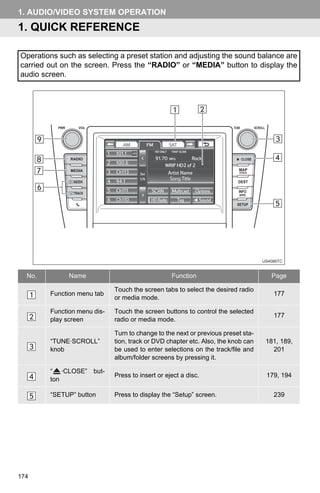
  • 1. 1. AUDIO/VIDEO SYSTEM OPERATION 1. QUICK REFERENCE Operations such as selecting a preset station and adjusting the sound balance are carried out on the screen. Press the “RADIO” or “MEDIA” button to display the audio screen. No. Name Function Page Touch the screen tabs to select the desired radio Function menu tab 177 or media mode. Function menu dis- Touch the screen buttons to control the selected 177 play screen radio or media mode. Turn to change to the next or previous preset sta- “TUNE·SCROLL” tion, track or DVD chapter etc. Also, the knob can 181, 189, knob be used to enter selections on the track/file and 201 album/folder screens by pressing it. “ ·CLOSE” but- Press to insert or eject a disc. 179, 194 ton “SETUP” button Press to display the “Setup” screen. 239 174
  • 2. 1. AUDIO/VIDEO SYSTEM OPERATION No. Name Function Page Press the “ ” or “ ” button to seek up or down “SEEK/TRACK” for a station, or to access a desired track, file or 182 button chapter. “MEDIA” button Press to display the media control screen. 177 “RADIO” button Press to display the radio control screen. 177 Press to turn the audio system on and off, and “PWR·VOL” knob 177 turn to adjust the volume. 5 AUDIO/VIDEO SYSTEM 175
  • 3. 1. AUDIO/VIDEO SYSTEM OPERATION 2. SOME BASICS This section describes some of the ba- NOTICE sic features of the audio/video system. Some information may not pertain to ● To prevent the 12-volt battery from being your system. discharged, do not leave the audio/video system on longer than necessary when Vehicles with a smart key system the hybrid system is off <the engine is Your audio/video system works when not running>. the “POWER” <“ENGINE START STOP”> switch is turned to ACCES- SORY or ON <IGNITION ON> mode. VOICE COMMAND SYSTEM Vehicles without a smart key system Press this switch to operate the voice Your audio/video system works when command system. the engine switch is turned to the “ACC” or “ON” position. CAUTION ● For vehicles sold in U.S.A. and Canada: Part 15 of the FCC Rules FCC Warning: Changes or modifications in construction not expressly approved by the party responsible for compliance could void the user’s authority to operate the equipment. Radio frequency expo- sure. This device is approved for Mobile Application only and, to comply with For the operation of the voice command applicable FCC radio frequency expo- system and its list of commands, see sure regulations, must be used with a pages 242 and 250. distance of at least 7.9 in. (20 cm) between the antenna and the body of any person at all time during use. AUDIO SPLIT SCREEN ● Laser products DISPLAY • Do not take this unit apart or attempt to make any changes yourself. This is an The audio split screen can be dis- intricate unit that uses a laser pickup to retrieve information from the surface of played while the map screen is dis- compact discs. The laser is carefully played. For details, see page 39. shielded so that its rays remain inside the cabinet. Therefore, never try to dis- assemble the player or alter any of its parts since you may be exposed to laser rays and dangerous voltages. • This product utilizes a laser. Use of controls or adjustments or perfor- mance of procedures other than those specified herein may result in hazard- ous radiation exposure. 176
  • 4. 1. AUDIO/VIDEO SYSTEM OPERATION “MEDIA” button: To display the “DISC”, TURNING THE SYSTEM ON “BT Audio”, “AUX”, “USB” and “iPod” AND OFF tabs on the screen. (Media mode) Up to 4 tabs can be displayed on the screen. Touch or , located either side of the screen tabs, to display tabs from the previous or next page. The desired audio mode can be found by touching or and then selecting that audio mode tab. INFORMATION ● If a disc is not inserted, the DVD player “RADIO”, “MEDIA” button: Press to dis- cannot be turned on. play screen buttons for the audio system. ● The DVD player can be turned off by “PWR·VOL” knob: Press to turn the audio ejecting a disc. system on and off. Turn this knob to adjust ● When radio or media mode is selected, the volume. The system turns on in the last the respective screen buttons are dis- mode used. played on the screen. 5 ● Dimmed screen buttons cannot be oper- A function that enables automatic return ated. to the previous screen from the audio ● If the system does not respond to a AUDIO/VIDEO SYSTEM screen can be selected. See page 42 touch of a screen button, move your fin- for details. ger away from the screen and then touch it again. ● Wipe off fingerprints using a glass clean- SWITCHING BETWEEN ing cloth. Do not use chemical cleaners to clean the screen. FUNCTIONS 1 Every time the “RADIO” or “MEDIA” button is pressed, the audio control DSP CONTROL mode changes. 1 Press the “RADIO” or “MEDIA” but- ton. 2 Touch . “RADIO” button: To display the “AM”, “FM”, “SAT” and “Apps” tabs on the screen. (Radio mode) 177
  • 5. 1. AUDIO/VIDEO SYSTEM OPERATION 3 Touch the “DSP” tab to display this BALANCE screen. A good balance of the left and right ste- reo channels and of the front and rear sound levels is also important. Keep in mind that when listening to a stereo recording or broadcast, chang- ing the right/left balance will increase the volume of one group of sounds while decreasing the volume of anoth- 4 Touch the desired items to be set. er. 5 Touch “OK”. 1 Touch the “Sound” tab to display this screen. AUTOMATIC SOUND LEVELIZER (ASL) The system adjusts to the optimum vol- ume and tone quality according to ve- hicle speed to compensate for increased vehicle noise. 1 Touch “On” of “Automatic Sound Levelizer”. 2 Touch the desired screen button. 2 Touch “OK”. Screen button Function “Treble” Touch to adjust high- SURROUND FUNCTION “+” or “-” pitched tones. 1 Touch “On” of “Surround”. “Mid” Touch to adjust mid- “+” or “-” pitched tones. 2 Touch “OK”. “Bass” Touch to adjust low- “+” or “-” pitched tones. TONE AND BALANCE Touch to adjust the sound balance between “Front” or “Rear” TONE the front and rear speakers. How good an audio program sounds is Touch to adjust the largely determined by the mix of the sound balance between “L” or “R” treble, mid and bass levels. In fact, dif- the left and right speak- ferent kinds of music and vocal pro- ers. grams usually sound better with different mixes of treble, mid and bass. 3 Touch “OK”. 178
  • 6. 1. AUDIO/VIDEO SYSTEM OPERATION INFORMATION Screen button Function ● The tone of each mode (such as AM, Touch to display a 3 : 4 FM and DVD player) can be adjusted. “Normal” screen, with either side in black. Touch to widen the 3 : 4 SELECTING SCREEN SIZE “Wide 1” screen horizontally to fill the screen. Before selecting screen size, it is nec- Touch to widen the 3 : 4 essary to insert a DVD disc and select screen vertically and DISC mode. “Wide 2” horizontally, by the same ratio, to fill the screen. 1 Press the “MEDIA” button. 2 Touch the “DISC” tab. When is touched, the previous screen is displayed. 3 Touch “Options”. 6 Touch “Save”. DVD PLAYER 5 1 When inserting a disc, press the “ ·CLOSE” button and gently insert AUDIO/VIDEO SYSTEM the disc with the label facing up. 4 Touch “Wide”. 5 Touch the desired screen button. NOTICE ● Never try to disassemble or oil any part of the DVD player. Do not insert any- thing other than a disc into the slot. INFORMATION ● The player is intended for use with 4.7 in. (12 cm) discs only. 179
  • 7. 1. AUDIO/VIDEO SYSTEM OPERATION AUX PORT USB PORT The sound of portable audio players A USB memory/iPod can be connect- connected to the AUX port can be en- ed to the USB port. For details, see joyed. For details, refer to “Owner’s “CONNECTING A USB MEMORY” on Manual”. page 212 and “CONNECTING iPod” on page 217. 1 Press the “MEDIA” button to display the media control screen and touch the 1 Press the “MEDIA” button to display “AUX” tab or press the “MEDIA” but- the media control screen and touch the ton repeatedly to change to AUX “USB” or “iPod” tab or press the mode. “MEDIA” button repeatedly to change to USB memory/iPod mode. INFORMATION ● When the portable audio player is not INFORMATION connected to the AUX port, the tab will ● When a USB memory/iPod is not con- be dimmed. nected with the USB port, the tab will be dimmed. 180
  • 8. 1. AUDIO/VIDEO SYSTEM OPERATION 3. RADIO OPERATION LISTENING TO THE RADIO PRESETTING A STATION Radio mode has a mix preset function, SELECTING A RADIO STATION which can store up to 36 stations (6 1 Press the “RADIO” button to display stations per page x 6 pages) from any the radio control screen. of the AM, FM or SAT bands. 1 Tune in the desired station. 2 Touch one of the left side screen but- tons (1-6) and hold it until a beep is heard. This sets the frequency to the screen button. The station’s frequency will be displayed in the screen button. 2 Touch the “AM”, “FM”, “SAT” or “Apps” tab or press the “RADIO” but- 5 ton repeatedly to select the desired tab. AUDIO/VIDEO SYSTEM STEP UP AND DOWN THE To change the preset station to a different STATION BAND one, follow the same procedure. 1 Turn the knob clockwise to step up the station band or counterclockwise to step down. INFORMATION ● The radio automatically changes to ste- reo reception when a stereo broadcast is received. 181
  • 9. 1. AUDIO/VIDEO SYSTEM OPERATION SELECTING A STATION RADIO BROADCAST DATA SYSTEM Tune in the desired station using one of the following methods. This audio system is equipped with Ra- Preset tuning: Touch one of the mix pre- dio Broadcast Data Systems (RBDS). set channels on the left side of the screen RBDS mode allows text messages to to select the desired station. The screen be received from radio stations that uti- button is highlighted and the station fre- lize RBDS transmitters. quency appears on the screen. When RBDS is on, the radio can Seek tuning: Press the “ ” or “ ” button — only select stations of a particular of “SEEK/TRACK”. The radio will begin program type, seeking up or down for a station of the — display messages from radio sta- nearest frequency and will stop when a tions, station is found. Each time the button is — search for a stronger signal station. pressed, the stations will be searched au- RBDS features are available only tomatically one after another. when listening to an FM station that To scan all the frequencies: Touch broadcasts RBDS information and the “SCAN”. “SCAN” will appear on the “FM info” indicator is on. screen. The radio will find the next station and stay there for 10 seconds if “All” or “HD Only” is selected, or 5 seconds if SELECTING A DESIRED TYPE “Analog” is selected, and then scan again. To stay tuned to a station and stop 1 Touch “Options”. the scanning, touch “SCAN” again. (To set HD Radio™ system, see page 239.) 182
  • 10. 1. AUDIO/VIDEO SYSTEM OPERATION 2 Touch “TYPE ” or “ TYPE” to TRAFFIC ANNOUNCEMENT move forward and backward through the program list. A station that regularly broadcasts traf- fic information is automatically located. Once a program type has been set, “TYPE SEEK” will appear on the screen. The program list is in the following order: “Traffic”: Touch to seek a traffic program • Classical station. “TRAF SEEK” will appear on the • Country screen. • EasyLis (Easy Listening) • Inform (Information) • Jazz INFORMATION • News ● If no traffic program station is found, “No • Oldies 5 Traffic” will appear on the screen. • Other • Pop Music ● If a traffic program station is found, the • Religion name of the traffic program station will AUDIO/VIDEO SYSTEM • Rock be displayed for a while. • R&B (Rhythm and Blues) • Sports • Talk • Traffic (Not available when “HD Radio Settings” are set to analog.) • Alert (Emergency Alert) 3 Touch “TYPE SEEK” and the system will start to seek for stations in the rele- vant program type. INFORMATION ● If no relevant program can be found, “no type” will appear on the screen. 183
  • 11. 1. AUDIO/VIDEO SYSTEM OPERATION 4. HD Radio™ TECHNOLOGY INFORMATION As a user works through the analog radio HD Radio™ Technology is the digital stations, (where applicable) the radio evolution of analog AM/FM radio. Your receiver will automatically tune from an radio product has a special receiver analog signal to a digital signal within 5 which allows it to receive digital seconds. broadcasts (where available) in An orange “HD)” logo indicator will be dis- played on the screen when in digital. The addition to the analog broadcasts it “HD)” logo will first appear in a gray color already receives. Digital broadcasts indicating the station is indeed (an analog have better sound quality than analog and) a digital station. Once the digital sig- broadcasts as digital broadcasts nal is acquired, the logo will change to a provide free, crystal clear audio with no bright orange color. static or distortion. For more The song title, artist name and music genre will appear on the screen when information, and a guide to available available by the radio station. radio stations and programming, refer to www.hdradio.com. 3 This screen will be displayed if “Options” is touched. USING HD Radio™ TECHNOLOGY 1 Press the “RADIO” button to display the radio control screen. When “Text” is touched, information such as the artist name, song title, album title and music genre of the track being lis- tened to are displayed on the text screen. To display messages from the station, touch “Additional Information”. When “TYPE ” or “ TYPE” is touched, a program type will be searched. Once a program type has been set, 2 Touch the “AM” or “FM” tab or press “TYPE SEEK” will appear on the screen. (See “SELECTING A DESIRED TYPE” on the “RADIO” button repeatedly to se- page 182.) lect the desired tab. 184
  • 12. 1. AUDIO/VIDEO SYSTEM OPERATION AVAILABLE HD Radio™ 2 Press the lid. TECHNOLOGY MULTICAST On the FM radio frequency most digital stations have “multiple” or supplemen- tal programs on one FM station. 1 Touch “Multicast”. 3 Open the cover and connect iPod us- ing an iPod cable. Each time “Multicast” is touched, the 5 supplemental program changes. If “Multicast” is touched when tuned to AUDIO/VIDEO SYSTEM the last of the supplemental programs, the main program will be returned to. Turn on the power of the iPod if it is not TAG turned on. Once an iPod is connected, the music tag 1 Touch “Tag” to bookmark the music moves from the radio into the iPod. information. When the iPod is connected to iTunes, the “tagged” information of the songs which were tagged while listening to the radio can be viewed. Then a user may decide to purchase the song or CD/Album which had been listened to on their radio. INFORMATION ● If tagging the music information fails, “Saving the HD Radio tag failed.” will be displayed on the screen. If this occurs, tag the information again. ● HD Radio™ stations can be preset. 185
  • 13. 1. AUDIO/VIDEO SYSTEM OPERATION TROUBLESHOOTING GUIDE Experience Cause Action Mismatch of time align- The radio stations analog ment- a user may hear a and digital volume is not None, radio broadcast issue. A short period of program- properly aligned or the sta- user can contact the radio station. ming replayed or an echo, tion is in ballgame mode. stutter or skip. Reception issue, may clear-up as Sound fades, blending in Radio is shifting between the vehicle continues to be driven. and out. analog and digital audio. Touching “Analog” can force ra- dio in an analog audio. This is normal behavior, wait until Audio mute condition when The radio does not have the digital signal returns. If out of an HD2/HD3 multicast access to digital signals at the coverage area, seek a new channel had been playing. the moment. station. The digital multicast con- tent is not available until Audio mute delay when se- HD Radio™ broadcast can This is normal behavior, wait for lecting an HD2/HD3 multi- be decoded and make the the audio to become available. cast channel preset. audio available. This takes up to 7 seconds. Broadcaster should be notified. Text information does not Data service issue by the Complete the form; match the present song au- radio broadcaster. www.ibiquity.com/automotive/ dio. report_radio_station_experiences. Broadcaster should be notified. No text information shown Data service issue by the Complete the form; for the present selected fre- radio broadcaster. www.ibiquity.com/automotive/ quency. report_radio_station_experiences. 186
  • 14. 1. AUDIO/VIDEO SYSTEM OPERATION HD Radio Technology manufactured under license from iBiquity Digital Corpora- tion. U.S. and Foreign Patents. HD Radio™ and the HD, HD Radio, and “Arc” logos are proprietary trademarks of iBiquity Digital Corp. 5 AUDIO/VIDEO SYSTEM 187
  • 15. 1. AUDIO/VIDEO SYSTEM OPERATION 5. RADIO OPERATION (XM Satellite Radio BROADCAST) HOW TO SUBSCRIBE TO AN INFORMATION XM Satellite Radio ● XM Satellite Radio is solely responsible for the quality, availability and content of To listen to a satellite radio broadcast the satellite radio services provided, which are subject to the terms and con- in the vehicle, a subscription to the XM ditions of the XM Satellite Radio cus- Satellite Radio service is necessary. tomer service agreement. An XM Satellite Radio is a tuner de- ● Customers should have their radio ID signed exclusively to receive broad- ready; the radio ID can be found by tun- ing to “CH 000” on the radio. For details, casts provided under a separate see “DISPLAYING THE RADIO ID” subscription. Availability is limited to below. the 48 contiguous U.S. states and ● All fees and programming are the some Canadian provinces. responsibility of XM Satellite Radio and are subject to change. HOW TO SUBSCRIBE SATELLITE TUNER It is necessary to enter into a separate TECHNOLOGY NOTICE service agreement with XM Satellite Radio in order to receive satellite Toyota’s satellite radio tuners are broadcast programming in the vehicle. awarded Type Approval Certificates Additional activation and service sub- from XM Satellite Radio Inc. as proof of scription fees apply that are not includ- compatibility with the services offered ed in the purchase price of the vehicle by XM Satellite Radio. and digital satellite tuner. For complete information on subscrip- DISPLAYING THE RADIO ID tion rates and terms, or to subscribe to XM Satellite Radio: Each XM tuner is identified with a U.S.A. unique radio ID. The radio ID is re- Refer to www.siriusxm.com or call quired when activating an XM service 1-800-967-2346. or when reporting a problem. Canada If “CH 000” is selected using the Refer to www.xmradio.ca or call “TUNE·SCROLL” knob, the ID code, 1-877-209-0079. which is 8 alphanumeric characters, will be displayed. If another channel is selected, the ID code will no longer be dis- played. The channel (000) alternates between displaying the radio ID and the specific radio code. 188
  • 16. 1. AUDIO/VIDEO SYSTEM OPERATION LISTENING TO SATELLITE CHANNEL CATEGORY RADIO 1 Touch either “TYPE ” or “ TYPE” 1 Press the “RADIO” button to display to go to the next or previous category. the radio control screen. PRESETTING A CHANNEL 2 Touch the “SAT” tab or press the 1 Tune in the desired channel. “RADIO” button repeatedly until the 2 Touch one of the left side screen but- “SAT” tab is selected to choose a tons (1-6) and hold it until a beep is satellite broadcast channel. heard. This sets the frequency to the 5 screen button. The channel number will be displayed in the screen button. AUDIO/VIDEO SYSTEM 3 Turn the “TUNE·SCROLL” knob to se- lect the next or previous channel. Turning the knob quickly allows rapid To change the preset channel to a differ- scrolling through the channel list. ent one, follow the same procedure. 189
  • 17. 1. AUDIO/VIDEO SYSTEM OPERATION SELECTING A CHANNEL DISPLAYING THE TITLE AND NAME Tune in the desired channel using one of the following methods. 1 Touch “Text” to display the artist name and song title currently being listening Preset tuning: Touch the channel selector to. screen button (1-6) to listen to the desired channel. The selected screen button (1-6) is highlighted and its related information appears on the right side of the screen. To select a channel within the current category: Press the “ ” or “ ” button of “SEEK/TRACK”. The radio will change up or down to a channel within the current channel category. INFORMATION ● Up to 64 alphanumeric characters can be displayed. (Some information will not be fully displayed.) To scan the currently selected channel category: Touch “SCAN”. “SCAN” ap- pears on the screen. The radio will find the next channel in the same channel catego- ry, stay there for a few seconds, and then scan again. To select a channel, touch “SCAN” again. 190
  • 18. 1. AUDIO/VIDEO SYSTEM OPERATION IF THE SATELLITE RADIO TUNER MALFUNCTIONS When problems occur with the XM tuner, a message will appear on the screen. Re- ferring to the table below to identify the problem, take the suggested corrective ac- tion. Message Explanation The XM antenna is not connected. Check whether the XM antenna cable is attached securely. Ck Antenna A short circuit occurs in the antenna or the surrounding antenna ca- ble. See a Toyota certified dealer for assistance. You have not subscribed to XM Satellite Radio. The radio is being updated with the latest encryption code. Contact XM Satellite Radio for subscription information. When a contract is canceled, you can choose “CH 000” and all free-to-air channels. Ch Unauth The premium channel you selected is not authorized. Wait for about 2 seconds until the radio returns to the previous channel or “CH001”. If it does not change automatically, select another channel. To listen 5 to the premium channel, contact XM Satellite Radio. AUDIO/VIDEO SYSTEM The XM signal is too weak at the current location. Wait until your ve- No Signal hicle reaches a location with a stronger signal. The unit is acquiring audio or program information. Wait until the unit Loading has received the information. The channel you selected is not broadcasting any programming. Se- Ch Off Air lect another channel. There is no song/program title or artist name/feature associated with ----- the channel at that time. No action is required. The channel you selected is no longer available. Wait for about 2 Ch Unavail seconds until the radio returns to the previous channel or “CH 001”. If it does not change automatically, select another channel. INFORMATION ● Contact the XM Listener Care Center at 1-800-967-2346 (U.S.A.) or 1-877-209-0079 (Canada). 191
  • 19. 1. AUDIO/VIDEO SYSTEM OPERATION NOTICE INFORMATION ● This XM tuner supports “Audio Services” ● This equipment has been tested and (Music and Talk) of only XM Satellite found to comply with the limits for a Radio and “Text Information*” linked to class B digital device, pursuant to Part the respective “Audio Services”. 15 of the FCC Rules. These limits are *: Text Information includes, Station designed to provide reasonable protec- Name, (Artist) Name, (Song) Title and tion against harmful interference in a Category Name. residential installation. This equipment generates, uses and can radiate radio frequency energy and, if not installed and used in accordance with the instruc- tions, may cause harmful interference to radio communications. However, there is no guarantee that interference will not occur in a particular installation. ● If this equipment does cause harmful interference to radio or television recep- tion, which can be determined by turning the equipment off and on, the user is encouraged to try to correct the interfer- ence by one or more of the following measures: • Reorient or relocate the receiving antenna. • Increase the separation between the equipment and receiver. • Connect the equipment into an outlet on a circuit different from that to which the receiver is connected. • Consult the dealer or an experienced radio/TV technician for help. ● Information to user • Alternation or modifications carried out without appropriate authorization may invalidate the user’s right to operate the equipment. 192
  • 20. 1. AUDIO/VIDEO SYSTEM OPERATION 6. RADIO OPERATION (INTERNET RADIO BROADCAST) LISTENING TO INTERNET 3 Touch “View Application Screen”. RADIO The internet radio application screen is displayed. Perform operations according to the dis- One of Entune’s features is the ability played application screen. to listen to internet radio. In order to By pressing the “RADIO” button, the use this service, an Entune compatible “Audio” screen can be returned to. phone and the navigation system needs to be set. For details, refer to the INFORMATION “ENTUNE SERVICE” section. (See ● Other applications can be activated page 276.) while listening to internet radio. ● An iPhone cannot be connected via 1 Press the “RADIO” button. Bluetooth® and USB connection at the same time. However, it is possible to recharge an iPhone while using Entune by connecting via USB. The system uses the connection method that was used last. Therefore, if connected via USB after Bluetooth® connection, it is necessary to reconnect the iPhone via Bluetooth®. 5 ● Services requiring a separate contract can also be used.* ● Some parts of “Apps” can be adjusted AUDIO/VIDEO SYSTEM using the switches on the steering 2 Touch the “Apps” tab on the screen or wheel. press the “RADIO” button repeatedly ● If internet radio has never been listened until the “Apps” tab is selected. to by activating “Apps” from the “Infor- mation” screen, the “Apps” tab will be dimmed. *: For details, refer to http:// www.toyota.com/entune/ or call 1-800- 331-4331. If a compatible phone is already regis- tered, it will be connected automatically. If a compatible phone has not been regis- tered or the Bluetooth® connection cannot be completed correctly, touch “Connect” to register and/or connect your phone. (See page 161.) When connection is complete, the applica- tion screen can be displayed. 193
  • 21. 1. AUDIO/VIDEO SYSTEM OPERATION 7. DVD PLAYER OPERATION For safety reasons, the DVD video After insertion, the disc is automatically loaded. discs can only be viewed when the fol- lowing conditions are met: 3 Press the “ ·CLOSE” button. (a)The vehicle is completely stopped. The display will slide up, closing the DVD slot. (b)The “POWER” <“ENGINE START Touching “ Disc” ejects the currently STOP”> switch is in ACCESSORY inserted disc. or ON <IGNITION ON> mode. (Ve- hicles with a smart key system) The engine switch is in the “ACC” or EJECTING A DISC “ON” position. (Vehicles without a smart key system) 1 Press the “ ·CLOSE” button to slide the display down. (c)The parking brake is applied. While driving in DVD video mode, only the DVD’s audio can be heard. INSERTING A DISC 1 Press the “ ·CLOSE” button to slide the display down. When the “ ·CLOSE” button is pressed, the disc will be automatically ejected. 2 Press the “ ·CLOSE” button to close the display. CAUTION The display will slide down, opening the ● Do not place anything on the opened DVD slot. display, as such items may be thrown about and possibly injure people in the 2 Insert a disc into the disc slot. vehicle during sudden braking or in an accident. ● To reduce the chance of injury in case of an accident or sudden stop while driv- ing, keep the display closed. ● Take care not to jam your hand while the display is moving. Otherwise, you could be injured. 194
  • 22. 1. AUDIO/VIDEO SYSTEM OPERATION When CD-TEXT information exists, the NOTICE name and artist of the CD currently being listened to will be displayed. ● Do not obstruct the display while it is moving. It could damage your audio sys- : Touch to pause the track. tem. : Touch to resume playing the track. INFORMATION SELECTING A DESIRED TRACK ● Under extremely cold conditions, the screen may react slowly or operation sound may become louder. ■ON THE AUDIO TOP SCREEN ● If a disc is inserted with the label facing down, it cannot be played. PLAYING A DISC 1 Press the “MEDIA” button if a disc has already been loaded in the disc slot. “SEEK/TRACK” button: Press the “ ” or 2 Touch the “DISC” tab or press the 5 “ ” button of “SEEK/TRACK” repeatedly “MEDIA” button repeatedly until the until the desired track number appears on “DISC” tab is selected. the screen. The player will start playing the AUDIO/VIDEO SYSTEM selected track from the beginning. “TUNE·SCROLL” knob: Turn the knob clockwise or counterclockwise to skip to the desired track. ■ON THE TRACK LIST SCREEN 1 Touch the track name screen button to display the CD’s track list. PLAYING AN AUDIO DISC 1 Touch the “DISC” tab. 2 Touch the desired track number. The player will start playing the selected track from the beginning. 195
  • 23. 1. AUDIO/VIDEO SYSTEM OPERATION , : Touch to move the list up or down REPEATING by 5 track groups. If either of these screen buttons is touched when the top/bottom The track currently being listened to page of the list is displayed, the last/first can be repeated. page is displayed. “SEEK/TRACK” button: Press the “ ” or ■REPEATING A TRACK “ ” button of “SEEK/TRACK” to scroll 1 Touch “RPT” while the track is play- through the track list one by one. ing. “TUNE·SCROLL” knob: Turn the knob clockwise or counterclockwise to quickly scroll up or down the track list. To select the desired track, press the knob. , : If appears to the right of an item name, the complete name is too long for the screen. Touch to scroll to the end of the name. Touch to scroll to the begin- ning of the name. “RPT” appears on the screen. When the track is finished, the player will automati- cally play it again. To cancel this function, ■FAST FORWARDING OR REWIND- touch “RPT” again. ING 1 Press and hold the “ ” or “ ” button RANDOM ORDER of “SEEK/TRACK” to fast forward or rewind the disc. Tracks or albums can be automatically and randomly selected. ■PLAYING THE TRACKS ON THE DISC IN RANDOM ORDER 1 Touch “RAND” while the disc is play- ing. When the button is released, the player resumes playing from that position. Once “RAND” appears on the screen, the system selects a track randomly from the disc currently being listened to. To cancel this function, touch “RAND” again. 196
  • 24. 1. AUDIO/VIDEO SYSTEM OPERATION INFORMATION ■ON THE FOLDER LIST SCREEN ● If a CD-TEXT disc is inserted, the title of 1 Touch the folder name screen button the disc and track will be displayed. Up to display the following folder list to 32 characters can be displayed. screen. PLAYING AN MP3/WMA DISC 1 Touch the “DISC” tab. 2 Touch the desired folder number to display the folder’s file list. From the file list, select the desired file number. , : Touch to move the list up or down The file name, folder name and artist by 5 folder groups. If either of these screen name currently being listened to and the buttons is touched when the top/bottom 5 disc icon are displayed on the screen. page of the list is displayed, the last/first : Touch to pause the file. page is displayed. AUDIO/VIDEO SYSTEM : Touch to resume playing the file. “SEEK/TRACK” button: Press the “ ” or “ ” button of “SEEK/TRACK” to scroll SELECTING A DESIRED through the folder list one by one. FOLDER “TUNE·SCROLL” knob: Turn the knob clockwise or counterclockwise to quickly ■ON THE AUDIO TOP SCREEN scroll up or down the folder list. To select the desired folder, press the knob. , : If appears to the right of an item name, the complete name is too long for the screen. Touch to scroll to the end of the name. Touch to scroll to the begin- ning of the name. , : Touch to skip to the next or previ- ous folder. 197
  • 25. 1. AUDIO/VIDEO SYSTEM OPERATION ■FAST FORWARDING OR REWIND- ■ON THE FILE LIST SCREEN ING 1 Touch the file name screen button to 1 Press and hold the “ ” or “ ” button display the following file list screen. of “SEEK/TRACK” to fast forward or rewind the file. 2 Touch the desired file number. The player will start playing the selected file from the beginning. When the button is released, the player , : Touch to move the list up or down resumes playing from that position. by 5 file groups. If either of these screen buttons is touched when the top/bottom SELECTING A DESIRED FILE page of the list is displayed, the last/first page is displayed. ■ON THE AUDIO TOP SCREEN “SEEK/TRACK” button: Press the “ ” or “ ” button of “SEEK/TRACK” to scroll through the file list one by one. “TUNE·SCROLL” knob: Turn the knob clockwise or counterclockwise to quickly scroll up or down the file list. To select the desired file, press the knob. , : If appears to the right of an item name, the complete name is too long for “SEEK/TRACK” button: Press the “ ” or the screen. Touch to scroll to the end of “ ” button of “SEEK/TRACK” repeatedly the name. Touch to scroll to the begin- until the desired file number appears on ning of the name. the screen. The player will start playing the selected file from the beginning. “TUNE·SCROLL” knob: Turn the knob clockwise or counterclockwise to skip to the desired file. 198
  • 26. 1. AUDIO/VIDEO SYSTEM OPERATION ■FAST FORWARDING OR REWIND- ■REPEATING A FOLDER ING 1 Touch “RPT” repeatedly until 1 Press and hold the “ ” or “ ” button “FLD.RPT” appears on the screen. of “SEEK/TRACK” to fast forward or When the folder is finished, the player will rewind the file. automatically go back to the beginning of the folder and play it again. To cancel this function, touch “RPT” again. RANDOM ORDER Files or folders can be automatically and randomly selected. ■PLAYING FILES FROM ONE FOLD- ER IN RANDOM ORDER When the button is released, the player 1 Touch “RAND” while the disc is play- resumes playing from that position. ing. REPEATING 5 The file or folder currently being lis- AUDIO/VIDEO SYSTEM tened to can be repeated. ■REPEATING A FILE 1 Touch “RPT” while the file is playing. Each time “RAND” is touched, the mode changes as follows: • Random (1 Folder Random)→ Folder Random (1 Disc Random)→Off Once “RAND” appears on the screen, the system selects a file randomly from the folder currently being listened to. To can- cel this function, touch “RAND” repeat- edly until the random mode turns off. Each time “RPT” is touched, the mode changes as follows: When “RAND” is off • File Repeat→Folder Repeat→Off When “RAND” is on • File Repeat→Off “RPT” appears on the screen. When the file is finished, the player will automatically play it again. To cancel this function, touch “RPT” repeatedly until the repeat mode turns off. 199
  • 27. 1. AUDIO/VIDEO SYSTEM OPERATION ■PLAYING THE FILES IN ALL THE PRECAUTIONS ON DVD VIDEO FOLDERS ON THE DISC IN RAN- DISC DOM ORDER 1 Touch “RAND” repeatedly until When recording with a DVD video, au- dio tracks may not record in some cas- “FLD.RAND” appears on the screen. es while the menu is displayed. As Once “FLD.RAND” appears on the screen, the system selects a file randomly audio will not play in this case, verify from all of the existing folders. To cancel that the video tracks are playing and this function, touch “RAND” again. then activate playback. When playback of a disc is completed: INFORMATION If an audio CD or MP3/WMA disc is ● When a file is skipped or the system is playing, the first track or file starts. inoperative, touch “RAND” to reset. If a DVD video is playing, playback will stop or the menu screen will be dis- OPERATING A DVD DISC played. The title/chapter number and playback The playback condition of some DVD time display may not appear while discs may be determined by the DVD playing back certain DVD video discs. software producer. This DVD player plays a disc as the software producer CAUTION intended. As such some functions may not work properly. Be sure to read the ● Conversational speech on some DVDs instruction manual that comes with the is recorded at a low volume to empha- individual DVD disc. For detailed infor- size the impact of sound effects. If you adjust the volume assuming that the mation about DVD video discs, see conversations represent the maximum “DVD PLAYER AND DVD VIDEO volume level that the DVD will play, you DISC INFORMATION” on page 210. may be startled by louder sound effects or when you change to a different audio source. The louder sounds may have a significant impact on the human body or pose a driving hazard. Keep this in mind when you adjust the volume. 200
  • 28. 1. AUDIO/VIDEO SYSTEM OPERATION PLAYING A DVD DISC DESCRIPTION OF DVD VIDEO CONTROLS 1 Press the “MEDIA” button. Screen button Function 2 Touch the “DISC” tab or press the “MEDIA” button repeatedly until the “Menu”, Touch to display the menu “Top Menu” screen for DVD video. “DISC” tab is selected. The menu control key ap- pears on the screen. (See page 201.) Touch to pause the video screen. Touch to rewind during playback. Touch “Options” on the “DVD” screen, Touch to stop the video then touch “Wide” on the “DVD Options” screen. screen. The screen mode can be changed. Touch to resume normal If “Full Screen” is touched when the vehi- play during pause. 5 cle is completely stopped and the parking Touch to fast forward dur- brake is applied, the video screen returns. ing playback and forward AUDIO/VIDEO SYSTEM frame by frame during DISPLAYING DVD CONTROLS pause. ■CHANGING A CHAPTER 1 Press and hold the “ ” or “ ” button of “SEEK/TRACK” or turn the “TUNE·SCROLL” knob to change the chapter. If is touched, while watching a DVD, the DVD controls will appear. INFORMATION ● If appears on the screen when a con- trol is touched the operation relevant to the control is not permitted. 201
  • 29. 1. AUDIO/VIDEO SYSTEM OPERATION SELECTING A MENU ITEM 4 The “DVD Options” screen will appear. 1 Select the menu item using , , and and touch “Enter”. The player starts playing the disc from the start of the selected item. Screen Function Page button Touch to display the “Search” 203 title search screen. When any part of the screen is touched, Touch to display the the controls will disappear. To display predetermined scene them again, touch any part of the screen. “Return” - on the screen and When is touched, the previous start playing. screen is displayed. Touch to display the “Audio” 203 audio editing screen. INFORMATION ● According to the DVD disc, some menu Touch to display the items can be selected by touching them “Subtitle” subtitle selection 203 directly. (For details, see the manual that screen. comes with the DVD disc provided sepa- Touch to display the rately.) “Angle” angle selection 203 screen. DVD OPTIONS “Wide” Touch to display the 179 screen mode screen. 1 Press the “MEDIA” button. Touch to display the “Display” image quality adjust- 204 2 Touch the “DISC” tab or press the ment screen. “MEDIA” button repeatedly until the “DISC” tab is selected. “DVD Touch to display the 204 Settings” initial set up screen. 3 Touch “Options”. 202
  • 30. 1. AUDIO/VIDEO SYSTEM OPERATION SEARCHING BY TITLE CHANGING THE SUBTITLE LANGUAGE 1 Touch “Search” on the “DVD Options” screen. 1 Touch “Subtitle” on the “DVD Op- tions” screen. 2 Enter the title number and touch “OK”. 2 Each time “Change” is touched, the language the subtitles are displayed in is changed. The languages available are restricted to those available on the DVD disc. The player starts playing video for that title number. If the wrong numbers are entered, touch to delete the numbers. When is touched, the previous screen is displayed. When “Hide” is touched, the subtitles can 5 be hidden. CHANGING THE AUDIO When is touched, the previous AUDIO/VIDEO SYSTEM screen is displayed. LANGUAGE 1 Touch “Audio” on the “DVD Options” CHANGING THE ANGLE screen. The angle can be selected for discs 2 Each time “Change” is touched, the that are multi-angle compatible when audio language is changed. the angle mark appears on the screen. The languages available are restricted to those available on the DVD disc. 1 Touch “Angle” on the “DVD Options” screen. 2 Each time “Change” is touched, the angle is changed. The angles available are restricted to those available on the DVD disc. When is touched, the previous screen is displayed. 203
  • 31. 1. AUDIO/VIDEO SYSTEM OPERATION When is touched, the previous Screen button Function screen is displayed. Touch to weaken the “Tone” “-” tone of the screen. AUDIO SCREEN ADJUSTMENT The brightness, contrast, color and 3 After adjusting the screen, touch “OK”. tone of the screen can be adjusted. In addition, the display can be turned off The screen goes off when “Screen Off” is touched. To turn the display screen back and the screen can be changed to ei- on, press any button. The selected screen ther day or night mode. appears. ■CONTRAST, BRIGHTNESS, COLOR DVD SETTINGS AND TONE ADJUSTMENT 1 Touch “Display” on the “DVD Op- 1 Touch “DVD Settings” on the “DVD Options” screen. tions” screen. 2 Touch “ ” or “ ” to display the de- 2 Touch the items to be set. sired item to be adjusted. Screen button Function Touch to strengthen the “Contrast” “+” contrast of the screen. Touch to weaken the “Contrast” “-” contrast of the screen. “Brightness” “+” Touch to brighten the 3 After the initial setting has been screen. changed, touch “Save”. Touch to darken the The initial screen will close, and the sys- “Brightness” “-” screen. tem will return to the previous screen. When “Default” is touched, all menus are Touch to strengthen the “Color” “R” initialized. red color of the screen. Touch to strengthen the “Color” “G” green color of the screen. Touch to strengthen the “Tone” “+” tone of the screen. 204
  • 32. 1. AUDIO/VIDEO SYSTEM OPERATION ■AUDIO LANGUAGE 2 Touch the desired language to be read on the “Menu Language” screen. The audio language can be changed. If the desired language to be read cannot be found on this screen, touch “Other” 1 Touch “Audio Language” on the and enter a language code. For entry of a “DVD Settings” screen. language code, see “ENTER AUDIO/ SUBTITLE/MENU LANGUAGE CODE” on 2 Touch the desired language to be page 206. heard on the “Audio Language” To return to the “DVD Settings” screen, screen. touch . If the desired language to be heard cannot be found on this screen, touch “Other” 3 Touch “Save” on the “DVD Settings” and enter a language code. For entry of a screen. language code, see “ENTER AUDIO/ SUBTITLE/MENU LANGUAGE CODE” on ■ANGLE MARK page 206. To return to the “DVD Settings” screen, The multi-angle mark can be turned on touch . or off on the screen while discs that are 3 Touch “Save” on the “DVD Settings” multi-angle compatible are being screen. played. 5 ■SUBTITLE LANGUAGE 1 Touch “Angle Mark” on the “DVD Set- tings” screen. The subtitle language can be changed. AUDIO/VIDEO SYSTEM 2 Touch “On” or “Off”. 1 Touch “Subtitle Language” on the 3 Touch “Save” on the “DVD Settings” “DVD Settings” screen. screen. 2 Touch the desired language to be read ■PARENTAL LOCK on the “Subtitle Language” screen. If the desired language to be read cannot The level of viewer restrictions can be be found on this screen, touch “Other” changed. and enter a language code. For entry of a language code, see “ENTER AUDIO/ 1 Touch “Parental Lock” on the “DVD SUBTITLE/MENU LANGUAGE CODE” on page 206. Settings” screen. To return to the “DVD Settings” screen, 2 Enter the 4-digit personal code on the touch . “Key Code” screen. 3 Touch “Save” on the “DVD Settings” If the wrong numbers are entered, touch screen. to delete the numbers. To return to the “DVD Settings” screen, ■MENU LANGUAGE touch . The language on the DVD video menu 3 Touch a parental level (1-8) on the “Se- can be changed. lect Restriction Level” screen. To return to the “DVD Settings” screen, 1 Touch “Menu Language” on the touch . “DVD Settings” screen. 205
  • 33. 1. AUDIO/VIDEO SYSTEM OPERATION 4 Touch “Save” on the “DVD Settings” ENTER AUDIO/SUBTITLE/ screen. MENU LANGUAGE CODE ■AUTO START PLAYBACK If “Other” on the “Audio Language” screen, “Subtitle Language” screen or Discs that are inserted while the vehi- “Menu Language” screen is touched, cle is in motion will automatically start the desired language to be heard or playing. Certain discs may not play. read can be selected by entering a 1 Touch “Auto Start Playback” on the language code. “DVD Settings” screen. 1 Enter the 4-digit language code. 2 Touch “On” or “Off”. 3 Touch “Save” on the “DVD Settings” screen. ■SOUND DYNAMIC RANGE The difference between the lowest vol- ume and the highest volume can be adjusted. If the wrong numbers are entered, touch to delete the numbers. 1 Touch “Sound Dynamic Range” on To return to the “DVD Settings” screen, the “DVD Settings” screen. touch . 2 Touch “MAX”, “STD” or “MIN”. 2 Touch “OK”. 3 Touch “Save” on the “DVD Settings” 3 Touch “Save” on the “DVD Settings” screen. screen. ■PROLOGIC Prologic is a matrix decoding technolo- gy that converts 2-channel audio to 5.1-channel audio. 1 Touch “Pro Logic” on the “DVD Set- tings” screen. 2 Touch “On” or “Off”. 3 Touch “Save” on the “DVD Settings” screen. 206
  • 34. 1. AUDIO/VIDEO SYSTEM OPERATION Code Language Code Language 0514 English 0301 Catalan 1001 Japanese 0315 Corsican 0618 French 0319 Czech 0405 German 0325 Welsh 0920 Italian 0401 Danish 0519 Spanish 0426 Bhutani 2608 Chinese 0515 Esperanto 1412 Dutch 0520 Estonian 1620 Portuguese 0521 Basque 1922 Swedish 0601 Persian 1821 Russian 0609 Finnish 1115 Korean 0610 Fiji 5 0512 Greek 0615 Faroese 0101 Afar 0625 Frisian AUDIO/VIDEO SYSTEM 0102 Abkhazian 0701 Irish 0106 Afrikaans 0704 Scottish-Gaelic 0113 Amharic 0712 Galician 0118 Arabic 0714 Guarani 0119 Assamese 0721 Gujarati 0125 Aymara 0801 Hausa 0126 Azerbaijani 0809 Hindi 0201 Bashkir 0818 Croatian 0205 Byelorussian 0821 Hungarian 0207 Bulgarian 0825 Armenian 0208 Bihari 0901 Interlingua 0209 Bislama 0905 Interlingue 0214 Bengali, Bangla 0911 Inupiak 0215 Tibetan 0914 Indonesian 0218 Breton 0919 Icelandic 207
  • 35. 1. AUDIO/VIDEO SYSTEM OPERATION Code Language Code Language 0923 Hebrew 1503 Occitan 1009 Yiddish 1513 (Afan) Oromo 1023 Javanese 1518 Oriya 1101 Georgian 1601 Panjabi 1111 Kazakh 1612 Polish 1112 Greenlandic 1619 Pashto, Pushto 1113 Cambodian 1721 Quechua 1114 Kannada 1813 Rhaeto-Romance 1119 Kashmiri 1814 Kirundi 1121 Kurdish 1815 Romanian 1125 Kirghiz 1823 Kinyarwanda 1201 Latin 1901 Sanskrit 1214 Lingala 1904 Sindhi 1215 Laotian 1907 Sango 1220 Lithuanian 1908 Serbo-Croatian 1222 Latvian, Lettish 1909 Sinhalese 1307 Malagasy 1911 Slovak 1309 Maori 1912 Slovenian 1311 Macedonian 1913 Samoan 1312 Malayalam 1914 Shona 1314 Mongolian 1915 Somali 1315 Moldavian 1917 Albanian 1318 Marathi 1918 Serbian 1319 Malay 1919 Siswati 1320 Maltese 1920 Sesotho 1325 Burmese 1921 Sundanese 1401 Nauru 1923 Swahili 1405 Nepali 2001 Tamil 1415 Norwegian 2005 Telugu 208
  • 36. 1. AUDIO/VIDEO SYSTEM OPERATION Code Language IF THE PLAYER 2007 Tajik MALFUNCTIONS 2008 Thai If the player or another unit equipped 2009 Tigrinya with the player malfunctions the audio/ video system will display a message. 2011 Turkmen These are described below. 2012 Tagalog If “Check DISC” appears on the screen: 2014 Setswana It indicates that the disc is dirty, damaged, or it was inserted upside down. Clean the 2015 Tongan disc or insert it correctly. If a disc which is 2018 Turkish not playable is inserted, “Check DISC” will also appear on the screen. For appropriate 2019 Tsonga discs for this player, see “AUDIO/VIDEO 2020 Tatar SYSTEM OPERATING HINTS” on page 230. 2023 Twi If “Region code error” appears on the 2111 Ukrainian screen: It indicates that the DVD region code is not set properly. 5 2118 Urdu If the malfunction is not rectified: Take 2126 Uzbek your vehicle to your Toyota dealer. AUDIO/VIDEO SYSTEM 2209 Vietnamese INFORMATION 2215 Volapük ● If an MP3/WMA disc contains CD-DA files only, the CD-DA files can be played. 2315 Wolof If an MP3/WMA disc contains CD-DA 2408 Xhosa files and files other than CD-DA files, only MP3/WMA files can be played. 2515 Yoruba 2621 Zulu 209
  • 37. 1. AUDIO/VIDEO SYSTEM OPERATION DVD PLAYER AND DVD Indicates a region code by which this vid- VIDEO DISC INFORMATION eo disc can be played. ALL: in all countries DVD VIDEO DISCS Number: region code This DVD player conforms to NTSC/ DVD VIDEO DISC GLOSSARY PAL color TV formats. DVD video discs conforming to another format such as DVD video discs: Digital Versatile Disc SECAM cannot be used. that holds video. DVD video discs have adopted “MPEG2”, one of the world stan- Region codes: Some DVD video discs dards of digital compression technologies. have a region code indicating which coun- The picture data is compressed by 1/40 on tries the DVD video disc can be played in average and stored. Variable rate encoded on this DVD player. If the DVD video disc technology in which the volume of data as- is not labeled as “ALL” or “1”, you cannot signed to the picture is changed depend- use it on this DVD player. If you attempt to ing on the picture format has also been play an inappropriate DVD video disc on adopted. Audio data is stored using PCM this player, “Region code error” appears and Dolby Digital, which enables higher on the screen. Even if the DVD video disc quality of sound. Furthermore, multi-angle does not have a region code, there are and multi-language features will also help cases when it cannot be used. users enjoy the more advanced technolo- gy of DVD video. ■MARKS SHOWN ON DVD VIDEO Viewer restrictions: This feature limits DISCS what can be viewed in conformity with a level of restrictions of the country. The lev- Indicates NTSC/PAL NTSC/PAL el of restrictions varies depending on the format of color TV. DVD video disc. Some DVD video discs cannot be played at all, or violent scenes Indicates the number are skipped or replaced with other scenes. of audio tracks. • Level 1: DVD video discs for children can be played. • Level 2 - 7: DVD video discs for children Indicates the number and G-rated movie can be played. of language subtitles. • Level 8: All types of the DVD video discs can be played. Multi-angle feature: The same scene can Indicates the number be enjoyed from different angles. of angles. Multi-language feature: The subtitle and audio language can be selected. Indicates the screen to be selected. Region codes: The region codes are pro- Wide screen: 16:9 vided on DVD players and DVD discs. If Standard: 4:3 the DVD video disc does not have the same region code as the DVD player, you cannot play the disc on the DVD player. For region codes, see page 210. 210
  • 38. 1. AUDIO/VIDEO SYSTEM OPERATION Audio: This DVD player can play liner PCM, Dolby Digital and MPEG audio for- mat DVDs. Other decoded types cannot be played. Title and chapter: Video and audio pro- grams stored in DVD video discs are divid- ed into parts by title and chapter. Title: The largest unit of the video and au- dio programs stored on DVD video discs. Usually, one movie, one album, or one au- dio program is assigned as a title. Chapter: A unit smaller than that of title. A title comprises of several chapters. Manufactured under license from Dolby Laboratories. “Dolby”, “Pro Logic”, and the double-D symbol are trademarks of Dolby Laboratories. This product incorporates copyright pro- tection technology that is protected by 5 U.S. patents and other intellectual prop- erty rights. Use of this copyright protec- tion technology must be authorized by AUDIO/VIDEO SYSTEM Rovi Corporation, and is intended for home and other limited viewing uses only unless otherwise authorized by Rovi Corporation. Reverse engineering or disassembly is prohibited. 211
  • 39. 1. AUDIO/VIDEO SYSTEM OPERATION 8. USB MEMORY OPERATION Connecting a USB memory enables CONNECTING A USB users to enjoy music from the vehicle MEMORY speakers. 1 Press the lid. CAUTION ● Do not operate the player’s controls or connect the USB memory while driving. NOTICE ● Depending on the size and shape of the USB memory that is connected to the system, the auxiliary box lid may not close fully. In this case, do not forcibly close the lid as this may damage the 2 Open the cover and connect a USB USB memory or the terminal, etc. memory. ● Do not leave your portable player in the car. In particular, high temperatures inside the vehicle may damage the por- table player. ● Do not push down on or apply unneces- sary pressure to the portable player while it is connected as this may dam- age the portable player or its terminal. ● Do not insert foreign objects into the port as this may damage the portable player or its terminal. Turn on the power of the USB memory if it is not turned on. 3 Press the “MEDIA” button. 212
  • 40. 1. AUDIO/VIDEO SYSTEM OPERATION PLAYING A USB MEMORY INFORMATION ● When the USB memory is connected and the audio source is changed to USB PLAYING AND PAUSING A USB memory mode, the USB memory will MEMORY start playing the first file in the first folder. If the same device is removed Tag mode and reinserted (and the contents have not been changed), the USB memory will resume playing from the same point it was last used. ● Depending on the USB memory that is connected to the system, certain func- tions may not be available. SELECTING A DESIRED Folder mode FOLDER/ALBUM ■ON THE USB TOP SCREEN 5 AUDIO/VIDEO SYSTEM 1 If a USB memory has already been connected, touch the “USB” tab to se- lect USB mode. Pressing the “MEDIA” , : Touch to skip to the next or previ- button repeatedly can also select the ous folder/album. tab. SELECTING A DESIRED INFORMATION FOLDER, ARTIST OR ALBUM ● If tag information exists, the file/folder names will be changed to track/album 1 Touch the folder/album name screen names. button. : Touch to start playing the music. : Touch to pause the music. : Touch to start playing the music again. 213
  • 41. 1. AUDIO/VIDEO SYSTEM OPERATION 2 Touch the desired tab and select the “TUNE·SCROLL” knob: Turn the knob desired folder, artist or album. clockwise or counterclockwise to skip to the desired file/track. ■ON THE FILE/TRACK LIST SCREEN 1 Touch the file/track name screen but- ton to display the following file/track list screen. Character screen buttons, “ABC”, “DEF” etc., allow a direct jump to list entries that begin with the same letter as the character button. Each time the same character screen but- ton is touched, the list starting with the subsequent character is displayed. , : Touch to move the list up or down 2 Touch the desired file/track number. by 5 folder/artist/album groups. If either of The player will start playing the select- these screen buttons is touched when the ed file/track from the beginning. top/bottom page of the list is displayed, the , : Touch to move the list up or down last/first page is displayed. by 5 file/track groups. If either of these , : If appears to the right of an item screen buttons is touched when the top/ name, the complete name is too long for bottom page of the list is displayed, the the screen. Touch to scroll to the end of last/first page is displayed. the name. Touch to scroll to the begin- “SEEK/TRACK” button: Press the “ ” or ning of the name. “ ” button of “SEEK/TRACK” to scroll through the file/track list one by one. SELECTING A DESIRED FILE/ “TUNE·SCROLL” knob: Turn the knob TRACK clockwise or counterclockwise to quickly scroll up or down the file/track list. To se- ■ON THE USB TOP SCREEN lect the desired file/track, press the knob. , : If appears to the right of an item name, the complete name is too long for the screen. Touch to scroll to the end of the name. Touch to scroll to the begin- ning of the name. “SEEK/TRACK” button: Press the “ ” or “ ” button of “SEEK/ TRACK” repeatedly until the desired file/track number appears on the screen. The player will start playing the selected file/track from the beginning. 214
  • 42. 1. AUDIO/VIDEO SYSTEM OPERATION ■FAST FORWARDING OR REWIND- REPEATING ING 1 Press and hold the “ ” or “ ” button The file or folder currently being lis- tened to can be repeated. of “SEEK/TRACK” to fast forward or rewind the file/track. ■REPEATING A FILE/TRACK 1 Touch “RPT” while the file or track is playing. When the button is released, the player resumes playing from that position. Each time “RPT” is touched, the mode changes as follows: When “RAND” is off 5 • File/Track Repeat → Folder/Album Repeat → Off AUDIO/VIDEO SYSTEM When “RAND” is on • File/Track Repeat → Off “RPT” appears on the screen. When the file/track is finished, the player will auto- matically play it again. To cancel this func- tion, touch “RPT” repeatedly until the repeat mode turns off. ■REPEATING A FOLDER/ALBUM 1 Touch “RPT” repeatedly until “FLD.RPT” appears on the screen. When the folder/album is finished, the player will automatically go back to the beginning of the folder/album and play it again. To cancel this function, touch “RPT” again. 215