
Recomendados
Mais conteúdo relacionado
Mais de jamsjamsjams
Mais de jamsjamsjams (20)
Último
Último (20)
Construction Of Website
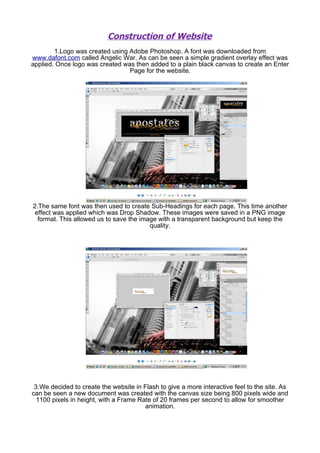
- 1. Construction of Website 1.Logo was created using Adobe Photoshop. A font was downloaded from www.dafont.com called Angelic War. As can be seen a simple gradient overlay effect was applied. Once logo was created was then added to a plain black canvas to create an Enter Page for the website. 2.The same font was then used to create Sub-Headings for each page. This time another effect was applied which was Drop Shadow. These images were saved in a PNG image format. This allowed us to save the image with a transparent background but keep the quality. 3.We decided to create the website in Flash to give a more interactive feel to the site. As can be seen a new document was created with the canvas size being 800 pixels wide and 1100 pixels in height, with a Frame Rate of 20 frames per second to allow for smoother animation.
- 2. 4.Once the pre- loader was installed all the relevant files that were required for the website were imported into the library. 5.Once the files were imported the buttons for the navigation bar were created. This was done but creating a Button Symbol and then placing the Text in the centre of the symbol canvas. From there the colour of the text was altered for the different states of the button.
- 3. 6.Once the buttons were created different objects were animated using Motion Tweens. The objects were animated for when the site initially loads after the pre-loader. As can be seen the Timeline shows the different objects on different layers. 7.Once the initial objects were laid out on the page the next step was to create each area of information, such as the text area, the jukebox, the events information, etc. This was done by creating Movie Clip Symbols and then animating within those symbols. As can be seen the text area for the Home Page is being created. The Timeline
- 4. shows the different objects and when their state changes by looking at where the Keyframes are positioned. 8.With the Jukebox area, the music tracks had to be imported in. These music tracks first had to be converted to a lower quality to decrease the file size so it would allow the overall website file size to be lower and as a result would load quicker. The play, pause, next and previous buttons were created using the tools in Flash and then converting them into Button Symbols. 9.This step shows how the gallery was created. Once again it was created as a Movie Clip Symbol and the images were cropped and re-sized in photoshop. Then using Motion Tweens and Keyframes, the Alpaha Levels were altered along with the size of the image to create a sense of a fade in, fade out gallery.
- 5. 10.Once all the information areas had been placed on the Timeline as separate layers and on the canvas, the site was then previewed, as can be seen. 11.This screenshot shows the exported version of the site. The site was then imported into a blank document in Adobe Dreamweaver and saved as the home page. The Enter page was linked to the Home page but saved as the Index page.