SlideShare uma empresa Scribd logo
1 de 28
Baixar para ler offline
Panorama Photography
by Andrew McDonald
Crater Lake - Andrew McDonald (10520 x 3736 - 39.3MP)
What is a Panorama?
A panorama is any wide-angle view or
representation of a physical space, whether in
painting, drawing, photography, film/video, or a
three-dimensional model.
Downtown Kansas City, MO – Andrew McDonald (16614 x 4195 - 69.6MP)
How do I make a panorama?
Cropping of normal image
• Some Cameras have had this built in
• APS Cameras had a setting that would indicate to the printer that the image should be
printed as a panorama and would mask the screen off. Some 35mm P&S cameras would
show a mask to help with composition.
• Advantages
• No special equipment or technique required
• Best (only?) option for scenes with lots of movement
• Disadvantages
• Reduction in resolution since you are cutting away portions of the image
• Depending on resolution may only be adequate for web or smaller prints
Union Pacific 3985-Andrew McDonald (4256 x 1583 - 6.7MP)(4256 x 2832 - 12.0MP)
How do I make a panorama?
Multiple Image Stitching
• Digital cameras do this automatically or assist
• Some newer cameras do this by “sweeping the camera” across the scene while holding
the shutter button. Images are stitched in-camera.
• Other cameras show the left or right edge of prior image to help with composition of
next image. Stitching may be done in-camera or multiple images are created.
• Advantages
• Resolution can be very high by using telephoto lenses to take smaller slices of the scene
• Disadvantages
• Depending on method used, requires extra equipment
• Takes time to set up and take the required exposures
• Use of multiple images can limit the amount of movement in the image
• Software usually required to stitch the images together
+ + =
Snake River Overlook – Andrew McDonald (7086 x 2833 - 20.0MP)
Types of Multi-Image Panoramas
Single Row
• A single row panorama is one in which the camera is only moved in one
axis (Horizontally or Vertically)
• Advantages
• Less equipment needed which reduces costs
• Quicker to set up and take images
• Disadvantages
• Not practical for vertical panoramas because of equipment limitations
• Vertical resolution limited to camera sensor
180 Degree View from North Window Arch - Andrew McDonald (19262 x 3925 - 75.6MP)
Types of Multi-Image Panoramas
Multiple Row
• A multiple row panorama is one in which the camera is moved in both
directions (Vertically and Horizontally)
• Advantages
• Allows for vertical panoramas instead of being limited to horizontal
• Vertical resolution not limited to camera sensor
• Disadvantages
• Potentially higher equipment costs, size and weight
• Takes longer to set up and take the images
• More computer RAM and processing speed required
to stitch the images
Bryce Canyon – Max Lyons 2003
1.09 Gigapixel image containing 196 6MP images
More images at http://www.tawbaware.com/maxlyons/
Equipment Options
Handheld
• Good results can be had by simply taking a series of hand held shots
• Best used for distant subjects
• No significant issues with parallax (shifting of foreground/background objects)
• Any stitching artifacts will be less noticeable
• To get good results without using a tripod, make sure you stand in one
spot and as you turn to take each picture keep the camera close to your
body, i.e. close to the point of rotation. Don't move from the spot you are
standing on between shots. Don't learn forwards or backwards between
shots, but try to stay still and steady.
Christmas Lights on the Plaza – Joe Sands
Equipment Options
Single Row without Nodal Slide
• Allows camera to rotate horizontally
• Works well for distant subjects where parallax is less of an issue
• Relatively inexpensive
• Light weight and easy to set up
• Could be used vertically but it’s not ideal
Novoflex Universal Panorama Plate
$195
Really Right Stuff Panorama Clamp
$235
Requires Arca-Swiss plate on camera
Equipment Options
Single Row with Nodal Slide
• Adjusts to camera & lens exit pupil to eliminate parallax errors
• Allows closer subjects such as room interiors or foreground objects
• Increased cost
• More weight and setup time
• Still mostly limited to horizontal panoramas
Really Right Stuff Single Row Package
$360
Requires Arca-Swiss plate on camera
Equipment Options
Multiple Row
• Adds ability to move camera vertically
• Allows for vertical panoramas
• Depending on choice can get expensive
• Even more set up time and carrying weight
• Allows for very high resolution stitched images
Nodal Ninja 3 MKII
$209
Really Right Stuff Ultimate-Pro Omni-Pivot Package
$795
Requires Arca-Swiss plate on camera
Giga Pan EPIC Pro Robotic
$895
Finding the Exit Pupil
• For Single Row with Nodal Slide and Multiple Row setups it is necessary to
find the exit pupil for your camera/lens/focal length combination to
prevent parallax errors
• This is not critical for distant objects but not having the position set
correctly can cause ghosting and overlap in closer subjects
• To do this you will need the following:
• Camera mounted on your panorama setup using a tripod
• Two easily aligned vertical objects such as light stands, door frames or light posts.
• The idea is to align the two objects in the center of the viewfinder, then
spin the camera to the left and right. Move the nodal slide forward or
back until the two objects do not appear to move against each other.
• There’s a very helpful video on YouTube at Panoramic photography - how
to find the Nodal Point (no parallax point) of your lens
(http://www.youtube.com/watch?v=k0HaRZi-FWs)
Setting Up Your Support
• Leveling the camera
• The panning base of your panorama equipment should be level. Doing this will make
your stitching go a lot smoother and reduce waste in your final image.
• Portrait vs. Landscape
• Most multi-row setups will force you into portrait while most single row setups will be
landscape
• An L-Bracket will allow you to select the orientation of the camera
• Since the camera should be level, the horizon is always in the center of the image.
Shooting in portrait mode allows you more room to shift the horizon via crop. This is
not an issue for multi-row since you can place the horizon anywhere you want.
• Shooting in portrait also allows for higher vertical resolution which can be important in
single-row panoramas
Setting Up Your Camera
• White Balance
• Use a preset (Daylight, Cloudy, Tungsten)
• You can also use a grey card (Whibal) or ExpoDisc to set white balance
• Must be consistent across all images
• Aperture/Shutter
• Use Manual Mode. Aperture and shutter should be the same for all images.
• Use an aperture that will get you good depth of field. This is not a hard and fast rule but
a general guideline.
• Focus
• Manual
• Once everything is set up, scan your scene with the meter on. Make sure
that the meter doesn’t swing to wildly from center. (+/- 1-2 stops max). If
needed, find an “average” that keeps the meter in the middle. It is
possible to do HDR if needed.
The goal here is to make everything consistent between images. Any
variances in white balance, exposure or focus will cause your stitched image
to be inconsistent as you move across the panorama.
Shooting Your Images
• Be Quick
• Light changes and clouds move. Don’t waste any time between images.
• Overlap images
• A good rule of thumb is to overlap 25-33%. You really can’t overlap too much but the
more you overlap the more pictures you will need to take. On the other hand, the more
overlap you have the more the stitching software has to work with.
• Use a good tripod
• The less your camera moves between exposures the better. If there is wind try to
weight your tripod down to avoid vibrations.
• Move the camera carefully. Don’t bump your tripod.
• Use a shutter release and mirror lockup (if available)
• A shutter release cable always a good idea when working on a tripod. If you don’t have
mirror lockup, see if your camera has a shutter delay. This allows the camera to settle
down after the mirror has been raised to reduce vibrations. This is less important at
really high shutter speeds but anytime you can remove vibration it’s a good thing.
Again, the object here is consistency. We want to provide the best possible
data for the stitching program to do it’s thing.
Stitching Software
• There are lots of options ranging from free to shareware to Photoshop
• Adobe Photoshop-$699 (http://www.adobe.com)
• PT Gui-$114-225 (http://www.ptgui.com)
• Panorama Factory-$79 (http://panoramafactory.com/)
• PTAssembler-$45 (http://www.tawbaware.com/ptasmblr.htm)
• Hugin-Free (http://hugin.sourceforge.net/download/)
• Your camera may have bundled software that will do panorama stitching
Post Processing Tips
• Changes to make before stitching
• Lens correction if your editing software supports it. This will correct any lens distortion
and vignetting that may be in your images. This will allow for better blending of images.
Make sure the same changes are made to each image.
• If you shoot RAW you can adjust white balance before you stitch. You will have more
control over white balance changes now rather than in the stitched TIFF or JPG file. If
you do make white balance adjustments make sure the same adjustment is made to all
images.
• Changes you shouldn’t make before stitching
• Levels and curves, brightness or contrast
• Exposure compensation
• Color adjustments
As before, our goal is to maintain consistency among the images. Any
changes to exposure or color and contrast could affect that consistency. If
you must make changes before stitching (like RAW exposure compensation or
highlight recovery) make sure the exact same change is done to all images.
Before Stitching Your Images
• If you are shooting RAW you will probably need to save your images as
TIFF or JPG before they can be used by the stitching software. TIFF is the
preferable format as it is lossless.
• Save your files to a new folder to make it easier to find them when you
import into the stitching software.
• If you shot for HDR (High Dynamic Range) in combination with a panorama
series, wait to do the HDR processing until after you stitch your panorama.
Since HDR does “magical” things to the image it will seriously affect the
image consistency we have worked so hard to achieve.
Stitching Your Images
This is the first screen you see when starting Panorama Factory. Clicking Import opens a file
dialog box. Navigate to the folder containing your images to be stitched, select them all and click
Open.
Stitching Your Images
If necessary you can drag images to change their order or do rotations using the buttons on the
left panel. You want the images to be in order from left to right and they should be correctly
oriented.
Stitching Your Images
Next we choose the stitching method. Fully Automatic will make all the decisions for you but if
you have some tricky stitching the other options provide ways to tell the software how to
combine the images.
Stitching Your Images
This screen allows us to provide information about the lens and sensor/film size. This allows the
software to accurately warp and blend the images. You should provide the most accurate
information you can.
Stitching Your Images
These options control image quality. If you’ve done a good job of taking the source photos then
you can use Automatically Fine Tune. Only select the Exposure Matching if the exposures aren’t
consistent. The correction and sharpening can be done later against your output TIFF file.
Stitching Your Images
If you are outputting to an image for printing or viewing, select Image File Only. The other
options don’t have any real effect. They are for VR viewers like Quick Time.
Stitching Your Images
The last screen in the setup allows you to control the output resolution. If you are heading to the
web or email, you can resize the image here. If you are going to do further editing or creating a
full sized image select Prepare Image for Printing.
Stitching Your Images
Now we wait. This will take a few minutes depending on the size and number of the source
images and your computer’s processor and RAM. This particular stitch took 110 seconds on a
2.4Ghz Quad Core processor and maximum memory usage was about 1GB.
Stitching Your Images
Stitching is complete.
Stitching Your Images
Now the stitched image can be saved. If you plan to do any further editing on the image (levels &
curves, dust removal, etc) you should save as 16 bit TIFF. If you are going to email or post on the
web you can select JPG.
A PDF version of this presentation can be found in the
Resources Section-Online Education at the Digital Dimensions Website.
Kansas City, MO Skyline from Kaw Point – Andrew McDonald

Mais conteúdo relacionado

Mais procurados

Photographic composition
Photographic compositionPhotographic composition
Photographic composition
ctedds
 
Production Elements
Production ElementsProduction Elements
Production Elements
Travis
 
Digital Photography- Exposure Triangle
Digital Photography- Exposure TriangleDigital Photography- Exposure Triangle
Digital Photography- Exposure Triangle
jspeir
 
Different applications of photography
Different applications of photographyDifferent applications of photography
Different applications of photography
oliviaberryy
 

Mais procurados (20)

Camera shots and angles
Camera shots and angles Camera shots and angles
Camera shots and angles
 
Photographic composition
Photographic compositionPhotographic composition
Photographic composition
 
Tutorial 2 - Basics of Digital Photography
Tutorial 2 - Basics of Digital PhotographyTutorial 2 - Basics of Digital Photography
Tutorial 2 - Basics of Digital Photography
 
Production Elements
Production ElementsProduction Elements
Production Elements
 
Digital Photography- Exposure Triangle
Digital Photography- Exposure TriangleDigital Photography- Exposure Triangle
Digital Photography- Exposure Triangle
 
Lesson 2 • Types of Photography
Lesson 2 • Types of PhotographyLesson 2 • Types of Photography
Lesson 2 • Types of Photography
 
Macro Photography
Macro PhotographyMacro Photography
Macro Photography
 
Camera shots power point
Camera shots power pointCamera shots power point
Camera shots power point
 
Framing in Photography
Framing in PhotographyFraming in Photography
Framing in Photography
 
Photography Composition Rules
Photography Composition RulesPhotography Composition Rules
Photography Composition Rules
 
Portraiture ppt
Portraiture pptPortraiture ppt
Portraiture ppt
 
Types of photography
Types of photography Types of photography
Types of photography
 
Advanced photography
Advanced photographyAdvanced photography
Advanced photography
 
Essay
Essay Essay
Essay
 
Photographic composition
Photographic compositionPhotographic composition
Photographic composition
 
Different applications of photography
Different applications of photographyDifferent applications of photography
Different applications of photography
 
Photojournalism
PhotojournalismPhotojournalism
Photojournalism
 
Composition in film
Composition in filmComposition in film
Composition in film
 
Playing with Exposure: Long Exposure Photography
Playing with Exposure: Long Exposure PhotographyPlaying with Exposure: Long Exposure Photography
Playing with Exposure: Long Exposure Photography
 
Photography powerpoint
Photography powerpointPhotography powerpoint
Photography powerpoint
 

Destaque

Poster submission #354 viability study of a costumized gis for the berlenga...
Poster submission #354   viability study of a costumized gis for the berlenga...Poster submission #354   viability study of a costumized gis for the berlenga...
Poster submission #354 viability study of a costumized gis for the berlenga...
Ædel Aerospace GmbH
 
Extended project evaluation
Extended project evaluationExtended project evaluation
Extended project evaluation
guestbf784b
 
How to analyse photography work
How to analyse photography workHow to analyse photography work
How to analyse photography work
Jaskirt Boora
 

Destaque (19)

Basic studio lighting
Basic studio lightingBasic studio lighting
Basic studio lighting
 
panorama ppt
panorama pptpanorama ppt
panorama ppt
 
Panorama
PanoramaPanorama
Panorama
 
Vocab
VocabVocab
Vocab
 
Thermal Panorama's
Thermal Panorama'sThermal Panorama's
Thermal Panorama's
 
20120722 nodal point cheat sheet
20120722 nodal point cheat sheet20120722 nodal point cheat sheet
20120722 nodal point cheat sheet
 
Poster submission #354 viability study of a costumized gis for the berlenga...
Poster submission #354   viability study of a costumized gis for the berlenga...Poster submission #354   viability study of a costumized gis for the berlenga...
Poster submission #354 viability study of a costumized gis for the berlenga...
 
Panoramic photos: how to take the most out of ultra-wide angles
Panoramic photos: how to take the most out of ultra-wide anglesPanoramic photos: how to take the most out of ultra-wide angles
Panoramic photos: how to take the most out of ultra-wide angles
 
Extended project evaluation
Extended project evaluationExtended project evaluation
Extended project evaluation
 
Streets of the world photography project
Streets of the world photography projectStreets of the world photography project
Streets of the world photography project
 
Streets Of The World - photography project
Streets Of The World - photography projectStreets Of The World - photography project
Streets Of The World - photography project
 
Cool Photography Techniques
Cool Photography TechniquesCool Photography Techniques
Cool Photography Techniques
 
Photography Project
Photography ProjectPhotography Project
Photography Project
 
Total360 - Panorama photography and 360° virtual tour Kerala India
Total360 - Panorama photography and 360° virtual tour Kerala IndiaTotal360 - Panorama photography and 360° virtual tour Kerala India
Total360 - Panorama photography and 360° virtual tour Kerala India
 
Studio Photography Basics
Studio Photography BasicsStudio Photography Basics
Studio Photography Basics
 
Presenting Your Photographic Work
Presenting Your Photographic WorkPresenting Your Photographic Work
Presenting Your Photographic Work
 
How to analyse photography work
How to analyse photography workHow to analyse photography work
How to analyse photography work
 
360 degree final ppt
360 degree final ppt360 degree final ppt
360 degree final ppt
 
Big Hairy Audacious Goals
Big Hairy Audacious GoalsBig Hairy Audacious Goals
Big Hairy Audacious Goals
 

Semelhante a Panorama photography pdf

Gigapixel Photography: RCAHMW
Gigapixel Photography: RCAHMWGigapixel Photography: RCAHMW
Gigapixel Photography: RCAHMW
RCAHMW
 
Week 3 Lens And Focal Lenghts
Week 3 Lens And Focal LenghtsWeek 3 Lens And Focal Lenghts
Week 3 Lens And Focal Lenghts
joelk
 
Digital image and file formats
Digital image and file formatsDigital image and file formats
Digital image and file formats
Ram Chandran
 
Using your digital camera 2010 newer version
Using your digital camera 2010 newer versionUsing your digital camera 2010 newer version
Using your digital camera 2010 newer version
Karen Conley
 

Semelhante a Panorama photography pdf (20)

Video Cameras and Features.pptx
Video Cameras and Features.pptxVideo Cameras and Features.pptx
Video Cameras and Features.pptx
 
Gigapixel Photography: RCAHMW
Gigapixel Photography: RCAHMWGigapixel Photography: RCAHMW
Gigapixel Photography: RCAHMW
 
DSLR video
DSLR videoDSLR video
DSLR video
 
Week 3 Lens And Focal Lenghts
Week 3 Lens And Focal LenghtsWeek 3 Lens And Focal Lenghts
Week 3 Lens And Focal Lenghts
 
Photogrammetry for Games
Photogrammetry for GamesPhotogrammetry for Games
Photogrammetry for Games
 
Photography 101 and PR Basics
Photography 101 and PR BasicsPhotography 101 and PR Basics
Photography 101 and PR Basics
 
Photographic Film and Slide Scanning Alternatives
Photographic Film and Slide Scanning AlternativesPhotographic Film and Slide Scanning Alternatives
Photographic Film and Slide Scanning Alternatives
 
Basics of Photography
Basics of PhotographyBasics of Photography
Basics of Photography
 
DSLR Cameras
DSLR Cameras DSLR Cameras
DSLR Cameras
 
Learn basic photography in detail
Learn basic photography in detailLearn basic photography in detail
Learn basic photography in detail
 
Pentax K100d
Pentax K100dPentax K100d
Pentax K100d
 
Introduction to DSLRs
Introduction to DSLRsIntroduction to DSLRs
Introduction to DSLRs
 
Camera fundamentals and modes
Camera fundamentals and modesCamera fundamentals and modes
Camera fundamentals and modes
 
New photo setup3
New photo setup3New photo setup3
New photo setup3
 
Digital image and file formats
Digital image and file formatsDigital image and file formats
Digital image and file formats
 
Plots spectroscope sasta presentation 2013
Plots spectroscope sasta presentation 2013Plots spectroscope sasta presentation 2013
Plots spectroscope sasta presentation 2013
 
Advanced photography techniques
Advanced photography techniquesAdvanced photography techniques
Advanced photography techniques
 
Photography1
Photography1Photography1
Photography1
 
Basic photography & intro to dslrs
Basic photography  & intro to dslrsBasic photography  & intro to dslrs
Basic photography & intro to dslrs
 
Using your digital camera 2010 newer version
Using your digital camera 2010 newer versionUsing your digital camera 2010 newer version
Using your digital camera 2010 newer version
 

Mais de جمال الكندي (19)

History of photography ppt
History of photography pptHistory of photography ppt
History of photography ppt
 
History of photography ppt
History of photography pptHistory of photography ppt
History of photography ppt
 
History of photography-notes
History of photography-notesHistory of photography-notes
History of photography-notes
 
Camera basics lesson_1
Camera basics lesson_1Camera basics lesson_1
Camera basics lesson_1
 
Basic camera controls
Basic camera controlsBasic camera controls
Basic camera controls
 
Landscapeseminar ppt
Landscapeseminar pptLandscapeseminar ppt
Landscapeseminar ppt
 
Kcc macro ppt1
Kcc macro ppt1Kcc macro ppt1
Kcc macro ppt1
 
silloute_7ppt
silloute_7pptsilloute_7ppt
silloute_7ppt
 
Wildlife photography ppt
Wildlife photography pptWildlife photography ppt
Wildlife photography ppt
 
lifewie digital photography_pdf
lifewie  digital photography_pdflifewie  digital photography_pdf
lifewie digital photography_pdf
 
portrait pdf
portrait pdfportrait pdf
portrait pdf
 
night ppt
 night  ppt night  ppt
night ppt
 
Macro photography pdf
Macro photography pdfMacro photography pdf
Macro photography pdf
 
landscape pdf
 landscape pdf landscape pdf
landscape pdf
 
black & white ppt
black & white pptblack & white ppt
black & white ppt
 
Schools wide angle pdf
Schools wide angle pdfSchools wide angle pdf
Schools wide angle pdf
 
Angle ppt
Angle pptAngle ppt
Angle ppt
 
abstract photography pdf
 abstract photography pdf abstract photography pdf
abstract photography pdf
 
Abstract photography-ppt
Abstract photography-pptAbstract photography-ppt
Abstract photography-ppt
 

Último

Cloud Frontiers: A Deep Dive into Serverless Spatial Data and FME
Cloud Frontiers:  A Deep Dive into Serverless Spatial Data and FMECloud Frontiers:  A Deep Dive into Serverless Spatial Data and FME
Cloud Frontiers: A Deep Dive into Serverless Spatial Data and FME
Safe Software
 
+971581248768>> SAFE AND ORIGINAL ABORTION PILLS FOR SALE IN DUBAI AND ABUDHA...
+971581248768>> SAFE AND ORIGINAL ABORTION PILLS FOR SALE IN DUBAI AND ABUDHA...+971581248768>> SAFE AND ORIGINAL ABORTION PILLS FOR SALE IN DUBAI AND ABUDHA...
+971581248768>> SAFE AND ORIGINAL ABORTION PILLS FOR SALE IN DUBAI AND ABUDHA...
?#DUbAI#??##{{(☎️+971_581248768%)**%*]'#abortion pills for sale in dubai@
 

Último (20)

Axa Assurance Maroc - Insurer Innovation Award 2024
Axa Assurance Maroc - Insurer Innovation Award 2024Axa Assurance Maroc - Insurer Innovation Award 2024
Axa Assurance Maroc - Insurer Innovation Award 2024
 
A Year of the Servo Reboot: Where Are We Now?
A Year of the Servo Reboot: Where Are We Now?A Year of the Servo Reboot: Where Are We Now?
A Year of the Servo Reboot: Where Are We Now?
 
Real Time Object Detection Using Open CV
Real Time Object Detection Using Open CVReal Time Object Detection Using Open CV
Real Time Object Detection Using Open CV
 
Automating Google Workspace (GWS) & more with Apps Script
Automating Google Workspace (GWS) & more with Apps ScriptAutomating Google Workspace (GWS) & more with Apps Script
Automating Google Workspace (GWS) & more with Apps Script
 
From Event to Action: Accelerate Your Decision Making with Real-Time Automation
From Event to Action: Accelerate Your Decision Making with Real-Time AutomationFrom Event to Action: Accelerate Your Decision Making with Real-Time Automation
From Event to Action: Accelerate Your Decision Making with Real-Time Automation
 
Workshop - Best of Both Worlds_ Combine KG and Vector search for enhanced R...
Workshop - Best of Both Worlds_ Combine  KG and Vector search for  enhanced R...Workshop - Best of Both Worlds_ Combine  KG and Vector search for  enhanced R...
Workshop - Best of Both Worlds_ Combine KG and Vector search for enhanced R...
 
Understanding Discord NSFW Servers A Guide for Responsible Users.pdf
Understanding Discord NSFW Servers A Guide for Responsible Users.pdfUnderstanding Discord NSFW Servers A Guide for Responsible Users.pdf
Understanding Discord NSFW Servers A Guide for Responsible Users.pdf
 
MINDCTI Revenue Release Quarter One 2024
MINDCTI Revenue Release Quarter One 2024MINDCTI Revenue Release Quarter One 2024
MINDCTI Revenue Release Quarter One 2024
 
Repurposing LNG terminals for Hydrogen Ammonia: Feasibility and Cost Saving
Repurposing LNG terminals for Hydrogen Ammonia: Feasibility and Cost SavingRepurposing LNG terminals for Hydrogen Ammonia: Feasibility and Cost Saving
Repurposing LNG terminals for Hydrogen Ammonia: Feasibility and Cost Saving
 
Scaling API-first – The story of a global engineering organization
Scaling API-first – The story of a global engineering organizationScaling API-first – The story of a global engineering organization
Scaling API-first – The story of a global engineering organization
 
Top 10 Most Downloaded Games on Play Store in 2024
Top 10 Most Downloaded Games on Play Store in 2024Top 10 Most Downloaded Games on Play Store in 2024
Top 10 Most Downloaded Games on Play Store in 2024
 
How to Troubleshoot Apps for the Modern Connected Worker
How to Troubleshoot Apps for the Modern Connected WorkerHow to Troubleshoot Apps for the Modern Connected Worker
How to Troubleshoot Apps for the Modern Connected Worker
 
HTML Injection Attacks: Impact and Mitigation Strategies
HTML Injection Attacks: Impact and Mitigation StrategiesHTML Injection Attacks: Impact and Mitigation Strategies
HTML Injection Attacks: Impact and Mitigation Strategies
 
Strategies for Unlocking Knowledge Management in Microsoft 365 in the Copilot...
Strategies for Unlocking Knowledge Management in Microsoft 365 in the Copilot...Strategies for Unlocking Knowledge Management in Microsoft 365 in the Copilot...
Strategies for Unlocking Knowledge Management in Microsoft 365 in the Copilot...
 
Cloud Frontiers: A Deep Dive into Serverless Spatial Data and FME
Cloud Frontiers:  A Deep Dive into Serverless Spatial Data and FMECloud Frontiers:  A Deep Dive into Serverless Spatial Data and FME
Cloud Frontiers: A Deep Dive into Serverless Spatial Data and FME
 
TrustArc Webinar - Unlock the Power of AI-Driven Data Discovery
TrustArc Webinar - Unlock the Power of AI-Driven Data DiscoveryTrustArc Webinar - Unlock the Power of AI-Driven Data Discovery
TrustArc Webinar - Unlock the Power of AI-Driven Data Discovery
 
A Domino Admins Adventures (Engage 2024)
A Domino Admins Adventures (Engage 2024)A Domino Admins Adventures (Engage 2024)
A Domino Admins Adventures (Engage 2024)
 
Bajaj Allianz Life Insurance Company - Insurer Innovation Award 2024
Bajaj Allianz Life Insurance Company - Insurer Innovation Award 2024Bajaj Allianz Life Insurance Company - Insurer Innovation Award 2024
Bajaj Allianz Life Insurance Company - Insurer Innovation Award 2024
 
2024: Domino Containers - The Next Step. News from the Domino Container commu...
2024: Domino Containers - The Next Step. News from the Domino Container commu...2024: Domino Containers - The Next Step. News from the Domino Container commu...
2024: Domino Containers - The Next Step. News from the Domino Container commu...
 
+971581248768>> SAFE AND ORIGINAL ABORTION PILLS FOR SALE IN DUBAI AND ABUDHA...
+971581248768>> SAFE AND ORIGINAL ABORTION PILLS FOR SALE IN DUBAI AND ABUDHA...+971581248768>> SAFE AND ORIGINAL ABORTION PILLS FOR SALE IN DUBAI AND ABUDHA...
+971581248768>> SAFE AND ORIGINAL ABORTION PILLS FOR SALE IN DUBAI AND ABUDHA...
 

Panorama photography pdf

  • 1. Panorama Photography by Andrew McDonald Crater Lake - Andrew McDonald (10520 x 3736 - 39.3MP)
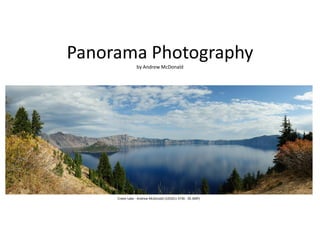
  • 2. What is a Panorama? A panorama is any wide-angle view or representation of a physical space, whether in painting, drawing, photography, film/video, or a three-dimensional model. Downtown Kansas City, MO – Andrew McDonald (16614 x 4195 - 69.6MP)
  • 3. How do I make a panorama? Cropping of normal image • Some Cameras have had this built in • APS Cameras had a setting that would indicate to the printer that the image should be printed as a panorama and would mask the screen off. Some 35mm P&S cameras would show a mask to help with composition. • Advantages • No special equipment or technique required • Best (only?) option for scenes with lots of movement • Disadvantages • Reduction in resolution since you are cutting away portions of the image • Depending on resolution may only be adequate for web or smaller prints Union Pacific 3985-Andrew McDonald (4256 x 1583 - 6.7MP)(4256 x 2832 - 12.0MP)
  • 4. How do I make a panorama? Multiple Image Stitching • Digital cameras do this automatically or assist • Some newer cameras do this by “sweeping the camera” across the scene while holding the shutter button. Images are stitched in-camera. • Other cameras show the left or right edge of prior image to help with composition of next image. Stitching may be done in-camera or multiple images are created. • Advantages • Resolution can be very high by using telephoto lenses to take smaller slices of the scene • Disadvantages • Depending on method used, requires extra equipment • Takes time to set up and take the required exposures • Use of multiple images can limit the amount of movement in the image • Software usually required to stitch the images together + + = Snake River Overlook – Andrew McDonald (7086 x 2833 - 20.0MP)
  • 5. Types of Multi-Image Panoramas Single Row • A single row panorama is one in which the camera is only moved in one axis (Horizontally or Vertically) • Advantages • Less equipment needed which reduces costs • Quicker to set up and take images • Disadvantages • Not practical for vertical panoramas because of equipment limitations • Vertical resolution limited to camera sensor 180 Degree View from North Window Arch - Andrew McDonald (19262 x 3925 - 75.6MP)
  • 6. Types of Multi-Image Panoramas Multiple Row • A multiple row panorama is one in which the camera is moved in both directions (Vertically and Horizontally) • Advantages • Allows for vertical panoramas instead of being limited to horizontal • Vertical resolution not limited to camera sensor • Disadvantages • Potentially higher equipment costs, size and weight • Takes longer to set up and take the images • More computer RAM and processing speed required to stitch the images Bryce Canyon – Max Lyons 2003 1.09 Gigapixel image containing 196 6MP images More images at http://www.tawbaware.com/maxlyons/
  • 7. Equipment Options Handheld • Good results can be had by simply taking a series of hand held shots • Best used for distant subjects • No significant issues with parallax (shifting of foreground/background objects) • Any stitching artifacts will be less noticeable • To get good results without using a tripod, make sure you stand in one spot and as you turn to take each picture keep the camera close to your body, i.e. close to the point of rotation. Don't move from the spot you are standing on between shots. Don't learn forwards or backwards between shots, but try to stay still and steady. Christmas Lights on the Plaza – Joe Sands
  • 8. Equipment Options Single Row without Nodal Slide • Allows camera to rotate horizontally • Works well for distant subjects where parallax is less of an issue • Relatively inexpensive • Light weight and easy to set up • Could be used vertically but it’s not ideal Novoflex Universal Panorama Plate $195 Really Right Stuff Panorama Clamp $235 Requires Arca-Swiss plate on camera
  • 9. Equipment Options Single Row with Nodal Slide • Adjusts to camera & lens exit pupil to eliminate parallax errors • Allows closer subjects such as room interiors or foreground objects • Increased cost • More weight and setup time • Still mostly limited to horizontal panoramas Really Right Stuff Single Row Package $360 Requires Arca-Swiss plate on camera
  • 10. Equipment Options Multiple Row • Adds ability to move camera vertically • Allows for vertical panoramas • Depending on choice can get expensive • Even more set up time and carrying weight • Allows for very high resolution stitched images Nodal Ninja 3 MKII $209 Really Right Stuff Ultimate-Pro Omni-Pivot Package $795 Requires Arca-Swiss plate on camera Giga Pan EPIC Pro Robotic $895
  • 11. Finding the Exit Pupil • For Single Row with Nodal Slide and Multiple Row setups it is necessary to find the exit pupil for your camera/lens/focal length combination to prevent parallax errors • This is not critical for distant objects but not having the position set correctly can cause ghosting and overlap in closer subjects • To do this you will need the following: • Camera mounted on your panorama setup using a tripod • Two easily aligned vertical objects such as light stands, door frames or light posts. • The idea is to align the two objects in the center of the viewfinder, then spin the camera to the left and right. Move the nodal slide forward or back until the two objects do not appear to move against each other. • There’s a very helpful video on YouTube at Panoramic photography - how to find the Nodal Point (no parallax point) of your lens (http://www.youtube.com/watch?v=k0HaRZi-FWs)
  • 12. Setting Up Your Support • Leveling the camera • The panning base of your panorama equipment should be level. Doing this will make your stitching go a lot smoother and reduce waste in your final image. • Portrait vs. Landscape • Most multi-row setups will force you into portrait while most single row setups will be landscape • An L-Bracket will allow you to select the orientation of the camera • Since the camera should be level, the horizon is always in the center of the image. Shooting in portrait mode allows you more room to shift the horizon via crop. This is not an issue for multi-row since you can place the horizon anywhere you want. • Shooting in portrait also allows for higher vertical resolution which can be important in single-row panoramas
  • 13. Setting Up Your Camera • White Balance • Use a preset (Daylight, Cloudy, Tungsten) • You can also use a grey card (Whibal) or ExpoDisc to set white balance • Must be consistent across all images • Aperture/Shutter • Use Manual Mode. Aperture and shutter should be the same for all images. • Use an aperture that will get you good depth of field. This is not a hard and fast rule but a general guideline. • Focus • Manual • Once everything is set up, scan your scene with the meter on. Make sure that the meter doesn’t swing to wildly from center. (+/- 1-2 stops max). If needed, find an “average” that keeps the meter in the middle. It is possible to do HDR if needed. The goal here is to make everything consistent between images. Any variances in white balance, exposure or focus will cause your stitched image to be inconsistent as you move across the panorama.
  • 14. Shooting Your Images • Be Quick • Light changes and clouds move. Don’t waste any time between images. • Overlap images • A good rule of thumb is to overlap 25-33%. You really can’t overlap too much but the more you overlap the more pictures you will need to take. On the other hand, the more overlap you have the more the stitching software has to work with. • Use a good tripod • The less your camera moves between exposures the better. If there is wind try to weight your tripod down to avoid vibrations. • Move the camera carefully. Don’t bump your tripod. • Use a shutter release and mirror lockup (if available) • A shutter release cable always a good idea when working on a tripod. If you don’t have mirror lockup, see if your camera has a shutter delay. This allows the camera to settle down after the mirror has been raised to reduce vibrations. This is less important at really high shutter speeds but anytime you can remove vibration it’s a good thing. Again, the object here is consistency. We want to provide the best possible data for the stitching program to do it’s thing.
  • 15. Stitching Software • There are lots of options ranging from free to shareware to Photoshop • Adobe Photoshop-$699 (http://www.adobe.com) • PT Gui-$114-225 (http://www.ptgui.com) • Panorama Factory-$79 (http://panoramafactory.com/) • PTAssembler-$45 (http://www.tawbaware.com/ptasmblr.htm) • Hugin-Free (http://hugin.sourceforge.net/download/) • Your camera may have bundled software that will do panorama stitching
  • 16. Post Processing Tips • Changes to make before stitching • Lens correction if your editing software supports it. This will correct any lens distortion and vignetting that may be in your images. This will allow for better blending of images. Make sure the same changes are made to each image. • If you shoot RAW you can adjust white balance before you stitch. You will have more control over white balance changes now rather than in the stitched TIFF or JPG file. If you do make white balance adjustments make sure the same adjustment is made to all images. • Changes you shouldn’t make before stitching • Levels and curves, brightness or contrast • Exposure compensation • Color adjustments As before, our goal is to maintain consistency among the images. Any changes to exposure or color and contrast could affect that consistency. If you must make changes before stitching (like RAW exposure compensation or highlight recovery) make sure the exact same change is done to all images.
  • 17. Before Stitching Your Images • If you are shooting RAW you will probably need to save your images as TIFF or JPG before they can be used by the stitching software. TIFF is the preferable format as it is lossless. • Save your files to a new folder to make it easier to find them when you import into the stitching software. • If you shot for HDR (High Dynamic Range) in combination with a panorama series, wait to do the HDR processing until after you stitch your panorama. Since HDR does “magical” things to the image it will seriously affect the image consistency we have worked so hard to achieve.
  • 18. Stitching Your Images This is the first screen you see when starting Panorama Factory. Clicking Import opens a file dialog box. Navigate to the folder containing your images to be stitched, select them all and click Open.
  • 19. Stitching Your Images If necessary you can drag images to change their order or do rotations using the buttons on the left panel. You want the images to be in order from left to right and they should be correctly oriented.
  • 20. Stitching Your Images Next we choose the stitching method. Fully Automatic will make all the decisions for you but if you have some tricky stitching the other options provide ways to tell the software how to combine the images.
  • 21. Stitching Your Images This screen allows us to provide information about the lens and sensor/film size. This allows the software to accurately warp and blend the images. You should provide the most accurate information you can.
  • 22. Stitching Your Images These options control image quality. If you’ve done a good job of taking the source photos then you can use Automatically Fine Tune. Only select the Exposure Matching if the exposures aren’t consistent. The correction and sharpening can be done later against your output TIFF file.
  • 23. Stitching Your Images If you are outputting to an image for printing or viewing, select Image File Only. The other options don’t have any real effect. They are for VR viewers like Quick Time.
  • 24. Stitching Your Images The last screen in the setup allows you to control the output resolution. If you are heading to the web or email, you can resize the image here. If you are going to do further editing or creating a full sized image select Prepare Image for Printing.
  • 25. Stitching Your Images Now we wait. This will take a few minutes depending on the size and number of the source images and your computer’s processor and RAM. This particular stitch took 110 seconds on a 2.4Ghz Quad Core processor and maximum memory usage was about 1GB.
  • 27. Stitching Your Images Now the stitched image can be saved. If you plan to do any further editing on the image (levels & curves, dust removal, etc) you should save as 16 bit TIFF. If you are going to email or post on the web you can select JPG.
  • 28. A PDF version of this presentation can be found in the Resources Section-Online Education at the Digital Dimensions Website. Kansas City, MO Skyline from Kaw Point – Andrew McDonald