Module 0 introduction (enhanced)
•
0 gostou•370 visualizações

This document provides an introduction and overview of the Macromedia Flash interface and tools. It describes the main components of the Flash workspace including the timeline, stage, layers, toolbox, and property inspector. It explains how to use the various tools to create and edit shapes, text, and symbols. It also outlines how to set the basic stage properties such as size, background color, and frame rate when starting a new Flash project.

Recomendados
Mais conteúdo relacionado
Mais procurados
Mais procurados (19)
Destaque
Destaque (20)
Semelhante a Module 0 introduction (enhanced)
Semelhante a Module 0 introduction (enhanced) (20)
Mais de Izatul Akma
Mais de Izatul Akma (12)
Último
Último (20)
Module 0 introduction (enhanced)
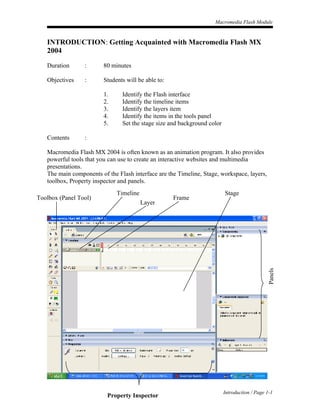
- 1. Macromedia Flash Module INTRODUCTION: Getting Acquainted with Macromedia Flash MX 2004 Duration : 80 minutes Objectives : Students will be able to: 1. Identify the Flash interface 2. Identify the timeline items 3. Identify the layers item 4. Identify the items in the tools panel 5. Set the stage size and background color Contents : Macromedia Flash MX 2004 is often known as an animation program. It also provides powerful tools that you can use to create an interactive websites and multimedia presentations. The main components of the Flash interface are the Timeline, Stage, workspace, layers, toolbox, Property inspector and panels. Timeline Stage Toolbox (Panel Tool) Frame Layer Panels Introduction / Page 1-1 Property Inspector
- 2. Macromedia Flash Module The Timeline is where you control the elements your movie overtime. The Stage is where your text, images, and animations appear. The white area of the Stage is the visible area of your project. You can modify the properties of the Stage, such as size, color, and frame rate. The workspace is the gray space surrounding the Stage. Nothing in the workspace is visible when you publish your finished movie. However, you can place objects here until you want them to appear on the Stage. The toolbox contains tools for creating and editing artwork. The Property inspector enables you to see and change properties of objects on the Stage. On the right side of the Flash workspace are panels you can collapse or expand, as you need them. For example, there are panels for working with color, components, and behaviors. The Timeline The Timeline is a key organizational and navigational tool for your animations. Here graphics are animated over time. You coordinate the timing of the animation and assemble the artwork in separate layers on the Timeline. The Timeline displays each frame in the movie. Your movies can contain frames, ~ keyframes, and empty/blank keyframes. Keyframe containing content Empty keyframe Playhead Introduction / Page 1-2
- 3. Macromedia Flash Module Layers Elapsed time Frame rate Current frame Layers are a way of organizing the objects on the Stage, much like a stack of transparent sheets for an overhead projector. You must use separate layers to draw overlapping shapes. Each layer has controls for hiding or showing the-layer, locking it (so you won't accidentally move its contents), and displaying its contents as outlines. Frames are like the individual frames of a filmstrip. The Timeline in a new Flash project appears to have many frames, but these are actually empty slots that you can define as frames or keyframes. A keyframe contains content and is shown by a solid circle. A keyframe usually indicates a change is going to occur on the stage. An empty keyframe, or blank keyframe, has no visual content on the Stage. The Timeline opens with one empty keyframe when you start a new project. The playhead indicates which frame of the Timeline is currently shown on the Stage. You can click and drag the playhead to move it to view a specific frame, or scan through the Timeline (scrubbing). The current frame is the frame on which the played is positioned. Introduction / Page 1-3
- 4. Macromedia Flash Module Frame rate is the number of frames that will play each second when your movie is viewed. Elapsed time is the amount of time it will take your movie to play from the first frame to the currently selected frame. You select a frame by clicking it. The Toolbox The Flash toolbox contains tools for drawing shapes, adding text, modifying objects, and controlling color. The Options section displays any additional options for modifying the selected tool. When you select a tool, the Property inspector changes to present the settings associated with that tool. For example, if you select the Text tool, the Property inspector displays text properties, making it easy to select the text attributes you want. Selection Subselection Line Lasso Pen Text Oval Rectangle Pencil Brush Free Transform Fill Transform Ink Bottle Paint Bucket Eyedropper Eraser Hand Zoom Introduction / Page 1-4
- 5. Macromedia Flash Module Stroke Color Fill Color Use the Selection tool to select entire objects by clicking or by dragging and enclosing the object within a rectangular selection marquee. To select connected lines or both the fill and stroke of a drawn shape, double-click with the Selection tool. Use the Text tool to add, select, and edit text. To draw basic geometric shapes, use the Line, Oval, and Rectangle tools. Use the Pencil tool to draw free-form lines and shapes as if drawing with a real pencil. Use the Pen tool to draw precise paths as straight or curved lines. Use the Brush tool to create brush-like strokes as if painting with a brush. The Free Transform tool is used to transform graphic objects, as well as groups, text blocks, and instances of symbols. Depending on the type of element you select, you can freely transform, rotate, skew, scale, or distort the element. The Paint Bucket tool fills enclosed areas with color. It can fill empty areas and change the color of already painted areas. Understanding Text, Shapes, and Symbols There are three main types of objects you can add to your Macromedia Flash movies. These are text, shapes, and symbols. Introduction / Page 1-5
- 6. Macromedia Flash Module Use the Text tool to add text. Adding text is easy when you use the Text tool. First drag to create a text box and type your text. Use the Property inspector to apply text attributes such as font, size and color. You can apply text attributes before or after typing your text. Create shapes by using the drawing tools in the toolbox. Symbols are reusable graphic objects stored in the library for the current project. Once a symbol is stored in the library, you can place copies, or instances, of the symbol in your movie. Once you add an instance of a symbol to your movie, you can change its properties, such as size or tint. You can add any number of instances of a symbol to your movie without increasing the file size of the movie. If you edit the original symbol in the library, every instance is updated automatically. Basic Stage Setting 1. Run/open Macromedia Flash MX 2004 software by clicking Start > Program > Macromedia > Macromedia Flash MX 2. Macromedia Flash MX 2004 window (figure 1) will appear. Figure 1 3. Click Flash Document under Create New 4. Interface like Figure 2 will appear. Under Properties panel, you can set the size, frame rate, background color, and other properties of a new or existing document. Introduction / Page 1-6
- 7. Macromedia Flash Module size tab Figure 2 5. Click size tab to change stage size/dimensions, background color and frame rate (Figure 3). Figure 3 6. Click OK button to start your Flash project. Introduction / Page 1-7