Arduino Detects Underground Cable Faults in Meters
•Transferir como DOCX, PDF•
5 gostaram•1,815 visualizações

Arduino based underground cable fault detection

Recomendados
Recomendados
Mais conteúdo relacionado
Mais procurados
Mais procurados (20)
Semelhante a Arduino Detects Underground Cable Faults in Meters
Semelhante a Arduino Detects Underground Cable Faults in Meters (20)
Último
Último (20)
Arduino Detects Underground Cable Faults in Meters
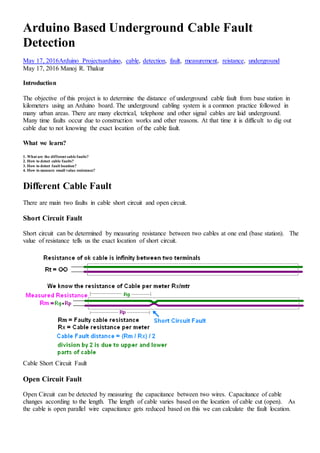
- 1. Arduino Based Underground Cable Fault Detection May 17, 2016Arduino Projectsarduino, cable, detection, fault, measurement, reistance, underground May 17, 2016 Manoj R. Thakur Introduction The objective of this project is to determine the distance of underground cable fault from base station in kilometers using an Arduino board. The underground cabling system is a common practice followed in many urban areas. There are many electrical, telephone and other signal cables are laid underground. Many time faults occur due to construction works and other reasons. At that time it is difficult to dig out cable due to not knowing the exact location of the cable fault. What we learn? 1. What are the different cable faults? 2. How to detect cable faults? 3. How to detect fault location? 4. How to measure small value resistance? Different Cable Fault There are main two faults in cable short circuit and open circuit. Short Circuit Fault Short circuit can be determined by measuring resistance between two cables at one end (base station). The value of resistance tells us the exact location of short circuit. Cable Short Circuit Fault Open Circuit Fault Open Circuit can be detected by measuring the capacitance between two wires. Capacitance of cable changes according to the length. The length of cable varies based on the location of cable cut (open). As the cable is open parallel wire capacitance gets reduced based on this we can calculate the fault location.
- 2. Cable Open Circuit Fault The proposed system is to find the exact location of the fault. The project uses the standard concept of Ohms law i.e., when a low DC voltage is applied at the feeder end through a Cable lines, then current would vary depending upon the location of fault in the cable. In case there is a short circuit (Line to Ground), the voltage across series resistors changes accordingly, which is then fed to inbuilt ADC of Arduino board to develop precise digital data for display in kilometers. The project is assembled with a set of resistors representing cable length in KM’s and fault creation is made by a set of switches at every known KM to cross check the accuracy of the same. The fault occurring at a particular distance and the respective phase is displayed on a LCD interfaced to the Arduino board. Further this project enhanced by measuring capacitance of cable which can even locate the open circuited cable. Arduino based underground cable fault detection circuit The circuit is consists of 4 line display, arduino and resistance measurement circuit. Main component of the underground cable fault detection circuit is low value resistance measurement. It is constructed using a constant current source of 100mAmps. It can measure very low value resistance as the cables have around 0.01 Ohm/meter resistance. For 10meter cable resistance becomes 0.1 Ohm. This circuit can measure resistance up 50 Ohm, Maximum cable length it can check up to 25000 meters.
- 3. Underground Cable Fault Detection Circuit Arduino Code for Underground Cable Fault Detection /* circuits4you.com Arduino Based Underground C */ 1 2 3 4 5 6 7 8 9 10 11 /* circuits4you.com Arduino Based Underground Cable Fault Detection */ // include the library code: #include <LiquidCrystal.h> // initialize the library with the numbers of the interface pins LiquidCrystal lcd(7, 6, 5, 4, 3, 2);
- 4. 12 13 14 15 16 17 18 19 20 21 22 23 24 25 26 27 28 29 30 31 32 33 34 35 const double Rc = 0.01; //Cable Resistance per meter its 0.01 Ohm/Mtr void setup() { // set up the LCD's number of columns and rows: lcd.begin(16, 4); // Print a message to the LCD. lcd.print(" Cable Fault "); } void loop() { double Vx=(5.0/1024.0) * analogRead(A0); //Voltage across Rx double Rx = Vx / (1.25/12); //Cable Resistace (1.25/R2)=I Constant Current Source //Display Cable Resistance lcd.setCursor(0, 1); // set the cursor to column 0, line 2 lcd.print("Res:"); lcd.print(Rx); lcd.print(" Ohm"); //Display Fault Location lcd.setCursor(0, 2); // set the cursor to column 0, line 3 lcd.print("Dist:"); lcd.print((Rx/Rc)/2); //Find Location of Fault lcd.print(" Mtr"); } Testing and Results Circuit can be tested with different resistor values to simulate various fault conditions. It displays exact location of short circuit. Similarly you can find the open circuit in a cable using capacitance measurement technique.