Pex Installation
•Transferir como DOC, PDF•
0 gostou•216 visualizações

Whether for potable water, radiant heating systems, or industrial use, installing GTPEX® is always fast and easy.Here is our unique GTPEX® 4-Step Installation Guide.To learn more, visit us at http://www.gtglobeindustries.com/

Recomendados
Mais conteúdo relacionado
Destaque
Destaque (17)
Último
Último (20)
Pex Installation
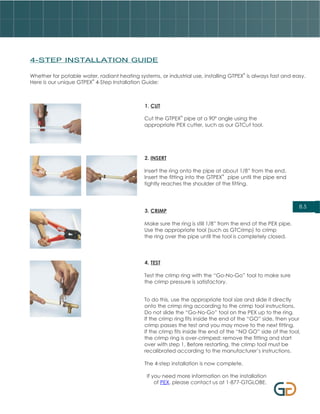
- 1. 4-STEP INSTALLATION GUIDE ® Whether for potable water, radiant heating systems, or industrial use, installing GTPEX is always fast and easy. ® Here is our unique GTPEX 4-Step Installation Guide: 1. CUT ® Cut the GTPEX pipe at a 90º angle using the appropriate PEX cutter, such as our GTCut tool. 2. INSERT Insert the ring onto the pipe at about 1/8” from the end. ® Insert the fitting into the GTPEX pipe until the pipe end tightly reaches the shoulder of the fitting. 8.5 3. CRIMP Make sure the ring is still 1/8” from the end of the PEX pipe. Use the appropriate tool (such as GTCrimp) to crimp the ring over the pipe until the tool is completely closed. 4. TEST Test the crimp ring with the “Go-No-Go” tool to make sure the crimp pressure is satisfactory. To do this, use the appropriate tool size and slide it directly onto the crimp ring according to the crimp tool instructions. Do not slide the “Go-No-Go” tool on the PEX up to the ring. If the crimp ring fits inside the end of the “GO” side, then your crimp passes the test and you may move to the next fitting. If the crimp fits inside the end of the “NO GO” side of the tool, the crimp ring is over-crimped; remove the fitting and start over with step 1. Before restarting, the crimp tool must be recalibrated according to the manufacturer’s instructions. The 4-step installation is now complete. If you need more information on the installation of PEX, please contact us at 1-877-GTGLOBE.
- 2. E251007-US ,