DIY Papermaking How-to Steps
•
4 gostaram•5,206 visualizações

Overview of steps for DIY Papermaking in your creative space by Art Therapist Registered Board Certified Gretchen Miller, MA, ATR-BC

Recomendados
Mais conteúdo relacionado
Semelhante a DIY Papermaking How-to Steps
Semelhante a DIY Papermaking How-to Steps (20)
Mais de Gretchen Miller, MA, ATR-BC, ACTP
Mais de Gretchen Miller, MA, ATR-BC, ACTP (8)
Último
Último (15)
DIY Papermaking How-to Steps
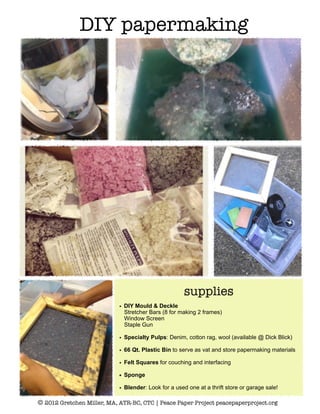
- 1. DIY papermaking supplies • DIY Mould & Deckle Stretcher Bars (8 for making 2 frames) Window Screen Staple Gun • Specialty Pulps: Denim, cotton rag, wool (available @ Dick Blick) • 66 Qt. Plastic Bin to serve as vat and store papermaking materials • Felt Squares for couching and interfacing • Sponge • Blender: Look for a used one at a thrift store or garage sale! © 2012 Gretchen Miller, MA, ATR-BC, CTC | Peace Paper Project peacepaperproject.org
- 2. Creating your DIY Mould & Deckle • You can use Fredrix wooden stretchers bars (8) to create two frames or even 2 wooden picture frames for your mould (bottom) and deckle (top). Make sure the size of your frame has enough room in your plastic bin (vat) for the activity needed to pull a sheet of paper. Glue the frame corners together to help keep both frames from coming apart. • Cut some window screening a little bigger than the size of the mould. Use a staple gun to attach the screening along all sides of the frame, making sure it is tight as possible (similar to stretching a canvas). Making Pulp | From Papermaking 101 @ http://makeprojects.com: • The paper used for pulping will influence the consistency, color, and feel of your handmade paper. Basic copy type paper creates a smoother, more consistent sheet, while magazine pages and glossy papers will tend to blend more irregularly, creating a more “artistic” look. Experiment with mixing different papers together. Please note: the blender’s blades cannot handle pulping cloth, ribbon, or fabric. • Cut or tear your paper into approximately 1" square pieces, and place them in the blender with enough water to cover them completely. Blend the paper scraps and water until all large chunks are pulverized (about 30 seconds to 1 minute). The longer you blend, the smoother and more regular your pulp (and paper) will be. Pulping can dull your blender’s blades quickly, so it’s a good idea to have a blender dedicated to papermaking. Adding a slight handful of speciality pulp (available from Dick Blick) will help make your paper stronger. • If desired, you can also add a variety of materials while blending (and in the vat), including leaves, flowers, plant fibers, glitter, confetti, seeds, and more. Then.... • Pour blender full of pulp into the vat already filled with 1/3 water. Remember to “charge the vat” (mixing it with your hand) between pulling each sheet to mix up the pulp. Pulling Paper • The mould and deckle are dipped and submerged into the vat of pulp and pulled up through the water. When bringing the mould & deckle up from the water, gently shake from side to side, as well as to and away from the papermaker to help drain any excess water. Remove the deckle (top) from the wet paper. Couching • Carefully transfer the wet paper sheet onto a piece of felt and continue pulling another sheet until the amount of pulp to create a thick enough sheet is gone. You can use a sponge to absorb excess water from the back of the mould before lifting and releasing the paper. For each sheet of newly made wet paper, put a piece of felt in between and keep stacking. Drying • Pressing your stacked, interfaced paper to drain any extra water out can be helpful. For the DIY papermaker, this can be done with putting a hard surface on top of the stack and applying pressure or even standing on it! Wet paper can dry/be hung directly on the felt, or carefully removed from the felt to stick/dry on a window or piece of wood. How fast your paper dries depends on how wet your paper still is and temperature factors such as humidity. When your paper is dry, carefully peel it off the felt, glass, or wood. © 2012 Gretchen Miller, MA, ATR-BC, CTC | Peace Paper Project peacepaperproject.org