SlideShare uma empresa Scribd logo
1 de 86
12:46:48 Saturday, July 21, 2012
Page 1 BRD
Back BoardBack Board
LPTLPT
Com ProtCom Prot
Serial ProtSerial Prot
Print ProtPrint Prot
VGAVGA
Game ProtGame Prot
USBUSB
PS2PS2
Line InLine In
Line OutLine Out
MicaMica
Key BoardKey Board
MouseMouse
PCIPCI
AGPAGP
CMOSCMOS
Front BoardFront Board
On BoardOn Board
Hard Disk IDEHard Disk IDE
Floppy IDEFloppy IDE
SMPSSMPS
ProcesserProcesser
Storage DevicesStorage Devices
Primary SDPrimary SD
Secondary SDSecondary SD
RAMRAM
ROMROM
Chip SetChip Set
HDDHDD
CDCD
DVDDVD
BRDBRD
Chip SetChip SetCPUCPU
Extra Case FanExtra Case Fan
Zip DriveZip Drive
Floppy DriveFloppy Drive
Power CardPower Card
Power SupplyPower Supply
FanFan
Heat SinkHeat Sink
Video CardVideo Card
ModemModem
Sound CardSound Card
Ribbon CableRibbon Cable
Mother BoardMother Board
CD-Rom or
DVD Drive
CD-Rom or
DVD Drive
HDDHDD
MonitorMonitor
ModemModem
System
Unit
System
Unit
MouserMouser
SpeakerSpeaker
PrinterPrinter
Keyboar
d
Keyboar
d
ComputerComputer North BridgeNorth Bridge
South BridgeSouth Bridge
Audio PortAudio Port
12:46:48 Saturday, July 21, 2012
The term computer is used to describe a device made up of electronic and electro mechanical computers.
The computer itself cannot perform any task and is referred to as hardware.
A computer system consists of three elements
I. Hardware.
II. Software
III. User
I. Hardware
The physical components which you can see, touch and feel in the computer system are called
"Hardware". Example monitor, keyboard, mouse etc...
II. Software
Software is used to describe the instruction that tells the computer how to perform a task. Software is
categorized
1) System Software {Example. Operating System, Compliers, Editors etc...}
2) Application Software {Example. MS-Word, Excel, Accounting Packages etc...}
III. User
Users who use operate the computer and also create computer software instructions...
MS-Word
MS-Excel
Accounting Packages
Operating System
Compliers
Editors
System Software Application Software
Keyboard
Monitor
Mouse
UsreHardware Software
Computer
Page 2
12:46:48 Saturday, July 21, 2012
Main Parts of computer
1. Monitor
A monitor or display is electronic visual display for computer. The
monitor comprises the display device, circuitry, and an enclosure. The
display device in modem monitors is typically a thin film transistor liquid
crystal display (TFT-CD) thin pane, while older monitors use a cathode
ray tube (CRT) about as deep as the screen size.
2. Modem
A modem modulates outgoing digital signals from a computer or other digital
device to analog signals for a conventional copper twisted pair telephone line and
demodulates the incoming analog signal and converts it to a digital signal for the
digital device
Page 3
12:46:48 Saturday, July 21, 2012
3. System Unit
Central Processing Unit
The CPU is the central electronic chip that determines the
processing power of the computer.
Power Supply
A power supply changes normal household electricity into electricity that a
computer can use.
Fan
A computer fan is any fan inside, or attached to, a computer
case used for active cooling, and may refer to fans that draw cooler air into the
case from the outside, expel warm air from inside, or move air across a heat
sink to cool a particular component.
Page 4
12:46:48 Saturday, July 21, 2012
Heat sink
A heat sink is a device that is attached to a microprocessor chip to keep it from
overheating by absorbing its heat and dissipating it into the air
Video card
The video card is an expansion card that allows the computer to send
graphical information to a video display device such as monitor or projector.
Modem
A modem is essentially a phone that is in your computer that allows you to connect
to a network like an internet service provider over the phone line.
Sound card
A sound card (also known as an audio card) is an
internal computer expansion card that facilitates the input and output
of audio signals to and from a computer under control of computer
programs
Ribbon cable
A "Ribbon cable" (also known as multi-wire planar cable) is a cable with
many conducting wires running parallel to each other on the same flat plane. As a
result the cable is wide and flat. Its name comes from the resemblance of the cable
to a piece of ribbon.
Motherboard
Page 5
12:46:48 Saturday, July 21, 2012
The motherboard is the main circuit board of a microcomputer. It is also
known as the main board or system board.
CD-Room or DVD drive
DVD-ROM stands for read-only memory and refers to a drive that can read DVD
discs. The advent of DVD-ROM drives has made it easier for computer users to access
large amounts of data as well as providing a medium for watching video.
A CD-ROM is a pre-pressed compact disc that contains data accessible to, but not
writable by, a computer for data storage and music playback. The 1985 “Yellow
Book” standard developed by Sony and Philips adapted the format to hold any form
of binary data
Hard Drive
A hard disk is part of a unit, often called a "disk drive," "hard drive," or "hard disk
drive," those stores and provides relatively quick access to large amounts of data on
an electromagnetically charged surface or set of surfaces.
Power card
The system unit was hotter than usual so I thought that the PSU encountered some
overheating.
Floppy drive
The floppy drive reads data from, and writes data to, a small disk. The most
common type of floppy drive is the 3.5" drive, followed by the 5.25" drive, among other
sizes
Page 6
12:46:48 Saturday, July 21, 2012
Zip drive
A Zip drive is a small, portable disk drive used primarily for backing up and
archiving personal computer files
Extra case fan
You have searched for "Extra Case Fans" . You might be interested in the
following threads:
• Extra Case Fans for Antic Two Hundred Case
• Help with Cooling in HAF 912 case
• First time buying gaming comp. $4000 system off of Cyber power
• New System
• Will these 2 fans be enough to cool my sly system?
4. Mouse
A mouse is a pointing device that functions by detecting two-
dimensional motion relative to its supporting surface. Physically, a mouse
consists of an object held under one of the user's hands, with one or more
buttons.
5. Speaker
Computer speakers, or multimedia speakers, are speakers external to a
computer that disable the lower fidelity built-in speaker.
6. Printer
In computing, a printer is a peripheral which produces a text or graphics of
documents stored in electronic form, usually on physical print media such as
paper or transparencies.
Page 7
12:46:48 Saturday, July 21, 2012
7. Keyboard
In computing, a keyboard is a typewriter-style
keyboard, which uses an arrangement of buttons or keys, to
act as mechanical levers or electronic switches
Motherboard
Page 8
12:46:48 Saturday, July 21, 2012
The motherboard serves to connect all of the parts of a computer together. The CPU, memory, hard
drives, optical drives, video card, sound and other ports and expansion cards all connect to the motherboard
directly or via cables.
1. Chipset
A chipset is a collection of chips or circuits that perform interface and peripheral functions for the
processor. There are two types of bridges
1. Northbridge.
2. Southbridge.
1. Northbridge
Northbridge is control high speed devices. i.e., Processer, RAM, AGP {Accelerated Graphics Port} and
etc... It is also called as Graphics Memory Controller Hub {GMCH}. It is controller that interconnects the CPU
to memory via the Front Side Bus {FSB}. The Northbridge may include a display controller, obviating the need
for a separate display adapter.
2. Southbridge
Page 9
12:46:48 Saturday, July 21, 2012
Southbridge controls low speed device. i.e., USB Bus, CD, Floppy and etc... Earlier chipsets supported
the ISA bus in the Southbridge.
2. Switch Mode Power Supply {SWPS}
A switched -Mode Power Supply {Switching-mode power supply, SMPS or Switcher} is an electronic
power supply that incorporates a switching regulator to convert electrical power efficiently.
AT {Advance Technology}:
The older supply used by AT systems has two 6-pin connectors (labeled P8 & P9) that connect to the
system board. It is possible to connect P8 & P9 round the wrong way — if this happens then the system board
will fry!
ATX {Advance Technology Extinction}:
ATX style PSUs use a single 20-pin adaptor, but may also sport auxiliary connectors for system boards
requiring higher currents. The main connector carries 12V, 5V and 3.3V supplies.
Page 10
12:46:48 Saturday, July 21, 2012
BTX {Balanced Technology Extended}:
BTX was intended to replace the ATX form factor. It offers better airflow but has been largely shunned
by manufacturers. Technically, a 20-pin ATX connector can be plugged straight into a 24-pin motherboard
socket, leaving pins 11, 12, 23, and 24 unconnected
Micro BTX:
3. Processor
A processor is the logic circuitry that responds to and processes the basic instructions that drive a
computer. The term processor has generally replaced the term central processing unit {CPU}. The processor in
a personal computer or embedded in small devices is often called a microprocessor. It is made with same
conductors {transistors, Flap Flops, Registers}.
Page 11
12:46:48 Saturday, July 21, 2012
Processors are two types. There is
1. Slate Processer
2. Socket Processer.
How processor works
Speed of Processor
Process with Speed
4004 4 Bit 108 KHz
Pentene/ P-Pro 32 Bit 33 – 133 MHz
P-2 Coleen/ Xeon 32 Bit 133 – 450 MHz
P -3 Coleen/ Xeon 32 Bit 450 MHz – 1.3 GHz
P -4 Coleen/ Xeon 32 Bit 1.3 – 3.8 GHz
P- 4 Extinction 64 Bit 1.3 – 4.2 GHZ
Cache Memory
Cache is a integrated temporary buffer. Its stores frequently and recently used instructions. It is also
working along with speed of the processer.
Proce
ssor
CPU
RAM
Interim Bus Adders P6 Data Bus Power
Data I/O (or) Front Side Bus (FSB)
Page 12
12:46:48 Saturday, July 21, 2012
L1 cache 8KB – 512 KB
L2 cache 64KB – 2 MB
L3 cache 512KB – 4 MB
4. Storage Devices
Storage device is a hardware device capable of storing information. There are two storage devices used in
computer; a primary storage device such as computer RAM, ROM and secondary storage device such as a
computer hard drive.
Primary Storage
Internal Memory, Main Memory and primary Memory is a storage location that holds memory for short
periods of time while the computer running. Primary storage memories are RAM, ROM Cache and etc…
1. Random Access Memory (RAM)
RAM is a form of computer data storage it takes the form of integrated circuits that allows stored data to be
accessed in an order with a worst case performance of constant time. The first RAM modules to come into the
market were created in 1951 and were sold until the late 1960s and early 1970s. RAM’s are mainly classified
into two types. One is static RAM and another one is Dynamic RAM.
Static RAM
It is used multiple transistors, typically four to six, for each memory cell but doesn’t have a capacitor in
each cell. It is used primarily for cache.
Storage Devices
Primary Storage Devices Secondary Storage Devices
RAM
Static RAM (S-RAM) Dynamic RAM (D-RAM)
Page 13
12:46:48 Saturday, July 21, 2012
Dynamic RAM
D-RAM has memory cells with a paired transistor and capacitor requiring constant refreshing.
Extended Data Output RAM (EDO RAM)
EDO RAM is a type of RAM chip that improves the time to read from memory on faster microprocessors such
as the Intel Pentium.
D-RAM
EDO RAM SD RAM DDR RAM DDR2 RAM RD RAM
EDO RAM
8 Bit RAM 32 Bit RAM
Page 14
12:46:48 Saturday, July 21, 2012
With - 8 Bit with - 32 Bit
Speed - 8 MHz Speed - 32 MHz
Capability - 8 MB Capabilities - 32 MB
Synchronous Dynamic RAM (SD RAM)
SD RAM is generic name for various kinds of dynamic random access memory (D RAM) that are
synchronized with the clock speed that the microprocessor is optimized for.
With - 64 Bit
Speed - 33 – 133 MHz
Capability - 32 – 512 MB
Pines - Front – 1 to 84
Back – 85 to 168
Double Data Rate RAM (DDR RAM)
DDR RAM is a type of very fast computer memory. DDR RAM is based on the same architecture as SD
RAM, but utilizes the clock signal differently to transfer twice the data in the same amount of time.
With - 64 Bit
Speed - 233 – 433 MHz
Capability - 128 MB – 1 GB
Pines - Front – 1 to 93
Back – 92 to 184
Page 15
12:46:48 Saturday, July 21, 2012
Double Data Rate 2 RAMS (DDR2 RAM)
DDR2 allows higher bus speed and requires lower power by running the internal clock at half the speed
of the data bus.
With - 64 Bit
Speed - 533 – 833 MHz
Capability - 256 MB – 2 GB
Pines - Front – 1 to 121
Back – 120 to 240
Ram bus Dynamic RAM (RD RAM / DDR3 RAM)
RD RAM is a memory sub-system that promises to transfer up to 1.6 Billion bytes per second.
With - 64 Bit
Speed - 233 – 433 MHz
Capability - 128 – 1 GB
Pines - Front – 1 to 93
Back – 92 to 184
2. Read Only Memory (ROM)
Page 16
12:46:48 Saturday, July 21, 2012
ROM is a class of storage medium used in computer and other electronic devices. Data stored in ROM
cannot be modified or can be modified only slowly or with difficulty, so it is mainly used to distribute
firmware.
Programmable ROM
P ROM or Field programmable read-only memory (FP ROM) or One-time programmable Non-volatile
memory (OTP NVM) is a form of digital memory where the setting of each bit is a locked b a fuse or antiques.
 Never update the program.
Erasable Programmable ROM
It is a type of memory chip that retains its data when its power. Supply is switched off. In other words, it
is non-volatile.
 Only once update the program
Electrically Erasable Programmable ROM
It is type of non-volatile memory used in computers and other electronic devices to store small amount
of data that must be saved when power is removed.
ROM
P ROM EP ROM EEP ROM
P ROMP ROM
GlassGlass
DICDIC
Page 17
12:46:48 Saturday, July 21, 2012
 Update many time the program.
Secondary Storage
Hard Disk Drive (HDD)
In a personal computer, a HDD is the mechanism that controls the positioning, reading, and writing of
the hard disk, which furnishes the largest amount of data storage for the PC. Although the hard disk drive (often
shortened to "hard drive") and the hard disk are not the same thing, they are packaged as a unit and so either
term is sometimes used to refer to the whole unit.
Secondary Storage Device
Magnetic Storage Device Optical Storage Device
Floppy, Magnetic Tape, Power
Tape, HDD and etc…
CD, DVD, BRD and etc…
Page 18
12:46:48 Saturday, July 21, 2012
Advanced Technology Attachment (ATA)
ATA is the official name that American National Standards Institute group X3T10 uses for what the
computer industry calls Integrated Drive Electronics (IDE).
Parallel ATA
PATA, also known as Parallel is a type of internal computer port that attaches to hard drives and other
devices. PATA has been replaced by the faster, sleeker port technology known as Serial ATA, or SATA.
Virtually all devices are now made to conform to the SATA standard.
Speed: 33- 133 MHz
Data Transforming Rate: 150 MBps
RPM: 3400 – 7200
Pines: 40 P
Serial ATA
Serial ATA is a new standard for connecting hard drives into computer systems. As its name implies,
SATA is based on serial signaling technology, unlike current IDE (Integrated Drive Electronics) hard drives
that use parallel signaling.
HDD
ATA SCSI
ATA
P ATA S ATA
Page 19
12:46:48 Saturday, July 21, 2012
SATA has several practical advantages over the parallel signaling (also called Parallel ATA or PATA)
that has been used in hard drives since the 1980s. SATA cables are more flexible, thinner, and less massive than
the ribbon cables required for conventional PATA hard drives. SATA cables can be considerably longer than
PATA ribbon cables, allowing the designer more latitude in the physical layout of a system. Because there are
fewer conductors (only 7 in SATA as compared with 40 in PATA), crosstalk and electromagnetic interference
(EMI) are less likely to be troublesome. The signal voltage is much lower as well (250 mV for SATA as
compared with 5 V for PATA).
Speed: 233- 2500 MHz
Data Transforming Rate: 480 MBps
RPM: 7600 – 10000
Pines: 7 P
Advantages of SATA over PATA
There are two types of hard drive connections that a computer could have: Parallel ATA (PATA) and Serial
ATA (SATA). SATA is most commonly used in nearly all computers today, due to below mentioned
advantages.
Advantages
Increased data transfer rate
The primary reason SATA is used over PATA is because of the increased data transfer speeds with that
SATA. PATA is capable of data transfers speeds of 66/100/133 MBs/second, whereas SATA is capable
of 150/300/600 MBs/second. The speed differences are due to the various flavors of PATA and SATA,
with the fastest speeds being the latest version of each currently available. You'll notice that SATA's
slowest speed is still faster than PATA's fastest speed. The improved speed of SATA allows for
programs to load faster, as well as pictures and larger documents. For video game enthusiasts, faster data
transfer speeds can mean better gaming experiences (i.e. smoother game-play).
Easy cable management and cable length
Another advantage of SATA over PATA is the length of the cable connecting the hard drive to the
computer motherboard. The max length of a PATA cable is 18-inches, whereas a SATA cable can be up
to 3.3 feet (1 meter) in length. This allows for more flexibility on where a hard drive can be mounted in a
computer case.
Page 20
12:46:48 Saturday, July 21, 2012
Increased airflow
SATA cables are also smaller in size than a PATA cable, allowing for increased airflow inside the
computer case and decreased heat buildup. This can help improve the overall life of a computer.
Support for more drives
There are typically four to six SATA connections on a computer motherboard, allowing for multiple
SATA hard drives to be hooked up. There are usually only two PATA connections on a computer
motherboard that supports a total of four PATA hard drives.
Disadvantages
Drivers and support
There are only a few small disadvantages of SATA over PATA. One disadvantage is that SATA hard
drives will sometimes require a specific driver to be loaded to a computer when installing an operating
system, in order for the computer to utilize the SATA hard drive. This has more recently been rectified
by allowing a SATA hard drive to act like a PATA hard drive, thus eliminating the need for the specific
driver to be loaded. However, some SATA functionality will be lost in order to gain this mimic
functionality.
Older operating systems such as Windows 95 and 98 that were released long before SATA was
introduced will also not support SATA drives.
One drive per cable
Another disadvantage with SATA is that the cable allows for only one SATA hard drive to be connected
at a time. Whereas a PATA cable allows for hooking up two PATA hard drives per cable
SCSI
SCSI (pronounced SKUH-zee and sometimes colloquially known as "skuzzy"), the Small Computer
System Interface, is a set of ANSI standard electronic interfaces that allow personal computers to communicate
with peripheral hardware such as disk drives, tape drives, CD-ROM drives, printers, and scanners faster and
more flexibly than previous interfaces. Developed at Apple Computer and still used in the Macintosh, the
present set of SCSIs are parallel interfaces. SCSI ports continue to be built into many personal computers today
and are supported by all major operating systems.
In addition to faster data rates, SCSI is more flexible than earlier parallel data transfer interfaces. The
latest SCSI standard, Ultra-2 SCSI for a 16-bit bus can transfer data at up to 80 megabytes per second
(MBps).SCSI allows up to 7 or 15 devices (depending on the bus width) to be connected to a single SCSI port
in daisy-chain fashion. This allows one circuit board or card to accommodate all the peripherals, rather than
having a separate card for each device, making it an ideal interface for use with portable and notebook
computers. A single host adapter, in the form of a PC Card, can serve as a SCSI interface for a laptop, freeing
up the parallel and serial ports for use with an external modem and printer while allowing other devices to be
used in addition.
Although not all devices support all levels of SCSI, the evolving SCSI standards are generally
backwards-compatible. That is, if you attach an older device to a newer computer with support for a later
standard, the older device will work at the older and slower data rate.
Page 21
12:46:48 Saturday, July 21, 2012
The original SCSI, now known as SCSI-1, evolved into SCSI-2, known as "plain SCSI." as it became
widely supported. SCSI-3 consists of a set of primary commands and additional specialized command sets to
meet the needs of specific device types. The collection of SCSI-3 command sets is used not only for the SCSI-3
parallel interface but for additional parallel and serial protocols, including Fiber Channel, Serial Bus Protocol
(used with the IEEE 1394Firewire physical protocol), and the Serial Storage Protocol (SSP).
A widely implemented SCSI standard is Ultra-2 (sometimes spelled "Ultra2") which uses a
40MHz clock rate to get maximum data transfer rates up to 80 MBps. It provides a longer possible cabling
distance (up to 12 meters) by using low voltage differential (LVD) signaling. Earlier forms of SCSIs use a
single wire that ends in a terminator with a ground. Ultra-2 SCSI sends the signal over two wires with the data
represented as the difference in voltage between the two wires. This allows support for longer cables. A low
voltage differential reduces power requirements and manufacturing costs.
The latest SCSI standard is Ultra-3 (sometimes spelled "Ultra3")which increases the maximum burst
rate from 80 Mbps to 160 Mbps by being able to operate at the full clock rate rather than the half-clock rate of
Ultra-2. The standard is also sometimes referred to as Ultra160/m. New disk drives supporting Ultra160/m will
offer much faster data transfer rates. Ultra160/m also includes cyclical redundancy checking (CRC) for ensuring
the integrity of transferred data and domain validation for testing the SCSI network.
Currently existing SCSI standards are summarized in the table below.
Technology
Name
Maximum Cable
Length (meters)
Maximum
Speed
(MBps)
Maximum
Number of
Devices
SCSI-1 6 5 8
SCSI-2 6 5-10 8 or 16
Fast SCSI-2 3 10-20 8
Wide SCSI-2 3 20 16
Fast Wide SCSI-2 3 20 16
Ultra SCSI-3, 8-bit 1.5 20 8
Ultra SCSI-3, 16-bit 1.5 40 16
Ultra-2 SCSI 12 40 8
Wide Ultra-2 SCSI 12 80 16
Ultra-3 (Ultra160/m) SCSI 12 160 16
Speed: 633 MHz
Page 22
12:46:48 Saturday, July 21, 2012
Data Transforming Rate: 600 MBps
RPM: 10000 - 15000
Pines: 50 P, 68 P and 80 P.
Compact Disc (Spelled Disk)
A CD is a small, portable, round medium made of molded polymer (close in size to the floppy disk) for
electronically recording, storing, and playing back audio, video, text, and other information in digital form.
Tape cartridges and CDs generally replaced the phonograph record for playing back music. At home, CDs have
tended to replace the tape cartridge although the latter is still widely used in cars and portable playback devices.
Initially, CDs were read-only, but newer technology allows users to record as well. CDs will probably
continue to be popular for music recording and playback. A newer technology, the digital versatile disc (DVD),
stores much more in the same space and is used for playing back movies.
Some variations of the CD include:
 CD-ROM
 CD-i
 CD-RW
 CD-ROM XA
 CD-W
 Photo CD
 Video CD
File System: CDFS (Compact Disc File System).
Source: Laser Light.
Capacity: Single Side Single Layer 700 MB
Single Side Double Layer 800 MB
Page 23
12:46:48 Saturday, July 21, 2012
DVD
DVD is an optical disc technology with a 4.7 gigabyte storage capacity on a single-sided, one-layered
disk, which is enough for a 133-minute movie. DVDs can be single- or double-sided, and can have two layers
on each side; a double-sided, two-layered DVD will hold up to 17 gigabytes of video, audio, or other
information. This compares to 650 megabytes (.65 gigabyte) of storage for a CD-ROM disk.
DVD uses the MPEG-2 file and compression standard. MPEG-2 images have four times the resolution
of MPEG-1 images and can be delivered at 60 interlaced fields per second where two fields constitute one
image frame. (MPEG-1 can deliver 30 no interlaced frames per second.) Audio quality on DVD is comparable
to that of current audio compact discs.
Formats:
 DVD-Video is the format designed for full-length movies that work with your television set.
 DVD-ROM is the type of drive and disc for use on computers. The DVD drive will usually also play
regular CD-ROM discs and DVD-Video disks.
 DVD-RAM is the writeable version.
 DVD-Audio is a CD-replacement format.
 There are a number of recordable DVD formats, including DVD-R for General, DVD-R for Authoring,
DVD-RAM, DVD-RW, DVD+RW, and DVD+R.
Page 24
12:46:48 Saturday, July 21, 2012
DVD was originally said to stand for digital video disc, and later for digital versatile disc. The current
official stance of the DVD Forum is that the format should just be referred to as DVD.
File System: UDFS (Universal Disk Format / File System).
Source: Red Laser Light.
Capacity: Single Side Single Layer 4.7 GB
Single Side Double Layer 8.5GB
Double Side Single Layer 9.4 GB
Double Side Double Layer 17.1 GB
Blue Ray Disk (BRD)
BD is an optical disc storage medium designed to supersede the DVD format. The plastic disc is 120 mm in
diameter and 1.2 mm thick, the same size as DVDs and CDs. Conventional (pre-BD-XL) Blue-ray Discs
contain 25 GB per layer, with dual layer discs (50 GB) being the industry standard for feature-length video
discs. Triple layer discs (100 GB) and quadruple layers (128 GB) are available for BD-XL re-writer drives.
File System: UDFS (Universal Disk Format / File System).
Source: Blue Laser Light.
Capacity: Single Side Single Layer 25 GB
Single Side Double Layer 54GB
Double Side Single Layer GB
Double Side Double Layer 200 GB
Page 25
12:46:48 Saturday, July 21, 2012
5. Back Panel
Line/ Local Printer Terminal (LPT):
LPT is the usual designation for a parallel port
connection to a printer or other device on a personal computer.
The data transfer rates were limited to 150KBPs in the forward
direction (Compatibility / Centronic Mode) and 50KBPs in the
reverse direction (Nibble and byte modes).
Page 26
12:46:48 Saturday, July 21, 2012
Comport:
Serial Port:
A serial port is a serial communication physical interface
through which information transfers in or out one bit at a time serial
port common bit rates include 1200, 2400, 4800, 9600, 14400, 19200,
38400, 57600 and 115200 bit/s.
Printer Port:
A parallel port is a type of interface found on
computer for connecting various peripherals.
Video Graphics Adopter (VGA):
Page 27
12:46:48 Saturday, July 21, 2012
VGA refer specifically to the display hardware first
introduced with the IBM PC/2 line of computers in 1987, but
through its wide spread adoption has also come to mean either an
analog computer display standard, the 15-pin D-Subminiature
VGA.
Game Port:
The game port is a device port found on IBM PC compatible
systems throughout the 1980s and 1990s. It was the traditional
connector for joystick input devices until superseded by USB in the
21st
century.
Universal Serial Bus (USB):
USB is an industry standard developed in the mid-1990s that
defines the cables, connectors and communications protocols used in a bus
for connection, a communication and power supply between computers
and electronic devices.
USB Type Speed Release Date
USB 1.0 1.5 Mbps January 1996
USB 1.1 12 Mbps September 1998
USB 2.0 480 Mbps April 2000
USB 3.0 5 Gbps November 2008
Page 28
12:46:48 Saturday, July 21, 2012
Personal System Connection 2 (PS2):
The PS2 is a 6-pin Mini-Din connector used
for connecting some keyboard and mouse. Mouse
colored is Green and Keyboard is Purple.
Audio Port:
Line-In: This port is where sound from an external source enters the
card, such as recording from a tape recorder. On many sound cards this
port is light blue.
Line-Out: Where sound is output; usually to head phones or stereo
speakers. On many cards this port is lime green
Mica: Microphone port, usually pink.
6. On Board
Integrated Drive Electronics (IDE):
IDE is a standard electronic interface used between a computer motherboard’s data paths or bus and the
computer’s disk storage devices.
IDE
Hard Disk IDE Floppy IDE
Page 29
12:46:48 Saturday, July 21, 2012
Hard Disk IDE:
Total  36 Pines.
Floppy IDE:
Total  33Pines
7. Front panel
A front panel was used on early electronic computers to display and allow the alteration of the state of
the machine's internal registers and memory. The front panel usually consisted of arrays of indicator
lamps, toggle switches, and push buttons mounted on a sheet metal face plate.
19 Pines19 Pines
20 Pines20 Pines
17 Pines17 Pines
16 Pines16 Pines
Page 30
12:46:48 Saturday, July 21, 2012
8. Peripheral Component Interconnect (PCI)
Conventional PCI (PCI is an initialize formed from Peripheral Component Interconnect, part of the PCI
Local Bus standard and often shortened to PCI) is a computer bus for attaching hardware devices in a computer.
The PCI bus supports the functions found on a processor, but in a standardized format that is independent of any
particular processor. Devices connected to the bus appear to the processor to be connected directly to the
processor bus, and are assigned addresses in the processor's address space.
Typical PCI cards used in PCs include: network cards, sound cards, modems, extra ports such
as USB or serial, TV tuner cards and disk controllers. PCI video cards replaced ISA and VESA cards, until
growing bandwidth requirements outgrew the capabilities of PCI; the preferred interface for video cards
became AGP, and then PCI Express. PCI video cards remain available for use with old PCs without AGP or
PCI Express slots.
9. Accelerated Graphics Port (AGP)
The AGP is a high-speed point-to-point channel for attaching a video card to a computer’s motherboard,
primarily to assist in the acceleration of 3D computer graphics. Originally it was designed as a successor to
PCI type connections. Since 2004 AGP has been progressively phased out in favor of PCI Express (PCIe). By
mid-2009 PCIe cards dominated the market; AGP cards and motherboards were still produced, but OEM driver
support was minimal. By 2010 few new motherboards had AGP slots. No new motherboard chipsets were
equipped with AGP support, but motherboards continued to be produced with older chipsets with support for
AGP.
Page 31
12:46:48 Saturday, July 21, 2012
10.Complementary Metal-Oxide Semiconductors (CMOS)
CMOS is a technology for constructing integrated circuits. CMOS technology is used
in microprocessors, microcontrollers, static RAM, and other digital logic circuits. CMOS technology is also
used for several analog circuits such as image sensors (CMOS sensor), data converters, and highly
integrated transceivers for many types of communication. Two important characteristics of CMOS devices are
high noise immunity and low static power consumption. Noise is a random fluctuation in an electrical signal, a
characteristic of all electronic circuits. Electric energy consumption is the form of energy consumption that
uses electric energy.
Page 32
12:46:48 Saturday, July 21, 2012
11.Jumper Pins
In a computer, a jumper is a pair of prongs that are electrical contact points set into the
computer motherboard or an adapter card . When you set a jumper, you place a plug on the prongs that
completes a contact. In effect, the jumper acts as a switch by closing (or opening) an electrical circuit. Jumpers
can be added or removed to change the function or performance of a PC component. A group of jumpers is
sometimes called a jumper block.
Jumper pins (points to be connected by the jumper) are arranged in groups called jumper blocks, each
group having at least one pair of contact points. An appropriately sized conductive sleeve called a jumper, or
more technically, a jumper shunt, is slipped over the pins to complete the circuit.
Partition
Partition a process of electronically on logically HDD space is sub divided into group slanders.
Dos Partition:
It was used only Windows Operating System Loading
Partition
Dos Partition Non-Dos Partition
Page 33
12:46:48 Saturday, July 21, 2012
Non-Dos Partition:
It was used only other Operating System Loading (Linux, UNIX, etc…).
Primary Non-Dos Partition:
It creates the C drive.
Extended Non-Dos Partition:
It creates the Logical drives like D,E,F, etc…
How to partition ur hard disk with CMD
Step 1: open CMD.
Step 2: type diskpart
Step 3: type list vol.
Step 4: sel vol in my case in foin to chose da volume that I want to partition.
Step 5: type sel vol it says vol 2 is knoe selected.
Step 6: type shrink desired-wat eva amount u wnt in my case in goin to do 12000 press enter wait for a
few seconds it says it’s done.
Knoe go to start left click on my computer click manage select disk management. It’s 11GB.
Non-Dos Partition
Primary Extended
Page 34
12:46:48 Saturday, July 21, 2012
Formation
Formatting is a process which creates traces and sectors or creates a file system. Formatting is two types
one is Low-level formatting and another one is High-level formatting. Low-level formatting is used only
manufactures. Manufactures was Creates the Takes, Segments, Sectors. High-level formatting is used only
Users. Users can create the File System.
File system is a sequential method of Reading and Writing files in the storage. There are many types of
file system are there. These are Windows File System, Dos File System, Etc…
Windows File System will be classified in to 4 types. These are FAT, NTFS, CDFS and UDFS.
File Allocation Table (FAT):
FAT 12  Floppy’s -- It support 16MB.
FAT 16  HDD -- It support 02GB
FAT 32  HDD -- It support 04TB
It is used up to windows XP version only.
New Technology File System (NTFS):
It is used Windows XP Service 2 onwards.
Compact Disk File System (CDFS):
It is used only CD.
User Defined File System (NTFS):
It is used in DVD and BRD.
Windows XP Formatting Process:
Before the install/reinstallation of Windows XP, I highly recommend that you download Service Pack 3
“for multiple computers” and burn it onto a CD. The download is approximately 316.4MB. If you choose not to
do this step, your system could become infected with a virus or worm exploiting the vulnerabilities that Service
Pack 3 fixes. I also recommend that you do NOT have your system connected to the Internet until after the
installation of Service Pack 3. This means that you cannot activate your XP installation during setup, but you
can accomplish that task following a reboot after Service Pack 3 is installed.
1) Shall we begin?
After configuring the system for booting from a CD, the Windows Setup screen appears.
At this point, Setup is loading the driver files it needs to continue with installation.
Page 35
12:46:48 Saturday, July 21, 2012
2) Welcome to Setup.
The “Welcome to Setup” screen appears with the option of Continuing Setup, Repair a previous installation, or
Quitting.
Press ENTER to Continue Setup.
You may also choose R to Repair or F3 to Quit and reboot the system.
3) Windows XP Licensing Agreement.
The “Windows XP Licensing Agreement” screen, otherwise known as “EULA,” displays the legal in’s and
out’s of this particular software package.
You may press F8 to signify that you agree with the terms, hit ESC if you do not agree and PAGE UP or PAGE
DOWN to scroll through each screen. Note: If you do not agree to the terms, setup will quit and reboot the
system.
4) Insert the previous version.
As this is an Upgrade, a previous qualifying product is required to be inserted in the CD drive to continue. Even
though Microsoft states that “Windows 95″ cannot be upgraded to XP Home, the CD is good enough for a clean
install.
At this point, the options include pressing ENTER to Continue or F3 to Quit and reboot the system.
Page 36
12:46:48 Saturday, July 21, 2012
5) Hard drive partition information.
Hard drive partition information is now displayed. This varies with each systems hardware configuration.
This example already has a partition defined. I will choose not to use this and create a new one by
pressing D. You may skip this and the next few steps if you do not have any partitions defined.
At this point, the options include pressing ENTER to install on the selected partition, D to Delete the selected
partition, or F3 to Quit and reboot the system.
6) Warning screen.
After pressing D to delete the selected partition, a warning screen appears explaining the pitfalls of deleting it.
This particular screen only appears when the partition selected to be deleted is formatted as a bootable system
partition. Other partitions will display the next screen.
I want this to happen, so I press ENTER to continue.
The options include pressing ENTER to continue, or ESC to Cancel.
7) Confirmation screen.
A confirmation screen that displays the logical drive, what file system the partition is currently using, the size in
MB and controller information
Options include L to delete the partition and ESC to cancel the action.
Page 37
12:46:48 Saturday, July 21, 2012
8) No partitions have been previously defined.
If no partitions have been previously defined, this screen will be displayed. You may section your hard drive in
as many partitions as you wish by selecting C to Create a Partition and then entering in a value less then the
total available. Here, I will create a Partition in the highlighted, unused portion.
Select the partition you wish to install to using the UP arrow and DOWN ARROW keys.
Press ENTER to use the highlighted partition and Install, C to Create a Partition, or F3 to Quit and reboot the
system.
9) Enter in the partition size.
Enter in the partition size in MB within the displayed minimum and maximum. I chose the default or maximum
available here.
You may choose ENTER to create the new partition or ESC to cancel the action.
10) Continue to create partitions.
Continue to create partitions until all space is used or the configuration meets your requirements.
Note: a small portion will be unavailable to partition. This is normal. In this example, it is 2 MB.
I chose drive C: or Partition1 to install the Operating System.
You may choose ENTER to install to the selected partition, D to Delete the highlighted Partition, or F3 to Quit
and reboot the system.
Page 38
12:46:48 Saturday, July 21, 2012
11) Format the partition.
Since this OS supports NTFS, format the partition with it. If you do not, many folder and file security features
will be unavailable. Note: If you are dual booting your system, a previous OS will not be able to read the local
information. This is a fact with Windows 9x and Me. If you have a requirement to view this partition from
another OS installed on the system, do not format it as NTFS. Also, the boot partition must be formatted with
FAT32 if you wish to dual boot. I have found no problems accessing a NTFS partition mapped as a network
drive from an older OS.
Select what format you wish to use by pressing the UP ARROW and DOWN ARROW keys.
Press ENTER to confirm your selection and Continue or ESC to Cancel.
12) Setup formats the partition.
Watch the progress bar as Setup formats the partition, or get up and get a soda. It may take awhile.
13) Creating File List.
Setup is now figuring out what files to copy over to the hard drive.
Page 39
12:46:48 Saturday, July 21, 2012
14) Setup copies various files.
After the partition are finished formatting, Setup copies various files to support booting from the hard drive and
continue on.
15) Creates various information files.
Setup then creates various information files required to continue on with setup.
16) Press ENTER to Restart.
The first reboot and the end of the blue background has arrived. If you are impatient, press ENTER to Restart
before the 15 seconds expire.
ENTER to Restart the Computer is the only option available.
17) Windows XP boot screen.
Page 40
12:46:48 Saturday, July 21, 2012
The new Windows XP boot screen is displayed.
18) Windows XP Installation.
If you have installed Windows before, this type of screen will look familiar.
Sit back. It may be awhile.
19) Faster and more reliable.
Every Windows OS that comes out has the same claim. Faster and better. It is subject to debate whether or not it
could get “any worse.”
20) Region and Input Languages.
A little while later, you will be prompted with options of configuring your Region and Input Languages. The
default was fine for me, so I selected Next.
Page 41
12:46:48 Saturday, July 21, 2012
Options include Customize button, Details Button, plus the standard Back and Next.
21) Enter in your Name.
Enter in your Name and optional Organization information, then select the Next button.
22) 25 digit Product Key.
Thought you could get away from it? Think again.
Enter your unique 25 digit Product Key that came with your CD, then select the Next button.
23) Enter a Computer name.
The “suggested” name for the computer is always really whacked out. Choose one that meets your needs.
Select Next to Continue.
Page 42
12:46:48 Saturday, July 21, 2012
24) Date, Time and Time Zone.
Configure the proper information for the Date, Time and Time Zone here.
25) Network Settings Dialog.
The Network Settings Dialog is next. Under usual circumstances, the Typical settings are fine.
Choose your method and select the Next button.
26) Display Settings Pop-up.
Windows XP no longer likes the “default” resolution of 640 x 480 and prompts you of that fact.
Select OK to continue.
Page 43
12:46:48 Saturday, July 21, 2012
27) Please wait.
800 x 600 is a wonderful thing, however, I chose to have it time out and return to 640 x 480 for this guide.
28) The Welcome Screen.
The “Welcome Screen” will now appear while Windows XP Home continues to load in the background.
29) Display Settings Pop-up.
Since the initial screen resolution is set to 640 x 480, a balloon dialog appears. You may click the pop-up
balloon to raise the resolution up to 800 x 600 automatically.
For the rest of this guide, I chose to ignore it.
Page 44
12:46:48 Saturday, July 21, 2012
30) Windows XP tour.
Click the balloon dialog to start a tour of Windows XP.
Even if you do not wish to see the information, you should click on the balloon to get rid of the annoyance in a
timely fashion.
31) Windows XP Tour dialog.
Windows XP Tour dialog popup is shown.
Select the Cancel button to never see it again.
32) Activate.
A little reminder also appears in the task bar about activating.
30 Days and the OS will no longer allow logon.
Page 45
12:46:48 Saturday, July 21, 2012
33) .NET Passport Wizard.
Double-Click the Messenger Icon in the bottom right (system tray) and the “.NET Passport Wizard” dialog
appears.
Select Cancel to not sign up for Passport at this time.
34) Windows Messenger.
With the .NET Passport Wizard gone, the Windows Messenger is opened.
35) Windows Messenger Tools
Select Tools, then Options
Page 46
12:46:48 Saturday, July 21, 2012
36) Messenger Preferences.
In the Options window, select the Preferences Tab.
Uncheck “Run this program when Windows starts” and “Allow this program to run in the background.”
Of course, if you wish to keep Windows Messenger, do not do this step.
37) Close Messenger.
Now you can select the Close button and Messenger will be unloaded from memory.
38) That is all!
That’s all there is to it! I hope this guide helped you out or gave you a sneak peek at what is to come. More
information
about Windows XP is located HERE!
Page 47
12:46:48 Saturday, July 21, 2012
Windows 7 Formatting Process:
Take note: Regardless of flavor of Windows 7 or if it is 32/64-bit that you will be installing, the steps
listed here are the same. The only difference would be which product key is entered to determine which flavor
of 7 is installed.
This guide assumes a “clean” installation and not an “upgrade” from a previous OS. Ensure that you
backup all of your important files (documents, music, etc) to CD/DVD/another hard drive before following
these steps.
If you are using Hard Disks in a ACPI or RAID setup, you will first need to download the latest Windows 7
compatible (32-bit or 64-bit) for your particular hardware before installing clean. Check with your chipset/hard
drive controllers manufactures web site for the latest drivers/information before starting.
This guide is for OEM (purchased separately from the computer) and retail versions of Windows 7.
Installation instructions specific to computers with “recovery partitions” or recovery DVD’s are very different.
Consult your manufactures instructions for details.
Selecting the image in the guide loads a larger version.
1) Shall we begin?
After configuring the system for booting from a DVD, the Windows Setup screen appears.
At this point, Setup is loading the driver files it needs to continue with installation.
Page 48
12:46:48 Saturday, July 21, 2012
2) Progress Bar.
The next screen is a more graphical progress bar indicating Windows 7 is still working in the background.
3) Option Selections.
The first options you will come across are selections for Language, Time and currency format, and Keyboard
layout.
Make your selections by using the pull down menus and press the Next button.
4) Install Now.
Here we have the option of repairing a previous installation or “Install Now.” Since this is a clean installation of
Windows 7 and not a repair, Install Now is the proper choice.
Highlight the “Install Now” button to continue to the next screen.
Page 49
12:46:48 Saturday, July 21, 2012
5) Please Wait.
Windows 7 is working in the background. This may take several minutes depending on the system.
6) License Agreement.
Here we see the License Agreement you must accept before continuing.
After reading the agreement, check the box next to “I accept the license terms” and select Next button.
7) Option Selections.
Here we would be able to choose an “Upgrade” install (if running setup from a previous version of Windows,
such as Vista) or a “Custom” (clean) install.
Select the whole box containing “Custom (advanced)” to continue to the next screen.
Page 50
12:46:48 Saturday, July 21, 2012
8) Hard Drives.
This is where you can select which hard drive/partition to install Windows 7 on. Since this system only has one
hard drive, only one place Windows 7 can go. Advanced options are shown in the next screen shot.
This is also where you would install drivers for your ACPI/RAID/SATA controller by using the “Load Driver”
option. After the installation of the ACPI/RAID/SATA drivers, your hard drives should appear as shown on the
right.
If no additional drivers are needed, select the Next button.
9) Advanced Options.
The advanced options allow creation of multiple partitions and the option of formatting existing partitions.
After finishing your particular partition configuration that you desire, select the Next button.
Page 51
12:46:48 Saturday, July 21, 2012
10) Installing.
Here is where Windows 7 installs major components of the OS. This process can take 10 to 60 minutes
depending on the system.
11) Reboot.
Here we see the system needing to reboot to continue installation tasks.
You can hit the Restart Now button or just allow the reboot to happen automatically after several seconds.
12) Setup Registry Entries.
Here we see progress as Windows 7 updates the registry settings. This process may take several minutes before
going to the next screen.
Page 52
12:46:48 Saturday, July 21, 2012
13) Starting Services.
Windows 7 starts up required services at this point in the setup process.
14) Installation Continues.
Windows 7 continues to install at this screen.
15) Another Reboot.
After initial setup is complete, another reboot is required with no user input.
Page 53
12:46:48 Saturday, July 21, 2012
16) Starting Windows.
This is the screen you will be greeted with upon each boot. Windows 7 is starting up
17) First Use.
Setup is now preparing the system for initial booting. Unlike the previous screen capture, you will not see this
on each boot.
18) Video Test.
Here is where Windows 7 tests the systems video performance to see if Aero will be enabled or not. This test
will only last a few minutes.
Page 54
12:46:48 Saturday, July 21, 2012
19) Account Creation.
Here is where the initial account creation happens. This user will have full administrator privileges and
automatically be logged in after setup is completed.
Enter in your user name and computer name as you would like it to be identified on the network and then select
the Next button.
20) User Password.
This screen prompts you to enter a password for the account that you just created. I highly recommend that you
password your account. Enter it twice, and then include a “password hint” to help remind you of what it is if
you misplace or forget it. You, of course, should not enter in your actual password in this field, but a subtle
reminder to jog your memory.
After this information is entered, select the Next button.
Page 55
12:46:48 Saturday, July 21, 2012
21) Product Key.
Windows 7 now asks you to enter the product key that was included with your purchase. This key determines
what features and which version will be installed on the system. 32 and 64-bit versions have the same product
key.
I highly recommend unchecking “Automatically activate Windows when I’m online”. The reason is that you
only have a finite amount of times that you may activate online. After this limit is reached, you will need to call
Microsoft directly to have them activate your installation. This can be a big hassle, especially when you are in a
hurry to get the computer back up and running. Windows 7 will nag you every so often to activate upon logging
in, but this is a minor nuisance compared to the phone call method of activating Windows 7. After verifying that
everything works as you intend, you can activate and know that you could have avoided problems later on if
you let Windows 7 do it right after logging in for the first time.
30 days is the intended grace period before requiring activation with retail versions, even with this method.
However, you can boost that number up to 116 days using the following method:
Open up a command prompt with administrator privileges
Type:
Slmgr -rearm
After a reboot, you will have an additional 30 days to ensure everything is running properly. You can perform
this action up to 3 times with the current Windows 7 retail release, bringing the required activation time to 116
days, if the Software License Manager is invoked at the end of the required activation period (on the 29th day).
I would recommend not waiting until the 30th day to run the command, thus 116 days total and not 120.
After this information is entered, select the Next button.
22) Use Recommended Settings.
This is where Automatic Updates and problems and reports solutions are offered as an option. I recommend to
most users to “Use Recommended Settings” here. These options can always be changed later.
Make your selection to continue to the next screen.
Page 56
12:46:48 Saturday, July 21, 2012
23) Time and Date.
Ensure that your time zone is entered correctly and make adjustments as necessary. Also ensure the proper time
is set. This information is extracted from the BIOS settings, so if the time was set correctly in a previous
installation of Windows (or most any other OS), it should still be correct here.
After this information is verified, select the Next button.
24) Network Profile.
Here, you can select the “general” security measures put in place for your particular network. Most people will
want to use “Home network” for desktop installations or “Public network” for a portable system, like a laptop.
Make your selection to continue to the next screen.
25) Network Connecting.
Page 57
12:46:48 Saturday, July 21, 2012
Windows 7 is now connecting to the network. This is where your initial IP address is acquired and internet
connectivity is verified.
26) Finalizing Settings.
Windows 7 is finally… finalizing settings. This should only take a few moments to complete.
27) Welcome.
Not much to say here. Just wait some more.
28) Desktop Setup.
Your initial desktop is setup here. This process will take a few moments, but only happen once.
Page 58
12:46:48 Saturday, July 21, 2012
29) The Desktop.
Windows 7 is now finished being installed and are greeted with the desktop. It is worth noting that you did not
need to log in this time, but after rebooting (or logging off), you will see the login screen and you must enter the
user name and password created earlier to return to this point.
Windows Vista Formatting Process:
This guide assumes a “clean” installation and not an “upgrade” from a previous OS. Ensure that you
backup all of your important files (documents, music, etc) to CD/DVD/another hard drive before following
these steps.
If you are using Hard Disks in a RAID or ACPI setup, you will first need to download the latest Vista
compatible (32-bit or 64-bit) for your particular hardware before installing clean. Check with your chipset/hard
drive controllers manufactures web site for the latest drivers/information before starting.
1) Shall we begin?
After configuring the system for booting from a CD/DVD, the Windows Setup screen appears.
At this point, Setup is loading the driver files it needs to continue with installation.
Page 59
12:46:48 Saturday, July 21, 2012
2) Progress Bar.
The next screen is a more graphical progress bar indicating Windows Vista is still working in the background.
3) Option Selections.
The first options you will come across are selections for Language, Time and currency format, and Keyboard
layout.
Make your selections by using the pull down menus and press the Next button.
4) Install Now.
Here we have the option of repairing a previous installation or “Install Now.”
Highlight the “Install Now” button to continue to the next screen.
Page 60
12:46:48 Saturday, July 21, 2012
5) Please Wait.
Windows Vista is working in the background. This may take several minutes depending on the system.
6) Product Key.
This screen is where you enter your product key or “CD Key” as it is sometimes called.
An option also exists to automatically activate Vista upon first coming online. I uncheck this box to ensure
everything is running smoothly before activating and having issues later on. 30 days is the standard amount of
time before activation is required, though some products (such as MSDN subscriptions) have 60 days or more.
After entering your product key, press the Next button.
7) License Agreement.
Here we see the License Agreement you must accept before continuing.
After reading the agreement, check the box next to “I accept the license terms”.
Page 61
12:46:48 Saturday, July 21, 2012
8) Option Selections.
Here we would be able to choose an “Upgrade” install (if running setup from a previous version of Windows,
such as XP) or a “Custom” (clean) install.
Select the whole box containing “Custom (advanced)” to continue to the next screen.
9) Hard Drives.
This is where you can select which hard drive/partition to install Vista on. Since this system only has one hard
drive, only one place Vista can go. Advanced options are shown in the next screen shot.
This is also where you would install drivers for your ACPI/RAID/SATA controller by using the “Load Driver”
option. After the installation of the ACPI/RAID/SATA drivers, your hard drives should appear as shown on the
right.
If no additional drivers are needed, select the Next button.
10) Advanced Options.
Page 62
12:46:48 Saturday, July 21, 2012
The advanced options allow creation of multiple partitions and the option of formatting existing partitions.
After finishing your particular partition configuration that you desire, select the Next button.
11) Installing…
Here is where Vista installs major components of the OS. This process can take 10 to 60 minutes depending on
the system.
12) Reboot.
Here we see the system needing to reboot to continue installation tasks.
You can hit the Restart Now button or just allow the reboot to happen automatically after several seconds.
13) First Time.
Here we see a “…” progress as Vista tries to start for the first time. This process may take several minutes
before going to the next screen.
Page 63
12:46:48 Saturday, July 21, 2012
14) Completing Installation.
Vista continues to install at this screen. Depending on system, another reboot or two may happen before the
next screen is displayed
15) Account Creation.
Here is where we create the first user account for the system and select an icon to be displayed on the login
screen. Ensure you password your account.
After finishing entering your information and icon selection, select the Next button.
16) PC Name.
Here is where we can name the system for networking purposes. By default, it uses the account name entered in
the previous step and adds “-PC” to it. We can also select a background for the desktop.
After making your selection, select the Next button.
Page 64
12:46:48 Saturday, July 21, 2012
16) PC Name: (Image 4.1)
17) Updates.
Here we can configure Windows Update with several options. I suggest “Use recommended options” or the top
option for most PC users.
18) Time Settings.
Here is where you can set the time and daylight savings time options.
After configuring your time zone, clock settings and date, select the Next button.
19) Network Configuration.
Vista now asks our network configuration by asking “Home, Work or Public Place.”
Descriptions are expanded on screen so I will not go into them here.
Make your selection to continue to the next screen.
Page 65
12:46:48 Saturday, July 21, 2012
20) Thanks!
On this screen, we are thanked by Bill G. for installing Windows Vista.
After you are done being thanked, select the Next button.
21) PC Performance.
Vista now checks the system performance to automatically configure a few options. This may take several
minutes while the system does this and it will only do it this one time.
22) Login.
We are finally greeted with the login screen, however, there is still more configuration to come.
Enter in your password that you used previously during the install process and hit ENTER or the little blue
arrow to login.
Page 66
12:46:48 Saturday, July 21, 2012
23) Desktop Setup.
Your account profile starts being created here starting with your personal desktop configuration. More happens
on the next screen. This process will also take several minutes, but only happen once.
24) Account Profile.
Vista now sets up profile configurations for Internet Explorer, Windows Media Player as well as a few
more Windows applications. This could take several more minutes but we are almost there!
25) Welcome Screen.
Vista is installed!
On this screen, we are presented with our system configuration as well as several different options.
I hope you enjoyed this install guide and I thank you for reading!
Page 67
12:46:48 Saturday, July 21, 2012
Linux Formatting Process:
Installing Linux operating system is very easy. You can install it either from CD/DVD, USB Sticks,
Network or using ISO images. Here we are using Compact Disc to install the operating system on your
machine. First enable the Boot from Compact Disc option in your BIOS setting and it is must. There are
numerous Linux distributions are available, here we are using Red hat Enterprise Linux. It contains 5 CDs.
Insert the CD-1 and let it booting
Booting Red hat Linux Operating System
Linux booting process
Page 68
12:46:48 Saturday, July 21, 2012
Linux Booting Process
Welcome to Red hat Enterprise Linux
Redhat
Enterprise Linux Screen
Page 69
12:46:48 Saturday, July 21, 2012
Click Next to continue the installation
Select
The language, by default English USA
Page 70
12:46:48 Saturday, July 21, 2012
Language
Select the appropriate keyboard for the system (normally all are using US English ). Click Next to continue.
Select
Your time zone from the list. Click Next to continue.
Page 71
12:46:48 Saturday, July 21, 2012
Time Zone
Set the root user (super user) password.
This
operation will override any previous installation choices about which drives to ignore. Click yes to first
time install the operating system and it will erasing all data
Page 72
12:46:48 Saturday, July 21, 2012
For Beginners, automatic partitioning is recommended and click Next to proceed
Automatic Partition
The GRUB boot loader wil be installed on /dev/sda. Click Next to continue [ad#Amazon mini 4]
Page 73
12:46:48 Saturday, July 21, 2012
GRUB Bootloader
You may set the IP address on your on host. Let it be automatically via DHCP first. You may configure
the IP address later. Click Next to continue
IP Address Configuration
Page 74
12:46:48 Saturday, July 21, 2012
Enable HTTP check box in the firewall settings ( if you want enable it else leave it )
The
default
installation environment includes recommended package selection
Page 75
12:46:48 Saturday, July 21, 2012
The settings are all over and click Next to fire up the installation.
Start the installation
Linux is format the drive and installing the fresh operating system
Page 76
12:46:48 Saturday, July 21, 2012
Take out CD-1 from the tray and insert the CD-2 to install
Installation of CD-2 is over and takes out CD-2 from the tray and inserts the CD-3 to install.
Page 77
12:46:48 Saturday, July 21, 2012
Do the same process for the remaining CDs too and the video hardware can be automatically detected.
Click next to continue.
Your Monitor can be automatically detected.
Page 78
12:46:48 Saturday, July 21, 2012
If need fix the color depth and the resolution of the screen and select the type of login you can choose
either graphical mode or text mode.
Page 79
12:46:48 Saturday, July 21, 2012
Congratulations you have been installed the Linux Operating system successfully. Remove the CD from
the tray and click exit. The System will reboot now.
After rebooting the system, Linux operating system welcomes you for the final setup
Page 80
12:46:48 Saturday, July 21, 2012
Read the license agreement carefully and proceed
Set the date and time and click Next button to continue
Page 81
12:46:48 Saturday, July 21, 2012
A sound card has been detected and checks the sound by clicking on the play test sound button.
The setup will register your system with an account from red hat network. I you like to register now
select yes else skip this with no option.
Page 82
12:46:48 Saturday, July 21, 2012
If you have any additional packages to install select the appropriate option and proceed.
The setup is finished now.
Page 83
12:46:48 Saturday, July 21, 2012
Enter the user name and password to login the account.
Page 84
12:46:48 Saturday, July 21, 2012
Enjoy the Red hat Enterprise Linux
Page 85
12:46:48 Saturday, July 21, 2012
Maser Mentis
8 Bites --- 1 Byte
1024 Bytes --- 1 KB
1024 KB --- 1 MB
1024 MB --- 1GB
1024 GB --- 1 TB
1024 TB --- 1PB
1024 PB --- 1 EB
Page 86

Mais conteúdo relacionado

Mais procurados

System unit components
System unit componentsSystem unit components
System unit componentschrisgreeny
 
Hardware & networking
Hardware & networkingHardware & networking
Hardware & networkingAjay Mistry
 
Unit 3- Internal components.
Unit 3- Internal components.Unit 3- Internal components.
Unit 3- Internal components.georgehurrell99
 
Comp tia flashcards set 3 (25 cards) esd ide
Comp tia flashcards set 3 (25 cards) esd   ideComp tia flashcards set 3 (25 cards) esd   ide
Comp tia flashcards set 3 (25 cards) esd ideSue Long Smith
 
Introduction to Computer Hardware Assembling
Introduction to Computer Hardware AssemblingIntroduction to Computer Hardware Assembling
Introduction to Computer Hardware AssemblingRanjith Siji
 
General Information About Information Technologies
General Information About Information TechnologiesGeneral Information About Information Technologies
General Information About Information Technologiestechgajanan
 
Building a Personal Computer: A detailed guide
Building a Personal Computer: A detailed guideBuilding a Personal Computer: A detailed guide
Building a Personal Computer: A detailed guideAnand Prithviraj
 
Building a computer in virtual desktop.
Building a computer in virtual desktop.Building a computer in virtual desktop.
Building a computer in virtual desktop.OriginalGSM
 
34 pc assembling
34 pc assembling34 pc assembling
34 pc assemblingnikesh124
 
Ch 2 computer assembly disassembly
Ch 2 computer  assembly disassemblyCh 2 computer  assembly disassembly
Ch 2 computer assembly disassemblymekashaw tizazu
 
Hard disk drive
Hard disk driveHard disk drive
Hard disk driveAwais Alam
 
Computer hardware basic -shashank
Computer hardware basic  -shashankComputer hardware basic  -shashank
Computer hardware basic -shashanktechbed
 

Mais procurados (20)

Motherboard
MotherboardMotherboard
Motherboard
 
System unit components
System unit componentsSystem unit components
System unit components
 
Hardware & networking
Hardware & networkingHardware & networking
Hardware & networking
 
Unit 3- Internal components.
Unit 3- Internal components.Unit 3- Internal components.
Unit 3- Internal components.
 
Computer Hardware
Computer HardwareComputer Hardware
Computer Hardware
 
How Motherboards Work
How Motherboards WorkHow Motherboards Work
How Motherboards Work
 
Comp tia flashcards set 3 (25 cards) esd ide
Comp tia flashcards set 3 (25 cards) esd   ideComp tia flashcards set 3 (25 cards) esd   ide
Comp tia flashcards set 3 (25 cards) esd ide
 
Introduction to Computer Hardware Assembling
Introduction to Computer Hardware AssemblingIntroduction to Computer Hardware Assembling
Introduction to Computer Hardware Assembling
 
General Information About Information Technologies
General Information About Information TechnologiesGeneral Information About Information Technologies
General Information About Information Technologies
 
Mother board
Mother board Mother board
Mother board
 
Building a Personal Computer: A detailed guide
Building a Personal Computer: A detailed guideBuilding a Personal Computer: A detailed guide
Building a Personal Computer: A detailed guide
 
Building a computer in virtual desktop.
Building a computer in virtual desktop.Building a computer in virtual desktop.
Building a computer in virtual desktop.
 
34 pc assembling
34 pc assembling34 pc assembling
34 pc assembling
 
Lecture 2.5 hardware
Lecture 2.5 hardwareLecture 2.5 hardware
Lecture 2.5 hardware
 
Pc Assembling
Pc AssemblingPc Assembling
Pc Assembling
 
Assembling a computer
Assembling a computerAssembling a computer
Assembling a computer
 
Power point presentation3
Power point presentation3Power point presentation3
Power point presentation3
 
Ch 2 computer assembly disassembly
Ch 2 computer  assembly disassemblyCh 2 computer  assembly disassembly
Ch 2 computer assembly disassembly
 
Hard disk drive
Hard disk driveHard disk drive
Hard disk drive
 
Computer hardware basic -shashank
Computer hardware basic  -shashankComputer hardware basic  -shashank
Computer hardware basic -shashank
 

Destaque

Computer saftey may 2013
Computer saftey may 2013Computer saftey may 2013
Computer saftey may 2013JimWhite
 
Shashank hardware workshop final
Shashank hardware workshop finalShashank hardware workshop final
Shashank hardware workshop finaltechbed
 
Input computer hardware notes for UCEand UACE ICT
Input computer hardware notes for UCEand UACE ICTInput computer hardware notes for UCEand UACE ICT
Input computer hardware notes for UCEand UACE ICTMukalele Rogers
 
Computer Hardware
Computer HardwareComputer Hardware
Computer Hardwarenitinmote
 
Computer hardware component. ppt
Computer hardware component. pptComputer hardware component. ppt
Computer hardware component. pptNaveen Sihag
 
Five Primary Goups of Computer Hardware
Five Primary Goups of Computer HardwareFive Primary Goups of Computer Hardware
Five Primary Goups of Computer Hardwareracel92gorres
 

Destaque (6)

Computer saftey may 2013
Computer saftey may 2013Computer saftey may 2013
Computer saftey may 2013
 
Shashank hardware workshop final
Shashank hardware workshop finalShashank hardware workshop final
Shashank hardware workshop final
 
Input computer hardware notes for UCEand UACE ICT
Input computer hardware notes for UCEand UACE ICTInput computer hardware notes for UCEand UACE ICT
Input computer hardware notes for UCEand UACE ICT
 
Computer Hardware
Computer HardwareComputer Hardware
Computer Hardware
 
Computer hardware component. ppt
Computer hardware component. pptComputer hardware component. ppt
Computer hardware component. ppt
 
Five Primary Goups of Computer Hardware
Five Primary Goups of Computer HardwareFive Primary Goups of Computer Hardware
Five Primary Goups of Computer Hardware
 

Semelhante a Hardware

lessonpartsnew1.pptx
lessonpartsnew1.pptxlessonpartsnew1.pptx
lessonpartsnew1.pptxHaryBert
 
Computer Parts and their Functions .pptx
Computer Parts and their Functions .pptxComputer Parts and their Functions .pptx
Computer Parts and their Functions .pptxJhoanaTamondong
 
Motherboard
MotherboardMotherboard
Motherboardayestas1
 
parts of motherboard.pptx
parts of motherboard.pptxparts of motherboard.pptx
parts of motherboard.pptxJeazelMosendo1
 
Internal components of the computer
Internal components of the computerInternal components of the computer
Internal components of the computerDanielAtkinson96
 
Identification of parts of motherboard
Identification of parts of motherboardIdentification of parts of motherboard
Identification of parts of motherboardAbhayaRajbanshi
 
Mother board
Mother boardMother board
Mother boardAshok Raj
 
Basic Computer Parts.pptx
Basic Computer Parts.pptxBasic Computer Parts.pptx
Basic Computer Parts.pptxrommelsalva1
 
Computer components checklist
Computer components checklistComputer components checklist
Computer components checklistkaleb Furstenberg
 
Computer Hardware Components
Computer Hardware ComponentsComputer Hardware Components
Computer Hardware Componentsgwaite97
 
00 Hardware Of Personal Computer V1 1
00 Hardware Of Personal Computer V1 100 Hardware Of Personal Computer V1 1
00 Hardware Of Personal Computer V1 1Rajan Das
 
Css grade 11 week 2
Css grade 11 week 2Css grade 11 week 2
Css grade 11 week 2Danilo Anos
 
System-Unit.ppt hvigxcogfogfogclgxufsfixkvxjfz
System-Unit.ppt hvigxcogfogfogclgxufsfixkvxjfzSystem-Unit.ppt hvigxcogfogfogclgxufsfixkvxjfz
System-Unit.ppt hvigxcogfogfogclgxufsfixkvxjfzIrishAbrematia
 

Semelhante a Hardware (20)

lessonpartsnew1.pptx
lessonpartsnew1.pptxlessonpartsnew1.pptx
lessonpartsnew1.pptx
 
Ppt hardwear
Ppt hardwearPpt hardwear
Ppt hardwear
 
Computer Parts and their Functions .pptx
Computer Parts and their Functions .pptxComputer Parts and their Functions .pptx
Computer Parts and their Functions .pptx
 
Motherboard
MotherboardMotherboard
Motherboard
 
P1 – Unit 3
P1 – Unit 3P1 – Unit 3
P1 – Unit 3
 
parts of motherboard.pptx
parts of motherboard.pptxparts of motherboard.pptx
parts of motherboard.pptx
 
Internal components of the computer
Internal components of the computerInternal components of the computer
Internal components of the computer
 
Identification of parts of motherboard
Identification of parts of motherboardIdentification of parts of motherboard
Identification of parts of motherboard
 
Hardware
HardwareHardware
Hardware
 
Hardware
HardwareHardware
Hardware
 
Mother board
Mother boardMother board
Mother board
 
Motherboard parts & functions
Motherboard parts & functionsMotherboard parts & functions
Motherboard parts & functions
 
Basic Computer Parts.pptx
Basic Computer Parts.pptxBasic Computer Parts.pptx
Basic Computer Parts.pptx
 
Computer components checklist
Computer components checklistComputer components checklist
Computer components checklist
 
Computer Hardware Components
Computer Hardware ComponentsComputer Hardware Components
Computer Hardware Components
 
Motherboard
MotherboardMotherboard
Motherboard
 
Basic hardware familiarization
Basic hardware familiarizationBasic hardware familiarization
Basic hardware familiarization
 
00 Hardware Of Personal Computer V1 1
00 Hardware Of Personal Computer V1 100 Hardware Of Personal Computer V1 1
00 Hardware Of Personal Computer V1 1
 
Css grade 11 week 2
Css grade 11 week 2Css grade 11 week 2
Css grade 11 week 2
 
System-Unit.ppt hvigxcogfogfogclgxufsfixkvxjfz
System-Unit.ppt hvigxcogfogfogclgxufsfixkvxjfzSystem-Unit.ppt hvigxcogfogfogclgxufsfixkvxjfz
System-Unit.ppt hvigxcogfogfogclgxufsfixkvxjfz
 

Último

Explore beautiful and ugly buildings. Mathematics helps us create beautiful d...
Explore beautiful and ugly buildings. Mathematics helps us create beautiful d...Explore beautiful and ugly buildings. Mathematics helps us create beautiful d...
Explore beautiful and ugly buildings. Mathematics helps us create beautiful d...christianmathematics
 
On National Teacher Day, meet the 2024-25 Kenan Fellows
On National Teacher Day, meet the 2024-25 Kenan FellowsOn National Teacher Day, meet the 2024-25 Kenan Fellows
On National Teacher Day, meet the 2024-25 Kenan FellowsMebane Rash
 
The basics of sentences session 3pptx.pptx
The basics of sentences session 3pptx.pptxThe basics of sentences session 3pptx.pptx
The basics of sentences session 3pptx.pptxheathfieldcps1
 
1029 - Danh muc Sach Giao Khoa 10 . pdf
1029 -  Danh muc Sach Giao Khoa 10 . pdf1029 -  Danh muc Sach Giao Khoa 10 . pdf
1029 - Danh muc Sach Giao Khoa 10 . pdfQucHHunhnh
 
ComPTIA Overview | Comptia Security+ Book SY0-701
ComPTIA Overview | Comptia Security+ Book SY0-701ComPTIA Overview | Comptia Security+ Book SY0-701
ComPTIA Overview | Comptia Security+ Book SY0-701bronxfugly43
 
Introduction to Nonprofit Accounting: The Basics
Introduction to Nonprofit Accounting: The BasicsIntroduction to Nonprofit Accounting: The Basics
Introduction to Nonprofit Accounting: The BasicsTechSoup
 
Beyond the EU: DORA and NIS 2 Directive's Global Impact
Beyond the EU: DORA and NIS 2 Directive's Global ImpactBeyond the EU: DORA and NIS 2 Directive's Global Impact
Beyond the EU: DORA and NIS 2 Directive's Global ImpactPECB
 
Unit-V; Pricing (Pharma Marketing Management).pptx
Unit-V; Pricing (Pharma Marketing Management).pptxUnit-V; Pricing (Pharma Marketing Management).pptx
Unit-V; Pricing (Pharma Marketing Management).pptxVishalSingh1417
 
TỔNG ÔN TẬP THI VÀO LỚP 10 MÔN TIẾNG ANH NĂM HỌC 2023 - 2024 CÓ ĐÁP ÁN (NGỮ Â...
TỔNG ÔN TẬP THI VÀO LỚP 10 MÔN TIẾNG ANH NĂM HỌC 2023 - 2024 CÓ ĐÁP ÁN (NGỮ Â...TỔNG ÔN TẬP THI VÀO LỚP 10 MÔN TIẾNG ANH NĂM HỌC 2023 - 2024 CÓ ĐÁP ÁN (NGỮ Â...
TỔNG ÔN TẬP THI VÀO LỚP 10 MÔN TIẾNG ANH NĂM HỌC 2023 - 2024 CÓ ĐÁP ÁN (NGỮ Â...Nguyen Thanh Tu Collection
 
Holdier Curriculum Vitae (April 2024).pdf
Holdier Curriculum Vitae (April 2024).pdfHoldier Curriculum Vitae (April 2024).pdf
Holdier Curriculum Vitae (April 2024).pdfagholdier
 
2024-NATIONAL-LEARNING-CAMP-AND-OTHER.pptx
2024-NATIONAL-LEARNING-CAMP-AND-OTHER.pptx2024-NATIONAL-LEARNING-CAMP-AND-OTHER.pptx
2024-NATIONAL-LEARNING-CAMP-AND-OTHER.pptxMaritesTamaniVerdade
 
Seal of Good Local Governance (SGLG) 2024Final.pptx
Seal of Good Local Governance (SGLG) 2024Final.pptxSeal of Good Local Governance (SGLG) 2024Final.pptx
Seal of Good Local Governance (SGLG) 2024Final.pptxnegromaestrong
 
Z Score,T Score, Percential Rank and Box Plot Graph
Z Score,T Score, Percential Rank and Box Plot GraphZ Score,T Score, Percential Rank and Box Plot Graph
Z Score,T Score, Percential Rank and Box Plot GraphThiyagu K
 
microwave assisted reaction. General introduction
microwave assisted reaction. General introductionmicrowave assisted reaction. General introduction
microwave assisted reaction. General introductionMaksud Ahmed
 
PROCESS RECORDING FORMAT.docx
PROCESS      RECORDING        FORMAT.docxPROCESS      RECORDING        FORMAT.docx
PROCESS RECORDING FORMAT.docxPoojaSen20
 
Presentation by Andreas Schleicher Tackling the School Absenteeism Crisis 30 ...
Presentation by Andreas Schleicher Tackling the School Absenteeism Crisis 30 ...Presentation by Andreas Schleicher Tackling the School Absenteeism Crisis 30 ...
Presentation by Andreas Schleicher Tackling the School Absenteeism Crisis 30 ...EduSkills OECD
 
1029-Danh muc Sach Giao Khoa khoi 6.pdf
1029-Danh muc Sach Giao Khoa khoi  6.pdf1029-Danh muc Sach Giao Khoa khoi  6.pdf
1029-Danh muc Sach Giao Khoa khoi 6.pdfQucHHunhnh
 
Nutritional Needs Presentation - HLTH 104
Nutritional Needs Presentation - HLTH 104Nutritional Needs Presentation - HLTH 104
Nutritional Needs Presentation - HLTH 104misteraugie
 
Energy Resources. ( B. Pharmacy, 1st Year, Sem-II) Natural Resources
Energy Resources. ( B. Pharmacy, 1st Year, Sem-II) Natural ResourcesEnergy Resources. ( B. Pharmacy, 1st Year, Sem-II) Natural Resources
Energy Resources. ( B. Pharmacy, 1st Year, Sem-II) Natural ResourcesShubhangi Sonawane
 
General Principles of Intellectual Property: Concepts of Intellectual Proper...
General Principles of Intellectual Property: Concepts of Intellectual  Proper...General Principles of Intellectual Property: Concepts of Intellectual  Proper...
General Principles of Intellectual Property: Concepts of Intellectual Proper...Poonam Aher Patil
 

Último (20)

Explore beautiful and ugly buildings. Mathematics helps us create beautiful d...
Explore beautiful and ugly buildings. Mathematics helps us create beautiful d...Explore beautiful and ugly buildings. Mathematics helps us create beautiful d...
Explore beautiful and ugly buildings. Mathematics helps us create beautiful d...
 
On National Teacher Day, meet the 2024-25 Kenan Fellows
On National Teacher Day, meet the 2024-25 Kenan FellowsOn National Teacher Day, meet the 2024-25 Kenan Fellows
On National Teacher Day, meet the 2024-25 Kenan Fellows
 
The basics of sentences session 3pptx.pptx
The basics of sentences session 3pptx.pptxThe basics of sentences session 3pptx.pptx
The basics of sentences session 3pptx.pptx
 
1029 - Danh muc Sach Giao Khoa 10 . pdf
1029 -  Danh muc Sach Giao Khoa 10 . pdf1029 -  Danh muc Sach Giao Khoa 10 . pdf
1029 - Danh muc Sach Giao Khoa 10 . pdf
 
ComPTIA Overview | Comptia Security+ Book SY0-701
ComPTIA Overview | Comptia Security+ Book SY0-701ComPTIA Overview | Comptia Security+ Book SY0-701
ComPTIA Overview | Comptia Security+ Book SY0-701
 
Introduction to Nonprofit Accounting: The Basics
Introduction to Nonprofit Accounting: The BasicsIntroduction to Nonprofit Accounting: The Basics
Introduction to Nonprofit Accounting: The Basics
 
Beyond the EU: DORA and NIS 2 Directive's Global Impact
Beyond the EU: DORA and NIS 2 Directive's Global ImpactBeyond the EU: DORA and NIS 2 Directive's Global Impact
Beyond the EU: DORA and NIS 2 Directive's Global Impact
 
Unit-V; Pricing (Pharma Marketing Management).pptx
Unit-V; Pricing (Pharma Marketing Management).pptxUnit-V; Pricing (Pharma Marketing Management).pptx
Unit-V; Pricing (Pharma Marketing Management).pptx
 
TỔNG ÔN TẬP THI VÀO LỚP 10 MÔN TIẾNG ANH NĂM HỌC 2023 - 2024 CÓ ĐÁP ÁN (NGỮ Â...
TỔNG ÔN TẬP THI VÀO LỚP 10 MÔN TIẾNG ANH NĂM HỌC 2023 - 2024 CÓ ĐÁP ÁN (NGỮ Â...TỔNG ÔN TẬP THI VÀO LỚP 10 MÔN TIẾNG ANH NĂM HỌC 2023 - 2024 CÓ ĐÁP ÁN (NGỮ Â...
TỔNG ÔN TẬP THI VÀO LỚP 10 MÔN TIẾNG ANH NĂM HỌC 2023 - 2024 CÓ ĐÁP ÁN (NGỮ Â...
 
Holdier Curriculum Vitae (April 2024).pdf
Holdier Curriculum Vitae (April 2024).pdfHoldier Curriculum Vitae (April 2024).pdf
Holdier Curriculum Vitae (April 2024).pdf
 
2024-NATIONAL-LEARNING-CAMP-AND-OTHER.pptx
2024-NATIONAL-LEARNING-CAMP-AND-OTHER.pptx2024-NATIONAL-LEARNING-CAMP-AND-OTHER.pptx
2024-NATIONAL-LEARNING-CAMP-AND-OTHER.pptx
 
Seal of Good Local Governance (SGLG) 2024Final.pptx
Seal of Good Local Governance (SGLG) 2024Final.pptxSeal of Good Local Governance (SGLG) 2024Final.pptx
Seal of Good Local Governance (SGLG) 2024Final.pptx
 
Z Score,T Score, Percential Rank and Box Plot Graph
Z Score,T Score, Percential Rank and Box Plot GraphZ Score,T Score, Percential Rank and Box Plot Graph
Z Score,T Score, Percential Rank and Box Plot Graph
 
microwave assisted reaction. General introduction
microwave assisted reaction. General introductionmicrowave assisted reaction. General introduction
microwave assisted reaction. General introduction
 
PROCESS RECORDING FORMAT.docx
PROCESS      RECORDING        FORMAT.docxPROCESS      RECORDING        FORMAT.docx
PROCESS RECORDING FORMAT.docx
 
Presentation by Andreas Schleicher Tackling the School Absenteeism Crisis 30 ...
Presentation by Andreas Schleicher Tackling the School Absenteeism Crisis 30 ...Presentation by Andreas Schleicher Tackling the School Absenteeism Crisis 30 ...
Presentation by Andreas Schleicher Tackling the School Absenteeism Crisis 30 ...
 
1029-Danh muc Sach Giao Khoa khoi 6.pdf
1029-Danh muc Sach Giao Khoa khoi  6.pdf1029-Danh muc Sach Giao Khoa khoi  6.pdf
1029-Danh muc Sach Giao Khoa khoi 6.pdf
 
Nutritional Needs Presentation - HLTH 104
Nutritional Needs Presentation - HLTH 104Nutritional Needs Presentation - HLTH 104
Nutritional Needs Presentation - HLTH 104
 
Energy Resources. ( B. Pharmacy, 1st Year, Sem-II) Natural Resources
Energy Resources. ( B. Pharmacy, 1st Year, Sem-II) Natural ResourcesEnergy Resources. ( B. Pharmacy, 1st Year, Sem-II) Natural Resources
Energy Resources. ( B. Pharmacy, 1st Year, Sem-II) Natural Resources
 
General Principles of Intellectual Property: Concepts of Intellectual Proper...
General Principles of Intellectual Property: Concepts of Intellectual  Proper...General Principles of Intellectual Property: Concepts of Intellectual  Proper...
General Principles of Intellectual Property: Concepts of Intellectual Proper...
 

Hardware

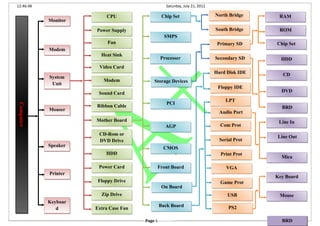
  • 1. 12:46:48 Saturday, July 21, 2012 Page 1 BRD Back BoardBack Board LPTLPT Com ProtCom Prot Serial ProtSerial Prot Print ProtPrint Prot VGAVGA Game ProtGame Prot USBUSB PS2PS2 Line InLine In Line OutLine Out MicaMica Key BoardKey Board MouseMouse PCIPCI AGPAGP CMOSCMOS Front BoardFront Board On BoardOn Board Hard Disk IDEHard Disk IDE Floppy IDEFloppy IDE SMPSSMPS ProcesserProcesser Storage DevicesStorage Devices Primary SDPrimary SD Secondary SDSecondary SD RAMRAM ROMROM Chip SetChip Set HDDHDD CDCD DVDDVD BRDBRD Chip SetChip SetCPUCPU Extra Case FanExtra Case Fan Zip DriveZip Drive Floppy DriveFloppy Drive Power CardPower Card Power SupplyPower Supply FanFan Heat SinkHeat Sink Video CardVideo Card ModemModem Sound CardSound Card Ribbon CableRibbon Cable Mother BoardMother Board CD-Rom or DVD Drive CD-Rom or DVD Drive HDDHDD MonitorMonitor ModemModem System Unit System Unit MouserMouser SpeakerSpeaker PrinterPrinter Keyboar d Keyboar d ComputerComputer North BridgeNorth Bridge South BridgeSouth Bridge Audio PortAudio Port
  • 2. 12:46:48 Saturday, July 21, 2012 The term computer is used to describe a device made up of electronic and electro mechanical computers. The computer itself cannot perform any task and is referred to as hardware. A computer system consists of three elements I. Hardware. II. Software III. User I. Hardware The physical components which you can see, touch and feel in the computer system are called "Hardware". Example monitor, keyboard, mouse etc... II. Software Software is used to describe the instruction that tells the computer how to perform a task. Software is categorized 1) System Software {Example. Operating System, Compliers, Editors etc...} 2) Application Software {Example. MS-Word, Excel, Accounting Packages etc...} III. User Users who use operate the computer and also create computer software instructions... MS-Word MS-Excel Accounting Packages Operating System Compliers Editors System Software Application Software Keyboard Monitor Mouse UsreHardware Software Computer Page 2
  • 3. 12:46:48 Saturday, July 21, 2012 Main Parts of computer 1. Monitor A monitor or display is electronic visual display for computer. The monitor comprises the display device, circuitry, and an enclosure. The display device in modem monitors is typically a thin film transistor liquid crystal display (TFT-CD) thin pane, while older monitors use a cathode ray tube (CRT) about as deep as the screen size. 2. Modem A modem modulates outgoing digital signals from a computer or other digital device to analog signals for a conventional copper twisted pair telephone line and demodulates the incoming analog signal and converts it to a digital signal for the digital device Page 3
  • 4. 12:46:48 Saturday, July 21, 2012 3. System Unit Central Processing Unit The CPU is the central electronic chip that determines the processing power of the computer. Power Supply A power supply changes normal household electricity into electricity that a computer can use. Fan A computer fan is any fan inside, or attached to, a computer case used for active cooling, and may refer to fans that draw cooler air into the case from the outside, expel warm air from inside, or move air across a heat sink to cool a particular component. Page 4
  • 5. 12:46:48 Saturday, July 21, 2012 Heat sink A heat sink is a device that is attached to a microprocessor chip to keep it from overheating by absorbing its heat and dissipating it into the air Video card The video card is an expansion card that allows the computer to send graphical information to a video display device such as monitor or projector. Modem A modem is essentially a phone that is in your computer that allows you to connect to a network like an internet service provider over the phone line. Sound card A sound card (also known as an audio card) is an internal computer expansion card that facilitates the input and output of audio signals to and from a computer under control of computer programs Ribbon cable A "Ribbon cable" (also known as multi-wire planar cable) is a cable with many conducting wires running parallel to each other on the same flat plane. As a result the cable is wide and flat. Its name comes from the resemblance of the cable to a piece of ribbon. Motherboard Page 5
  • 6. 12:46:48 Saturday, July 21, 2012 The motherboard is the main circuit board of a microcomputer. It is also known as the main board or system board. CD-Room or DVD drive DVD-ROM stands for read-only memory and refers to a drive that can read DVD discs. The advent of DVD-ROM drives has made it easier for computer users to access large amounts of data as well as providing a medium for watching video. A CD-ROM is a pre-pressed compact disc that contains data accessible to, but not writable by, a computer for data storage and music playback. The 1985 “Yellow Book” standard developed by Sony and Philips adapted the format to hold any form of binary data Hard Drive A hard disk is part of a unit, often called a "disk drive," "hard drive," or "hard disk drive," those stores and provides relatively quick access to large amounts of data on an electromagnetically charged surface or set of surfaces. Power card The system unit was hotter than usual so I thought that the PSU encountered some overheating. Floppy drive The floppy drive reads data from, and writes data to, a small disk. The most common type of floppy drive is the 3.5" drive, followed by the 5.25" drive, among other sizes Page 6
  • 7. 12:46:48 Saturday, July 21, 2012 Zip drive A Zip drive is a small, portable disk drive used primarily for backing up and archiving personal computer files Extra case fan You have searched for "Extra Case Fans" . You might be interested in the following threads: • Extra Case Fans for Antic Two Hundred Case • Help with Cooling in HAF 912 case • First time buying gaming comp. $4000 system off of Cyber power • New System • Will these 2 fans be enough to cool my sly system? 4. Mouse A mouse is a pointing device that functions by detecting two- dimensional motion relative to its supporting surface. Physically, a mouse consists of an object held under one of the user's hands, with one or more buttons. 5. Speaker Computer speakers, or multimedia speakers, are speakers external to a computer that disable the lower fidelity built-in speaker. 6. Printer In computing, a printer is a peripheral which produces a text or graphics of documents stored in electronic form, usually on physical print media such as paper or transparencies. Page 7
  • 8. 12:46:48 Saturday, July 21, 2012 7. Keyboard In computing, a keyboard is a typewriter-style keyboard, which uses an arrangement of buttons or keys, to act as mechanical levers or electronic switches Motherboard Page 8
  • 9. 12:46:48 Saturday, July 21, 2012 The motherboard serves to connect all of the parts of a computer together. The CPU, memory, hard drives, optical drives, video card, sound and other ports and expansion cards all connect to the motherboard directly or via cables. 1. Chipset A chipset is a collection of chips or circuits that perform interface and peripheral functions for the processor. There are two types of bridges 1. Northbridge. 2. Southbridge. 1. Northbridge Northbridge is control high speed devices. i.e., Processer, RAM, AGP {Accelerated Graphics Port} and etc... It is also called as Graphics Memory Controller Hub {GMCH}. It is controller that interconnects the CPU to memory via the Front Side Bus {FSB}. The Northbridge may include a display controller, obviating the need for a separate display adapter. 2. Southbridge Page 9
  • 10. 12:46:48 Saturday, July 21, 2012 Southbridge controls low speed device. i.e., USB Bus, CD, Floppy and etc... Earlier chipsets supported the ISA bus in the Southbridge. 2. Switch Mode Power Supply {SWPS} A switched -Mode Power Supply {Switching-mode power supply, SMPS or Switcher} is an electronic power supply that incorporates a switching regulator to convert electrical power efficiently. AT {Advance Technology}: The older supply used by AT systems has two 6-pin connectors (labeled P8 & P9) that connect to the system board. It is possible to connect P8 & P9 round the wrong way — if this happens then the system board will fry! ATX {Advance Technology Extinction}: ATX style PSUs use a single 20-pin adaptor, but may also sport auxiliary connectors for system boards requiring higher currents. The main connector carries 12V, 5V and 3.3V supplies. Page 10
  • 11. 12:46:48 Saturday, July 21, 2012 BTX {Balanced Technology Extended}: BTX was intended to replace the ATX form factor. It offers better airflow but has been largely shunned by manufacturers. Technically, a 20-pin ATX connector can be plugged straight into a 24-pin motherboard socket, leaving pins 11, 12, 23, and 24 unconnected Micro BTX: 3. Processor A processor is the logic circuitry that responds to and processes the basic instructions that drive a computer. The term processor has generally replaced the term central processing unit {CPU}. The processor in a personal computer or embedded in small devices is often called a microprocessor. It is made with same conductors {transistors, Flap Flops, Registers}. Page 11
  • 12. 12:46:48 Saturday, July 21, 2012 Processors are two types. There is 1. Slate Processer 2. Socket Processer. How processor works Speed of Processor Process with Speed 4004 4 Bit 108 KHz Pentene/ P-Pro 32 Bit 33 – 133 MHz P-2 Coleen/ Xeon 32 Bit 133 – 450 MHz P -3 Coleen/ Xeon 32 Bit 450 MHz – 1.3 GHz P -4 Coleen/ Xeon 32 Bit 1.3 – 3.8 GHz P- 4 Extinction 64 Bit 1.3 – 4.2 GHZ Cache Memory Cache is a integrated temporary buffer. Its stores frequently and recently used instructions. It is also working along with speed of the processer. Proce ssor CPU RAM Interim Bus Adders P6 Data Bus Power Data I/O (or) Front Side Bus (FSB) Page 12
  • 13. 12:46:48 Saturday, July 21, 2012 L1 cache 8KB – 512 KB L2 cache 64KB – 2 MB L3 cache 512KB – 4 MB 4. Storage Devices Storage device is a hardware device capable of storing information. There are two storage devices used in computer; a primary storage device such as computer RAM, ROM and secondary storage device such as a computer hard drive. Primary Storage Internal Memory, Main Memory and primary Memory is a storage location that holds memory for short periods of time while the computer running. Primary storage memories are RAM, ROM Cache and etc… 1. Random Access Memory (RAM) RAM is a form of computer data storage it takes the form of integrated circuits that allows stored data to be accessed in an order with a worst case performance of constant time. The first RAM modules to come into the market were created in 1951 and were sold until the late 1960s and early 1970s. RAM’s are mainly classified into two types. One is static RAM and another one is Dynamic RAM. Static RAM It is used multiple transistors, typically four to six, for each memory cell but doesn’t have a capacitor in each cell. It is used primarily for cache. Storage Devices Primary Storage Devices Secondary Storage Devices RAM Static RAM (S-RAM) Dynamic RAM (D-RAM) Page 13
  • 14. 12:46:48 Saturday, July 21, 2012 Dynamic RAM D-RAM has memory cells with a paired transistor and capacitor requiring constant refreshing. Extended Data Output RAM (EDO RAM) EDO RAM is a type of RAM chip that improves the time to read from memory on faster microprocessors such as the Intel Pentium. D-RAM EDO RAM SD RAM DDR RAM DDR2 RAM RD RAM EDO RAM 8 Bit RAM 32 Bit RAM Page 14
  • 15. 12:46:48 Saturday, July 21, 2012 With - 8 Bit with - 32 Bit Speed - 8 MHz Speed - 32 MHz Capability - 8 MB Capabilities - 32 MB Synchronous Dynamic RAM (SD RAM) SD RAM is generic name for various kinds of dynamic random access memory (D RAM) that are synchronized with the clock speed that the microprocessor is optimized for. With - 64 Bit Speed - 33 – 133 MHz Capability - 32 – 512 MB Pines - Front – 1 to 84 Back – 85 to 168 Double Data Rate RAM (DDR RAM) DDR RAM is a type of very fast computer memory. DDR RAM is based on the same architecture as SD RAM, but utilizes the clock signal differently to transfer twice the data in the same amount of time. With - 64 Bit Speed - 233 – 433 MHz Capability - 128 MB – 1 GB Pines - Front – 1 to 93 Back – 92 to 184 Page 15
  • 16. 12:46:48 Saturday, July 21, 2012 Double Data Rate 2 RAMS (DDR2 RAM) DDR2 allows higher bus speed and requires lower power by running the internal clock at half the speed of the data bus. With - 64 Bit Speed - 533 – 833 MHz Capability - 256 MB – 2 GB Pines - Front – 1 to 121 Back – 120 to 240 Ram bus Dynamic RAM (RD RAM / DDR3 RAM) RD RAM is a memory sub-system that promises to transfer up to 1.6 Billion bytes per second. With - 64 Bit Speed - 233 – 433 MHz Capability - 128 – 1 GB Pines - Front – 1 to 93 Back – 92 to 184 2. Read Only Memory (ROM) Page 16
  • 17. 12:46:48 Saturday, July 21, 2012 ROM is a class of storage medium used in computer and other electronic devices. Data stored in ROM cannot be modified or can be modified only slowly or with difficulty, so it is mainly used to distribute firmware. Programmable ROM P ROM or Field programmable read-only memory (FP ROM) or One-time programmable Non-volatile memory (OTP NVM) is a form of digital memory where the setting of each bit is a locked b a fuse or antiques.  Never update the program. Erasable Programmable ROM It is a type of memory chip that retains its data when its power. Supply is switched off. In other words, it is non-volatile.  Only once update the program Electrically Erasable Programmable ROM It is type of non-volatile memory used in computers and other electronic devices to store small amount of data that must be saved when power is removed. ROM P ROM EP ROM EEP ROM P ROMP ROM GlassGlass DICDIC Page 17
  • 18. 12:46:48 Saturday, July 21, 2012  Update many time the program. Secondary Storage Hard Disk Drive (HDD) In a personal computer, a HDD is the mechanism that controls the positioning, reading, and writing of the hard disk, which furnishes the largest amount of data storage for the PC. Although the hard disk drive (often shortened to "hard drive") and the hard disk are not the same thing, they are packaged as a unit and so either term is sometimes used to refer to the whole unit. Secondary Storage Device Magnetic Storage Device Optical Storage Device Floppy, Magnetic Tape, Power Tape, HDD and etc… CD, DVD, BRD and etc… Page 18
  • 19. 12:46:48 Saturday, July 21, 2012 Advanced Technology Attachment (ATA) ATA is the official name that American National Standards Institute group X3T10 uses for what the computer industry calls Integrated Drive Electronics (IDE). Parallel ATA PATA, also known as Parallel is a type of internal computer port that attaches to hard drives and other devices. PATA has been replaced by the faster, sleeker port technology known as Serial ATA, or SATA. Virtually all devices are now made to conform to the SATA standard. Speed: 33- 133 MHz Data Transforming Rate: 150 MBps RPM: 3400 – 7200 Pines: 40 P Serial ATA Serial ATA is a new standard for connecting hard drives into computer systems. As its name implies, SATA is based on serial signaling technology, unlike current IDE (Integrated Drive Electronics) hard drives that use parallel signaling. HDD ATA SCSI ATA P ATA S ATA Page 19
  • 20. 12:46:48 Saturday, July 21, 2012 SATA has several practical advantages over the parallel signaling (also called Parallel ATA or PATA) that has been used in hard drives since the 1980s. SATA cables are more flexible, thinner, and less massive than the ribbon cables required for conventional PATA hard drives. SATA cables can be considerably longer than PATA ribbon cables, allowing the designer more latitude in the physical layout of a system. Because there are fewer conductors (only 7 in SATA as compared with 40 in PATA), crosstalk and electromagnetic interference (EMI) are less likely to be troublesome. The signal voltage is much lower as well (250 mV for SATA as compared with 5 V for PATA). Speed: 233- 2500 MHz Data Transforming Rate: 480 MBps RPM: 7600 – 10000 Pines: 7 P Advantages of SATA over PATA There are two types of hard drive connections that a computer could have: Parallel ATA (PATA) and Serial ATA (SATA). SATA is most commonly used in nearly all computers today, due to below mentioned advantages. Advantages Increased data transfer rate The primary reason SATA is used over PATA is because of the increased data transfer speeds with that SATA. PATA is capable of data transfers speeds of 66/100/133 MBs/second, whereas SATA is capable of 150/300/600 MBs/second. The speed differences are due to the various flavors of PATA and SATA, with the fastest speeds being the latest version of each currently available. You'll notice that SATA's slowest speed is still faster than PATA's fastest speed. The improved speed of SATA allows for programs to load faster, as well as pictures and larger documents. For video game enthusiasts, faster data transfer speeds can mean better gaming experiences (i.e. smoother game-play). Easy cable management and cable length Another advantage of SATA over PATA is the length of the cable connecting the hard drive to the computer motherboard. The max length of a PATA cable is 18-inches, whereas a SATA cable can be up to 3.3 feet (1 meter) in length. This allows for more flexibility on where a hard drive can be mounted in a computer case. Page 20
  • 21. 12:46:48 Saturday, July 21, 2012 Increased airflow SATA cables are also smaller in size than a PATA cable, allowing for increased airflow inside the computer case and decreased heat buildup. This can help improve the overall life of a computer. Support for more drives There are typically four to six SATA connections on a computer motherboard, allowing for multiple SATA hard drives to be hooked up. There are usually only two PATA connections on a computer motherboard that supports a total of four PATA hard drives. Disadvantages Drivers and support There are only a few small disadvantages of SATA over PATA. One disadvantage is that SATA hard drives will sometimes require a specific driver to be loaded to a computer when installing an operating system, in order for the computer to utilize the SATA hard drive. This has more recently been rectified by allowing a SATA hard drive to act like a PATA hard drive, thus eliminating the need for the specific driver to be loaded. However, some SATA functionality will be lost in order to gain this mimic functionality. Older operating systems such as Windows 95 and 98 that were released long before SATA was introduced will also not support SATA drives. One drive per cable Another disadvantage with SATA is that the cable allows for only one SATA hard drive to be connected at a time. Whereas a PATA cable allows for hooking up two PATA hard drives per cable SCSI SCSI (pronounced SKUH-zee and sometimes colloquially known as "skuzzy"), the Small Computer System Interface, is a set of ANSI standard electronic interfaces that allow personal computers to communicate with peripheral hardware such as disk drives, tape drives, CD-ROM drives, printers, and scanners faster and more flexibly than previous interfaces. Developed at Apple Computer and still used in the Macintosh, the present set of SCSIs are parallel interfaces. SCSI ports continue to be built into many personal computers today and are supported by all major operating systems. In addition to faster data rates, SCSI is more flexible than earlier parallel data transfer interfaces. The latest SCSI standard, Ultra-2 SCSI for a 16-bit bus can transfer data at up to 80 megabytes per second (MBps).SCSI allows up to 7 or 15 devices (depending on the bus width) to be connected to a single SCSI port in daisy-chain fashion. This allows one circuit board or card to accommodate all the peripherals, rather than having a separate card for each device, making it an ideal interface for use with portable and notebook computers. A single host adapter, in the form of a PC Card, can serve as a SCSI interface for a laptop, freeing up the parallel and serial ports for use with an external modem and printer while allowing other devices to be used in addition. Although not all devices support all levels of SCSI, the evolving SCSI standards are generally backwards-compatible. That is, if you attach an older device to a newer computer with support for a later standard, the older device will work at the older and slower data rate. Page 21
  • 22. 12:46:48 Saturday, July 21, 2012 The original SCSI, now known as SCSI-1, evolved into SCSI-2, known as "plain SCSI." as it became widely supported. SCSI-3 consists of a set of primary commands and additional specialized command sets to meet the needs of specific device types. The collection of SCSI-3 command sets is used not only for the SCSI-3 parallel interface but for additional parallel and serial protocols, including Fiber Channel, Serial Bus Protocol (used with the IEEE 1394Firewire physical protocol), and the Serial Storage Protocol (SSP). A widely implemented SCSI standard is Ultra-2 (sometimes spelled "Ultra2") which uses a 40MHz clock rate to get maximum data transfer rates up to 80 MBps. It provides a longer possible cabling distance (up to 12 meters) by using low voltage differential (LVD) signaling. Earlier forms of SCSIs use a single wire that ends in a terminator with a ground. Ultra-2 SCSI sends the signal over two wires with the data represented as the difference in voltage between the two wires. This allows support for longer cables. A low voltage differential reduces power requirements and manufacturing costs. The latest SCSI standard is Ultra-3 (sometimes spelled "Ultra3")which increases the maximum burst rate from 80 Mbps to 160 Mbps by being able to operate at the full clock rate rather than the half-clock rate of Ultra-2. The standard is also sometimes referred to as Ultra160/m. New disk drives supporting Ultra160/m will offer much faster data transfer rates. Ultra160/m also includes cyclical redundancy checking (CRC) for ensuring the integrity of transferred data and domain validation for testing the SCSI network. Currently existing SCSI standards are summarized in the table below. Technology Name Maximum Cable Length (meters) Maximum Speed (MBps) Maximum Number of Devices SCSI-1 6 5 8 SCSI-2 6 5-10 8 or 16 Fast SCSI-2 3 10-20 8 Wide SCSI-2 3 20 16 Fast Wide SCSI-2 3 20 16 Ultra SCSI-3, 8-bit 1.5 20 8 Ultra SCSI-3, 16-bit 1.5 40 16 Ultra-2 SCSI 12 40 8 Wide Ultra-2 SCSI 12 80 16 Ultra-3 (Ultra160/m) SCSI 12 160 16 Speed: 633 MHz Page 22
  • 23. 12:46:48 Saturday, July 21, 2012 Data Transforming Rate: 600 MBps RPM: 10000 - 15000 Pines: 50 P, 68 P and 80 P. Compact Disc (Spelled Disk) A CD is a small, portable, round medium made of molded polymer (close in size to the floppy disk) for electronically recording, storing, and playing back audio, video, text, and other information in digital form. Tape cartridges and CDs generally replaced the phonograph record for playing back music. At home, CDs have tended to replace the tape cartridge although the latter is still widely used in cars and portable playback devices. Initially, CDs were read-only, but newer technology allows users to record as well. CDs will probably continue to be popular for music recording and playback. A newer technology, the digital versatile disc (DVD), stores much more in the same space and is used for playing back movies. Some variations of the CD include:  CD-ROM  CD-i  CD-RW  CD-ROM XA  CD-W  Photo CD  Video CD File System: CDFS (Compact Disc File System). Source: Laser Light. Capacity: Single Side Single Layer 700 MB Single Side Double Layer 800 MB Page 23
  • 24. 12:46:48 Saturday, July 21, 2012 DVD DVD is an optical disc technology with a 4.7 gigabyte storage capacity on a single-sided, one-layered disk, which is enough for a 133-minute movie. DVDs can be single- or double-sided, and can have two layers on each side; a double-sided, two-layered DVD will hold up to 17 gigabytes of video, audio, or other information. This compares to 650 megabytes (.65 gigabyte) of storage for a CD-ROM disk. DVD uses the MPEG-2 file and compression standard. MPEG-2 images have four times the resolution of MPEG-1 images and can be delivered at 60 interlaced fields per second where two fields constitute one image frame. (MPEG-1 can deliver 30 no interlaced frames per second.) Audio quality on DVD is comparable to that of current audio compact discs. Formats:  DVD-Video is the format designed for full-length movies that work with your television set.  DVD-ROM is the type of drive and disc for use on computers. The DVD drive will usually also play regular CD-ROM discs and DVD-Video disks.  DVD-RAM is the writeable version.  DVD-Audio is a CD-replacement format.  There are a number of recordable DVD formats, including DVD-R for General, DVD-R for Authoring, DVD-RAM, DVD-RW, DVD+RW, and DVD+R. Page 24
  • 25. 12:46:48 Saturday, July 21, 2012 DVD was originally said to stand for digital video disc, and later for digital versatile disc. The current official stance of the DVD Forum is that the format should just be referred to as DVD. File System: UDFS (Universal Disk Format / File System). Source: Red Laser Light. Capacity: Single Side Single Layer 4.7 GB Single Side Double Layer 8.5GB Double Side Single Layer 9.4 GB Double Side Double Layer 17.1 GB Blue Ray Disk (BRD) BD is an optical disc storage medium designed to supersede the DVD format. The plastic disc is 120 mm in diameter and 1.2 mm thick, the same size as DVDs and CDs. Conventional (pre-BD-XL) Blue-ray Discs contain 25 GB per layer, with dual layer discs (50 GB) being the industry standard for feature-length video discs. Triple layer discs (100 GB) and quadruple layers (128 GB) are available for BD-XL re-writer drives. File System: UDFS (Universal Disk Format / File System). Source: Blue Laser Light. Capacity: Single Side Single Layer 25 GB Single Side Double Layer 54GB Double Side Single Layer GB Double Side Double Layer 200 GB Page 25
  • 26. 12:46:48 Saturday, July 21, 2012 5. Back Panel Line/ Local Printer Terminal (LPT): LPT is the usual designation for a parallel port connection to a printer or other device on a personal computer. The data transfer rates were limited to 150KBPs in the forward direction (Compatibility / Centronic Mode) and 50KBPs in the reverse direction (Nibble and byte modes). Page 26
  • 27. 12:46:48 Saturday, July 21, 2012 Comport: Serial Port: A serial port is a serial communication physical interface through which information transfers in or out one bit at a time serial port common bit rates include 1200, 2400, 4800, 9600, 14400, 19200, 38400, 57600 and 115200 bit/s. Printer Port: A parallel port is a type of interface found on computer for connecting various peripherals. Video Graphics Adopter (VGA): Page 27
  • 28. 12:46:48 Saturday, July 21, 2012 VGA refer specifically to the display hardware first introduced with the IBM PC/2 line of computers in 1987, but through its wide spread adoption has also come to mean either an analog computer display standard, the 15-pin D-Subminiature VGA. Game Port: The game port is a device port found on IBM PC compatible systems throughout the 1980s and 1990s. It was the traditional connector for joystick input devices until superseded by USB in the 21st century. Universal Serial Bus (USB): USB is an industry standard developed in the mid-1990s that defines the cables, connectors and communications protocols used in a bus for connection, a communication and power supply between computers and electronic devices. USB Type Speed Release Date USB 1.0 1.5 Mbps January 1996 USB 1.1 12 Mbps September 1998 USB 2.0 480 Mbps April 2000 USB 3.0 5 Gbps November 2008 Page 28
  • 29. 12:46:48 Saturday, July 21, 2012 Personal System Connection 2 (PS2): The PS2 is a 6-pin Mini-Din connector used for connecting some keyboard and mouse. Mouse colored is Green and Keyboard is Purple. Audio Port: Line-In: This port is where sound from an external source enters the card, such as recording from a tape recorder. On many sound cards this port is light blue. Line-Out: Where sound is output; usually to head phones or stereo speakers. On many cards this port is lime green Mica: Microphone port, usually pink. 6. On Board Integrated Drive Electronics (IDE): IDE is a standard electronic interface used between a computer motherboard’s data paths or bus and the computer’s disk storage devices. IDE Hard Disk IDE Floppy IDE Page 29
  • 30. 12:46:48 Saturday, July 21, 2012 Hard Disk IDE: Total  36 Pines. Floppy IDE: Total  33Pines 7. Front panel A front panel was used on early electronic computers to display and allow the alteration of the state of the machine's internal registers and memory. The front panel usually consisted of arrays of indicator lamps, toggle switches, and push buttons mounted on a sheet metal face plate. 19 Pines19 Pines 20 Pines20 Pines 17 Pines17 Pines 16 Pines16 Pines Page 30
  • 31. 12:46:48 Saturday, July 21, 2012 8. Peripheral Component Interconnect (PCI) Conventional PCI (PCI is an initialize formed from Peripheral Component Interconnect, part of the PCI Local Bus standard and often shortened to PCI) is a computer bus for attaching hardware devices in a computer. The PCI bus supports the functions found on a processor, but in a standardized format that is independent of any particular processor. Devices connected to the bus appear to the processor to be connected directly to the processor bus, and are assigned addresses in the processor's address space. Typical PCI cards used in PCs include: network cards, sound cards, modems, extra ports such as USB or serial, TV tuner cards and disk controllers. PCI video cards replaced ISA and VESA cards, until growing bandwidth requirements outgrew the capabilities of PCI; the preferred interface for video cards became AGP, and then PCI Express. PCI video cards remain available for use with old PCs without AGP or PCI Express slots. 9. Accelerated Graphics Port (AGP) The AGP is a high-speed point-to-point channel for attaching a video card to a computer’s motherboard, primarily to assist in the acceleration of 3D computer graphics. Originally it was designed as a successor to PCI type connections. Since 2004 AGP has been progressively phased out in favor of PCI Express (PCIe). By mid-2009 PCIe cards dominated the market; AGP cards and motherboards were still produced, but OEM driver support was minimal. By 2010 few new motherboards had AGP slots. No new motherboard chipsets were equipped with AGP support, but motherboards continued to be produced with older chipsets with support for AGP. Page 31
  • 32. 12:46:48 Saturday, July 21, 2012 10.Complementary Metal-Oxide Semiconductors (CMOS) CMOS is a technology for constructing integrated circuits. CMOS technology is used in microprocessors, microcontrollers, static RAM, and other digital logic circuits. CMOS technology is also used for several analog circuits such as image sensors (CMOS sensor), data converters, and highly integrated transceivers for many types of communication. Two important characteristics of CMOS devices are high noise immunity and low static power consumption. Noise is a random fluctuation in an electrical signal, a characteristic of all electronic circuits. Electric energy consumption is the form of energy consumption that uses electric energy. Page 32
  • 33. 12:46:48 Saturday, July 21, 2012 11.Jumper Pins In a computer, a jumper is a pair of prongs that are electrical contact points set into the computer motherboard or an adapter card . When you set a jumper, you place a plug on the prongs that completes a contact. In effect, the jumper acts as a switch by closing (or opening) an electrical circuit. Jumpers can be added or removed to change the function or performance of a PC component. A group of jumpers is sometimes called a jumper block. Jumper pins (points to be connected by the jumper) are arranged in groups called jumper blocks, each group having at least one pair of contact points. An appropriately sized conductive sleeve called a jumper, or more technically, a jumper shunt, is slipped over the pins to complete the circuit. Partition Partition a process of electronically on logically HDD space is sub divided into group slanders. Dos Partition: It was used only Windows Operating System Loading Partition Dos Partition Non-Dos Partition Page 33
  • 34. 12:46:48 Saturday, July 21, 2012 Non-Dos Partition: It was used only other Operating System Loading (Linux, UNIX, etc…). Primary Non-Dos Partition: It creates the C drive. Extended Non-Dos Partition: It creates the Logical drives like D,E,F, etc… How to partition ur hard disk with CMD Step 1: open CMD. Step 2: type diskpart Step 3: type list vol. Step 4: sel vol in my case in foin to chose da volume that I want to partition. Step 5: type sel vol it says vol 2 is knoe selected. Step 6: type shrink desired-wat eva amount u wnt in my case in goin to do 12000 press enter wait for a few seconds it says it’s done. Knoe go to start left click on my computer click manage select disk management. It’s 11GB. Non-Dos Partition Primary Extended Page 34
  • 35. 12:46:48 Saturday, July 21, 2012 Formation Formatting is a process which creates traces and sectors or creates a file system. Formatting is two types one is Low-level formatting and another one is High-level formatting. Low-level formatting is used only manufactures. Manufactures was Creates the Takes, Segments, Sectors. High-level formatting is used only Users. Users can create the File System. File system is a sequential method of Reading and Writing files in the storage. There are many types of file system are there. These are Windows File System, Dos File System, Etc… Windows File System will be classified in to 4 types. These are FAT, NTFS, CDFS and UDFS. File Allocation Table (FAT): FAT 12  Floppy’s -- It support 16MB. FAT 16  HDD -- It support 02GB FAT 32  HDD -- It support 04TB It is used up to windows XP version only. New Technology File System (NTFS): It is used Windows XP Service 2 onwards. Compact Disk File System (CDFS): It is used only CD. User Defined File System (NTFS): It is used in DVD and BRD. Windows XP Formatting Process: Before the install/reinstallation of Windows XP, I highly recommend that you download Service Pack 3 “for multiple computers” and burn it onto a CD. The download is approximately 316.4MB. If you choose not to do this step, your system could become infected with a virus or worm exploiting the vulnerabilities that Service Pack 3 fixes. I also recommend that you do NOT have your system connected to the Internet until after the installation of Service Pack 3. This means that you cannot activate your XP installation during setup, but you can accomplish that task following a reboot after Service Pack 3 is installed. 1) Shall we begin? After configuring the system for booting from a CD, the Windows Setup screen appears. At this point, Setup is loading the driver files it needs to continue with installation. Page 35
  • 36. 12:46:48 Saturday, July 21, 2012 2) Welcome to Setup. The “Welcome to Setup” screen appears with the option of Continuing Setup, Repair a previous installation, or Quitting. Press ENTER to Continue Setup. You may also choose R to Repair or F3 to Quit and reboot the system. 3) Windows XP Licensing Agreement. The “Windows XP Licensing Agreement” screen, otherwise known as “EULA,” displays the legal in’s and out’s of this particular software package. You may press F8 to signify that you agree with the terms, hit ESC if you do not agree and PAGE UP or PAGE DOWN to scroll through each screen. Note: If you do not agree to the terms, setup will quit and reboot the system. 4) Insert the previous version. As this is an Upgrade, a previous qualifying product is required to be inserted in the CD drive to continue. Even though Microsoft states that “Windows 95″ cannot be upgraded to XP Home, the CD is good enough for a clean install. At this point, the options include pressing ENTER to Continue or F3 to Quit and reboot the system. Page 36
  • 37. 12:46:48 Saturday, July 21, 2012 5) Hard drive partition information. Hard drive partition information is now displayed. This varies with each systems hardware configuration. This example already has a partition defined. I will choose not to use this and create a new one by pressing D. You may skip this and the next few steps if you do not have any partitions defined. At this point, the options include pressing ENTER to install on the selected partition, D to Delete the selected partition, or F3 to Quit and reboot the system. 6) Warning screen. After pressing D to delete the selected partition, a warning screen appears explaining the pitfalls of deleting it. This particular screen only appears when the partition selected to be deleted is formatted as a bootable system partition. Other partitions will display the next screen. I want this to happen, so I press ENTER to continue. The options include pressing ENTER to continue, or ESC to Cancel. 7) Confirmation screen. A confirmation screen that displays the logical drive, what file system the partition is currently using, the size in MB and controller information Options include L to delete the partition and ESC to cancel the action. Page 37
  • 38. 12:46:48 Saturday, July 21, 2012 8) No partitions have been previously defined. If no partitions have been previously defined, this screen will be displayed. You may section your hard drive in as many partitions as you wish by selecting C to Create a Partition and then entering in a value less then the total available. Here, I will create a Partition in the highlighted, unused portion. Select the partition you wish to install to using the UP arrow and DOWN ARROW keys. Press ENTER to use the highlighted partition and Install, C to Create a Partition, or F3 to Quit and reboot the system. 9) Enter in the partition size. Enter in the partition size in MB within the displayed minimum and maximum. I chose the default or maximum available here. You may choose ENTER to create the new partition or ESC to cancel the action. 10) Continue to create partitions. Continue to create partitions until all space is used or the configuration meets your requirements. Note: a small portion will be unavailable to partition. This is normal. In this example, it is 2 MB. I chose drive C: or Partition1 to install the Operating System. You may choose ENTER to install to the selected partition, D to Delete the highlighted Partition, or F3 to Quit and reboot the system. Page 38
  • 39. 12:46:48 Saturday, July 21, 2012 11) Format the partition. Since this OS supports NTFS, format the partition with it. If you do not, many folder and file security features will be unavailable. Note: If you are dual booting your system, a previous OS will not be able to read the local information. This is a fact with Windows 9x and Me. If you have a requirement to view this partition from another OS installed on the system, do not format it as NTFS. Also, the boot partition must be formatted with FAT32 if you wish to dual boot. I have found no problems accessing a NTFS partition mapped as a network drive from an older OS. Select what format you wish to use by pressing the UP ARROW and DOWN ARROW keys. Press ENTER to confirm your selection and Continue or ESC to Cancel. 12) Setup formats the partition. Watch the progress bar as Setup formats the partition, or get up and get a soda. It may take awhile. 13) Creating File List. Setup is now figuring out what files to copy over to the hard drive. Page 39
  • 40. 12:46:48 Saturday, July 21, 2012 14) Setup copies various files. After the partition are finished formatting, Setup copies various files to support booting from the hard drive and continue on. 15) Creates various information files. Setup then creates various information files required to continue on with setup. 16) Press ENTER to Restart. The first reboot and the end of the blue background has arrived. If you are impatient, press ENTER to Restart before the 15 seconds expire. ENTER to Restart the Computer is the only option available. 17) Windows XP boot screen. Page 40
  • 41. 12:46:48 Saturday, July 21, 2012 The new Windows XP boot screen is displayed. 18) Windows XP Installation. If you have installed Windows before, this type of screen will look familiar. Sit back. It may be awhile. 19) Faster and more reliable. Every Windows OS that comes out has the same claim. Faster and better. It is subject to debate whether or not it could get “any worse.” 20) Region and Input Languages. A little while later, you will be prompted with options of configuring your Region and Input Languages. The default was fine for me, so I selected Next. Page 41
  • 42. 12:46:48 Saturday, July 21, 2012 Options include Customize button, Details Button, plus the standard Back and Next. 21) Enter in your Name. Enter in your Name and optional Organization information, then select the Next button. 22) 25 digit Product Key. Thought you could get away from it? Think again. Enter your unique 25 digit Product Key that came with your CD, then select the Next button. 23) Enter a Computer name. The “suggested” name for the computer is always really whacked out. Choose one that meets your needs. Select Next to Continue. Page 42
  • 43. 12:46:48 Saturday, July 21, 2012 24) Date, Time and Time Zone. Configure the proper information for the Date, Time and Time Zone here. 25) Network Settings Dialog. The Network Settings Dialog is next. Under usual circumstances, the Typical settings are fine. Choose your method and select the Next button. 26) Display Settings Pop-up. Windows XP no longer likes the “default” resolution of 640 x 480 and prompts you of that fact. Select OK to continue. Page 43
  • 44. 12:46:48 Saturday, July 21, 2012 27) Please wait. 800 x 600 is a wonderful thing, however, I chose to have it time out and return to 640 x 480 for this guide. 28) The Welcome Screen. The “Welcome Screen” will now appear while Windows XP Home continues to load in the background. 29) Display Settings Pop-up. Since the initial screen resolution is set to 640 x 480, a balloon dialog appears. You may click the pop-up balloon to raise the resolution up to 800 x 600 automatically. For the rest of this guide, I chose to ignore it. Page 44
  • 45. 12:46:48 Saturday, July 21, 2012 30) Windows XP tour. Click the balloon dialog to start a tour of Windows XP. Even if you do not wish to see the information, you should click on the balloon to get rid of the annoyance in a timely fashion. 31) Windows XP Tour dialog. Windows XP Tour dialog popup is shown. Select the Cancel button to never see it again. 32) Activate. A little reminder also appears in the task bar about activating. 30 Days and the OS will no longer allow logon. Page 45
  • 46. 12:46:48 Saturday, July 21, 2012 33) .NET Passport Wizard. Double-Click the Messenger Icon in the bottom right (system tray) and the “.NET Passport Wizard” dialog appears. Select Cancel to not sign up for Passport at this time. 34) Windows Messenger. With the .NET Passport Wizard gone, the Windows Messenger is opened. 35) Windows Messenger Tools Select Tools, then Options Page 46
  • 47. 12:46:48 Saturday, July 21, 2012 36) Messenger Preferences. In the Options window, select the Preferences Tab. Uncheck “Run this program when Windows starts” and “Allow this program to run in the background.” Of course, if you wish to keep Windows Messenger, do not do this step. 37) Close Messenger. Now you can select the Close button and Messenger will be unloaded from memory. 38) That is all! That’s all there is to it! I hope this guide helped you out or gave you a sneak peek at what is to come. More information about Windows XP is located HERE! Page 47
  • 48. 12:46:48 Saturday, July 21, 2012 Windows 7 Formatting Process: Take note: Regardless of flavor of Windows 7 or if it is 32/64-bit that you will be installing, the steps listed here are the same. The only difference would be which product key is entered to determine which flavor of 7 is installed. This guide assumes a “clean” installation and not an “upgrade” from a previous OS. Ensure that you backup all of your important files (documents, music, etc) to CD/DVD/another hard drive before following these steps. If you are using Hard Disks in a ACPI or RAID setup, you will first need to download the latest Windows 7 compatible (32-bit or 64-bit) for your particular hardware before installing clean. Check with your chipset/hard drive controllers manufactures web site for the latest drivers/information before starting. This guide is for OEM (purchased separately from the computer) and retail versions of Windows 7. Installation instructions specific to computers with “recovery partitions” or recovery DVD’s are very different. Consult your manufactures instructions for details. Selecting the image in the guide loads a larger version. 1) Shall we begin? After configuring the system for booting from a DVD, the Windows Setup screen appears. At this point, Setup is loading the driver files it needs to continue with installation. Page 48
  • 49. 12:46:48 Saturday, July 21, 2012 2) Progress Bar. The next screen is a more graphical progress bar indicating Windows 7 is still working in the background. 3) Option Selections. The first options you will come across are selections for Language, Time and currency format, and Keyboard layout. Make your selections by using the pull down menus and press the Next button. 4) Install Now. Here we have the option of repairing a previous installation or “Install Now.” Since this is a clean installation of Windows 7 and not a repair, Install Now is the proper choice. Highlight the “Install Now” button to continue to the next screen. Page 49
  • 50. 12:46:48 Saturday, July 21, 2012 5) Please Wait. Windows 7 is working in the background. This may take several minutes depending on the system. 6) License Agreement. Here we see the License Agreement you must accept before continuing. After reading the agreement, check the box next to “I accept the license terms” and select Next button. 7) Option Selections. Here we would be able to choose an “Upgrade” install (if running setup from a previous version of Windows, such as Vista) or a “Custom” (clean) install. Select the whole box containing “Custom (advanced)” to continue to the next screen. Page 50
  • 51. 12:46:48 Saturday, July 21, 2012 8) Hard Drives. This is where you can select which hard drive/partition to install Windows 7 on. Since this system only has one hard drive, only one place Windows 7 can go. Advanced options are shown in the next screen shot. This is also where you would install drivers for your ACPI/RAID/SATA controller by using the “Load Driver” option. After the installation of the ACPI/RAID/SATA drivers, your hard drives should appear as shown on the right. If no additional drivers are needed, select the Next button. 9) Advanced Options. The advanced options allow creation of multiple partitions and the option of formatting existing partitions. After finishing your particular partition configuration that you desire, select the Next button. Page 51
  • 52. 12:46:48 Saturday, July 21, 2012 10) Installing. Here is where Windows 7 installs major components of the OS. This process can take 10 to 60 minutes depending on the system. 11) Reboot. Here we see the system needing to reboot to continue installation tasks. You can hit the Restart Now button or just allow the reboot to happen automatically after several seconds. 12) Setup Registry Entries. Here we see progress as Windows 7 updates the registry settings. This process may take several minutes before going to the next screen. Page 52
  • 53. 12:46:48 Saturday, July 21, 2012 13) Starting Services. Windows 7 starts up required services at this point in the setup process. 14) Installation Continues. Windows 7 continues to install at this screen. 15) Another Reboot. After initial setup is complete, another reboot is required with no user input. Page 53
  • 54. 12:46:48 Saturday, July 21, 2012 16) Starting Windows. This is the screen you will be greeted with upon each boot. Windows 7 is starting up 17) First Use. Setup is now preparing the system for initial booting. Unlike the previous screen capture, you will not see this on each boot. 18) Video Test. Here is where Windows 7 tests the systems video performance to see if Aero will be enabled or not. This test will only last a few minutes. Page 54
  • 55. 12:46:48 Saturday, July 21, 2012 19) Account Creation. Here is where the initial account creation happens. This user will have full administrator privileges and automatically be logged in after setup is completed. Enter in your user name and computer name as you would like it to be identified on the network and then select the Next button. 20) User Password. This screen prompts you to enter a password for the account that you just created. I highly recommend that you password your account. Enter it twice, and then include a “password hint” to help remind you of what it is if you misplace or forget it. You, of course, should not enter in your actual password in this field, but a subtle reminder to jog your memory. After this information is entered, select the Next button. Page 55
  • 56. 12:46:48 Saturday, July 21, 2012 21) Product Key. Windows 7 now asks you to enter the product key that was included with your purchase. This key determines what features and which version will be installed on the system. 32 and 64-bit versions have the same product key. I highly recommend unchecking “Automatically activate Windows when I’m online”. The reason is that you only have a finite amount of times that you may activate online. After this limit is reached, you will need to call Microsoft directly to have them activate your installation. This can be a big hassle, especially when you are in a hurry to get the computer back up and running. Windows 7 will nag you every so often to activate upon logging in, but this is a minor nuisance compared to the phone call method of activating Windows 7. After verifying that everything works as you intend, you can activate and know that you could have avoided problems later on if you let Windows 7 do it right after logging in for the first time. 30 days is the intended grace period before requiring activation with retail versions, even with this method. However, you can boost that number up to 116 days using the following method: Open up a command prompt with administrator privileges Type: Slmgr -rearm After a reboot, you will have an additional 30 days to ensure everything is running properly. You can perform this action up to 3 times with the current Windows 7 retail release, bringing the required activation time to 116 days, if the Software License Manager is invoked at the end of the required activation period (on the 29th day). I would recommend not waiting until the 30th day to run the command, thus 116 days total and not 120. After this information is entered, select the Next button. 22) Use Recommended Settings. This is where Automatic Updates and problems and reports solutions are offered as an option. I recommend to most users to “Use Recommended Settings” here. These options can always be changed later. Make your selection to continue to the next screen. Page 56
  • 57. 12:46:48 Saturday, July 21, 2012 23) Time and Date. Ensure that your time zone is entered correctly and make adjustments as necessary. Also ensure the proper time is set. This information is extracted from the BIOS settings, so if the time was set correctly in a previous installation of Windows (or most any other OS), it should still be correct here. After this information is verified, select the Next button. 24) Network Profile. Here, you can select the “general” security measures put in place for your particular network. Most people will want to use “Home network” for desktop installations or “Public network” for a portable system, like a laptop. Make your selection to continue to the next screen. 25) Network Connecting. Page 57
  • 58. 12:46:48 Saturday, July 21, 2012 Windows 7 is now connecting to the network. This is where your initial IP address is acquired and internet connectivity is verified. 26) Finalizing Settings. Windows 7 is finally… finalizing settings. This should only take a few moments to complete. 27) Welcome. Not much to say here. Just wait some more. 28) Desktop Setup. Your initial desktop is setup here. This process will take a few moments, but only happen once. Page 58
  • 59. 12:46:48 Saturday, July 21, 2012 29) The Desktop. Windows 7 is now finished being installed and are greeted with the desktop. It is worth noting that you did not need to log in this time, but after rebooting (or logging off), you will see the login screen and you must enter the user name and password created earlier to return to this point. Windows Vista Formatting Process: This guide assumes a “clean” installation and not an “upgrade” from a previous OS. Ensure that you backup all of your important files (documents, music, etc) to CD/DVD/another hard drive before following these steps. If you are using Hard Disks in a RAID or ACPI setup, you will first need to download the latest Vista compatible (32-bit or 64-bit) for your particular hardware before installing clean. Check with your chipset/hard drive controllers manufactures web site for the latest drivers/information before starting. 1) Shall we begin? After configuring the system for booting from a CD/DVD, the Windows Setup screen appears. At this point, Setup is loading the driver files it needs to continue with installation. Page 59
  • 60. 12:46:48 Saturday, July 21, 2012 2) Progress Bar. The next screen is a more graphical progress bar indicating Windows Vista is still working in the background. 3) Option Selections. The first options you will come across are selections for Language, Time and currency format, and Keyboard layout. Make your selections by using the pull down menus and press the Next button. 4) Install Now. Here we have the option of repairing a previous installation or “Install Now.” Highlight the “Install Now” button to continue to the next screen. Page 60
  • 61. 12:46:48 Saturday, July 21, 2012 5) Please Wait. Windows Vista is working in the background. This may take several minutes depending on the system. 6) Product Key. This screen is where you enter your product key or “CD Key” as it is sometimes called. An option also exists to automatically activate Vista upon first coming online. I uncheck this box to ensure everything is running smoothly before activating and having issues later on. 30 days is the standard amount of time before activation is required, though some products (such as MSDN subscriptions) have 60 days or more. After entering your product key, press the Next button. 7) License Agreement. Here we see the License Agreement you must accept before continuing. After reading the agreement, check the box next to “I accept the license terms”. Page 61
  • 62. 12:46:48 Saturday, July 21, 2012 8) Option Selections. Here we would be able to choose an “Upgrade” install (if running setup from a previous version of Windows, such as XP) or a “Custom” (clean) install. Select the whole box containing “Custom (advanced)” to continue to the next screen. 9) Hard Drives. This is where you can select which hard drive/partition to install Vista on. Since this system only has one hard drive, only one place Vista can go. Advanced options are shown in the next screen shot. This is also where you would install drivers for your ACPI/RAID/SATA controller by using the “Load Driver” option. After the installation of the ACPI/RAID/SATA drivers, your hard drives should appear as shown on the right. If no additional drivers are needed, select the Next button. 10) Advanced Options. Page 62
  • 63. 12:46:48 Saturday, July 21, 2012 The advanced options allow creation of multiple partitions and the option of formatting existing partitions. After finishing your particular partition configuration that you desire, select the Next button. 11) Installing… Here is where Vista installs major components of the OS. This process can take 10 to 60 minutes depending on the system. 12) Reboot. Here we see the system needing to reboot to continue installation tasks. You can hit the Restart Now button or just allow the reboot to happen automatically after several seconds. 13) First Time. Here we see a “…” progress as Vista tries to start for the first time. This process may take several minutes before going to the next screen. Page 63
  • 64. 12:46:48 Saturday, July 21, 2012 14) Completing Installation. Vista continues to install at this screen. Depending on system, another reboot or two may happen before the next screen is displayed 15) Account Creation. Here is where we create the first user account for the system and select an icon to be displayed on the login screen. Ensure you password your account. After finishing entering your information and icon selection, select the Next button. 16) PC Name. Here is where we can name the system for networking purposes. By default, it uses the account name entered in the previous step and adds “-PC” to it. We can also select a background for the desktop. After making your selection, select the Next button. Page 64
  • 65. 12:46:48 Saturday, July 21, 2012 16) PC Name: (Image 4.1) 17) Updates. Here we can configure Windows Update with several options. I suggest “Use recommended options” or the top option for most PC users. 18) Time Settings. Here is where you can set the time and daylight savings time options. After configuring your time zone, clock settings and date, select the Next button. 19) Network Configuration. Vista now asks our network configuration by asking “Home, Work or Public Place.” Descriptions are expanded on screen so I will not go into them here. Make your selection to continue to the next screen. Page 65
  • 66. 12:46:48 Saturday, July 21, 2012 20) Thanks! On this screen, we are thanked by Bill G. for installing Windows Vista. After you are done being thanked, select the Next button. 21) PC Performance. Vista now checks the system performance to automatically configure a few options. This may take several minutes while the system does this and it will only do it this one time. 22) Login. We are finally greeted with the login screen, however, there is still more configuration to come. Enter in your password that you used previously during the install process and hit ENTER or the little blue arrow to login. Page 66
  • 67. 12:46:48 Saturday, July 21, 2012 23) Desktop Setup. Your account profile starts being created here starting with your personal desktop configuration. More happens on the next screen. This process will also take several minutes, but only happen once. 24) Account Profile. Vista now sets up profile configurations for Internet Explorer, Windows Media Player as well as a few more Windows applications. This could take several more minutes but we are almost there! 25) Welcome Screen. Vista is installed! On this screen, we are presented with our system configuration as well as several different options. I hope you enjoyed this install guide and I thank you for reading! Page 67
  • 68. 12:46:48 Saturday, July 21, 2012 Linux Formatting Process: Installing Linux operating system is very easy. You can install it either from CD/DVD, USB Sticks, Network or using ISO images. Here we are using Compact Disc to install the operating system on your machine. First enable the Boot from Compact Disc option in your BIOS setting and it is must. There are numerous Linux distributions are available, here we are using Red hat Enterprise Linux. It contains 5 CDs. Insert the CD-1 and let it booting Booting Red hat Linux Operating System Linux booting process Page 68
  • 69. 12:46:48 Saturday, July 21, 2012 Linux Booting Process Welcome to Red hat Enterprise Linux Redhat Enterprise Linux Screen Page 69
  • 70. 12:46:48 Saturday, July 21, 2012 Click Next to continue the installation Select The language, by default English USA Page 70
  • 71. 12:46:48 Saturday, July 21, 2012 Language Select the appropriate keyboard for the system (normally all are using US English ). Click Next to continue. Select Your time zone from the list. Click Next to continue. Page 71
  • 72. 12:46:48 Saturday, July 21, 2012 Time Zone Set the root user (super user) password. This operation will override any previous installation choices about which drives to ignore. Click yes to first time install the operating system and it will erasing all data Page 72
  • 73. 12:46:48 Saturday, July 21, 2012 For Beginners, automatic partitioning is recommended and click Next to proceed Automatic Partition The GRUB boot loader wil be installed on /dev/sda. Click Next to continue [ad#Amazon mini 4] Page 73
  • 74. 12:46:48 Saturday, July 21, 2012 GRUB Bootloader You may set the IP address on your on host. Let it be automatically via DHCP first. You may configure the IP address later. Click Next to continue IP Address Configuration Page 74
  • 75. 12:46:48 Saturday, July 21, 2012 Enable HTTP check box in the firewall settings ( if you want enable it else leave it ) The default installation environment includes recommended package selection Page 75
  • 76. 12:46:48 Saturday, July 21, 2012 The settings are all over and click Next to fire up the installation. Start the installation Linux is format the drive and installing the fresh operating system Page 76
  • 77. 12:46:48 Saturday, July 21, 2012 Take out CD-1 from the tray and insert the CD-2 to install Installation of CD-2 is over and takes out CD-2 from the tray and inserts the CD-3 to install. Page 77
  • 78. 12:46:48 Saturday, July 21, 2012 Do the same process for the remaining CDs too and the video hardware can be automatically detected. Click next to continue. Your Monitor can be automatically detected. Page 78
  • 79. 12:46:48 Saturday, July 21, 2012 If need fix the color depth and the resolution of the screen and select the type of login you can choose either graphical mode or text mode. Page 79
  • 80. 12:46:48 Saturday, July 21, 2012 Congratulations you have been installed the Linux Operating system successfully. Remove the CD from the tray and click exit. The System will reboot now. After rebooting the system, Linux operating system welcomes you for the final setup Page 80
  • 81. 12:46:48 Saturday, July 21, 2012 Read the license agreement carefully and proceed Set the date and time and click Next button to continue Page 81
  • 82. 12:46:48 Saturday, July 21, 2012 A sound card has been detected and checks the sound by clicking on the play test sound button. The setup will register your system with an account from red hat network. I you like to register now select yes else skip this with no option. Page 82
  • 83. 12:46:48 Saturday, July 21, 2012 If you have any additional packages to install select the appropriate option and proceed. The setup is finished now. Page 83
  • 84. 12:46:48 Saturday, July 21, 2012 Enter the user name and password to login the account. Page 84
  • 85. 12:46:48 Saturday, July 21, 2012 Enjoy the Red hat Enterprise Linux Page 85
  • 86. 12:46:48 Saturday, July 21, 2012 Maser Mentis 8 Bites --- 1 Byte 1024 Bytes --- 1 KB 1024 KB --- 1 MB 1024 MB --- 1GB 1024 GB --- 1 TB 1024 TB --- 1PB 1024 PB --- 1 EB Page 86