Replacing a Broken Tongue on a Violin Bow Frog
•
0 gostou•1,461 visualizações

This article describes the step-by-step procedures we use in our shop to repair a broken tongue on a violin (family) bow frog.

Recomendados
Mais conteúdo relacionado
Último
Último (20)
Destaque
Destaque (20)
Replacing a Broken Tongue on a Violin Bow Frog
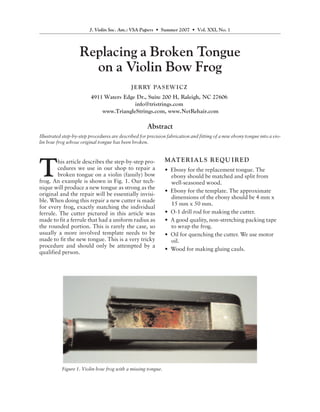
- 1. J. Violin Soc. Am.: VSA Papers • Summer 2007 • Vol. XXI, No. 1 Replacing a Broken Tongue on a Violin Bow Frog J E R RY PA S E W I C Z 4911 Waters Edge Dr., Suite 200 H, Raleigh, NC 27606 info@tristrings.com www.TriangleStrings.com, www.NetRehair.com Abstract Illustrated step-by-step procedures are described for precision fabrication and fitting of a new ebony tongue into a vio- lin bow frog whose original tongue has been broken. M AT E R I A L S R E QU I R E D T his article describes the step-by-step pro- cedures we use in our shop to repair a • Ebony for the replacement tongue. The broken tongue on a violin (family) bow ebony should be matched and split from frog. An example is shown in Fig. 1. Our tech- well-seasoned wood. nique will produce a new tongue as strong as the • Ebony for the template. The approximate original and the repair will be essentially invisi- dimensions of the ebony should be 4 mm x ble. When doing this repair a new cutter is made 15 mm x 50 mm. for every frog, exactly matching the individual ferrule. The cutter pictured in this article was • O-1 drill rod for making the cutter. made to fit a ferrule that had a uniform radius as • A good quality, non-stretching packing tape the rounded portion. This is rarely the case, so to wrap the frog. usually a more involved template needs to be • Oil for quenching the cutter. We use motor made to fit the new tongue. This is a very tricky oil. procedure and should only be attempted by a • Wood for making gluing cauls. qualified person. Figure 1. Violin bow frog with a missing tongue.
- 2. J. Violin Soc. Am.: VSA Papers • Summer 2007 • Vol. XXI, No. 1 R E PA I R P R O C E D U R E S supply company. The first step is to make a blank. After cutting the rod to length, the mate- Initial Steps rial is turned to the appropriate diameter to fit The first step when starting this repair is to take the collet of the milling machine. Then the head measurements. It is important to measure the of the cutter is shaped so that the head matches width of the rails right behind the ferrule, as well the inside ferrule height and width measure- as the height and weight of the frog. The ferrule’s ments, with an additional 0.1 mm to allow for inside width and inside height should be noted ferrule fitting later (Fig. 2). The neck should be for use in making the cutter, as well as the silver smaller than the mortise for the pearl slide. Once thickness for use during the cutter setup. It is the blank is made, the shaping of the cutter also a good idea to take photographs of the orig- begins (Fig. 3). The cutter used in this project inal, paying particular attention to any missing needed to have an exact radius, so we were able chips, distortion, cracks, or wear. to use a radius cutter. When the cutter does not A single layer of non-stretching packing tape have a fixed radius, the blank is colored with a is applied to the entire frog to protect the fragile permanent marker and the shaping is done with edges of the repair area, as well as to protect the files, paying attention not to remove the last lit- frog as a whole from glue squeeze out. The pack- tle black of the marker representing the height ing tape should be carefully trimmed so as not to and width. The ferrule is used as a guide by hold- get in the way later. At this time, any remnants of ing it under the cutter blank and comparing it to the old tongue are removed. the work in progress. Next, cut the teeth. A 0.5-in.-dia. 60° dove- Making the Cutter tail cutter is mounted in the lathe, and the tongue The cutter for this project is made from O-1 drill cutter blank is mounted in a milling attachment rod, an oil-hardened, non-shrinking, general- on the lathe compound. The cross slide is used to purpose tool steel available from any industrial slowly feed the tongue cutter blank into the Figure 2. A tongue cutter blank is machined from a drill rod in a lathe. 2
- 3. J. Violin Soc. Amer.: VSA Papers • Summer 2007 • Vol. XXI, No. 1 Figure 3. With the cutter blank in a lathe, a radius cutter is used to machine a rounded portion. dovetail cutter to the appropriate depth. The repeated until the top of the rails shows no milling attachment is then lowered to the appro- deflection, and the two sides of the rails have the priate height and the carriage is slowly moved same amount of deflection. This ensures that the away from the chuck, creating a cutting surface cutter goes down the center of the frog and par- on the blank (Fig. 4). allel to the top of the rails. This is repeated four times to make the four Once the frog is positioned correctly in the teeth of the tongue cutter. The steel is then heat- vise, the cutter is clamped into the milling head ed to 1450-1500°F and quenched in oil. Once and centered on the frog (Fig. 7). At this point the teeth have been slid across a polish stone, the the cutter is raised so that the top of the cutter is cutter is complete, as shown in Fig 5. at the same level as your rails. In other words, if a straight edge is laid on the rail from back to Setting Up and Removing Material to front, the straight edge would also be resting on Accept the New Tongue the top of the cutter. Using the silver thickness measurement from earlier, the cutter is adjusted The frog is now clamped into the milling vise down. Allow for the fact that the ferrules on old- with the use of cauls to begin the setup for cut- er bows sit slightly above the rail surface. The ting. It is very important to know where the cut- setup is ready to cut. ter is going before it gets there. Therefore, a dial The cutter is backed away from the frog and indicator is used on the top and the two sides of the mill speed is set at ~800 rpm. Using the cross the rails to determine the position of the frog as slide, the cutter is slowly moved into the frog shown in Fig. 6. The dial indicator is set to con- while being careful to avoid heat buildup (Fig. tact the rail and the cross slide is moved in or 8). The goal is to mill until the cutter touches the out, taking note of the amount of deflection back of the mortise. As the cutter goes in, the shown on the dial. (Re-position the frog and rails will tend to spring out. This is normal. take another measurement.) This process is 3
- 4. J. Violin Soc. Am.: VSA Papers • Summer 2007 • Vol. XXI, No. 1 Figure 4. A dovetail cutter is used to make teeth in the new tongue cutter. 4
- 5. J. Violin Soc. Am.: VSA Papers • Summer 2007 • Vol. XXI, No. 1 Figure 5. Custom-manufactured tongue cutter. 5
- 6. J. Violin Soc. Am.: VSA Papers • Summer 2007 • Vol. XXI, No. 1 Figure 6. A dial indicator is used to position the frog. 6
- 7. J. Violin Soc. Am.: VSA Papers • Summer 2007 • Vol. XXI, No. 1 Figure 7. The cutter is aligned to the frog ready for machining. Figure 8. Cutting the frog to accept a new tongue. 7
- 8. J. Violin Soc. Am.: VSA Papers • Summer 2007 • Vol. XXI, No. 1 Making the Template and Fitting the When the rounded part of the ferrule does New Tongue not have a radial profile, the tongue is construct- With the cutter still in the milling machine and ed a little differently. The ebony is first planed to the frog removed from the vise, it is time to make the correct thickness, the thickness of the origi- a template to fit the tongue (Fig. 9). A notch is nal tongue cutter blank that represents the inside made in the 5-mm piece of ebony to accept the of the ferrule +0.1mm. After the ebony is planed neck of your tongue cutter. The ebony is placed to thickness, it is planed to the width of the cut- into the vise and the cutter is run through it, ter blank. While referring to the template, a making an outline of the frog cut. series of even, parallel chamfers are planed into If the rounded part of the ferrule has a circu- what will be the rounded portion of the tongue. lar curvature, this is the only template that is Smaller and smaller chamfers are blended until needed. If, however, the rounded part of the fer- the tongue blank fits through the template. rule does not have a fixed radius, the template Using the half profile portion of the template, should have this cut, a cut of half of the profile, the end of the tongue is fitted. Figure 13 shows and a cut of just the rounded portion of the fer- the new fabricated tongue as it is progressively rule up to the flat (Fig. 10). fitted into place in the frog. This template (not the frog) will be used to fit the tongue. For the bow worked on in this Gluing the New Tongue and Finishing article, the tongue was spun down on the lathe to When the tongue is shaped to exactly match the the correct radius, the round at the end was cut frog, it is glued in place. A gluing caul will be with the radius cutter, and the template was used needed that matches the underslide of the frog, to gauge how much of the tongue blank was to as well as a flat caul for the rail side of the frog. be planed away (Figs. 11 and 12). The flat caul will be used to wrap the new tongue Figure 9. Tongue-fitting template for use with fixed-radius tongues. Figure 10. Tongue-fitting template for a tongue with non-constant radius of curvature. 8
- 9. J. Violin Soc. Am.: VSA Papers • Summer 2007 • Vol. XXI, No. 1 Figure 11. Ebony dowel prior to being formed into a new tongue. Figure 12. Using a plane, the ebony dowel is formed to fit the template. 9
- 10. J. Violin Soc. Am.: VSA Papers • Summer 2007 • Vol. XXI, No. 1 Figures 13. Fitting the new tongue into the frog. Figure 14. The new tongue is glued into the frog while being held under pressure in an appropriate fixture. 10
- 11. J. Violin Soc. Amer.: VSA Papers • Summer 2007 • Vol. XXI, No. 1 Figure 15. Violin bow frog before and after replacing the missing tongue. area, so it needs to be of appropriate length. shows the violin bow frog before and after fit- The frog is dry-fitted, so be sure your mea- ting the new tongue into place. surements are correct. The tongue is then glued using a good epoxy designed for wood. The tongue is wrapped with a rubber band to apply ACKNOWLEDGMENTS pressure to the graft area (Fig. 14). Once the epoxy is cured, the slide and ferrule are fitted as The work shown in the illustrations was per- normal, and the project is complete. Figure 15 formed by Tom Goering. 11