SlideShare uma empresa Scribd logo
1 de 38
Process Journal
Date: 21 September 2011

Title:Drawing and Measuring Body Of The Moving Toy

What You Did:
Today I use a pencil to draw the rabbit’s shape on the wood. I use a tri-square to
mark lines across the other end. This tells me where do I draw my rabbit at the
other side. I finished drawing my rabbit’s head and body.

Emotions:
I was really excited to start making my moving toy. Sometimes I really can’t wait
till we enter in the create section.

AOI learning profile:
Today, I learn that we need to draw our moving toy on both sides of the wood. I
also learn that if we draw to small, the small little parts will break easily.

Why?
The reason I need to draw my rabbit on the other end is because we will know
where to cut on both sides.

Pictures and Diagrams:Drawing my rabbit on the hard wood.
Using tri-square to mark out lines.

Changes to my plan:
So far I didn’t make any changes to my plan.

What’s next?
The next thing that I will do is using a coping saw to cut out the shape of the
rabbit’s body. I need to cut out the shape of the rabbit’s leg. I think I will finish all
of this plans.
Date: 25 September 2011

Title:
Using a coping saw

Emotion:
I was really happy that I learn more skills when I am cutting softwood. I feel
nervous when I think that I am doing the wrong thing.


What I did:
Today, I use a coping saw to cut out the shape of my moving toy’s body. I turned
my moving toy when I am cutting at the lowest part. Other then cutting my
moving toy’s body, I also cut the head of the moving toy.


Why:
I turn my moving toy around when I am cutting the body part. The reason I
turned around is because I’m not cutting the table but I am cutting my moving
toy. The reason that I am using a coping saw instead of a tenon saw is because I
am cutting curved shapes.


AOI learning profile:
Today, I learn that I should lower down the position of my timber. The reason I
do this is because I will break the coping saw’s blade if it is too high. The second
reason is because it will be easier to cut the moving toy.


Pictures and diagram
Using a coping saw to cut the shape of a rabbit’s head.
Changes to my plans:
So far, I didn’t make any changes to my plans.


What’s next?
I need to finish cutting my timber by the next lesson. I need to cut the legs for my
moving toy. The last thing I will do is to draw a cool skateboard on a new timber.
I will finish all this things in the next lesson.
Date: 26 September 2011

Title:
Learning more skills to use a coping saw

What I did:
For today, I continue using a coping saw to cut the rabbit’s body. I broke the
coping saw twice when I was cutting. I realized that the way I was using a
coping saw wasn’t correct. After that, I changed the way that I used it. I don’t
know why the coping saw broke at the second time when I was using the
correct way. I didn’t pull the coping saw out of the timber when I want to
change the angle of cutting it.

Why:
The reason that we are not supposed to pull the saw out of the timber is
because the blade is very tin.

Emotions:
I was very nervous when I broke the saw. I feel very stressful when I broke
the 2nd blade. The reason I feel very stressful is because I didn’t pull the
coping saw out of the timber and the blade broke.

AOI learning profile:
Today, I learn a lot of skills. The first skill that I learn was learning how to pull
the coping saw out of the timber correctly.

Pictures and diagram:
Using a coping saw to cut the rabbit’s body. Coping saw are use to cut curve
shapes.
Changes to my plans:
So far I didn’t make any changes to my plans.

Plans:
I will finish cutting the rabbit’s body and I will need to sand all the edges and
make it smooth. I also need to cut out the rabbit’s leg and finally the
skateboard.
Date: 28 September 2011

Title:
Using Disc sander to cut the rough edge off.

What I Did:
Today I used the flat-headed tool to file all the corners off. I also used Disc
sander to cut off all the rough edges. Before using that machine, I checked all
my safety rules. I wore safety goggles and I started my work. I used garnet
paper to rub the both surfaces. I rubbed it in 1 direction.

Why?
The reason I use the garnet paper to rub only in 1 direction is because I will
rub all the fibers.

AOI Learning Profile:
I should use the garnet paper to rub the where the lines are pointing.

Emotions:
Today was a very interesting day learning design technology. I started
learning more skills in using tools and machines.


Pictures And Diagrams:

Filing the corners using flat file tool


Changes To Plans:
So far, I didn’t make any changes to my plans.


What’s next?
Start drawing my skateboard on a new timber. I’m going to use a tenon saw to
cut my skateboard out.
Date: 8 October 2011

Title:
Using a tenon saw to cut the bottom part of the rabbit’s body

What I did:
Today, I use a tenon saw to cut the bottom part of the rabbit’s body. I used
disc sander to sand the bottom part off, this will make it the bottom part
straight. After sanding my rabbit’s body, I drew a shape of a skateboard on a
new timber.

Why:
The reason I use a tenon saw instead of other saws is because I am cutting a
straight line. If I am cutting curves shapes, I will use coping saw to cut it.

Emotion:
I feel very proud of myself, because I did a lot of things today.

AOI learning profile:
Today, I learn that I should draw my skateboard on the side of the timber. If
we draw anything in the middle of the timber, we will waste a lot of wood.

Pictures And Diagram:
Draw skateboard on a new timber
Using a tenon saw to cut the bottom part of the rabbit’s body.


Changes to my plans:
So far, I didn’t make any changes to my plans.

What’s next?
The next thing that I should do is to cut my skateboard and fix all the problems.
I need to start making wheels for my skateboard in the next lesson.
Date:
10 October 2011

Title:
Using a coping saw to cut my skateboard shape

What I did:
Today, I used a coping saw to cut my skateboard. I used the coping saw to
cut the curves and a tenon saw to cut straight line. After finishing cutting it, I
use a disc sander to sand my skateboard. I sand all the rough edges on the
side. I also used garnet paper to run the surface on the skateboard.

Why:
The reason I check safety rules before using disc sander is because, it’s
important or it will be dangerous.
Safety rules:
• Wear safety goggles
• Nothing else is around there
• Wear aprons

AOI Learning Profile:
I learn that I should draw my skateboard on the side or else I will waste a lot
of wood. We must not waste wood and we should use it properly.

Emotions:
Today it was a really cool day when I did a lot of things in today’s lesson. I
hope that I will do more fun things in the next lesson.

Pictures and Diagrams:
Using a coping saw to cut my skateboard shape
Using disc sander to sand the sides off and to make them smooth


Using garnet paper to sand the surface off.

Changes to my plans:
So far, I didn’t make any changes to my plans.

What’s next?
I need to use trimmer router to cut the sharp sides off on my skateboard and
my rabbit. After this, I need to create wheels for my skateboard.
Date:
12 October 2011

Title:
Using trimmer router to cut my skateboard and my rabbit’s
edge off

What I did:
Today, I check all the safety rules and waited for instruction before I used the
trimmer router.After everything is ready, I hold the trimmer router and cut the
edge off. I cut the rabbit and the skateboard’s edge off.

Why:
Safety rules:
•Wear safety goggles
•Never on the trimmer router unless the teacher ask you to
•Apron on
•Got to wait for the trimmer router’s blade to stop spinning before laying it
down

AOI Learning Profile:
In today’s lesson, I learn that when I am using the trimmer router, we should
cut it in anti clockwise direction.

Emotions:
Today’s lesson was a bit boring, because I waited too long using the trimmer
router.

Pictures And Diagrams:

Using trimmer router to cut the skateboard’s edge off


Changes to my plans:
I didn’t make any changes to my plans.
What’s next?
I need to create 4 wheels for my skateboard in today’s lesson. If there is
enough time, I need combine my wheels and skateboard together.


Changes to my plans:
So far, I didn’t make and changes to my plans.


What’s next?
I need to start making wheels using a machine. I need to draw markings on
my skateboard and start drilling my wheels into the skateboard.
Date:
16 October 2011

Title:
Drawing 4 wheels on a timber

What I Did:
Today, I used a pencil to draw 4 wheels on a new timber. I used a timber that
people had used to create wheels to draw my wheels. I chose timbers that
have big wheels on it, because I need big wheels on a skateboard. I drew all
my wheels at the same size.

Why:
The reason I drew all the wheels at the same size is because I want the
movement of the skateboard to be smooth.

Emotions:
Today, there wasn’t enough time to complete my plans in 1 period. I feel very
sad and frustrating whenever I can’t complete anything. I feel like rushing and
finishing all the plans I have in today’s lesson.

Pictures and diagrams:

Using tenon saw to cut the timber for the wheels.
Using a pencil to draw wheels.


Changes to my plans:
So far, I didn’t make any changes to my plans.

What’s next?
I need to make wheels using the machine. I also need to drill my wheels into
the skateboard.


Date:
17 October 2011

Title:
Using pedestrian drill to make wheels

What I did:
Today, I used the pedestrian drill to make wheels. I wore safety goggles and I
clamped my timber tightly to the table. I on the green button to start and I pull
down the thing slowly. When it is drill halfway, I turn the timber around and
start making the other side. I repeat these steps 3 times to make 4 wheels.
After making all the wheels, I used garnet paper to sand the wheels.

Why:
The reason I ask a teacher to watch me when I am using the pedestal drill is
because this is my first time using it. This is a more safety way to use the
machine. I used garnet paper to sand my wheels because the wheels can’t
roll if there are sharp edges around the wheels.

AOI learning profile:
Today was a very special day; I finally know how to use the pedestrian drill
properly. This was my first time using the pedestrian drill and I learnt a lot of
experience when I am using it.

Emotions:
Today I used a very scary machine, which is the pedestrian drill. I feel very
nervous when I am using because I’m scared that I will break the drill. It was
exciting when I learn something new, but I am very serious when I am using it.

Pictures and diagrams:

Using pedestal drill and wheel cutting bit make wheels


Using garnet paper to sand my wheels.
Changes to my plans:
So far, I didn’t make any changes to my plans.


What’s next?
The next thing that I should do is to sand my wheels using garnet paper. I
need to draw markings on my skateboard and start drilling my wheels into my
skateboard.


Date:
19 October 2011

Title:
Drill holes in my skateboard for my wheels using pedestal drill

What I did:
Today, I continue to sand my wheels using garnet paper. After sanding, I took
my skateboard and drill 2 holes on the skateboard for my wheels. I used
pedestal drill-to-drill holes in my skateboard. I cut a stick using a tenon saw for
my wheels.

Why:
Safety rules when you are using the pedestal drill
• Wear safety goggles
• Wear apron
• Hold on the clamp when you are drilling
• Do not drill it too fast
• Wait for teacher’s instruction before you turn on

Emotions:
Today I feel very comfortable when I am using the pedestal drill, because I
learn a lot of tiny experience when I am using it the last time. It found that it is
really relaxing when I am using it. Nothing happen if I drill it slowly.

Pictures and diagrams:
Drill my holes in my skateboard using pedestal drill


Changes to my plans:
So far, I didn’t make any changes to my plans.


What’s next?
I need to continue cutting sticks for my wheels. I need to drill holes in my
wheels using pedestal drill.
Date:
26 October 2011

Title:
Drill holes in my wheels and the skateboard using pedestal drill

What I did:
Today, I use a tenon saw to cut the stick for my wheels. I used the pedestal
drill to drill holes in my wheels and my skateboard. I drill 2 holes in the middle
of the skateboard and 1 hole in the middle in each wheel.

Why:
Safety rules while using pedestal drill:
   - Wear safety goggles
   - Wear apron
   - Wait for instructions
   - Drill it slowly
Emotions:
Today, It was a good day to learn a lot of interesting stuff. I enjoy a lot when I
know how to use the pedestal drill. I finish all my plans in time and I feel proud
of myself.

Pictures and diagrams:

Drilling holes in the middle part of the skateboard using pedestal drill


Timber

Changes to my plans:
So far I didn’t make any changes to my plans.

What’s next?
I need to draw markings and start drilling everything together. After this I need
to start painting my moving toy.


Date:
30 October 2011

Title:
Cutting the stick shorter with a tenon saw

What I did:
Today, I cut the stick with a tenon saw to make it shorter. It’s too long for my
wheels. I drill 4 holes in my skateboard so that it will be ready to screw 4
screws in my skateboard after I paint it.

Why:
The reason that I should paint everything first before I joined everything
together is because some parts need to be painted before joining everything
together.

Emotions:
Today, It was a great day to learn a lot of interesting stuff. I am glad that I am
up to the painting stage. It is fun when I am painting beautiful colors on my
moving toy.

Pictures and diagrams:

Using tenon saw to cut the stick shorter.


Drilling holes in my skateboard


Changes to my plans:
Today I decided that I should change 1 of my plans. Instead of painting my
wheels brown, I need to paint it yellow. The reason for me painting it yellow is
because there isn’t blue in the box.

What’s Next?
I need to continue painting my 4 wheels and I need to let it dry up. I need to
paint my skateboard and after that I need to paint my rabbit.
Date:
31 October 2011

Title:
Painting my wheels and skateboard with beautiful colors

What I did:
Today, I grab a small brush, cardboard, painting pallet, paint, and set
everything up. I paint my wheels with yellow color. I let my wheels dry after I
finished painting my wheels. I use the color black, to paint my skateboard.

Why?
The reason I should paint the edges first before painting the surfaces it
because we should finish the hardest part first.

Emotions:
Today, I’m glad that I’m up to the painting stage. I can’t wait to see how is my
moving toy.

Pictures and diagrams:
Painting my wheels yellow


Painting my skateboard black


Changes to my plans:
So far, I changed some of my plans. I painted my wheels yellow instead of
brown. The reason I painted my wheels to yellow is because there isn’t brown
in the box.

What’s next?
I need to sand my skateboard using garnet paper and continue painting it
again. I need to repeat this a lot of time. After that, I need to start painting my
rabbit.
Date:
6 November 2011

Title:
Sanding skateboard and paint it again

What I did:
Today, I sand all my parts using different kinds of garnet paper. I used 180 to
sand my skateboard. I used 360 to make my skateboard smoother. After that,
I grab paintbrush, pallet, and cardboard, paint. I set everything up and I
started painting my skateboard black. I let my skateboard to dry and I use
garnet paper to sand my rabbit.

Why:
The reason I painted the sides on the skateboard first it is because the sides
is the hardest part to paint. We should always complete the hardest part first
and then the easiest part.

AOI learner profile:
Today, I learnt to use different kinds of garnet paper to sand my skateboard. I
can use 180 first and then 360. This will make my skateboard smoother.

Emotions:
Today, It was a really relaxing day because I have a lot of fun when I am
painting my skateboard. I feel a bit bored when I heardthat I need to sand and
paint my skateboard 4 times.

Pictures and diagrams:

Sand my skateboard using garnet paper


Painting my skateboard black

Changes to my plans:
I didn’t make any changes to my plans.
What’s next?
I need to sand my skateboard and paint my skateboard. I need to repeat this
process 3 times more. I also need to paint my rabbit with different beautiful
colors.
Date:
7 November 2011

Title:
Sanding my skateboard with different grids of garnet paper

What I did:
Today, I used 180 to sand my skateboard. After that, I used 360 to sand my
skateboard. This process actually works because I did tried touching my
skateboard’s surface before I use 360. I painted black on the sides of my
skateboard and the surfaces. I also sand my wheels using 180 and after that I
painted my wheels using yellow paint.

Why?
The reason repeats the sanding and painting process it’s because the moving
toy will be really smooth.

Emotions:
Today was a really great day because we have 2 periods and I manage to
complete all my plans. I was glad that I just need to repeat the process 2 more
times and I am done with my skateboard.

Pictures and diagrams:


Sand my skateboard using garnet paper
Painting my skateboard black

Changes to my plans:
So far I didn’t make any changes to my plans.

What’s next?
The next thing that I need to do is to paint my rabbit. I need to let it dry and
after that I need to sand it again.


Date:
9 November 2011

Title:
Painting my rabbit white

What I did?
Today, I sand my skateboard using 360 grid garnet paper. After that I sanded
my wheels using 360 grid garnet paper. I paint my wheels and my skateboard.
After that, I paint my rabbit using white paint. I paint the body of the rabbit
white.

Why?
The reason I didn’t paint my rabbit’s ear white it’s because I am painting other
colors at the ears. The reason I paint before I drill 2 holes in my rabbit is
because I need to set everything up before I drill and put the 2 eyes in my
rabbit.

Emotions:
I was glad that I complete my plans today. Today was a great day because
we have 2 periods of design technology to finish our plans. I feel a little bit of
bored when I am waiting for the paint to dry.
Pictures and diagrams:
Painting my skateboard black


Painting my rabbit white

Changes to my plans:
Today, I painted my rabbit white instead of peach.

What’s next?
I need to paint my rabbit using white on the other side and I need to sand it. I
need to repeat this process more than 4 times.
Date:
13 November 2011

Title:
Sanding my rabbit using garnet paper

What I did?
Today I sand my rabbit and skateboard using smooth garnet paper. I painted
my rabbit using white color on the sides. After that, I painted my rabbit using
white color on both sides. I sanded the sides of my rabbit after my rabbit is dry.

Why:
The reason I paint the sides of my rabbit first before I paint the surfaces it’s
because we should always complete the hardest part first and then the
easiest part.

Emotions:
Today wasn’t a really lucky day because we only have1 period for design
technology, but it was good that I completed all my plans.I feel a bit bored
whenever I repeat the sanding and painting process.

Pictures and diagram:

Using 180 grid garnet paper to sand my skateboard.
Using 306 grid garnet paper to sand my skateboard.


Changes to my plans:
I decided to drill 2 holes at the rabbit’s face after I have finish the sanding and
painting stage. I need to put 2 eyes on the rabbit’s face.


What’s next?
I need to sand my skateboard and rabbit using grid 180 and 360 garnet paper.
After that, I need to paint all the parts again.
Date:
14 November 2011

Title:
Sanding and painting

What I did?
Today, I sand my wheels, skateboard rabbit using garnet paper. At first I used
180 to sand all the parts and then 360. I painted my skateboard black on the
sides. After that, I painted my skateboard on the 2 surfaces.

Why?
The reason I paint the sides first before painting the surfaces it’s because it is
we should paint the hardest part before painting the easiest part.

AOI learner profile:
I learn that we should paint the dark colors first before painting the light colors.

Emotions:
I was glad that I finished the sanding and painting process on my skateboard.
It was a great day because we have 2 awesome periods to complete our work.
If I’m not wrong, I will finish my project at the end of this week.

Pictures and diagrams:
Sanding my skateboard using 180 grit garnet paper.
Painting my skateboard black with a paintbrush

Changes to my plans:
I didn’t make any changes to my plans so far.


What’s next?
I need to sand and paint my rabbit white 3 more times and I need to repaint
my wheels. After that I need to screw in 2 holes at the rabbit’s face to put in
eyes.
Date:
16 November 2011

Title:
Sanding and painting

What I did?
Today, I sand my rabbit using 360 grid garnet paper. After that I painted my
rabbit white. I sand my wheels because it is too rough. I tear the garnet paper
into half and I sand it. I use garnet paper to sand my skateboard to make it
smoother.

Why?
The reason I wait for my rabbit to dry for 24 hours before sanding is because
it is not fully dry.

Emotions:
I was glad that I finished the sanding and painting process on the skateboard.
I feel a little bit of bored when I’m not finish sanding and painting my rabbit.

Pictures and diagrams:
Sanding my rabbit using 180 grid garnet paper
Change to my plans?
I didn’t make any changes to my plans so far.


What’s next?
I need to paint my rabbit again on the sides and the surfaces. I need to drill 2
holes in the face and screw the eyes in the rabbit.
Date:
19 November 2011


Title:
Painting my rabbit white

What I did?
Today, I grab garnet paper and sand the sides of the rabbit. I also sand the
surfaces, because I want to repaint it. After that, I grab a cup of water,
paintbrush, white paint, card box, and pallet. I started using all this stuff to
paint my rabbit.

Why?
The reason I need to repaint my rabbit again Is because there is still a lot of
empty spaces in my rabbit. The second reason is I want to make it smoother.

Emotions:
Today it was a great day because I don’t need to sand and paint my
skateboard any more. Today it was an interesting because I’m finished with
painting all my stuff.

Pictures and diagrams:


Changes to my plans:
So far, I didn’t make any changes to my plans.

What’s Next?
I need to drill 2 holes at the rabbit’s face and glue the eyes together on the
rabbit’s face. I screw 4 screws in my skateboard.
Process journal

Mais conteúdo relacionado

Destaque (13)

Origami of roses. bless rachel
Origami of roses. bless rachelOrigami of roses. bless rachel
Origami of roses. bless rachel
 
Nathan's artwork
Nathan's artworkNathan's artwork
Nathan's artwork
 
Origami of roses
Origami of rosesOrigami of roses
Origami of roses
 
Origami of roses
Origami of rosesOrigami of roses
Origami of roses
 
Origami of roses
Origami of rosesOrigami of roses
Origami of roses
 
파워포인트
파워포인트 파워포인트
파워포인트
 
Math test2
Math test2Math test2
Math test2
 
1 rattanlal
1 rattanlal1 rattanlal
1 rattanlal
 
1 rattanlal
1 rattanlal1 rattanlal
1 rattanlal
 
Perfumes of
Perfumes ofPerfumes of
Perfumes of
 
Canon pachelbel
Canon pachelbelCanon pachelbel
Canon pachelbel
 
Dasar Ilmu Tanah
Dasar Ilmu TanahDasar Ilmu Tanah
Dasar Ilmu Tanah
 
How to write_email
How to write_emailHow to write_email
How to write_email
 

Semelhante a Process journal

Laura process journal memphis
Laura process journal memphisLaura process journal memphis
Laura process journal memphisRob
 
Biomimicry Project -Process Journal
Biomimicry Project -Process JournalBiomimicry Project -Process Journal
Biomimicry Project -Process Journalimdoldoli
 
Movie it process
Movie it processMovie it process
Movie it processSana Samad
 
Cutting and stick together the drawer sides
Cutting and stick together the drawer sidesCutting and stick together the drawer sides
Cutting and stick together the drawer sidesmotorwan
 
Process journal5
Process journal5Process journal5
Process journal5jeeyeon
 
Biomimicry process journal pdf
Biomimicry process journal  pdfBiomimicry process journal  pdf
Biomimicry process journal pdfgdiane
 
Biomimicry process journal
Biomimicry process journal Biomimicry process journal
Biomimicry process journal gdiane
 
Dt process journal
Dt process journal Dt process journal
Dt process journal kmisaki
 
Process journal 102810
Process journal 102810Process journal 102810
Process journal 102810rlawlals019
 
Process journal moving toy
Process journal moving toyProcess journal moving toy
Process journal moving toycriszamu
 
Process journal 3
Process journal 3Process journal 3
Process journal 3Xavier Tan
 
Process journal8
Process journal8Process journal8
Process journal8kkh98
 
Cutting the starfish drawer sides2
Cutting the starfish drawer sides2Cutting the starfish drawer sides2
Cutting the starfish drawer sides2motorwan
 
Cutting the starfish shape1
Cutting the starfish shape1Cutting the starfish shape1
Cutting the starfish shape1motorwan
 
Sanding and cutting the product
Sanding and cutting the productSanding and cutting the product
Sanding and cutting the productmotorwan
 
Process journal nov:10:2011
Process journal nov:10:2011Process journal nov:10:2011
Process journal nov:10:20111234567891011Han
 

Semelhante a Process journal (20)

1 whole pj
1 whole pj1 whole pj
1 whole pj
 
Laura process journal memphis
Laura process journal memphisLaura process journal memphis
Laura process journal memphis
 
Biomimicry Project -Process Journal
Biomimicry Project -Process JournalBiomimicry Project -Process Journal
Biomimicry Project -Process Journal
 
Movie it process
Movie it processMovie it process
Movie it process
 
Cutting and stick together the drawer sides
Cutting and stick together the drawer sidesCutting and stick together the drawer sides
Cutting and stick together the drawer sides
 
Process journal5
Process journal5Process journal5
Process journal5
 
Biomimicry process journal pdf
Biomimicry process journal  pdfBiomimicry process journal  pdf
Biomimicry process journal pdf
 
Biomimicry process journal
Biomimicry process journal Biomimicry process journal
Biomimicry process journal
 
Dt process journal
Dt process journal Dt process journal
Dt process journal
 
Process journal 102810
Process journal 102810Process journal 102810
Process journal 102810
 
Process journal moving toy
Process journal moving toyProcess journal moving toy
Process journal moving toy
 
Process journal 3
Process journal 3Process journal 3
Process journal 3
 
Process journal8
Process journal8Process journal8
Process journal8
 
Cutting the starfish drawer sides2
Cutting the starfish drawer sides2Cutting the starfish drawer sides2
Cutting the starfish drawer sides2
 
Process journal
Process journalProcess journal
Process journal
 
Cutting the starfish shape1
Cutting the starfish shape1Cutting the starfish shape1
Cutting the starfish shape1
 
Sanding and cutting the product
Sanding and cutting the productSanding and cutting the product
Sanding and cutting the product
 
Process journal nov:10:2011
Process journal nov:10:2011Process journal nov:10:2011
Process journal nov:10:2011
 
Process Journal
Process JournalProcess Journal
Process Journal
 
Process journal
Process journalProcess journal
Process journal
 

Último

VIP Call Girls In Saharaganj ( Lucknow ) 🔝 8923113531 🔝 Cash Payment (COD) 👒
VIP Call Girls In Saharaganj ( Lucknow  ) 🔝 8923113531 🔝  Cash Payment (COD) 👒VIP Call Girls In Saharaganj ( Lucknow  ) 🔝 8923113531 🔝  Cash Payment (COD) 👒
VIP Call Girls In Saharaganj ( Lucknow ) 🔝 8923113531 🔝 Cash Payment (COD) 👒anilsa9823
 
VIP Kolkata Call Girl Howrah 👉 8250192130 Available With Room
VIP Kolkata Call Girl Howrah 👉 8250192130  Available With RoomVIP Kolkata Call Girl Howrah 👉 8250192130  Available With Room
VIP Kolkata Call Girl Howrah 👉 8250192130 Available With Roomdivyansh0kumar0
 
Sales & Marketing Alignment: How to Synergize for Success
Sales & Marketing Alignment: How to Synergize for SuccessSales & Marketing Alignment: How to Synergize for Success
Sales & Marketing Alignment: How to Synergize for SuccessAggregage
 
Pharma Works Profile of Karan Communications
Pharma Works Profile of Karan CommunicationsPharma Works Profile of Karan Communications
Pharma Works Profile of Karan Communicationskarancommunications
 
Call Girls Navi Mumbai Just Call 9907093804 Top Class Call Girl Service Avail...
Call Girls Navi Mumbai Just Call 9907093804 Top Class Call Girl Service Avail...Call Girls Navi Mumbai Just Call 9907093804 Top Class Call Girl Service Avail...
Call Girls Navi Mumbai Just Call 9907093804 Top Class Call Girl Service Avail...Dipal Arora
 
Tech Startup Growth Hacking 101 - Basics on Growth Marketing
Tech Startup Growth Hacking 101  - Basics on Growth MarketingTech Startup Growth Hacking 101  - Basics on Growth Marketing
Tech Startup Growth Hacking 101 - Basics on Growth MarketingShawn Pang
 
7.pdf This presentation captures many uses and the significance of the number...
7.pdf This presentation captures many uses and the significance of the number...7.pdf This presentation captures many uses and the significance of the number...
7.pdf This presentation captures many uses and the significance of the number...Paul Menig
 
Catalogue ONG NƯỚC uPVC - HDPE DE NHAT.pdf
Catalogue ONG NƯỚC uPVC - HDPE DE NHAT.pdfCatalogue ONG NƯỚC uPVC - HDPE DE NHAT.pdf
Catalogue ONG NƯỚC uPVC - HDPE DE NHAT.pdfOrient Homes
 
Mondelez State of Snacking and Future Trends 2023
Mondelez State of Snacking and Future Trends 2023Mondelez State of Snacking and Future Trends 2023
Mondelez State of Snacking and Future Trends 2023Neil Kimberley
 
BEST ✨ Call Girls In Indirapuram Ghaziabad ✔️ 9871031762 ✔️ Escorts Service...
BEST ✨ Call Girls In  Indirapuram Ghaziabad  ✔️ 9871031762 ✔️ Escorts Service...BEST ✨ Call Girls In  Indirapuram Ghaziabad  ✔️ 9871031762 ✔️ Escorts Service...
BEST ✨ Call Girls In Indirapuram Ghaziabad ✔️ 9871031762 ✔️ Escorts Service...noida100girls
 
Grateful 7 speech thanking everyone that has helped.pdf
Grateful 7 speech thanking everyone that has helped.pdfGrateful 7 speech thanking everyone that has helped.pdf
Grateful 7 speech thanking everyone that has helped.pdfPaul Menig
 
0183760ssssssssssssssssssssssssssss00101011 (27).pdf
0183760ssssssssssssssssssssssssssss00101011 (27).pdf0183760ssssssssssssssssssssssssssss00101011 (27).pdf
0183760ssssssssssssssssssssssssssss00101011 (27).pdfRenandantas16
 
Vip Dewas Call Girls #9907093804 Contact Number Escorts Service Dewas
Vip Dewas Call Girls #9907093804 Contact Number Escorts Service DewasVip Dewas Call Girls #9907093804 Contact Number Escorts Service Dewas
Vip Dewas Call Girls #9907093804 Contact Number Escorts Service Dewasmakika9823
 
Call Girls in Gomti Nagar - 7388211116 - With room Service
Call Girls in Gomti Nagar - 7388211116  - With room ServiceCall Girls in Gomti Nagar - 7388211116  - With room Service
Call Girls in Gomti Nagar - 7388211116 - With room Servicediscovermytutordmt
 
M.C Lodges -- Guest House in Jhang.
M.C Lodges --  Guest House in Jhang.M.C Lodges --  Guest House in Jhang.
M.C Lodges -- Guest House in Jhang.Aaiza Hassan
 
Regression analysis: Simple Linear Regression Multiple Linear Regression
Regression analysis:  Simple Linear Regression Multiple Linear RegressionRegression analysis:  Simple Linear Regression Multiple Linear Regression
Regression analysis: Simple Linear Regression Multiple Linear RegressionRavindra Nath Shukla
 
The CMO Survey - Highlights and Insights Report - Spring 2024
The CMO Survey - Highlights and Insights Report - Spring 2024The CMO Survey - Highlights and Insights Report - Spring 2024
The CMO Survey - Highlights and Insights Report - Spring 2024christinemoorman
 
RE Capital's Visionary Leadership under Newman Leech
RE Capital's Visionary Leadership under Newman LeechRE Capital's Visionary Leadership under Newman Leech
RE Capital's Visionary Leadership under Newman LeechNewman George Leech
 
Call Girls In Panjim North Goa 9971646499 Genuine Service
Call Girls In Panjim North Goa 9971646499 Genuine ServiceCall Girls In Panjim North Goa 9971646499 Genuine Service
Call Girls In Panjim North Goa 9971646499 Genuine Serviceritikaroy0888
 

Último (20)

VIP Call Girls In Saharaganj ( Lucknow ) 🔝 8923113531 🔝 Cash Payment (COD) 👒
VIP Call Girls In Saharaganj ( Lucknow  ) 🔝 8923113531 🔝  Cash Payment (COD) 👒VIP Call Girls In Saharaganj ( Lucknow  ) 🔝 8923113531 🔝  Cash Payment (COD) 👒
VIP Call Girls In Saharaganj ( Lucknow ) 🔝 8923113531 🔝 Cash Payment (COD) 👒
 
VIP Kolkata Call Girl Howrah 👉 8250192130 Available With Room
VIP Kolkata Call Girl Howrah 👉 8250192130  Available With RoomVIP Kolkata Call Girl Howrah 👉 8250192130  Available With Room
VIP Kolkata Call Girl Howrah 👉 8250192130 Available With Room
 
Sales & Marketing Alignment: How to Synergize for Success
Sales & Marketing Alignment: How to Synergize for SuccessSales & Marketing Alignment: How to Synergize for Success
Sales & Marketing Alignment: How to Synergize for Success
 
Pharma Works Profile of Karan Communications
Pharma Works Profile of Karan CommunicationsPharma Works Profile of Karan Communications
Pharma Works Profile of Karan Communications
 
Call Girls Navi Mumbai Just Call 9907093804 Top Class Call Girl Service Avail...
Call Girls Navi Mumbai Just Call 9907093804 Top Class Call Girl Service Avail...Call Girls Navi Mumbai Just Call 9907093804 Top Class Call Girl Service Avail...
Call Girls Navi Mumbai Just Call 9907093804 Top Class Call Girl Service Avail...
 
Tech Startup Growth Hacking 101 - Basics on Growth Marketing
Tech Startup Growth Hacking 101  - Basics on Growth MarketingTech Startup Growth Hacking 101  - Basics on Growth Marketing
Tech Startup Growth Hacking 101 - Basics on Growth Marketing
 
7.pdf This presentation captures many uses and the significance of the number...
7.pdf This presentation captures many uses and the significance of the number...7.pdf This presentation captures many uses and the significance of the number...
7.pdf This presentation captures many uses and the significance of the number...
 
Catalogue ONG NƯỚC uPVC - HDPE DE NHAT.pdf
Catalogue ONG NƯỚC uPVC - HDPE DE NHAT.pdfCatalogue ONG NƯỚC uPVC - HDPE DE NHAT.pdf
Catalogue ONG NƯỚC uPVC - HDPE DE NHAT.pdf
 
Mondelez State of Snacking and Future Trends 2023
Mondelez State of Snacking and Future Trends 2023Mondelez State of Snacking and Future Trends 2023
Mondelez State of Snacking and Future Trends 2023
 
BEST ✨ Call Girls In Indirapuram Ghaziabad ✔️ 9871031762 ✔️ Escorts Service...
BEST ✨ Call Girls In  Indirapuram Ghaziabad  ✔️ 9871031762 ✔️ Escorts Service...BEST ✨ Call Girls In  Indirapuram Ghaziabad  ✔️ 9871031762 ✔️ Escorts Service...
BEST ✨ Call Girls In Indirapuram Ghaziabad ✔️ 9871031762 ✔️ Escorts Service...
 
Grateful 7 speech thanking everyone that has helped.pdf
Grateful 7 speech thanking everyone that has helped.pdfGrateful 7 speech thanking everyone that has helped.pdf
Grateful 7 speech thanking everyone that has helped.pdf
 
0183760ssssssssssssssssssssssssssss00101011 (27).pdf
0183760ssssssssssssssssssssssssssss00101011 (27).pdf0183760ssssssssssssssssssssssssssss00101011 (27).pdf
0183760ssssssssssssssssssssssssssss00101011 (27).pdf
 
Best Practices for Implementing an External Recruiting Partnership
Best Practices for Implementing an External Recruiting PartnershipBest Practices for Implementing an External Recruiting Partnership
Best Practices for Implementing an External Recruiting Partnership
 
Vip Dewas Call Girls #9907093804 Contact Number Escorts Service Dewas
Vip Dewas Call Girls #9907093804 Contact Number Escorts Service DewasVip Dewas Call Girls #9907093804 Contact Number Escorts Service Dewas
Vip Dewas Call Girls #9907093804 Contact Number Escorts Service Dewas
 
Call Girls in Gomti Nagar - 7388211116 - With room Service
Call Girls in Gomti Nagar - 7388211116  - With room ServiceCall Girls in Gomti Nagar - 7388211116  - With room Service
Call Girls in Gomti Nagar - 7388211116 - With room Service
 
M.C Lodges -- Guest House in Jhang.
M.C Lodges --  Guest House in Jhang.M.C Lodges --  Guest House in Jhang.
M.C Lodges -- Guest House in Jhang.
 
Regression analysis: Simple Linear Regression Multiple Linear Regression
Regression analysis:  Simple Linear Regression Multiple Linear RegressionRegression analysis:  Simple Linear Regression Multiple Linear Regression
Regression analysis: Simple Linear Regression Multiple Linear Regression
 
The CMO Survey - Highlights and Insights Report - Spring 2024
The CMO Survey - Highlights and Insights Report - Spring 2024The CMO Survey - Highlights and Insights Report - Spring 2024
The CMO Survey - Highlights and Insights Report - Spring 2024
 
RE Capital's Visionary Leadership under Newman Leech
RE Capital's Visionary Leadership under Newman LeechRE Capital's Visionary Leadership under Newman Leech
RE Capital's Visionary Leadership under Newman Leech
 
Call Girls In Panjim North Goa 9971646499 Genuine Service
Call Girls In Panjim North Goa 9971646499 Genuine ServiceCall Girls In Panjim North Goa 9971646499 Genuine Service
Call Girls In Panjim North Goa 9971646499 Genuine Service
 

Process journal

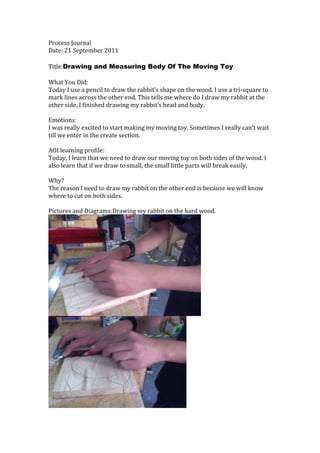
  • 1. Process Journal Date: 21 September 2011 Title:Drawing and Measuring Body Of The Moving Toy What You Did: Today I use a pencil to draw the rabbit’s shape on the wood. I use a tri-square to mark lines across the other end. This tells me where do I draw my rabbit at the other side. I finished drawing my rabbit’s head and body. Emotions: I was really excited to start making my moving toy. Sometimes I really can’t wait till we enter in the create section. AOI learning profile: Today, I learn that we need to draw our moving toy on both sides of the wood. I also learn that if we draw to small, the small little parts will break easily. Why? The reason I need to draw my rabbit on the other end is because we will know where to cut on both sides. Pictures and Diagrams:Drawing my rabbit on the hard wood.
  • 2. Using tri-square to mark out lines. Changes to my plan: So far I didn’t make any changes to my plan. What’s next? The next thing that I will do is using a coping saw to cut out the shape of the rabbit’s body. I need to cut out the shape of the rabbit’s leg. I think I will finish all of this plans.
  • 3. Date: 25 September 2011 Title: Using a coping saw Emotion: I was really happy that I learn more skills when I am cutting softwood. I feel nervous when I think that I am doing the wrong thing. What I did: Today, I use a coping saw to cut out the shape of my moving toy’s body. I turned my moving toy when I am cutting at the lowest part. Other then cutting my moving toy’s body, I also cut the head of the moving toy. Why: I turn my moving toy around when I am cutting the body part. The reason I turned around is because I’m not cutting the table but I am cutting my moving toy. The reason that I am using a coping saw instead of a tenon saw is because I am cutting curved shapes. AOI learning profile: Today, I learn that I should lower down the position of my timber. The reason I do this is because I will break the coping saw’s blade if it is too high. The second reason is because it will be easier to cut the moving toy. Pictures and diagram Using a coping saw to cut the shape of a rabbit’s head.
  • 4. Changes to my plans: So far, I didn’t make any changes to my plans. What’s next? I need to finish cutting my timber by the next lesson. I need to cut the legs for my moving toy. The last thing I will do is to draw a cool skateboard on a new timber. I will finish all this things in the next lesson.
  • 5. Date: 26 September 2011 Title: Learning more skills to use a coping saw What I did: For today, I continue using a coping saw to cut the rabbit’s body. I broke the coping saw twice when I was cutting. I realized that the way I was using a coping saw wasn’t correct. After that, I changed the way that I used it. I don’t know why the coping saw broke at the second time when I was using the correct way. I didn’t pull the coping saw out of the timber when I want to change the angle of cutting it. Why: The reason that we are not supposed to pull the saw out of the timber is because the blade is very tin. Emotions: I was very nervous when I broke the saw. I feel very stressful when I broke the 2nd blade. The reason I feel very stressful is because I didn’t pull the coping saw out of the timber and the blade broke. AOI learning profile: Today, I learn a lot of skills. The first skill that I learn was learning how to pull the coping saw out of the timber correctly. Pictures and diagram: Using a coping saw to cut the rabbit’s body. Coping saw are use to cut curve shapes.
  • 6. Changes to my plans: So far I didn’t make any changes to my plans. Plans: I will finish cutting the rabbit’s body and I will need to sand all the edges and make it smooth. I also need to cut out the rabbit’s leg and finally the skateboard.
  • 7. Date: 28 September 2011 Title: Using Disc sander to cut the rough edge off. What I Did: Today I used the flat-headed tool to file all the corners off. I also used Disc sander to cut off all the rough edges. Before using that machine, I checked all my safety rules. I wore safety goggles and I started my work. I used garnet paper to rub the both surfaces. I rubbed it in 1 direction. Why? The reason I use the garnet paper to rub only in 1 direction is because I will rub all the fibers. AOI Learning Profile: I should use the garnet paper to rub the where the lines are pointing. Emotions: Today was a very interesting day learning design technology. I started learning more skills in using tools and machines. Pictures And Diagrams: Filing the corners using flat file tool Changes To Plans: So far, I didn’t make any changes to my plans. What’s next?
  • 8. Start drawing my skateboard on a new timber. I’m going to use a tenon saw to cut my skateboard out.
  • 9. Date: 8 October 2011 Title: Using a tenon saw to cut the bottom part of the rabbit’s body What I did: Today, I use a tenon saw to cut the bottom part of the rabbit’s body. I used disc sander to sand the bottom part off, this will make it the bottom part straight. After sanding my rabbit’s body, I drew a shape of a skateboard on a new timber. Why: The reason I use a tenon saw instead of other saws is because I am cutting a straight line. If I am cutting curves shapes, I will use coping saw to cut it. Emotion: I feel very proud of myself, because I did a lot of things today. AOI learning profile: Today, I learn that I should draw my skateboard on the side of the timber. If we draw anything in the middle of the timber, we will waste a lot of wood. Pictures And Diagram: Draw skateboard on a new timber
  • 10. Using a tenon saw to cut the bottom part of the rabbit’s body. Changes to my plans: So far, I didn’t make any changes to my plans. What’s next? The next thing that I should do is to cut my skateboard and fix all the problems. I need to start making wheels for my skateboard in the next lesson.
  • 11. Date: 10 October 2011 Title: Using a coping saw to cut my skateboard shape What I did: Today, I used a coping saw to cut my skateboard. I used the coping saw to cut the curves and a tenon saw to cut straight line. After finishing cutting it, I use a disc sander to sand my skateboard. I sand all the rough edges on the side. I also used garnet paper to run the surface on the skateboard. Why: The reason I check safety rules before using disc sander is because, it’s important or it will be dangerous. Safety rules: • Wear safety goggles • Nothing else is around there • Wear aprons AOI Learning Profile: I learn that I should draw my skateboard on the side or else I will waste a lot of wood. We must not waste wood and we should use it properly. Emotions: Today it was a really cool day when I did a lot of things in today’s lesson. I hope that I will do more fun things in the next lesson. Pictures and Diagrams: Using a coping saw to cut my skateboard shape
  • 12. Using disc sander to sand the sides off and to make them smooth Using garnet paper to sand the surface off. Changes to my plans: So far, I didn’t make any changes to my plans. What’s next? I need to use trimmer router to cut the sharp sides off on my skateboard and my rabbit. After this, I need to create wheels for my skateboard.
  • 13. Date: 12 October 2011 Title: Using trimmer router to cut my skateboard and my rabbit’s edge off What I did: Today, I check all the safety rules and waited for instruction before I used the trimmer router.After everything is ready, I hold the trimmer router and cut the edge off. I cut the rabbit and the skateboard’s edge off. Why: Safety rules: •Wear safety goggles •Never on the trimmer router unless the teacher ask you to •Apron on •Got to wait for the trimmer router’s blade to stop spinning before laying it down AOI Learning Profile: In today’s lesson, I learn that when I am using the trimmer router, we should cut it in anti clockwise direction. Emotions: Today’s lesson was a bit boring, because I waited too long using the trimmer router. Pictures And Diagrams: Using trimmer router to cut the skateboard’s edge off Changes to my plans: I didn’t make any changes to my plans.
  • 14. What’s next? I need to create 4 wheels for my skateboard in today’s lesson. If there is enough time, I need combine my wheels and skateboard together. Changes to my plans: So far, I didn’t make and changes to my plans. What’s next? I need to start making wheels using a machine. I need to draw markings on my skateboard and start drilling my wheels into the skateboard.
  • 15. Date: 16 October 2011 Title: Drawing 4 wheels on a timber What I Did: Today, I used a pencil to draw 4 wheels on a new timber. I used a timber that people had used to create wheels to draw my wheels. I chose timbers that have big wheels on it, because I need big wheels on a skateboard. I drew all my wheels at the same size. Why: The reason I drew all the wheels at the same size is because I want the movement of the skateboard to be smooth. Emotions: Today, there wasn’t enough time to complete my plans in 1 period. I feel very sad and frustrating whenever I can’t complete anything. I feel like rushing and finishing all the plans I have in today’s lesson. Pictures and diagrams: Using tenon saw to cut the timber for the wheels.
  • 16. Using a pencil to draw wheels. Changes to my plans: So far, I didn’t make any changes to my plans. What’s next? I need to make wheels using the machine. I also need to drill my wheels into the skateboard. Date: 17 October 2011 Title: Using pedestrian drill to make wheels What I did: Today, I used the pedestrian drill to make wheels. I wore safety goggles and I clamped my timber tightly to the table. I on the green button to start and I pull down the thing slowly. When it is drill halfway, I turn the timber around and start making the other side. I repeat these steps 3 times to make 4 wheels. After making all the wheels, I used garnet paper to sand the wheels. Why:
  • 17. The reason I ask a teacher to watch me when I am using the pedestal drill is because this is my first time using it. This is a more safety way to use the machine. I used garnet paper to sand my wheels because the wheels can’t roll if there are sharp edges around the wheels. AOI learning profile: Today was a very special day; I finally know how to use the pedestrian drill properly. This was my first time using the pedestrian drill and I learnt a lot of experience when I am using it. Emotions: Today I used a very scary machine, which is the pedestrian drill. I feel very nervous when I am using because I’m scared that I will break the drill. It was exciting when I learn something new, but I am very serious when I am using it. Pictures and diagrams: Using pedestal drill and wheel cutting bit make wheels Using garnet paper to sand my wheels.
  • 18. Changes to my plans: So far, I didn’t make any changes to my plans. What’s next? The next thing that I should do is to sand my wheels using garnet paper. I need to draw markings on my skateboard and start drilling my wheels into my skateboard. Date: 19 October 2011 Title: Drill holes in my skateboard for my wheels using pedestal drill What I did: Today, I continue to sand my wheels using garnet paper. After sanding, I took my skateboard and drill 2 holes on the skateboard for my wheels. I used pedestal drill-to-drill holes in my skateboard. I cut a stick using a tenon saw for my wheels. Why: Safety rules when you are using the pedestal drill • Wear safety goggles • Wear apron • Hold on the clamp when you are drilling
  • 19. • Do not drill it too fast • Wait for teacher’s instruction before you turn on Emotions: Today I feel very comfortable when I am using the pedestal drill, because I learn a lot of tiny experience when I am using it the last time. It found that it is really relaxing when I am using it. Nothing happen if I drill it slowly. Pictures and diagrams: Drill my holes in my skateboard using pedestal drill Changes to my plans: So far, I didn’t make any changes to my plans. What’s next? I need to continue cutting sticks for my wheels. I need to drill holes in my wheels using pedestal drill.
  • 20. Date: 26 October 2011 Title: Drill holes in my wheels and the skateboard using pedestal drill What I did: Today, I use a tenon saw to cut the stick for my wheels. I used the pedestal drill to drill holes in my wheels and my skateboard. I drill 2 holes in the middle of the skateboard and 1 hole in the middle in each wheel. Why: Safety rules while using pedestal drill: - Wear safety goggles - Wear apron - Wait for instructions - Drill it slowly
  • 21. Emotions: Today, It was a good day to learn a lot of interesting stuff. I enjoy a lot when I know how to use the pedestal drill. I finish all my plans in time and I feel proud of myself. Pictures and diagrams: Drilling holes in the middle part of the skateboard using pedestal drill Timber Changes to my plans: So far I didn’t make any changes to my plans. What’s next? I need to draw markings and start drilling everything together. After this I need to start painting my moving toy. Date: 30 October 2011 Title: Cutting the stick shorter with a tenon saw What I did: Today, I cut the stick with a tenon saw to make it shorter. It’s too long for my wheels. I drill 4 holes in my skateboard so that it will be ready to screw 4 screws in my skateboard after I paint it. Why: The reason that I should paint everything first before I joined everything together is because some parts need to be painted before joining everything together. Emotions:
  • 22. Today, It was a great day to learn a lot of interesting stuff. I am glad that I am up to the painting stage. It is fun when I am painting beautiful colors on my moving toy. Pictures and diagrams: Using tenon saw to cut the stick shorter. Drilling holes in my skateboard Changes to my plans: Today I decided that I should change 1 of my plans. Instead of painting my wheels brown, I need to paint it yellow. The reason for me painting it yellow is because there isn’t blue in the box. What’s Next? I need to continue painting my 4 wheels and I need to let it dry up. I need to paint my skateboard and after that I need to paint my rabbit.
  • 23. Date: 31 October 2011 Title: Painting my wheels and skateboard with beautiful colors What I did: Today, I grab a small brush, cardboard, painting pallet, paint, and set everything up. I paint my wheels with yellow color. I let my wheels dry after I finished painting my wheels. I use the color black, to paint my skateboard. Why? The reason I should paint the edges first before painting the surfaces it because we should finish the hardest part first. Emotions:
  • 24. Today, I’m glad that I’m up to the painting stage. I can’t wait to see how is my moving toy. Pictures and diagrams: Painting my wheels yellow Painting my skateboard black Changes to my plans: So far, I changed some of my plans. I painted my wheels yellow instead of brown. The reason I painted my wheels to yellow is because there isn’t brown in the box. What’s next? I need to sand my skateboard using garnet paper and continue painting it again. I need to repeat this a lot of time. After that, I need to start painting my rabbit.
  • 25. Date: 6 November 2011 Title: Sanding skateboard and paint it again What I did: Today, I sand all my parts using different kinds of garnet paper. I used 180 to sand my skateboard. I used 360 to make my skateboard smoother. After that, I grab paintbrush, pallet, and cardboard, paint. I set everything up and I started painting my skateboard black. I let my skateboard to dry and I use garnet paper to sand my rabbit. Why:
  • 26. The reason I painted the sides on the skateboard first it is because the sides is the hardest part to paint. We should always complete the hardest part first and then the easiest part. AOI learner profile: Today, I learnt to use different kinds of garnet paper to sand my skateboard. I can use 180 first and then 360. This will make my skateboard smoother. Emotions: Today, It was a really relaxing day because I have a lot of fun when I am painting my skateboard. I feel a bit bored when I heardthat I need to sand and paint my skateboard 4 times. Pictures and diagrams: Sand my skateboard using garnet paper Painting my skateboard black Changes to my plans: I didn’t make any changes to my plans.
  • 27. What’s next? I need to sand my skateboard and paint my skateboard. I need to repeat this process 3 times more. I also need to paint my rabbit with different beautiful colors.
  • 28. Date: 7 November 2011 Title: Sanding my skateboard with different grids of garnet paper What I did: Today, I used 180 to sand my skateboard. After that, I used 360 to sand my skateboard. This process actually works because I did tried touching my skateboard’s surface before I use 360. I painted black on the sides of my skateboard and the surfaces. I also sand my wheels using 180 and after that I painted my wheels using yellow paint. Why? The reason repeats the sanding and painting process it’s because the moving toy will be really smooth. Emotions: Today was a really great day because we have 2 periods and I manage to complete all my plans. I was glad that I just need to repeat the process 2 more times and I am done with my skateboard. Pictures and diagrams: Sand my skateboard using garnet paper
  • 29. Painting my skateboard black Changes to my plans: So far I didn’t make any changes to my plans. What’s next? The next thing that I need to do is to paint my rabbit. I need to let it dry and after that I need to sand it again. Date: 9 November 2011 Title: Painting my rabbit white What I did? Today, I sand my skateboard using 360 grid garnet paper. After that I sanded my wheels using 360 grid garnet paper. I paint my wheels and my skateboard. After that, I paint my rabbit using white paint. I paint the body of the rabbit white. Why? The reason I didn’t paint my rabbit’s ear white it’s because I am painting other colors at the ears. The reason I paint before I drill 2 holes in my rabbit is because I need to set everything up before I drill and put the 2 eyes in my rabbit. Emotions: I was glad that I complete my plans today. Today was a great day because we have 2 periods of design technology to finish our plans. I feel a little bit of bored when I am waiting for the paint to dry.
  • 30. Pictures and diagrams: Painting my skateboard black Painting my rabbit white Changes to my plans: Today, I painted my rabbit white instead of peach. What’s next? I need to paint my rabbit using white on the other side and I need to sand it. I need to repeat this process more than 4 times.
  • 31. Date: 13 November 2011 Title: Sanding my rabbit using garnet paper What I did? Today I sand my rabbit and skateboard using smooth garnet paper. I painted my rabbit using white color on the sides. After that, I painted my rabbit using white color on both sides. I sanded the sides of my rabbit after my rabbit is dry. Why: The reason I paint the sides of my rabbit first before I paint the surfaces it’s because we should always complete the hardest part first and then the easiest part. Emotions: Today wasn’t a really lucky day because we only have1 period for design technology, but it was good that I completed all my plans.I feel a bit bored whenever I repeat the sanding and painting process. Pictures and diagram: Using 180 grid garnet paper to sand my skateboard.
  • 32. Using 306 grid garnet paper to sand my skateboard. Changes to my plans: I decided to drill 2 holes at the rabbit’s face after I have finish the sanding and painting stage. I need to put 2 eyes on the rabbit’s face. What’s next? I need to sand my skateboard and rabbit using grid 180 and 360 garnet paper. After that, I need to paint all the parts again.
  • 33. Date: 14 November 2011 Title: Sanding and painting What I did? Today, I sand my wheels, skateboard rabbit using garnet paper. At first I used 180 to sand all the parts and then 360. I painted my skateboard black on the sides. After that, I painted my skateboard on the 2 surfaces. Why? The reason I paint the sides first before painting the surfaces it’s because it is we should paint the hardest part before painting the easiest part. AOI learner profile: I learn that we should paint the dark colors first before painting the light colors. Emotions: I was glad that I finished the sanding and painting process on my skateboard. It was a great day because we have 2 awesome periods to complete our work. If I’m not wrong, I will finish my project at the end of this week. Pictures and diagrams: Sanding my skateboard using 180 grit garnet paper.
  • 34. Painting my skateboard black with a paintbrush Changes to my plans: I didn’t make any changes to my plans so far. What’s next? I need to sand and paint my rabbit white 3 more times and I need to repaint my wheels. After that I need to screw in 2 holes at the rabbit’s face to put in eyes.
  • 35. Date: 16 November 2011 Title: Sanding and painting What I did? Today, I sand my rabbit using 360 grid garnet paper. After that I painted my rabbit white. I sand my wheels because it is too rough. I tear the garnet paper into half and I sand it. I use garnet paper to sand my skateboard to make it smoother. Why? The reason I wait for my rabbit to dry for 24 hours before sanding is because it is not fully dry. Emotions: I was glad that I finished the sanding and painting process on the skateboard. I feel a little bit of bored when I’m not finish sanding and painting my rabbit. Pictures and diagrams: Sanding my rabbit using 180 grid garnet paper
  • 36. Change to my plans? I didn’t make any changes to my plans so far. What’s next? I need to paint my rabbit again on the sides and the surfaces. I need to drill 2 holes in the face and screw the eyes in the rabbit.
  • 37. Date: 19 November 2011 Title: Painting my rabbit white What I did? Today, I grab garnet paper and sand the sides of the rabbit. I also sand the surfaces, because I want to repaint it. After that, I grab a cup of water, paintbrush, white paint, card box, and pallet. I started using all this stuff to paint my rabbit. Why? The reason I need to repaint my rabbit again Is because there is still a lot of empty spaces in my rabbit. The second reason is I want to make it smoother. Emotions: Today it was a great day because I don’t need to sand and paint my skateboard any more. Today it was an interesting because I’m finished with painting all my stuff. Pictures and diagrams: Changes to my plans: So far, I didn’t make any changes to my plans. What’s Next? I need to drill 2 holes at the rabbit’s face and glue the eyes together on the rabbit’s face. I screw 4 screws in my skateboard.