SlideShare uma empresa Scribd logo
1 de 38
Baixar para ler offline
Well I decide to share with all the ones
who want it, the complete construction of
one of my rods. For this purpose I leave
the blank that I had made for another
rod order and begin the new Guru from
zero.
1 Selecting the culm
When I talked with Marty he told me that
he like's full flamed rods, so I have to
look for a special culm to do the job. I will
look for a medium culm with dense walls
for the butt and the medium pieces and
the 2 tips will be done from the same
culm with low wall measure.
I select this type of culm because if I
work with a big one, when I flamed, the
cane will get deformed into an oval form
with the heat treatment.
I will use the 3 / 3 nodes staggering in
this rod so I need two full culm pieces to
the whole rod. The dense one for but &
medium and the other for the 2 tips. I cut
this pieces to measure and mark the
down side Green for Butt, Black for Mid
and Red for Tips. This allows me in
coming steps to plane strips always in
the same direction.
Important: Made a full spliting check
along the two culm pieces.
2 Flaming the culm
Time and patience. Remember this. With the
same process we can turn the cane into a full
flamed tone or get it burned. This is only a
matter of time and care. I always think in this
step that cane and grass are the same thing,
so I slow all my process. When to stop? the
cane or many canes will tell you. But remember
that cane have many layers. The first one will
go with the heat treatment but the second is in
the one we want to change the color. This
changing will take place in many different
stages and colors.
a. first layer goes out with heat.
b. very light flamed
c. light flamed
d. flamed
e. medium flamed
f. full flamed
g. dark flamed (I never try this one)
I do this work outside and with a heat gun
with a trigger that let's me stop fire instantly.
This gun is connected to gas and I used always
full power blue flame and work at about 12/15
inches from the cane.
The whole process take's me about one
morning.
To get this stage finished I take out all
diaphragm at each culm.
Splitting
This where real connect with cane begins. In the
whole process you can appreciate the special
particularities of the rod you had selected.
After many search for this fundamental stage I
arrived after many different test to what I called
"My split Machine". Trying to avoid any
commentaries I must say that I called "my"
because I own it...
Perhaps is an obvious stuff but is great to take
care of my splitting work. In the zoom picture you
can appreciate how simple it is, just wood and
two steel nails. The head of the nail will hetp
turning down the strips along the splitting of
each one. The only thing to do is match the main
split. I always make my strips over measured
and them with a knife I take them to real
measure.
Here you can see how my machine work, in the
full process. The half culm in two parts, them two
in other two, and this ones in other two. Eight
perfect strips, 6 for the rod and two for spares
Here you can see how my machine work, in the
full process. The half culm in two parts, them two
in other two, and this ones in other two. Eight
perfect strips, 6 for the rod and two for spares
Filling & straightening nodes is one of the most
important job involved in making a rod. All the work,
time and patience that we spend in this stage will be
recovered in the Planing job.
Filling the nodes
Simple tools, our eyes, our hands, two limes in two
different thickness and shapes and two C clamps.
Another important thing that you have to take care is
the place to work. Personally I like to do it outside,
where mi mind is more suitable to make a relaxed
work. I found into my house gallery a handrail that
give me a firmly ground and a nice garden looking. Also
"the boss" (wife) don't get angry because of the dirt
involved with this work.
I support the strip with the C clamps and start working with the big file in the pit side of the
node. I liked that this job finish with a plane surface.
Them I attack the upside of the node. I work first with the big file and them I get the work
finished with the little one, at the point that I get a polish surface. In the upside of the nodes I'll
try to continue the round form of the strip and leave any node a little over-measure. This will
disappear whit the pressing stage.
Pressing the nodes
Tools involved, again eyes, hands, a
variable heat gun and a vice.
From those tools that I was able to
choose I had tested many, and
selected the Metabo Heat Gun and
the Record Vice (mod. 50 / 51) no
commercial interest just the ones I
think are the best.
I bought the two models of vices, one
is fixed on my workbench and the
other one follows me wherever I go.
Steps in the pressing nodes stage.
a. heat the node sides.
b. press the node sides.
c. heat the node faces.
d. press the node faces.
When I heat the nodes I always take
care that they don't get burned time
and patience will tell us when it is too
much.
This is like the nodes are in their different stages: before & after
The first 30 angle
After pressing nodes I must get perfect straight strips, so with the heat gun I turn all the
strips to a fine straight shape. To make the first angle I have developed a great machine, I
called the "Angle machine". This tool turns a difficult work into a very easy step.
(Rodmakers, specially hand planers take a look at this tool
As you can see the machine
consist in two forms with it's
30 angles inverted, so when
I place a strip and get it
tight, it turns into a 30
angle and all my planing will
go with that attack. Also
because the strip is firmly
holded we can work only
with one hand
Here you can see a zoom
view and how the strips are
placed into the machine.
To make this job I use a
Record Plane 60 1/2
sharpened at 45 angle This
plane because of it's wide is
more comfortable and easy
to control.
Press on picture to play video
Triangulation 60 angle
After I got my 24 strips with the first 30 angle from the Angle
Machine I work in a form I'd made for triangulation, with 4
fixed 60 angle different measures, that are the most used by
me in all my tapers
Here, you can see the strip in his 30 angle stage and
finished at 60 angle.
An advice about sharpening
Another day is finishing and as Jeff (Ghome) told me a
big glass of wine is near my computer. Sharpening is
one of the most important things to take care in the
whole process of making a rod.
I read many, many advices talking about the best way
to do this job, and I found that as always the simple is
the best.
I use a square glass and place over sand paper of
different grits starting at 220 and them 360, 500, 800
and finishing at 1.000 this gives a mirror finish that
looks & work great for me.
Many times along the hole rodmaking process you get
tired so you must take a time for you. Sharpening is
really a good investment, you can do it in any place,
with a glass of wine near you and really this time will
pay for it self.
I helped my sharpening with two tools, a Veritas
Precision Honing Guide and a right angle square that I
marked at 30, 35 and 45 angle.
Don't forget this advice, sharpening is one of the must
important jobs to be done, you will listen along the
planing when your blades need to be sharped.
It's binder time
My binder was the first machine that I made. I
remember that I'd take parts from here and from there,
please don't tell my boss, but the wooden handle is from
our Thomson table, she will kill me if she knows. Many,
many wars we fought together and he show his scars
proudly, many rods and many dreams were tied there. I
love this machine, because he is faithful and help me to
get great rods. Many times when customers visit my
shop tell me that it's time to make a new one, but with
him I made my first rod and with him I will made my last
one.
Well this stage is simple the only thing to take care is
about learning the knots and work with a great machine.
The more straight you obtain the rod pieces, with the
oven treatment the will be copied and the planing stage
will be better.
Press on picture to play video
Oven treatment
I'd made two different types of oven along the years. One is an
electric one that give's me about 400 degrees Fahrenheit and
another, that is the one I prefer, a Gun Oven that gives me
about 400 degrees Fahrenheit with the heat gun set in max.,
200 F in medium, and 100 at low.
Why I select the Heat Gun Oven?
With a rod flamed like this one, I prefer a very slow treatment,
so I do it at 150 F for about 40 minutes in one side and
another 40 m for the other side. I liked this way, because I
think that a slow process is better than an aggressive one. The
heat treatment is done by heat air circulating along the cane,
that for sure will not cook it. Also, because the only reason for
this is to drive moisture from the cane, why more? After this,
the project rod always will be keep into my drying cabinet, that
also is at 80/100 F
Ferrules impregnation BOBFS I
Here we start with the BOBFS, so to give some protection to this part of
the rod I impregnate the sections where the ferrules will be made.
To do this job I impregnate by immersion the three parts where the
ferrules are, the two tips and the mid section. I leave there for about one
day, and they will cure in the drying cabinet along the rod process
continues
Preparing for Planing: Removing the enamel
Involved tools:
3M sandpapers blocks, 1 little block, sandpaper in 220
and 600 grit, rough form and scraper.
I like to take out the enamel sanding each strip first
with the 220 and them with the 600 sandpaper. This
must be a careful job because I don't want to take
out any powerfiber. For that I use my rough form little
60 angle and carefully sand each strip. Only if I find
any problem to solve I use my LN scraper.
With the little block loaded with 600g
sand paper I light sand each strip to
get a clear finish.
It's planing time
Tools involved:
For my planing I like to use the same block planes for each
piece of the cane, so when I got them sharpened I begun
with the Record 9 1/2 with his blade sharped at 30
degrees. Follows my Old Stanley 9 1/2 sharped at 45
degrees. Along the planing I like to verify measures so I
do it with the caliper in this stage.
Them begun the final planing for what I use 2 different LN
9 1/2 with different blade exposure. In this stage I verify
with my micrometer.
For what I use 4 different blocks planes?
1. This force me to do the job in four stages. (Time &
patience)
2. I don't like to sharp any blade in the middle of a piece.
So when I get finished a piece I sharp all my blades again.
3. I use my R to take the first shape. Them with my S I do
the real work. I like it because is very light. And with my
LN's only the fine finish work
One thing before planing
I was thinking to do something new for me with this rod, so I
just made some flamed marks only for looking. And I really like
them.
I used a jewelery torch that gives me a real blue flame, so this
would allow me to draw if it wanted.
Look that I care in the butt piece the number three (up to
down), the space for the grip and for the sign mark.
Planing Form & Digital Depth Gauge
I made my planing form and really after that I
can take any challenge.
It's 70 inches long with 30 stations placed 2,5
inch one to the other. As I told sometime ago,
it take's me a month of full work to get it
ready and working.
My depth gauge is a digital one that allows
me to see mesures in mm and in inches. It is
placed always in his steel bed with a plastic
protection for the sharp 60 angle point
Planing (BOBFS II)
Well guys I just got the butt finished. I suppose that this piece was not the one you are interested,
so take a look and we will go over the first BOBFS in the medium piece.
The most difficult part of the job is setting the forms, them you must go just ike with any planing
situation.
Also in this case I added a little movie just to show my
forms in an up view with a strip into it.
Press on picture to play video
Planing (BOBFS III)
When I got finished the 6 strips of each piece, I put them together, been carefully that nodes
match the 3 x 3 staggered system and them will be tapered with paper tape
Planing (BOBFS IV)
There you can see a sequence of how BOBFS are made. I had designed a special form that make's the
job easy and accuracy. The form was made in steel with a hard temper to allow that always will keep in
shape. The depth of the form bed is 1.8 mm (0.071 in)
Planing (BOBFS V)
Two tools are involved in the BOBFS making process. The ferrule form and a Finishing Sander loaded
with 120 grit sandpaper first and 400 grit sandpaper for finish. The FS works just like a plane over the
form.
Gluing (BOBFS VI)
To got my rods glued I use an ureafolmaldehyde glue that closely match the color of the cane. This
glue, works with a hardener that must be weighted to exactly proportions that are advised in it's
packaging. This proportions, are related with room's temperature. So when I get the correct
temperature, the measure table will indicate the correct proportion of hardener to use. To weight it I
use a jewellery scale. The glue allows me 40 minutes to complete all the job. Another tool's that must
be used are a tooth brush and the binder
This is very important stage in the BOBFS making process. I
must align perfectly the six strips to get a perfect hex ferrule,
so here is where I have to put all my attention because any
imperfection here could not be corrected later when the glue
dry. That's the reason why I love my binder. I know that it
will work perfectly and all my caring are with the ferrules
This is the finished glued rod
The little BOBFS story
For the ones who ask about how we
arrived to our BOBFS, here in the story in
pictures. From top to down.
1- The first design with a truncated bamboo
ferrule
2- The broken ferrule of my son's SAGE.
Here
is when my point of view about bamboo
ferrules was changed.
3- Our first swelled bamboo ferrules.
4- My 2MBFS (Mini metal bamboo Ferrule
system). This ferrules own inside a little
metal females and a metal tip in the male
At last with Jorge when the design of new tapers were made the new concept of the BOBFS was born.
Removing thread and glue
Well because I want to do this job under the sun, for
better looking, and tomorrow will rain here, I accelerate
the drying process in the drying cabinet so the rod is
ready to work. For this job I use three blocks with sand
paper 220, 400 and 800 for the finish.
The finish will be the result of a hard polishing work, it's
take about 6 hour to get the job completed.
Wrapping (BOBFS VII)
Thank you very much for the ones who help me with the
colors decision. Classic Chestnut wraps with Violets tips was
the winner option in the poll 12 votes over a total of 34 (33
%).
The wrapping section that I always made is 20mm more than
the BOBFS female hole (in this case 70 mm) so the wrapping
area will be 90 mm
For wrapping the BOBFS I like to use Pearsall's Naples and
doing the 3 ferrules is just like wrapping a complete rod, just
be prepared for that.
I use for the job my Golden Witch Wrapping Machine with
some modifications of my own
This would result in a complete wrap of 90 mm.
Varnishing (BOBFS VIII)
For varnish I like to first made two coats of Alchemist using a fine brush and waiting
aprox. 1 or 1 1/2 hour in between.
After 1 1/2 hour later, I varnish the ferrule (female) section, in this case using my
varnish I do it by dipping for a total of 9 times including the ones (3 times) when the
hole section rod will be varnished. Each time with the help of paper towells I take out
any excess of varnish out and into the BOBFS female hole
Signing
Not much to say about this stage. I use black indian ink and a fine pen. I have to find the correct
splines for the tips before sign them.
BOBFS IX (Ferrule male Tips)
As I told you I like to protect the butt tips with a little metal tip. I use aluminum but could be
made with any metal. For this job I use my Sherline lathe an aluminum bar. I take two measures
of the butt tip, one over the angles and the other over the flat. For example if the first measure
is 6.05 mm and the other 5.60 mm I use 5.85 mm to made tip
When I made the hole of the tip I always leave a 1 mm wall at the
tip.
The grip
Argentina is a very difficult place to find finish stuff but a really good one to find quality materials. This
happens at the time when I was looking for cork. Finally I found a fine quality, they call "grade AAA"
Portuguese cork. The cork came in pieces of 13 in x 2.8 in and 1/4 inch of depth. So I was in the
necessity of a good tool to make the job from the beginning. In the picture sequence that follows you
can take a look to the complete process
Them the rouged grip will stay in the drying cabinet for a day and then will be ready for shaping.
I don't like to use any mould or shape plane I have the wanted grip in my mind, so I go for it.
Finally I cover all the grip section with plastic
tape to protect it in the coming work.
Wrapping time
Well the rod was sleeping in a warm place for about 24
hours and it's ready for some wrapping. My drying
cabinet maintains a constancy temperature of 90/100
Fahrenheit degrees and 20 % of humidity.
I had to move all my shop to get some pictures, because
I like to show you in the better way.
This is my wrapping machine from GW. I'd made some
modifications that allow me to work more comfortably.
Two wire thread tensors make's possible to go back
about 10/15 threads rounds if something don't satisfy
me.
Also some tool's that I always use
One of the first things I do to test my day, is the grip wrap. Really I have days that I had to change
my plans and make something else. That's the reason I like to work always with three or four
different rods in different stages.
After I got finished the grip wrap, the first coat of Alchemist will be done to avoid it to move
Selecting Guides
Snake Brand is our first choice for our
new line of rods, that's because of it's
quality and the great service that
Michael and Susan give to us.
All our rods take's an Agate striping
guide and black nickel guides
Placing the guides
Every time we made a taper we also design where the guides must be placed to get the best
action, so we had make a special wood piece with all our tapers and guides display "formulas”. To
place the guides we use paper taper.
Some wrapping
Wrapping is something like flyfishing or golf you never stop to learn. I'd tied many rods along my
rodmaking, but a new one is really a new challenge. One thinking that I learn with many rods
wrapped in my life and I'll never forget is that "rush is the best enemy of perfection"
When I got all the rod wrapped I like to take time between
varnish to start tuning the BOBFS. If I done the correct job
when planing the ferrules taper of the male may goes into
the female ferrule comfortably not loose just comfortably.
Because is difficult to explain this sensation I made a little
movie that tries to shows this to all of you.
Well the first thing to do is cleaning all the
female hole with alcohol with the help of a Q-
Tip. Then we made the 2 ton. Epoxy coat with
the help of an extended Q-tip that allows to
get into the bottom of the hole. When I'm
completely sure that all the hole surface was
coated I take out any excess from the borders
and put the rod piece to roll in the wrapping
machine. I made a rotary tool that can be
attached to the machine so while the epoxy
dries I can make another wrap varnish. When
the female is finished I dip the male up the
ferrule wrap.
Press on picture to play video
BOBFS (Pining ferrules males)
To make this job I use a Dremel tool, steel wire and a little hammer. This is very simply but
must be done with extreme careful because we can lost all the work here. After getting the
little cups pinned I just polish to return to the good looking cup.
Making the Reel Seat
For making the reel seat I'd selected a native hard
wood called Guayabira, this trees grows at the rivers
banks in our state of Misiones where the famous
Iguazu Falls are placed. Also I made all the silver
hardware but I avoid to show all this process because
it will take's me another thread. I made all the Job at
my Sherline lathe with the help of common tools and
specific ones that I'd made for this purpose. When I
got the reel seat shape finished I polish it with a "doll"
with nuts.
Well 21 days of full work. This is the finished second Guru
Rod: Guru764 3/2 specially made for Mr. Martin J. Keane
SPLIT BAMBOO RODS por Marcelo Calviello

Mais conteúdo relacionado

Semelhante a SPLIT BAMBOO RODS por Marcelo Calviello

Building giant articulated hands carved from wood
Building giant articulated hands carved from woodBuilding giant articulated hands carved from wood
Building giant articulated hands carved from woodjessica30251
 
4 classic roubo-style-workbench
4 classic roubo-style-workbench4 classic roubo-style-workbench
4 classic roubo-style-workbenchYadeaHerman
 
Mola ram headdress tutorial cosjj.com
Mola ram   headdress tutorial cosjj.comMola ram   headdress tutorial cosjj.com
Mola ram headdress tutorial cosjj.comcosplaymall
 
Ji yoon process journal entry 5 – side blocks 11
Ji yoon process journal entry 5 – side blocks 11Ji yoon process journal entry 5 – side blocks 11
Ji yoon process journal entry 5 – side blocks 11Rob
 
How to sand and refinish hardwood floors yourself
How to sand and refinish hardwood floors yourself How to sand and refinish hardwood floors yourself
How to sand and refinish hardwood floors yourself NajiyaAkhtar
 
Foosball table-diy
Foosball table-diyFoosball table-diy
Foosball table-diydiamante
 
Process journal(dt)
Process journal(dt)Process journal(dt)
Process journal(dt)cherry9289
 
Process journal(dt)
Process journal(dt)Process journal(dt)
Process journal(dt)SeungHeeShin
 
How to retrofit lancer 2008 headlights
How to retrofit lancer 2008 headlightsHow to retrofit lancer 2008 headlights
How to retrofit lancer 2008 headlightsalxlo
 
Wheelchair wheel dryer tutorial
Wheelchair wheel dryer tutorialWheelchair wheel dryer tutorial
Wheelchair wheel dryer tutorialTpicavet
 
Paascheh Talon Airbrush Review
Paascheh Talon Airbrush ReviewPaascheh Talon Airbrush Review
Paascheh Talon Airbrush ReviewSergej Voronko
 
Biomimicry process journal pdf
Biomimicry process journal  pdfBiomimicry process journal  pdf
Biomimicry process journal pdfgdiane
 
Dt processes journal thursday
Dt processes journal  thursdayDt processes journal  thursday
Dt processes journal thursdayAndytheZhang
 
Dt processes journal thursday
Dt processes journal  thursdayDt processes journal  thursday
Dt processes journal thursdayAndytheZhang
 
gcse product design coursework
gcse product design courseworkgcse product design coursework
gcse product design courseworkAdnan Hassan
 
How to-make-pallet-wood-slab-from-recycled-materia (1)
How to-make-pallet-wood-slab-from-recycled-materia (1)How to-make-pallet-wood-slab-from-recycled-materia (1)
How to-make-pallet-wood-slab-from-recycled-materia (1)NehalNadaf
 

Semelhante a SPLIT BAMBOO RODS por Marcelo Calviello (20)

Building giant articulated hands carved from wood
Building giant articulated hands carved from woodBuilding giant articulated hands carved from wood
Building giant articulated hands carved from wood
 
4 classic roubo-style-workbench
4 classic roubo-style-workbench4 classic roubo-style-workbench
4 classic roubo-style-workbench
 
Measuring device
Measuring deviceMeasuring device
Measuring device
 
Mola ram headdress tutorial cosjj.com
Mola ram   headdress tutorial cosjj.comMola ram   headdress tutorial cosjj.com
Mola ram headdress tutorial cosjj.com
 
Ji yoon process journal entry 5 – side blocks 11
Ji yoon process journal entry 5 – side blocks 11Ji yoon process journal entry 5 – side blocks 11
Ji yoon process journal entry 5 – side blocks 11
 
Solar%20cooker%20 jse
Solar%20cooker%20 jseSolar%20cooker%20 jse
Solar%20cooker%20 jse
 
How to sand and refinish hardwood floors yourself
How to sand and refinish hardwood floors yourself How to sand and refinish hardwood floors yourself
How to sand and refinish hardwood floors yourself
 
Foosball table-diy
Foosball table-diyFoosball table-diy
Foosball table-diy
 
Process journal(dt)
Process journal(dt)Process journal(dt)
Process journal(dt)
 
Something big: Biggy
Something big: BiggySomething big: Biggy
Something big: Biggy
 
Process journal(dt)
Process journal(dt)Process journal(dt)
Process journal(dt)
 
How to retrofit lancer 2008 headlights
How to retrofit lancer 2008 headlightsHow to retrofit lancer 2008 headlights
How to retrofit lancer 2008 headlights
 
Wheelchair wheel dryer tutorial
Wheelchair wheel dryer tutorialWheelchair wheel dryer tutorial
Wheelchair wheel dryer tutorial
 
Paascheh Talon Airbrush Review
Paascheh Talon Airbrush ReviewPaascheh Talon Airbrush Review
Paascheh Talon Airbrush Review
 
Biomimicry process journal pdf
Biomimicry process journal  pdfBiomimicry process journal  pdf
Biomimicry process journal pdf
 
Dt processes journal thursday
Dt processes journal  thursdayDt processes journal  thursday
Dt processes journal thursday
 
Dt processes journal thursday
Dt processes journal  thursdayDt processes journal  thursday
Dt processes journal thursday
 
gcse product design coursework
gcse product design courseworkgcse product design coursework
gcse product design coursework
 
How to-make-pallet-wood-slab-from-recycled-materia (1)
How to-make-pallet-wood-slab-from-recycled-materia (1)How to-make-pallet-wood-slab-from-recycled-materia (1)
How to-make-pallet-wood-slab-from-recycled-materia (1)
 
Build-It: Charcoal press
Build-It: Charcoal pressBuild-It: Charcoal press
Build-It: Charcoal press
 

Mais de Anibal Ruben Reyes

Del dicho al hecho claudio arazi
Del dicho al hecho   claudio araziDel dicho al hecho   claudio arazi
Del dicho al hecho claudio araziAnibal Ruben Reyes
 
Diccionario Enciclopédico de LA CAÑA VIAJERA
Diccionario Enciclopédico de LA CAÑA VIAJERADiccionario Enciclopédico de LA CAÑA VIAJERA
Diccionario Enciclopédico de LA CAÑA VIAJERAAnibal Ruben Reyes
 
Construcción de varas de caña dividida de sección poligonal.
Construcción de varas de caña dividida de sección poligonal.Construcción de varas de caña dividida de sección poligonal.
Construcción de varas de caña dividida de sección poligonal.Anibal Ruben Reyes
 
Horeshair fly lines_power_fibers_issue_36
Horeshair fly lines_power_fibers_issue_36Horeshair fly lines_power_fibers_issue_36
Horeshair fly lines_power_fibers_issue_36Anibal Ruben Reyes
 
Coloring bamboo strips compressed
Coloring bamboo strips compressedColoring bamboo strips compressed
Coloring bamboo strips compressedAnibal Ruben Reyes
 
Ten tipstocustomizeyourreelkit
Ten tipstocustomizeyourreelkitTen tipstocustomizeyourreelkit
Ten tipstocustomizeyourreelkitAnibal Ruben Reyes
 
Its reely pretty easy power fibers-issue_37
Its reely pretty easy   power fibers-issue_37Its reely pretty easy   power fibers-issue_37
Its reely pretty easy power fibers-issue_37Anibal Ruben Reyes
 
Fly lines how to make them overview
Fly lines   how to make them overviewFly lines   how to make them overview
Fly lines how to make them overviewAnibal Ruben Reyes
 
Como empezar a pescar con mosca tomo 1: la pesca
Como empezar a pescar con mosca   tomo 1: la pescaComo empezar a pescar con mosca   tomo 1: la pesca
Como empezar a pescar con mosca tomo 1: la pescaAnibal Ruben Reyes
 
The fly tying bible por Peter Gathercole
The fly tying bible por Peter GathercoleThe fly tying bible por Peter Gathercole
The fly tying bible por Peter GathercoleAnibal Ruben Reyes
 
LINEAS CASERAS PARA LA PESCA CON MOSCA - SINGLE HAND SPEY CASERAS
LINEAS CASERAS PARA LA PESCA CON MOSCA - SINGLE HAND SPEY CASERASLINEAS CASERAS PARA LA PESCA CON MOSCA - SINGLE HAND SPEY CASERAS
LINEAS CASERAS PARA LA PESCA CON MOSCA - SINGLE HAND SPEY CASERASAnibal Ruben Reyes
 
LINEAS CASERAS PARA LA PESCA CON MOSCA - SINGLE HAND SKAGIT CASERAS
LINEAS CASERAS PARA LA PESCA CON MOSCA - SINGLE HAND SKAGIT CASERASLINEAS CASERAS PARA LA PESCA CON MOSCA - SINGLE HAND SKAGIT CASERAS
LINEAS CASERAS PARA LA PESCA CON MOSCA - SINGLE HAND SKAGIT CASERASAnibal Ruben Reyes
 
Manual de construcción de viviendas en madera
Manual de construcción de viviendas en maderaManual de construcción de viviendas en madera
Manual de construcción de viviendas en maderaAnibal Ruben Reyes
 
Tearfund paso a paso - construccion de estanques de tierra y cria de peces
Tearfund   paso a paso - construccion de estanques de tierra y cria de pecesTearfund   paso a paso - construccion de estanques de tierra y cria de peces
Tearfund paso a paso - construccion de estanques de tierra y cria de pecesAnibal Ruben Reyes
 
Cord grips and handles (Empuñaduras encordadas)
Cord grips and handles (Empuñaduras encordadas)Cord grips and handles (Empuñaduras encordadas)
Cord grips and handles (Empuñaduras encordadas)Anibal Ruben Reyes
 

Mais de Anibal Ruben Reyes (20)

Del dicho al hecho claudio arazi
Del dicho al hecho   claudio araziDel dicho al hecho   claudio arazi
Del dicho al hecho claudio arazi
 
Diccionario Enciclopédico de LA CAÑA VIAJERA
Diccionario Enciclopédico de LA CAÑA VIAJERADiccionario Enciclopédico de LA CAÑA VIAJERA
Diccionario Enciclopédico de LA CAÑA VIAJERA
 
Construcción de varas de caña dividida de sección poligonal.
Construcción de varas de caña dividida de sección poligonal.Construcción de varas de caña dividida de sección poligonal.
Construcción de varas de caña dividida de sección poligonal.
 
Varas de bambu laminadas
Varas de bambu laminadas Varas de bambu laminadas
Varas de bambu laminadas
 
Horeshair fly lines_power_fibers_issue_36
Horeshair fly lines_power_fibers_issue_36Horeshair fly lines_power_fibers_issue_36
Horeshair fly lines_power_fibers_issue_36
 
Coloring bamboo strips compressed
Coloring bamboo strips compressedColoring bamboo strips compressed
Coloring bamboo strips compressed
 
Bamboo rods marcelo calviello
Bamboo rods   marcelo calvielloBamboo rods   marcelo calviello
Bamboo rods marcelo calviello
 
Ten tipstocustomizeyourreelkit
Ten tipstocustomizeyourreelkitTen tipstocustomizeyourreelkit
Ten tipstocustomizeyourreelkit
 
Its reely pretty easy power fibers-issue_37
Its reely pretty easy   power fibers-issue_37Its reely pretty easy   power fibers-issue_37
Its reely pretty easy power fibers-issue_37
 
Fly lines how to make them overview
Fly lines   how to make them overviewFly lines   how to make them overview
Fly lines how to make them overview
 
Como empezar a pescar con mosca tomo 1: la pesca
Como empezar a pescar con mosca   tomo 1: la pescaComo empezar a pescar con mosca   tomo 1: la pesca
Como empezar a pescar con mosca tomo 1: la pesca
 
The fly tying bible por Peter Gathercole
The fly tying bible por Peter GathercoleThe fly tying bible por Peter Gathercole
The fly tying bible por Peter Gathercole
 
LINEAS CASERAS PARA LA PESCA CON MOSCA - SINGLE HAND SPEY CASERAS
LINEAS CASERAS PARA LA PESCA CON MOSCA - SINGLE HAND SPEY CASERASLINEAS CASERAS PARA LA PESCA CON MOSCA - SINGLE HAND SPEY CASERAS
LINEAS CASERAS PARA LA PESCA CON MOSCA - SINGLE HAND SPEY CASERAS
 
LINEAS CASERAS PARA LA PESCA CON MOSCA - SINGLE HAND SKAGIT CASERAS
LINEAS CASERAS PARA LA PESCA CON MOSCA - SINGLE HAND SKAGIT CASERASLINEAS CASERAS PARA LA PESCA CON MOSCA - SINGLE HAND SKAGIT CASERAS
LINEAS CASERAS PARA LA PESCA CON MOSCA - SINGLE HAND SKAGIT CASERAS
 
Manual de construcción de viviendas en madera
Manual de construcción de viviendas en maderaManual de construcción de viviendas en madera
Manual de construcción de viviendas en madera
 
Tearfund paso a paso - construccion de estanques de tierra y cria de peces
Tearfund   paso a paso - construccion de estanques de tierra y cria de pecesTearfund   paso a paso - construccion de estanques de tierra y cria de peces
Tearfund paso a paso - construccion de estanques de tierra y cria de peces
 
Bamboo under the_microscope
Bamboo under the_microscopeBamboo under the_microscope
Bamboo under the_microscope
 
Bamboo in the_laboratory
Bamboo in the_laboratoryBamboo in the_laboratory
Bamboo in the_laboratory
 
Cord grips and handles (Empuñaduras encordadas)
Cord grips and handles (Empuñaduras encordadas)Cord grips and handles (Empuñaduras encordadas)
Cord grips and handles (Empuñaduras encordadas)
 
Basic box make
Basic box makeBasic box make
Basic box make
 

Último

Technical Data | Sig Sauer Easy6 BDX 1-6x24 | Optics Trade
Technical Data | Sig Sauer Easy6 BDX 1-6x24 | Optics TradeTechnical Data | Sig Sauer Easy6 BDX 1-6x24 | Optics Trade
Technical Data | Sig Sauer Easy6 BDX 1-6x24 | Optics TradeOptics-Trade
 
Belgium Vs Slovakia Belgium at Euro 2024 Teams in group, fixtures, schedule, ...
Belgium Vs Slovakia Belgium at Euro 2024 Teams in group, fixtures, schedule, ...Belgium Vs Slovakia Belgium at Euro 2024 Teams in group, fixtures, schedule, ...
Belgium Vs Slovakia Belgium at Euro 2024 Teams in group, fixtures, schedule, ...World Wide Tickets And Hospitality
 
Netherlands Players expected to miss UEFA Euro 2024 due to injury.docx
Netherlands Players expected to miss UEFA Euro 2024 due to injury.docxNetherlands Players expected to miss UEFA Euro 2024 due to injury.docx
Netherlands Players expected to miss UEFA Euro 2024 due to injury.docxEuro Cup 2024 Tickets
 
basketball evolution History Slides.pdf
basketball evolution  History Slides.pdfbasketball evolution  History Slides.pdf
basketball evolution History Slides.pdftishvidphotography
 
Hire 💕 8617370543 Amethi Call Girls Service Call Girls Agency
Hire 💕 8617370543 Amethi Call Girls Service Call Girls AgencyHire 💕 8617370543 Amethi Call Girls Service Call Girls Agency
Hire 💕 8617370543 Amethi Call Girls Service Call Girls AgencyNitya salvi
 
Spain Vs Italy Spain to be banned from participating in Euro 2024.docx
Spain Vs Italy Spain to be banned from participating in Euro 2024.docxSpain Vs Italy Spain to be banned from participating in Euro 2024.docx
Spain Vs Italy Spain to be banned from participating in Euro 2024.docxWorld Wide Tickets And Hospitality
 
+971565801893>>SAFE AND ORIGINAL ABORTION PILLS FOR SALE IN DUBAI AND ABUDHAB...
+971565801893>>SAFE AND ORIGINAL ABORTION PILLS FOR SALE IN DUBAI AND ABUDHAB...+971565801893>>SAFE AND ORIGINAL ABORTION PILLS FOR SALE IN DUBAI AND ABUDHAB...
+971565801893>>SAFE AND ORIGINAL ABORTION PILLS FOR SALE IN DUBAI AND ABUDHAB...Health
 
Italy vs Albania Italy Euro 2024 squad Luciano Spalletti's full team ahead of...
Italy vs Albania Italy Euro 2024 squad Luciano Spalletti's full team ahead of...Italy vs Albania Italy Euro 2024 squad Luciano Spalletti's full team ahead of...
Italy vs Albania Italy Euro 2024 squad Luciano Spalletti's full team ahead of...Eticketing.co
 
Croatia vs Italy Inter Milan Looking to Carry On Success at Euro 2024.pdf
Croatia vs Italy Inter Milan Looking to Carry On Success at Euro 2024.pdfCroatia vs Italy Inter Milan Looking to Carry On Success at Euro 2024.pdf
Croatia vs Italy Inter Milan Looking to Carry On Success at Euro 2024.pdfEticketing.co
 
Albania Vs Spain South American coaches lead Albania to Euro 2024 spot.docx
Albania Vs Spain South American coaches lead Albania to Euro 2024 spot.docxAlbania Vs Spain South American coaches lead Albania to Euro 2024 spot.docx
Albania Vs Spain South American coaches lead Albania to Euro 2024 spot.docxWorld Wide Tickets And Hospitality
 
JORNADA 6 LIGA MURO 2024TUXTEPECOAXACA.pdf
JORNADA 6 LIGA MURO 2024TUXTEPECOAXACA.pdfJORNADA 6 LIGA MURO 2024TUXTEPECOAXACA.pdf
JORNADA 6 LIGA MURO 2024TUXTEPECOAXACA.pdfArturo Pacheco Alvarez
 
Cricket Api Solution.pdfCricket Api Solution.pdf
Cricket Api Solution.pdfCricket Api Solution.pdfCricket Api Solution.pdfCricket Api Solution.pdf
Cricket Api Solution.pdfCricket Api Solution.pdfLatiyalinfotech
 
Unveiling the Mystery of Main Bazar Chart
Unveiling the Mystery of Main Bazar ChartUnveiling the Mystery of Main Bazar Chart
Unveiling the Mystery of Main Bazar ChartChart Kalyan
 
Genuine 8617370543 Hot and Beautiful 💕 Etah Escorts call Girls
Genuine 8617370543 Hot and Beautiful 💕 Etah Escorts call GirlsGenuine 8617370543 Hot and Beautiful 💕 Etah Escorts call Girls
Genuine 8617370543 Hot and Beautiful 💕 Etah Escorts call GirlsNitya salvi
 
Personal Brand Exploration - By Bradley Dennis
Personal Brand Exploration - By Bradley DennisPersonal Brand Exploration - By Bradley Dennis
Personal Brand Exploration - By Bradley Dennisjocksofalltradespodc
 

Último (16)

Technical Data | Sig Sauer Easy6 BDX 1-6x24 | Optics Trade
Technical Data | Sig Sauer Easy6 BDX 1-6x24 | Optics TradeTechnical Data | Sig Sauer Easy6 BDX 1-6x24 | Optics Trade
Technical Data | Sig Sauer Easy6 BDX 1-6x24 | Optics Trade
 
Belgium Vs Slovakia Belgium at Euro 2024 Teams in group, fixtures, schedule, ...
Belgium Vs Slovakia Belgium at Euro 2024 Teams in group, fixtures, schedule, ...Belgium Vs Slovakia Belgium at Euro 2024 Teams in group, fixtures, schedule, ...
Belgium Vs Slovakia Belgium at Euro 2024 Teams in group, fixtures, schedule, ...
 
Netherlands Players expected to miss UEFA Euro 2024 due to injury.docx
Netherlands Players expected to miss UEFA Euro 2024 due to injury.docxNetherlands Players expected to miss UEFA Euro 2024 due to injury.docx
Netherlands Players expected to miss UEFA Euro 2024 due to injury.docx
 
basketball evolution History Slides.pdf
basketball evolution  History Slides.pdfbasketball evolution  History Slides.pdf
basketball evolution History Slides.pdf
 
Hire 💕 8617370543 Amethi Call Girls Service Call Girls Agency
Hire 💕 8617370543 Amethi Call Girls Service Call Girls AgencyHire 💕 8617370543 Amethi Call Girls Service Call Girls Agency
Hire 💕 8617370543 Amethi Call Girls Service Call Girls Agency
 
Spain Vs Italy Spain to be banned from participating in Euro 2024.docx
Spain Vs Italy Spain to be banned from participating in Euro 2024.docxSpain Vs Italy Spain to be banned from participating in Euro 2024.docx
Spain Vs Italy Spain to be banned from participating in Euro 2024.docx
 
+971565801893>>SAFE AND ORIGINAL ABORTION PILLS FOR SALE IN DUBAI AND ABUDHAB...
+971565801893>>SAFE AND ORIGINAL ABORTION PILLS FOR SALE IN DUBAI AND ABUDHAB...+971565801893>>SAFE AND ORIGINAL ABORTION PILLS FOR SALE IN DUBAI AND ABUDHAB...
+971565801893>>SAFE AND ORIGINAL ABORTION PILLS FOR SALE IN DUBAI AND ABUDHAB...
 
Italy vs Albania Italy Euro 2024 squad Luciano Spalletti's full team ahead of...
Italy vs Albania Italy Euro 2024 squad Luciano Spalletti's full team ahead of...Italy vs Albania Italy Euro 2024 squad Luciano Spalletti's full team ahead of...
Italy vs Albania Italy Euro 2024 squad Luciano Spalletti's full team ahead of...
 
Croatia vs Italy Inter Milan Looking to Carry On Success at Euro 2024.pdf
Croatia vs Italy Inter Milan Looking to Carry On Success at Euro 2024.pdfCroatia vs Italy Inter Milan Looking to Carry On Success at Euro 2024.pdf
Croatia vs Italy Inter Milan Looking to Carry On Success at Euro 2024.pdf
 
Albania Vs Spain South American coaches lead Albania to Euro 2024 spot.docx
Albania Vs Spain South American coaches lead Albania to Euro 2024 spot.docxAlbania Vs Spain South American coaches lead Albania to Euro 2024 spot.docx
Albania Vs Spain South American coaches lead Albania to Euro 2024 spot.docx
 
JORNADA 6 LIGA MURO 2024TUXTEPECOAXACA.pdf
JORNADA 6 LIGA MURO 2024TUXTEPECOAXACA.pdfJORNADA 6 LIGA MURO 2024TUXTEPECOAXACA.pdf
JORNADA 6 LIGA MURO 2024TUXTEPECOAXACA.pdf
 
Cricket Api Solution.pdfCricket Api Solution.pdf
Cricket Api Solution.pdfCricket Api Solution.pdfCricket Api Solution.pdfCricket Api Solution.pdf
Cricket Api Solution.pdfCricket Api Solution.pdf
 
Unveiling the Mystery of Main Bazar Chart
Unveiling the Mystery of Main Bazar ChartUnveiling the Mystery of Main Bazar Chart
Unveiling the Mystery of Main Bazar Chart
 
Slovenia Vs Serbia Eurovision odds Slovenia have top.docx
Slovenia Vs Serbia Eurovision odds Slovenia have top.docxSlovenia Vs Serbia Eurovision odds Slovenia have top.docx
Slovenia Vs Serbia Eurovision odds Slovenia have top.docx
 
Genuine 8617370543 Hot and Beautiful 💕 Etah Escorts call Girls
Genuine 8617370543 Hot and Beautiful 💕 Etah Escorts call GirlsGenuine 8617370543 Hot and Beautiful 💕 Etah Escorts call Girls
Genuine 8617370543 Hot and Beautiful 💕 Etah Escorts call Girls
 
Personal Brand Exploration - By Bradley Dennis
Personal Brand Exploration - By Bradley DennisPersonal Brand Exploration - By Bradley Dennis
Personal Brand Exploration - By Bradley Dennis
 

SPLIT BAMBOO RODS por Marcelo Calviello

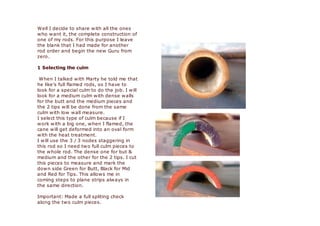
  • 1. Well I decide to share with all the ones who want it, the complete construction of one of my rods. For this purpose I leave the blank that I had made for another rod order and begin the new Guru from zero. 1 Selecting the culm When I talked with Marty he told me that he like's full flamed rods, so I have to look for a special culm to do the job. I will look for a medium culm with dense walls for the butt and the medium pieces and the 2 tips will be done from the same culm with low wall measure. I select this type of culm because if I work with a big one, when I flamed, the cane will get deformed into an oval form with the heat treatment. I will use the 3 / 3 nodes staggering in this rod so I need two full culm pieces to the whole rod. The dense one for but & medium and the other for the 2 tips. I cut this pieces to measure and mark the down side Green for Butt, Black for Mid and Red for Tips. This allows me in coming steps to plane strips always in the same direction. Important: Made a full spliting check along the two culm pieces.
  • 2. 2 Flaming the culm Time and patience. Remember this. With the same process we can turn the cane into a full flamed tone or get it burned. This is only a matter of time and care. I always think in this step that cane and grass are the same thing, so I slow all my process. When to stop? the cane or many canes will tell you. But remember that cane have many layers. The first one will go with the heat treatment but the second is in the one we want to change the color. This changing will take place in many different stages and colors. a. first layer goes out with heat. b. very light flamed c. light flamed d. flamed e. medium flamed f. full flamed g. dark flamed (I never try this one) I do this work outside and with a heat gun with a trigger that let's me stop fire instantly. This gun is connected to gas and I used always full power blue flame and work at about 12/15 inches from the cane. The whole process take's me about one morning. To get this stage finished I take out all diaphragm at each culm.
  • 3. Splitting This where real connect with cane begins. In the whole process you can appreciate the special particularities of the rod you had selected. After many search for this fundamental stage I arrived after many different test to what I called "My split Machine". Trying to avoid any commentaries I must say that I called "my" because I own it... Perhaps is an obvious stuff but is great to take care of my splitting work. In the zoom picture you can appreciate how simple it is, just wood and two steel nails. The head of the nail will hetp turning down the strips along the splitting of each one. The only thing to do is match the main split. I always make my strips over measured and them with a knife I take them to real measure. Here you can see how my machine work, in the full process. The half culm in two parts, them two in other two, and this ones in other two. Eight perfect strips, 6 for the rod and two for spares Here you can see how my machine work, in the full process. The half culm in two parts, them two in other two, and this ones in other two. Eight perfect strips, 6 for the rod and two for spares
  • 4. Filling & straightening nodes is one of the most important job involved in making a rod. All the work, time and patience that we spend in this stage will be recovered in the Planing job. Filling the nodes Simple tools, our eyes, our hands, two limes in two different thickness and shapes and two C clamps. Another important thing that you have to take care is the place to work. Personally I like to do it outside, where mi mind is more suitable to make a relaxed work. I found into my house gallery a handrail that give me a firmly ground and a nice garden looking. Also "the boss" (wife) don't get angry because of the dirt involved with this work.
  • 5. I support the strip with the C clamps and start working with the big file in the pit side of the node. I liked that this job finish with a plane surface. Them I attack the upside of the node. I work first with the big file and them I get the work finished with the little one, at the point that I get a polish surface. In the upside of the nodes I'll try to continue the round form of the strip and leave any node a little over-measure. This will disappear whit the pressing stage.
  • 6. Pressing the nodes Tools involved, again eyes, hands, a variable heat gun and a vice. From those tools that I was able to choose I had tested many, and selected the Metabo Heat Gun and the Record Vice (mod. 50 / 51) no commercial interest just the ones I think are the best. I bought the two models of vices, one is fixed on my workbench and the other one follows me wherever I go. Steps in the pressing nodes stage. a. heat the node sides. b. press the node sides. c. heat the node faces. d. press the node faces. When I heat the nodes I always take care that they don't get burned time and patience will tell us when it is too much.
  • 7. This is like the nodes are in their different stages: before & after The first 30 angle After pressing nodes I must get perfect straight strips, so with the heat gun I turn all the strips to a fine straight shape. To make the first angle I have developed a great machine, I called the "Angle machine". This tool turns a difficult work into a very easy step. (Rodmakers, specially hand planers take a look at this tool
  • 8. As you can see the machine consist in two forms with it's 30 angles inverted, so when I place a strip and get it tight, it turns into a 30 angle and all my planing will go with that attack. Also because the strip is firmly holded we can work only with one hand Here you can see a zoom view and how the strips are placed into the machine. To make this job I use a Record Plane 60 1/2 sharpened at 45 angle This plane because of it's wide is more comfortable and easy to control. Press on picture to play video
  • 9. Triangulation 60 angle After I got my 24 strips with the first 30 angle from the Angle Machine I work in a form I'd made for triangulation, with 4 fixed 60 angle different measures, that are the most used by me in all my tapers Here, you can see the strip in his 30 angle stage and finished at 60 angle.
  • 10. An advice about sharpening Another day is finishing and as Jeff (Ghome) told me a big glass of wine is near my computer. Sharpening is one of the most important things to take care in the whole process of making a rod. I read many, many advices talking about the best way to do this job, and I found that as always the simple is the best. I use a square glass and place over sand paper of different grits starting at 220 and them 360, 500, 800 and finishing at 1.000 this gives a mirror finish that looks & work great for me. Many times along the hole rodmaking process you get tired so you must take a time for you. Sharpening is really a good investment, you can do it in any place, with a glass of wine near you and really this time will pay for it self. I helped my sharpening with two tools, a Veritas Precision Honing Guide and a right angle square that I marked at 30, 35 and 45 angle. Don't forget this advice, sharpening is one of the must important jobs to be done, you will listen along the planing when your blades need to be sharped.
  • 11. It's binder time My binder was the first machine that I made. I remember that I'd take parts from here and from there, please don't tell my boss, but the wooden handle is from our Thomson table, she will kill me if she knows. Many, many wars we fought together and he show his scars proudly, many rods and many dreams were tied there. I love this machine, because he is faithful and help me to get great rods. Many times when customers visit my shop tell me that it's time to make a new one, but with him I made my first rod and with him I will made my last one. Well this stage is simple the only thing to take care is about learning the knots and work with a great machine. The more straight you obtain the rod pieces, with the oven treatment the will be copied and the planing stage will be better. Press on picture to play video
  • 12. Oven treatment I'd made two different types of oven along the years. One is an electric one that give's me about 400 degrees Fahrenheit and another, that is the one I prefer, a Gun Oven that gives me about 400 degrees Fahrenheit with the heat gun set in max., 200 F in medium, and 100 at low. Why I select the Heat Gun Oven? With a rod flamed like this one, I prefer a very slow treatment, so I do it at 150 F for about 40 minutes in one side and another 40 m for the other side. I liked this way, because I think that a slow process is better than an aggressive one. The heat treatment is done by heat air circulating along the cane, that for sure will not cook it. Also, because the only reason for this is to drive moisture from the cane, why more? After this, the project rod always will be keep into my drying cabinet, that also is at 80/100 F
  • 13. Ferrules impregnation BOBFS I Here we start with the BOBFS, so to give some protection to this part of the rod I impregnate the sections where the ferrules will be made. To do this job I impregnate by immersion the three parts where the ferrules are, the two tips and the mid section. I leave there for about one day, and they will cure in the drying cabinet along the rod process continues Preparing for Planing: Removing the enamel Involved tools: 3M sandpapers blocks, 1 little block, sandpaper in 220 and 600 grit, rough form and scraper. I like to take out the enamel sanding each strip first with the 220 and them with the 600 sandpaper. This must be a careful job because I don't want to take out any powerfiber. For that I use my rough form little 60 angle and carefully sand each strip. Only if I find any problem to solve I use my LN scraper.
  • 14. With the little block loaded with 600g sand paper I light sand each strip to get a clear finish. It's planing time Tools involved: For my planing I like to use the same block planes for each piece of the cane, so when I got them sharpened I begun with the Record 9 1/2 with his blade sharped at 30 degrees. Follows my Old Stanley 9 1/2 sharped at 45 degrees. Along the planing I like to verify measures so I do it with the caliper in this stage. Them begun the final planing for what I use 2 different LN 9 1/2 with different blade exposure. In this stage I verify with my micrometer. For what I use 4 different blocks planes? 1. This force me to do the job in four stages. (Time & patience) 2. I don't like to sharp any blade in the middle of a piece. So when I get finished a piece I sharp all my blades again. 3. I use my R to take the first shape. Them with my S I do the real work. I like it because is very light. And with my LN's only the fine finish work
  • 15. One thing before planing I was thinking to do something new for me with this rod, so I just made some flamed marks only for looking. And I really like them. I used a jewelery torch that gives me a real blue flame, so this would allow me to draw if it wanted. Look that I care in the butt piece the number three (up to down), the space for the grip and for the sign mark. Planing Form & Digital Depth Gauge I made my planing form and really after that I can take any challenge. It's 70 inches long with 30 stations placed 2,5 inch one to the other. As I told sometime ago, it take's me a month of full work to get it ready and working. My depth gauge is a digital one that allows me to see mesures in mm and in inches. It is placed always in his steel bed with a plastic protection for the sharp 60 angle point
  • 16. Planing (BOBFS II) Well guys I just got the butt finished. I suppose that this piece was not the one you are interested, so take a look and we will go over the first BOBFS in the medium piece. The most difficult part of the job is setting the forms, them you must go just ike with any planing situation. Also in this case I added a little movie just to show my forms in an up view with a strip into it. Press on picture to play video
  • 17. Planing (BOBFS III) When I got finished the 6 strips of each piece, I put them together, been carefully that nodes match the 3 x 3 staggered system and them will be tapered with paper tape Planing (BOBFS IV) There you can see a sequence of how BOBFS are made. I had designed a special form that make's the job easy and accuracy. The form was made in steel with a hard temper to allow that always will keep in shape. The depth of the form bed is 1.8 mm (0.071 in)
  • 18. Planing (BOBFS V) Two tools are involved in the BOBFS making process. The ferrule form and a Finishing Sander loaded with 120 grit sandpaper first and 400 grit sandpaper for finish. The FS works just like a plane over the form.
  • 19. Gluing (BOBFS VI) To got my rods glued I use an ureafolmaldehyde glue that closely match the color of the cane. This glue, works with a hardener that must be weighted to exactly proportions that are advised in it's packaging. This proportions, are related with room's temperature. So when I get the correct temperature, the measure table will indicate the correct proportion of hardener to use. To weight it I use a jewellery scale. The glue allows me 40 minutes to complete all the job. Another tool's that must be used are a tooth brush and the binder
  • 20. This is very important stage in the BOBFS making process. I must align perfectly the six strips to get a perfect hex ferrule, so here is where I have to put all my attention because any imperfection here could not be corrected later when the glue dry. That's the reason why I love my binder. I know that it will work perfectly and all my caring are with the ferrules This is the finished glued rod
  • 21. The little BOBFS story For the ones who ask about how we arrived to our BOBFS, here in the story in pictures. From top to down. 1- The first design with a truncated bamboo ferrule 2- The broken ferrule of my son's SAGE. Here is when my point of view about bamboo ferrules was changed. 3- Our first swelled bamboo ferrules. 4- My 2MBFS (Mini metal bamboo Ferrule system). This ferrules own inside a little metal females and a metal tip in the male At last with Jorge when the design of new tapers were made the new concept of the BOBFS was born.
  • 22. Removing thread and glue Well because I want to do this job under the sun, for better looking, and tomorrow will rain here, I accelerate the drying process in the drying cabinet so the rod is ready to work. For this job I use three blocks with sand paper 220, 400 and 800 for the finish. The finish will be the result of a hard polishing work, it's take about 6 hour to get the job completed. Wrapping (BOBFS VII) Thank you very much for the ones who help me with the colors decision. Classic Chestnut wraps with Violets tips was the winner option in the poll 12 votes over a total of 34 (33 %). The wrapping section that I always made is 20mm more than the BOBFS female hole (in this case 70 mm) so the wrapping area will be 90 mm
  • 23. For wrapping the BOBFS I like to use Pearsall's Naples and doing the 3 ferrules is just like wrapping a complete rod, just be prepared for that. I use for the job my Golden Witch Wrapping Machine with some modifications of my own This would result in a complete wrap of 90 mm.
  • 24. Varnishing (BOBFS VIII) For varnish I like to first made two coats of Alchemist using a fine brush and waiting aprox. 1 or 1 1/2 hour in between. After 1 1/2 hour later, I varnish the ferrule (female) section, in this case using my varnish I do it by dipping for a total of 9 times including the ones (3 times) when the hole section rod will be varnished. Each time with the help of paper towells I take out any excess of varnish out and into the BOBFS female hole
  • 25. Signing Not much to say about this stage. I use black indian ink and a fine pen. I have to find the correct splines for the tips before sign them.
  • 26. BOBFS IX (Ferrule male Tips) As I told you I like to protect the butt tips with a little metal tip. I use aluminum but could be made with any metal. For this job I use my Sherline lathe an aluminum bar. I take two measures of the butt tip, one over the angles and the other over the flat. For example if the first measure is 6.05 mm and the other 5.60 mm I use 5.85 mm to made tip When I made the hole of the tip I always leave a 1 mm wall at the tip.
  • 27.
  • 28. The grip Argentina is a very difficult place to find finish stuff but a really good one to find quality materials. This happens at the time when I was looking for cork. Finally I found a fine quality, they call "grade AAA" Portuguese cork. The cork came in pieces of 13 in x 2.8 in and 1/4 inch of depth. So I was in the necessity of a good tool to make the job from the beginning. In the picture sequence that follows you can take a look to the complete process
  • 29. Them the rouged grip will stay in the drying cabinet for a day and then will be ready for shaping. I don't like to use any mould or shape plane I have the wanted grip in my mind, so I go for it. Finally I cover all the grip section with plastic tape to protect it in the coming work.
  • 30. Wrapping time Well the rod was sleeping in a warm place for about 24 hours and it's ready for some wrapping. My drying cabinet maintains a constancy temperature of 90/100 Fahrenheit degrees and 20 % of humidity. I had to move all my shop to get some pictures, because I like to show you in the better way. This is my wrapping machine from GW. I'd made some modifications that allow me to work more comfortably. Two wire thread tensors make's possible to go back about 10/15 threads rounds if something don't satisfy me. Also some tool's that I always use
  • 31. One of the first things I do to test my day, is the grip wrap. Really I have days that I had to change my plans and make something else. That's the reason I like to work always with three or four different rods in different stages. After I got finished the grip wrap, the first coat of Alchemist will be done to avoid it to move Selecting Guides Snake Brand is our first choice for our new line of rods, that's because of it's quality and the great service that Michael and Susan give to us. All our rods take's an Agate striping guide and black nickel guides
  • 32. Placing the guides Every time we made a taper we also design where the guides must be placed to get the best action, so we had make a special wood piece with all our tapers and guides display "formulas”. To place the guides we use paper taper. Some wrapping Wrapping is something like flyfishing or golf you never stop to learn. I'd tied many rods along my rodmaking, but a new one is really a new challenge. One thinking that I learn with many rods wrapped in my life and I'll never forget is that "rush is the best enemy of perfection"
  • 33. When I got all the rod wrapped I like to take time between varnish to start tuning the BOBFS. If I done the correct job when planing the ferrules taper of the male may goes into the female ferrule comfortably not loose just comfortably. Because is difficult to explain this sensation I made a little movie that tries to shows this to all of you. Well the first thing to do is cleaning all the female hole with alcohol with the help of a Q- Tip. Then we made the 2 ton. Epoxy coat with the help of an extended Q-tip that allows to get into the bottom of the hole. When I'm completely sure that all the hole surface was coated I take out any excess from the borders and put the rod piece to roll in the wrapping machine. I made a rotary tool that can be attached to the machine so while the epoxy dries I can make another wrap varnish. When the female is finished I dip the male up the ferrule wrap. Press on picture to play video
  • 34. BOBFS (Pining ferrules males) To make this job I use a Dremel tool, steel wire and a little hammer. This is very simply but must be done with extreme careful because we can lost all the work here. After getting the little cups pinned I just polish to return to the good looking cup. Making the Reel Seat For making the reel seat I'd selected a native hard wood called Guayabira, this trees grows at the rivers banks in our state of Misiones where the famous Iguazu Falls are placed. Also I made all the silver hardware but I avoid to show all this process because it will take's me another thread. I made all the Job at my Sherline lathe with the help of common tools and specific ones that I'd made for this purpose. When I got the reel seat shape finished I polish it with a "doll" with nuts.
  • 35.
  • 36. Well 21 days of full work. This is the finished second Guru Rod: Guru764 3/2 specially made for Mr. Martin J. Keane