
Recomendados
Recomendados
Mais conteúdo relacionado
Semelhante a Orchard dep self enrollment guide
Semelhante a Orchard dep self enrollment guide (20)
Orchard dep self enrollment guide
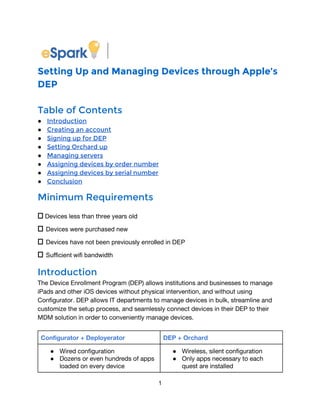
- 1. Setting Up and Managing Devices through Apple’s DEP Table of Contents ● Introduction ● Creating an account ● Signing up for DEP ● Setting Orchard up ● Managing servers ● Assigning devices by order number ● Assigning devices by serial number ● Conclusion Minimum Requirements ⎕ Devices less than three years old ⎕ Devices were purchased new ⎕ Devices have not been previously enrolled in DEP ⎕ Sufficient wifi bandwidth Introduction The Device Enrollment Program (DEP) allows institutions and businesses to manage iPads and other iOS devices without physical intervention, and without using Configurator. DEP allows IT departments to manage devices in bulk, streamline and customize the setup process, and seamlessly connect devices in their DEP to their MDM solution in order to conveniently manage devices. Configurator + Deployerator DEP + Orchard ● Wired configuration ● Dozens or even hundreds of apps loaded on every device ● Wireless, silent configuration ● Only apps necessary to each quest are installed 1
- 2. ● Manual app installation ● Apps purchased through redeemable codes and associated with an Apple ID ● Automatic app installation ● Apps purchased as managed licenses associated with and managed by the institution The steps for setting up your DEP account and assigning devices to your school are outlined below. If you have any questions while working through the processes, please email patrick@esparklearning.com. Creating an account In order to participate in Apple’s Volume Service offerings, you’ll need to create an Apple ID for use with deploy.apple.com. This should be separate from the Apple ID you use for personal purchases. A note on DEP accounts There are two types of accounts, an Agent account and a Admin account. The agent account creates and controls the admin accounts. You cannot use a current VPP or Apple ID username to create a DEP Agent account. It has to be a new username. Apple verifies Agent accounts by visiting your school’s website to verify that the Agent is an administrator or technology director. If the Apple representative doing the verification doesn’t see the Agent’s name on the school or district’s website, your account will be rejected. ● If you don’t yet have an account, click “Enroll Now” on the deploy.apple.com landing page. 2
- 3. 3
- 4. ● You can enroll in any of Apple’s education services here. Since we want to enroll and manage devices, click “Enroll” to the right of “Device Enrollment Program”. ● Fill in your contact information and title. 4
- 5. ● It’s important to use a new email address associated with your institution (yourname@school.edu, for example). Apple does not provide deployment services management options to unsupervised email accounts (yourname@gmail.com or yourname@yahoo.com, for example), and your ID will not be eligible for these programs if it has been used for any other Apple services in the past. ● The next step is identity verification. You will be instructed to check your email to continue the setup process. 5
- 6. ● This is the email you will receive. Make note of the temporary password Apple has assigned to your account. 6
- 7. ● In order to continue the registration process, you will need to enable two-step verification and create security questions for your new account. You can accomplish this by clicking the link at the top of your verification email. ● Selecting the “My Apple ID” link in your email will take you to Apple’s ID management site. Sign in using your new school-connected Apple ID. 7
- 8. ● The temporary password Apple provides expires upon first login, so you’ll be asked to reset it before you continue. ● Next, you’ll be required to provide your birthday and set up one unique security question. 8
- 9. ● When you arrive at the ID management page, you’ll need to set up account security by enabling two-step authentication and adding answers to security questions generated by Apple. ● Click “Get Started” beneath the Two-Step Verification section of the page. Read the explanation and click “Continue”. 9
- 10. ● Add a phone number to be used for identity confirmation. ● Print your recovery key. You won’t have any other way to access your account if you forget your password, so this step is particularly important. 10
- 11. ● Enter your recovery key, then click “Confirm”. ● Indicate that you accept the conditions and terms by clicking the checkbox. 11
- 12. ● Click the “Enable two-step Verification” button at the bottom of the page and you can now begin the DEP enrollment process. ● Once you’ve enabled two-step authentication, you can go back to deploy.apple.com and sign in. There will be three steps left in the registration process: verification contact details, institution contact details, and a review of information. ● Provide contact information for a school building or district leader who can verify your legal authority as an administrator of Apple’s programs. 12
- 13. ● Add your institution’s address and Apple Customer Number. If you aren’t sure what your customer number is, contact your Apple Account Executive. 13
- 14. ● The final step in creating your account is reviewing your enrollment details. If the information is accurate, submit your responses. ● When you click the submit button, your verification contact person will receive an email. Once he or she authorizes your account, you’re ready to sign up for a specific volume services programs. Before you do that, you’ll need to make sure your institutional Apple ID is set up to work with deploy.apple.com. 14
- 15. Signing up for DEP Access to Apple’s Volume Services Portal is available at deploy.apple.com, so sign in and continue the DEP enrollment process. 15
- 16. ● Click “Admins” on the sidebar. This will give you a chance to add yourself as an administrator. ● Select “Add Admin Account”. 16
- 17. 17
- 20. Setting Orchard up eSpark Learning’s Orchard MDM is a simple but powerful way to manage iPads. In order to set up your servers at deploy.apple.com, you’ll first need to sign in to your organization’s management site at www.esparklearning.com. ● Log in to your institution’s eSpark page and choose “Settings” in the sidebar. 20
- 23. Managing Servers Your Mobile Device Management solution needs to be configured before you assign devices to it. You’ll need to add the Orchard MDM server, download your public key from eSpark, then upload the key to Apple’s servers. ● Head back to deploy.apple.com, then use the sidebar or the “Get Started” link to access your institution’s DEP page. ● The first step is adding an MDM server. Select “Manage Servers” from the sidebar. 23
- 28. Assigning Devices by Order Number The next step in the enrollment process is assigning your devices to the MDM you just set up. Use the sidebar to navigate to “Assign by Order Number” if you have an order number from Apple and would like to assign all devices associated with that number. Assigning by order number will enroll all devices that are part of an order without exception. To enroll a selection of devices from an order, scroll down to Section IV, Assigning Devices by Serial Number. ● Use the sidebar to select “Assign by Order Number”. ● Assigning by Order Number is a two step process. First, input the order number of the devices you want to assign. 28
- 32. Assigning Devices by Serial Number If you don’t have your order number or don’t want to assign all devices in an order to the same MDM, you can use individual device serial numbers to manage devices. ● Start by using the sidebar to select “Assign by Serial Number”. 32
- 36. ● Assignment details include information about who assigned the devices, when devices were assigned, and the MDM server name. Conclusion Apple’s Device Enrollment Program makes managing devices convenient and supports the company’s zero-touch deployment goal. eSpark Learning’s Orchard MDM is built with DEP integration in mind and works seamlessly to deliver apps silently and wirelessly while still giving schools control over license allocation. If you have any additional questions, please contact your School Partnership Manager or patrick@esparklearning.com. 36