
Recomendados
Mais conteúdo relacionado
Mais procurados
Mais procurados (20)
Destaque
Semelhante a Zoom
Semelhante a Zoom (20)
Mais de Charlotte Jean
Mais de Charlotte Jean (20)
Último
Último (20)
Zoom
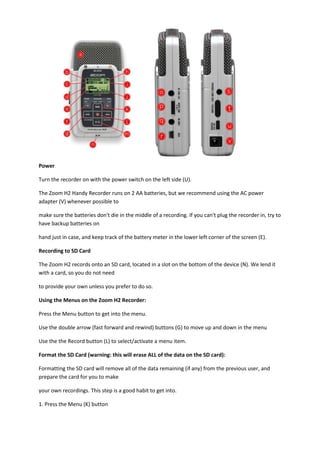
- 1. Power Turn the recorder on with the power switch on the left side (U). The Zoom H2 Handy Recorder runs on 2 AA batteries, but we recommend using the AC power adapter (V) whenever possible to make sure the batteries don't die in the middle of a recording. If you can't plug the recorder in, try to have backup batteries on hand just in case, and keep track of the battery meter in the lower left corner of the screen (E). Recording to SD Card The Zoom H2 records onto an SD card, located in a slot on the bottom of the device (N). We lend it with a card, so you do not need to provide your own unless you prefer to do so. Using the Menus on the Zoom H2 Recorder: Press the Menu button to get into the menu. Use the double arrow (fast forward and rewind) buttons (G) to move up and down in the menu Use the the Record button (L) to select/activate a menu item. Format the SD Card (warning: this will erase ALL of the data on the SD card): Formatting the SD card will remove all of the data remaining (if any) from the previous user, and prepare the card for you to make your own recordings. This step is a good habit to get into. 1. Press the Menu (K) button
- 2. 2. Press the left double-arrow/rewind button 3 times to move to the "SD CARD" menu item. 3. Select "FORMAT" 4. Select "YES" The Zoom will then format the SD card. Choose an audio recording format/quality: 1. Press Menu 2. Choose REC MODE 3. Use the double-arrow buttons to choose a recording format and quality. (You can use any setting you like, but we recommend using "MP3 160kbps", which provides very good sound quality with a small file size, and allows the Zoom to record for almost 7 hours before running out of space on the included 512MB SD card.) 4. Press the Menu button to exit back to the main screen. 5. The bottom right corner of the screen will indicate how much recording time you have left in hours, minutes, and seconds. (J) Getting Ready to Record: Press record once (L). This puts the recorder into record-ready mode. The Recorder status (C) will change from "STOP" to "REC" and the level meters (D) will start moving. Plug a pair of headphones into the Phones/Line Out jack (S) and you will be able to hear what your recording will sound like. Adjust the "Gain" and recording level Change the gain setting with the switch on the side of the Zoom (P) • Low is best for recording loud sounds (a band performance, for example) • Medium is good for recording acoustic instruments or other sounds with a moderate volume. • High is good when you're recording a lecture or other situation where the sound is quiet or far away. Listen with the headphones and watch the level bars (D) while you try all 3 to determine which gain setting will work the best for you. To ensure good sound quality, make sure the level bars (D) are generally moving to the right half of the screen, but they should
- 3. only occasionally be hitting the far right side. Adjust the gain as necessary or fine-tune the recording level at this stage with the fast-forward and rewind buttons (G). Recording: When you're happy with the volume, press record again to start recording. The counter (B) will now start counting up. If it isn't counting up, it isn't recording. When you go to retrieve or playback your file, it will be located in the folder indicated in the upper right corner (H) of the Zoom screen. When you are finished recording, press record (L) again to stop. The counter (B) will stop counting up. REMEMBER TO TURN THE RECORDER OFF (U) when you are done, as the battery will continue to drain as long as it is turned on. Playback: • The Zoom does not have a built-in speaker. You will need to connect headphones or external speakers to the Zoom's Phones/Line Out jack (S) to hear the recording. • The file whose name is shown in the center of the display (I) is the one that will be played back. • Use the fast-forward and rewind buttons (G) to select a different file. • Press the Play button (M) to begin playback. • Press it again to pause/stop playback. • Press fast-forward or rewind to skip to the next/previous recording. Connect the Zoom H2 to a computer When you connect the USB port of the H2 to a computer, the H2 will be recognized as card reader, and the SD card inserted in the H2 can be accessed directly from the computer. This lets you easily copy your recordings to the computer for further editing or burning to an audio CD. 1. Connect the Zoom's USB port (R) to your computer with a USB cable (usually supplied with the recorder) or access the contents of
- 4. the SD card with a separate SD card reader. 2. An icon for the SD card in the H2 will appear on the desktop of the computer 3. Browse to the folder where your recording is located (Probably in FOLDER01 for a stereo file, or in 4CH for a 4-channel file) 4. Drag your recording from the Zoom folder to your computer. 4. Eject the H2 from your computer • Windows: Click the "safely remove hardware" icon in the task tray and select the H2 as the device to remove • Mac: Select the H2 icon and drag-and-drop it into the trash 5. Disconnect the USB cable and turn off the Zoom H2.